by Barbara Obermeier and Ted Padova
Photoshop
®
Elements 4
FOR
Photoshop
®
Elements 4
FOR
by Barbara Obermeier and Ted Padova
Photoshop
®
Elements 4
FOR
Photoshop®Elements 4 For Dummies®
Published by
Wiley Publishing, Inc.
111 River Street Hoboken, NJ 07030-5774
www.wiley.com
Copyright © 2006 by Wiley Publishing, Inc., Indianapolis, Indiana Published by Wiley Publishing, Inc., Indianapolis, Indiana Published simultaneously in Canada
No part of this publication may be reproduced, stored in a retrieval system or transmitted in any form or by any means, electronic, mechanical, photocopying, recording, scanning or otherwise, except as permit-ted under Sections 107 or 108 of the 1976 Unipermit-ted States Copyright Act, without either the prior written permission of the Publisher, or authorization through payment of the appropriate per-copy fee to the Copyright Clearance Center, 222 Rosewood Drive, Danvers, MA 01923, (978) 750-8400, fax (978) 646-8600. Requests to the Publisher for permission should be addressed to the Legal Department, Wiley Publishing, Inc., 10475 Crosspoint Blvd., Indianapolis, IN 46256, (317) 572-3447, fax (317) 572-4355, or online at http:// www.wiley.com/go/permissions.
Trademarks:Wiley, the Wiley Publishing logo, For Dummies, the Dummies Man logo, A Reference for the Rest of Us!, The Dummies Way, Dummies Daily, The Fun and Easy Way, Dummies.com, and related trade dress are trademarks or registered trademarks of John Wiley & Sons, Inc. and/or its affiliates in the United States and other countries, and may not be used without written permission. Photoshop is a registered trademark of Adobe Systems, Incorporated in the United States and other countries. All other trademarks are the property of their respective owners. Wiley Publishing, Inc., is not associated with any product or vendor mentioned in this book.
LIMIT OF LIABILITY/DISCLAIMER OF WARRANTY: THE PUBLISHER AND THE AUTHOR MAKE NO REP-RESENTATIONS OR WARRANTIES WITH RESPECT TO THE ACCURACY OR COMPLETENESS OF THE CON-TENTS OF THIS WORK AND SPECIFICALLY DISCLAIM ALL WARRANTIES, INCLUDING WITHOUT LIMITATION WARRANTIES OF FITNESS FOR A PARTICULAR PURPOSE. NO WARRANTY MAY BE CREATED OR EXTENDED BY SALES OR PROMOTIONAL MATERIALS. THE ADVICE AND STRATEGIES CONTAINED HEREIN MAY NOT BE SUITABLE FOR EVERY SITUATION. THIS WORK IS SOLD WITH THE UNDER-STANDING THAT THE PUBLISHER IS NOT ENGAGED IN RENDERING LEGAL, ACCOUNTING, OR OTHER PROFESSIONAL SERVICES. IF PROFESSIONAL ASSISTANCE IS REQUIRED, THE SERVICES OF A COMPE-TENT PROFESSIONAL PERSON SHOULD BE SOUGHT. NEITHER THE PUBLISHER NOR THE AUTHOR SHALL BE LIABLE FOR DAMAGES ARISING HEREFROM. THE FACT THAT AN ORGANIZATION OR WEBSITE IS REFERRED TO IN THIS WORK AS A CITATION AND/OR A POTENTIAL SOURCE OF FURTHER INFORMATION DOES NOT MEAN THAT THE AUTHOR OR THE PUBLISHER ENDORSES THE INFORMA-TION THE ORGANIZAINFORMA-TION OR WEBSITE MAY PROVIDE OR RECOMMENDAINFORMA-TIONS IT MAY MAKE. FURTHER, READERS SHOULD BE AWARE THAT INTERNET WEBSITES LISTED IN THIS WORK MAY HAVE CHANGED OR DISAPPEARED BETWEEN WHEN THIS WORK WAS WRITTEN AND WHEN IT IS READ.
For general information on our other products and services, please contact our Customer Care Department within the U.S. at 800-762-2974, outside the U.S. at 317-572-3993, or fax 317-572-4002. For technical support, please visit www.wiley.com/techsupport.
Wiley also publishes its books in a variety of electronic formats. Some content that appears in print may not be available in electronic books.
Library of Congress Control Number: 2005936631 ISBN-13: 978-0-471-77483-9
ISBN-10: 0-471--77483-9
Manufactured in the United States of America 10 9 8 7 6 5 4 3 2 1
About the Authors
Barbara Obermeier:Barbara Obermeier is principal of Obermeier Design, a graphic design studio in Ventura, California. She’s the author of Photoshop
CS2 All-in-One Desk Reference For Dummiesand has contributed as author,
coauthor, or technical editor on numerous books. Barb is also a faculty member in the Visual Communication Department at Brooks Institute.
Ted Padova:In addition to writing several books about Adobe Photoshop and Adobe Illustrator, Ted is the world’s leading author of books on Adobe Acrobat. He is a coauthor of Adobe Creative Suite and Adobe Creative Suite 2
(Wiley Publishing, Inc.) and spends most of his time writing and speaking at conferences and expos nationally and internationally.
Dedication
Barbara Obermeier: I would like to dedicate this book to Gary, Kylie, and Lucky, who constantly remind me of what’s really important in life.
Ted Padova: For Arnie.
Authors’ Acknowledgments
The authors would like to thank our excellent project editor, Becky Huehls, who kept us and this book on track; Bob Woerner, the planet’s premiere Sr. Acquisitions Editor; Andy Cummings, Dummies Royalty; David Herman, technical editing wizard; Andy Hollandbeck, who made what we wrote sound better; and all the dedicated production staff at Wiley. Additionally, we would like to thank Stephen Shafer of Schaf Photo, Ventura, California, for supply-ing us with sample images; and Don Mason of Don Mason Photography, Bakersfield, California, for helping us out with some color correction and his expert advice on digital color correction. Additionally, we would like to personally thank our good friend and colleague Deke McClelland. Deke’s expert knowledge and advice has helped us on many occasion.
Barbara Obermeier: A special thanks to Ted Padova, my coauthor and friend, who always reminds me that there is still a one in fifty-three million chance that we can win the lottery.
Publisher’s Acknowledgments
We’re proud of this book; please send us your comments through our online registration form located at www.dummies.com/register/.
Some of the people who helped bring this book to market include the following:
Acquisitions, Editorial, and Media Development
Project Editor:Rebecca Huehls
Sr. Acquisitions Editor:Bob Woerner
Copy Editor:Andy Hollandbeck
Technical Editor:David Herman
Editorial Manager:Leah Cameron
Media Development Manager:Laura VanWinkle
Media Development Supervisor:Richard Graves
Editorial Assistant:Amanda Foxworth
Cartoons:Rich Tennant (www.the5thwave.com)
Composition Services
Project Coordinator: Adrienne Martinez
Layout and Graphics: Denny Hager, Lynsey Osborn, Melanee Prendergast, Heather Ryan, Julie Trippetti
Proofreaders: David Faust, Leeann Harney, Lisa Stiers
Indexer: Sherry Massey
Publishing and Editorial for Technology Dummies
Richard Swadley,Vice President and Executive Group Publisher
Andy Cummings,Vice President and Publisher
Mary Bednarek,Executive Acquisitions Director
Mary C. Corder,Editorial Director
Publishing for Consumer Dummies
Diane Graves Steele,Vice President and Publisher
Joyce Pepple,Acquisitions Director
Composition Services
Gerry Fahey,Vice President of Production Services
Contents at a Glance
Introduction ...1
Part I: Getting Started ...7
Chapter 1: Getting to Know the Work Area ...9
Chapter 2: Getting Ready to Edit ...29
Chapter 3: Working with Resolutions, Color Modes, and File Formats ...43
Part II: Getting Organized ...67
Chapter 4: Getting Your Images ...69
Chapter 5: Viewing and Finding Your Images ...93
Chapter 6: Organizing and Managing Your Photos ...111
Part III: Selecting and Correcting Photos...131
Chapter 7: Making and Modifying Selections...133
Chapter 8: Working with Layers ...161
Chapter 9: Simple Image Makeovers...179
Chapter 10: Correcting Contrast, Color, and Clarity ...205
Part IV: Exploring Your Inner Artist...229
Chapter 11: Playing with Filters, Effects, Styles, and More...231
Chapter 12: Drawing and Painting...253
Chapter 13: Working with Type ...279
Part V: Printing, Creating, Sharing ...295
Chapter 14: Getting It on Paper ...297
Chapter 15: Showing It on Screen...325
Chapter 16: Making Creations...339
Part VI: The Part of Tens ...347
Chapter 17: Ten Tips for Composing Better Photos ...349
Chapter 18: Ten More Project Ideas...359
Table of Contents
Introduction...1
About This Book...2
Conventions Used in This Book ...2
How This Book Is Organized...3
Icons Used in This Book...5
Where to Go from Here...5
Part I: Getting Started ...7
Chapter 1: Getting to Know the Work Area . . . .9
Getting Around in Standard Edit Mode ...10
Jumping to Standard Edit mode ...10
Examining the Image window ...10
Moving through the Menu bar ...14
Uncovering the context menus...15
Using the Tools palette ...16
Playing with palettes...17
Selecting tool options from the Options bar ...17
Juggling all your interface options ...18
Looking at the Shortcuts bar ...18
Changing Workspaces...19
Using Quick Fix mode ...20
Using Creation Setup...21
Using the Photo Bin ...22
Retracing Your Steps ...24
Using the Undo History palette ...24
Reverting to the last save...25
Getting a Helping Hand...25
Using Help ...26
Using PDFs from the installation CD ...26
Using ToolTips ...27
Using the How To palette ...27
Taking Charge with Shortcuts ...27
Chapter 2: Getting Ready to Edit . . . .29
Controlling the Editing Environment...29
Launching and navigating Preferences...30
Controlling the Organizing Environment ...33
Understanding the Photoshop Elements 4.0 Organizer ...33
Launching and navigating Organize & Share preferences...33
Setting preferences in all the panes ...34
Customizing Presets ...35
Getting Familiar with Color...36
Introducing color channels ...36
Understanding bit depth ...37
Getting Color Right ...38
Calibrating your monitor...39
Choosing a color profile ...41
Chapter 3: Working with Resolutions,
Color Modes, and File Formats . . . .43
The Ubiquitous Pixels...43
Understanding resolution ...44
Understanding image dimensions...46
The Art of Resampling...46
Changing image size and resolution ...46
Understanding the results of resampling ...48
Choosing a Resolution for Print or On-Screen ...49
Go Ahead . . . Make My Mode!...50
Converting to bitmap mode ...50
Converting to grayscale mode...53
Converting to indexed color mode ...55
Saving Files with Purpose ...56
Using the Save/Save As dialog box...56
Saving files for the Web ...58
Understanding file formats...58
File formats at a glance...64
Audio and video formats supported in Elements ...65
Part II: Getting Organized...67
Chapter 4: Getting Your Images . . . .69
Digital Cameras versus Scanners ...70
Grabbing Images from Your Camera...72
Choosing a file format ...72
Using the Microsoft Scanner and Camera Wizard...73
Using Adobe Photo Download Manager...74
Resizing images from digital cameras ...77
Using a Scanner ...77
Using Online Services ...82
Phoning In Your Images...83
Creating Images from Scratch ...84
Everything You Want to Know about Camera Raw ...86
Chapter 5: Viewing and Finding Your Images . . . .93
The Many Faces of the Organizer ...93
Adding files to the default Organizer view ...94
Viewing photos in a slideshow (Full Screen View)...95
Moving around the Image Window ...100
Zooming in and out of images...100
Viewing multiple documents ...103
Using Pan and Zoom ...104
Using the Navigator palette ...105
Sorting Your Photos...105
Using Search Options ...107
Searching by date ...107
Searching for untagged items ...108
Searching collections ...108
Searching captions and notes...108
Searching by history ...109
Searching metadata...110
Searching faces ...110
Chapter 6: Organizing and Managing Your Photos . . . .111
Organizing Groups of Images with Collections ...112
Creating a new collection ...112
Working with collections ...113
Cataloging Files ...114
Splitting a big catalog into smaller catalogs ...115
Importing photos to a new catalog ...116
Switching to a different catalog ...116
Tag — You’re It! ...117
Creating new tags ...118
Creating new categories ...119
Creating new subcategories...120
Assigning and Managing tags...120
Hiding Files That Get in the Way ...122
Stack ’em up ...122
Creating versions...123
Sticking Digital Notes on Your Photos...124
Automating Your Organization ...125
Automating common tasks when you export...125
Renaming files...128
Part III: Selecting and Correcting Photos ...131
Chapter 7: Making and Modifying Selections . . . .133
Defining Selections...133
Creating Rectangular and Elliptical Selections...134
Making Freeform Selections with Lasso Tools ...138
Selecting with the Lasso tool ...138
Getting straight with the Polygonal Lasso tool ...140
Snapping with the Magnetic Lasso tool...141
Working Wizardry with the Magic Wand ...143
Talking about tolerance ...143
Wielding the Wand to select...144
Modifying Your Selections ...145
Adding to a selection ...145
Subtracting from a selection ...145
Intersecting two selections ...145
Avoiding key collisions ...146
Painting with the Selection Brush...146
Painting with the Magic Selection Brush ...148
Using the Cookie Cutter Tool...150
Eliminating with the Eraser Tools ...152
The Eraser tool ...152
The Background Eraser tool ...153
The Magic Eraser tool...154
Using the Magic Extractor Command...154
Using the Select Menu ...156
Selecting all or nothing ...157
Reselecting a selection ...157
Inversing a selection ...157
Feathering a selection...157
Using the Modify commands ...158
Applying the Grow and Similar commands...159
Saving and loading selections...159
Chapter 8: Working with Layers . . . .161
Getting to Know Layers ...161
Anatomy of a Layers palette ...163
Using the Layer and Select Menus ...165
Working with Different Layer Types ...167
Image layers ...167
Adjustment layers ...167
Fill layers ...169
Shape layers ...171
Tackling Layer Basics ...172
Creating a new layer from scratch ...172
Using Layer via Copy and Layer via Cut...173
Duplicating layers...173
Dragging and dropping layers...174
Using the Paste Into Selection command ...175
Moving a Layer’s Content...176
Transforming Layers...176
Flattening and Merging Layers ...177
Chapter 9: Simple Image Makeovers . . . .179
Cropping and Straightening Images...179
Cutting away with the Crop tool...180
Cropping with a selection border...181
Straightening images...181
Using the Divide Scanned Photos command ...183
Employing One-Step Auto Fixes ...184
Auto Smart Fix ...185
Auto Levels...185
Auto Contrast...186
Auto Color Correction ...186
Auto Red Eye Fix...187
Editing with Quick Fix...188
Cloning with the Clone Stamp Tool ...191
Retouching with the Healing Brush ...193
Zeroing In with the Spot Healing Brush ...195
Lightening and Darkening with Dodge and Burn Tools...196
Smudging Away Rough Spots ...198
Softening with the Blur Tool ...199
Focusing with the Sharpen Tool...200
Sponging Color On and Off ...201
Replacing One Color with Another ...202
Chapter 10: Correcting Contrast, Color, and Clarity . . . .205
Adjusting Lighting ...206
Fixing lighting with Shadows/Highlights ...206
Using Brightness/Contrast ...207
Pinpointing proper contrast with Levels ...208
Adjusting Color...210
Removing color casts automatically...211
Adjusting with Hue/Saturation ...212
Eliminating color with Remove Color ...214
Switching colors with Replace Color ...214
Adjusting skin tones...215
Correcting with Color Variations...217
Adjusting color temperature with photo filters ...219
Mapping your colors...221
Adjusting Clarity...222
Removing noise, artifacts, dust, and scratches...223
Blurring when you need to...224
Sharpening for better focus ...226
Part IV: Exploring Your Inner Artist ...229
Chapter 11: Playing with Filters, Effects, Styles, and More . . . .231
Having Fun with Filters...231
Applying filters ...232
Corrective or destructive filters ...233
One-step or multi-step filters ...233
Giving a filter an encore...233
Fading a filter ...234
Selectively applying a filter ...234
Working in the Filter Gallery...235
Distorting with the Liquify filter...237
Dressing Up with Effects ...240
Adding Shadows, Glows, and More...242
Applying Layer Styles ...242
Working with layer styles ...244
Mixing It Up with Blend Modes ...245
General blend modes ...245
Darken blend modes ...246
Lighten blend modes ...246
Lighting blend modes ...247
Inverter blend modes...249
HSL blend modes...250
Using Photomerge Panorama ...250
Chapter 12: Drawing and Painting . . . .253
Choosing Color ...253
Working with the Color Picker...254
Dipping into the Color Swatches palette...255
Sampling with the Eyedropper tool ...256
Getting Artsy with the Pencil and Brush Tools ...258
Drawing with the Pencil tool...258
Painting with the Brush tool ...259
Creating your own brush...261
Filling and Outlining Selections...263
Fill ’er up...264
Outlining with the Stroke command ...265
Splashing on Color with the Paint Bucket Tool...266
Working with Multi-Colored Gradients...266
Applying a preset gradient ...267
Customizing gradients ...268
Working with Patterns ...271
Applying a preset pattern...271
Creating a new pattern ...272
Creating Shapes of All Sorts...273
Drawing a shape ...274
Drawing multiple shapes ...275
Specifying geometry options ...276
Editing shapes...277
Chapter 13: Working with Type . . . .279
Understanding Type Basics ...279
Creating Point Type ...281
Creating Paragraph Type ...282
Specifying Type Options ...283
Editing Text ...286
Simplifying Type...287
Masking with Type ...288
Stylizing and Warping Type ...291
Adjusting type opacity...291
Applying filters to your type ...292
Painting your type with color and gradients ...292
Warping your type...293
Part V: Printing, Creating, Sharing ...295
Chapter 14: Getting It on Paper . . . .297
Setting Up Your Printer ...298
Printing from the Organizer ...299
Checking out Elements’ print shop ...300
Stepping through a print job with Print Selected Files...301
Printing a video image ...307
Printing a contact sheet ...308
Packaging pictures ...309
Printing Avery label sizes ...311
Printing Creations with Adobe Reader...311
Printing with the dialog boxes...312
Getting Professional...318
Using color profiles with service centers...318
Submitting files to service centers...321
Using Online Printing Services ...322
Chapter 15: Showing It on Screen . . . .325
Optimizing Images for the Web ...325
Preparing files for Web hosting ...326
Using the Save for Web command...326
Creating a Slide Show ...330
Creating a project ...331
Exporting to slides and video ...334
Opening multi-page PDF files in Elements...335
Writing Creations to CDs and DVDs...336
Chapter 16: Making Creations . . . .339
Getting a Grip on Common Output Methods...339
Creating the Family Photo Album ...340
Greetings! ...341
Calendars ...342
Spreading the Love through Sharing ...344
Ordering bound books and calendars online ...344
E-mailing creations ...345
Part VI: The Part of Tens ...347
Chapter 17: Ten Tips for Composing Better Photos . . . .349
Find a Focal Point...349
Use the Rule of Thirds ...351
Cut the Clutter ...352
Frame Your Shot ...353
Employ Contrast...353
Using Leading Lines ...354
Experiment with Viewpoints...354
Use Light...355
Giving Direction...357
Consider Direction of Movement ...358
Chapter 18: Ten More Project Ideas . . . .359
Wallpaper and Screen Savers ...359
Flyers, Ads, and Online Auctions ...361
Clothes, Hats, and More ...362
Posters...363
Household and Business Inventories ...363
Project Documentation ...364
School Reports and Projects ...364
Wait, There’s More ...364
Index...365
Bonus Chapters ...On the Web
Bonus Chapter 1: Exploring Audio and Video in Elements . . . .BC1
Adding Audio Notes to Images in the Organizer ...BC2 Adding Animation to Your Images ...BC2 The Elements Soap Opera...BC3 Creating files for TV viewing ...BC4 Creating a TV-safe template ...BC5 Prepping files for TV with the template...BC7 Export a creation to a TV format...BC7Bonus Chapter 2: Setting Up a Web Photo Gallery . . . .BC11
Creating Your Web Gallery ...BC11 Uploading the Gallery to the Web ...BC13Introduction
W
hat was once a consumer-grade, low-level program for beginning image editors and a junior cousin to the powerful Adobe Photoshop pro-gram has evolved and matured to stand on its own merits now in version 4.0. You won’t find much comparison between Adobe Photoshop Elements and Adobe Photoshop in this book, nor will you see any suggestions that you should consider using Photoshop for one thing or another. We don’t make suggestions simply because Photoshop Elements is a powerful tool that satisfies many needs of amateurs and professionals alike.Who should buy Elements (and ultimately this book)? The range of people who can benefit from using Elements is wide and includes a vast audience. From beginning image editors to intermediate users to more advanced amateurs and professionals, Elements has something for everyone. We’ll even stick our necks out a little and suggest that many Photoshop users can benefit greatly by adding Elements to their software tool cabinet. Why? Because Elements offers you some wonderful creation tools that Photoshop hasn’t yet dreamed of supporting. For example, you can create postcards, greeting cards, calendars, and photo albums with just a few mouse clicks. You can place orders with online service centers that professionally print your photo creations. All these opportunities are available in Elements, and we cover these and many more creation ideas in Chapters 15 and 16.
We have to make one exception here and say that Elements is not for everyone. The down side to the program is that version 4 is supported only on Windows. Adobe is no longer releasing a Macintosh version, so the poor Mac users can’t explore all the power available in this new release. Our suggestion to the Mac users: buy a second computer. None of the Mac programs gives you the power that you find in Elements when it comes to image editing and pack-aging creations.
For the beginning and intermediate users, you’ll find some of Photoshop Elements’ quick fix operations a breeze to use to help you enhance your images, as we explain in Chapters 9 and 10. And when it comes time to print some homemade greeting cards, calendars, and photo albums, Elements provides beginners, intermediate users, and professionals easy-to-follow steps to package your creations, as we cover in Chapters 15 and 16.
About This Book
Elements is a feature-rich program, and this book is an effort to provide a comprehensive introduction. So although we may skip over a few little things, all you need to know about using Photoshop Elements for designing images for print, sharing, Web hosting, packaging in many different ways, e-mailing, and more is covered in the pages ahead. If you’re ready to go a bit further, we also included Bonus Chapters on this book’s Web site at www.dummies.com/ go/elements4.
As we said, Photoshop Elements has something for just about everyone. Hence, we know our audience is large, and not everyone will use every tool, command, or method described in this book. Therefore we added a lot of cross-references in the text in case you want to jump around. You can just about go to any chapter and start reading; if some concept is dependent on more explanation, we point you in the right direction to get some background when it’s necessary.
Conventions Used in This Book
Throughout this book, we point you to menus where commands are accessed. A couple things to remember are the references for where to go when we detail steps in a procedure. For accessing a menu command, you might see some-thing like this:
Choose File➪Get Photos➪From Files and Folders.
When you see commands like this, we’re asking you to click the Filemenu to open the drop-down menu and then click the menu command labeled
Get Photosto open a submenu. Then, in the submenu, select the command
From Files and Folders.
click the right mouse button, or as we like to say, right-clickthe object in question.
Finally, a third item to remember relates to using keystrokes on your keyboard. When we mention that some keys need to be pressed on your keyboard, the text looks like this:
Alt+Shift+Ctrl+S
In this case, you hold down the Alt key, Shift key, and Ctrl key and then press the S key. Then release them all together.
How This Book Is Organized
This book is divided into logical parts in which related features are nested together in chapters within six different parts. The parts of the book are as follows:
Part I: Getting Started
If you just bought a digital camera and you’re new to image editing in a pro-gram like Photoshop Elements, you’re probably tempted to jump into fixing and editing your pictures. The essentials are usually not the most exciting part on any program or book. That’s true with this book. The more mundane issues related to understanding some basics are assembled together in the first three chapters. Although not as exciting as many other chapters, there are some bits of information that are critical to understand before you start editing images. Be sure to review the first three chapters before you dive into the other chapters.
In Part I, we talk about the tools, menus, commands, preferences, work-spaces, and some features to help you move around easily in the program. The more you pick up in the preliminary chapters, the easier you will adapt to the Elements way of working.
Part II: Getting Organized
Part III: Selecting and Correcting Photos
This part relates to creating and manipulating selections. There’s a lot to making selections in photos, but after you’ve figured it out (by reading Chapter 7), you can cut out a figure in a picture and drop it into another picture, drop in differ-ent backgrounds, or isolate an area that needs some brightness and contrast adjustment. In Chapter 8, we talk about layers and how to create and manage them in Elements. In many other chapters, we refer you back to the layers chap-ter because so many of the things you do in Elements are done on layers.
In Chapter 9, we talk about fixing image flaws and problems. That picture you took with your digital camera may be underexposed, overexposed, or may need some work to remove dust and scratches, need a little sharpening, or have some other imperfection that requires editing. All the know-hows and how-tos are in this chapter.
In Chapter 10, we cover correcting color problems, brightness, and contrast. We show you ways to quickly fix photos as well as some methods for custom image corrections.
Part IV: Exploring Your Inner Artist
This part is designed to bring out the artist in you. With Elements’ easy appli-cation of filter effects, you can turn a photo image into a drawing or apply a huge number of different effects to change the look of your image.
In Chapter 12, we talk about drawing and painting, so you can let your artistic expression run wild. We follow up in Chapter 13 by talking about adding text to photos so you can create your own layouts, posters, cards, and so on.
Part V: Printing, Creating, and Sharing
One of the most critical chapters in the book is Chapter 14, in which we talk about printing your pictures. If your prints don’t look the way they do on your monitor, you need to read and reread this chapter.
If screen viewing is of interest to you, we cover a number of different options for viewing your pictures on-screen in Chapter 15. For slide shows, Web-hosted images, animated images, viewing your photos on your TV, and even creating movie files, this chapter shows you the many ways you can view your Elements images on-screen.
Part VI: The Part of Tens
We wrap up the book with the Part of Tens chapters. We offer ten tips for composing better images and ten other fun, interesting creations that you can make with Elements, but that didn’t fit in elsewhere in the book.
Icons Used in This Book
In the margins throughout this book, you’ll see icons that indicate that some-thing important is stated in the respective text:
This icon informs you that the item discussed is a new feature in Photoshop Elements 4.
Tips tell you about an alternate method for a procedure, a shortcut, a workaround, or other helpful information related to working on tasks in the section being discussed.
Pay particular attention when you see the warning icon. This information informs about when you may experience a problem performing your work in Elements.
This icon is a heads-up for something you may want to commit to memory. Usually it tells you about a shortcut for a repetitive task, where remembering a procedure can save you time.
After all, Elements is a computer program. No matter how hard we try to simplify explaining features, we can’t entirely avoid the technical. When we cover technical details that are interesting (to some) but not essential to know, we use this icon to alert you.
Where to Go from Here
When you need a little extra help, refer back to Chapter 1, where we talk about using the online help documents available in Elements.
If you have questions, comments, suggestions, or complaints, send your comments here:
Part I
In this part . . .
H
ere you have it . . . a computer book specifi-cally designed to help you get the most out of a computer software program — and not just any software program, but a powerful one with many complicated features. You probably want to jump in and perform some spiffy editing opera-tions to get that prize photo looking the best you can. But there are a few basics that need to be understood when editing your photos.1
Getting to Know the Work Area
In This Chapter
Understanding the Elements workspace
Changing workspace views
Using the Undo History palette
Accessing Help documents
Using keyboard shortcuts
I
n Elements’ work areas, you find quite a collection of tools, palettes, but-tons, and options. Just a quick glance at the Elements workspace when you enter the Standard Edit mode shows you some of the power that Elements offers with just a click of your mouse. With all the possibilities, the Elements workspace can be intimidating. To ease your introduction to the many options for editing your pictures, we break them down for you in this chapter.Elements has several work areas, and we start off by introducing you to the one you’ll likely use most often, Standard Edit mode. This is the mode in which you can be creative with all the tools and features Photoshop Elements is known for, such as filters, drawing tools, layers, and more. We then introduce other work areas and tools you may not be as familiar with — Quick Fix mode for making common corrections to photos, Creation Setup mode for collecting your photos into creations such as calendars, and the Photo Bin for navigating among all your open images.
Elements also includes the Organizer, a powerful tool for acquiring your images and keeping them organized. The Organizer includes features that help you view and search for images, too. We introduce the Organizer in Part II.
Getting Around in Standard Edit Mode
Standard Edit mode offers bundles of tools for editing your images, from cor-rection tools for fixing color and clarity to filters, layers, and more for creating entirely original images either from existing photos or from scratch. But all these tools also make Standard Edit mode complex.
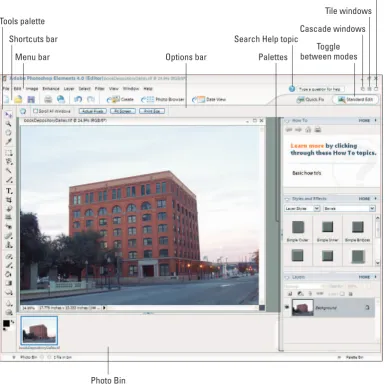
Figure 1-1 shows Elements in Standard Edit mode, highlighting all the tools and features we discuss in the sections that follow.
Jumping to Standard Edit mode
You can move into Standard Edit mode in a couple of ways:
From the initial Welcome screen, click Edit and Enhance Photos and open a photo. Your Elements window appears in Standard Edit mode, as shown in Figure 1-1.
From the Organizer, click Edit in the Shortcuts Bar and select Go to Standard Edit from the drop-down menu.
Examining the Image window
Not surprisingly, the Image window’s tools and features are most useful when an image is actually open in the window. To get an image into the image window (refer to Figure 1-1), follow these steps:
1. Click the Open tool in the Shortcuts bar.
The standard Open dialog box appears. It works like any ordinary Open dialog box you find in other applications.
2. Move around your hard drive by using methods you know to open folders and select a picture.
If you haven’t yet downloaded digital camera images or acquired scanned photos and want an image to experiment with, you can use an image found in your My Pictures folder that was installed with Windows.
3. After selecting a picture, click Open.
Figure 1-1:The Photoshop Elements workspace shown when you open a file in Standard Edit mode.
You can open as many image windows in Elements as your computer memory can handle. As each new file is opened, a thumbnail image is added to the Photo Bin at the bottom of the screen, and the image windows are stacked, with the current active image on the topmost window. To bring another open file to the foreground and make it active, click the respective thumbnail in the Photo Bin.
Tools palette
Menu bar Shortcuts bar
Options bar
Search Help topic
Maximize mode
Photo Bin
Palettes
Toggle between modes
Tile windows
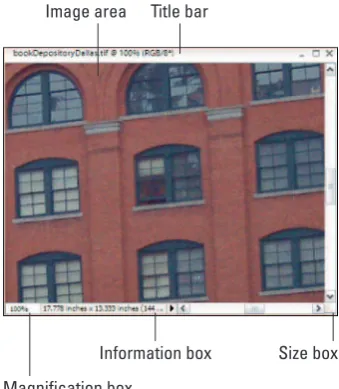
Here’s a quick look at important items in the image window, shown in Figure 1-2:
Scroll bars become active when you zoom in on an image. You can click the scroll arrows, move the Scroll bar, or grab the Hand tool in the Tools palette and drag within the window to move the image around. The Magnification boxshows
you at a glance how much you’ve zoomed in or out.
The Information boxshows you a read-out for a particular tidbit of information. You can choose what information you want to see in this area by choosing one of the options from the pop-up menu, which
we discuss in more detail later in this section.
When working on an image in Elements, you always want to know the physical image size, the image’s resolution, and the color mode (these terms are explained in more detail in Chapters 3 and 4). Regardless of which menu option you choose in the status bar, you can get a quick glimpse at these essential stats by clicking the Information box, which displays a pop-up menu like the one shown in Figure 1-3.
The Size boxenables you to resize the window. Move the cursor to the box and a diagonal line with two opposing arrows appears. When the cursor changes, drag in or out to size the window smaller or larger.
You can also resize the window by dragging any of the other corners in or out.
Click the Minimize button(the _ button in the upper-right corner of the image window) and the window hides from view. It’s still open; you just click the image in the Photo Bin to maximize the window.
Image area Title bar
Magnification box
[image:32.530.290.460.90.285.2]Size box Information box
Figure 1-2:The image window displays an open file within the Elements workspace.
If you click the Maximize button(the button with the box-shaped icon), the Title bar shown at the top of the window disappears and provides you a little more room for viewing images in the window.
You can click the Close button(it’s shaped like an X) to close the active image window and keep Elements open. Alternatively, you can use the keyboard shortcut Ctrl+W or menu command File➪Close to close the active window.
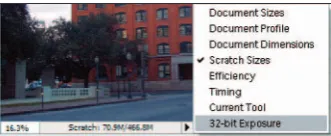
[image:33.530.293.459.184.252.2]Now that you’re familiar with the image window overall, we want to introduce you to the Information box’s pop-up menu, which enables you to choose the type of information you want to view in the Information box. Click the right-pointing arrow to open the menu, as shown in Figure 1-4. Here’s the lowdown on the options you find in the pop-up menu:
Document Sizes:Shows you the saved file size.
Document Profile:Shows you the color profile used with the file. Document Dimensions:Shows you the physical size in your default unit
of measure, such as inches.
Scratch Sizes:As shown in Figure 1-4, displays the amount of memory on your hard drive that is consumed by all documents open in Elements. For example 20M/200M indicates that the open documents consume 20 megabytes, and a total of 200 megabytes are available for Elements to edit your images. As you add more content to a file — such as adding new layers, the first figure grows while the second figure remains static. Efficiency:This indicates how many operations you are performing in
RAM as opposed to using your scratch disk. When the number is 100%, you are working in RAM. When the number drops below 100%, you are using the scratch disk. If you continually work below 100%, it’s a good indication that you need to buy more RAM to increase your efficiency. Timing:Indicates the time it took to complete the last operation. Current Tool:Shows the name of the current tool selected from the
Tools palette.
32-bit Exposure:This menu command provides you an option for adjust-ing the preview image for viewadjust-ing a High Dynamic Range (HDR) document on your monitor.
Don’t worry about trying to understand all these terms. The important thing to know is that you can visit the pop-up menu and change the items at will during your editing sessions.
Moving through the Menu bar
Like just about every program you launch in Windows, Elements supports drop-down menus. The menus are logically constructed and identified to provide commands for working with your pictures (commands that you don’t find supported in tools and palettes). A quick glimpse at the menu names gives you a hint of what might be contained in a given menu list.
The ten different menus are as follows:
File menu:Just as you might suspect, the File menu contains commands for working with your picture as a file. You find commands for saving, opening, processing, importing, exporting, and printing in the menu list. We cover saving files in Chapter 3 and printing or exporting for other output in Part V.
Edit menu:As you might guess, the old-fashioned Copy/Cut/Paste commands are located here. Additionally, you have some important file settings commands in the menu, including preferences, which we cover in more detail in Chapter 2.
Image menu:You find yourself in the Image menu when you want to affect changes to the entire image, such as changing a color mode or cropping, rotating, and resizing images. For details about sizing and color modes, check out Chapter 3. For more about cropping and rotating images, flip to Chapter 9.
Enhance menu:Just the name of this menu should tell you what commands to expect here. This is where you go to change image appearances, such as changing the brightness and contrast, adjusting color and lighting, and doing some smart fix-up work to improve image appearance. In Chapters 9 and 10, you find out how to use correction tools so your images look their best.
Layer menu: As we describe in great detail in Chapter 8 (a whole chapter just about layers), most kinds of editing you do in Elements are best han-dled using layers. Elements neatly tucks away all the relevant commands associated with working in layers right here.
Select menu: Of just about equal importance to layers is working with selections. Whereas the Image menu contains commands that are applied to the entire image, you can edit isolated areas of images by using the commands in the Select menu. In order to isolate an area, you need to create a selection, as we explain in Chapter 7. This menu contains com-mands to help you with all the essential tasks related to working with selections.
View menu: Zooming in and out of images, turning on a grid, exposing horizontal and vertical rulers, adding annotations, and checking out the print size of your pictures are handled in the View menu. Chapter 5 unearths secrets of the Zoom tool, rulers, and more.
Window menu: Elements supports a number of different palettes, as we explain later in this chapter. Elements has so many palettes, keeping them all open at one time is impractical. Thanks to the Window menu, you can easily view and hide palettes, reopen the Welcome window, tile and cas-cade open windows, and bring an inactive window to the foreground. Help menu: Hopefully, you get all you need right here in this book; but
just in case we miss something (or the neighbor has borrowed it, fine book that it is), you have some interactive Help right at your mouse-tip in the Help menu. The menu also offers links to Adobe’s Web site for more information and a little assistance, courtesy of the tutorials acces-sible in this menu. (Find a little more detail about accessing help later in this chapter.)
Uncovering the context menus
Context menus are common to many programs, and Photoshop Elements is no exception. They’re those little menus that appear when you right-click, offering commands and tools related to whatever area or tool you right-clicked.
The context menus are your solution when you may be in doubt about where to find a command in a menu. You just right-click an item, and a pop-up menu opens. As you become familiar with
Photoshop Elements and you find yourself struggling to find a menu command, always try to first open a context menu and look for the command you want in the menu list.
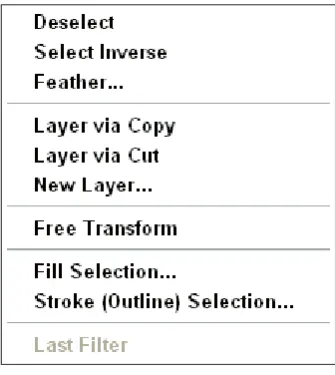
Because context menus provide commands respective to the tool you’re using, the menu commands change according to what tool or feature you are using at the moment you open a context menu. For exam-ple, in Figure 1-5, you can see the context menu that appears after we create a selection marquee and right-click that marquee in the Image window. Notice that the commands
[image:35.530.291.459.397.585.2]Using the Tools palette
Elements provides a good number of palettes for different purposes. The one you’ll find you use most is the Tools palette. In palette hierarchy terms, you typically first click a tool in the Tools palette and then use another palette for additional tool options or use the Options bar for fine-tuning your tool instru-ments. More often than not, clicking a tool in the Tools palette is your first step in most editing sessions.
Tools can be easily accessed in Elements by pressing shortcut keys on your keyboard. For a quick glance at the Tools palette and the keystrokes needed to access the tools, look over Figure 1-6.
If you accidentally press the Tab key on your key-board, the Tools palette hides from view. Press Tab again and the Tools palette reappears.
Notice in the Tools palette that several tools appear with a tiny arrow pointing right and downward on the lower-right corner of each tool. Whenever you see this arrowhead, remember that more tools are nested within that tool group. Click a tool with an arrowhead and hold the mouse button down. A pop-up toolbar opens, as shown in Figure 1-7, and offers you more tool selections within that group.
To select tools within a tool group by using key-strokes, press the Shift key and strike the respective key (shown in Figure 1-6) to access the tool. Keep the Shift key down and repeatedly press the shortcut key to scroll through all tools in a given group.
The shortcuts work for you at all times except when typing text. Be certain to click in the Tools palette to select a tool if your last edit was made with one of the Type tools.
The tools are varied, and you may find that you won’t use all the tools in the Tools palette in your workflow. Rather than describe the tool functions here, we address the tools in the remaining chapters in this book as they pertain to the respective Elements tasks.
V Z H I M L W F T C Q P Y J S E B K G U R O D X
Figure 1-7:Click and hold the mouse button on a tool that has a tiny arrowhead, and a pop-up toolbar opens.
Playing with palettes
Elements provides you with a bunch of palettes that contain settings and options used to refine the tools you select in the Tools palette and tasks you perform to edit images. As an example of how a palette is used, assume for a moment that you want to let your creative juices loose and create a Picasso-esque painting — something that you can easily do in Photoshop Elements.
You first click the Brush tool and then click a color in the Color Swatches palette. On a new canvas, you begin to paint. When you want to change color, you click again in the Color Swatches palette on a different color. This kind of interactivity between the Tools palette and another palette is something you will frequently use in Elements.
Palettes are accessed from either the Palette Bin or from the Window menu. Many options in palettes are intuitive. To become familiar with various palette options, just poke around a little, and most of the options will become famil-iar to you.
Selecting tool options from the Options bar
When you click a tool in the Tools palette, the Options bar offers you choices specific to a selected tool. Figure 1-8 shows the options available when the Clone Stamp tool is selected.
Juggling all your interface options
With all the settings you can use for any given tool, it can become downright frustrating trying to figure out exactly where to select an option for the edit you want to make. To help simplify the process of using tools and selecting options for the tools, here’s what you might do in a normal workflow:
1. Select a tool in the Tools palette.
Obviously, you need to know what task you want to perform, so select-ing the proper tool to complete the task is important to know up-front.
2. Take a quick look at the Options bar.
Before moving to other options choices, be certain you look over the choices in the Options bar. If you want to use a tool like the Brush tool or the Clone Stamp tool, perhaps you want to make a decision about what size brush tip you want to use. This choice is specific to the selected tool and therefore appears as an Options bar choice.
3. Open a palette for more options.
If you, for example, want to use the Brush tool to apply some color to an image, after selecting the Brush tip in the Options bar, open the Color Swatches palette and select a color.
4. Open the More menu.
Maybe the color you want to use doesn’t appear in the Color Swatches palette. Your next stop is the More menu. From the menu choices, you can load different swatch libraries that provide more color options.
Try following the same sequence when you want to edit images in Elements by first selecting a tool, then checking out the Options bar, opening palettes related to providing choices for the task at hand, and finally clicking the More button for additional choices in the palettes.
Looking at the Shortcuts bar
Figure 1-9:In Standard Edit mode, the Shortcuts bar provides tools and viewing options.
Depending on your editing mode, such as Standard Edit, Quick Fix, or one of the other viewing modes, the Shortcuts bar changes to provide different tools and buttons. Figure 1-9 shows how the Shortcuts bar appears when viewed in Standard Edit mode.
The Shortcuts bar contains tools and buttons grouped together as follows:
The first group offers quick access to file management commands. You can create a new file, open a file, or save a file by clicking one of the first three tools in the Shortcuts bar.
Click the Print tool to print a file or the Attach to E-mail tool to attach an open document to a new e-mail message in your default e-mail program.
Click Undo to undo an edit and Redo to redo an undone edit.
For a quick jump to all the wonderful organizing features provided in Elements, such as creating slide shows, calendars, and postcards or writing to video discs, click the Create button. Click Photo Browser to open the Photo Browser window, where you can easily manage your pictures. The Date View shows you a calendar, where you can add thumbnails of your pictures.
Changing Workspaces
When you’re in Standard Edit mode, discussed in preceding sections, you can apply any kind of edits to a picture, improve the appearance, and apply all that Elements offers you. This mode is the richest editor in Elements in terms of accessing all features. Because Elements has so many different kinds of edit-ing opportunities, the program offers you other workspace views, tailored to the kinds of tasks people typically want to perform.
Open Print Undo Create Date View
Using Quick Fix mode
The Quick Fix mode is designed to provide you with just those tools that are needed to prepare a picture for its intended destination, whether it be print-ing, on-screen viewprint-ing, or one of the other organizing items. Use this mode to make your pictures look good. You won’t find tools for adding text, painting with brushes, or applying gradients in Quick Fix mode. Rather, what you find is a completely different set of palettes for balancing contrast and brightness, lighting, sharpening, and so on. This mode is like having a digital darkroom on your desktop, where you take care of perfecting an image like you would in analog photography darkrooms.
To enter the Quick Fix mode while you are in Standard Edit mode, click the Quick Fix button adjacent to the Shortcuts bar; the view changes, as shown in Figure 1-10.
If you want to start up Elements in Quick Fix mode, click the Quick Fix button in the Welcome screen when you first launch the program.
There are several differences between Standard Edit mode and Quick Fix mode:
Completely different sets of palettes are docked in the Palette Bin. All the palettes in Quick Fix mode are related to adjusting brightness controls and are designed to improve the overall appearance of your pictures. In addition, all the Window menu commands for accessing palettes are grayed out. While you work in Quick Fix mode, Elements is insistent on limiting your use of palettes to just those palettes docked in the Palette Bin. Moreover, you cannot undock palettes from the Palette Bin by dragging them out, as you can in other modes.
The Tools palette disappears.Quick Fix mode offers you only the Zoom tool, Hand tool, Genie Brush tool, Crop tool, and Red Eye Removal tool in the Tools palette. None of the other Elements tools are accessible while you work in this mode.
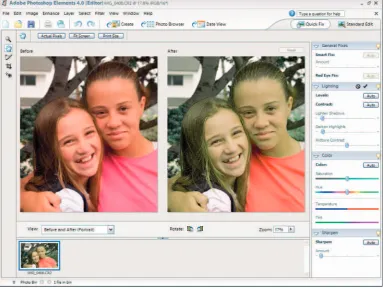
Multiple viewing options are available. Notice in Figure 1-10 that there are two views of the same image. One view displays the raw, unedited image. The After view shows you the results of changes you make with palette options and menu commands.
Figure 1-10:Click Quick Fix in Standard Edit mode, and the workspace changes.
Using Creation Setup
To organize your pictures for display in a variety of different ways, you begin by accessing the Creation Setup window. While in either Standard Edit or Quick Fix mode, click the Create button on the Shortcuts bar. The Creation Setup window opens, as shown in Figure 1-11.
Figure 1-11:Click Create in either Standard Edit or Quick Fix mode to open the Creation Setup window.
Using the Photo Bin
Figure 1-12:All open pictures and new views are displayed as thumbnails in the Photo Bin.
If you want to rearrange the thumbnails in the Photo Bin, just click and drag horizontally to reorganize the order of the thumbnails.
Creating different views of an image
What? Different views of the same picture, you say? Yes indeed. You might create a new view when you want to zoom in on an area for some precise editing and then want to switch back to a wider view. Here’s how you do it:
1. Click an image’s thumbnail in the Photo Bin.
The respective photo appears in the image window as the active document.
2. Choose View➪New Window for <filename>.
Note that <filename> is the name of the file in the image window.
3. Zoom to the new view.
A new view appears for the active document, and you see another thumbnail image added to the Photo Bin.
To zoom quickly, click the Zoom tool and click a few times on the picture in the image window to zoom into the photo.
4. Toggle views of the same image.
Click one thumbnail and you see the opening view; click the other thumbnail and you see the zoomed view.
Hiding the Photo Bin
To temporarily hide the Photo Bin, do one of the following:
Place the cursor over the separator bar between the Image window and the Photo Bin. When the cursor changes to two horizontal lines with vertical opposing arrowheads, drag down to collapse the Photo Bin. When the bin is collapsed, drag the separator bar up to open the bin. To auto-hide the Photo Bin, open a context menu (right-click inside the
Photo Bin) and select Auto-hide from the menu choices. (Alternately, you can just click the separator bar where you see the tiny arrowhead to show/hide the bin.) When you use Auto-hide, the Photo Bin automati-cally hides when the cursor appears in the image window. The Photo Bin automatically opens when you move the cursor below the separator bar.
Retracing Your Steps
Ever since Apple Macintosh brought a windows interface to the masses, the Undo command has been one of the most frequently used menu commands in every program developed. You make a change to your document, and if you don’t like it, you simply choose Edit➪Undo or press the keyboard shortcut, Ctrl+Z.
In Elements, your options to undo your work have expanded, as we explain in the following sections.
Using the Undo History palette
Elements takes the Undo command to new levels by offering you a palette in which all your changes (well, almost
all) in an editing session are recorded and available for undoing at any step in an editing sequence.
Each edit you make is recorded in the Undo History palette. To open the palette, choose Window➪Undo History. Make changes to your docu-ment, and each step is recorded in the palette, as you see in Figure 1-13.
[image:44.530.291.461.430.605.2]If Elements slows down, and you’re moving along at a snail’s pace, open the More drop-down menu in the History palette and select Clear Undo History. Elements flushes all the recorded history and frees up some precious memory that often enables you to work faster.
We said almost all steps are recorded because the number of steps the History palette can record is controlled by a preference setting that tops out at 1,000 steps. If you choose Edit➪Preferences and look at the General preferences, as we explain in more depth in Chapter 2, the number of history states defaults to 50. You can change the number to the maximum of 1,000 if you like. But realize that the more history states you record, the more memory Elements requires.
To undo the last edit, you can use the keyboard shortcut, Ctrl+Z. When you want to undo multiple edits, open the Undo History palette and click any item listed in the palette. Elements takes you to that last edit while scrubbing all the edits that follow the selected item. If you want to bring them back, just click again on any step appearing grayed out in the palette to Redo up to that level.
All your steps are listed in the Undo History palette as long as you remain in Elements and don’t close the file. When the file is closed, all the history infor-mation is lost.
Reverting to the last save
As you work away in Elements, you should always plan on saving your work regularly. Each time you save in an editing session, the Undo History palette preserves the list of edits you made prior to the save and up to the maximum number of history states defined in the General preferences.
If you save, then perform more edits, and then want to return to the last saved version of your document, Elements provides you a quick, efficient way to do so. Choose Edit➪Revert, and Elements eliminates your new edits and takes you back to the last time you saved your file.
When you choose Revert, the word Revertappears in the Undo History palette. You can eliminate the Revert command from the Undo History palette by right-clicking Revert in the Undo History palette and choosing Delete from a context menu. This returns you to the edits made subsequent to the last save.
Getting a Helping Hand
You can reach for this book when you want some details about accomplishing a task while working in Elements. However, for those little annoying moments, and just in case some coffee stains blot out a few pages in this book, you may want to look for an alternative feature description from another source.
Using Help
Your first stop for exploring the helpful information Elements provides you is in the Help menu. Here, you find several menu commands that offer you information:
Photoshop Elements Help:Choose Help➪Photoshop Elements Help or press the F1 key to open the Elements Help file. You can type in a search topic and press Enter to open a list of items that provide helpful infor-mation on the searched words.
For quick access to the Help document, type the text you want to search into the text box on the right side of the menu bar in Standard Edit or Quick Fix mode.
Glossary of Terms:As you read this book, if we use a term that you don’t completely understand, open the Photoshop Elements glossary. Here, you find definitions of terms commonly used in photography and image editing, as well as terms related specifically to Elements.
Tutorials:If you want to explore some advanced learning, check out the online tutorials provided by Adobe Systems.
Photoshop Elements Online:This menu command launches your default Web browser and takes you to Adobe’s Web site, where you can find information about Elements, problems reported by users, and some workarounds for getting a job done.
Using PDFs from the installation CD
A number of bonus files are stored in PDF form on your installation CD. PDF files require the free Adobe Reader program or one of the commercial Acrobat viewers. Adobe Reader can be installed from the CD during your installation process.
Depending on when you purchased your Elements installer CD, the version of Adobe Reader on the CD might be outdated. If you want to stay with the latest upgrade of Adobe Reader, open your Web browser and type this address in the Location bar:
www.adobe.com/products/acrobat/readermain.html
Using ToolTips
As you move your cursor around tools and palettes, pause a moment before clicking the mouse. A slight delay in your actions produces a ToolTip, as shown in Figure 1-14. Elements provides you this sort of dynamic help as you move the cursor around the workspace and pause before moving to another location.
Figure 1-14:Place the cursor over a tool and pause a moment to open a ToolTip.
Using the How To palette
The default Palette Bin in Standard Edit mode contains the How To palette at the top of the bin. The How To palette lists some of the more common tasks you are likely to perform in Elements. Click the right-pointing arrowhead to expand a list and then click an item to open help information in the palette. You can scroll pages by clicking the arrows, return to the opening How To page by clicking the house icon, and print a topic by clicking the printer icon if you want to create hard copy of some help information.
Taking Charge with Shortcuts
As Emeril says, “It’s time to kick it up a notch.” Kicking it up a notch in Elements terms means leaving the pick and poke editing methods of the novice and graduating to techniques used by the swift keyboard master.
Using keyboard shortcuts greatly reduces your time in Elements and makes you much more proficient. The up side is that most of what you can do by moving the mouse and clicking a tool or menu command can be performed right from your keyboard by using combinations of keystrokes. The down side is that, because there are so many keyboard shortcuts to remember, learning all of them is nearly impossible.
Here are some considerations to help you remember shortcuts and find more information about them:
For common tasks, always take special note of ToolTips and com-mands in a menu. ToolTips provide a description of what a tool does, and they often display the keyboard shortcuts used to access the tools. Menu commands that support keyboard shortcuts list the shortcut keys to the right of command names.
Look over all the tips and alternate methods for performing an action that we describe throughout this book. As you are introduced to more features in Elements, we try to offer you the keyboard shortcut options as well as tools and commands. Instead of giving you a list here, we pro-vide keyboard shortcuts when explaining a feature.
Search the Help document.Open the Elements Help document (Help➪ Photoshop Elements Help or press F1) and search for keyboard shortcuts.
The Help document provides a comprehensive list of all the keyboard shortcuts you can use in Elements.
Stick with the essentials.Try to commit to memory only those short-cuts that produce actions for your most common editing tasks.
The Cheat Sheet at the front of this book lists some common keyboard short-cuts so that you can reference them quickly and easily.
2
Getting Ready to Edit
In This Chapter
Specifying editing preferences
Specifying organizing preferences
Working with presets
Understanding color in Photoshop Elements
Setting up your color management system
A
lthough not as exciting as firing up Elements and working on your pre-cious pictures, customizing Elements for your personal work habits and properly setting up color management is critical to everything else you do in the program. This chapter explains how to take charge of Elements and customize your work environment by adjusting preference settings and setting up a color management system. If you’re new to Elements or image editing in general, you might not know just how you want to set up certain features right away. However, you canalways refer to this chapter and review and update set-tings and options later as you become familiar with other features in Elements.
What we offer here is a very brief description of what preference options are available to you. When you need some detail regarding one preference option or another, look at the help documents we discuss in Chapter 1. Use the help documents as a reference and you won’t need to memorize the vast number of settings Elements provides you.
Launching and navigating Preferences
Preferences are all contained in a dialog box that’s organized into ten panes. By default, when you open the Preferences dialog box, the opening pane is the General pane. To open the Preferences dialog box, do one of the following:
Choose Edit➪Preferences. Press Ctrl+K.
Using either method opens the dialog box to the General preferences pane, as shown in Figure 2-1.
Figure 2-1:The General preferences dialog box.
In Figure 2-1, you see a number of items that are common to all preference panes. Here’s a quick introduction to what these items are and how they work:
Drop-down pane menu: Click the topmost downward-pointing arrow and you see all the individual panes listed. You can select from the menu to jump to another pane.
Cancel: Click Cancel to return to the same settings as when you opened a pane. If you hold down the Alt key, the Cancel button changes to Reset and performs the same action as clicking the Reset button.
Reset:If you change the settings options and click Reset, the action takes you back to the same settings as when you opened the Preferences dialog box.
Learn about Preferences:Click the blue text and the Adobe Help Center opens where you find help information that’s specific to this dialog box. Prev: Switches to the previous pane.
Next: Switches to the next pane.
You can also press Ctrl+(1 through 0 keys) to jump to another pane.
All these options are available regardless of the pane in view.
Checking out all the Preferences panes
The settings in the Preferences dialog box are organized into different panes, that reflect key categories of preferences. The following list briefly describes the types of settings you can adjust in each of the Preferences panes:
As the name implies, General preferences apply to overall general set-tings you adjust for your editing environment.
Saving Files preferences relate to options available for saving files. You can choose to add extensions to filenames, save files with layers or flat-ten layers when saving a file (as we explain in Chapter 8), save files with image previews that appear when viewing files as icons on your desktop, and save with some compatibility options.
Display and Cursor preferences offer options for how certain tool cursors are displayed and how you view the Crop tool when cropping images. Working with the Transparency preferences requires an understanding
of how Elements represents transparency. Imagine painting a portrait on a piece of clear acetate. The area you paint is opaque and the area surrounding the portrait is transparent. To display transparency in Elements, you need some method to represent transparent areas (Chapter 7 has more details). Open the Transparency preferences and you make choices for how transparency is viewed in your 2-D Elements environment.
The Grid preferences offer options for gridline color, divisions, and subdivisions. A gridshows you nonprinting horizontal and vertical lines. You use a grid to align objects, type, and other elements. You can snap items to the gridlines to make aligning objects much easier.
TheScratch Disks preferences contains options for selecting scratch
disks.Assume you have 100MB of free RAM (your internal computer
memory), and you want to work on a picture that consumes 200MB of hard disk space. Elements needs to load all 200MB of the file into RAM. Therefore, an auxiliary source of RAM is needed in order for you to work on the image; Elements uses your hard drive. When a hard drive is used as an extension of RAM, we call this source a scratch disk.
If you have more than one hard drive connected to your computer, you can instruct Elements to use all hard drives, and you can select the order of the hard drives Elements uses for your extension of RAM. All disks and media sources appear in the drop-down menus you see for First, Second, Third, and Fourth.
Don’t use USB external hard drives or other drives with connections slower than FireWire. Using slower drives will actually slow the perfor-mance of Elements.
Memory — and the need to conserve and manage it well — is important to Elements. Yet another preference item for managing memory is the Memory & Image Cache settings.
Cache is a memory location on your hard drive that Elements uses to
remember things like image levels, screen redraws, and histogram dis-plays. (We explain more about using histograms in Chapters 4 and 10.) When one of these items is loaded in memory, it is stored in a cache location. The next time you use the same operation, Elements pulls the item from the cache. The result is much faster access to frequently used items.
You can set the cache level from 0 to 8 by typing a number in the text box. Setting the number to a lower value can help you free up memory so you can work on large images. If you have a lot of RAM and hard-drive memory to work with, caching is not a concern; you can set the cache to 8 for faster operations.
Type preferences provide options for setting text attributes. You have options for using different quote marks, showing Asian characters, show-ing font names in English, and previewshow-ing font sizes.
Controlling the Organizing Environment
A whole different set of Preferences appears when you select Organize and Share in the Preferences dialog box. Initially, it may be confusing to you because the dialog box that opens when you select Organize and Share is also called Preferences. However, a quick glance at the dialog box shows you a different set of preference choices. In the following sections, you find a brief introduc-tion to the Organizer and discover all the different organizaintroduc-tion preferences that Elements has to offer.
Understanding the Photoshop
Elements 4.0 Organizer
We cover all you need to know about a wonderful tool called the Adobe Photoshop Elements 4.0 Organizer in Chapt