- Hour 1 -
Introducing Visual C++ 5
Welcome to Hour 1 of Teach Yourself Visual C++ 5 in 24 Hours! Visual C++ is an
exciting subject, and this first hour gets you right into the basic features of the new Visual
C++ 5 compiler and starts you off building some basic programs.
These are the highlights of this hour:
• A short overview of the Visual C++ environment and how to work in it
• How to compile a simple console-mode program
• How to use AppWizard to create a Windows application
Exploring Visual C++ 5
Visual C++ 5 is the latest C++ compiler from Microsoft, continuing a long line of Microsoft tools for Windows development. The Visual C++ package contains more than a compiler; it also contains all the libraries, examples, and documentation needed to create applications for Windows 95 and Windows NT. Windows development tools have certainly come a long way since the earliest C and C++ compilers for Windows. By combining into a single tool all the resources required to build Windows applications, Microsoft has made it much easier for you to learn to build applications.
The Visual C++ Environment
New Term: An IDE, or Integrated Development Environment, is a program that hosts the compiler, debugger, and application-building tools.
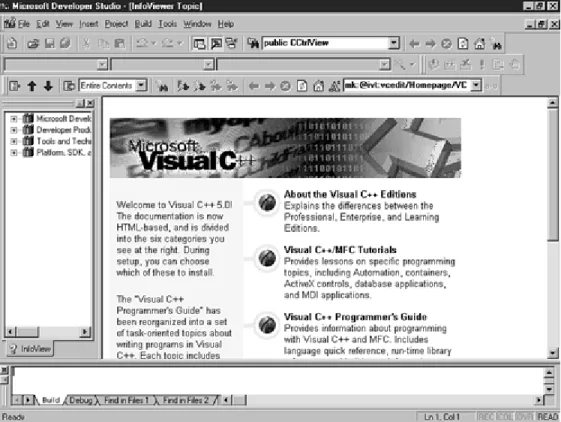
The central part of the Visual C++ package is Developer Studio, the Integrated Development Environment (IDE), shown in Figure 1.1. Developer Studio is used to integrate the development tools and the Visual C++ compiler. You can create a Windows program, scan through an impressive amount of online help, and debug a program without leaving Developer Studio.
Figure 1.1. Using Developer Studio to create a Windows program.
Visual C++ and Developer Studio make up a fully integrated environment that makes it very easy to create Windows programs. By using the tools and wizards provided as part of Developer Studio, along with the MFC class library, you can create a program in just a few minutes.
Many of the programs used as examples in this book require less than a page of additional source code. However, these programs use the thousands of lines of source code that are part of the MFC class library. They also take advantage of AppWizard and ClassWizard, two of the Developer Studio tools that manage your project for you.
Developer Studio Tools
Once upon a time, Windows programmers used simple text editors and tools that were hosted on MS-DOS to create their Windows programs. Developing a program under those conditions was tedious and error-prone. Times have definitely changed; Developer Studio includes a number of tools that you might once have paid extra to purchase.
• An integrated editor offers drag-and-drop and syntax highlighting as two of its major features. You can configure the Developer Studio editor to emulate the keystroke commands used by two popular programmer's editors, Brief and Epsilon.
• A resource editor is used to create Windows resources, such as bitmaps, icons, dialog boxes, and menus.
• An integrated debugger enables you to run programs and check for errors. Because the debugger is part of Developer Studio, it's easy to find and correct bugs. If you find a programming error while debugging, you can correct the source code, recompile, and restart the debugger.
Developer Studio also features an online help system, which can be used to get context-sensitive help for all of the tools included in Developer Studio, as well as detailed help on the C++ language, the Windows programming interface, and the MFC class library.
Developer Studio Wizards
New Term: A Wizard is a tool that helps guide you through a series of steps.
In addition to tools that are used for debugging, editing, and creating resources, Developer Studio includes several wizards that are used to simplify developing your Windows programs. The most commonly used ones are
• AppWizard (also referred to in some screens as MFC AppWizard) is used to create the basic outline of a Windows program. Three types of programs are supported by AppWizard: single document and multiple document applications based on the Document/View architecture and dialog box-based programs, in which a dialog box serves as the application's main window. Later in this hour, you will use AppWizard to create a simple program.
• ClassWizard is used to define the classes in a program created with AppWizard. Using ClassWizard, you can add classes to your project. You can also add functions that control how messages received by each class are handled. ClassWizard also helps manage controls that are contained in dialog boxes by enabling you to associate an MFC object or class member variable with each control. You will learn more about ClassWizard in Hour 4, "Dialog Boxes and C++ Classes."
• ActiveX ControlWizard is used to create the basic framework of an ActiveX control. An ActiveX control is a customized control that supports a defined set of interfaces and is used as a reusable component. ActiveX controls replace Visual Basic controls, or VBXs, which were used in 16-bit versions of Windows. ActiveX controls are used in Hour 20, "Using ActiveX Controls," and you will build an ActiveX control in Hour 24, "Creating ActiveX Controls."
MFC Libraries
New Term: A library is a collection of source code or compiled code that you can reuse in your programs. Libraries are available from compiler vendors such as Microsoft, as well as from third parties.
New Term: Visual C++ 5 includes Version 5.0 of MFC, the Microsoft Foundation Classes, a class library that makes programming for Windows much easier.
By using the MFC classes when writing your programs for Windows, you can take advantage of a large amount of source code that has been written for you. This enables you to concentrate on the important parts of your code rather than worry about the details of Windows programming.
New Term: A recent addition to the C++ standard is the Standard C++ Library. This library includes a set of classes that were known as the Standard Template Library, or STL, during the standardization process. Unlike the MFC class library, which is used primarily for Windows programming, the standard C++ library is used for general-purpose programming.
Starting Developer Studio
To start Developer Studio, click the Developer Studio icon located in the Visual C++ folder. To get to the Visual C++ folder, click the Start button on the taskbar and then select Programs. One of the items in the Programs folder is Microsoft Visual C++ 5.0. Figure 1.2 shows a start menu tree opened to the Microsoft Developer Studio icon.
Figure 1.2. Starting Developer Studio from the Start button.
Developer Studio initially displays two windows:
• A Document window on the right side; this window contains the documentation home page
Developer Studio also includes a rich set of menus, toolbars, and other user interface features, as shown in Figure 1.3.
Figure 1.3. Developer Studio when first started.
Exploring InfoViewer
InfoViewer is the online help system integrated into Developer Studio. InfoViewer is also compatible with the Microsoft Developer Network CD-ROM, enabling you to search that database for information.
Time Saver:
Usually, the indexes used by the InfoViewer are copied to your hard disk
and the actual database remains on the CD-ROM. If you would like to speed up
InfoViewer, run Visual C++ setup again and install InfoViewer to the hard disk.
Using Dockable Windows in Developer Studio
New Term: Many of the views displayed by Developer Studio are dockable, which means they can be attached to the edge of the Developer Studio workspace, where they remain until undocked.
The Project Workspace window shown in Figure 1.3 is an example of a dockable view. To "undock" a dockable window, double-click the window's edge. To dock a floating window, move it to the edge of the workspace. If it is a dockable window, it docks itself. If you want to move a dockable window close to the edge of a workspace without docking, press the Ctrl key on the keyboard when moving the window.
Getting Context-Sensitive Help
To get context-sensitive help from InfoViewer, press F1. You select a topic based on the current window and cursor position, and you see the InfoViewer window, containing context-sensitive help. If you press F1 while editing a source file, help is provided for the word under the cursor. If there is more than one possible help topic, you see a list of choices.
The Visual C++ Editor
Developer Studio includes a sophisticated editor as one of its tools. The editor is integrated with the other parts of Developer Studio; files are edited in a Developer Studio child window.
You use the Developer Studio editor to edit C++ source files that will be compiled into Windows programs. The editor supplied with Developer Studio is similar to a word processor, but instead of fancy text-formatting features, it has features that make it easy to write source code.
You can use almost any editor to write C++ source code, but there are several reasons to consider using the editor integrated with Developer Studio. The editor includes many features that are found in specialized programming editors.
• Automatic syntax highlighting colors keywords, comments, and other source code in different colors.
• Automatic "smart" indenting helps line up your code into easy-to-read columns.
• Emulation for keystrokes used by other editors helps if you are familiar with editors such as Brief and Epsilon.
• Integrated keyword help enables you to get help on any keyword, MFC class, or Windows function just by pressing F1.
• Drag-and-drop editing enables you to move text easily by dragging it with the mouse.
• Integration with the compiler's error output helps you step through the list of errors reported by the compiler and positions the cursor at every error. This enables you to make corrections easily without leaving Developer Studio.
Just a Minute:
If you do choose to use another editor to create your source files, make
sure the files are stored as ASCII, also known as "plain text" files. The Visual C++
compiler cannot process files that have special formatting characters embedded in them,
such as the files created by word- processing programs.
Using Editor Commands
• Undo, which reverses the previous editor action, is performed by pressing Ctrl+Z on the keyboard. The number of undo steps that can be performed is configurable in the Options dialog box.
• Redo, which is used to reverse an undo, is performed by pressing Ctrl+Y.
• LineCut, which removes or "cuts" the current line and places it on the Clipboard, is performed by pressing Ctrl+L.
• Cut removes any marked text from the editor and places it on the Clipboard. This command is performed by pressing Ctrl+X.
• Copy copies any marked text to the Clipboard but, unlike the Cut command, doesn't remove the text from the editor. If no text is marked, the current line is copied. This command is performed by pressing Ctrl+C.
• Paste copies the Clipboard contents into the editor at the insertion point. This command is performed by pressing Ctrl+V.
This is only a small list of the available keyboard commands. To see a complete list, select Keyboard Map... from the Help menu. A list of the current keyboard command bindings is displayed, as shown in Figure 1.4.
Creating Your First C++ Program
New Term: A console-mode application is a character-based program that runs in a DOS window.
For your first Visual C++ program, you will build a console-mode program that displays a Hello World greeting. Console-mode programs are often simpler to build than Windows applications, and this example will take you through the steps of building and running a program built with Visual C++.
Starting Your First Program
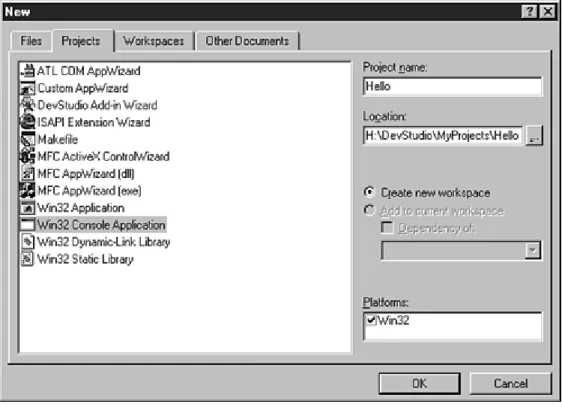
The first stage in writing your first Visual C++ program is to create a project. Follow these steps: 1. Choose File|New from the main menu. The New dialog box will be displayed.
2. Select the Projects tab, and then click the Win32 Console Application icon from the list box. 3. Specify Hello as the project name in the Project name box; a default location for your project will
automatically be entered in the Location box (see Figure 1.5).
Figure 1.5. The New Projects dialog box for the Hello project.
Editing Your First C++ Source File
The most important parts of any C++ program are the source files. Although the sample program provided in Listing 1.1 is very short, it contains many of the elements present in all C++ programs.
TYPE: Listing 1.1. A simple C++ console-mode program.
// Hello world example
#include <iostream>
using namespace std;
int main()
{
cout << "Hello World!" << endl;
return 0;
}
Open a new source file document and type the program exactly as shown in Listing 1.1. As discussed earlier, there are two ways to open a new source file for editing:
• Click the New Text File icon on the toolbar.
• Select File|New from the main menu, and select C++ Source File from the New dialog box under the Files tab.
If you open a new file for editing while a project is open, you have the option of automatically adding the file to the currently open project. To take advantage of this option, make sure the Add to Project: check box is checked, and provide a name for the file in the dialog box (in this case use
Hello.cpp
).CAUTION:
When using C++, remember that capitalization is important. For example,
MAIN and main are two different names to the compiler. White space, such as the
number of spaces before a word such as cout, is not significant to the compiler. White
space is often used to help make programs more readable.
Just a Minute:
If you used the toolbar's New Source File icon to create your new
source file, syntax highlighting will not be provided until the file is saved and the file is
given a name. This is because the Developer Studio editor uses the file extension to
determine the file type, and it does not know what type of file is being edited.
Saving a Source File
After you have entered the program in Listing 1.1, save the source file in your project's directory as
Hello.cpp
. To save the contents of the editor, click the Save icon on the toolbar. The Save icon looks like a small floppy disk. You can also press Ctrl+S or select Save from the File menu.When updating a previously saved source file, you don't see a dialog box, and no further action is needed on your part. The existing file is updated using the current contents of the editor. If you save a new file, you see the Save As dialog box, and you must choose a location and filename for the new source file. Save the contents of Listing 1.1 in the
C:\
directory using the nameCFoo.cpp
. After saving the file, closeCFoo.cpp
by selecting Close from the File menu.To save a file under a new name, select Save As from the File menu or press F12. Enter the new path and filename using the Save As dialog box as described previously.
If you have not yet added the source file to the project, follow these steps:
1. Select Project|Add To Project|Files... from the main menu. This will display the Insert Files into Project dialog box.
2. Select the
Hello.cpp
source file and then click OK.Just a Minute: Visual C++ requires that your C++ source files have a .CPP file
extension. This helps Developer Studio properly compile your source code, as well as
provide the proper syntax highlighting.
Other types of files also have standard extensions. For example, C source files must use
the .C extension. Other file extensions will be discussed as they are introduced.
Building the Hello Project
Compile the Hello project by selecting Build|Build Hello.exe from the main menu (or press F7). If you entered Listing 1.1 correctly, the project is built with no errors, and the last line in the status window reads as follows:
HELLO.exe - 0 error(s), 0 warning(s)
Time Saver:
You can also build the Hello project by clicking the Build button on the
toolbar. The toolbar was shown in Figure 1.3.
If errors or warnings are displayed in the Build status window, there is probably an error in the source file. Check your source file again for missing semicolons, quotes, or braces.
Running Your First C++ Program
To run the Hello program, open a DOS window and change the working directory to the project's directory. By default, this directory is
C:\Program File\DevStudio\MyProjects\Hello
On some machines, filenames may be truncated, so the path on your machine might be something like
C:\progra~1\devstudio\myprojects\hello
You'll see a subdirectory named
DEBUG
. The Visual C++ IDE puts all the executable and intermediate files into this directory by default. Change to theDEBUG
directory and execute theHello.exe
program by typing the following at the DOS prompt:HELLO
The program loads and then displays
Hello World!
. That's all there is to it.All of the console mode or DOS programs used as examples in this book should be compiled and executed just like
Hello.exe
. You'll always create a project, add files to it, and then build the project. After the application is built, you then go out to DOS and execute the program.Creating a Windows Program Using AppWizard
AppWizard is a tool that generates an MFC project based on options that you select. AppWizard creates all the source files required to make a skeleton project that serves as a starting point for your program. You can use AppWizard to create single-document, multiple-document, or dialog box-based applications.
AppWizard creates all the source files required to build a skeleton Windows application. It also configures a project for you and allows you to specify the project directory. Although an AppWizard project is a skeleton of a future project, it uses the MFC class library to include the following functions:
• Automatic support for the common Windows dialog boxes, including Print, File Open, and File Save As
• Dockable toolbars
• A status bar
After answering a few questions using AppWizard, you can compile and run the first version of your application in a few minutes.
Building Windows Applications with AppWizard
In general, the following steps are used to build a program using AppWizard: 1. Create a program skeleton using AppWizard.
2. Create any additional resources used by the program.
3. Add any additional classes and message-handling functions using ClassWizard.
4. Add the functionality required by your program. You actually have to write some code yourself for this part.
5. Compile and test your program, using the Visual C++ integrated debugger if needed.
To start AppWizard and create your first Windows program, follow these steps: 1. Select New from the File menu. The New dialog box is displayed. 2. 2. Select the Projects tab. A list of project types will be displayed.
3. 3. To create an MFC-based project, select MFC AppWizard(exe) as the project type.
4. 4. Specify HelloMFC as the project name in the Project name box; a default location for your project will automatically be entered in the Location box (see Figure 1.6).
6. The first MFC AppWizard screen asks for a project type, as shown in Figure 1.7. MFC AppWizard works similarly to the Developer Studio Setup Wizard, enabling you to move forward and backward using the Next and Back buttons. Select the radio button labeled Single Document and then click the Next button.
Figure 1.7. The first AppWizard screen for HelloMFC.
7. Move through all six MFC AppWizard screens. Each screen enables you to change a different option about the HelloMFC project. Although this example won't use any optional features, feel free to experiment with the options offered by MFC AppWizard.
8. 8. The last MFC AppWizard screen presents a list of classes that is generated for the project. Click the button labeled Finish. MFC AppWizard displays a summary of the project, listing the classes and features you selected, as shown in Figure 1.8.
Figure 1.8. The New Project Information dialog box for the Hello project.
9. Click the OK button to start generating files required for the HelloMFC project.
Exploring the HelloMFC AppWizard Project
After you create the HelloMFC project using MFC AppWizard, the Project Workspace window opens. The Project Workspace window contains four tabs, each used to show a different view of the current project:
• The ClassView tab displays information about the C++ classes used in the HelloMFC project.
• The ResourceView tab displays information about the resources, such as bitmaps and dialog boxes, used in the HelloMFC project.
• The FileView tab displays information about the files used for the HelloMFC project.
• The final view is the InfoView, which is used for online help information.
Handling Output Using MFC
The HelloMFC project already contains a function that handles output. It's called
OnDraw
, and it can be found in theCHelloMFCView
class. When your project is created by AppWizard, theOnDraw
function really doesn't do much useful work--it's up to you to supply a version of this function that does something meaningful.To edit the
CHelloMFCView
class, follow these steps:1. Click the ClassView tab in the Project Workspace window. A list of the classes used in the
a Microsoft naming convention--all of Microsoft's classes begin with C.
2. Expand the
CHelloMFCView
node of the tree control. A list of functions that are used in theCHelloMFCView
class will be displayed.3. Double-click the function named
OnDraw
. The editor will open to theOnDraw
member function. Edit theCHelloMFCView::OnDraw
function so that it looks like the function in Listing 1.2. You will need to remove a comment and two existing lines of code that were in the function already.TYPE: Listing 1.2. The OnDraw function used for HelloMFC.
void CHelloMFCView::OnDraw(CDC* pDC)
{
pDC->TextOut(50,50,"Hello MFC!", 10);
}
Compile the HelloMFC project by selecting Build|Build HelloMFC.exe from the main menu (or press F7). The build window displays the progress of the build, which should look something like the following:
Compiling resources...
Compiling...
StdAfx.cpp
Compiling...
HelloMFCDoc.cpp
HelloMFC.cpp
MainFrm.cpp
HelloMFCView.cpp
Generating Code...
Linking...
HelloMFC.exe - 0 error(s), 0 warning(s)
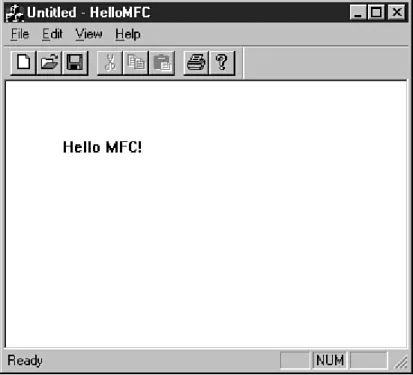
Congratulations; you have created a simple Windows program! To execute the HelloMFC project, select Execute from the Build menu or press F5 on the keyboard. The most common way to launch a project from Developer Studio is to use the debugger. To start the debugger, click the Go button on the toolbar or press F5 on the keyboard.
Figure 1.9 shows an example of the HelloMFC application running under Windows 95.
One unusual aspect of the HelloMFC application is that the message is in a fixed location. If the window is resized, the text doesn't move. This is because the call to
DrawText
needs a fixed location for the message string in the first two parameters:pDC->TextOut(50,50,"Hello MFC!", 10);
The third parameter is the actual message to be displayed, and the last parameter is the number of characters in the message.
In the next hour, you will learn how to display the message in the center of the main window.
Summary
In this chapter, you were introduced to Developer Studio and Visual C++, as well as the main tools and wizards included in Developer Studio and the MFC class library.
You also created two small programs using Visual C++: a console-mode application that displayed "Hello World!" and a Windows application that was built with AppWizard.
Q&A
Q. If I know C, how much effort is needed to learn C++?
A. C++ is very close to C in a number of ways. Almost every legal C program is also a legal C++ program. C++ introduces the idea of classes, which are discussed in Hour 3. A C++ compiler also has a different standard library than a C compiler. As you will see, Visual C++ makes it very easy to develop Windows programs using C++, even if you have no experience in C or C++.
Q. Can I replace the Developer Studio editor with my own favorite editor?
A. No, but you can use your favorite editor to edit files, then use Developer Studio to build those files into a final executable. You will lose many of the integrated benefits of the integrated editor if you do this, however. You can change the Developer Studio editor to emulate Brief and Epsilon editors if you prefer their keyboard mappings.
Workshop
The Workshop is designed to help you anticipate possible questions, review what you've learned, and begin thinking ahead to putting your knowledge into practice. The answers to the quiz are in Appendix B, "Quiz Answers."
Quiz
1. What is a library?
2. How do you build a project using Developer Studio? 3. What is a wizard?
4. What are the three most commonly used wizards?
5. How do you invoke context-sensitive help inside the editor? 6. What are the four tab views inside the Project Workspace window? 7. What MFC function is used to display output?
8. What keyboard function is used to start the build process in Developer Studio? 9. What keyboard editor command is used for Undo?
10. What is the difference between Undo and Redo?
Exercises
1. Change the Hello World console-mode program to display your name.
2. The first two parameters in the
TextOut
function call are the position coordinates for the text message. Experiment with the HelloMFC application, and change the position of the output message.- Hour 2 -
Writing Simple C++ Programs
In the previous hour, you compiled some simple programs. Now it's time to learn some
more details about how C++ programs work. Even simple C++ programs demonstrate basic
concepts that are shared by all applications.
In this hour, you will learn
• The common elements of a C++ program
• Standard input and output in a C++ program
• The C++ preprocessor
In this hour you will build a simple C++ program that accepts input from the user and echoes it back on the screen.
The Common Elements of a C++ Program
Computer programs are composed of instructions and data. Instructions tell the computer to do things, such as to add and subtract. Data is what the computer operates on, such as the numbers that are added and subtracted. In mature programs, the instructions don't change as the program executes (at least they're not supposed to). Data, on the other hand, can and usually does change or vary as the program executes. A variable is nothing more than the name used to point to a piece of this data.
Fundamental C++ Data Types
The C++ language offers several fundamental data types. As in most other programming languages, these built-in types are used to store and calculate data used in your program. In later chapters, you use these fundamental types as a starting point for your own more complex data types.
C++ has a strong type system, which is used to make sure that your data variables are used consistently and correctly. This makes it easy for the compiler to detect errors in your program when it is compiled rather than when it is executing. Before a variable is used in C++, it must first be declared and defined as follows:
This line declares and defines a variable named
myAge
as an integer. A declaration introduces the namemyAge
to the compiler and attaches a specific meaning to it. A definition like this also instructs the compiler to allocate memory and create the variable or other object.When the Visual C++ compiler reads the
myAge
definition, it will do the following:• Set aside enough memory storage for an integer and use the name
myAge
to refer to it• Reserve the name
myAge
so that it isn't used by another variable• Ensure that whenever
myAge
is used, it is used in a way that is consistent with the way an integer should be usedTime Saver:
It's possible to define several variables on a single line, although as a style
issue, many people prefer to declare one variable per line. If you want to make your
source file more compact, you can separate your variables by a comma, as follows:
int myAge, yourAge, maximumAge;
This line defines three integer variables. Declaring all three variables on one line of
code doesn't make your code execute any faster, but it can sometimes help make your
source code more readable.
Understanding Type Safety
New Term: Some languages enable you to use variables without declaring them. This often leads to problems that are difficult to trace or fix. When using C++, you must declare all variables before they are used. This enables the compiler to catch most of the common errors in your software program. This capability to catch errors when your program is compiled is sometimes referred to as type safety.
You can think of type safety as a warranty that the compiler helps to enforce in your C++ program. For example, if you try to use an
int
when another type is expected, the compiler either complains or converts the variable into the expected type. If no conversion is possible, the compiler generates an error and you have to correct the problem before the program can be compiled.For example, character values are normally between 0 and 127 and are stored in variables of type
char
. In Visual C++, achar
is a single byte variable and is quite capable of storing all character values. If the compiler detects that you are attempting to store a number larger than 127 in achar
, it will complain about it and issue a warning message. Listing 2.1 is an example of a program that tries to store a value that is too large in achar
.TYPE: Listing 2.1. An example of a problem that can be caught by the compiler.
#include <iostream>
using namespace std;
// This program will generate a compiler warning
int main()
{
char distance = 765;
cout << "The distance is " << distance << endl;
return 0;
}
To see an example of a type mismatch that is caught by the compiler, create a console mode project with Listing 2.1 as the only source file, following the steps used in Hour 1, "Introducing Visual C++ 5." The compiler flags line 6 with a warning; however, it still generates an executable program.
In order to get the program to compile with no warnings and run as expected, you must change line 5 so that the distance variable is defined as an integer:
int distance = 765;
The new version of the source code is shown in Listing 2.2.
TYPE: Listing 2.2. A corrected version of the previous example.
#include <iostream>
using namespace std;
// This program will compile properly.
int main()
{
int distance = 765;
cout << "The distance is " << distance << endl;
return 0;
}
New Term: Another common data type is the floating-point value, or a number with a decimal point. Floating-point values are stored in
float
ordouble
variables in C++ programs. These are the only two built-in (or fundamental) variable types that can store floatbuilt-ing-pobuilt-int values.Using Different Variable Types
So far, you've used
int
anddouble
variables, two of the fundamental types available in C++. They're called fundamental types because they are the basic data types that are a part of the language definition. There is also a set of derived types that will be covered in the next few hours. In addition, as you saw earlier with the string class, you can define your own types that work just like the built-in types. The names of the built-in types used in C++ include the following:•
bool
is a Boolean variable that can have the valuestrue
orfalse
.•
char
is a variable normally used for storing characters. In Visual C++, it can have any value from -128 to 127. Ifchar
is declared asunsigned
, its range is from 0 to 255, and no negative values are allowed.• A
short int
variable, sometimes just written asshort
, is similar to anint
, but it can contain a smaller range of values. Think of it as a lightweight version of anint
that can be used if data storage is a problem. Ashort
variable can store any scalar (whole) value between -32768 and 32767. If ashort
is declared as
unsigned
, its range is from 0 to 65535.•
int
is an integer value used to store whole numbers. When using Visual C++, anint
is a 32-bit value so it can store any value from -2,147,483,648 to 2,147,483,647. If anint
is declared asunsigned
, its range is from 0 to 4,294,967,295.• A
long int
, sometimes just written aslong
, is a scalar variable like anint
, only larger when using some compilers. In Visual C++, along int
can store the same values as anint
.• A
float
variable is the smallest variable type capable of storing floating-point values. It is often an approximation of the value that was originally stored. In Visual C++, afloat
stores up to six decimal digits.• A
double
variable stores floating-point values just like afloat
does. However, the compiler stores the value with more precision, meaning that a more accurate value can be stored. Adouble
can store up to 15 decimal digits.• A
long double
has the same characteristics as adouble
. However, from the compiler's point of view, they are different types. Thelong double
type is part of the C++ language, and on some machines and compilers, the difference betweendouble
andlong double
is thatlong double
has greater precision, allowing storage of more than 15 decimal digits.both negative and positive numbers. However, an
unsigned int
can store a much larger positive value than a plain oldint
.An
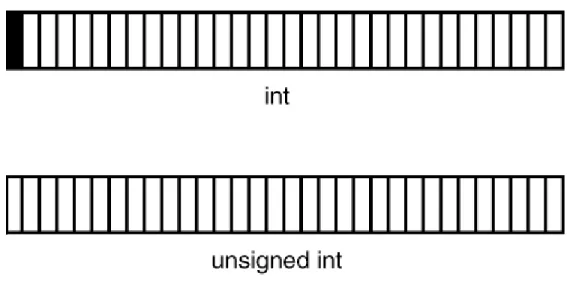
unsigned int
can store a larger positive value because the computer must use one bit of data in the memory location to handle the sign. This sign indicates whether the variable is positive or negative. Because using the sign bit reduces the number of bits that are available for storage, the maximum value for the variable is reduced by half. Figure 2.1 is an example of a variable that has been declared asint
and another variable that has been declared asunsigned int
.Figure 2.1. Most computers can use a sign bit to determine whether a variable is positive or negative.
The fundamental variable types require different amounts of storage. As a rule of thumb, the
char
data type is large enough to contain all the characters in the machine's native language, or eight bits. Theint
type is usually the "natural" variable size for the target machine, soint
variables are 32 bits in Visual C++. Table 2.1 lists the number of bytes required to store each of the fundamental types.Just a Minute:
Earlier versions of Visual C++ that were used with Windows 3.1 were
16-bit compilers. The natural variable size under Windows 3.1 was 16 bits, so the int
type was 16 bits. The last version of Visual C++ that used 16-bit integers was Visual
C++ 1.5.
Table 2.1. Storage required for fundamental C++ types.
Type Size (in bytes)
bool
1char
1short
2int
4long
4float
4double
8long double
8Variable Naming
One important part of programming is the selection of names for your variables and other parts of your programs. The program listings you've seen so far have been very simple. As you become a more experienced user of Visual C++, you will need to establish some sort of naming convention for your identifiers.
When naming your variables, use names that are as long as necessary to indicate how the variable is used. A variable name in C++ is an example of an identifier. Identifiers in C++ are used to name variables and functions, among other things. In Visual C++, your identifiers can be literally hundreds of characters long and can include any combination of letters, numbers, and underscores, as long as the first character is a letter or underscore. Listing 2.3 is an example of several different variable declarations.
TYPE: Listing 2.3. Some examples of good and bad variable names.
#include <iostream>
using namespace std;
int main()
{
// Good declarations
int
nEmployees;
// Number of employees
char
chMiddleInitial; // A middle initial
// Declarations that could be improved
int
i, n, k;
// What are these vars used for ?
float temp;
// May not be enough information
char
ch;
// Should have more information
return 0;
}
No matter which technique you use to name your variables, it's important to be consistent. For example, most of the sample programs and online help examples provided as part of Visual C++ use a naming convention known as Hungarian Notation.
When Hungarian is used properly, it's easy to tell the logical type of variable at a glance without searching for its declaration. For example, most scalar variables such as
int
,long
, orshort
are prefixed with ann
. Variables that are used to store characters are prefixed withch
, as inchEntry
andchInitial
. Most of the sample code available from Microsoft uses Hungarian Notation, which will be used for the remainder of the code listings in this book. A listing of common Hungarian prefixes is provided in Appendix D, "Hungarian Notation."DO/DON'T:
DO use meaningful names for your variables. DO be consistent in your naming conventions. DO use variable types that match your data.
DON'T depend on capitalization to differentiate between variables.
Assigning Values to Variables
In assigning values to variables, the assignment operator is just an equals sign used as follows:
nFoo = 42;
This line assigns the integer value
42
tonFoo
.If a floating-point decimal value is assigned, it's assumed by the compiler to be a
double
, as follows:dFoo = 42.4242;
You can assign to a variable of type
char
in two ways. If you are actually storing a character value, you can assign the letter using single quotes as shown here:chInitial = `Z';
The compiler converts the letter value into an ASCII value and stores it in the
char
variable. Small integer values can also be stored in achar
, and the assignment is done just like anint
variable.Time Saver:
The char variable type is sometimes used to store small integer values.
This is useful if you are storing a large number of values, because an int takes up four
times the storage of a char.
A Simple C++ Program
In Hour 1, you created a C++ project named Hello that displayed a simple "Hello World!" message. This hour you will make a simple modification to the Hello project--the Hello2 project will ask you for a name and then use the name in the greeting. Building this project will help demonstrate some common elements found in C++ programs.
Creating the Hello2 Project
The first step in writing any Visual C++ program is to create a project, as you did in the first hour. To review, these are the steps required to create a console-mode project:
1. Begin by selecting File | New from the Visual C++ main menu. This will display the New dialog box. 2. Select the Projects tab in the New dialog box. A list box containing different types of projects will be
displayed.
3. Select the icon labeled Win32 Console Application, as shown in Figure 2.2. You must also provide a name for the project--a default location will be provided for you automatically.
Figure 2.2. The New Projects dialog box.
After you have selected the project type and the subdirectory, click OK to create the project.
Creating the Source File for Your Program
The source file for the Hello2 project is shown in Listing 2.4. Unlike your first Hello program, this version collects input from the user and then outputs a greeting.
TYPE: Listing 2.4. A console mode program that accepts input.
#include <iostream>
#include <string>
using namespace std;
// Prompt the user to enter a name, collect the name,
// and display a message to the user that contains
// the name.
int main()
{
string userName;
cout << "What is your name? :";
cin >> userName;
cout << "Hello " << userName << "!" << endl;
return 0;
}
Open a new C++ source file and type the code shown in Listing 2.4. Remember that C++ is case-sensitive. Save the file as
Hello2.cpp
in the project's directory. To review, these are the steps required to open a new C++ source file and add it to the project:1. Select File | New from the main menu, and select the Files tab in the New dialog box. 2. Select the icon labeled C++ Source File.
3. Check the Add to Project check box, and enter
Hello2.cpp
as the filename. 4. Click OK to close the dialog box and open the file for editing.Compile the Hello2 project by selecting Build | Build Hello2.exe from the main menu (or press F7). If the source code was entered correctly, the project will be built with no errors, and the last line in the status window will read
Hello2.exe - 0 error(s), 0 warning(s)
If there are errors or warnings, check the source code for typographical errors and build again.
Running the Hello2 Program
Open a DOS window and change to the
DEBUG
subdirectory under the Hello2 project directory. Run the Hello2 program by typingHello2
at the DOS prompt. The program produces the following output:What is your name? :Alex
Hello Alex!
The Hello2 program accepts any name as input and uses that name for its Hello World message.
Analyzing the Hello2 Program
Let's take a look at the Hello2 program because it has a lot in common with much larger C++ programs. Even though it is fairly short, it has many of the elements that you will see in more complicated Windows programs later in this book.
Include Statements
The first line of
Hello2.cpp
is a message to the compiler to include another file when compilingHello2.cpp
:#include <iostream>
This
#include
statement tells the compiler to look for the file namediostream
and insert it into your source file. Actually, the#include
statement is read by the preprocessor, a part of the compiler that scans the source file before the file is compiled.New Term: Statements read by the preprocessor are known as preprocessor directives because they aren't actually used by the compiler. Preprocessor directives always begin with a
#
. You will learn more about preprocessor statements throughout the rest of the book.New Term: The file
iostream
is an example of a header file. A header file contains declarations or other code used to compile your program. In order to perform common input and output operations, you must#include
theiostream
file.Just a Minute:
Traditionally, C++ header files have an .h or .hpp file extension; the
standard C++ library includes files such as iostream that have no extension. For
backward compatibility, the Visual C++ compiler includes older versions of the include
files that have the .h extension.
• When including library files, the file to be included is surrounded by angled brackets, as shown in the
Hello2.cpp
file shown earlier. The preprocessor searches a predefined path for the file.• When including header files that are specific to a specific application, the filename is surrounded by quotes, such as
#include "stdafx.h"
. The preprocessor will search for the file in the current source file directory. If the file is not found, the search will continue along the predefined include path.The second line of
Hello2.cpp
is also an#include
directive:#include <string>
The string header file is part of the standard C++ library. Including the string header file enables a C++ source file to use the standard string class, which simplifies using text strings in a C++ application.
The std Namespace
New Term: A collection of names and other identifiers in C++ is known as a namespace. By default, any name that is introduced in a C++ program is in the global namespace. All names found in the standard C++ library are located in the
std
namespace.Namespaces make it easier to manage names in large C++ projects, especially when using libraries or code developed by different groups of people. Before namespaces were introduced to C++, it wasn't unusual to have two or more libraries that were incompatible with each other simply because they used conflicting names.
Namespaces allow libraries to place their names into a compartment that itself has a name. As shown in Figure 2.3, two namespaces can each use a common name, in this case
string
; because each namespace provides a compartment for the namestring
, the two names do not conflict with each other.Figure 2.3. Namespaces provide separate compartments for names used in a C++ program.
When using a name from a namespace, the namespace must be prefixed, like
std::string
orcodev::string
. Alternatively, ausing namespace
directive can be used to tell the compiler that an identifier can be found in the global namespace, as in the next line of the program, which tells the compiler that the names found in the program can be found in thestd
namespace:using namespace std;
Using Comments to Document Your Code
New Term: A comment is a note provided to the person reading the source code. It has no meaning to the compiler or computer.
The next line begins with
//
, which is used to mark the beginning of a single-line comment in a C++ program. By default, comments are colored green by the Developer Studio editor. In contrast,int
andreturn
are colored blue to indicate that they are C++ keywords.Time Saver:
It's a good idea to use comments to document your code. After time has
passed, you can use your comments to help explain how your code was intended to
work.
The main Function
The next line of
Hello2.cpp
is the beginning of themain
function.The first line inside the
main
function is a variable declaration.string userName;
Don't worry too much about what this means--for now, it's enough to know that
userName
is astring
variable. A
string
is not one of the fundamental data types; instead, it's part of the standard library. Thestring
type enables you to use strings of text as though they are built-in fundamental types.Following the declaration of
userName
is a statement that displays a message to the user as a prompt for the user's name:cout << "What is your name? :";
This particular statement in
Hello2.cpp
displays a line of characters to the console window by using theiostream
objectcout
. Theiostream
library is included with every C++ compiler, although it is not technically part of the C++ language definition; instead, it's part of the standard C++ library. Performing standard input and output for your console mode program is easy using theiostream
library.The
iostream
library uses the<<
symbol for output and the>>
for input to and from IO streams. Think of a stream as a sequence of bytes, like a disk file, or the output to a printer or a character-mode screen.Just a Minute:
One simple rule of thumb is that when you see the << symbol, the value
to the right of the symbol will be output to the IO object on the left. When you see the
>> symbol, data from the IO object on the left is stored in a variable to the right.
The next line of
Hello2.cpp
accepts input from the user and stores it inuserName
:cin >> userName;
The variable
userName
now contains whatever value was entered by the user.The next line displays the Hello greeting and adds the contents of the
userName
variable. When usingcout
, several different components can be output one after another by separating them with the<<
symbol:cout << "Hello " << userName << "!" << endl;
The last line of the
main
function is areturn
statement. When areturn
statement is executed, the function returns or stops executing, and the caller of the function is passed the value provided after thereturn
keyword. Because this return statement is inside
main
, the value0
is passed back to the operating system. Thereturn
keyword can appear almost anywhere in a function. However, as a matter of style, most people prefer to have a singlereturn
statement in a function if possible.Summary
In this hour, you have learned more details about C++ programs. You wrote a simple console-mode program and analyzed its parts. You also learned about the C++ preprocessor, type-safety, and variables.
Q&A
Q. When I compile the Hello2 project and enter my first and last name, only the first name is displayed. How can I display my first and last names?
A. When using
cin
to gather input as shown in the Hello2 project, white space such as the space between your first and last name will cause your names be parsed into two separate variables. You can usecin
with multiple variables much like you usecout
with multiple variables; just separate the variables with the>>
operator. A new version of Hello2 that displays first and last names looks like this:#include <iostream>
#include <string>
using namespace std;
int main()
{
string strFirstName;
string strLastName;
cout << "Please enter your first and last name:";
cin >> strFirstName >> strLastName;
cout << "Hello " << strFirstName << strLastName
<< endl;
return 0;
}
Q. When I declare a variable, sometimes I get strange error messages from the compiler in the Build window. This is the line that causes the error:
the identifier as a variable name, it can't figure out what to do with the identifier name. One coding style is to separate the words that make up a variable name with an underscore, like this:
int my_age;
Workshop
The Workshop is designed to help you anticipate possible questions, review what you've learned, and begin thinking ahead to putting your knowledge into practice. The answers to the quiz are in Appendix B, "Quiz Answers."
Quiz
1. What is the difference between the
cout
andcin
iostream
objects? 2. What are the two forms of the#include
preprocessor directive? 3. What type of variable is used to store character values?4. What is the purpose of a C++ namespace?
5. How can you declare more than one variable on a single line? 6. What is type-safety?
7. What types of variable are used to store floating-point values? 8. How do you assign a value to a variable?
9. What type of variable is normally used to store integer values? 10. Why would you declare a variable as unsigned?
Exercise
1. Modify the Hello2 program to ask for your age in addition to your name; display the name and age in the Hello message.
- Hour 3 -
Structures, Classes, and the MFC Class Library
In the first two hours, you have learned some of the basic concepts behind C++, and you
have written some simple programs. In this hour, you will be introduced to some more
advanced Visual C++ programming topics. In particular, you will learn
• How functions are used to provide small reusable chunks of code
• How structures and classes are used to create source code and data components
• How expressions and statements are used in C++ programs
• How to use the MFC class library to write Windows programs without using ClassWizard
You will also build sample programs that illustrate the topics you learn about in this hour.
Using Functions
New Term: A function is a group of computer instructions that performs a well-defined task inside a computer program.
Functions are one of the primary building blocks of C and C++ applications. Functions provide a way to break up a large program into more manageable parts. At the same time, functions make it possible to perform the same task at various points within the program without repeating the code.
For example, If you buy a wagon, you'll find that it comes with a full set of assembly instructions and has four identical wheels. Why should the instructions repeat the steps to assemble a wheel four times? It is much easier to describe the wheel assembly process once and indicate that you perform the process for each wheel. The wheel assembly instructions are a module (function), within the full set of assembly instructions
(program), that is executed four times.
Every C++ program has at least one function; this function is called
main
. Themain
function is called by the operating system when your application starts; whenmain
has finished executing, your program has finished.Declaring Function Prototypes
Before you can use a function, you must declare it by supplying a function prototype to the compiler. To declare a function, you specify the function's name, its return value, and a list of any parameters that are passed to it, as shown here:
int CalculateAge(int nYearBorn);
This line is a function prototype for the
CalculateAge
function, which takes a single integer as a parameter and returns an integer as its result. A function that returns no value is declared as returning thevoid
type.New Term: The traditional way to provide function prototypes is to place them in header files, which are usually named with an
.h
extension.Header files that are part of the C++ standard library do not use the
.h
extension; two examples of standard header files areiostream
andmath
. These header files contain all the prototypes and other declarations needed for IO streams and math functions to be compiled correctly.Defining Functions
A function is defined the same way the
main
function is defined. All function definitions follow the same pattern; it's basically the function prototype with the function's body added to it. The function definition always consists of the following:• The function's return value
• The function's name
• The function's parameter list
• The actual function body, enclosed in curly braces
Listing 3.1 shows how to use a function to display the Hello World! message. To run this project, create a new console-mode project named HelloFunc, using the steps described for the Hello and Hello2 projects in the first two hours.
TYPE: Listing 3.1. The Hello World! program rewritten to use a function.
#include <iostream>
using namespace std;
// Function prototype
int main()
{
DisplayAge(42);
return 0;
}
void DisplayAge(int nAge)
{
cout << "Hello World! I'm " << nAge << " years old."
<< endl;
}
Because the function doesn't return a value to the calling function, the return type is defined as
void
.Calling Functions
In the C++ language, the act of transferring control to a function is known as calling the function. When a function is called, you supply a function name and a list of parameters, if any. The following steps take place when a function is called:
1. The compiler makes a note of the location from which the function was called and makes a copy of the parameter list, if any.
2. Any storage required for the function to execute is temporarily created.
3. The called function starts executing, using copies of the data that was supplied in the parameter list. 4. After the function has finished executing, control is returned to the calling function, and memory
used by the function is released.
Figure 3.1. Steps involved in calling a function.
Just a Minute:
The requirement that you declare functions before using them is an
extension of the C++ type system. Because function prototypes are required, the
compiler can detect errors such as incorrect parameters used in a function call.
What Are Structures?
New Term: A structure is a data type that is an aggregate; that is, it contains other data types, which are grouped together into a single user-defined type.
Just a Minute:
Structures are commonly used when it makes sense to associate two or
more data variables.
An example of a structure is a payroll record, where the number of hours worked and the pay rate are combined in a structure, as shown in Figure 3.2.
Figure 3.2. Structures are made up of member variables.
Declaring a structure introduces a new type of variable into your program. Variables of this new type can be defined just like
int
,char,
orfloat
variables are defined. Listing 3.2 is an example of how a structure is typically used.TYPE: Listing 3.2. Using a structure to calculate a weekly salary.
#include <iostream.h>
struct
TIME_REC
{
double
dHours;
double
dRate;
};
int main()
{
TIME_REC
payrollRecord;
payrollRecord.dHours = 40.0;
payrollRecord.dRate = 3.75;
cout << "This week's payroll information:"
<< endl;
cout << "Hours worked : " << payrollRecord.dHours
<< endl;
cout << "Rate
:$" << payrollRecord.dRate
<< endl;
double dSalary =
payrollRecord.dRate * payrollRecord.dHours;
cout << "Salary
:$" << dSalary
<< endl;
return 0;
}
What Are Classes?
New Term: A class allows data and functions to be bundled together and used as if they are a single element. Classes typically model real-world concepts that have both data and some sort of behavior, although this is not a hard and fast rule.
Classes are similar to structures; in fact, classes really are just structures with a different name. Classes have one feature that makes them very useful for object-oriented programming: Unless a member of a class is specifically declared as
public
, that member is generally not accessible from outside the class. This means that you can hide the implementation of methods behind the external interface.Just a Minute:
Like functions, classes are an important part of the C++ programming
language. In fact, one of the earliest names for C++ was C with Classes.
New Term: An instance of a class, sometimes called an object, is an occurrence of a class. An instance of one of your classes can be used or manipulated inside your programs.
You normally use classes to model objects in your program. Member functions, described in the next section, are used to control the state of an object, as well as to access any data contained in it.
In programs written with MFC, classes are used to model different parts of the application, such as the window frame, menus, buttons, and other controls. Member functions are used to handle specific work that needs to be handled by the class.
Classes Versus Instances
Classes and instances of classes are not the same things--this can sometimes be a confusing concept if you are new to C++ or object-oriented programming. Think of a class as the description of an object; an instance of a class is a concrete occurrence of that class.
Constructors
New Term: A constructor, sometimes called a "ctor," is a special member function that is created when an object of the class is created.
A constructor always has the same name as the class and never has a return value, not even
void
. The purpose of the constructor is to place a newly created object into a known state. Typically, constructors can allocate system resources, clear or set variables, or perform some other type of initialization.Destructors
New Term: A destructor, sometimes called a "dtor," is a special member function that is called as an object is destroyed. The destructor is declared as having no return type and is never declared with a parameter list. The name of the destructor is the class name prefixed by a tilde (~) character.
It is not necessary to define a destructor unless there are specific tasks that must be performed to clean up after an object, such as releasing system resources that might have been allocated.
Using MFC for Windows Programming
In the first hour, you created an MFC program using AppWizard. When you use AppWizard to create a project, it might seem that you get a great deal of functionality for free. However, a great deal of code is generated--even a simple program like HelloMFC results in a large number of source files.
MFC doesn't need to be that complicated. In fact, you can write a very simple MFC program that fits in a single source file and is about one page long.
The HelloWin MFC Example
Listing 3.3 is an example of a simple MFC program that displays a Hello World message in the center of the client window, much like the HelloMFC program you created in the first hour.
TYPE: Listing 3.3. A simple Windows program written using C++ and MFC.
#include <afxwin.h>
// The CHelloApp class
class CHelloApp : public CWinApp
{
public:
BOOL InitInstance();
};
// The CHelloWnd class
class CHelloWnd : public CFrameWnd
{
public:
CHelloWnd();
protected:
afx_msg void OnPaint();
DECLARE_MESSAGE_MAP()
};
// InitInstance - Returns TRUE if initialization is
successful.
BOOL CHelloApp::InitInstance()
{
m_pMainWnd = new CHelloWnd;
if( m_pMainWnd != 0 )
{
m_pMainWnd->ShowWindow( m_nCmdShow );
m_pMainWnd->UpdateWindow();
return TRUE;
}
else
return FALSE;
}
// Create a message map that handles one message
-WM_PAINT
BEGIN_MESSAGE_MAP( CHelloWnd, CFrameWnd )
ON_WM_PAINT()
END_MESSAGE_MAP()
CHelloWnd::CHelloWnd()
{
Create( NULL, "Hello" );
}
// OnPaint - Handles the WM_PAINT message from Windows.
void CHelloWnd::OnPaint()
{
CPaintDC
dc(this);
dc.TextOut(50, 50, "Hello World!", 12);
}
// Create a single instance of the application.
CHelloApp
theApplication;
The simple Windows program provided in Listing 3.3 might seem large, but it's actually about half the size of a similar program written in C. Using the MFC class library enables you to use a large amount of source code that has already been written for you. There is a lot of strange-looking code in Listing 3.3, so don't try to understand it all right now.
Building the HelloWin Example
To build the program, create an MFC Windows project named HelloWin. Begin by selecting File | New from the Visual C++ main menu; select the Projects tab in the New dialog box. Next, select Win32 Application as the project type. You must also specify a name and location for your project, just as you did for the projects in the first two hours.
After the project has been created, open a new C++ source file document and enter the contents of Listing 3.3 exactly as they are shown. Save the file as
HelloWin.cpp
and add it to the project. (If necessary, refer to Hour 1, "Introducing Visual C++ 5," for specific instructions.)Set the linking options for the project by selecting Project | Settings from the main menu. On the tab marked General is an item labeled Microsoft Foundation Classes. It will have the value
Not Using MFC
. Change the selection toUse MFC in a Shared Dll
. You can do this by clicking on the down arrow beside the Not Using MFC selection. This opens a box where you can then make the appropriate selection.Compile the HelloWin project by selecting Build | Build HelloWin.exe from the main menu (or Press F7). To start the HelloWin program, select Build | Start Debug | Go from the main menu (or Press F5). Figure 3.3 shows an example of HelloWin running.
Figure 3.3. The HelloWin program displaying its message in a window.
The Common Elements of a Windows Program
Two elements are found in almost every Windows program; each of these elements can be found in the HelloWin program that you just compiled and ran:
• Windows are used for visible parts of an application
• Messages are used to control the interaction between an application and the Windows operating system
Windows Are Everywhere
One of the fundamental concepts in Windows programming is that everything you see is a window. Some examples of windows are
• Controls such as pushbuttons, list boxes, and text edit controls
• Dialog boxes and property pages
• Toolbars and menu bars
• The Windows 95 taskbar
• The DOS command box that is used for console-mode applications
All windows have a common set of operations that can be applied to them. They are all re-sized, moved, enabled, disabled, hidden, and displayed in the same way.
The Client and Non-Client Areas
• The non-client area, which contains the border, menus, and caption area for the window
• The client area, which is the area that is left over, also known as the "main" part of the window
Figure 3.4. Client and non-client areas of a window.
The non-client area of a window is normally maintained by Windows; your applications will normally be concerned only with the client area.
Messages and Functions
When Windows needs to communicate with an application, it sends it a message. A message is similar to a function call--in fact, the MFC library will route most messages as function calls into your application. For example, in an AppWizard application, the MFC library calls the
OnDraw
function whenever Windows sends aWM_PAINT
message.When your application communicates with a window, it will usually send it a message. To enable or disable a control, you must send the control a
WM_ENABLE
message. When using C, this process is very tedious and error prone. MFC simplifies things by providing functions that you can call and then handling the message sending for you.What Are Statements and Expressions?
Statements and expressions are the elements defined by the C++ language that are converted into machine code by the compiler to build your C++ programs. Seems like a textbook-type definition, doesn't it? In reality, though, it is very hard to define exactly what they are. When talking about a building, we can say that it is made of bricks, boards, and other things; we can define the brick or board very easily. In the case of the C++ programming language, it is much more difficult. Here we are dealing with abstract concepts. The difference between a statement and expression is very subtle, as you will soon see. Although it appears to be confusing at first, the language will become understandable with practice. Eventually the C++ language will become as natural to you as your native language.
Just like the simple Hello programs, all C++ programs are made up of statements and expressions.
Expressions and statements range from the simple statements that were shown in the Hello programs to very complex expressions that stretch across several lines.
Statements
All statements end with semicolons. In fact, the simplest statement is called the null statement, and it consists of only a single semicolon, as follows:
;
The null statement isn't used often; it's used only in situations in which the C++ syntax requires a statement, but no real work needs to be done.
You use a statement to tell the compiler to perform some type of specific action. For example, you know from the console mode programs you created that the following statement will cause the characters
Hello World!
to be displayed on your screen:
cout << "Hello World!" << endl;
Declarations
A declaration is another type of statement. As discussed earlier, declarations introduce a variable to the compiler. The following line is an example of a simple declaration:
int myAge;
Assignment
An assignment expression is used to assign a value to a variable, using the assignment operator,
=
, as follows:int
myAge;
myAge = 135;
Every expression has a value. The value of an assignment expression is the value of the assignment. This means that the following statement assigns the value
42
to the variablesyourAge
andmyAge
:myAge = yourAge = 42;
The program in Listing 3.4 demonstrates how to