APER: S
YMANTE
C SE
CURIT
Y RESPONSE
A Testing Methodology
for Antispyware Product’s
Removal Effectiveness
Josh Harriman
Symantec Security Response
Dublin, Ireland
This paper was originally presented at the 15th Annual EICAR Conference, 2006. For more information on EICAR, please visit http://www.eicar.org.
Contents
Abstract ... 4 Background ... 4 Current Methods ... 5 Testing Methodology ... 5 Tools ... 6 Test Environment ... 6 Step-by-Step Testing... 7 Areas of Interest ... 8 Load points ... 8 Files ... 10 Registry ... 11 Special cases... 12 Results ... 12Reporting the findings ... 13
Buckets ... 14
Conclusion ... 15
References ... 16
Abstract
Testing the removal effectiveness of an antispyware product relies on the tester having knowledge of the adware or spyware application, and having knowledge of the behavior it exhibits on the system under test. One must use various monitoring tools before, during, and after the test cycle, in order to really understand and measure how well the antispyware product removes adware or spyware from a compromised computer.
Some test results rely on interpreting the antispyware product’s logs to determine how many risks were found and removed during a system scan. These logs are important, but they cannot be solely re-lied on to determine the removal effectiveness. Using other tools to monitor and log system behavior before and after a remediation by the antispyware product will help accomplish this task.
The tester doesn’t need to be an expert in system analysis in order to conduct a thorough review, but they do need to take the necessary steps outlined in this paper to correctly report the removal ef-fectiveness of an antispyware product. This paper will discuss the techniques needed to conduct an accurate and comprehensive evaluation of the removal effectiveness of any antispyware product in the market.
Background
Adware and spyware risks are as prevalent as ever. They are mentioned regularly in the media and even making it to the legal stage with a bill known as the I-SPY Act1. More and more users, both
con-sumer and corporate, are finding these programs installed on their systems. In order to combat these risks, users need to have an antispyware product installed along with their antivirus solution. Some ntivirus vendors now combine both antivirus and antispyware products into one. Other vendors are purely antispyware. While solid reputable tests for antivirus products exist, such as the VB100 award, few are available for antispyware products. One positive testing method conducted for antispyware products can be found from Spyware Warrior. But since there are no standard testing methodologies for antispyware products, the consumer can receive mixed reviews. As Howes states, although a num-ber of tests of antispyware scanners have been reported on the Internet, many if not most of those tests are of limited value because the design, methodology, and execution of the tests is not fully and publicly documented, leaving even experienced users and experts to wonder just how meaningful those tests really are2.
Until a standardized testing methodology is created for antispyware products, reviewers will continue to conduct their own tests and produce results accordingly. One of the most popular reviews seen today is testing various antispyware products in a head to head battle to see which product comes out on top. These tests will be conducted on systems which have adware or spyware already installed on them. The antispyware products are then rated to see how well they removed the risks from the system. This is one of many areas that need to be looked at in detail in order to conduct a proper and thorough review of any antispyware product.
Current Methods
Most antispyware product testing falls into the following two methods: Flat file scanning.
1.
Follow-on scans by multiple products. 2.
Flat file scanning is a testing method derived from antivirus testing. This method is very easy to perform and provides quick results. A set of files deemed to be adware or spyware are placed on the test system and then scanned by the antispyware product. These files are not executed. But this type of testing also has its drawbacks. It does not test the true effectiveness of the antispyware product. Merely scanning a set of files will not test other important artifacts of adware and spyware. This is a nonholistic view of testing. You must look at the whole picture when dealing with adware or spyware. Registry keys, running processes, and other noncritical files will not be tested for removal with this method. Some products will have different detection techniques for adware and spyware. They might not detect a set of static files, but would actually detect and remove the risk if it were installed on the system.
Follow-on scanning is a testing method used to compare multiple antispyware products. A test system is first scanned with one antispyware product, then immediately following this scan, the test system is scanned by another antispyware product. This method also has various drawbacks. Many reviewers have used this type of testing to highlight how some products miss risks, which other products de-tect. This is misleading and not the correct method to evaluate the removal effectiveness. You cannot rely on any antispyware product to inform you of which files are clean, or which registry keys should or shouldn’t be removed. Just because one vendor’s product reports a risk and removes some set of files and registry keys, doesn’t mean that they were correct in doing so. You need to know which files, processes, and registry keys are part of the risk, and which ones are possibly clean. Don’t rely on the product to tell you.
Neither of these methods is effective. Other antispyware product testing can consist of installation, performance, usability, and prevention. This paper will not discuss these areas of evaluation. In order to know which product removed the risks properly and effectively, the tester needs to take a more de-tailed approach in understanding the adware and spyware applications.
Testing Methodology
In order to evaluate how well an antispyware product has removed an adware or spyware risk, you must be able to monitor exactly what was installed by the risk onto the test system. Some adware or spyware risks are fairly simple applications and it’s easy to monitor their installations and behavior. Others can be quite complex and very difficult. See Techniques of Adware and Spyware for more de-tails about adware and spyware techniques.
It is also important to understand that some files and registry entries will be made by the system it-self as a result of installing or executing some risks. Some of these files and registry entries need to be treated differently. Also, some files and registry entries will be shared components. These shared components might belong to legitimate programs and should not be removed. The changes made by the system and legitimate programs will be discussed further in the Areas of Interest section.
Tools
You will need to use various monitoring tools to capture changes made to the test system by the ad-ware or spyad-ware risk. Most of the tools mentioned below are freely available on the web.
Regshot:
• This is a freeware utility that monitors changes to the file system and registry. It will monitor files and registry entries that were added, deleted, or modified. It’s small and fast, but will not save file system changes if you need to reboot in between system snapshots.
WhatChangedForWindow
• s: A complete tool for file and registry monitoring, it has the ability to track changes during reboots and also be run as a Management Console to monitor multiple clients.
Filemo
• n: A file system monitor from Sysinternals that monitors activity in real-time.
Regmo
• n: A registry monitor from Sysinternals that monitors activity in real-time.
ProcessExplore
• r: A process monitor from Sysinternals that monitors running processes.
RootKitReveale
• r: A rootkit detection utility from Sysinternals that can be used to detect various forms of spyware that try to hide from the system and user.
Etherea
• l: A network protocol analyzer that can be used to determine exactly where various forms of adware and spyware are coming from on the Internet.
Test Environment
To ensure a repeatable testing environment, the test system should be imaged. Some imaging prod-ucts available are Norton Ghost and VMware. Be aware that some risks have the ability to determine if they are running in a VMware session. This could result in the risk not running at all, or give false results as to its behaviour. Using an imaged system is important for repeatable testing across multiple antispyware products. The operating system choice and setup of the test system should be similar to that of a typical user. A good base setup would be Windows XP Home Edition with Service Pack 2. This would suffice for most consumer users. If the testing is also to be conducted for the corporate edition of an antispyware product, then other types of operating systems might need to be considered. Install the monitoring tools listed above and create a clean test image.
Step-by-Step Testing
The following steps should be used when conducting the removal effectiveness of an antispyware product. As stated previously, this test method is only to evaluate the removal of the adware or spy-ware risk which was installed on the test system. Before starting these steps, decide which risks you want to install. The adware and spyware landscape is constantly changing. Some risks update them-selves on a weekly basis; others might stay static for months. Try to gather the most widespread risks for testing. This will ensure good coverage for the typical user. Choosing one risk or many risks is irrelevant, but what is important is that you record the location, name, MD5, and a copy of the actual file used during testing. This will be important in regards to the validity of the testing. The informa-tion gathered from the steps below will be used in the results phase of the testing methodology.
Begin with a clean imaged test system. This machine needs to be connected to the Internet. 1.
Using one of the system change monitoring tools, take a baseline snapshot. This snapshot 2.
should include the file system and the registry. Save this snapshot for comparison during test-ing.
Start the real-time system monitoring tools. These include Filemon, Regmon, ProcessExplorer 3.
and Ethereal. The logs from these tools can help match various files and registry entries to the actual risks installed.
Install the adware or spyware applications. Various web sites have information about these 4.
risks and some links to locations where they can be installed3. If you use Windows XP with
Ser-vice Pack 2, you will need to accept the ActiveX controls used for installation by certain risks. Some risks will install or bundle other risks. You will need to wait some small amount of time, possibly 15 minutes, to give the risks time to properly install.
Stop the real-time monitoring tools and save the logs. 5.
Reboot the test machine. Some risks need to have a system reboot for full installation. 6.
After reboot, wait again for a few minutes before taking the second snapshot with the system 7.
change monitoring tool. This snapshot will list the adware or spyware file and registry modi-fications. This information will be used to show what was added or changed by the adware or spyware risk.
Create and save an image of the test system. This imaged system will be used for testing 8.
against multiple antispyware products. Before testing against one antispyware product, restore the system to this image, and then install the antispyware product for testing.
Install one antispyware product for testing. Make sure to update the product and antispyware 9.
definitions to the most recent versions. Make note of the product and definition versions. These will be used during the results phase.
Start Internet Explorer (IE), as some adware or spyware applications are loaded into this pro-10.
cess. Run a full system scan with the antispyware product. If any alerts pop up from the prod-uct, for example denying access from suspect programs, then always choose YES to deny. This will help limit the installation of further risks.
If the antispyware product requires a reboot to complete the remediation, then reboot before 11.
taking the final system snapshot.
Take the final system snapshot. This snapshot will be compared with the one taken during Step 12.
7. The comparison will show what files and registry entries were either removed, added, or modified during remediation.
Take note of any problems or issues with the test system after the full remediation, such as sys-13.
tem crashes, blue screens, etc. Start IE and make sure the system still has Internet connectiv-ity. If the adware or spyware risk was installed as a layered service provider (LSP), an improper removal will cause loss of network connectivity. LSP installs will be discussed in the Areas of Interest section. Also watch for any error dialog boxes or messages, and any ads that are still being generated. Some antispyware products will report they have successfully removed a risk and its associated files and registry entries. But in fact the risk either reinstalled itself on the system or was never removed at all.
Areas of Interest
Files and registry entries will be discussed as areas of interest as they are needed to formulate the results. These will be gathered during Steps 4 - 7 above.
Load points
Windows load points are used by adware and spyware applications to ensure they run each time the com-puter starts. The antispyware product must handle these locations during remediation. These load point areas should be highlighted during the results phase, as they are important factors to determine the removal effectiveness. Another point to note with load points is that some antispyware products might success-fully remove the file, but miss the load point. This will most likely cause simple Windows error messages to pop up after every reboot. Below is a list of some common load points used by adware and spyware risks.
HKEY_LOCAL_MACHINE\SOFTWARE\Microsoft\Windows\CurrentVersion\Run
•
The most common load point in Windows is the Run key in the registry. Files located in this key will execute after system startup.
HKEY_LOCAL_MACHINE\SOFTWARE\Microsoft\Windows\CurrentVersion\Explorer\Browser Helper
•
Objects
Another common area targeted by adware or spyware applications is to load their programs •
into IE as toolbars or browser helper objects.
In its simplest form, a Browser Helper Object (BHO) is a COM in-process server registered un-•
der a certain registry key. Upon startup, IE looks up that key and loads all the objects whose CLSID is stored there4.
HKEY_LOCAL_MACHINE\SOFTWARE\Microsoft\Internet Explorer\Toolbar •
HKEY_LOCAL_MACHINE\SOFTWARE\Classes\CLSID\<CLSID number>\InprocServer32
•
A path to the file, which is loaded as a COM object, will be located in this key.
A sample log generated with the Regshot tool while monitoring the installation of a BHO and toolbar from Step 4 using a sample from IEPlugin is show in Figure 1 below.
Some other load point locations are listed below.
HKEY_LOCAL_MACHINE\Software\Microsoft\Windows NT\CurrentVersion\Winlogon •
The Shell value by default will have Explorer.exe as the process that loads during system •
startup. Some risks will add a path to their file in this location.
The Userinit value by default will have userinit.exe as the process that loads during system •
startup. Some risks will add a path to their file in this location.
HKEY_CURRENT_USER\Software\Microsoft\Windows\CurrentVersion\Run •
Another location in the registry that will load files after system startup. •
HKEY_LOCAL_MACHINE\Software\Microsoft\Windows\CurrentVersion\Runonce •
HKEY_CLASSES_ROOT\exefile\shell\open\command •
The (Default) value could be changed to load a suspect file every time an .exe file is executed •
on the system.
Files
Files usually fall into two broad categories of critical or noncritical. Within these two categories, there are both clean files and detectable files. Critical files are considered to be executable, for example .exe, .com, or .cab files, and dynamic link libraries, for example .dll files. The executable files will usually be running as processes or services. Their functions might be to download other files, load .dll files into various processes, or contact a particular Web site to check for updates. Noncritical files can consist of logs, configuration, and information, for example readme text files.
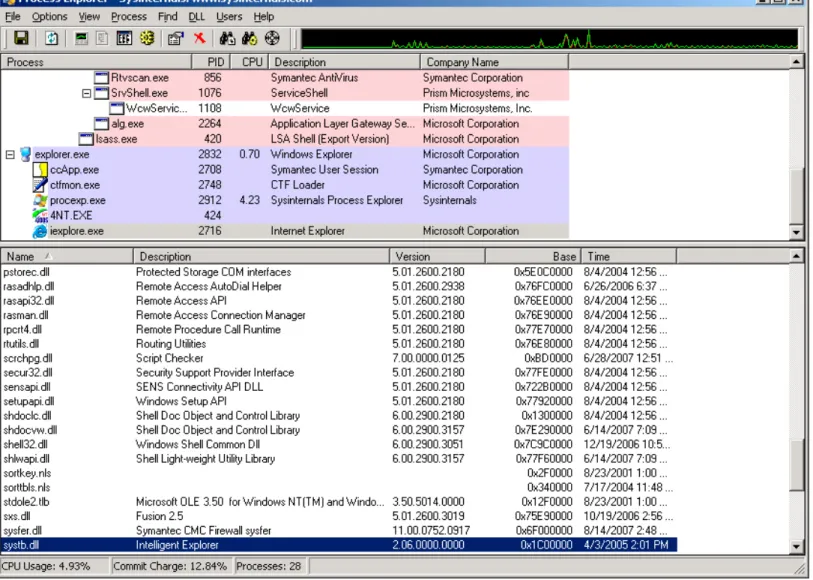
You can monitor files with the system change tool and Filemon. These logs will show what files have been added and by which process. ProcessExplorer will show not only the running processes, but also the modules running inside another process. Using the IEPlugin sample again we can see that within the IE process, the file systb.dll is loaded as a module and running under the context of IE (Figure 2). When surfing the Web, various files will be downloaded and will be located in the cache folder for the browser. For IE, the path to this folder is usually located in C:\Documents and Settings\[USER NAME]\Local Settings\Temporary Internet Files\Content.IE5. Under this folder are subfolders that are randomly named, for example 4TU30D6R. All the files from Web surfing with IE will be in these subfolders. This could include .cab, .exe and .dll files. Note that some antispyware products might have a separate function to completely clear the cache folder. Others might delete various noncritical files from these locations, such as .gif, .jpg, and .htm files, and others even clear the reference of the files from the index.dat file.
Clean files are those that belong to a legitimate application or the operating system. Some adware and spyware risks come bundled with legitimate programs. They could share a common component, which both applications might need in order to function properly. Most of these files will be located in the parent folder of the application that was installed but could exist in the %Windir% or %System% folders. For example, one clean file which should not be removed is %System%\unwise.exe. This file is used to uninstall applications that were created with the WISE installer. Deleting this file could cause legitimate applications problems when trying to uninstall them. Some adware or spyware risks might include an unwise.exe file, but place it in their own folder.
Prefetch files are files that Windows XP uses to speed application startup procedures. When adware or spyware applications are installed on a Windows XP system, a .pf file will be created in the %Windir%\ Prefetch folder. More information about prefetch files can be found in the article titled, “Windows XP: Kernel Improvements Create a More Robust, Powerful, and Scalable OS” in the Microsoft Developers Network magazine. You will notice that some antispyware products will detect and remove prefetch files. This is not really necessary, as the system will remove these files when they are no longer
need-ed. They also do not pose a security risk on your system as they cannot be executneed-ed. But if an antispy-ware product does delete them that is OK as well.
Registry
Many registry entries will be added or modified by the installation of an adware or spyware applica-tion. Even the most basic application might modify hundreds of registry keys and values. If the ad-ware or spyad-ware application is bundled with a legitimate program, for example peer-to-peer softad-ware or bundled with other adware or spyware applications, then the number modifications could be well over one thousand.
Some registry keys are created by the system as an indirect result from installing some adware or spy-ware risks. One of the most common registry keys to be added on a Windows XP system is a CLSID key Figure 2: IEPlugin .dll file loaded and running in the IE process.
located under HKEY_CURRENT_USER\Software\Microsoft\Windows\CurrentVersion\Ext\Stats\. This key is not well documented, but is holds information of ActiveX installs used by IE.
Some adware or spyware applications will load into the Windows layered service provider chain of Winsock. Winsock is needed for all network connectivity and if an entry from the LSP chain is re-moved improperly, then network loss is possible.
As mentioned in the load point section above, BHOs and toolbars create a key or value as a CLSID type number. This key is used to find the COM object’s information located in
HKEY_LOCAL_MACHINE\Soft-ware\Classes\CLSID. While it’s important for the BHO and toolbar entries to be removed, the
actu-ally CLSID key itself cannot load the COM object and therefore is not as critical. It should be removed though if it’s certain the key is part of the adware or spyware risk.
Some adware or spyware risks will alter various registry keys, which control your browser home or search pages. It would be impossible to know what the original settings of these keys were before in-fection, so there is no real proper reset value. But they should be cleared of any reference of the risk.
Special cases
Some adware or spyware risks will try and hide themselves from the user and from the system. Some versions of Elitebar do just that and are known as user-mode rootkits. Some antispyware products will handle these rootkits, while others will fail to even detect them, much less remove them. You can view some rootkits with the RootKitRevealer tool. If you encounter some of these risks during testing, make sure to include a note about a risk that is hidden. Also, be aware that some antispyware products will remove these risks, and even the system analysis tools will report the removal, but the files will be recreated after the full remediation. This information needs to be recorded during the reporting phase.
Results
Reporting the correct results gathered from the Step-by-Step Testing section above a very crucial ele-ment of the testing methodology. It’s important to note that not all antispyware products will remove the same set of risks. This could be a limitation of technology, or could also be a company policy with regards to a particular risk. This could prove difficult when reviewing multiple antispyware prod-ucts.
Another ineffective testing method is to use one antispyware product’s result to gauge another prod-uct’s effectiveness. This method should never be used. Even using the logs reported by one antispy-ware product is the wrong way to conduct the results phase. Just because a product states that it has successfully handled or removed the adware or spyware risk, you must use the system monitoring tools to verify this.
Some mistakes made in product reviews of this nature include the assumption that the antispyware product will properly remove an adware or spyware risk based upon the detection only. Full remedia-tion must be run on the antispyware product to verify the removal. Some antispyware products show all the associated files and registry entries for a particular risk during the detection and removal actions whereas other products might only show one file during detection, but actually remove the same set of files and registry entries during the removal action. So it is important to use the system monitoring tools to see exactly which files were removed and which registry entries were removed or modified.
Reporting the findings
All of the detail that goes into following the step-by-step testing and the areas of interest are not needed in the final report. The report needs to be concise yet complete. A good report should include the following:
Common name of adware or spyware samples used for testing. •
Most adware and spyware risks have common names that are shared among the antispyware •
industry.
Files and registry entries added or modified by the installation of the adware or spyware sam-•
ple.
These files can be grouped together as totals into meaningful buckets for critical and non-•
critical. The same could be applied to the registry keys and values following the load point section listed above.
Product information. •
The exact version of the antispyware product. •
The exact version of the data file definitions. If versioning information is not available, then •
the exact date and time the definitions were updated.
Files and registry entries deleted or modified by the antispyware product. •
These files can be grouped as totals into meaningful buckets for critical and noncritical. The •
same could be applied to the registry keys and values following the load point section listed above.
This could also be represented as a percentage. •
Any issues with the test system or applications after the full scan is completed. •
This would be detail from Step 13 in the
• Step-by-Step Testing section.
An appendix that list details of the adware or spyware samples. •
This would include the location of the sample, for example the Internet address, the MD5 •
value of the samples, the date and time each sample was harvested, and if the sample was gathered from a bundled legitimate program, such as a peer-to-peer program.
A rating scale could be used to show the removal effectiveness of the antispyware products.
1. Poor: Not enough critical files, processes, load points removed. Adware or spyware risks still exist on the system.
2. Good: All critical files, processes, load points removed. All adware or spyware risks were neu-tralized on the system. Some remnants are left behind. These remnants could be ext\stats keys, log files, or empty folders.
3. Best: All critical files, processes, load points and remnant side effects are removed. This would be a complete removal of all files and registry entries created by the adware or spyware risk. This would also include some system files and registry entries such as the ext\stats keys and prefetch files.
4. Aggressive: This rating could be given to an antispyware product that removed too much from a system or incorrectly removed some risks. This would include deleting %System%\unwise. exe, incorrectly removing LSP registry entries, and deleting shared component files or regis-try entries of a legitimate application if their removal caused system instability, or application crashes.
Buckets
Reporting that an antispyware product removed 80% of risks from the system, as a stand-alone com-ment, is not very meaningful. 80% might sound good, but if the other 20% was some load point in the registry or critical .dll files in the %System% folder, then the result is not that good. Af-ter gathering the information from Steps 4 - 7 in the Step-by-Step Testing section above, the file and registry entries should be separated into meaningful buckets. Files could be listed as follows:
Critical:
• All .exe, .dll, .cab, and .com files.
Non-critical:
• All .txt, .gif, .htm, .html, .dat, .lnk, .pf, image files (.jpg, .gif, and .bmp), and folders created by the risk.
Registry entries could be listed as follows:
Critical:
• All load points such as the Run key, BHOs, toolbars, Explorer shell value, and browser home and search pages.
Non-critical:
• All ext\stats keys, CLSID key in the root Classes hive, risk named key under the Software hive, for example HKEY_LOCAL_MACHINE\Software\AdwareName
Another bucket could be for processes and services. Even though the process or service will be run by an executable file, it is a critical part of the removal action of an antispyware product and should be noted separately.
Conclusion
Testing the removal effectiveness of an antispyware product properly is not an easy task. Various steps are required to ensure the tests are conducted thoroughly. First and foremost, the antispyware product’s logs should never be used to tabulate the results. Also, running one antispyware product immediately after another antispyware product to see what the first one missed is not a good indica-tion of the effectiveness of either product.
Gather all the information from the test system before, during, and after the installation of the ad-ware or spyad-ware risk. Use that information as a base to judge all of the antispyad-ware products individu-ally. Report the findings clearly and if any issues arise, such as why one product didn’t remove some adware or spyware, contact that company and see if there is policy for that particular risk. Don’t just assume it was missed.
Make sure to run a full system remediation from the antispyware product. Do not report the results on detection alone. Removal is the key to this testing methodology and should not be limited to de-tection numbers and how many risk were found on the system. Since some antispyware products will remove the same set of risks, but have different methods of detection, the detection numbers can be very misleading. This testing methodology should be used to determine the removal effectiveness and that can only be accomplished by following the steps outlined in this document.
References
1. U.S. House of Representatives (2005). Internet Spyware (I-SPY) Prevention Act Of 2005. Retrieved January 15, 2006 from http://thomas.loc.gov/cgi-bin/cpquery/ R?cp109:FLD010:@1(hr093)
2. Howes, E. (2004). The Spyware Warrior Guide to Antispyware Testing, Overview p. 1. Retrieved January 17, 2006 from http://spywarewarrior.com/asw-test-guide.htm
3. Spywareguide (2005). List of Adware and Spyware products found on the Internet. Retrieved January 15, 2006 from http://www.spywareguide.com/product_list_full.php
4. Esposito D. (1999). Browser Helper Objects: The Browser the Way You Want It. Retrieved January 17, 2006 from http://msdn.microsoft.com/library/default.asp?url=/library/en-us/dn-webgen/html/bho.asp
Appendix A
MD5 value of sample used for Figure 1 & Figure 2
products is the worldwide leader in consumer security and problem-solving solutions. Headquartered in Cupertino, California, Symantec has operations in 35 countries. More information is available at www.symantec.com.
Symantec has worldwide operations in 35 countries. For specific country offices and contact numbers, please visit our Web site. For product information in the U.S., call toll-free 1 800 745 6054.
Symantec Corporation World Headquarters
20330 Stevens Creek Boulevard Cupertino, CA 95014 USA 408 517 8000
800 721 3934 www.symantec.com
Symantec and the Symantec logo are U.S. registered trademarks of Symantec Corporation. Microsoft and Windows are either registered trademarks or trademarks of Microsoft Corporation in the United States and/or other countries. Other brand andproduct names are trademarks of their respec-tive holder(s). Any technical information that is made available by Symantec Corporation is the copyrighted work of Symantec Corporation and is owned by Symantec Corporation. NO WARRANTY. The technical information is being delivered to you as-is and Symantec Corporation makes no warranty as to its accuracy or use. Any use of the technical documentation or the informa-tion contained herein is at the risk of the user. Copyright © 2007 Symantec Corporation. All rights reserved. 04/05 10406630