Agile Development for Serverless Platforms
Selected by Danilo Poccia
Manning Author Picks
Copyright 2017 Manning Publications
www.manning.com. The publisher offers discounts on these books when ordered in quantity.
For more information, please contact
Special Sales Department Manning Publications Co. 20 Baldwin Road
PO Box 761
Shelter Island, NY 11964 Email: [email protected]
©2017 by Manning Publications Co. All rights reserved.
No part of this publication may be reproduced, stored in a retrieval system, or transmitted, in any form or by means electronic, mechanical, photocopying, or otherwise, without prior written permission of the publisher.
Many of the designations used by manufacturers and sellers to distinguish their products are claimed as trademarks. Where those designations appear in the book, and Manning
Publications was aware of a trademark claim, the designations have been printed in initial caps or all caps.
Recognizing the importance of preserving what has been written, it is Manning’s policy to have the books we publish printed on acid-free paper, and we exert our best efforts to that end. Recognizing also our responsibility to conserve the resources of our planet, Manning books are printed on paper that is at least 15 percent recycled and processed without the use of elemental chlorine.
Manning Publications Co. 20 Baldwin Road Technical PO Box 761
Shelter Island, NY 11964
Cover designer: Leslie Haimes
ISBN 9781617294983
iii
contents
Introduction ivARE YOU READY FOR AGILE? 1
Are you ready for agile?
Chapter 3 from Becoming Agile by Greg Smith and Ahmed Sidky 2
WORKING WITH WEB APIS 19
Working with web APIs
Chapter 2 from Irresistible APIs by Kirsten Hunter 20
ARCHITECTURES AND PATTERNS 43
Architectures and patterns
Chapter 2 from Serverless Architectures on AWS by Peter Sbarski 44
DESIGNING AN AUTHENTICATION SERVICE 67
Designing an authentication service
Chapter 8 from AWS Lambda in Action by Danilo Poccia. 68
AUTOMATING DEPLOYMENT: CLOUDFORMATION,
ELASTIC BEANSTALK, AND OPSWORKS 82
Automating deployment: CloudFormation, Elastic Beanstalk,
and OpsWorks
Chapter 5 from Amazon Web Services in Action by Michael Wittig
and Andreas Wittig 83
iv
introduction
Releasing great software requires more than great dev tools; it also demands an effi-cient operations pipeline that takes advantage of modern Agile practices. Serverless platforms like AWS Lambda implement the basic building blocks you need to run code, store data, or process streaming information so developers can focus on the fea-tures they want to provide, not on the underlying infrastructure. Combined with an agile process, serverless architectures facilitate a quick feedback loop between devel-opers, end users, and business stakeholders, allowing the rapid prototyping and easy production rollout required for innovation.Because serverless architectures start with hosted, self-managed services instead of custom-built servers, they provide a lot of ops advantages when it comes to reliability, scalability, and availability. Web APIs are also key to the serverless mindset, because they enable simple, consistent integrations within and between applications.
This collection of chapters from several Manning books will introduce you to serverless application design using AWS Lambda. You’ll also learn about how adopting an agile mindset will give you a leg up when you build and deploy serverless systems.
We hope you’ll enjoy it!
Danilo Poccia
T
his selection introduces the core ideas of the Agile mindset and helps you assess whether you and your team are ready to go Agile. You’ll enjoy Greg and Ahmed’s practicality-over-purity approach, which encourages you to adopt the parts of the Agile process that you’re ready for and grow into the rest over time.2
and Ahmed Sidky
Are you ready for agile?
Yes, you’re ready for agile. The real questions are as follows:
How much agility are you ready for today?
How much agility can you add tomorrow?
How can you continuously adapt to your ever-changing business climate?
We’re confident you can improve your current development process and obtain a level of agility. If your environment is conducive to it, you may be able to reach the level of agility that Archway Software reached in our discussion in chapter 2.
3
What areas will you become more agile in?
providing a tool that will let you assess your potential for bringing in agile practices and cultural changes.
3.1
What areas will you become more agile in?
When people think of becoming agile, they often envision the practices and not the goals of an agile process. We often hear people say that they can’t become agile because their developers don’t want to do pair programming, or they have limitations with co-locating their project team members. Although these types of practices may help you become agile, they aren’t the only practices that support the goals of an agile process. Let’s take a moment to look at some of the key agile goals you’ll be able to accomplish on some level.
3.1.1 Increasing customer involvement
A traditional process has the customer involved mainly at the beginning and the end of the project. In agile, you seek customer feedback and input throughout the project. The customer or product owner is involved in planning, tradeoff decisions, prioritiza-tion, and demonstrations. Increased customer involvement leads to several benefits such as quicker feedback, accurate delivery, increased customer satisfaction, and rapid decisions. A great indirect benefit of customer involvement is the customer’s new-found appreciation for the work needed to deliver on requests.
3.1.2 Improving prioritization of features
Agile processes improve prioritization and deliver higher-value features first. This is accomplished by creating feature cards or user stories and evaluating features before requirements are detailed. You’ll evaluate features for their customer value, level of risk, frequency of use, and dependencies. This allows you to do the following:
Estimate work and evaluate risks early in the process.
Prioritize features in terms of customer value early in the process.
Deliver features in usable subsets.
In effect, the agile prioritization process lets your team run leaner and create deep requirements only for work that passes the prioritization test.
3.1.3 Increasing team buy-in and involvement
The majority of people on an agile project team are involved in planning, estimating, and sequencing. The team is also involved in adapting to discoveries between itera-tions. Over time, the team begins suggesting features for the product or platform. Increasing team involvement ensures that everyone understands the value of the proj-ect before work begins and also increases team satisfaction.
3.1.4 Clarifying priorities and reminding everyone
of the consequences of changing thembudget? Additional categories may include quality, feature richness, and compli-ance. The project team learns the priorities and uses this knowledge to make trad-eoff decisions along the way.
Many projects wait for a fire before identifying their priorities. An agile team knows the project priorities in advance of an emergency and can react quickly to keep the focus on the main objective.
3.1.5 Adapting to change during development
A more agile and iterative methodology provides an opportunity to reassess and redi-rect the project while it’s in motion. You perform development in iterations and offer demonstrations at the end of each. The customer has an opportunity to request changes based on the demonstrations, even though this may affect other fea-tures or potentially the project timeline. Team members learn to expect and embrace change.
3.1.6 Better understanding the project’s status
Agile development is time-boxed. You evaluate status by demonstrating functioning code. Supporting tasks are also measured in binary terms (done or not done) to eliminate possible confusion related to expressing status as “percent complete.” An agile process also involves team members reporting their status themselves versus through a manager or other intermediary. This improves tracking accuracy and per-sonal accountability.
3.1.7 More efficient planning and estimating
Many companies try to plan all of a project’s details at the start. The planning may be at a detailed level even though the amount of uncertainty at this point is extremely high. An agile team performs a level of planning that correlates to the current level of uncertainty in the project.
As you learn more about desired features you’ll do more detailed planning, but you won’t waste time trying to guess intricate details early in the project. Figure 3.1 illustrates this point.
5
What areas will you become more agile in?
3.1.8 Continuous risk management
A secondary definition of agile could be continuous risk management. The processes are all intended to make the team alert and responsive to new information and changes as the project progresses. The following are a few examples of how agile manages risk:
Features are evaluated for requirements uncertainty and technical uncertainty. These attributes help determine whether a feature goes into an iteration and what iteration it should go into, to mitigate risk. For example, a feature with high business value and high technical risk, such as an interface, would go into an early iteration to allow more time for uncertainty. On the other hand, a fea-ture with low business value and high technical uncertainty might be moved to the last iteration or removed from the project all together.
Risk is managed via demonstrations throughout the project. The customer gets a feel for how requirements are translated into an application before the project is complete. This provides a window for adapting and hitting the final target.
Risk is managed on a daily basis by building and integrating the latest code. This process allows the team and the customer to validate the status of the latest build.
Deployment risk is also managed by gathering maintenance and deployment concerns as early as possible. This starts early in the planning phase and contin-ues throughout development.
Risk is managed via team review of potential features. During the feature-card exercise, representatives from all areas can raise risks and concerns with pro-posed features. These concerns are noted with the feature information and sometimes can lead to a feature not being pursued.
3.1.9 Delivering the project needed at the end
Jim Highsmith, one of the founding members of the Agile Alliance, taught Adaptive Software Development a few years before the Agile Manifesto was created. One of Jim’s adaptive principles is, “Deliver the project needed at the end, not the one requested at the beginning.”
This idea is a foundational piece of agile software development. Jim knew the world wasn’t static during the project lifecycle; therefore the lifecycle should support changes that happen during the project. This includes identifying new requirements, discovering technical risks, and identifying potential changes in the business environment.
3.1.10 Achieving the right level of project structure
project teams and project managers. If you don’t know what to do next, you just look at the lifecycle documentation to determine your next step.
This approach is beneficial when you have inexperienced employees. A standardized process defines roles, provides common tools, and offers gateways to evaluate status.
If your employees are more experienced, this formal methodology has drawbacks. The team will notice that every step or process isn’t needed for their specific project. They will frequently find themselves doing compliance work that adds no value, except to be in compliance.
The agile process described in this book approaches the issue differently. We suggest a standardized methodology, but the required processes are minimal and are of value to every project. Your team chooses the majority of the processes to use at the start of the project. The team also revisits their process and documentation options as the project proceeds, to see if they need to add or remove a process or document.
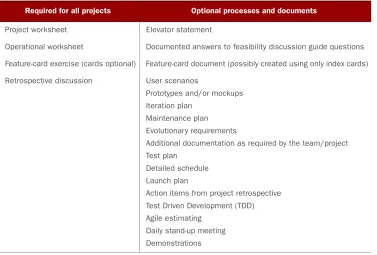
To illustrate this idea, let’s look at an example from Acme Media after the company has outlined a new, more agile process (see table 3.1).
Acme Media has projects that last from 1 week to 6 months. The company doesn’t require the teams for one-week projects to create iteration plans or to do a cost-bene-fit analysis every time.
Table 3.1 Required and optional processes and documentation
Required for all projects Optional processes and documents
Project worksheet Elevator statement
Operational worksheet Documented answers to feasibility discussion guide questions
Feature-card exercise (cards optional) Feature-card document (possibly created using only index cards)
Retrospective discussion User scenarios
Prototypes and/or mockups
Iteration plan
Maintenance plan
Evolutionary requirements
Additional documentation as required by the team/project
Test plan
Detailed schedule
Launch plan
Action items from project retrospective
Test Driven Development (TDD)
Agile estimating
Daily stand-up meeting
7
The different flavors of agile
These one-week projects are frequently driven by a need to increase readership or to provide support in the aftermath of a major news event such as an election. Executive approval is almost immediate, and the projects use team members already assigned to the website. These teams only need the processes and documents outlined in the first column of table 3.1.
Conversely, Acme Media pursues some major projects that require funding, syn-chronization with third parties, and identification of milestones. In these instances, the project teams review the items in the second column of table 3.1 and decide which ones to use in addition to the required ones in the first column.
In this way, agile provides the correct amount of structure for the project. Time isn’t wasted on processes that don’t add value, and teams can scale their processes mid-project if needed.
Now that you understand the goals of an agile process, you need to know the best way to obtain them. You can do this by selecting a prepackaged agile process, creating a process from scratch, or a combination of the two. Let’s evaluate each option.
3.2
The different flavors of agile
Many packaged methods are available for agile. For our purposes, packaged will mean a framework with a common set of practices. In this section, we’ll discuss two of the most popular packages in use today: Scrum and XP. According to VersionOne’s 2008 “State of Agile Development” survey, 77 percent of the respondents said they use Scrum, XP, or a Scrum/XP hybrid. Each of these packages has its own unique charac-teristics, strengths, and weaknesses. Let’s examine each package.
3.2.1 Scrum
The Scrum process begins by reviewing a product backlog with the product owner. You identify the highest-priority features and then estimate how many will fit into a sprint. These features then compose the sprint backlog. A sprint is a predefined period of time, usually 2 to 4 weeks, during which the team analyzes, designs, constructs, tests, and doc-uments the selected features. Figure 3.2 shows an overview of the process.
The team holds a daily status meeting, referred to as the daily Scrum, to review feature status. Individual team members answer these three questions:
What have you accomplished since our last meeting?
What will you work on today?
Are you encountering any impediments or roadblocks in completing your work?
When a sprint is completed, the features are demonstrated to the customer, and the team and the customer decide whether additional work is needed or if the sprint work is approved to be released to a beta or production environment. Each sprint is fol-lowed by a retrospective during which the team lists items that went well or poorly; action plans are documented to keep the successes going and to improve the areas that performed poorly.
Some of the characteristics of Scrum are as follows:
Discipline —Scrum is strict about time-boxing activities, compiling code daily, and team members being punctual and responsible.
Three major roles —Scrum teams have a ScrumMaster, a product owner, and team members.
Quality —Features are expected to be totally complete and deployable at the end of a sprint.
Scrum has a number of strengths:
Prioritized delivery —Features are delivered in a sequence that ties to business value.
Non-prescriptive on practices performed during a sprint —This is demonstrated by the fact that a Scrum/XP hybrid is the second most popular agile methodol-ogy in use. Many teams pull their detailed practices from XP while using the Scrum framework.
Demonstrated success across the software industry —Scrum has been successful in multiple environments.
Status transparency —The daily meetings expose the project status.
Team accountability —Everyone signs off on the work that will be pursued during the sprint.
Continuous delivery —Scrum delivers product features (commercial software or web portals) continuously.
Scrum also has some weaknesses:
Scrum doesn’t want specialists. It may be difficult to quickly convert an existing team from a group of specialists to a group where anyone can perform any task.
A Scrum team can’t be successful without a strong ScrumMaster, which makes the process highly dependent on one individual.
9
The different flavors of agile
Scrum is incredibly popular today—it’s almost become synonymous with the term agile development. Scrum provides a great, repeatable process that is well suited for product development and steady-state release management. In addition, a plethora of books, consultants, and other resources are available for those who pursue Scrum.
Scrum may be more difficult to use with teams that do one-off projects versus steady-state releases, or if a team has highly specialized resources and skill sets. In addition, the Scrum framework still needs agile practices inserted to support a com-plete development lifecycle.
3.2.2 Extreme Programming
Similar to Scrum, XP starts the process by creating a backlog of work to perform dur-ing a sprint/iteration. XP creates the backlog by working with customers and creating user stories. In parallel with this work, the team performs an architectural spike, dur-ing which they experiment with the features to envision the initial architecture. XP classifies this work as the exploration phase.
The planning phase follows exploration. This phase focuses on identifying the most critical user stories and estimating when they can be implemented. Tasks are defined for each feature, to aid with estimating complexity. The team outlines an overall release schedule, with an understanding that a high level of uncertainty exists until the work begins. A release will have one to many iterations, which are typically 2- to 4-week construction windows.
When an iteration begins, the specific plan for the iteration is revisited. The team adds any new user stories and tasks that have been discovered since the overall release was outlined.
XP integrates customer testing into the development iteration. The customer is asked to identify the acceptance tests, and the team works to automate these tests so they can be run throughout the iteration.
The planning phase is followed by the productionizing phase, during which the code is certified for release. Certified means the code passes all customer tests plus nonfunc-tional requirements such as load testing, service-level requirements, and response-time requirements. You can see an overview of XP in figure 3.3.
Some of the characteristics of XP are as follows:
Specific practice —Unlike Scrum, XP is specific about the practices that should be used during a software project. These practices include pair programming, TDD, continuous integration, refactoring, and collective code ownership.
Modeling —XP teams frequently use modeling to better understand the tasks and architecture needed to support a user story.
Simplicity —Teams perform the minimum work needed to meet requirements.
Automation —Unit and functional tests are automated.
Quality through testing —Features are tested constantly, and developers check each other’s code via pair programming.
These are some of XP’s strengths :
Customer-focused (it’s all about user stories)
Quality via frequent testing
Constant focus on identifying and delivering the critical user stories
High visibility on project status
Great support for volatile requirements
It also has weaknesses:
Need for team maturity —Practices such as pair programming and TDD require responsible developers, and they aren’t always easy to obtain.
Dependency on testing —If developers know that significant testing will take place downstream, they may be less than diligent when they’re creating designs.
Scalability —XP may not work well for large projects.
Dependency on team member co-location —The team usually has a team room.
XP supports many of the critical goals of an agile process, such as dealing with volatile requirements and delivering prioritized, working software as soon as possible. XP also supports the principle of just enough, keeping with the lean philosophy of minimiz- ing waste.
XP has sometimes been criticized for its lack of formality in system documentation and system design. In recent years this has changed, and XP teams now create the doc-umentation needed to support a project’s customers.
3.3
Create your own flavor to become agile
within your constraints
As we discussed in chapter 1, VersionOne’s 2007 “State of Agile Development” survey validated the benefits of using agile. If the survey is accurate, then should every com-pany migrate to agile methods tomorrow?
11
Create your own flavor to become agile within your constraints
How difficult was it to convert to an agile development process?
How was your conversion initiated? Did the idea originate with executive man-agement or from within the development team?
Have your employees bought into the process, or was it forced on them?
What are you doing to ensure that your development process is viable for the future?
What did you do to make agile work within the realities of your environment?
We believe 100 percent of the survey respondents would say that moving to agile was a lot of work. We think they would tell you that to be successful, you need your project team to buy into the process; and that management requires time to learn how to pro-vide value in an agile environment.
This discussion reminds us of a popular commercial from our childhood. When we were kids, we ate Jiffy Pop popcorn. Jiffy Pop ran a commercial for many years that stated, “Jiffy Pop: it’s as much fun to make as it is to eat!”
After you establish an agile culture and life-cycle, it’s “fun to eat” (as illustrated in fig- ure 3.4), and you’ll do a better job of delivering projects. But creating an agile environment is work. Many companies implement an agile methodology and then fade back into their pre-vious process because they didn’t cover all the delicate areas needed to ensure long-term sup-port for agile.
We’ve spent a lot of time with companies that have made it to the other side and stayed there. As this book continues, we’ll show you how com-panies got to be agile with the least amount of pain and sustainable benefits.
Now let’s take a moment to look at the impor-tance of creating an agile process that supports the unique characteristics of your environment.
3.3.1 Your goal: reach the right level of agility for your organization
Many companies try to “shotgun” agile into their organization. They think, “Let’s get through the migration pain quickly and start obtaining the benefits as soon as possi-ble.” We’ve seen a few cases where this approach makes sense: for example, a project team that has become so dysfunctional that they’re delivering practically no function-ality or business value. This approach also works well for a start-up company that hasn’t yet established its development process. But for most companies, you should allow time for the process to “bake.”
This is why we suggest an iterative approach for bringing agile into an organiza-tion. An iterative approach allows you to see how well your employees are adapting to
the change. It also lets you learn what works and what doesn’t in your environment. In effect, it allows you to reach the right level of agility for your organization.
Part of your iterative approach will include a process for maintaining the method-ology. We suggest establishing a core team to support this maintenance. A core team is composed of employees from all aspects of the development process. They play a huge part in establishing your custom methodology and then settle into a mainte-nance mode with the goal of constantly adapting to your environment. The core team is covered in detail in chapter 6.
Next, you need to choose the best way to iteratively create a methodology at your company. Should you select a packaged method, such as Scrum or XP? Or should you create a custom or hybrid process?
CUSTOM PROCESS OR PACKAGED METHOD?
In order to be successful, you should customize your agile process. For many years, consultants and others have said that you must embrace agile completely or not at all.
In 2006, we witnessed a shift in this attitude. Highly respected folks such as Kent Beck (the founder of XP) and Steve McConnell (the writer of Code Complete) now endorse customization. Kent Beck noted the following in an interview with InfoQ (InfoQ.com is an independent online community focused on change and innovation in enterprise software development) in 2006:
Failure at an organizational level seems to come from the inability to customize processes and make them their own. Trying to apply someone else’s template to your organization directly doesn’t work well. It leaves out too many important details of the previous successes and ignores your company’s specific situation. Rubber-stamping agile processes isn’t agile. The value of having a principle-based process is that you can apply the principles for an individualized process for your situation and, as an extra bonus, one that has been designed to adapt from your learning as you adopt changes into your organization. It’s always “custom.”
Kent’s quote is comforting to us because it supports our personal experiences. Custom means picking and choosing the agile practices that best support your environment. Custom means you shouldn’t use a pure packaged methodology off the shelf, such as Scrum or XP. You can start with one of these methods as a basis for your process, but you should modify it to obtain the best results for your company.
If we revisit VersionOne’s 2008 survey, we see that 14 percent of the people who responded are using a hybrid process based on Scrum and XP. The hybrid model is closer to what we’ll suggest for you. To be specific, here are the steps we’ll walk you through as the book continues:
1 Assess your organization to determine where you should begin adding agility. 2 Obtain executive support for the move to a more agile process. You can use the
readiness assessment in chapter 4 to quantify the value of bringing in agile and identify the risks you must manage during migration.
3 Get the development team involved in the migration process to ensure buy-in.
13
Create your own flavor to become agile within your constraints
4 Identify a coach or consultant to help you with your migration. They will train
the core team on agile and help you with other adoption aspects.
5 Develop a clear understanding of your current processes by documenting
them.
6 Review your current process, and look for areas that can be shifted to more
agile methods. Focus on areas with the most potential for improvement and the most value to the customer and your organization. The readiness assessment will also help with this task.
7 Outline a custom process based on the findings in step 6. 8 Try the new process on a pilot project.
9 Review the findings after the pilot, make changes, and continue to scale out
your new methodology.
As this book continues, our case study, Acme Media, will represent your company. We’ll take Acme through these nine steps and show you how the company iteratively creates and tests a custom process. We’ll also show you how Acme Media takes its own constraints into account with the new methodology.
Before we jump into the case study, let’s spend a moment looking at the character-istics that make it easier to adopt agile and the charactercharacter-istics that make agile adop-tion more challenging.
3.3.2 Characteristics that make agile easier to adopt
As we stated earlier in this chapter, agile principles can be applied in any environ-ment, but some environmental characteristics influence how easy the principles are to adopt. Let’s look at these characteristics.
URGENCY TO DELIVER
Agile works best in an urgent environment. It provides tools to prioritize features quickly and determine how much scope to pursue within the constraints of a critical timeline. If you have urgency due to a competitive market, compliance deadlines, or a large backlog of project requests, agile provides methods for quicker delivery.
EVOLVING OR VOLATILE REQUIREMENTS
One descriptor of agile could be just enough. “Give me just enough requirements to start a design.” “Give me just enough design to start my code.” “Give me just enough code to demonstrate some level of value to the customer.” If you don’t have all the requirements, you can still get started with an agile project. If you complete an itera-tion and the customer wants to change the requirements, you can adapt and still meet the objectives. Managing changing requirements still takes effort in an agile environ-ment, but you don’t have to fight the project framework. The framework is designed to support uncertainty.
CUSTOMER AVAILABILITY
work together every day throughout a project cycle, but there are definite times when the customer must be available. In theory, a project must not be urgent if the cus-tomer can’t make time to clarify requirements or review functionality. The cuscus-tomer can have a proxy, such as a product manager; but someone needs to be available every day to represent the customer’s vision.
CONSISTENT RESOURCES
Part of the power of agile is a level of familiarity within the team and a consistent understanding of the processes they use. Agile teams and processes get better over time. If project team members are new to each other, they must learn processes together while at the same time trying to complete the project. Agile works best with a core group of people who work together on continuous projects. Agile isn’t a good methodology to use with a team that has never worked together before, unless you have long-term plans to keep them together.
CO-LOCATED RESOURCES
Agile promotes face-to-face communication and common understanding. One of the best ways to support this principle is to put your team members face to face. Co-location is an amazing tool. Your team can get out of email hell, and their mutual understanding of the project will increase.
One of the best setups we have seen is at a Fortune 500 company we visited. All 10 of the project team members are in an area approximately 25 feet by 25 feet. The cubicles have half-walls that provided a level of privacy when people are sitting but let them easily see the rest of the team and communicate when they stand up. This setup provides the privacy the developers enjoy when they’re deep into a coding session but also lets team members stand up to converse with each other at any time without hav-ing to go to each others’ cubicles. Team members can also walk a few feet and reach common areas where they can whiteboard a design or have a quick caucus.
THE TEAM IS A TEAM
In larger companies, a project team may be constructed of team members from a shared resource pool. For example, the QA (Quality Assurance) lead for a project may be from the QA shared resources pool. If such team members view themselves as resources on loan, and not as team members dedicated to the project, the result can be functional silos.
When silos exist, team members are more concerned about the welfare of their team or area than they are with the livelihood of the project. This mentality doesn’t bode well for agile development and leads to customer neglect. The team needs to bond as a unified group toward the goals of the project. Roles are assigned, but one of the objectives of agile is for the team to working collectively.
Working collectively can also be applied to team member roles. A tester can point out a possible code improvement. A developer can suggest a feature enhancement. In general, team members speak out—they don’t limit their roles to their titles.
15
Create your own flavor to become agile within your constraints
3.3.3 Roadblocks that others have overcome
Now that you know the characteristics that make agile easier to implement, let’s look at a few that make agile more difficult to move to.
LACK OF AGILE KNOWLEDGE
Your first challenge will be finding expertise to help you with your migration. If you’re fortunate, you’ll have some level of agile experience within your company; but this probably won’t be true to the point that you can coach yourself through an agile migration.
We’ll help you with this issue by showing you how often Acme Media requested assistance, from initial training to issues encountered along the way.
LARGE PROJECT TEAMS
Agile is compromised as team size increases. Major principles such as face-to-face com-munication and common understanding require additional effort to maintain their effectiveness as a team grows.
Larger teams require additional overhead to ensure that information is shared consistently across all groups. Scrum teams frequently use the term scrum of scrums, meaning a representative from each team Scrum attends a master Scrum meeting to share information with other groups.
Jeff Bezos of Amazon.com believes that the most productive and innovative teams can be “fed with two pizzas.” Jeff shared this thought with his senior managers at an offsite retreat. He envisioned a company culture of small teams that could work inde-pendently, which would lead to more innovative products. Since that time, the Ama-zon “pizza teams” have created some of the most popular features on the site (Fast Company, 2004).
If your team has an average appetite, you can convert Jeff’s concept into a team of five to seven people. This is a nice-size group for communication and agility. If five to seven is perfect, then what is the maximum size for a team to remain agile? On the high side, we believe you can have a team of 15 people without major impact on your agility. When you have more than 15, communication needs to become more formal, which slows the team.
There are ways to make agile work with larger or distributed teams, but you’ll sacri-fice some level of agility.
DISTRIBUTED DEVELOPMENT
Related to large teams, many companies use distributed development. Frequently, the distributed development is performed by offshore resources.
Distributed development implies that the team is large in size and that communi-cation methods must be scaled to get information to all involved. In addition, you may have issues with time zone differences, language, and code integration into a common environment. Some offshore companies support and advertise the use of agile meth-odologies, but their location may make it challenging to support the core principles.
development (for example, providing an offshore group with standardized tools to create automated workflows).
FIXED-BID CONTRACT WORK
Fixed-bid contract work goes against most of the agile principles. The customer isn’t a partner, evolving requirements are a no-no, and adapting is usually called scope creep. We used to believe that fixed-bid work couldn’t be performed using an agile process, but recently we’ve met several managers who have customized their process to allow the inner workings to be agile while customer interaction remained contract oriented. AN IMMATURE OR ONE-TIME TEAM
If you have a team that will work together for only one project, they’re usually better served by using a plan-driven methodology unless they have previous exposure to agile. If the team will work through multiple projects or releases, you can introduce agile tech-niques, and the team can migrate to a full agile methodology as their knowledge matures. GOING TOO FAST
“Hey, it’s agile. We don’t need to do any planning to convert to it, just start thinking agile!” A lot of folks take this approach when migrating to agile. But if you go too fast, you don’t give your company enough time to digest the concepts. When this happens, you may experience issues with common understanding and terminology.
Don’t let this happen to you. You need to plan before migrating to agile, and this book will show you how to do it with an awareness, buy-in, ownership approach. If you take your time, the methodology will stick, and you’ll minimize the risk of failure. You’ll learn more about ownership in chapter 5.
TEAM WITH SPECIALIZED SKILL SETS
An organization’s structure can create artificial barriers between teams, and so can skill sets. If your team has specialized skill sets, it’s hard to be agile when the work mix doesn’t correlate well to the available resource types. Some tasks always have to be done by certain individuals, which doesn’t help the team bond or unite when pursu-ing the completion of a feature.
Specialized skill sets also place an additional constraint on team capacity. Imagine that your team has only one person who can perform user-interface design, and the work assigned to an iteration is 80 percent user-interface work. Other team members can look for work to do outside of the iteration, but delivery will be slow due to the one-person constraint.
Teams that are just becoming agile usually have members with specialized roles. You can overcome this constraint by cross training over time and rewarding employees for obtaining and using additional skills.
AVOIDING CUSTOMIZATION
Many people get hung up on the questions, “Are we doing it right? Are we doing it in an agile fashion? Are we following a pure agile process?”
17
Looking ahead
This same mentality has managers trying to find a perfect agile methodology and insert it directly into their company. As we discussed earlier, you can start with a pack-aged agile process, but you need to look at the realities of your company and adjust accordingly. Acme Media will look at a generic agile process and see how it applies to their realities; then, they’ll modify the process to fit their environment.
3.4
Key points to remember
The key points to remember from this chapter are as follows:
Moving to agile isn’t a one-time event. You can and will add agility over time.
The goals of an agile process tie directly to company success.
You can start with a prepackaged agile process such as Scrum and then modify and enrich the process to support the realities of your environment.
Some of your existing company characteristics will make it easier to move to agile. This is especially true if you have volatile requirements or urgency to deliver frequently.
Every migration to agile encounters roadblocks. We’ll identify the most com-mon roadblocks and show you how others have addressed them.
Every migration to agile is unique, but we believe our nine-step framework will work for most companies and provide the best chance of moving to and sustain-ing an agile process.
3.5
Looking ahead
Many books discuss Agile from a theoretical or academic perspective. Becoming Agile takes a different approach and focuses on explaining Agile from a ground-level point-of-view. Author Greg Smith, a certified ScrumMas-ter with dozens of Agile projects under his belt, presents Agile principles in the context of a case study that flows throughout the book.
Becoming Agile focuses on the importance of adapt-ing Agile principles to the realities of your environ-ment. While Agile purists have often discouraged a "partial-Agile" approach, the reality is that in many shops a "purist" approach simply isn't a viable option. Over the last few years, Agile authorities have begun to discover that the best deploy-ments of Agile are often customized to the specific situation of a given company.
As well, Becoming Agile addresses the cultural realities of deploying Agile and how to deal with the needs of executives, managers, and the development team during migra-tion. The author discusses employee motivation and establishing incentives that reward support of Agile techniques.
Becoming Agile will show you how to create a custom Agile process that supports the realities of your environment. The process will minimize risk as you transition to Agile iteratively, allowing time for your culture and processes to acclimate to Agile princi-ples.
What's inside
How to migrate to Agile
How to get your team to buy into the change
How to scale and sustain your new Agile process
How to create an Agile process that works for your company
How to use Agile in special situations
I
n this chapter, you’ll get an overview of how Web APIs work, along with some guidance on how to design APIs that your developers and external API consum-ers will find refreshingly clear and easy to use.20
Hunter
Working with web APIs
The next few chapters cover the server-client interaction in detail, but this chapter helps you understand the concepts with a simple example of an API and sample application. Most basic API examples use a to-do list, but that’s kind of overused. I decided to go a different way: I’ve selected a list application with pizza toppings. Note that this particular application is simple by design; the goal is to show you how to interact with the API, and how an application interacts with an API. If this were a production application it would have a full pizza, or pizzas, and the database wouldn’t be shared, but for the goals here I’ve taken out as much complexity as possible to make the basic principles clear.
This chapter covers
Structure of a simple API
Ways to inspect calls to an API
Interaction between an API and a client application
21
HTTP basics
Looking at an API is interesting, but it doesn’t necessarily help you to understand how it can drive an application. Additionally, performing actions such as create and delete in a browser is challenging, so in addition to the API I’ve included a simple application using this API with JavaScript. This application exercises all the functional-ity in the API so you can see how an application interacts with a web API.
To get an idea of how this works in practice, I’ve created a basic API using Node.js, a JavaScript-based web server framework. (You can learn more about this framework at www.nodejs.org.) The API supports all the needed actions to represent a complete system: create, read, update, and delete. The first task will be to explore the API in a browser using the read functionality.
This application runs on a web host at www.irresistibleapis.com/demo. You can check out the application there and follow along with the concepts in this chapter. If you’re a developer and want to explore the code more intimately, use the exercises at the end of the chapter to get the example running on your own system, including both the Node.js application and the HTML/JavaScript web application. Section 2.6 also describes the var-ious moving parts to this API and application so you can play with it as you like.
2.1
HTTP basics
To understand the transactions between the client and the server in API interactions, you’ll need a basic grasp of how HTTP works. Chapter 4 covers this topic in more detail, but for now I’ll give you some high-level information about the protocol.
You’re probably most familiar with HTTP as the way web browsers get information from web servers. An HTTP transaction is composed of a request from the client to the server (like a browser asking for a web page), and a response from the server back to the client (the web page from the server, for a browser). First, I’ll describe the ele-ments in an HTTP request. You’re familiar with the URL, the address that you type into the address box on a browser, but that address is only one portion of the information sent from your browser to the server in order to process a web request.
2.1.1 HTTP request
Figure 2.1 illustrates the elements that make up an HTTP request, along with exam-ples of how these sections are used. The HTTP request is usually sent with headers, set-ting the context for the transaction. An HTTP request always has a method; methods are the verbs of the HTTP protocol. To understand what your browser does, imagine that you’re visiting my main website. Here are the pieces of the request that are sent by your browser:
Headers: Accept: text/html —This tells the server that the browser wants to get an HTML-formatted page back. It’s the most readable format for humans, so it makes sense that your browser would request it.
Method: GET—This is the read method in HTTP and is generally the method used by browsers when reading web pages.
URL: http://irresistibleapis.com—This is the only piece you indicated for the browser.
All the actions of CRUD (create, read, update, and delete) are represented by meth-ods within HTTP:
Create: POST
Read: GET
Update: PUT
Delete: DELETE
The URL is the unique identifier for the resource. It’s like any other URL on the inter-net, except in this case it’s used to describe the resource in an application system. If parameters are needed for the request, such as a keyword for search, they’re included in the parameters of the request. To see how parameters would look, here’s an exam-ple search request:
http://www.example.com/api/v1.0/search?keyword=flintstone&sort=alphabetical
In this example, the resource being called is http://www.example.com/api/v1.0/ search. The question mark and everything following it are parameters giving more information about what the client wants in the response. A body section is only sent for create (POST) and update (PUT) transactions.
Next, I’ll describe the sections of an HTTP response.
2.1.2 HTTP response
Figure 2.2 shows the elements of a typical HTTP server response. The server is likely to send back several headers giving information about the system and the response. All requests have a method, and all responses have a status code. These status codes are described in more detail in chapter 4, but for now it’s sufficient to know that 2XX means that the request was successful, 3XX is a redirect to another location, 4XX is an
Headers
• Accept (content type)• Authentication
• PUT
• POST
• DELETE
• GET
Method
• For PUT and POST operations
Body
• Address for the resource
• Optional Parameters
URL
23
The Toppings API
error in the request from the client, and 5XX means the server had a problem. In the earlier example, calling my website, the server would’ve responded with the following:
Status code: 200 —Everything worked correctly.
Headers:
– Content-Type: text/html —as requested by the client – Date: <date of response>
– Content-Length: <size of response>
Body —The content of the page. This is what you see if you “view source” within the browser—the HTML page that tells the browser how to render the page and what content to display.
2.1.3 HTTP interactions
Every HTTP transaction between a client and server is composed of a request, sent from the client to the server, and a response, sent from the server back to the client. There’s no higher level interaction; each request/response is stateless and starts again from scratch. To help you understand this better, I’ll move on to a discussion of a spe-cific API.
2.2
The Toppings API
Many different styles of API are available, but the one I’m going to be using and talk-ing most about here is a Representational State Transfer (REST)-style API, the most common type of web API.
As discussed in chapter 1, RESTAPIs are designed to work with each resource as a noun. A specific resource within a system has a unique identifier, which is a URL, like the ones you visit in the browser. This URL identifies the resource in the system and is designed to be understandable when viewed. For example, with a REST API you could view the list of existing toppings with the following request:
http://irresistibleapis.com/api/v1.0/toppings
Status
Code
• 2XX (OK)
• 3XX (Redirect)
• 4XX (Client Error)
• 5XX (Server Error)
• Content-Type
• Date
• Content-Length
• Content of result for GET operations
Headers
Body
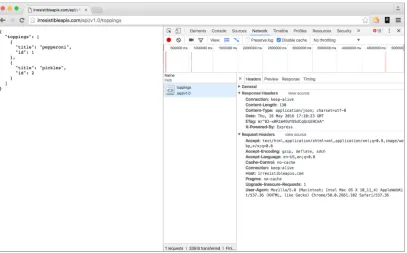
These are the actual URLs, retrieved with a GET (read) operation. If you put the pre-ceding URL in a browser, you’ll see the results displayed in figure 2.3.
Figure 2.3 Example result of a web call in a browser. The response is JSON, a common markup language for web APIs. As you can see, the formatting makes it easy to understand the content of the response.
You can visit this URL in your browser right now and get the information about a single topping or a list of toppings. Figure 2.3 shows what this call will look like in a web browser. Go ahead and try both of these calls in your own web browser to see how easy it is to retrieve information from this kind of service. Again, this is like any other web request, only formatted for a computer to work with.
Now, to view a single topping, you’d take the id field from the list you retrieved and append it to the URL. Basically, you’re saying, “Give me the toppings list” and then, “but just the one with the ID of 1.” Almost all APIs work this way. The parent level is a list of items, and adding an ID will retrieve a single member of the list.
http://irresistibleapis.com/api/v1.0/toppings/1
25
Designing the API
2.3
Designing the API
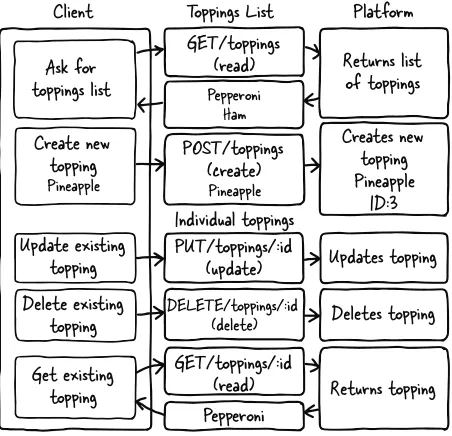
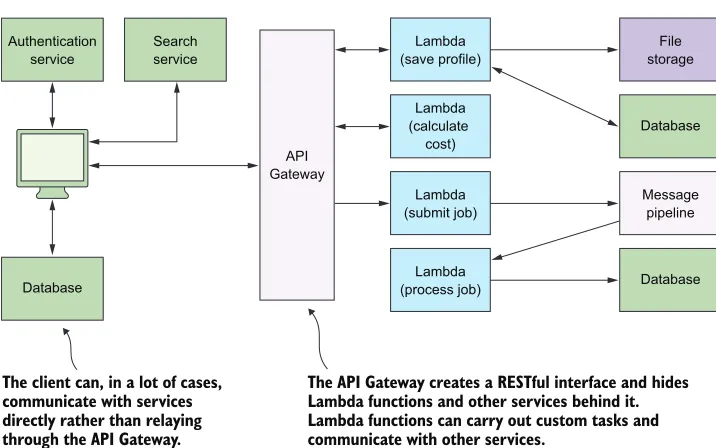
To go through the steps, imagine an online website for a pizza parlor. Users are having trouble interfacing with the pizza ordering system and want to be able to customize their pizzas. The company wants to increase customer satisfaction. This represents the business value for this platform. Figure 2.4 illustrates each call to the system and how it would be formatted.
Client
Ask for
toppings list
Create new
topping
PineappleUpdate existing
topping
Delete existing
topping
Get existing
topping
GET/toppings
(read)
POST/toppings
(create)
PineapplePUT/toppings/:id
(update)
GET/toppings/:id
(read)
Pepperoni
DELETE/toppings/:id (delete)Returns list
of toppings
Creates new
topping
Pineapple
ID:3
Updates topping
Deletes topping
Returns topping
Pepperoni HamToppings List
Individual toppings
Platform
Figure 2.4 This diagram represents the complete set of interactions with the API system. The GET request reads the current value of the resource, whether it’s a list or an individual item. POST is only allowed at the list level, and creates a new resource in the system. PUT updates and DELETE deletes an existing resource. All four of the needed methods, Create, Read, Update, and Delete, are represented in this diagram.
To provide this, they need to create a system that consistently allows users to pick dif-ferent pizza toppings and keep them in a list (use case). The company decides to mea-sure success by determining the increase in people finishing up started orders (measurements). Fortunately for this example, it’s relatively easy to figure out how an API can meet these needs.
And that’s it. The platform features create, read, update, and delete operations avail-able to you by combining the HTTP methods with the URLs for your resources. But what do you get when you make these calls? When you GET the resource for a single topping, you get information about that topping. Try this now in your browser: http://irresistibleapis.com/api/v1.0/toppings/1.
GET /api/v1.0/toppings/1
{ Curly braces indicate an object.
"topping": {
"id": 1, "title": "Pepperoni" }
}
This response is represented in JavaScript Object Notation (JSON), a formatting syn-tax first described in chapter 1. JSON is covered in more detail in chapter 4, but for now you can see how the data is structured. (If you want more information about JSON, you can find it at http://json.org.) The curly braces indicate an object, which is a group of pairings of names and values. What’s represented here is a JSON structure describing a single object—a “topping,” which has an ID of 1 and a title of Pepperoni. This is the same resource address a client can access to view, delete, or update an exist-ing toppexist-ing. This means that the URL for the single topping is the toppings list of http://irresistibleapis.com/api/v1.0/toppings followed by the ID of the topping from within this structure—so it’s http://irresistibleapis.com/api/v1.0/toppings/1.
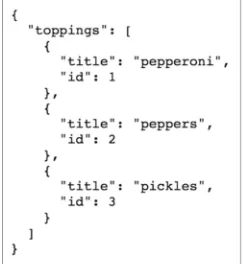
If you GET the resource for the list of toppings directly, the returned information includes a list instead of a single object. Call this URL in your browser to see the list: http://irresistibleapis.com/api/v1.0/toppings.
GET /api/v1.0/toppings
{ Curly braces indicate dictionaries.
"toppings": [ Square braces indicate lists.
{
Table 2.1 API calls
API call Description
GET /api/v1.0/toppings List current toppings
GET /api/v1.0/toppings/1 View a single topping
POST /api/v1.0/toppings Create a new topping
PUT /api/v1.0/toppings/1 Update an existing topping
DELETE /api/v1.0/toppings/1 Delete an existing topping
Listing 2.1 Retrieving a single topping
27
Using a web API
"id": 1,
"title": "Pepperoni" },
{
"id": 2,
"title": "Pineapple" }
] }
In this case, because the request was for a list of objects, square brackets demonstrate that the returned object contains a list of toppings. Each individual topping looks the same as listing 2.1. Again, this is how information is represented in JSON. To under-stand these calls and responses, remember that an object (with keys and values) is rep-resented by curly braces, and a list (an unnamed collection of items) is reprep-resented with square brackets. In some programming languages these are referred to as hashes and arrays.
Both of these calls can be made from a standard web browser. If other people have added items to the list, you’ll see those included in the list view as well; this is a live call into the API system and returns the appropriate information. In this case, the API is generated by node. If you’re a developer who’s interested in learning more about the back end of the system, Exercise 3 at the end of the chapter will give you information about how to run this system on your own, as well as the application running on top of the API.
This simple API interaction gives you the opportunity to start understanding some of the topics covered in chapter 4.
2.4
Using a web API
You can interact with this API in various ways, as you’ll learn in this section. Feel free to try any or all of these approaches to see how the interaction works.
2.4.1 Browser
A browser can make GET calls to specific resources easily. Note that this is easy in the case of my demo API because there’s no authentication to worry about. The challenge is that the browser doesn’t have any way to easily update, delete, or create new items. Using the developer tools or web inspector in your browser can give you more infor-mation about the call as well.
For the request:
Headers —Accept: text/html,application/xhtml+xml,application/xml;q=0.9,image/ webp;*/*;q=0.8—This is the list of accepted formats for this browser request, in order of preference. Because it includes */* (meaning “any content type”) late in the list, the browser will accept any type of response and do the best it can with it. Many other headers are shown in figure 2.5. Take a look at them and run the same request on your system to see how they change and what stays the same in each request/response transaction.
Method —GET
URL—http://irresistibleapis.com/api/v1.0/toppings
Request body —none
Status code —200 OK
29
Using a web API
2.4.2 Command line (curl)
If you’re comfortable with the command line, you can use the curl command to make calls to the API as well. This tool is fairly straightforward and makes it possible to inter-act with the API more completely, using all the available methods rather than limiting transactions to read operations as the browser does. curl is native on UNIX-based sys-tems such as Linux and Macintosh, and you can install it easily for Windows from http://curl.haxx.se/download.html.
Let’s take a quick tour through the API using curl. By default, curl uses GET (read), but you can specify other methods on the command line, as shown in the fol-lowing examples. Remember that your responses may be different if other people have been changing things; go ahead and work with what you get. Don’t be shy—this API is for this book, and you can’t break anything important. The best way to under-stand this type of system is to work with it yourself.
First, let’s use curl to look at a single topping. Lines beginning with a dollar sign indicate a command-line call. The other information is the information returned by the server itself.
$ curl http://irresistibleapis.com/api/v1.0/toppings/1 {
"topping": { "id": 1,
"title": "Pepperoni" }
}
That seems pretty reasonable. I’d eat a pizza with pepperoni on it. Let’s list all the top-pings and see what else is on the pizza. Remember that the list for the toptop-pings is at the parent level, or /api/v1.0/toppings.
$ curl http://irresistibleapis.com/api/v1.0/toppings {
"toppings": [ {
"id": 1,
"title": "Pepperoni" },
{
"id": 2,
"title": "Pineapple" },
{
"id": 3,
"title": "Pickles" }
] }
Listing 2.3 GET /api/v1.0/toppings/1
Wait, what? Pickles? That’s kind of gross. Let’s delete that one. The id for it is 3, so the correct path to operate on is /api/v1.0/toppings/3.
curl -i -X DELETE http://irresistibleapis.com/api/v1.0/toppings/3 {
"result": true }
The response here says we succeeded. To be sure, let’s pull a list of toppings again.
$ curl http://irresistibleapis.com/api/v1.0/toppings {
"toppings": [ {
"id": 1,
"title": "Pepperoni" },
{
"id": 2,
"title": "Pineapple" }
] }
Okay, that’s much better. But our pizza has pepperoni and pineapple, and I’d much prefer ham with my pineapple. Let’s go ahead and change that first one to make the pizza how I want it. To update an existing item, the command needs to send a PUT to the resource with the new information required.
$ curl -i -H "Content-Type: application/json" -X PUT -d '{"title":"Ham"}'
http://irresistibleapis.com/api/v1.0/toppings/1 {
"topping": { "id": 1, "title": "Ham" }
}
Nice, now the pizza is looking pretty good. But as far as I’m concerned the pizza is merely a vehicle to get cheese in my mouth, so I’ll add some extra cheese to go with the Hawaiian pizza I’ve built.
Listing 2.5 DELETE /api/v1.0/toppings/3
Listing 2.6 GET /api/v1.0/toppings
31
Using a web API
$ curl -H "Content-Type: application/json" -X POST -d '{"title":"Extra extra cheese"}' http://irresistibleapis.com/api/v1.0/toppings
{
"topping": { "id": 3,
"title": "Extra extra cheese" }
}
Let’s do one final check to make sure that the pizza looks good.
$ curl http://irresistibleapis.com/api/v1.0/toppings {
"toppings": [ {
"id": 1, "title": "Ham" },
{
"id": 2,
"title": "Pineapple" },
{
"id": 3,
"title": "Extra extra cheese" }
] }
Awesome! Now the pizza is just right.
Note that with curl you can also pass -i for slightly more chatty information, or –v for a much larger dose of verbose output. If you’re having fun and you’d like to try those now, feel free. The extra details you’ll see are HTTP transaction details, which are described in chapter 4.
2.4.3 HTTP sniffers
Browsers have become good at showing information about the calls they’re making, but this is of limited use for a couple of reasons. As I mentioned earlier, a browser is only capable of sending a read request, which restricts the actions you’re able to explore. When you submit a form, it creates a create (POST) request, but you can’t arbitrarily call these operations in your browser.
HTTP sniffers are tools that allow you to explore all the HTTP traffic your system processes. HTTP sniffers watch and report on the network traffic your system is gener-ating, whether it comes from a browser, an application, or a raw command-line call.
Listing 2.8 POST /api/v1.0/toppings/1
With these tools, you can see the entirety of the HTTP request and response, and this allows you to debug what’s happening if you’re running into issues.
If you’re using a Mac, HTTPScoop (www.tuffcode.com) is a friendly choice. It’s easy to set up and use, and the output is clear and complete. The downside to this tool is that it can’t monitor secure transactions (HTTPS calls), and so it’s not going to work with any API requiring secure calls. For the purposes of this book, though, you’ll only be accessing a nonsecure API (the demo API), so HTTPScoop is a fine choice—it would be my first choice for any Mac users wanting a reasonably intuitive experience. The license cost is $15, but you can try it for two weeks for free.
Figure 2.6 shows an example of the windows in HTTPScoop. For this chapter, I’ll focus on the main screen listing all calls and the Request/Response tab. Later in the book you’ll learn about headers, status codes, and other HTTP details so you can understand how they all interact together. For now, though, consider the request to be a simple request and response, and don’t worry about particular details if you’re not already familiar with HTTP.
For Windows users, the best choice out there is Fiddler, which you can find at www.telerik.com/fiddler. For Windows, Mac, and Linux, there’s a slightly more com-plicated choice in Charles (www.charlesproxy.com). If you’re quite advanced in your network administration skills, you can try out Wireshark from www.wireshark.org. Wireshark is available and free for every major platform and sniffs all kinds of traffic, not only web/HTTP traffic, but the interface is complex, and it can be difficult to understand what you’re seeing.
33
Interaction between the API and client
EXERCISE 1 Watch the traffic in an HTTP sniffer as you go through the exer-cises from this chapter. Use the curl calls to access the API directly and see what the calls look like. For more verbosity with curl, you can use –v in your command and see more information about the call from the client side. Com-pare the information in the sniffer to what curl sends and see if you can find patterns. Which debugging method gives the best information? Which one is easier for you to use?
EXERCISE 2 Make a deliberately incorrect call. Call /api/v1.0/toppings /100—there’s not likely 100 toppings on the pizza, so this is a bad call. What kind of output did you get from curl–v? What did the HTTP sniffer show? The status code tells you how the system responded, which should give you the information you need to figure out what the issue is.
2.5
Interaction between the API and client
Seeing these GET calls to the API is somewhat interesting, but unfortunately you can’t see the POST, PUT, or DELETE calls using a browser. curl isn’t intuitive for exploring a system. Without some kind of application using the API, it’s difficult to explore and visualize the elegance and simplicity of this kind of interface.
Keeping in line with the simple API, I’ve created a simple application to exercise the API, creating a list of toppings for your virtual pizza. Again, for a real application there would be a full pizza and a method to place the order, but this application is deliberately as simple as possible so it’s easy to understand how it works.
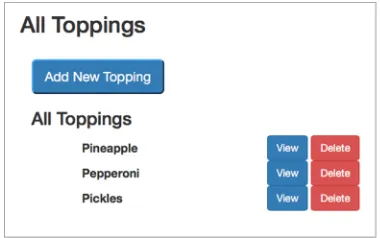
I’ll go through the same sequence I did in the last section. Here’s our starting pizza, with pepperoni, pineapple, and pickles. Loading the initial page causes an API call to be generated, and we get the current list of toppings from the system.
First, take a look at the JSON representation returned when the API is called directly at /api/v1.0/toppings, shown in figure 2.7. Figure 2.8 shows how the appli-cation looks when this API call is made on the back end.
Figure 2.8 The application view for the toppings list shows the same information, as shown in figure 2.4. This screen is created by calling the toppings list and creating the HTML based on the returned information. If the list changes on the server, both figure 2.4 and figure 2.5 would change, with both showing the same information in different ways.
Now take a look at the main application at http://irresistibleapis.com/demo. With the JSON data, the simple application can build the front page. Some of the items are static—they don’t change. The top half of the page, for instance, is always the same, with the title of the display and a button to add new toppings. The bottom half, though, is created based on the information retrieved from the API. Each topping is listed, and the ID of the topping is used to create an appropriate button to act on that specific item. The user has no need to understand the relationship between the ID and the name of the topping, but the IDs are used programmatically to set up the page to be functionally correct. Note how the information in the API in figure 2.4 directly maps to what’s shown in the application in figure 2.5. The buttons on this page map directly to the other API calls, as shown in table 2.2.
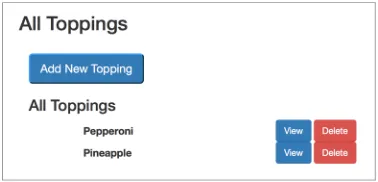
As we walk through the API actions, use the HTTP sniffer of your choice to watch the traffic as the interactions happen. Note that because this system is live, other people may have added, deleted, or edited the toppings, and they may not match. Feel free to use the buttons to adjust the toppings to match or follow along with your own favorite toppings (Jalapeños? Sun dried tomatoes? Legos?).
The first action in the previous example was removing the pickles from the pizza, and clicking Delete on this page for the Pickles entry will do that. This button knows which ID to operate on because it was embedded in the page when the listing was rendered.
Table 2.2 The mapping between the API calls and application functions
API call Application function
GET /api/v1.0/toppings Main application page
GET /api/v1.0/toppings/1 View button on main page
POST /api/v1.0/toppings “Add new topping”