Page 84 www.ijiras.com | Email: [email protected]
Universal Networking Hub For Personalized Transfer Of Data In A
Cloud Environment
Dr. N Hariharan
Professor & Dean – PG Studies ASIET, Kalady, Affiliated to KTU Kerala, India
AkhilJyoth
Student, ECE Dept. ASIET, Kalady, Affiliated to KTU Kerala, India
I. INTRODUCTION
We are living in the 21stcentury where the usage of the word ―cloud‖ has become a new trend. Even MNCs are trying to pivot towards this change in tech buzz. The second term that’s shining in the tech world is IOT. Internet of things has a great impact on our current society, especially when the people are trying to get things done in an easy manner. What we are trying to create is an affordable technology which connects IOT with digital could. To have your cloud storage at your home means, data security and ease of access. To access any devices like printers and web cams remotely from anywhere is a giant leap in IOT. Even though IOT and personal cloud systems are one of the hottest topics in tech world, the cost of affording a smart home fully equipped with devices interconnected to each other is ground shaking. That’s the same case with personal cloud systems.
Considering IOT first, Internet of things literally means creating a network of devices which is connected to World Wide Web in one way or the other. IOT has become one of the most invested and looked up on market by the tech
enthusiast, mainly due to its vast possibilities and due to its budding stage. Even though a lot of dedicated IOT devices are coming up on markets, mainly due to rise in start-ups. All are concentrating on independent devices which can interact with other through a Wi-Fi connection. Even though it’s all well and good, if we take the cost of buying a printer equipped with Wi-Fi connectivity or a web cam it’s almost 3 times the normal value. In such a situation how will common people afford an IOT equipped home?
Personal cloud is a fascinating piece of technology. The idea of storing everything in a remote location has a great impact in modern life. We don’t need to bother about carrying storage devices everywhere we go. That was the initiative of cloud storage. But then the idea of creating a remotely accessible storage location in our home itself got into trend. Thus personal storage devices came into existence. But the major drawback of this piece of technology is the limitation of the manufacturer provided limited memory and high cost. Most of us have a storage device lying around, what if we were able to turn that into a personal data cloud for your day to day activities. The possibilities are limitless. There will be Abstract: An affordable technology which connects IOT with digital world. The system we are proposing will act as a HUB which will enable us to connect and link other devices to internet. For example if you have to share the contents of a storage device to your friends at different locations, you just have to plug in the drive to the hub. By giving specific user access, they can access any content of your drive for collaborative development and so on. Printers and smart devices are a common part of day to day life, so its turns out necessary at times to connect them to your PC while you are away. By connecting your printer with hub, it will get in sync with the network. Thus the user can share or a group can use the printer facilities from anywhere. By attaching a storage device to the HUB, it can act as a personalized cloud. By sitting at your home it helps you to sink your data into it from anywhere on the world. By detaching the storage device, it’s off the grid and your data is safe and secure at your hands. It can be used as a downloader box as well, no need for keeping your PC on for hours while downloading huge files.
Page 85 www.ijiras.com | Email: [email protected] no need of downloading the data that has already been hosted
at once, since when you get back home the data will be on your table top. There are situations where you are having the need of downloading a huge file and to do that we have to keep the pc on for like days! This can be avoided if we can use a device to download the contents to a specific drives.
II. LITERATURESURVEY
Dependence on the cloud systems for ease of storage has increased vastly. But the security concerns with cloud systems are still high and there are many cases where the fire wall was broken and precious personal data is stolen. One of the most secure cloud systems is that of Google’s, and they are offering a free storage of about 15 GB. What if there was a safer yet cheaper way to store your personal data. One that puts the power right in your hands.
A. SERVICEABLE ADDRESSABLE MARKET (SAM) The global Internet of Things market will grow to $1.7 trillion in 2020 from $655.8 billion in 2014, research firm IDC says, as more devices come online and a bevy of platforms and services grow up around them. The firm predicts that the number of ―IoT endpoints,‖ connected devices such as cars, refrigerators and everything in between, will grow from 10.3 billion in 2014 to more than 29.5 billion in 2020. According to a recently released TechSci Research report, ―India Internet of Things (IIoT) Market Opportunities and Forecast, 2020‖, IoT market in India is projected to grow at a CAGR more than 28% during 2015 – 2020. Growth in the market is anticipated on account of ongoing technological developments in IoT technology for providing better connectivity and coverage as well as real-time monitoring & tracking of services and systems across diverse industry verticals to reduce operational and manpower costs. Moreover, various government projects such as smart cities, smart transportation, smart grids, etc., are also expected to further propel use of IoT technology in the country over the next five years. According to ―India Cloud Computing Market Forecast & Opportunities, 2020‖, the market for cloud computing services in India is projected to grow at a CAGR of over 22% during 2015-2020.
B. PRODUCT DIFFERENTIATION
The competitive advantage is that even though different devices are coming in the digital market which boost up the IOT potential, the number of devices which converts / assists the exiting devices to enable connectivity is less. By doing so the flexibility is more, the system can adapt to the network and the user doesn’t need to bother about the home / public networks. By implementing this system with any storage devices, the user can easily establish a personal cloud with less effort. Backup power feature enable the user to an uninterrupted networking experience either for cloud storage purpose or for the IOT implementations.
Personal cloud market is expected to grow progressively due to the technological advancements in this sector. Personal
cloud applications have been widely adoption among small and medium enterprises in various industry verticals. These enterprises demand personal cloud solutions and services to store, sync, and share documents, files, and photos. Personal cloud offers storage space setup in the user’s home as well as at a data centre of the service provider and can be accessed with the help of the internet. This helps users view and stream these documents from internet connected devices such as smart phones, laptops, and tablets. The rise in the demand for solutions that can provide real-time access to employees while keeping their documents secure is also encouraging organizations to implement personal cloud services within their businesses. The increase in the number of organizations with offices in different places, having employees located at various locations and requiring real-time access has encouraged personal cloud service vendors to offer various personal cloud offerings including applications, technologies, and devices.
We estimate that by 2019 it will be more than double the size of the Smartphone, PC, tablet, connected car, and the wearable market combined. The IOT will result in $1.7 trillion in value added to the global economy in 2019. This includes hardware, software, installation costs, management services, and economic value added from realized IOT efficiencies. People are looking in the latest and simplest ways to get things done. And investors are piling up on IOT sectors. The future of this sector is surly looking bright.
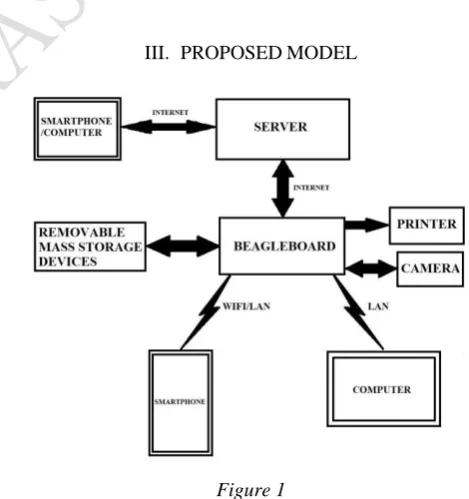
III. PROPOSEDMODEL
Figure 1
Page 86 www.ijiras.com | Email: [email protected] out necessary at times to connect link them to your PC. By
connecting your printer to hub, the required drivers will be downloaded into the device and the printer will get in sync with the network. Thus the user can share or a group can use the printer facilities from anywhere.
The data transfer using the internet can become slow at times. When we are transferring data from a specific location into the storage device connected to your hub sitting at home, the major issue will be lag due to the effect of dependence of data speeds in both the uploading point and download speed in the home network. This we are avoiding by using an intermediary cloud storage system. By using an intermediary cloud, it can act as a cache or temporary storage. Thus increasing the data transfer speeds at the user end. Thus the user won’t feel any lag even if the internet speed in his/her home is somewhat slow.
The usage of devices like printers with the hub leads to the issue of updating and maintenance of driver software. One of the solutions is to let the user configure the hub by pre requesting the required drivers of specific devices which he will be needing soon. Thus such can be transferred to that hub using our server. If the user is planning to keep the hub 24/7 online the power interruption have affect his/her day to day activities depending on the hub/networking. To prevent situation like that we are using a decent powerful battery to function as a temporary backup power even if there are fluctuations in the line voltage of the user’s home. The growing ubiquity of Wi-Fi networks combined with the integration of low-cost Wi-Fi chipsets in all devices makes Wi-Fi as the wireless technology the most used for accessing to internet [3].
IV. NETWORKSETUP
The communication initiation will instantiate a virtual Wi
-Fi AP and distributes all policies and access certificates for an
authentication based on EAP-TLS [2]. STEP 1
Boot the Raspberry Pi without the WiFi adapter plugged in.
STEP 2
Open a Terminal session by clicking on the LXTerminal icon, and enter the following command into it: sudo nano /etc/network/interfaces.
Example code: auto lo
iface lo inet loopback iface eth0 inet dhcp allow-hotplug wlan0 auto wlan0
iface wlan0 inet dhcp wpa-ssid "ssid" wpa-psk "password"
The two places where we need to make a change are on the last two lines, ssid and password. Now save the edited file
by pressing ctrl+X and Y.
V. ASSIGNINGSTATICIP
To connect remotely to our Raspberry pi we need its IP address. By default, our Raspberry Pi will have a dynamic IP address. This means that the IP address can change at any time, not ideal if you want to run our Raspberry Pi headless, as you’ll need to keep checking and updating the IP address in our system. A static IP address however will not change, it assigns our Raspberry Pi a permanent address on our network - so you know exactly where it is at all times. The Dynamic Host Configuration Protocol (DHCP) provides configuration parameters to Internet hosts. DHCP consists of two components: a protocol for delivering host-specific configuration parameters from a DHCP server to a host and a mechanism for allocation of network addresses to hosts. [1] STEP 1
Check our connection!
First up we’ll need to double check that our Raspberry Pi is connected to our network. A great way to do this is to run
sudo ifconfig
STEP 2
Make some notes!
Before we can begin applying a static IP address to our Raspberry Pi we’ll need to gather the necessary data from it! We can get a lot of this from the “ifconfig” command we ran earlier. Make a note of the following data:
Current IP Address (inet addr) Broadcast Range (Bcast) Subnet Mask (Mask)
With those noted down, run sudo route -n, this will give us information from our router.
Gateway
Destination
STEP 3
Edit the files
Run sudo nano /etc/network/interfaces. This opens the
configuration file for the network settings in the nano text editor.
Page 87 www.ijiras.com | Email: [email protected] Depending on whether we want to set a static IP address
for a wired connection or a wireless connection eth0 = wired, wlan0 = wireless.
Example code: interface eth0
static ip_address=192.168.0.10/24 static routers=192.168.0.1
static domain_name_servers=192.168.0.1 interface wlan0
static ip_address=192.168.0.200/24 static routers=192.168.0.1
static domain_name_servers=192.168.0.1
interface = This defines which network interface you are setting the configuration for.
static ip_address = This is the IP address that you want to set our device to. (Make sure you leave the /24 at the end).
static routers = This is the IP address of our gateway (probably the IP address or our router)
static domain_name_servers = This is the IP address of our DNS (probably the IP address of our router). You can add multiple IP addresses here separated with a single space.
To exit the editor, press ctrl+x.
To save our changes press the letter ―Y‖ then hit enter. Now it is needed to be reboot, and everything should be set.
After reboot by the command ifconfig we can check the interfaces IP address.
Figure 3
VI. INTERFACECONTROLWITHNETWORK CONDITIONS
For an effective way to interface with Raspberry pi, it is needed to be configured in such a manner that the Raspberry pi first attempt to connect to WiFi and if that fails, create and use an ad-hoc network as fallback.
A. STEPS FOR SETUP INTERFACE CONTROL
To start with hostapd hotspot client and dnsmasq lightweight dns server need to be installed.
Open a Terminal session.
Update Raspbian with the latest updates by entering the commands:
sudo apt-get update sudo apt-get upgrade
To install hostapd enter the command:
sudo apt-get install hostapd
enter Y when prompted.
To install dnsmasq enter the command:
sudo apt-get install dnsmasq
enter Y when prompted
The installers will have set up the program so they run when the pi is started. For this setup they only need to be started if the home router is not found. So automatic startup needs to be disabled. This is done with the following commands:
sudo systemctl disable hostapd sudo systemctl disable dnsmasq
Now the hostspot configuration file can be setup. This contains the name of the WiFi signal you will need to connect to (SSID) and the security password.
B. HOSTAPD CONFIGURATION
Using a text editor edit the hostapd configuration file. This file won't exist at this stage so will be blank.
sudo nano /etc/hostapd/hostapd.conf
Enter the settings: interface=wlan0 driver=nl80211 ssid=iHUB hw_mode=g channel=6 wmm_enabled=0 macaddr_acl=0 auth_algs=1
ignore_broadcast_ssid=0 wpa=2
wpa_passphrase=1234567890 wpa_key_mgmt=WPA-PSK wpa_pairwise=TKIP rsn_pairwise=CCMP
The interface will be wlan0
The SSID is the name of the WiFi signal broadcast from the RPi, which you will connect to with our Tablet or phones WiFi settings.
Channel can be set between 1 and 13. If you are having trouble connection because of to many wifi signals in our area are using channel 6 then try another channel.
Wpa_passphrase is the password you will need to enter when you first connect a device to our Raspberry Pi's hotspot. This should be at least 8 characters and a bit more difficult to guess.
To save the config file press Ctrl & x.
Now the defaults file needs to be updated to point to where the config file is stored.
In terminal enter the command
sudo nano /etc/default/hostapd
Change: #DAEMON_CONF="" to
Page 88 www.ijiras.com | Email: [email protected] C. DNSMASQ CONFIGURATION
Next dnsmasq need to be configured to allow the PI to act as a router and issue IP addresses.
sudo nano /etc/dnsmasq.conf
Go to the bottom of the file and add the following lines #Pi3Hotspot Config
#stop DNSmasq from using resolv.conf no-resolv
#Interface to use interface=wlan0 bind-interfaces
dhcp-range=10.0.0.3,10.0.0.20,12h And then save (ctrl & o) and exit (ctrl & x)
Now that hostapd and dnsmasq are configured we now need to make some changes to the interfaces file and then add a script that will detect if you are at home or not. Next we need to edit the interfaces file. There will be several entries already in the file. Look for references to Wlan0 and alter them as below. Any reference to wpa_conf for wlan0 should be disabled by putting a # at the start of the line.
Open the interfaces file with the command
sudo nano /etc/network/interfaces
Edit the following lines as below auto lo wlan0
iface lo inet loopback allow-hotplug wlan0 iface wlan0 inet manual
# wpa-conf /etc/wpa_supplicant/wpa_supplicant.conf Now save and exit (ctrl & x).
Required only if our home routers SSID and password was listed in this file then the hotspot will probably not get generated. You will need to put a # infront of each line
#iface wlan0 inet dhcp #wpa-ssid "mySSID" #wpa-psk "Router Pasword"
These details need to be in the wpa_supplicant.conf file to work with this setup. Add our router details to the wpa_supplicant.conf file with
sudo nano /etc/wpa_supplicant/wpa_supplicant.conf
and add the following commands to the bottom of the file. network={
ssid="mySSID" psk="Router Password" key_mgmt=WPA-PSK }
If in the future you change our router connection details with the WiFi icon by the clock then check that the changes have been made to the wpa_supplicant.conf file and not the /etc/network/interfaces file.
Note: Change "mySSID" to the ssid of our router and "Router Password" to the password of our router.
D. START-UP SCRIPT
The final stage is to setup the startup-scripts using the systemd process. If you have been updating Raspbian Jessie and not used a recent image you may not have some wifi tools installed. Just cheek you have iw installed with
dpkg -s iw
If it is not found then install it with
sudo apt-get install iw
This script will check what routers are available when the RPi is started in the order of mySSID1 mySSID2 etc. The first router found in the list will be connected to using existing configured WiFi settings. If none of the listed SSIDs are in range then a WiFi hotspot is created.
VII. USBINTERFACE
The USB mount Debian package automatically mounts USB mass storage devices (typically USB pens) when they are plugged in, and unmounts them when they are removed. The mountpoints (/media/usb[0-7] by default), filesystem types to consider, and mount options are configurable. When multiple devices are plugged in, the first available mountpoint is automatically selected. The script that does the (un)mounting is called by the udev daemon. USBmount is intended as a lightweight solution which is independent of a desktop environment. [6]
A. INSTALLATION
Install usbmount with sudo apt-get install usbmount.
Install NTFS driver package ntfs-3g with sudo apt-get install ntfs-3g.
Configure usbmount to mount specified filesystems by opening the usbmount file with
sudo nano /etc/usbmount/usbmount.conf.
To mount desired file systems we need to edit usbmount.conf file. In here there is a line called FILESYSTEMS="". Only filesystems specified in this line are mounted via usbmount, so we change it to: FILESYSTEMS="vfat ntfs fuseblk ext2 ext3 ext4 hfsplus". The next important line is FS_MOUNTOPTIONS="". Here we need to specify which filesystems should be mounted and how they should be mounted. We change it to:
FS_MOUNTOPTIONS="-fstype=ntfs-3g,nls=utf8,umask=007,gid=46
-fstype=fuseblk,nls=utf8,umask=007,gid=46 -fstype=vfat,gid=1000,uid=1000,umask=007".
With this the filesystems vfat (fat32) ntfs-3g (NTFS), and fuseblk (NTFS again) are mounted. [6]
VIII. HUBASASERVER
Page 89 www.ijiras.com | Email: [email protected] LAMP is an acronym that stands for Linux Apache
MySQL PHP and are components required to run a Dynamic HTML webpage. Here we will turn our Raspberry Pi into a personal web server. The steps to install all of the components are discussed below. After our personal web server is complete, we can use it to host a custom HTML or PHP resume, or a personal landing page.
A. INSTALL APACHE HTTP SERVER
The Apache HTTP Server, colloquially called Apache, is the world's most used web server software. Originally based on the NCSA HTTPd server, development of Apache began in early 1995 after work on the NCSA code stalled. Apache played a key role in the initial growth of the World Wide Web, quickly overtaking NCSA HTTPd as the dominant HTTP server, and has remained most popular since April 1996. In 2009, it became the first web server software to serve more than 100 million websites.
Apache is developed and maintained by an open community of developers under the auspices of the Apache Software Foundation. Most commonly used on a Unix-like system (usually Linux), the software is available for a variety of operating systems besides Unix, including Microsoft Windows. Version 2.0 improved support for non-Unix, e.g. Windows and OS/2 (and eComStation). Old versions of Apache were ported to run on e.g. OpenVMS, and NetWare. Released under the Apache License, Apache is free and open-source software.
B. FEATURE OVERVIEW
Apache supports a variety of features, many implemented as compiled modules which extend the core functionality. These can range from server-side programming language support to authentication schemes. Some common language interfaces support Perl, Python, Tcl, and PHP. Popular authentication modules include mod_access, mod_auth, mod_digest, and mod_auth_digest, the successor to mod_digest. A sample of other features include Secure Sockets Layer and Transport Layer Security support (mod_ssl), a proxy module (mod_proxy), a URL rewriting module (mod_rewrite), custom log files (mod_log_config), and filtering support (mod_include and mod_ext_filter).
Popular compression methods on Apache include the external extension module, mod_gzip, implemented to help with reduction of the size (weight) of Web pages served over HTTP. ModSecurity is an open source intrusion detection and prevention engine for Web applications. Apache logs can be analyzed through a Web browser using free scripts, such as AWStats/W3Perl or Visitors.
Virtual hosting allows one Apache installation to serve many different Web sites. For example, one machine with one Apache installation could simultaneously serve www.example.com, www.example.org, test47.test-server.example.edu, etc.
Apache features configurable error messages, DBMS-based authentication databases, and content negotiation. It is also supported by several graphical user interfaces (GUIs).
It supports password authentication and digital certificate authentication. Because the source code is freely available, anyone can adapt the server for specific needs, and there is a large public library of Apache add-ons.
C. PERFORMANCE
Instead of implementing a single architecture, Apache provides a variety of MultiProcessing Modules (MPMs), which allow Apache to run in a process-based, hybrid (process and thread) or event-hybrid mode, to better match the demands of each particular infrastructure. This implies that the choice of correct MPM and the correct configuration is important. Where compromises in performance need to be made, the design of Apache is to reduce latency and increase throughput, relative to simply handling more requests, thus ensuring consistent and reliable processing of requests within reasonable time-frames.
For delivery of static pages, Apache 2.2 series was considered significantly slower than nginx and varnish.[32] To address this issue, the Apache developers created the Event MPM, which mixes the use of several processes and several threads per process in an asynchronous event-based loop.[33] This architecture, and the way it was implemented in the Apache 2.4 series, provides for performance equivalent or slightly better than event-based web servers, as is cited by Jim Jagielski and other independent sources.[34][35][36] However, some independent, but significantly outdated, benchmarks show that it still is half as fast as nginx.
D. INSTALLATION
Run the following command.
sudo apt-get install apache2 apache2-utils
This will install Apache 2.4, which is the web server that responds to http (and https if you like) requests.
E. INSTALL PHP
PHP is a server-side scripting language designed primarily for web development but also used as a general-purpose programming language. Originally created by Rasmus Lerdorf in 1994, the PHP reference implementation is now produced by The PHP Development Team. PHP originally stood for Personal Home Page, but it now stands for the recursive acronym PHP: Hypertext Preprocessor. PHP code may be embedded into HTML or HTML5 markup, or it can be used in combination with various web template systems, web content management systems and web frameworks. PHP code is usually processed by a PHP interpreter implemented as a module in the web server or as a Common Gateway Interface (CGI) executable. The web server software combines the results of the interpreted and executed PHP code, which may be any type of data, including images, with the generated web page. PHP code may also be executed with a command-line interface (CLI) and can be used to implement standalone graphical applications.
Page 90 www.ijiras.com | Email: [email protected] servers on almost every operating system and platform, free of
charge.
F. INSTALLATION
The command used to install PHP and PHP libraries that we need is: sudo apt-get install libapache2-mod-php5 php5 php-pear php5-xcache php5-mysql php5-curl php5-gd
Now we can write code foe custom web pages in PHP and the Apache HTTP Server along with PHP will process the code for displaying the web page contents.
IX. WEBCAMSERVER A. INTRODUCTION
By interfacing web cam, the user will be able to see the video that is available from the camera from anywhere in the world. Here we are using a normal USB camera, which can be connected to the USB port of the Raspberry pi. We are installing a software package named ―motion‖ by editing the code in the bash script, by editing the configuration file, we can achieve our needs.[6]
Motion is a software motion detector, is a free, open source CCTV software package developed for Linux. It can monitor video signal from one or more cameras and is able to detect if a significant part of the picture has changed saving away video when it detects that motion is occurring. The program is written in C and is made for Linux. Motion is a command line-based tool whose output can be either jpeg, netpbm files or mpeg video sequences. It is strictly command line driven and can run as a daemon with a rather small footprint and low CPU usage. It is operated mainly via config files, though the end video streams can be viewed from a web browser. It can also call to user configurable "triggers" when certain events occur.
cURL is a command line tool for getting or sending files using URL syntax. Since cURL uses libcurl, it supports a range of common Internet protocols, currently including HTTP, HTTPS, FTP, FTPS, SCP, SFTP, TFTP, LDAP, DAP, DICT, TELNET, FILE, IMAP, POP3, SMTP and RTSP. cURL supports HTTPS and performs SSL certificate verification by default when a secure protocol is specified such as HTTPS. When cURL connects to a remote server via HTTPS, it will first obtain the remote server certificate and check against its CA certificate store the validity of the remote server to ensure the remote server is the one it claims to be. Some cURL packages have bundled with CA certificate store file. There are few options to specify CA certificate such as --cacert and --capath. ----cacert option can be used to specify the location of the CA certificate store file. In the Windows platform, if a CA certificate file is not specified, cURL will look for a CA certificate file name ―curl-ca-bundle.crt‖ in the following order:
Directory where the cURL program is located.
Current working directory.
Windows system directory.
Windows directory.
Directories specified in the %PATH% environment variables.
cURL will return an error message if the remote server is using a self-signed certificate, or if the remote server certificate is not signed by a CA listed in the CA cert file. -k or --insecure option can be used to skip certificate verification. Alternatively, if the remote server is trusted, the remote server CA certificate can be added to the CA certificate store file. A. STEPS
1. We will be using the terminal so open the terminal on the Pi or connect to it via SSH.
2. To begin, first update the Raspberry Pi so you’re running on the latest version.
3. sudo apt-get update 4. sudo apt-get upgrade
5. We start by removing libraries that may conflict with the newer package. These may or may not already exist on your copy of Raspbian.
sudo apt-get remove libavcodec-extra-56 libavformat56 libavresample2 libavutil54
6. Download and install the following packages by inserting the following commands into the terminal.
Wget
https://github.com/ccrisan/motioneye/wiki/precompiled/ffmpe g_3.1.1-1_armhf.deb
sudo dpkg -i ffmpeg_3.1.1-1_armhf.deb
7. Now we need to install the following packages, we will need these as the motion software relies on them.
sudo apt-get install curl libssl-dev libcurl4-openssl-dev libjpeg-dev libx264-142 libavcodec56 libavformat56 libmysqlclient18 libswscale3 libpq5
8. With those packages installed we can now grab the latest version of the motion software and install it. To do this run the following commands.
Wget https://github.com/Motion-Project/motion/releases/ download/release-4.0.1/pi_jessie_motion_4.0.1-1_armhf.deb
sudo dpkg -i pi_jessie_motion_4.0.1-1_armhf.deb 9. Now we need to make some edits to the configuration file (motion.conf)
sudo nano /etc/motion/motion.conf
10. Find the following lines and change them to the following.
daemon on
stream_localhost off
output_pictures off
ffmpeg_output_movies off
Optional (Don’t include the text in brackets)
Page 91 www.ijiras.com | Email: [email protected]
framerate 100 (This will allow for 100 frames to be
captured per second allowing for smoother video)
width 640 (This changes the width of the image displayed) height 480 (This changes the height of the image
displayed)
11. Now we need to setup up the daemon, first we need to edit the motion file.
sudo nano /etc/default/motion
12. Find the following line and change it to the following: start_motion_daemon=yes
13. Once done simply save and exit
14. Now make sure the camera is connected and run the following line:
sudo service motion start
15. Now you should be able to check out the Webcam Stream at the IP address of our Pi so in your browser go to the following address:
192.168.1.103:8081
16. If the webpage isn’t loading try restarting the service. sudo service motion restart
X. NETWORKPRINTER A. INTRODUCTION
CUPS consist of a print spooler and scheduler, a filter system that converts the print data to a format that the printer will understand, and a backend system that sends this data to the print device. CUPS uses the Internet Printing Protocol (IPP) as the basis for managing print jobs and queues. It also provides the traditional command line interfaces for the System V and Berkeley print systems, and provides support for the Berkeley print system's Line Printer Daemon protocol and limited support for the server message block (SMB) protocol. System administrators can configure the device drivers which CUPS supplies by editing text files in Adobe's PostScript Printer Description (PPD) format. There are a number of user interfaces for different platforms that can configure CUPS, and it has a built-in web-based interface. CUPS is free software, provided under the GNU General Public License and GNU Lesser General Public License, Version 2.[7]
Samba is a free software re-implementation of the SMB/CIFS networking protocol, and was originally developed by Andrew Tridgell. Samba provides file and print services for various Microsoft Windows clients and can integrate with a Microsoft Windows Server domain, either as a Domain Controller (DC) or as a domain member. As of version 4, it supports Active Directory and Microsoft Windows NT domains.
Samba runs on most Unix, OpenVMS and Unix-like systems, such as Linux, Solaris, AIX and the BSD variants,
including Apple's macOS Server, and macOS client (Mac OS X 10.2 and greater). Samba is standard on nearly all distributions of Linux and is commonly included as a basic system service on other Unix-based operating systems as well. Samba is released under the terms of the GNU General Public License. The name Samba comes from SMB (Server Message Block), the name of the standard protocol used by the Microsoft Windows network file system. [7]
B. STEPS
To get started we should first update the Raspberry Pi to ensure we are running the latest software. You can do this by entering the following commands into the terminal: sudo apt-get update
sudo apt-get upgrade
Once the Raspberry Pi has been updated we can now start installing the print server software. In this case, we will be installing CUPS, this software manages printers connected via USB or over the network and it has the bonus of providing a management interface that you can view over the internet.
Install this software by typing the following command into the terminal:
sudo apt-get install cups
When CUPS has finished installing there is a few extra things that we will need to do.
The first thing to do is add the pi user to the lpadmin group. This will allow the pi user to access the administrative functions of CUPS without needing to use the super user.
sudo usermod -a -G lpadmin pi
There is one other thing that we will need to do to CUPS to ensure that it runs well on the home network and that is to make CUPS accessible across your whole network, at the moment it will block any non-localhost traffic.
We can get it to accept all traffic by running the following two commands:
sudo cupsctl --remote-any sudo /etc/init.d/cups restart
Now we should be able to access the Raspberry Pi print server from any computer within your network. If you are unsure on what your Raspberry Pi’s local IP Address is then you can make use of the following command: hostname -I
Once you have your Raspberry Pi’s IP Address, go to the following web address in your favorite web browser, eg:(192.168.1.105)
Page 92 www.ijiras.com | Email: [email protected] C. SETTING UP SAMBA FOR THE PI PRINT SERVER
If you intend on using your print server with Windows, then setting up SAMBA correctly is necessary. We will need to install SAMBA and make a few changes to its configuration to ensure that it runs correctly and utilizes the CUPS print drivers.
Now firstly, we should make sure we have SAMBA installed, the easiest way to do this is simply run the install command in the terminal. We can do that by entering the following command in the terminal:
sudo apt-get install samba
With SAMBA now installed to our Raspberry Pi, we will need to open its configuration file and make several edits, we can open the file with the following command:
sudo nano /etc/samba/smb.conf
Now with the file open, we will need to scroll to the bottom of the file. The quickest way to do this is to use
Ctrl+V.
Once at the bottom of the file you should add or change the following lines. In my case the [printers] and the [print$] sections were already in the file, so I just needed to change the values to match the following.
# CUPS printing. [printers]
comment = All Printers browseable = no path = /var/spool/samba printable = yes
guest ok = yes read only = yes create mask = 0700
# Windows clients look for this share name as a source of downloadable
# printer drivers [print$]
comment = Printer Drivers path = /var/lib/samba/printers browseable = yes
read only = no guest ok = no
Save the file by pressing Ctrl+X and then pressing Y and then Enter.
We can now restart SAMBA to get it to load in our new configuration, to do that, all we need to do is type the following command into the terminal:
sudo /etc/init.d/samba restart
D. ADDING A PRINTER TO CUPS
Adding a printer to CUPS is a rather simple process, but first we need to load up the CUPS web interface. If you’re unsure what your Raspberry Pi’s IP address is, then run the following command in the terminal:
hostname -I
Once you have your Raspberry Pi’s IP address, go to the following web address in your favorite web browser, eg:(192.168.1.105)
https://192.168.1.105:631
You should be greeted with the following screen, on here we need to click ―Administration‖.
Now that we are on the administration screen, we need to click on the ―Add Printer‖ button.
With the ―Add Printer‖ screen now loaded, we can select the printer we want to set up. In our case, that is the Canon MG25000 series (Canon MG2500 series) printer. Once selected, press the ―continue‖ button. If your printer is not showing up on this screen, ensure that you have plugged it into one of the USB ports on the Raspberry Pi and that it is turned on.
You may need to restart your Raspberry Pi if it is still refusing to show up, ensure the printer is turned on and plugged in when you restart.
On this screen you need to select the model of your printer. CUPS will try and automatically detect the model and pick the correct driver.
However, in some cases this will not function correctly, so you will have to go through the list yourself and find the most relevant driver. Once you are certain everything is correct, click the ―Add Printer‖ button.
Now this is the last screen you need to deal with before the printer is successfully added, you can set the name and description to whatever you want. It is handy setting the location if you have multiple printers in your house that you need to deal with. Also, make sure you enable ―Share This Printer‖, otherwise other computers will not be able to access it. Once you are happy with the settings, feel free to press ―Continue‖.
The final screen that you will be presented with after setting up your printer is pictured right below. This allows you to change a few of the printer’s specific settings. Such as the page print size, the print quality,and various other options.
Now we will go over how to add our newly setup Raspberry Pi print server to Windows. This should be a relatively easy process thanks to setting up SAMBA earlier in the tutorial.
E. ADDING A RASPBERRY PI PRINT SERVER TO WINDOWS
Page 93 www.ijiras.com | Email: [email protected] Double click on your Raspberry Pi’s share, it may ask for
a username and password. If just pressing enter doesn’t work, try entering pi as the username.
You should now be greeted with a screen displaying the printers available on your Raspberry Pi print server. Double click on the printer you want to have connected to your computer.
Upon double clicking this, you will likely be greeted with the warning message below, just click the ―OK‖ button.
Now you will need to find your printer within this list, on the left is a list of all the brands, and on the right, is a list of all the printers for that brand that Windows has drivers for. If you don’t find your printer on here, then try looking up your printer’s model online and download the appropriate drivers for it.
In my case I had to look for the Canon MG2500 series as shown below. Once you have selected your printer press the ―Ok‖ button.
This will now load up a connection with your printer, if you want to make this the default printer for the computer, the click Printer -> Set as Default Printer.
The printer should now be successfully added to your computer and be available for any program to use. You can ensure the printer is correctly set up by printing
XI. ANDROIDAPPLICATION A. INTRODUCTION
Android apps are written in the Java programming language. The Android SDK tools compile your code along with any data and resource files into an APK, an Android
package, which is an archive file with an .apk suffix. One APK
file contains all the contents of an Android app and is the file that Android-powered devices use to install the app.
Each Android app lives in its own security sandbox, protected by the following Android security features:
The Android operating system is a multi-user Linux system in which each app is a different user.
By default, the system assigns each app a unique Linux user ID (the ID is used only by the system and is unknown to the app). The system sets permissions for all the files in an app so that only the user ID assigned to that app can access them.
Each process has its own virtual machine (VM), so an app's code runs in isolation from other apps.
By default, every app runs in its own Linux process. The Android system starts the process when any of the app's components need to be executed, and then shuts down the process when it's no longer needed or when the system must recover memory for other apps.
The Android system implements the principle of least
privilege. That is, each app, by default, has access only to the
components that it requires to do its work and no more. This creates a very secure environment in which an app cannot access parts of the system for which it is not given permission. However, there are ways for an app to share data with other apps and for an app to access system services:
It's possible to arrange for two apps to share the same Linux user ID, in which case they are able to access each other's files. To conserve system resources, apps with the same user ID can also arrange to run in the same Linux process and share the same VM. The apps must also be signed with the same certificate.
An app can request permission to access device data such as the user's contacts, SMS messages, the mountable storage (SD card), camera, and Bluetooth. The user has to explicitly grant these permissions.
The rest of this document introduces the following concepts:
The core framework components that define your app.
The manifest file in which you declare the components and the required device features for your app.
Resources that are separate from the app code and that allow your app to gracefully optimize its behavior for a variety of device configurations.
B. ACTIVITIES
An activity is the entry point for interacting with the user.
It represents a single screen with a user interface. For example, an email app might have one activity that shows a list of new emails, another activity to compose an email, and another activity for reading emails. Although the activities work together to form a cohesive user experience in the email app, each one is independent of the others. As such, a different app can start any one of these activities if the email app allows it. For example, a camera app can start the activity in the email app that composes new mail to allow the user to share a picture. An activity facilitates the following key interactions between system and app:
Keeping track of what the user currently cares about (what is on screen) to ensure that the system keeps running the process that is hosting the activity.
Knowing that previously used processes contain things the user may return to (stopped activities), and thus more highly prioritize keeping those processes around.
Helping the app handle having its process killed so the user can return to activities with their previous state restored.
Providing a way for apps to implement user flows between each other, and for the system to coordinate these flows. (The most classic example here being share. E. SERVICES
A service is a general-purpose entry point for keeping an
Page 94 www.ijiras.com | Email: [email protected] them running until their work is completed. This could be to
sync some data in the background or play music even after the user leaves the app. Syncing data in the background or playing music also represent two different types of started services that modify how the system handles them:
Music playback is something the user is directly aware of, so the app tells the system this by saying it wants to be foreground with a notification to tell the user about it; in this case the system knows that it should try really hard to keep that service's process running, because the user will be unhappy if it goes away.
A regular background service is not something the user is directly aware as running, so the system has more freedom in managing its process. It may allow it to be killed (and then restarting the service sometime later) if it needs RAM for things that are of more immediate concern to the user.
Bound services run because some other app (or the system) has said that it wants to make use of the service. This is basically the service providing an API to another process. The system thus knows there is a dependency between these processes, so if process A is bound to a service in process B, it knows that it needs to keep process B (and its service) running for A. Further, if process A is something the user cares about, then it also knows to treat process B as something the user also cares about. Because of their flexibility (for better or worse), services have turned out to be a really useful building block for all kinds of higher-level system concepts. Live wallpapers, notification listeners, screen savers, input methods, accessibility services, and many other core system features are all built as services that applications implement and the system binds to when they should be running.
A service is implemented as a subclass of Service. For more information about the service class, see the Services developer guide
A broadcast receiver is a component that enables the
system to deliver events to the app outside of a regular user flow, allowing the app to respond to system-wide broadcast announcements. Because broadcast receivers are another well-defined entry into the app, the system can deliver broadcasts even to apps that aren't currently running. So, for example, an app can schedule an alarm to post a notification to tell the user about an upcoming event... and by delivering that alarm to a BroadcastReceiver of the app, there is no need for the app to remain running until the alarm goes off. Many broadcasts originate from the system—for example, a broadcast announcing that the screen has turned off, the battery is low, or a picture was captured. Apps can also initiate broadcasts—for example, to let other apps know that some data has been downloaded to the device and is available for them to use. Although broadcast receivers don't display a user interface, they may notification to alert the user when a broadcast event occurs. More commonly, though, a broadcast receiver is just a
gateway to other components and is intended to do a very
minimal amount of work. For instance, it might schedule a jobservice to perform some work based on the event with JobScheduler.
F. CONTENT PROVIDERS
A content provider manages a shared set of app data that
you can store in the file system, in a SQLite database, on the web, or on any other persistent storage location that your app can access. Through the content provider, other apps can query or modify the data if the content provider allows it. For example, the Android system provides a content provider that manages the user's contact information. As such, any app with the proper permissions can query the content provider, such as ContactsContract.Data, to read and write information about a particular person. It is tempting to think of a content provider as an abstraction on a database, because there is a lot of API and support built in to them for that common case. However, they have a different core purpose from a system-design perspective. To the system, a content provider is an entry point into an app for publishing named data items, identified by a URI scheme. Thus an app can decide how it wants to map the data it contains to a URI namespace, handing out those URIs to other entities which can in turn use them to access the data. There are a few particular things this allows the system to do in managing an app:
Assigning a URI doesn't require that the app remain running, so URIs can persist after their owning apps have exited. The system only needs to make sure that an owning app is still running when it has to retrieve the app's data from the corresponding URI.
These URIs also provide an important fine-grained security model. For example, an app can place the URI for an image it has on the clipboard, but leave its content provider locked up so that other apps cannot freely access it. When a second app attempts to access that URI on the clipboard,the system can allow that app to access the data via a temporary URI permission grant so that it is allowed to access the data only behind that URI, but nothing else in the second app.
Content providers are also useful for reading and writing data that is private to your app and not shared. For example, the notepad sample app uses a content provider to save notes. A content provider is implemented as a subclass of contentprovider and must implement a standard set of APIs that enable other apps to perform transactions.
A unique aspect of the Android system design is that any app can start another app’s component. For example, if you want the user to capture a photo with the device camera, there's probably another app that does that and your app can use it instead of developing an activity to capture a photo yourself. You don't need to incorporate or even link to the code from the camera app. Instead, you can simply start the activity in the camera app that captures a photo. When complete, the photo is even returned to your app so you can use it. To the user, it seems as if the camera is actually a part of your app.
Page 95 www.ijiras.com | Email: [email protected] Because the system runs each app in a separate process
with file permissions that restrict access to other apps, your app cannot directly activate a component from another app. However, the Android system can. To activate a component in another app, deliver a message to the system that specifies your
intent to start a particular component. The system then
activates the component for you.
Three of the four component types—activities, services, and broadcast receivers—are activated by an asynchronous message called an intent. Intents bind individual components to each other at runtime. You can think of them as the messengers that request an action from other components, whether the component belongs to your app or another.
An intent is created with an intent object, which defines a message to activate either a specific component (explicit intent) or a specific type of component (implicit intent). For activities and services, an intent defines the action to perform (for example, to view or send something) and may specify the URI of the data to act on, among other things that the component being started might need to know. For example, an intent might convey a request for an activity to show an image or to open a web page. In some cases, you can start an activity to receive a result, in which case the activity also returns the result in an Intent. For example, you can issue an intent to let the user pick a personal contact and have it returned to you. The return intent includes a URI pointing to the chosen contact.
For broadcast receivers, the intent simply defines the announcement being broadcast. For example, a broadcast to indicate the device battery is low includes only a known action string that indicates battery is low.
Unlike activities, services, and broadcast receivers, content providers are not activated by intents. Rather, they are activated when targeted by a request from a ContentResolver. The content resolver handles all direct transactions with the content provider so that the component that's performing transactions with the provider doesn't need to and instead calls methods on the ContentResolver object. This leaves a layer of abstraction between the content provider and the component requesting information (for security).
There are separate methods for activating each type of component:
You can start an activity or give it something new to do by passing an Intent to startActivity() or startActivityForResult (when you want the activity to return a result).
With Android 5.0 (API level 21) and later, you can use the JobScheduler class to schedule actions. For earlier Android versions, you can start a service (or give new instructions to an ongoing service) by passing an Intent to startService(). You can bind to the service by passing an Intentto bindService().
You can initiate a broadcast by passing an Intent to
methods such as sendBroadcast(),
sendOrderedBroadcast(), or sendStickyBroadcast().
You can perform a query to a content provider by calling query() on a ContentResolver.
G. THE MANIFEST FILE
Before the Android system can start an app component, the system must know that the component exists by reading the app's manifest file, AndroidManifest.xml. Your app must declare all its components in this file, which must be at the root of the app project directory.
The manifest does a number of things in addition to declaring the app's components, such as the following:
Identifies any user permissions the app requires, such as Internet access or read-access to the user's contacts.
Declares the minimum API Level required by the app, based on which APIs the app uses.
Declares hardware and software features used or required by the app, such as a camera, bluetooth services, or a multitouch screen.
Declares API libraries the app needs to be linked against (other than the Android framework APIs), such as the Google Maps library.
H. LAYOUTS
A layout defines the visual structure for a user interface, such as the UI for an activity or app widget. You can declare a layout in two ways:
Declare UI elements in XML. Android provides a
straightforward XML vocabulary that corresponds to the View classes and subclasses, such as those for widgets and layouts.
Instantiate layout elements at runtime. Your application
can create View and ViewGroup objects (and manipulate their properties) programmatically.
The Android framework gives you the flexibility to use either or both of these methods for declaring and managing your application's UI. For example, you could declare your application's default layouts in XML, including the screen elements that will appear in them and their properties. You could then add code in your application that would modify the state of the screen objects, including those declared in XML, at run time.
The advantage to declaring your UI in XML is that it enables you to better separate the presentation of your application from the code that controls its behavior. Your UI descriptions are external to your application code, which means that you can modify or adapt it without having to modify your source code and recompile. For example, you can create XML layouts for different screen orientations, different device screen sizes, and different languages. Additionally, declaring the layout in XML makes it easier to visualize the structure of your UI, so it's easier to debug problems. As such, this document focuses on teaching you how to declare your layout in XML.
Page 96 www.ijiras.com | Email: [email protected] naming differences. For example, the EditText element has a
text attribute that corresponds to EditText.setText(). I. JAVA FILES
In the case of android applications, the back end is completely on Java language. There will lot .java files associated with all android projects. These java files are linked to the .xml files. For example if an application that consists of a button which will go to a particular URL on click, the actual process running behind will be based on the code that is included in the .java file that is linked with the .xml file of the button. Java is a general purpose, high level programming language, developed by Sun Microsystems. The Java programming language was developed by a small team of engineers, known as the Green Team, who initiated the language in 1991. The language was originally called OAK,
and at the time it was designed for handheld devices and set-top boxes. Oak was unsuccessful and in 1995 Sun changed the name to Java and modified the language to take advantage of the burgeoning World Wide Web.
In the case of this iHUB android application, mainly there are two .java file, 2 .xml file, 1 manifest file. One .java file is the main backend of the application, another one is the backend of the splash. There are two layout file, one for splash and the other one for main layout of the application. The java code is written in such a way that when the button named ―ONLINE‖ is clicked, it will open a IP address as the URL in the web browser, that IP adderss is the IP address provided by the ISP. When the button named ―offline‖ is clicked, it will open the static IP of the Raspberry pi as URL.
XII. CONCLUSION
The final product is a hub which enable us to connect to the internet and link other devices. We can connect data
storage devices like hard disk, pen drives etc to the hub. The hub will act as a media server which allows live streaming of media on a device connected to the hub through Wi-Fi. It can also act as a personal cloud. The user can access the content of the storage device connected to the hub from anywhere in the world. The user will be also allowed to see video signal from the camera connected to the device from anywhere. The user can also print documents using the printer connected to the hub from anywhere. This flexible device works based on multiple file sharing protocols which enables the data transfer to be secure during accessing and requesting. With a dedicated team we can further enhance its performance by creating a cache server system which will boost the data transfer rate and further increase its remote accessing capability.
REFERENCES
[1] Droms, R. (1997) Dynamic Host Configuration Protocol. RFC 2131
[2] Creation of Virtual Fi Access Point and Secured Wi-Fi Pairing, through NFC Oussama Stiti, Othmen Braham, Guy Pujolle International journal of Communications, Network and System Sciences Vol.7 No.6
[3] Wireless Broadband Alliance, Global Developments in Public Wi-Fi, WBA Report Industry 2011
[4] D. O. Awduche, A. Chiu, A. Elwalid, I. Widjaja and X. Xiao, ―Overview and Principles of Internet Traffic Engineering,‖ Request for Comments (RFC) 3272, May 2002
[5] https://www.htpcguides.com/properly-mount-usb-storage-raspberry-pi/
[6] https://usbmount.alioth.debian.org/