http://www.3com.com/
Getting Started with the
pcXset Application
Release 4.3
3Com Corporation 350 Campus Drive Marlborough, MA 01752-3064
Copyright © 2002, 3Com Corporation. All rights reserved. No part of this documentation may be reproduced in any form or by any means or used to make any derivative work (such as translation, transformation, or adaptation) without written permission from 3Com Corporation.
3Com Corporation reserves the right to revise this documentation and to make changes in content from time to time without obligation on the part of 3Com Corporation to provide notification of such revision or change. 3Com Corporation provides this documentation without warranty, term, or condition of any kind, either implied or expressed, including, but not limited to, the implied warranties, terms, or conditions of merchantability, satisfactory quality, and fitness for a particular purpose. 3Com may make improvements or changes in the product(s) and/or the program(s) described in this documentation at any time.
If there is any software on removable media described in this documentation, it is furnished under a license agreement included with the product as a separate document, in the hardcopy documentation, or on the removable media in a directory file named LICENSE.TXT or !LICENSE.TXT. If you are unable to locate a copy, please contact 3Com and a copy will be provided to you.
UNITED STATES GOVERNMENT LEGEND
If you are a United States government agency, then this documentation and the software described herein are provided to you subject to the following:
All technical data and computer software are commercial in nature and developed solely at private expense. Software is delivered as “Commercial Computer Software” as defined in DFARS 252.227-7014 (June 1995) or as a “commercial item” as defined in FAR 2.101(a) and as such is provided with only such rights as are provided in 3Com’s standard commercial license for the Software. Technical data is provided with limited rights only as provided in DFAR 252.227-7015 (Nov 1995) or FAR 52.227-14 (June 1987), whichever is applicable. You agree not to remove or deface any portion of any legend provided on any licensed program or documentation contained in, or delivered to you in conjunction with, this guide.
3Com, the 3Com logo, and NBX are registered trademarks of 3Com Corporation. NetSet and pcXset are trademarks of 3Com Corporation.
Adobe is a trademark and Adobe Acrobat is a registered trademark of Adobe Systems Incorporated. Internet Explorer, Microsoft, Windows, Windows 2000, and Windows NT are registered trademarks of
Microsoft Corporation. Netscape and Netscape Navigator are registered trademarks of Netscape Communication Corporation in the United States and other countries.
C
ONTENTS
A
BOUTT
HISG
UIDEConventions 5 Terminology 6 Related Documentation 7
G
ETTINGS
TARTEDWITHTHEPCX
SETAPPLICATIONOverview 9
Computer Requirements 10 Installing the pcXset Software 10 Configuring the pcXset Software 12
Customizing pcXset’s Display 14 Configuring Network Settings 18 Configuring Advanced Settings 19 Audio Drivers 21
Headset Recommendation 23
Editing the Access Button Labels and Tooltip Pop-ups 24 Keyboard Shortcuts 25
Troubleshooting 25
Audio Buffers Need Adjusting 26 Audio Sounds Distorted 26 Audio Stream Error 26
DTMF Tones Echo Back to the Analog Line Card 28 Full-Duplex Errors 28
Incorrect IP Address for the Call Processor 29 NBX Packet Driver Error (Windows NT Only) 30 The pcXset Software Won't Initialize 31
A
BOUT
T
HIS
G
UIDE
This guide explains how to install and configure the pcXset™ Soft
Telephone application. It is designed for resellers and technical support representatives.
If release notes are shipped with your product and the information there differs from the information in this guide, follow the instructions in the release notes.
Most user guides and release notes are available in Adobe Acrobat Reader Portable Document Format (PDF) or HTML on the 3Com World Wide Web site:
http://www.3com.com/
Conventions
Table 1 and Table 2 list conventions that are used throughout this guide.Table 1 Notice Icons
Icon Notice Type Description
Information note Information that describes important features or instructions
Caution Information that alerts you to potential loss of data or potential damage to an application, system, or device
6 ABOUT THIS GUIDE
Terminology In this guide the following terminology is used:
Audio card is used to refer to a sound card.
NBX system is used to refer to any of the 3Com® Networked
Telephony Solutions.
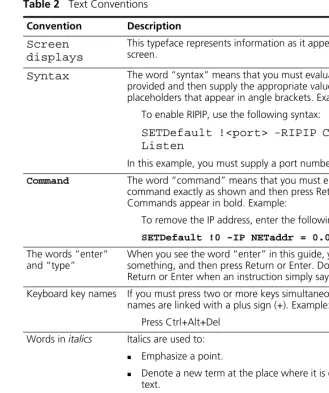
Table 2 Text Conventions
Convention Description
Screen displays
This typeface represents information as it appears on the screen.
Syntax The word “syntax” means that you must evaluate the syntax provided and then supply the appropriate values for the placeholders that appear in angle brackets. Example:
To enable RIPIP, use the following syntax:
SETDefault !<port> -RIPIP CONTrol = Listen
In this example, you must supply a port number for <port>.
Command The word “command” means that you must enter the command exactly as shown and then press Return or Enter. Commands appear in bold. Example:
To remove the IP address, enter the following command:
SETDefault !0 -IP NETaddr = 0.0.0.0
The words “enter” and “type”
When you see the word “enter” in this guide, you must type something, and then press Return or Enter. Do not press Return or Enter when an instruction simply says “type.”
Keyboard key names If you must press two or more keys simultaneously, the key names are linked with a plus sign (+). Example:
Press Ctrl+Alt+Del
Words in italics Italics are used to:
Emphasize a point.
Denote a new term at the place where it is defined in the
text.
Identify menu names, menu commands, and software
button names. Examples:
Related Documentation 7
Related
Documentation
Use this guide in conjunction with the following documents:
NBX Administrator’s Guide
This guide describes how to change and manage the NBX system after initial installation and configuration. It is intended for installation technicians and administrators.
NBX Business Telephone Guide
This guide provides an overview of the features in the NBX system as they relate to the NBX Business Telephone.
G
ETTING
S
TARTED
WITH
THE
PC
X
SET
APPLICATION
This guide explains how to install and configure the pcXset software. It is designed for resellers and technical support representatives. Only users with administrative privileges can install and configure the software.
Overview
The pcXset™ Soft Telephone is a software application that enables auser’s multimedia computer to have the same features and functions as the NBX® Business Telephone.
Using the pcXset application is very similar to using the NBX Business Telephone, except that the telephone has a handset, while the pcXset software requires a headset with a microphone connected to the client computer. You use the mouse and keyboard to operate the pcXset controls.
The pcXset software can accept calls only when both the client computer and the pcXset software are running. However, the software can receive voice mail messages even if neither it nor the computer is running, because voice mail operates on the Call Processor, not on the software.
The pcXset Help contains instructions for using the application. For detailed instructions select Contents from the Help menu.
10 GETTING STARTEDWITHTHEPCXSETAPPLICATION
Computer
Requirements
The computer on which you install the pcXset software must meet the following hardware and software requirements:
Processor — Pentium III 450MHz or greater.
Operating System — Windows NT 4.0 (with Service Pack 3 or
greater), Windows 95, Windows 98, Windows 2000 (Server and Professional versions), Windows XP (Home and Professional). 3Com recommends Windows 2000 or Windows XP.
RAM — 64MB (Windows 95/98), 128 MB (Windows NT/2000/XP) Video Display — 640 x 480 pixels with 16 colors minimum. 3Com
recommends 800 x 600 pixels with high color or 16 bit setting or greater.
Network — An Ethernet network adapter. The pcXset software
operates in either Layer 2 (MAC) or Layer 3 (IP) mode.
Audio — An audio adapter and audio drivers that fully support
full-duplex audio, that is, simultaneous microphone and speaker audio.
Disk Space — 40 MB of free disk space.
A good quality headset with a microphone — 3Com does not
recommend the use of speakers and a separate microphone. See
“DTMF Tones Echo Back to the Analog Line Card” for more information.
Installing the
pcXset Software
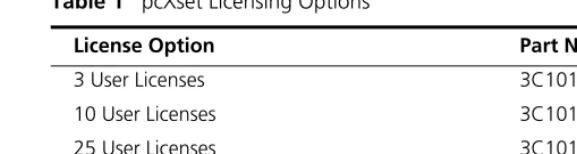
You install the pcXset software from the NBX Resource Pack CD. However, before you can use the software, you must purchase user licenses and enter the license key into the NBX system. In the NetSet utility, select Operations > Licenses. Table 1 shows the part numbers for the licensing options.
Installing the pcXset Software 11
CAUTION:Do not install the pcXset software on the same computer on which NBX ConneXtions is installed.
To install the pcXset software:
1 Insert the NBX Resource Pack CD into the CD-ROM drive of the client computer.
2 In the NBX Resource Pack dialog box, click NBXApplications and then click NBXpcXset to begin the installation.
3 Read the Terms and Conditions statement, and then click Finish. The computer unpacks the installation files.
4 Read the informational text and click Next.
5 Select a destination folder and click Next.
To accept the default destination, click Next. The default is:
C:\Program Files\3Com\NBX\NBX pcXset
6 Select a program folder for the Windows Start menu. To accept the default, click Next.
7 Click Next again.
8 Click Finish.
When the installation is complete, you must configure the pcXset software before the user can begin.
Table 1 pcXset Licensing Options
License Option Part Number
3 User Licenses 3C10151
10 User Licenses 3C10152
25 User Licenses 3C10153
12 GETTING STARTEDWITHTHEPCXSETAPPLICATION
Configuring the
pcXset Software
You must configure the pcXset software so that it can interact with both the Call Processor and with the computer on which it is installed.
To configure the pcXset software:
1 Select Start > 3Com NBX > NBX pcXset Configuration Wizard. The Configuration Wizard window appears (Figure 1).
Figure 1 Configuration Wizard Window
Configuring the pcXset Software 13
3 Use the Configuration Wizard tabs to configure the pcXset software.
Welcome — Introduction.
Audio — Test the client computer’s audio controls for compatibility
with the pcXset software.
Mic — Test the headset microphone’s compatibility with the pcXset
software.
MAC Info — Enter the Call Processor address and NBX system’s MAC
address.
IP Info — Enter the NBX system’s IP address. The wizard will locate
the subnet mask and default gateway information automatically.
NetSet — Add the pcXset software to the Call Processor using the
NetSet utility.
Country — To match the pcXset tones and cadences and Help
regional settings to those of the NBX system, select the appropriate country setting from the Country tab. To specify different regional settings for tones and cadences and Help, enable the Use Advanced Settings check box and click Advanced. The default setting is U.S. English.
Done! — Finish the pcXset configuration process.
The user can now start using the pcXset application, and may customize the pcXset display and other settings at any time.
Table 2 Windows Access Buttons
Windows Configuration Type Button
Multimedia Control Panel — Displays multimedia properties for your PC.
Volume Control — Allows you to set the volume for speaking and listening using the pcXset application.
Network Control Panel — Provides information on network devices, such as network interface card parameters,
protocols, and IP addresses.
14 GETTING STARTEDWITHTHEPCXSETAPPLICATION
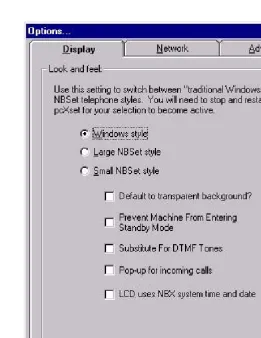
Customizing pcXset’s Display
To set the pcXset display:
1 Select pcXset Tools > Options > Display. See (Figure 2).
Configuring the pcXset Software 15
2 Select from the following display types:
Windows style — This Windows application-style appearance
(Figure 3) is recommended for computers with a video card capable of displaying only 256 colors.
16 GETTING STARTEDWITHTHEPCXSETAPPLICATION
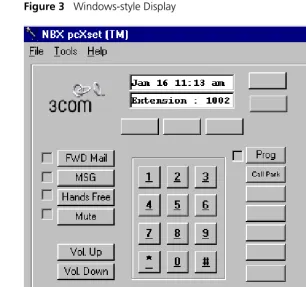
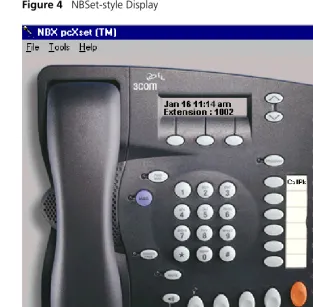
Large NBSet or Small NBSet — You can set this realistic telephone
display (Figure 4) to large or small to suit your preference. To display only the telephone image on the screen, select Display > Default to transparent background? or, when the pcXset application is running, double-click the telephone image to remove the grey background.
Figure 4 NBSet-style Display
Prevent Machine from Entering Standby Mode — (See Figure 2)
A call that comes into the pcXset application when your computer is in standby mode is automatically transferred to voice mail. This setting is enabled by default to prevent your computer from entering standby mode. Some hardware systems do not support this feature.
Substitute for DTMF tones — (See Figure 2) Check this box to hear
Configuring the pcXset Software 17
telephone. This substitution makes the pcXset software sound more like a PC application.
Pop-up for incoming calls — Check this box to turn on the
incoming call dialog pop-up. On Windows NT and 9x enabling this option obrings the pcXset application window to the forground and gives it focus. On Windows 2000 and XP enabling this option displays a pop-up bubble above the pcXset icon in the windows system tray.
LCD uses NBX system time and date — Check this box to have
18 GETTING STARTEDWITHTHEPCXSETAPPLICATION
Configuring Network Settings
In the Network tab (Figure 5), you can customize or adjust the network settings that you applied in the Configuration Wizard.
Configuring the pcXset Software 19
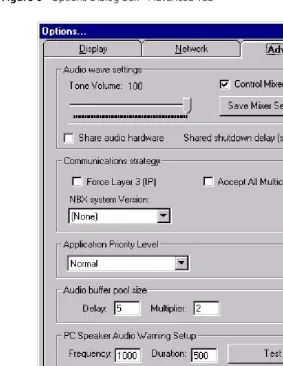
Configuring Advanced Settings
Use the Advanced tab (Figure 6) to adjust your audio parameters and communications strategy.
Figure 6 Options Dialog Box - Advanced Tab
Tone Volume — Allows independent volume control of dial tone,
dialing, and DTMF tone sounds (that is, telephone audio tones), which are generated when you press digits to dial a telephone number.
Control Mixer — Computers that use audio cards have a mixer
20 GETTING STARTEDWITHTHEPCXSETAPPLICATION
Windows NT and Windows 9x — Select Start > Programs >
Accessories > Multimedia > Volume Control.
Windows 2000 and XP — SelectStart>Programs > Accessories >
Entertainment > Volume Control.
You can also access the Volume Control program by clicking the Volume Control icon (see Table 2) in the Configuration Wizard.
To set the mixer state values for the pcXset application:
1 Select Tools > Options, check the Control Mixer check box.
2 Set the volume controls to the values you want to use with pcXset.
3 Click the Save Mixer Settings button.
4 Set the mixer amplification levels back to the values you want to use as the Windows default values.
When the pcXset application is active, it uses the saved mixer amplification levels. When pcXset is not active, it uses the Windows default values.
To verify this:
1 Open the Volume Control window.
2 Start the pcXset application and observe the volume control settings.
3 Exit from the pcXset application and observe that the volume control mixer settings change from the values used by the pcXset application to the Windows default values.
Share audio hardware — Enable this selection for the pcXset
software to share the audio hardware (audio card). If you do not share the audio hardware, you must close the pcXset application before any other applications can use the audio hardware for recording, since only one application can record audio at a time.
Shared shutdown delay (sec.) — If you have chosen to share the
audio hardware and find that the pcXset application is cutting off the audio, increase this value. For example, increase the value if the tones are distorted when you dial a telephone number. The default value for this setting is 2 seconds.
Audio Drivers 21
Force Layer 3 (IP) — Select Force Layer 3 to force the pcXset
software to use Layer 3 IP addressing to communicate with the NBX system. When you use Layer 3, the pcXset software requires the IP address of the NBX system. You specify this setting through either the pcXset Configuration Wizard, or the Network tab of the Options
dialog box.
When you use Layer 3, you must also specify the version of your NBX software.
Accept All Multicasts — Some Ethernet cards do not fully support
selective multicasting communication. Select this option if you are experiencing problems with conference calls or internal paging.
NBX System Version — Select the version of your NBX system when
you are using IP Layer 3 mode.
Audio Buffer Pool Size— The size of the audio buffer pool is a
product of Delay and Multiplier. Higher multipliers and lower delays generally produce an optimal audio setup. Higher overall values may improve audio quality for slower machines at the expense of a small communications delay. Lower overall values improve audio
responsiveness, but may result in some audio break-up for slower machines.
PC Speaker Audio Warning Setup — These values determine the
frequency and duration your PC plays a sound when there is an incoming call. Click Test to hear a sample tone.
Audio Drivers
To view the installed audio drivers:1 Select Start > Settings > Control Panel > Multimediafor all operating systems other than Windows XP.For Windows XP select Start > Control Panel > Sounds and Audio Devices.
2 Perform one of the following:
Windows 9x — Select the Advanced tab. Windows NT — Select the Devices tab.
Windows 2000, XP — Select the Hardware tab.
22 GETTING STARTEDWITHTHEPCXSETAPPLICATION
Table 3 summarizes the audio cards that are supported for desktop computers.
Table 3 Supported Audio Cards for Desktop Computers
Audio Cards Manufacturer OS
Sound Blaster PCI 128
Sound Blaster 16 Wave Effects
Monster sound MX300PCI
Sound Wave 128 PCI
Creative Labs Creative Labs Diamond SiiG Inc Windows 98/NT Windows 98 Windows 98 Windows 98
Sound Blaster 16
SC 16-3D ISA
Monster Sound 3D
UltraSound PnP Creative Labs Aztec Diamond Gravis Windows 98 Windows 98 Windows 98 Windows 98 Audiotrex 3D-XG PCI-128 Wave Mediatrix Periph Aztec Windows 98 Windows 98
Sound Blaster AWE64 Value
Sound Blaster Live PCI
3D Sound PnP
WaveRider Platinum 3D ISA
Headset Recommendation 23
Table 4 summarizes the audio cards supported for laptop computers.
Headset
Recommendation
Audio and voice quality can vary greatly among makes and models of headsets. For best results with the pcXset software, 3Com recommends that you use a high-quality headset.
3Com recommends the following headsets:
Plantronics DSP 100 GN Netcom GN8110
Table 4 Supported Audio Cards for Laptop Computers
Supported Audio Cards Manufacturer OS
SC16-3D ISA
WaveRider Platinum 3D ISA
PCI-128 Wave
Sound Blaster 16
Sound Blaster 16 WavEffects PNP
Sound Blaster Live PCI
Sound Blaster PCI 128
Monster Sound MX200 True3D PCI
Monster Sound MX300 PCI
Monster Sound 3D
16-bit Media Audio
SoundWave 128 PCI
3D Sound PnP
WaveForce 192XG 16-bit
Audiotrex 3D-XG
UltraSound PnP
Sound Blaster AWE64 Value
Crystalizer Tidal Wave32 PnP
Creative SB Live! Basic (WDM)
24 GETTING STARTEDWITHTHEPCXSETAPPLICATION
Editing the Access
Button Labels and
Tooltip Pop-ups
You can edit the labels to the right of the Access buttons on both the NBX Telephone display and the Windows style display. You can add brief text that describes the feature or speed dial that you have assigned to the button. You can also add a description that appears as a “tooltip” comment when you place the cursor over any of the buttons.
To edit the label and tooltip of a button:
1 Right-click any of the Access buttons. The Button Properties dialog box appears (Figure 7).
Figure 7 Button Properties Dialog Box
2 Enter a brief, descriptive name in the Button text field.
If the name is longer than five or six characters, it may be truncated on the Access button labels.
3 Enter a more descriptive comment in the Tooltip text field. You can use up to 100 characters.
Keyboard Shortcuts 25
Keyboard Shortcuts
Table 5 lists the keyboard shortcuts you can use instead of clicking telephone control buttons with the mouse.Alternatively, you may use 0 through 9 and * on the numeric keypad on your computer’s keyboard. Use “.” (the period key) for hash or pound. Before you use the keypad, verify that Num Lock is on.
Troubleshooting
This section outlines possible problems that you may encounter when you install and use the pcXset software for the first time. It includes error messages, problem descriptions, and recommended solutions. The pcXset log file (pcXset.log) is in the pcXset installation directory.Some of the errors described in this section are audio card problems. Audio card errors have an error number of [8004xxxxH].
Table 5 Keyboard Shortcuts
Press Key To Select
0through 9 Digits 0 through 9
* Star
# Hash or pound
F1 through F12 Line Appearance Buttons L1 through L12
Esc Speaker
S Speaker
R Redial
C Conference
T Transfer
H Hold
F Forward Voice Mail
V Voice Mail (Msg)
A Handsfree
M Mute
P Program
Up Arrow Volume Up
Right Arrow Volume Up
Down Arrow Volume Down
26 GETTING STARTEDWITHTHEPCXSETAPPLICATION
Audio Buffers Need Adjusting
Choppy audio occurs during telephone conversations or during the audio test in the Configuration Wizard, or there are delays in audio playback during telephone conversations.
Description
This problem is caused by incompatible audio buffer size settings.
Solution
Audio buffer size settings are expressed as two values: Delay and Multiplier. The product of these numbers represents the overall size of the buffer pool. Lower values for these numbers reduce echo delay. Higher values increase audio quality. Change these values in any of these ways:
Select Configuration Wizard > Audio > Audio Configuration. Select Configuration Wizard > Mic > Audio Configuration. Select Options > Advanced.
These numbers depend on your computer hardware and operating system. Experiment with different value combinations to see how low you can adjust the product of the delay and multiplier and still achieve good audio quality.
Audio Sounds Distorted
Audio sounds choppy while on a conference call.
Description
Some Ethernet cards require the accept all multicasts option to be selected for conference calls.
Solution
1 Run the pcXset software.
2 Select Tools > Options > Advanced > Accept All Multicasts.
Audio Stream Error This type of error occurs when the pcXset software is trying to play or record audio.
The following messages appear during an audio test, microphone test, or during pcXset startup:
Troubleshooting 27
Error running audio stream from engine. Could be caused by accidentally running pcXset and the configuration wizard at the same time.
A similar message may appear in the log file:
ERROR: XXXXX [80044802H]
Error running audio stream from engine. Could be caused by accidentally running pcXset and the configuration wizard at the same time.
Error code: [80041000H] Error Message: XXXXX Context: XXXXX
This error has occurred in the Wave Audio object. Please contact your technical support
representative.
A similar message may appear in the log file:
ERROR: XXXXXXXX [80041000H]
This error has occurred in the Wave Audio object. Please contact your technical support
representative.
Description
You cannot hear pcXset audio with the audio card.
Solution
1 Select one of these:
Windows 9x and Windows NT
Start > Settings > Control Panel > Multimedia > Audio
Windows 2000
Start > Settings > Control Panel > Sounds and Multimedia > Audio
Windows XP
Start > Control Panel > Sounds and Audio Devices > Audio
28 GETTING STARTEDWITHTHEPCXSETAPPLICATION
3 Use Windows Sound Recorderto verify that you can play wave files. See the solution under “Full-Duplex Errors”, later in this guide, for more information.
DTMF Tones Echo Back to the Analog Line Card
The pcXset software cannot make external calls through any Analog Line Card port, but calls to internal extensions are successful.
The call fails the first time, but succeeds if you click the Redial button.
Description
This error occurs when DTMF tones echo from the PC speakers back into the microphone, causing the Analog Line Card to receive each outpulsed digit twice.
Solution
Select Options > Display > Substitute For DTMF Tones. This option replaces DTMF tones with clicks. The Analog Line Card ignores the clicks when they echo back to the TLIM. You can also use headphones to alleviate this problem.
Full-Duplex Errors Full-duplex audio is an audio card’s hardware ability to play and record audio at the same time.
The following related message appears during an audio test or microphone test:
Error code: [80042004H] Error Message: XXXXX Context: XXXXX
The likely cause of this error is lack of full-duplex audio.
A similar message may appear in the log file:
ERROR: XXXXX [80042004H]
Troubleshooting 29
Description
This error occurs when the pcXset software attempts to use the audio card while another application is recording audio. It also happens when the audio driver does not support full-duplex audio.
You can use Windows Sound Recorder to verify that the audio subsystem supports full-duplex audio by running two Windows Sound Recorder applications at once. Play a wave file in one application while recording in another application. If you get an error message, your audio card does not support full-duplex audio.
Solution
Replace the audio card with one capable of full-duplex audio, or obtain the latest drivers for the audio card. See “Audio Drivers” for more information.
Incorrect IP Address for the Call Processor
The following message appears during pcXset startup or after you click the Test buttonon the IP Info tab of the Configuration Wizard.
Error code: [80043002H] Error Message: XXXXX Context: XXXXX
This error has occurred in the Winsock subsystem. Please check your IP configuration. Especially your NCP IP address.
A similar message may appear in the log file:
ERROR: XXXXX [80043002H]
This error has occurred in the Winsock subsystem. Please check your IP configuration. Especially your NCP IP address.
Description
30 GETTING STARTEDWITHTHEPCXSETAPPLICATION
Solution
1 Verify the Call Processor IP address. See “Configuring the pcXset Software” for more information.
2 Verify the network connection by pinging the Call Processor from the DOS prompt.
NBX Packet Driver Error (Windows NT Only)
The following message appears during pcXset startup:
Error code: [80046000H] Error Message: XXXXX Context: XXXXX
This error has occurred in the Communications object. Please contact your technical support representative.
A similar message may appear in the log file:
ERROR: XXXXX [80046000H]
This error has occurred in the Communications object. Please contact your technical support representative.
Description
This error occurs if the system cannot open the packet driver (Layer 2).
Solution
1 Select Start > Options > Control Panel.
2 The next steps depend on your operating system:
Windows NT — Select Network > Services and look for the NBX
Packet Driver entry.
If the NBX Packet Driver entry is missing, install the driver manually (select Network > Protocols). The driver is in the Packetsubdirectory of the pcXset application directory.
Troubleshooting 31
Windows 2000 — Select Network and Dialup Connections icon >
Local Area Connections > General and look for the NBX Packet Protocol Driver entry.
If the NBX Packet Driver entry is missing, click the Install buttonto install the driver manually. The driver is in the Packetsubdirectory of the pcXset application directory.
If the NBX Packet Driverentry exists, you must determine if the driver has been bound to the network adapters. Select Network and Dialup Connections > Advanced > Advanced Settings. The driver should be visible in the Adapters and Bindings tab.
If not, try uninstalling and reinstalling the driver.
The pcXset Software Won't Initialize
If the pcXset software does not initialize, a message like the following may appear:
ERROR: [80046000H]
Error Message: H3InitDefault failed
Context: Starting
This error has occurred in the Communications object. Please contact your technical support representative.
Solution
If you receive an initialization error, do one or more of the following:
Verify that you have enough pcXset licenses. The SuperStack 3 NBX
system ships with only one pcXset license.
To view the number of user licenses that you have installed:
1 Log on to the NetSet utility as an administrator.
2 Select Operations > Licenses.
You can purchase additional licenses from your authorized NBX reseller.
Verify that you have connectivity with the Call Processor. Try to ping
32 GETTING STARTEDWITHTHEPCXSETAPPLICATION
ping the Call Processor, then the pcXset software cannot communicate with it either.
If you are attempting to use autodiscover, verify that Auto Discover
Telephones is enabled. In the NetSet utility, select System Configuration > System Settings > System-wide.
Verify the Call Processor MAC address. Select Configuration Wizard >
MAC Info > Reports > System Data.
Verify that you have selected the active network adapter on the MAC
Info tab. If you are unsure which device to select, select Start > Settings > Control Panel > Devices to see which adapter driver is started, or select Start > Settings > Control Panel > Networks > Adapters to see the available adapters.
PC Standby Mode Causes pcXset Calls to be Missed
The pcXset software does not wake a PC from standby mode on an incoming call, so the user misses incoming calls.
Description
The pcXset software provides no mechanism to wake a computer from standby mode. However, you can set it to prevent the machine from entering standby mode.
Not all computers support standby mode properly. Therefore, pcxset may not be able to stop the PC from going into standby mode.
Solution
Select Options > Display > Prevent Machine from entering Standby Mode.
Audio Driver Configuration Error
The following message appears during an audio or microphone test, or during the pcXset software startup:
Error code [8007xxxxH] Error starting stream. Ensure that this computer’s multimedia devices are properly installed.
A similar message may appear in the log file:
ERROR: Error starting NBX pcXset [8007xxxxH] Error starting stream. Ensure that this computer’s
Troubleshooting 33
Description
The Waveform Audio interface returned an error code. There is a problem with the wave play device.
Solution
1 Select Start > Settings > Control Panel.
Windows 9x and Windows NT — Select Multimedia. Windows 2000 — Select Sounds and Multimedia. Windows XP — Select Sounds and Audio Devices.
2 Verify that there are entries in the Preferred Device drop down lists for
Playback and for Recording.
3 To verify that you can play wave files:
Windows NT and Windows 9x — Select Start > Programs >
Accessories > Sound Recorder.
Windows 2000 and Windows XP — Select Start > Programs >