CentreVu
®
Explorer II
Version 1.0
Installation for
Windows NT
®
585-218-201
Comcode 108456609
Issue 1.0
document was complete and accurate at the time of printing. However, information is subject to change.
Your Responsibility for Your System’s Security
Toll fraud is the unauthorized use of your telecommunications system by an unauthorized party, for example, persons other than your company’s employees, agents, subcontractors, or persons working on your company’s behalf. Note that there may be a risk of toll fraud associated with your telecommunications system and, if toll fraud occurs, it can result in substantial additional charges for your telecommunications services. You and your system manager are responsible for the security of your system such as programming and configuring your equipment to prevent unauthorized use. The system manager is also responsible for reading all installation, instruction, and system administration documents provided with this product in order to fully understand the features that can introduce risk of toll fraud and the steps that can be taken to reduce that risk. Lucent Technologies does not warrant that this product is immune from nor will prevent unauthorized use of common-carrier telecommunication services or facilities accessed through or connected to it. Lucent Technologies will not be responsible for any charges that result from such unauthorized use.
Lucent Technologies Fraud Intervention
If you suspect that you are being victimized by toll fraud and you need technical support or assistance, call the Technical Service Center Toll Fraud Intervention Hotline at 1-800-643-2353.
Trademarks
●
CentreVu, DEFINITY, and NetCare are registered trademarks of Lucent Technologies.
●
Intel and Pentium are registered trademarks of Intel Corporation.
●
Java is a registered trademark of Sun Microsystems, Inc.
●
Microsoft, Windows, Windows NT, and SQL Server are registered trademarks of Microsoft Corp.
●
Netscape Navigator is a trademark of Netscape Communications Corporation.
●
pcAnywhere is a copyright of Symantec Corporation.
●
All other product names mentioned herein are the trademarks of their respective companies.
Ordering Information
Call: Lucent Technologies Publications Center
Voice: 1-800-457-1235
International Voice: +1-317-322-6416 Fax: 1-800-457-1764
International Fax: +1-317-322-6699
Write: Lucent Technologies BCS Publications Center
2855 N. Franklin Road Indianapolis, IN 46219 U.S.A.
Order: CentreVu® Explorer II Installation for Windows NT®
Guide
Document No. 585-218-201 Comcode 108456609
For more information on Standing Orders, or to be put on a list to receive future issues of this document, please contact the Lucent Technologies Publications Center.
Lucent Technologies National Customer Care Center
Lucent Technologies provides a telephone number for you to use to report problems or to ask questions about your call center. The support telephone number is 1 800 242-2121.
Document Support Telephone Number
Lucent Technologies provides telephone numbers for you to use to report errors or to ask questions about the information in this document. The support telephone numbers are:
Voice: 1 888 584-6366 and
International Voice: +1-317-322-6848.
European Union Declaration of Conformity
Lucent Technologies Business Communications Systems declares that the equipment specified in this document conforms to the referenced European Union (EU) Directives and Harmonized Standards listed below:
EMC Directive 89/336/EEC Low Voltage Directive 73/23/EEC
The “CE” mark affixed to the equipment means that it conforms to the above Directives.
Disclaimer
Intellectual property related to this product (including trademarks) and registered to AT&T Corporation has been transferred to Lucent Technologies Incorporated. Any references within this text to American Telephone and Telegraph Corporation or AT&T should be interpreted as references to Lucent Technologies Incorporated. The exception is cross references to books published prior to December 31, 1996, which retain their original AT&T titles.
Heritage Statement
Table of Contents
CentreVu Explorer II
Introduction . . . 1-1 What is CentreVu® Explorer II? . . . 1-1 Purpose . . . 1-2 Background . . . 1-3 New Features . . . 1-4 Audience. . . 1-5 System Overview . . . 1-5 Network Diagram . . . 1-6 Installation Checklist . . . 1-8 Pre-installation . . . 1-8 Installation . . . 1-9 Installation Dependencies . . . 1-10 ECS/Switch Requirements . . . 1-10 CentreVu CMS Requirements . . . 1-10 External Call History Interface (ECHI) Overview. . . 1-10 Customer Responsibilities . . . 1-11 Server Requirements and Recommendations. . . 1-12 Processor Requirements . . . 1-12 Performance Requirements . . . 1-13 Hard Disk Drives . . . 1-14 Remote Access . . . 1-15 System Software Configuration . . . 1-15 Co-Residency Issues . . . 1-15 Disk Storage Requirements . . . 1-16 Optional Recommendations . . . 1-17 Network Connectivity . . . 1-19 Client Requirements and Recommendations . . . 1-20 Installation Information Chart . . . 1-21 CentreVu Explorer II Installation Preparation. . . 1-22 Setting Up the CentreVu Explorer II Server . . . 1-24 Setting Up CentreVu Explorer II Client . . . 1-25 Setting Up CentreVu CMS . . . 1-26 CentreVu CMS Login and Password. . . 1-27 CentreVu CMS Modem Address. . . 1-28 Setting Up Windows NT . . . 1-28 Provisioning and Activation of ECHI . . . 1-29 Obtaining a CentreVu Explorer II License . . . 1-30
Loading CentreVu Explorer II Software . . . 2-4 Installing SQL Server 7.0 . . . 2-4 Administration Passwords . . . 2-4 Installing CentreVu Explorer II Software . . . 2-5 Creating the CentreVu Explorer II Database . . . 2-12 Populating the Data . . . 2-17 Launching CentreVu Explorer II . . . 2-18 pcAnywhere® Security Considerations. . . 2-19 Uninstalling the CentreVu Explorer II Software . . . 2-21 Uninstalling CentreVu Explorer II Software . . . 2-22 Removing the Database . . . 2-28
Upgrading to CentreVu Explorer II Software . . . 3-1 Overview . . . 3-1 Upgrading to SQL Server 7.0 . . . 3-2 Upgrading the CentreVu Explorer II Software . . . 3-3 Creating the CentreVu Explorer II Database . . . 3-10 Converting CentreVu Explorer 1.x Data . . . 3-15
Maintenance . . . 4-1 Overview . . . 4-1 Backing Up SQL Server Database. . . 4-2 Checking for Security . . . 4-3 Logins and Passwords Stored in the Database . . . 4-3 Administration Utilities . . . 4-4 Database Administration . . . 4-11 Accessing Database Administration . . . 4-11 Determining Average Daily Call Record Volumes. . . 4-13 Discarding or Archiving Data. . . 4-14 Restoring Data . . . 4-20 Migrating CMS Data Dictionary Synonyms . . . 4-21
Troubleshooting and Maintenance Routines. . . 5-13 Expanding the Database. . . 5-13 Clearing Out the Transaction Log . . . 5-13 Expanding the tempdb File . . . 5-14 Troubleshooting Tips for Windows NT . . . 5-15 Windows NT Event Log Error Messages Types . . . 5-15 Installation Error Messages . . . 5-15 Java Web Server Error Messages. . . 5-17 Data Import Service Messages. . . 5-19 Open Database Connection (ODBC)
Error Messages. . . 5-20 Database (DB)-Library Error Messages . . . 5-20 Log-in Error Messages. . . 5-21 Service Affecting Automated Procedures . . . 5-21 Data Import . . . 5-21 Database Maintenance Procedures . . . 5-22
Appendix . . . A-1 Windows NT Server Connection Assistance . . . A-1 Establishing Server Network Connection . . . A-2 Hardware . . . A-2 Software . . . A-2 CentreVu Explorer II Server Identification. . . A-3 CentreVu Explorer II Protocol Assignment . . . A-4
Glossary . . . GL-1
1
CentreVu
Explorer CentreVu Explorer II
Introduction
1What is
CentreVu®
Explorer II?
1CentreVu Explorer II transforms DEFINITY® Enterprise Communications Server (ECS) Call Center information into powerful knowledge for call centers’ business needs. Information collected from the CentreVu Call Management System (CMS), is compiled, formatted, and presented to the user through a Web browser to illustrate critical call center activity.
CentreVu Explorer II handles critical call center activity by recording and supplying specific information about a particular call. For example, CentreVu Call
Management System (CMS) indicates that a call has abandoned and CentreVu Explorer II provides more specific information about that abandoned call. The following type of information can also be gathered on CentreVu Explorer II:
l How many callers abandoned after holding for more than 30 seconds?
l Which agent splits transfer the most calls?
In addition to the CentreVu Explorer 1.0, 1.1 and 1.2 functionality, CentreVu Explorer II provides:
l More deployment options
l More flexible queries
l More results presentation alternatives
l More flexibility to export data
l Support for multiple CMSs.
Purpose
1Background
1When CentreVu Explorer 1.0 was released in 1997, it quickly revolutionized the way call center managers thought about call center data. Call switch data—not previously considered “information” because it could not be easily accessed—could now be queried upon and used to more efficiently and cost-effectively run call centers. Customer feedback showed that customers liked CentreVu Explorer’s friendly query tools, its ease of administration, and the familiar Web interface.
One of CentreVu Explorer’s most requested features, is that no client desktop software is needed. Nothing needs to be loaded onthe users’ PCs to allow them access to CentreVu Explorer Version 1.0 or later software. This eliminates the need to install or upgrade client software and minimizes the use of desktop resources. Windows and a TCP/IP connection to a Language Area Network (LAN) were the only client requirements.
Previous releases of CentreVu Explorer software include:
l CentreVu Explorer 1.0
l CentreVu Explorer 1.1
l CentreVu Explorer 1.1.1
l CentreVu Explorer 1.1.2
l CentreVu Explorer 1.2
l CentreVu Explorer 1.2.2.
New Features
1CentreVu Explorer II retains all of the features in the previous versions of CentreVu Explorer (1.0, 1.1, and 1.2) which includes access to CentreVu Call Management System’s External Call History (ECH) elements in a logical, easy-to-analyze format. The CentreVu Explorer II software is easy to install, maintain, and does not require any client software.
The CentreVu Explorer II new features include:
l Enhanced query capabilities
l Conditional queries: and/or, <, >, =, not =, grouping
l Ability to easily save queries
l Time of day and day of week queries
l Support for a variety of databases (for example, SQL Server and INFORMIX)
l Compatibility with the Windows NT and Sun Solaris platforms
l Data exportability to other applications
l Support for multiple CMSs
l Retention of the “Explorer Classic” look and feel
l Expanded number of row limitations on query results (for example, more than 500 rows can now be used)
l Migration of some CentreVu CMS Data Dictionary synonyms to the CentreVu Explorer II server
l Ability to move between multiple web frames—this eliminates the need to back out of web frames
l Multiple window capabilities allow queries to be viewed simultaneously
l Some maintenance capabilities are automated (for example, data discard).
For more information about the features offered with CentreVu Explorer II, see the
Audience
1This guide is written for customers of the CentreVu Explorer II solution, and includes anyone who is installing the CentreVu Explorer II software (for example, Lucent NetCare® Professional Services, Technical Service Center, Maintenance and Provisioning, Call Management System Helpline, Sales Design Support Center (SDSC), and anyone else who might use or support a CentreVu Explorer II
installation and setup).
In general, the Lucent NetCare Professional Services is responsible for installing and training on the CentreVu Explorer II software. This CentreVu® Explorer II Installation for Windows NT® guide is for anyone who needs to know:
l Software installation
l Maintenance for CentreVu Explorer II
l Suggestions for installers concerning the troubleshooting of the CentreVu Explorer II solution.
System Overview
1CentreVu Explorer II collects data from a Lucent Technologies call center
environment. Data is delivered to an external Windows NT® server through a local area network (LAN) connection to the CentreVu Call Management System (CMS).
Files are transmitted over the local area network at a rate based on the CentreVu CMS settings. CentreVu Explorer II reads these files, formats the data, and stores it in a local database. This data is accessed through a query engine utilizing a web browser front end as an access vehicle.
Network Diagram
1The following is a list of the network requirements:
l ECS/switch
l CentreVu CMS
l CentreVu Explorer II server
l Local area network
The following diagram indicates a typical network configuration utilizing CentreVu Explorer II.
ECH
ECH
CentreVu Explorer II Network Diagram
NOW !
Multiple database options including Informix, SQL Server, Oracle* *Date for Oracle availability to be determined. Contact CenterPoint Solutions for more information.
Explorer II Server running Sun Solaris
or Windows NT DEFINITY PBX DEFINITY PBX CMS DEFINITY PBX CMS
Local Area Network with TCP/IP Protocol External Call
History Software (granular call data based on CMS reports)
Client running only browser
Installation Checklist
1This section includes a high-level overview of the following information:
l Pre-installation
l Installation
l Important Information.
Pre-installation
1Prior to beginning your installation, you must make sure that your computer meets the minimum system requirements. If your computer does not match up to the requirements described in this section, you may have problems in installing and using the CentreVu Explorer II application.
CentreVu Explorer II supports a variety of client and server platforms including various browser clients. The pre-installation platform requirements are as follows:
1. The server runs on Windows NT 4.0 with an SQL Server.
The Service Pack level for Windows NT 4.0 is Service Pack 4 (SP4), and the SQL Server versions supported is SQL Server 7.0.
2. There is one version of server code for all platforms.
3. The client supported can be any platform capable of supporting the selected browsers.
This includes, but is not limited to, Windows 95, 98, Windows NT 4.0, and any Sun hardware platform. For Sun systems, see the CentreVu® Explorer II Installation for Sun (585-218-202) guide for details.
4. The CentreVu Explorer II application supports standard browsers.
5. The application uses the Java plug-in for the non-standard browsers.
The Java plug-in allows older browsers to use the Custom Query Builder feature.
For more details, see Chapter 5, “Custom Query Builder,” in the CentreVu® Explorer II Version 1.0 User Guide (585-218-200).
Installation
1Installation Dependencies
1ECS/Switch Requirements
1The ECS/switch requires a communication link to the CentreVu CMS. Appropriate automatic call distribution (ACD) translations must be configured to generate external call history (ECH) results on the CentreVu CMS. These results include measured agents, vectors, vector directory numbers (VDNs) and other applicable call center translations.
No exceptional connection logistics exist for the CentreVu Explorer II product. Standard ECS/switch communication to CentreVu CMS is used.
CentreVu
CMS Requirements
1The External Call History Interface (ECHI) feature must be authorized in the CentreVu CMS. See setup information in the CentreVu Call Management System Release 3 Version 8 External Call History Interface (585-210-912) document. Contact your Lucent Technologies representative or distributor for details.
External Call History Interface (ECHI) Overview
1The External Call History Interface is an optional CentreVu CMS feature, which allows for the transfer of CentreVu CMS Release 3 Version 8 call record files (call history data files) to another computer for processing.
This feature is useful for call centers with a high volume of call traffic. It allows a much higher volume of call data to be processed and stored because the CentreVu CMS computer can process only a limited amount of call data.
Customer Responsibilities
1Who Is Responsible for CentreVu Explorer II Server (CES)?
It is the owner of the CentreVu Explorer II server’s responsibility to maintain the server. This maintenance includes making regular database backups, performing SQL Server database administration, and verifying processing of External Call History (ECH) data. Specific descriptions of the maintenance that must be performed are explained in detail in this document.
While responsibility for the CentreVu Explorer II server seems logically to fall to the telecommunications group, in many cases the Information Systems (IS) department is better equipped to maintain the product because it is based primarily on the Windows NT operating system and the Microsoft BackOffice Suite.
You must do the following to transfer call history data:
1. Purchase the External Call History Interface (ECHI) package.
2. Contact your Lucent representative to have the ECHI feature authorized and installed. If you are an international customer, contact your Lucent
Technologies representative or distributor.
3. Lucent NetCare Professional Services sets up the connection between the CentreVu CMS computer and the computer that receives the data.
Server Requirements and Recommendations
1CentreVu Explorer II employs industry standard components to deliver access to the ECS switch’s CentreVu CMS Call History data. The final system configurations may vary in individual call centers. Recommendations for the CentreVu Explorer II configuration follow. Hardware performance varies based on actual system configuration.
Two server platforms are available for CentreVu Explorer II which are as follows:
l Windows NT—see this guide for details.
l Sun Solaris—see the CentreVu Explorer II, Version 1.0, Installation for Sun
(585-218-202) guide for details.
Processor Requirements
1The minimum recommended processor to be used with CentreVu Explorer II is the Intel* Pentium† Pro because of its 32-bit software architecture. Since all
components of CentreVu Explorer II are 32-bit code, your system benefits from the Pentium architecture. Additionally, faster processor speeds improve the
performance of CentreVu Explorer II.
The minimum recommended processors for the CentreVu Explorer II server are as follows:
l Pentium Pro 250 Mhz or greater
l Pentium Pro, multiple processor architecture for large call centers.
Performance Requirements
1Call centers of all sizes benefit from CentreVu Explorer II. Call centers taking 100,000 or more ACD calls per day quickly accumulate large volumes of data. Smaller call centers taking less than 10,000 ACD calls per day also accumulate large volumes of data over a period of months.
All performance measurements are based on call segments. A call segment is each record in the ECH file sent by the CentreVu CMS. A call that is delivered to an agent, who then transfers to another agent, contains two call segments.Therefore, the following capabilities are required when running CentreVu Explorer II running on Windows NT for populating call segments:
l 8,500 call segments an hour
— 128 megabytes of memory
— 266 MHz chip.
l 15,000 call segments an hour
— 512 megabytes of memory
— dual 400 MHz chip.
l For more call segments an hour use long term considerations—for example, a motherboard with the capacity of 1 gigabyte (GB) of RAM.
Hard Disk Drives
1The amount and type of local disk storage directly impacts CentreVu Explorer II’s ability to store and retrieve information. A direct correlation exists between local disk capacity and the total number of call records that can be stored. Actual disk space usage will vary by call center depending on the number of ACD calls per day, the average number of segments per call, and the number of days that CentreVu Explorer II is required to keep data online.
See the “Disk Storage Requirements,” section in Chapter 1, “Introduction,” which shows disk storage requirements for a variety of daily call volumes. CentreVu Explorer II operates more efficiently with Ultra Fast Wide Small Computer System Interface (SCSI) disk drives. Having the option to add Input/Output (I/O) controllers allows for performance increases as the situation dictates.
The following hard disk drives are recommended:
l Multiple 4GB and 8GB drives (depending on storage requirements)
l Drive type—Ultra Fast Wide SCSI
Remote Access
1The CentreVu Explorer II server requires a 28.8 (or greater) high-speed modem and also requires that the pcAnywhere software be installed. Remote access is necessary for system diagnosis, maintenance, and software updates. The pcAnywhere software is shipped om a separate CD withe the CentreVu Explorer II software. To install pcAnywhere, see the pcAnywhere installation instructions.
System Software Configuration
1CentreVu Explorer II employs industry standard components to deliver access to CentreVu CMS Call History data. Therefore, the final system configuration may vary across call centers. It is the customer’s responsibility to purchase and install the following required software packages for CentreVu Explorer II Version 1.0:
l Microsoft Windows NT Server 4.0 Service Pack 4
l Microsoft SQL Server 7.0
l Microsoft Internet Explorer or Netscape Navigator.
In the context of this guide, CentreVu Exchange Server (CES) refers not only to the CentreVu Explorer II software package, but also to all supplementary software required for the product to function. It is the customers responsibility to purchase and install the supplementary software.
Co-Residency Issues
1CentreVu Explorer II is configured at installation to use all resources of the server on which Explorer II is loaded.
Caution It is strongly recommended that the server remain fully dedicated to CentreVu Explorer II. The loading and running of additional software on the CentreVu Explorer II server is strongly
Disk Storage Requirements
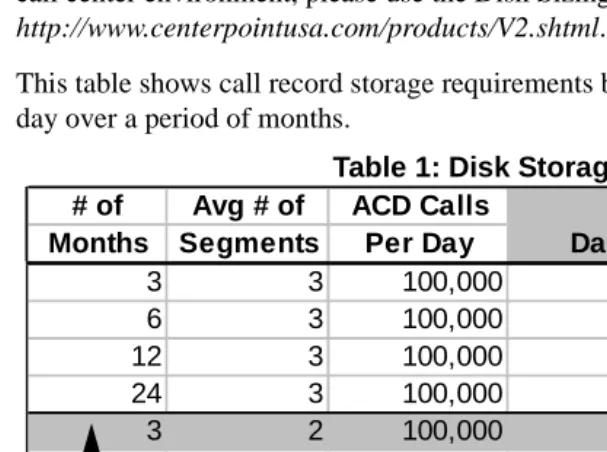
1The required amount of disk space is a function of the average daily call volume, the average number of call segments per call, and the desired retention period. The table below gives some example sizing information. For a more specific estimate of your call center environment, please use the Disk Sizing Tool that can be found at: http://www.centerpointusa.com/products/V2.shtml.
This table shows call record storage requirements based on the number of calls per day over a period of months.
Table 1: Disk Storage
Example
Question: How much disk space do I need on my server to store three months of call records?
Answer: If your call center averages 100,000 calls per day with an average of two
segments per call, then the above table shows that you would need at least 12.5 GB of disk space allocated for call records on your server.
l Daily storage requirement = 139 MB
l
# of Avg # of ACD Calls
Months Segments Per Day Daily Total
3 3 100,000 207.1 18,600.0
6 3 100,000 207.1 37,199.5
12 3 100,000 207.1 74,398.5
24 3 100,000 207.1 148,796.6
3 2 100,000 139.0 12,463.1
6 2 100,000 139.0 24,925.7
12 2 100,000 139.0 49,850.9
24 2 100,000 139.0 99,701.4
6 2 20,000 28.2 4,985.5
12 2 20,000 28.2 9,970.6
24 2 20,000 28.2 19,940.7
6 2 5,000 7.4 1,246.7
12 2 5,000 7.4 2,493.0
24 2 5,000 7.4 4,985.5
Segments—All CentreVu Explorer II information is collected on the database server in the form of call data that is divided by call segments. A segment is defined by the ECS/switch as a logical grouping of call information. Each call that enters the ECS/switch call vector processing has a minimum of one (1) segment. Over the life of the call, information is added to a segment based on the corresponding events occurring during the call’s life, starting from the time it entered vector processing and until vector processing releases all call record information for the call.
For more complete information regarding the format of ECHI data, please refer to the following External Call History Interface documents:
l CentreVu Call Management System Release 3 Version 4 External Call History
Interface (585-215-804)
l CentreVu Call Management System Release 3 Version 5 External Call History
Interface (585-215-824)
l CentreVu Call Management System Release 3 Version 6 External Call History
Interface (585-215-854)
l CentreVu Call Management System Release 3 Version 8 External Call History
Interface (585-210-912).
Optional Recommendations
1We recommend the following components to enhance overall system performance and integrity:
l High-speed modem for remote access. Remote access is desirable for system diagnosis, maintenance, and software updates.
l Uninterrupted Power Supply (UPS).
l Near-line storage—In addition to a resident tape backup, near-line storage may be provided for direct access to archived historical information. Near-line storage may take the form of an optical jukebox for rapid access.
l Digital tape backup—A tape backup is desirable as an archiving mechanism to minimize the requirement for on-line storage and protect valuable Call Center historical information.
l Client 17” SVGA Monitor (or Better)—This is highly recommended due to the amount of information available within a CentreVu Explorer II query. A large monitor allows you to display more information simultaneously and reduces the need for scrolling to view the data.
Network Connectivity
1The Appendix in this guide provides additional network connectivity assistance in connecting CentreVu Explorer II to your local area network (LAN) or wide area network (WAN). In particular, these instructions pertain to the administration of the Microsoft* Windows NT† Server 4.0.
This section provides some suggestions for connecting to the network, however, the LAN, the WAN, and troubleshooting the LAN or WAN are the customer’s
responsibility.
CentreVu Explorer II requires a transmission control protocol/internet protocol (TCP/IP) connection to the CentreVu CMS through a LAN or WAN. The TCP/IP LAN or WAN connection is necessary so that the CentreVu CMS can transfer external call history data to the CentreVu Explorer II server. This same LAN or WAN connectivity allows client workstations to access CentreVu Explorer II through a web browser when using:
l DEFINITY Communications System switch to CentreVu CMS—Standard
CentreVu CMS connectivity.
l CentreVu CMS to CentreVu Explorer II—LAN or WAN connection
running TCP/IP with file transfer protocol (FTP) active. The CentreVu CMS must be running a software module that allows transmission of External Call history files for a local area network.
l CentreVu Explorer II Server to Client—LAN or WAN connection running
TCP/IP.
Note: Refer to the Microsoft software support manuals and your network administrator for further assistance.
Client Requirements and Recommendations
1The client workstation must be able to run a supported web browser. CentreVu Explorer II has been tested with Microsoft Internet Explorer 3.01 and also with Netscape Navigator* 3.x (minimum). Netscape 4.0 or Internet Microsoft Explorer 4.0 are recommended. However, any hypertext markup language (HTML) 2.0 compliant browser will work.
The following configuration is recommended for running CentreVu Explorer II from a PC:
l Pentium central processing unit (CPU) or better
l 90 megahertz (MHz) or higher
l 32MB of RAM or better
l Mouse
l Web browser (HTML 2.0 compliant)
l An Ethernet™ LAN card
l Windows† 95 or Windows NT workstation
l VGA monitor or better. (A terminal with a resolution of 1024 X 768 video resolution or higher makes viewing data easier.)
Installation Information Chart
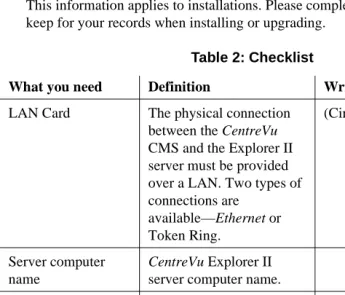
1This information applies to installations. Please complete the following table and keep for your records when installing or upgrading.
The LAN card, server computer name, and server domain name information can be obtained by selecting: Start>Settings>Control Panel>Network (from the Windows NT).
Table 2: Checklist
What you need Definition Write It Down Here
LAN Card The physical connection between the CentreVu CMS and the Explorer II server must be provided over a LAN. Two types of connections are available—Ethernet or Token Ring. (Circle One) Ethernet Token Ring Server computer name
CentreVu Explorer II server computer name.
Server domain name CentreVu Explorer II server domain name.
Server IP address
Server subnet mask
CentreVu
Explorer II Installation Preparation
1Your network connectivity must be verified with the CentreVu CMS using telnet or FTP.
The following checklists are designed to assist Lucent Technologies technical support personnel in the installation of your CentreVu Explorer II server. Please fill in the table below, and to specify additional information or descriptions where requested.
NT Server
Windows NT ❏ Version #________________________________________
❏ Service Pack # ___________________________________
System Memory ❏ Please specify amount: ____________________________
CPU Type ❏ Please specify:___________________________________
Motherboard ❏ Single CPU
❏ Dual CPU
❏ Quad CPU
❏ Other (please specify): _____________________________
IP Address ❏ Please specify: __________________________________
Modem Dial-in # ❏ Please specify: (__ __ __) __ __ __ - __ __ __ __
Login ❏ Please specify: __________________________________
Please fill in the table below and specify additional information or descriptions where requested.
Disk Details
Disk Type ❏ EIDE
❏ SCSI (Ultra SCSI Recommended)
Disk Controller Type
❏ EIDE Controller
❏ SCSI Controller
❏ RAID Array Controller (please specify RAID level): _______________________________________________
❏ Other (please specify):_____________________________
Number of I/O Controllers/ Channels
❏ 1 _____________________________________________
❏ 2 _____________________________________________
❏ Other (please specify): _____________________________
Disk Capacity ❏ Less than 4 GB (please specify): _____________________
Hard disk available for
CentreVu
Explorer II
❏ Please specify: ___________________________________
CD-ROM ❏ Yes
❏ No
Name Resolution ❏ DNS
Setting Up the
CentreVu
Explorer II Server
1Verify that the CentreVu CMS can ping the CentreVu Explorer II server. This test establishes the IP connectivity required for the CentreVu CMS to transfer external call history data to the CentreVu Explorer II server.
Can you successfully ping the CentreVu Explorer II server from the CMS?
— Yes
— No
Fill in the temporary IP address line only if you plan to enable ECHI on CentreVu CMS more than 3 days prior to the scheduled installation date for the CentreVu Explorer II server.
See the “Setting Up CentreVu CMS” section later in this chapter for specific IP address, login/password information, and modem numbers you need for Note: You may need to enlist the assistance of a network administrator to
accurately provide the IP address and network name resolution information.
Enter your Information here...
CentreVu Explorer II server modem number
❏ _______________________________
CentreVu Explorer II IP address
❏ _____-_____-_____-_____
CentreVu Explorer II server system name
❏ _ _ _ _ _ _ _ _ _ _ _ _ _ _ _ (Choose a name no more than 15 characters in length)
CentreVu Explorer II login/password information
❏ _______________________________
Setting Up
CentreVu
Explorer II Client
1If you plan to access the CentreVu Explorer II server from a client workstation, verify that you can reach the CentreVu Explorer II server by pinging it from a workstation.
Can you successfully ping the CentreVu Explorer II from a client workstation?
— Yes
Setting Up
CentreVu
CMS
1Lucent Technologies’ NetCare Professional Services require the following information for each CentreVu CMS:
l Internet Protocol (IP) addresses
l Login/password information
l Modem numbers.
Use the following table to record CentreVu CMS IP addresses:
CentreVu CMS IP Addresses
Which CentreVu CMS? Enter your information here...
CMS1 ❏ _____-_____-_____-_____
CMS2 ❏ _____-_____-_____-_____
CMS3 ❏ _____-_____-_____-_____
CMS4 ❏ _____-_____-_____-_____
CMS5 ❏ _____-_____-_____-_____
CMS6 ❏ _____-_____-_____-_____
CMS7 ❏ _____-_____-_____-_____
CentreVu CMS Login and Password
1 Use the following table to record CentreVu CMS login and passwordinformation:
CentreVu CMS Login and Password Information
Which CMS? Enter your Login here... Enter your Password here...
CMS1 ❏ ____________________ ❏ ____________________
CMS2 ❏ ____________________ ❏ ____________________
CMS3 ❏ ___________________ ❏ _____________________
CMS4 ❏ ____________________ ❏ ____________________
CMS5 ❏ ____________________ ❏ ____________________
CMS6 ❏ ____________________ ❏ ____________________
CMS7 ❏ ____________________ ❏ ____________________
CentreVu CMS Modem Address
1 Use the following table to record CentreVu CMS modem addresses:Setting Up
Windows NT
1Use the instructions provided by Microsoft Corporation to set up your Windows NT CentreVu CMS Modem Addresses
Which CentreVu CMS? Enter your information here...
CMS1 ❏ ____________________
CMS2 ❏ ____________________
CMS3 ❏ ____________________
CMS4 ❏ ____________________
CMS5 ❏ _____________________
CMS6 ❏ _____________________
CMS7 ❏ _____________________
Provisioning and Activation of ECHI
1Call your Lucent representative to schedule activation of ECHI.
Lucent Technologies Professional Services require the following information: Note: ECHI should be activated within 24 hours prior to the installation of the
CentreVu Explorer II server software. Activation of ECHI requires a shutdown and restart of the CentreVu CMS. Care should be taken to schedule this appropriately.
Has External Call History Interface been installed on CMS? Yes No
CentreVu CMS1 ❏ ❏
CentreVu CMS2 ❏ ❏
CentreVu CMS3 ❏ ❏
CentreVu CMS4 ❏ ❏
CentreVu CMS5 ❏ ❏
CentreVu CMS6 ❏ ❏
CentreVu CMS7 ❏ ❏
Obtaining a
CentreVu
Explorer II License
1CentreVu Explorer II will not run without a valid license. A license must be generated for each CMS that is attached to the CentreVu Explorer II server and each CMS can have up to eight ACDs.
Each instance of CentreVu Explorer II software must have a license. The license includes a unique ID number that is based on an algorithm that takes into account the end-user’s environment.
The following is an example of the License form.
License Request
Thank you for purchasing CenterPoint Solutions’ software. Please fill out the following License Request form, sign it, and fax it to CenterPoint Solutions at 303-382-6301.
Check the box for the product you wish to license: Agent Assist™
q Agent Observing
q Malicious Call Recording
q C.E.O.
q S.T.A.R.
q AgentNow!
Other Products
q CenterVu® Explorer 1.2e
q CenterVu® Explorer II
q CallBack Manager
q Form Manager
Company Information
Company Name: Address: City: State: Postal Code: Phone #: Fax #: Billing Contact Name: Billing Contact Phone #:
Required License Information
System Administrator: Phone #: E-mail: Machine Name: IP Address (for CentreVu Explorer II): Number of ACDs (for CenterVu Explorer II): Customer IL #: Order #:
Lucent Technologies Contact Information
Account Team Representative: Representative E-mail: Phone #:
Product Agreement
Signature indicates the customer has agreed and accepted the Software Terms and Conditions as outlined in the License Agreement.
Signed and Agreed To:
Name Date
2
CentreVu
Explorer CentreVu Explorer II
Installing and
Uninstalling the
Software
2Overview
2The purpose of this chapter is to provide the procedures for installing and uninstalling the CentreVu® Explorer II software and other software components. The following list provides a high-level view of the installation process:
● Checking the installation for the necessary Operating System Software
(Windows NT®)
● Checking for the installation of the correct Service Pack for Windows NT
● Checking the installation of the SQL Server
● Checking the setup and installation of the pcAnywhere ® software (the remote
access software for Windows NT)
● Checking that after completing the installation an entry is placed in the log with
the installation date
Installation Prerequisites
2The following list represents the complete set of software that is required to build a functioning CentreVu Explorer II server from a server grade PC. It is assumed that the PC has sufficient hardware components (for example, disk, memory, and CPU). See the section entitled “CentreVu Explorer II Server Requirements and
Recommendations in” Chapter 1, “Introduction,” for a complete list of system requirements.
● CentreVu CMS Software—includes External Call History (ECH) turned on at
the CMS
● Microsoft Windows NT® Server Service Pack 4
● Internet Microsoft Explorer 4.0 or Netscape Navigator 4.0
● Microsoft SQL Server 7.0
● Sun Java™ Web Server—automatically installed with CentreVu Explorer II
software
● CentreVu® Explorer II.
This section documents the software installation sequence required to install the software components for the CentreVu Explorer II server. For server requirements, see Chapter 1, “Introduction.”
Installing
CentreVu
Explorer II Server Software
2The primary tasks in CentreVu Explorer II server installation are as follows:
● Loading CentreVu Explorer II software
● Installing CentreVu Explorer II software
● Creating the license
● Creating the database
● Populating the data
● Installing pcAnywhere software
● Launching the software.
Loading
CentreVu
Explorer II Software
2Prior to loading the CentreVu Explorer II application software, make sure you load all of the required software as described in the “System Software Configuration” section in Chapter 1, “Introduction,” of this document.
Installing SQL Server 7.0
2Prior to installing SQL Server 7.0, load all of the prerequisites (for example, Internet Explorer 4.01 SP1).
The installation wizard asks you if you want to run the “SQL Server Upgrade Wizard.” This installation creates a new CentreVu Explorer II database used with the SQL Server 7.0. Follow all of the steps provided by the Wizard.
Administration Passwords
2Installing
CentreVu
Explorer II Software
2To install the CentreVu Explorer II software from the CD-ROM, do the following:
1. Log into the Windows NT server as Administrator.
2. Insert the CentreVu Explorer II Installation for Windows NT Software CD-ROM into the appropriate drive. The CentreVu Explorer II setup program
automatically displays:
The Select Destination Directory window displays:
5. Select the location of the backup directory:
● Accept the recommended default path (The installation default directory is
C:\JavaWebServer1.1. ), or
● Use the Browse button to to install the software on a different disk drive
(such as the D drive).
The Backup Replaced Files window displays:
7. You can choose to create or not to create a backup replacement file:
● If you want to create backup files, select the Yes radio button.
The Select Backup Directory window displays:
9. Select the location of the backup directory:
● Accept the recommended default path, or
● Use the Browse button to select the path of the backup directory.
The Installation Wizard initiates copying the files to the directory you specified. The following status window appears:
Creating the
CentreVu
Explorer II Database
2To create the database, the Installation Wizard finishes copying the files and then automatically displays the Create Database window:
1. Click on the Browse button to enter the Database Location. The Database location window displays. The default directory is selected (as shown below).
3. Enter the Database Size from the drop-down list (with selections beginning at 500MB). Select the size that best suits your business needs. (For more information about the database size, see the “Disk Storage Requirements” section in Chapter 1, “Introduction,” of this guide.)
4. Enter the User Name (the default is “sa”). This is the user name that was set up when you installed SQL Server 7.0.
5. Enter the Password. This is the password that was set up when you installed SQL Server 7.0.
After the database is created, the License Information window displays:
7. Enter the Company/Location Name. This is your company name and location.
8. Enter the License Key information. This is the license key you receive from CenterPoint Solutions (see the “Obtaining a License” section in Chapter 1, “Introduction”).
9. Enter the CMS Host Name. This is the host name of your Call Management System.
One of two windows display:
● If you did not supply all the requested information, a message window
prompts you to enter the license information:
Press Yes to return to the Input/Update License Information screen and Complete the licensing process (see steps 7-10 on the previous page).
● If you supplied all of the requested licensing information, the following
window displays:
Populating the Data
2Launching
CentreVu
Explorer II
2After installing the appropriate browser, you can launch the CentreVu Explorer II application:
1. Click on the internet browser icon on your desktop. After clicking the internet browser icon, your predefined “home page” is activated.
2. If the CentreVu Explorer II screen is not defined as your start-up screen, you must change the IP address to your CentreVu Explorer II server. After entering the correct IP address or host name, the Login screen appears:
pcAnywhere
® Security Considerations
2See the pcAnywhere documentation that is shipped with your software for complete installation instructions.
Before installing and using pcAnywhere to use with CentreVu Explorer II software, you should be aware of the security considerations. The Business Communications Systems (BCS) services technical staff uses pcAnywhere software to diagnose and maintain some Lucent BCS products on the customer premises. Simply having pcAnywhere installed on a PC does not pose a security risk; it must be up and running and administered to receive calls. In addition pcAnywhere 8.0 and later offers a number of security features.
To check for security issues, do the following:
1. Only run pcAnywhere when remote access is necessary.
2. Do not publish the phone number for the modem.
3. For added security, unplug the phone jack from the modem when pcAnywhere is not in use.
4. Change your password after services leave and after remote access.
5. Configure the following security options:
● Require login names for callers ● Make passwords case sensitive ● Log all failed connection attempts
● Set a maximum number of login attempts per call ● Allow time to enter the complete login
● Disconnect if inactive.
6. Configure pcAnywhere to log remote control and on-line sessions. (Set the “Save Session Statistics in Activity Log File” checkbox in the “Other Session Parameters” groupbox).
8. Blank the host screen after a connection to prevent users at the host site from viewing the activities on the host (Recommended).
9. Use the Windows NT User Manager to control caller access to the host PC (Recommended).
10. Allow the host user to acknowledge the remote caller and permit connection to the host PC (Recommended).
Uninstalling the
CentreVu
Explorer II Software
2You can uninstall CentreVu Explorer II software when it is no longer needed. This section describes the complete uninstall procedures for:
● Uninstalling CentreVu Explorer II software
● Removing the Database.
Uninstalling
CentreVu
Explorer II Software
2The CentreVu Explorer II application is removed the same way as any other Windows application.
1. From the Start Menu, select Settings and Control Panel.
The Control Panel displays.
3. Select the CentreVu Explorer II option.
4. Press the Add/Remove button.
The Uninstall Wizard displays the Select Uninstall Method window and guides you through uninstalling CentreVu Explorer II:
The Perform Uninstall screen displays:
The Wizard begins the Uninstall process:
The Add/Remove Programs Properties window displays after the CentreVu Explorer II is successfully uninstalled.
Removing the Database
2You can remove or “delete” a database when it is no longer needed, such as when you uninstall CentreVu Explorer II. When a database is deleted, the files and their data are deleted from the disk on the server. Once a database is deleted, it is permanently deleted and cannot be retrieved without using a previous backup.
To remove a database, do the following:
1. From the Start Menu, select Programs, Microsoft SQL Server 7.0, and
Enterprise Manager.
2. Select the database you wish to delete. In this example, the database is named “exp2”.
3. Select Delete from the Action Menu.
The Delete Database verification window displays:
3
CentreVu
Explorer CentreVu Explorer II
Upgrading to
CentreVu Explorer
II Software
3Overview
3This chapter describes how to upgrade previous software to the CentreVu® Explorer II software. In addition, the following are discussed:
● Upgrading to SQL Server 7.0
● Upgrading the CentreVu Explorer II software
● Creating the CentreVu Explorer II database
● Converting CentreVu Explorer 1.x data.
Lucent Technologies recommends that you backup your data prior to upgrading your software. Backing up your data ensures that your old data is not lost while upgrading your software.
The advantage of upgrading your current CentreVu Explorer software to CentreVu Explorer II software is to provide you with:
● the Custom Query Builder application
● an easier way to save data
Upgrading to SQL Server 7.0
3Prior to upgrading the software, you must install SQL Server 7.0. The installation wizard asks you if you want to run the “SQL Server Upgrade Wizard”. This step upgrades your current CentreVu Explorer database to SQL Server 7.0. The Upgrade Wizard runs after the Install Wizard is completed. Follow all of the steps provided by both Wizards.
Upgrading the
CentreVu
Explorer II Software
3To upgrade to the CentreVu Explorer II software from the CD-ROM, do the following:
1. Log into the Windows NT server as Administrator.
2. Insert the CentreVu Explorer II Installation for Windows NT Software CD-ROM into the appropriate drive. The CentreVu Explorer II setup program
automatically displays:
The Readme information displays:.
The Select Destination Directory window displays:
5. Select the location of the backup directory:
● Accept the recommended default path (The installation default directory is
C:\JavaWebServer1.1. ), or
● Use the Browse button to to install the software on a different disk drive
(such as the D drive).
The Backup Replaced Files window displays:
7. You can choose to create or not to create a backup replacement file:
● If you want to create backup files, select the Yes radio button.
The Select Backup Directory window displays:
9. Select the location of the backup directory:
● Accept the recommended default path, or
● Use the Browse button to select the path of the backup directory.
The Step One Completed window displays:
The Installation Wizard initiates copying the files to the directory you specified. The following status window appears:
Creating the
CentreVu
Explorer II Database
3To create the database, the Installation Wizard finishes copying the files and then automatically displays the Create Database window:
1. Click on the Browse button to enter the Database Location. The Database location window displays. The default directory is selected (as shown below).
3. Enter the Database Size from the drop-down list (with selections beginning at 500MB). Select the size that best suits your business needs. (For more information about the database size, see the “Disk Storage Requirements” section in Chapter 1, “Introduction,” of this guide.)
4. Enter the User Name (the default is “sa”). This is the user name that was set up when you installed SQL Server 7.0.
5. Enter the Password. This is the password that was set up when you installed SQL Server 7.0.
After the database is created, the License Information window displays:
7. Enter the Company/Location Name. This is your company name and location.
8. Enter the License Key information. This is the license key you receive from CenterPoint Solutions (see the “Obtaining a License” section in Chapter 1, “Introduction”).
9. Enter the CMS Host Name. This is the host name of your Call Management System.
One of two windows display:
● If you did not supply all the requested information, a message window
prompts you to enter the license information:
Press Yes to return to the Input/Update License Information screen and Com plete the licensing process (see steps 7-10 on the previous page).
● If you complete all the licensing information, the following window
displays:
Converting
CentreVu
Explorer 1.x Data
3The CentreVu Explorer II installation runs through a process to determine if there is a previous version of CentreVu Explorer (for example, CentreVu Explorer 1.1 or 1.2) installed.
To convert to the newest version of CentreVu Explorer II, do the following:
1. If a previous version of CentreVu Explorer is detected, you are prompted to enter license information (see previous section).
2. On the Input/Update License Information frame, select the Proceed to
CentreVu Explorer II hot link, the Convert Explorer 1 window displays:
The Convert Explorer 1 window allows you to upgrade the data from an existing CentreVu Explorer installation.
The following conversion confirmation message displays:
4. Press OK. The conversion verification window displays:
4
CentreVu
Explorer CentreVu Explorer II
Maintenance
4Overview
4This chapter is written for Database Administrators or Supervisors who are responsible for maintaining CentreVu Explorer II. Lucent Technologies
recommends that the maintenance practices described in this chapter be performed on a regular basis.
This chapter describes:
● how to maintain the CentreVu® Explorer II software
● the procedures for backing up the server and the data
● the administration of three critical functions:
— Determining the average daily call record volumes in the existing database
— Allowing you to select a reasonable data archival interval
Backing Up SQL Server Database
4Backing up the database is a Database Administrator function that should be performed by someone familiar with SQL Server Enterprise Manager. Backups are the customer’s responsibility.
Checking for Security
4For more security information, see the CentreVu Explorer II Version 1.0 User Guide (585-218-200).
You should check the security to verify that there are:
● Two types of security are established: User and Administration
● A default setting should ship with CentreVu Explorer II for the Administration
privilege
● A user privilege that allows a user to query on data, build queries, and use
standard queries
● An administration privilege that allows all user privileges, plus modifying
synonym data, setting user privileges, and establishing standard queries
● Viewing privileges set at the ALL, CMS, ACD, and SPLIT/SKILL levels
● Secure Socket Layers added to the browser.
Logins and Passwords Stored in the Database
4Administration Utilities
4CentreVu Explorer II has a built-in Administration Utilities feature, which allows an administrator to perform and monitor certain tasks within the application.
To access the Administration Utilities do the following:
1. You must be logged in as “admin”. When you start up CentreVu Explorer II, as a regular user, log in as “admin” in the Login window. The default password is cexplorer1. See the CentreVu Explorer II Version 1.0 User Guide (585-218-200) for more details.
The Main CentreVu Explorer II window displays automatically:
The Session & License Details window displays:
3. Click on Administrator Utilities at the bottom of the right frame (you will not see this feature if you are not logged in as “admin”).
4. In the Navigation frame, select Active Sessions to view how many users have logged into CentreVu Explorer II.
The following window displays:
The fields include:
● User –who logged in
● Host Name –what machine they used to log in
● Created –the time of the log in
● Last Access –the time of the last access into the application
5. In the Navigation frame, select View Log File from the Administration (Admin) Utilities Tree to view the log information.
The following View Log File window shows how the data is tracked (such as, connecting to CentreVu Explorer II, processing files, ftp commands, and so on.).
6. In the navigation frame, select Database Status.
The Database Status window displays.
The fields include:
● CMS –this field will identify which CMS this particular file came from
● File Name – this field is the actual file name of the each data file that has
been processed
● Status – the status field will keep track of the files that are processed
● Error Message – this field will identify any problems associated with the
processing of this file
● Start Time – this is the start time for processing this particular file
● End Time – this is the end time for processing this particular file
● Rows – this field will identify how many rows were processed from this
file
● Rows/Sec – this field will let you know how many rows per second were
processed
7. In the navigation frame, select View License.
The following window displays:
8. From the View License frame, you can add a license for each additional CMS. For each CentreVu CMS, enter the License Key and CMS Hostname.
9. After adding each CMS, press the Save button.
10. To return to the CentreVu Explorer II main window, select Return to Main
Menu from the Navigation frame or the Return to CentreVu Explorer II hot
Database Administration
4An administrator has the ability to discard, archive, or restore data. This capability can be set up as an automated process through the Data Discard Wizard. For instance, an administrator can discard or archive all of the calls older than a certain date or more than a certain number of days old. This process creates a file for each CMS that matches the criteria. If the data has been archived, it can then be restored at a later date if needed. See the “Restoring Data” section in this chapter for more details.
Accessing Database Administration
4To access the Data Discard Wizard, do the following:
1. From the Start menu, select Programs and CentreVu Explorer..
2. Click on Data Discard Wizard.
Select Data
The Database Discard Utility window displays:
Determining Average Daily Call Record Volumes
4The CentreVu Data Discard Utility analyzes the CentreVu Explorer II database to determine daily average call volumes. It then calculates the number of days the current database can hold data before becoming full. If the database becomes too large, you can either expand the database through the SQL Server Enterprise Manager or follow the steps provided in the next section “Discarding or Archiving Data.”
Discarding or Archiving Data
4Discard is the removal of data without saving it. Archive is the removal of data and saving it to a file, so that information can be read back in by the Restore Data routine (described later in this chapter). In addition, CentreVu Explorer II population routing checks to verify that the database capacity does not exceed 95 percent. The population routine stores any data on the CentreVu Explorer II server, but does not process after the database reaches 95 percent of the total capacity. To prevent the database from filling up, you can set up an “aging process” to discard or archive data after a certain number of days.
To set up the “aging process,” do the following:
The Discard Data frame displays:
3. Records can be removed or archived based on a certain date by selecting the
4. From the equal to or older than drop-down list, select a specific date. This removes or archives any records that are equal to or older than the date you selected.
5. If you want to archive rather than remove the data, be sure that the Archive
The File Creation List displays. For example:
7. From the File Creation List window, use the drop down list to select the file you want to archive. The archive process creates one file for each CentreVu CMS data piece with that particular date. The name of the file identifies which CentreVu CMS the file was generated from, the date, the hour, and the minute.
8. Press the OK button.
The following displays:
9. In the File name text box, enter the name of the file you want to archive.
10. From the Save in drop down list, enter the directory where you want to save the file.
The following displays:
12. Press the OK button.
The File Creation List displays;
13. After making your selections, press OK.
14. Select the Aging radio button and enter a number in the more than ______
days old box to remove or archive data that has aged more than a certain
16. Press OK.
17. If you have the Archive data radio button selected, this process archives your data daily.
18. Press the OK button.
Restoring Data
4The Restore Data feature allows you to select previously archived data and insert the file back into the CentreVu Explorer II database.
To restore the data, do the following:
1. From the Data Discard Wizard, press the Restore Data button. The Restore Data window displays:
2. Press the Browse button to find the file you wish to restore. The Enter the file to Restore window displays:
Migrating CMS Data Dictionary Synonyms
4Synchronizing the CMS Data Dictionary (Agent names, Vectors, and Vector Directory Numb