•
u
Installation
Guide
Copyright © 1991 Unisys Corporation All rights reserved.
Unisys is a registered trademark of Unisys Corporation. OS/3 Release 14
Priced Item
NO WARRANTIES OF ANY NATURE ARE EXTENDED BY THIS DOCUMENT. Any product and related material disclosed herein are only furnished pursuant and subject to the terms and conditions of a duly executed Program Product License or Agreement to purchase or lease equipment. The only warranties made by Unisys, if any, with respect to the products described in this document are set forth in such License or Agreement. Unisys cannot accept financial or other responsibility that may be the result of your use of the information in this document or software material, including direct, indirect, special, or consequential damages.
You should be very careful to ensure that the use of this information and/or software material complies with the laws, rules, and regulations of the jurisdictions with respect to which it is used.
The information contained herein is subject to change without notice. Revisions may be issued to advise of such changes and/or additions.
o New Release • Revision o Update 0 New Mail Code Title
System 80 M~dels 8-20 Installation Guide
This announces the release of a revision to this document, which was previously released as UP-8839.
This guide contains the information and procedures necessary to install, generate, and maintain OS/3 software on the System 80 models 8 through 20.
This revision documents a number of enhancements to the OS/3 software applicable to Release 14. These include: • Deletion of documentation on the System 80 Models
3-6
• Change to the CONALARM SUPGEN parameter to permit a single audible alarm • Setting of the SPOOLCYL SUPGEN parameter to 25 for the basic starter supervisors
• Change to the PRINTER I/OGEN parameter to increase the maximum number of allowable virtual printers to 999 • Change to the SYSLOG SUPGEN parameter to add three new options
• Change to the SPOOLMAXUNE SUPGEN parameter to permit an unlimited number of records to be entered into the spool file
• New SUPGEN parameter, SPOOLMAXREC, to allow the spooling of records up to 224 bytes • The new RELOAD parameter on the SG$PRB job control stream.
•
An
enhancement to the DCOP job control stream that allows copies between different disk devices with similar operating characteristics.This revision also includes a number of minor technical and editorial corrections. To order additional copies of this document:
• United States customers should call Unisys Direct at 1-800-448-1424. • All other customers should contact their Unisys Subsidiary Librarian. • Unisys personnel should use the Electronic Literature Ordering (ELO) system.
Announcement only: Announcement and attachments:
MBOO, SAB, and SAE MBOI and ECC3
System: System 80 Release: 14
Page Update Part/Section Number level
Cover
Title Page/Disclaimer
PSS iii
About This Guide v thru xi i
Contents xiii thru xix
1 1 thru 11
2 1 thru 35
3 1 thru 52
4 1 thru 71
5 1 thru 30
Appendix 1 thru 4
Index 1 thru 10
User Reply Form
Back Cover
Part/Section
Page Number
Update
level Part/Section
Page Number
Update Level
Unisys uses an 11-digit document numbering system. The SuffIX of the document number (1234 5678-xyz) indicates the document level. The first digit of the suffix (xl designates a revision level; the second digit (yl designates an update level. For example, the first release of a document has a SuffIX of -000, A SuffIX of -130 designates the third update to revision 1. The third digit (z) is used to indicate an errata for a particular level and is not reflected in the page status summary.
This guide specifically describes the system installation procedures for the Unisys
System 80
8 through 20.
It
is assumed that the system hardware is installed
and that your system is ready for software installation.
The intended audience of this guide is the site administrator who is to install the
current release of OS/3 software.
Prerequisites
How
Before beginning the installation task, read the documentation that accompanies your
software release to familiarize yourself with the most current information pertaining
to installation, restrictions, and guidelines. You should also familiarize yourself with
the other documents referred to in this guide. They are listed under the heading
"Related Product Information" in this section.
Use This Guide
This installation guide tells you how to install and generate OS/3 software on the
System 80 models 8 through 20. You should follow the procedures that configure a
system that matches the system configuration at your site. This document also has a
number of reference sections that provide detailed information required to complete
specific system installation steps.
To verify that you performed the installation procedures correctly, see the
Installation
Verification Procedures (NP) Operating Guide,
7004 5232.
vi
This
presents system installation information as
Section 1 ..
Defines system installation and discusses all the installation facilities that Unisys
to simplify the process.
Section 2 ..
Describes software installation considerations and gives specific procedures for
installing the software that Unisys delivers
to
you.
~elctlon
3..
System Generation
Describes system generation considerations and gives specific procedures for tailoring
the operating system
to
meet your particular needs.
Section 4..
Using an Alternate Method to the SYSGEN Dialog
Provides information on how
to
prepare system generation parameters by using
alternate methods. Includes statement conventions, keyword parameters, and
reference tables.
Section 5..
System Maintenance
Describes system maintenance considerations and gives specific procedures on how to
install system maintenance packages.
Appendix. Performance Tuning
Provides 8UPGEN parameters and additional information that can be used to
obtain
optimum system performance for most system applications.
After reading this guide and following the procedures in it, the site administrator win
have successfully installed the current release of 08/3 system control software.
The conventions used
todefine the configuration parameter values in this guide are:
•
Parameter definition is by keyword association. Keyword parameters consist of a
word or a code immediately followed by an equal sign, which is followed by a
specification. Keyword parameters can be written in any order except where
restrictions are noted. Keyword parameters can be written in columns 1 through
71. More than one keyword parameter can be included on the same statement,
but they must be separated by at least one blank character. Keywords and their
specifications must be contained on the same statement.
PRIORITY=5 PRIORITY=5 PRIORITV=5
JOBSLOTS=3 TRANS=3
TRANS=3 JOBSLOTS=3
Special rules for coding ICAM network definition keywords and macro
instructions are described in 4.1.3.
•
Capital letters, commas, equal signs, and parentheses must be coded exactly as
shown. The exceptions are acronyms, which are
of the generic terms
representing information
tobe supplied by the programmer.
Example
SUPMOD=supvrnam COMM=4
CACH=(nn,network-name,line-nUffiber)
•
Lowercase letters and words are generic terms representing information that
must be supplied by the user. Such lowercase terms can contain hyphens and
acronyms (for readability).
Example
channel
supervisor-name vsn
•
Information contained within braces represents alternate choices. Code only one
of the choices.
{ MAX } MIN
~~RM
viii
•
Information contained within brackets represents optional entries that
(depending upon program requirements) are included or omitted. Braces within
brackets signify that one of the specified entries must be chosen if that parameter
is to be included.
rSUPMOD=supvrnaml
[
SUPVRNAM: {SupervisOr-name}
1
SY$STD•
An optional parameter that has a list of alternate entries can have a default
specification that is supplied by the operating system when the parameter is not
specified by the user. The default can be specified by the user, but it is considered
inefficient. Default specifications shown in the format are printed on a shaded
background.
Example
[SUPVRNAM:
{,.~
SY$STD ... u., ... pe., ... , .. ,.,.,.r., .. v.,.". i sor -name}1
•
Keyword parameters can contain sublists called subparameters. Subparameters
can be positional or nonpositional, as indicated in the text. Subparameters must
be separated by commas.
Positional subparameters must be coded in the order shown, and commas
must be retained for any that are omitted, with the exception of trailing
commas.
Example
SPOOlMODE=ACCT NO, account number value
Nonpositional subparameters can be coded
in
any order, on a single
statement, separated by commas. If all subparameters do not fit on one
parameter statement, that statement can exceed one line, provided you
repeat the keyword parameter and its equal sign for each additional line
that you need. Remember that this rule does not apply
to
parameters that fit
on one line; in those instances, every keyword parameter and its
specifications must be on one line.
RESHARE=BAS,DDlP,DDPR.DP,EDT,ESC,ESCF, ISB,ISF,RPG,SF
If all but one subparameters in this example fit on one statement, code the
keyword parameter as follows:
RESHARE=BAS,DDLP,DDPR,DP,EDT,ESC,ESCF, ISB,ISF RESHARE=SF
G
The label entry must begin in column 1.
SUPGEN END
10 16 72
411
Use the Assembler Coding Form ,UDl-1548, to code the SYSGEN keyword
parameters. The LABEL, OPERATION, and OPERAND field limits are shown.
..
Keyword parameters must not appear on the following label statements:
70045505-000
SUPGEN I/OGEN COMPilCT NTRGEN COBGEN END
x
The following Unisys documents may be helpful in understanding
implementing
the information presented in
guide.
Note:
Use
the version that applies to the software level in use at your site.
Describes system messages, message response, and
reIJn.ellualactions, when applicable.
4623)
Describes
OS/3 job control language
to manage system resources, prepare
programs for execution, and start program execution.
l,;ons«)tU'la~~eQ,
Data Management Programming
'OcJ "'"''''''"''''''(UP-997S)
Describes the organization, type, and format of the data files under OS/3. Also
describes the manner
in
which data management handles the movement of data
between programs and peripherals.
Models 8-20 Operations Guide
(7004 520S)
Provides the information needed
to
operate System 80 models 8-20 within the OS/3
environment.
Integrated Communications Access Method (ICAM) Operations Guide
(70044557)
Describes how to define an ICAM network on models 8-20, submit it to the systems
generation procedure, and load and operate the resulting ICAM symbiont. Sample
network definitions are included.
Integrated Communications Access Method (ICAM) Utilities Programming
Guide
(7004 4565)
Describes the utilities provided by ICAM. Where applicable, these descriptions
include necessary ICAM network definition examples.
1974 American l:!it(Zmtal'Q, COBOL
Prc')gr'an~ml~ng Kp:tpr,(>7ru"pManual
(7004 4490)
Describes 1974 ANS COBOL for the applications programmer.
Describes 1985 ANS COBOL for the applications programmer.
Describes the use of the system activity monitor for evaluating system performance.
Spooling and
Describes spooling concepts
functions.
Describes
use of system service utility programs that support the operation of the
OS/3 operating system.
Data
Describes how to use the data utilities for reproducing and maintaining data files on
various media.
Installation en:ncatdton Procedures (IVP) Operating Guide
(7004 5232)
Describes the procedures and information needed to verify that OS/3 software
products are properly installed and ready for use.
Information Management System (IMS) System Support Functions
Programming Guide
(UP-11907)
Describes how to configure and generate IMS.
}lTR Utility Programming Guide
(UP-9502)
Describes the NTR utility ,which permits a System 80 system to operate as a remote
job entrylbatch terminal to a Series 1100 system via IeAM.
Interactive Services
Bno7l"'n"'",'l/'t IIGuide
(UP.9972)
Describes the
for communicating with the operating system interactively
thlt"OUl2'h
local workstations or remote terminals.
Ve:scI'lbE~S
the commands and procedures needed to use the ... "', ... ""' ... .", editor.
61Ul~"Ylr.PUl
(UP-8831)
Provides an overview
Cl"nO',",rlC:1r\T'and its functions.
xii
Provides hardware design, operations, and programming information
toassist in
programming
subsystems integrated with System 80 models 8, 10, 15,
and 20.
Provides hardware design, operations, and programming information
toassist in
programming peripheral devices and communications attachments integrated
System 80 models 8, 10, 15, and 20.
System 80 Models 8110115120 Processor and £"n,,,,"""',..,Il Peripherals
Guide
(UP·9608)Provides operating information for models 8,10,15, and 20 processor and peripheral
equipment required for minimum system configurations.
System 80
M(Jlltej~S8110115120 Processor Programming Reference Manual
(UP-9692)
Describes the operating characteristics of the models 8, 10, 15, and 20. Also provides
the commands, formats, and other data needed
tooperate the system.
~ectlon
1.
1.1.
What Is
Installation? ...
1-1
1.2.
What Does Software Installation Involve? ...
1-2
1.3.
What Does System Generation Involve? ...
1-2
1.4.
What Does
Maintenance Involve? ... ,. .... ...
1-3
1.5.
Delivery of OS/3 Software ...
1-3
1.5.1.
Software Delivered on Diskettes ...1-4
1.5.2.
Software Delivered on Dump!Restore Tape ...1-5
1.6.
How to Install OS/3 Software ...
1-5
1.6.1.
Stand-Alone Installation Facilities ...1-5
1.6.2.
Optional Software Installation Facilities ...1-6
1.6.3.
Tape Software Installation Facilities Using anExisting SYSRES ... 1-6
1.6.4.
System Maintenance Installation Facilities ...1-6
1.1.
How to Perform System Generation ...
1-6
1.7.1.
SYSGEN Dialog ...1-7
1.7.2.
SYSGEN Parameter Processor ...1-9
1.7.3.
SYSGEN Job Control Streams ...1-9
1.8.
System Installation Review ...
1-10
Section
Software Installation
2.1.
Considerations...
2-1
2.1.1.
Initial Users ...2-1
2.1.2.
Existing Users ... ... ... ... ... ... ... ... .... ...2-2
Installing New Optional OS/3 Software ...2-2
Installing a New Release of OS/3 ... , .... ... ... ...2-3
2.1.3.
SYSRES Build Guidelines ...2-4
2.2.
Installation Procedures ...
~...2-6
2.2.1.
Installing Standard Release OS/3 Software from Diskettes orTapes Using Stand-Alone Routines ...
2-6
Stand-alone Routines Considerations ...2-11
Restarting SU@RST ...2-11
2.2.2.
Installing Optional Program Product Software from Diskettes2-12
2.2.3.
Installing Standard Release OS/3 Software from Tapes UsingOnline Dump!Restore Routines ...
2-13
Using PRPMIC ...2-15
Sample Disk Prep ...2-16
2.3. Post-Software Installation Procedures ... 2-17 2.3.1. Updating the System Definition File (SDF) ... 2-17
Determining What to Update by Reviewing
$Y$MIC and $Y$SDF ... .... .... ... ... ... ... 2-21
Adding a Device to $Y$SDF ... ; ... 2-23
Deleting a Device from $Y$SDF ... ... ... ... ... ... 2-26
Updating Existing Device Information in $Y$SDF ... ... ... ... ... 2-26
Confirming $Y$SDF . ... ... ... ... ... ... ... 2-28
Dumping $Y$SDF ... ... ... ... ... ... ... 2-28
Restoring $Y$SDF ... 2-29
Terminating SDU ... 2-29
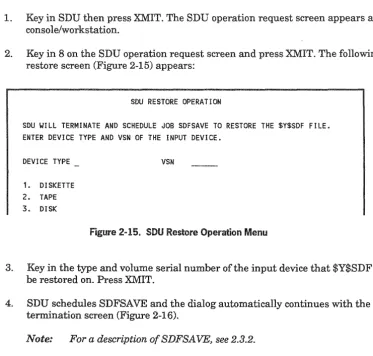
Performing IMPL and IPL Procedures ... 2-30 2.3.2. Copying and Restoring $Y$SDF ... 2-32 2.3.3. Creating an IMPL System Microcode Diskette ... 2-33 2.3.4. Creating an IDCU Microcode Diskette ... 2-34 2.3.5. Restoring Modules Saved from a Previous Release ... 2-34 2.3.6. Verrrying System Installation ... 2·35 2.3.7. Performing System Generation .... ... ... ... 2-35
Section
3.1. Considerations ...
00... ... ... ... ... ...
3-1 3.1.1. Supervisor Elements ... 34-Supplied Starter Supervisors ... .... ... 3-5User-Generated Supervisors ... 3-5
Supervisor Maintenance Considerations ...
3-8
3.1.2. Nine-Thousand-Remote (NTR) Element .... ... ... ... ...
3-8
3.1.3. COBOL Element ... 3-9 3.1.4. Communications (lCAM) Elements .... ... ... ... ... .... ... 3-9 3.1.5. Resource Management ... 3-10
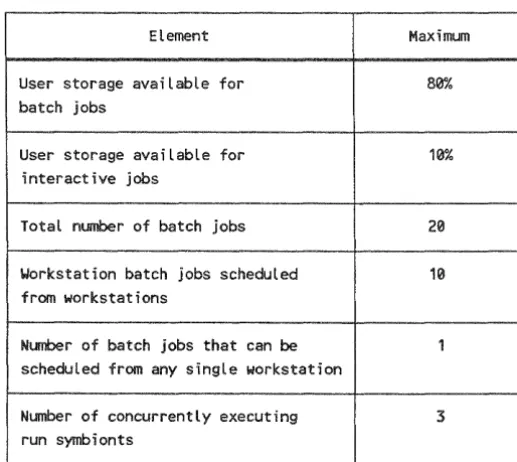
Resource Management Batch System Configuration ... 3-11
Resource Management Interactive System Configuration ... 3-12
Resource Management Mixed Configuration ... 3-13 3.2. Procedures ... 3-14 3.2.1. Using SYSGEN Dialog to Prepare Parameter Sets ... 3-14 3.2.2. Processing the SYSGEN Parameter Sets ... 3-19
Automatic Execution of the Parameter Processor ... ... ... 3-20
Manual Execution of the Parameter Processor ... ... ... 3-26 3.2.3. Running the SYSGEN job Control Streams ... 3-29
Supervisor SYSGEN Job Control Stream 3-29
ICAM Job Control Stream ... 3-29
NTR Job Control Stream ... 3-31
COBOL Job Control Stream ... 3-31
3.3. Post-SYSGEN Procedures 3-32
3.3.1. Updating the System Definition File ... 3-32 3.3.2. Configuring Automatic Supervisor Loading ... 3-32 3.3.3. Generating an IMS Online Load Module ... 3-32 3.3.4. Defining Alternate Printer Characteristics 3-32 3.3.5. Changing the Interactive Services Logo ... " ... 3-38
3.3.6. Changing the System Bulletin ... 3-38 3.3.7. Verifying System Installation .. ... ... ... ... ... ... ... ... ... 3-39 3.3.8. Making and Restoring a Backup Copy of Your
Current SYSRES ... 3-39 Using a Fixed Disk for Your Backup SYSRES (DCOP) ... 340 Using a Removable Disk for Your Backup SYSRES (SETREL/COPYREl) 342 Using Diskettes for Your Backup SYSRES ... 347 Using Tape for Your Backup SYSRES ... 3-51 Restoring SYSRES from Tape Using SU@RST ... 3-52
4.1. Parameter Sets ... 4-1 4.1.1. SUPGEN ... 4-2 4.1.2. I/OGEN ... 4-2 4.1.3. COMMCT ... 4-3 4.1.4. NTRGEN ... 4-5 4.1.5. COBGEN ... 4-5
4.2. SYSGEN Keyword Parameters ... 4-5
4.3. Additional SYSGEN Parameter Information ... 4-62 4.3.1. Spool-File Bit Map Calculation Table ... 4-62 4.3.2. Shared Load Module Groups ... 4-63 4.3.3. Logical Unit Numbers (I/OGEN DVCNO Parameter for
All Devices) ... 4-64 4.3.4. Nine-Track Recording Mode Settings (I/OGEN
MODE Parameter) .. ... .... ... ... ... .... ... ... ... 4-66 4.3.5. Seven-Track Recording Mode Settings (I/OGEN MODE
Parameter) ... 4-66 4.3.6. Line Speed Values ... 4-68 4.3.7. Space Compression Characters ... 4-69 4.3.8. Device Function Codes ... 4-70 4.3.9. I/O Guidelines - Co-Channel Support ... 4-70
Section
System Maintenance
5.1. System Maintenance ... 5-1 5.2. Installation of SMPs ... ... ... ... ... ... 5-2 5.2.1. Initiating the SMC Program ... ... ... ... ... 5-3 5.2.2. Installing an SMP ... 5-7 5.2.3. Performing Additional Regenerations ... 5-11 5.2.4. Erasing SMP Files ... 5-12 5.3. Installation of Individual SMCs ... 5-12 5.4. Running the SMC Installation ... 5-13 5.4.1. Building Your SMC from the Console ... 5-16 5.4.2. Building Your SMC from a Workstation ... 5-19 5.4.3. Installing the SMC ... 5-23 5.5. Sample SMC Printouts ... 5-28
A.l.
SUPGEN Values ... A-IA.2.
SUPGEN Memory Values ... A-2A.3. SUPGEN Data Values ... ~~... ... .... A-2
A.4.
SUPGEN Spooling Values ... ... ... ... ... ... ... A-2A.S.
SUPGEN Resident Shared load Module Values .. ... ... ... ... .... A-2A.S.
Considerations ... : ... A-3A.7.
Disk Cache Size ... A-31-1.
2-1.
2-2.
2-3.
24. 2-5.2-6.
2-7.
2-8.
2-9.
2-10.
2-11.
2-12.
2-13.
2-14.
2-15.
2-16.
2-17.
2-18.5-1.
5-2.
5-3.
5-4.
5-5.5-6.
5-7.
5-8.
5-9.
5-10.
5-11.
70045505-000
System Installation Process ...
1-11
Software Installation from Diskettes for an Initial User ... ... ... ... ... ... ...2-2
Software Installation from Tapes for an Initial User ... ... ... ... ... ... ... ... ... ... ...2-2
Installation of New OptionalOSj3
Software ...2-3
Installation of a NewOSj3
Release ... 2-5 System Date/Time Display ...2-11
Updating $V$SDF ...2-20
SDU Operation Request Screen ... ... ... ...2-22
SDU Display Operation Screen ... ...2-22
Sample $V$SDF Printer Output .... ... ... ... ... ... ... ... ... ... ...2-23
SDU Add Screen for Non-lMPL Devices ... '" ... .... .... ... ... ... ...2-24
SDU Add Screen for IMPL Devices ... ... .... ... ... ... ... ... .... ... ... ...2-24
SDU Delete Operation Menu ... .... ... ... ... ... ... ... ... ... ...2-26
SDU Update Operation Menu ... ... .... ... ... ... ... ... ... ...2-27
SDU Dump Operation Menu ... 2-28 SDU Restore Operation Menu ... ... 2-29 SDU Termination Screen ... ... ... ... ...2-29
System Operations Menu ...2-30
System Date/Time Display . ...2-30
Processing Options Menu Screen ...5-6
Supervisor Regeneration Screen ...5-8
ICAM Regeneration Screen ... 0 .. 0 ... 0 ... 0...5-9
Installation of Individual SMCs ...0
... 0...
5-12
SMC Instruction Screen ...5-19
First SMC Entry Screen ... ...5-20
Second SMC Entry Screen ...5-20
Editing Commands HELP Screen ...5-21
SMC Special Processing Screen ...5-26
Sample SMC - Required Fields for SMC Console Dialog ...5-29
Sample SMC - Required Fields for Interactive SMC Entry from Workstation ... ... ... ...5-30
3-1. 3-2. 3-3.
3-4.
3-5.3-6.
4-1. 4-2. 4-3. 44. 4-5. 4-6. 4-7.4-8.
4-9. 4-10. 4-11. 4-12. 4-13.70045505-000
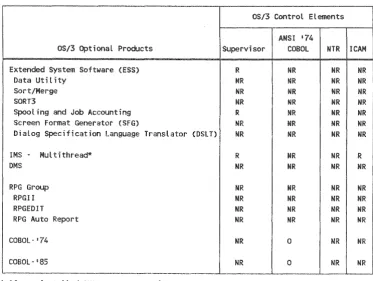
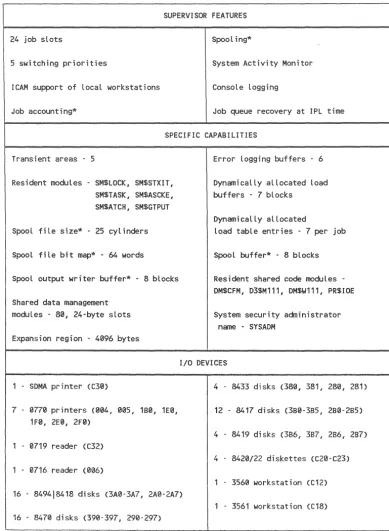
Control Element Generations for Optional Software ... 3-2 SY#BAS (Model 8) .. ...
3-6
SY$BAS (Models 10 through 20) ... 3-7 Resource Management Elements for a Batch-Oriented System ... 3-11 Resource Management Elements for an Interactive System ... 3-12 COPYREL Copy Order ...0
... 0...
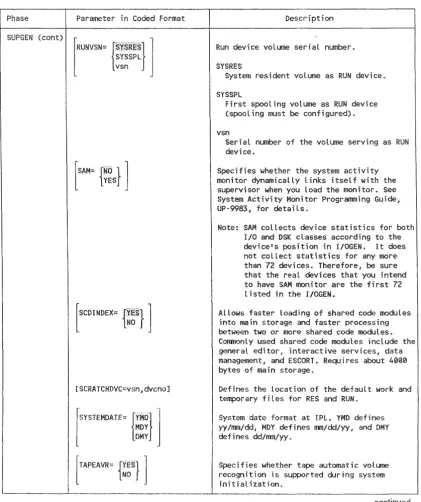
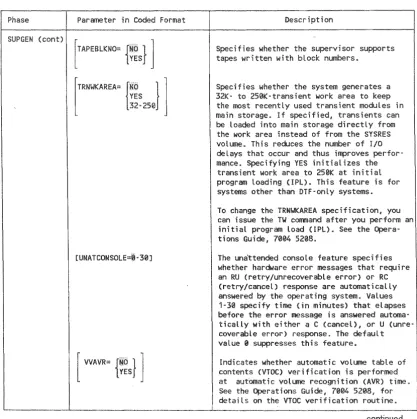
3-46 SUPGEN Keyword Parameters0
.. 0
... 0
... 0
... 0
.. 0...
4-6 I/OGEN Keyword Parameters ...0
... 0
... 0
... 0
... 000 ... 0
... 0...
4-34 COMMCT Keyword Parameters ... 0. •••• ... 449 NTRGEN Keyword Parameters ... 4-55 COBGEN Keyword Parameters ... 4-59 Spool-File Bit Map Calculations ... 0 •. 0.... 4-63 Shared Load Module Groups ...0...
4-63 Logical Unit Numbers ... 4-64 Nine-Track Recording Mode Settings ... 4-66 Seven-Track Recording Mode Settings ... 4-67 Line Speed Values ... 4-68 Space Compression Characters ... ... ... 4-69 Device Function Codes ... 4-711.1.
System installation is the process of installing the Unisys System 80 hardware,
integrating the Operating System/3
(OS/3)
software into it, and tailoring this software
to fit your specific needs. The process of tailoring operating system software is called
system generation.
SYSTEM INSTALLATION
I
I
SYSTEM 813 OS/3 OS/3
HARDWARE SOFTWARE SYSTEM
INSTALLATION INSTALLATION GENERATION
This guide discusses the system installation tasks that concern you after the hardware
is installed - those of installing and generating the
OS/3
software. It also describes the
installation of system maintenance packages (SMPs), which contain OS/3 software
changes that maintain the software's effectiveness.
1.
1
1-2
Software installation involves the transfer of all OS/3 software from the delivered
release media
to
the disk that serves as the system resident volume, or SYSRES. This
includes both the standard OS/3 software that all users need
to
operate their system
and the separately priced program products and programming aids (optional software)
you order
to
complement the standard OS/3 system software.
The SYSRES contains all the OS/3 system software, and it must be online whenever
you operate the OS/3 system.
Use software installation procedures in this guide to install:
•
Initial releases of OS/3 software
•
Any new software that you receive between major releases
It
Updated software as Unisys releases major improvements to OS/3
Once the software is installed on the SYSRES, you are ready for system generation.
Install all delivered release software before you generate the system.
.. What Does
Generation Involve?
System generation, or SYSGEN, is the process whereby you define the system's
hardware configuration
to
OS/3 and generate, or create, the control elements that you
need to satisfy your particular processing requirements. Using SYSGEN facilities, you
can configure:
•
Customized supervisors and their associated input/output
(lIO)device
configurations
•
Nine-thousand-remote (NTR) system utilities
•
Processing options for the ANSI '74 or '85 COBOL compiler
III
Communications networks (ICAM)
You don't need
toperform
generation
tobegin normal system operations
immediately. The OS/3 system contains its own ready-to-use starter
<:!"'n,cn .... ncu ... rSY#BAS for model 8 and SY$BAS
models 10 through 20. This starter
C'nV'"\""""'TlC""lets you load the operating
and
a customized
and its
as!;;;Oclat;eQ lIO device configuration. See 3.1.1 for instances when
is
1
1
As you
experience with the system and your site operations, you can add features
to satisfy special processing requirements that the starter supervisor does not include,
or you can delete features that you can do without. In either case, you can perform
system generation to customize
system to meet your particular processing
requirements.
System maintenance involves the installation of system maintenance packages
(SMPs) to your SYSRES. SMPs contain a collection of software changes that maintain
your system's operation and effectiveness. System maintenance changes (SMCs) are
the individual changes within the package.
Installation routines are used to install SMPs. They are easy to run and protect the
system's integrity during SMP application. For example, the routines automatically
regenerate the supervisor if it must be regenerated to operate properly. The routines
also copy all original modules affected by the SMP. If the SMP adversely affects
system operation, you can restore the system to its original operating configuration.
m
Delivery of
Software
OS/3 software is available on diskette and tape. This software must be copied to disk
before it can be loaded.
Choose the media type that is compatible with your system configuration, subject to
the following guidelines on OS/3 software delivery:
•
Initial users receive standard software on tape or diskette.
•
Optional software ordered between major releases is shipped on diskette only.
•
System maintenance
(SMPs) are always delivered on diskette
accompanied by an SMP document.
OS/3 standard software ordered on
or diskette is delivered in dump/restore file or
volume format, depending on the disk and system type. Dump/restore dumps or
restores only to like device types; therefore it is necessary to order the tape or diskette
media that correspond to your disk configuration. File mode media can be used by
stand-alone restore and dump/restore to install a new 08/3 release. File and volume
mode installations are discussed
in this section.
Note:
For model
8
customers only, software is available on an M9720 disk only as
an optional program product (S809720·DSK).
1
1.
1-4
Media Type Format
Data set label 8417 F He mode
diskette 8470 F He mode
8494 F He mode "19720 F He mode
Tape 8430 Volune mode
8433 Votune mode 8419 Volune mode 8417 F He mode 8470 F He mode 8494 F He mode "19720 F He mode
JPIII\lPIf'pn
on Diskettes
Unisys delivers two sets of release diskettes: one set contains standard OS/3 software,
and the other contains the optional OS/3 software that meets your specific processing
needs.
The standard release diskettes contain four types of software:
1.
Initial microprogram load (IMPL) code
2.
Integrated disk control unit (IDCU) microcode
3.
Initial program load (IPL) code plus stand-alone products
4.
System control software on
Se(IUE~nt,lal aH;k.e~tt€~s:SUm(1m"d
OS/3
Release Software
I
.... >[]
IPL CODE
&
SYSTEMIMPl IDCU STAND-ALONE CONTROL
0 0 0 0
CODE MICROCODE PRODUCTS SOFTWARE
n
n
n
n
'1
1
1
1.
U nisys
optional software on separate release diskettes, one set for each
component. These components can include program products, such as language
compilers, or programming aids, such as conversion products.
08/3 release software is also available on dump/restore tapes in a format compatible
with your disks. Tape releases contain only the standard OS/3 software; optional
software is delivered on separate release diskettes upon request.
No existing SYSRES disk is reCJUllred.
if
the tape is loaded to a nonremovable disk
using stand-alone restore.
Unisys provides facilities that simplify OS/3 software installation. Each set of release
media includes all the software needed to install the release software on your system.
The following subsections describe these software facilities.
:!)talna'''AI()ne
Installation Facilities
To install an initial or updated OS/3 release from diskettes or tapes, Unisys includes
two installation routines as part of the standard OS/3 release: a stand-alone disk prep
and a stand-alone disk restore. These routines transfer the system control software
from the release diskettes or tapes to your SYSRES, which is on a nonremovable
(fixed) disk. Perform this transfer before installing optional software or performing
SYSGEN.
You must run SU@PRPbeforeyourun SU@RST. The stand-alone prep routine,
SU@PRP, prepares (or preps) your nonremovable disk to serve as your SYSRES. The
stand-alone restore program, SU@RST, copies
system control software from the
release diskettes or tapes to your SYSRES.
Stand-Alone Media SYSRES Disk
Diskette 8417/8470/8494/M9720
Tape 8417/8470/8494/M9720
These stand-alone routines also let you rebuild or restore your SYSRES if necessary.
See Section 3 for more information on making and restoring a backup SYSRES copy.
1
1
1
To install optional software components from diskettes, Unisys provides a job control
stream, SG@CPYPD, as part of the system control software.
It
automatically initiates
the routines that move separate program products and programming aids from
release diskettes to the SYSRES. Run SG@CPYPD after you install your system
control software.
install each separate component before you perform SYSGEN.
an
To install an OS/3 release using an existing SYSRES from a dump/restore tape (file or
volume mode), use the job control stream SG$DMPTD. This control stream copies the
standard release software from the dumplrestore tape to an output disk that you
specify at run time. The output disk must be the same disk type used to produce the
tape.
This job control stream can transfer an 8433 dump/restore tape onto a removable 8433
SYSRES volume. However, if you order your release on a removable disk formatted
tape (such as the 8419 disk) and you have a fixed 8417 disk as your SYSRES, you
must first run SG$DMPTD to transfer the software
to
an 8419 disk. Then you must
run SETREUCOPYREL to copy the software
to
your permanent 841 7 SYSRES
volume.
''''Ii:''T~1I''r'II
Maintenance Installation Facilities
To install system maintenance packages and system maintenance changes, Unisys
provides two installation programs, SMP and SMC, as part
system control
software. The installation programs check the software components of your system
and then install the
that apply to you. If your system requires regeneration as
a result of an SMP or SMC, the installation programs perform the regeneration for
you.
1 .... How
System Generation
1-6
SYSGEN is the process that defines the
hardware configuration to OS/3.
SYSGEN
control elements you need to satisfy particular pT()CeSSlne:
requirements. Unisys provides various facilities that define these requirements to
your
These are the SYSGEN dialog, parameter processor, and job control
streams.
1 1.
The SYSGEN dialog is an easy-to-use facility that helps you prepare and process the
SYSGEN parameters, or requirements. At your workstation, the SYSGEN dialog:
•
Displays questions, menu choices, explanations, and help screens concerning the
various SYSGEN options
•
Accepts your answers and choices
•
Stores your parameters until you are
to process them
•
Executes the SYSGEN component that processes your parameters (the SYSGEN
parameter processor)
The workstation screen displays groups of options to choose from and provides
explanations and questions. If you need more information about a particular
parameter to make a valid choice, you can request help. The dialog provides detailed
explanations of that parameter. After it displays a help screen, the dialog resumes
where it left off.
An
experienced SYSGEN user can build parameter sets quickly and easily, receiving
help only when needed. Users less familiar with· SYSGEN can use the help screens to
learn about SYSGEN as the dialog guides them in building valid parameter sets. The
following screens show typical examples of the SYSGEN dialog.
PROGRAM=DIAlOG FOR SYSTEM GENERATION
THE DIALOG FOR SYSTEM GENERATION IS A COMPUTER ASSISTED METHOD FOR PREPARING SYSGEN PARAMETER SETS. FOR A DESCRIPTION OF THE DIALOG PROCESS, ENTER IIHElpl' IN THE SPACE PROVIDED.
THE DIALOG METHOD USES THE COMPUTER TO ASSIST YOU IN PREPARING PARAMETER SETS BY PROVIDING EXPLANATIONS AND PROMPTING FOR DATA ENTRY. AS PARAMETERS ARE NEEDED, THE DIALOG PROCEEDS UNTIL A COMPLETE PARAMETER SET HAS BEEN GENERATED. All THE PARAMETERS ARE VERIFIED BY THE USER BEFORE THEY ARE OUTPUT FOR USE BY THE SYSGEN PARAMETER PROCESSOR. PARAMETERS ARE SPECIFIED EITHER BY SELECTING OPTIONS FROM A MENU OR BY ENTERING DATA DIRECTLY FROM A WORKSTATION.
1-8
Select
phases of SYSGEN you want
to
by entering the appropriate
nu.mr)er See
3 for
descriptions of these SYSGEN phases.
SELECT THE SYSGEN PHASE TO BE PREPARED:
1. SUPERVISOR GENERATION (SUPGEN and IOGEN) 2. COBOL COMPILER OPTIONS SPECS (COBGEN) 3. NTR UTILITY GENERATION (NTRGEN) 4. NO FURTHER PHASE REQUIREMENTS 5. DISPLAY PHASE DESCRIPTIONS
(ENTER PHASE NUMBER OR IALll) ENTER CHOICE BY NUMBER
The SYSGEN dialog displays only those screens that pertain
to
the SYSGEN phases
you select. These screens display the parameter choices for each selected section,
explain your options in specifying parameters, and give the parameter default values.
You can specify values for most parameters, or you can accept the OS/3 default values
that create a workable system and are usually sufficient. At the end of each section of
related SYSGEN parameters, the dialog lists the selections you chose. You can:
•
Accept the list as it is
•
Correct or change a selection
•
Completely erase and ignore a parameter set that you mistakenly specified
The SYSGEN dialog lets you double-check choices and display only those parameters
that apply
to
you. After you respond
to
the choice at the end of each parameter section,
you move on
to
next set of parameter statements.
You can also save a
of the dialog sessions in case you want
to
your
SYSGEN parameters. The dialog saves this record in a dialog audit file and provides a
"" ... n1"£.r1
summary
You can use this summary
as a map
to
the audit file.
After you respond
to
all the phases of SYSGEN, a system message displayed at the
workstation informs you that the dialog session is complete. The SYSGEN dialog then
asks you
to
execute the parameter processor. If you are satisfied with your parameter
choices and are ready
to
process them, direct the SYSGEN dialog
to
execute the
parameter processor.
1
1
The SYSGEN parameter processor (SG$P
ARAM)is the SYSGEN component that
accepts and processes your parameter choices.
It
informs the system of the choices
made during the SYSGEN dialog session. The SYSGEN
processor:
•
Checks and validates each of the SYSGEN parameters to ensure that you
specified them correctly (These checks are in addition to those of the SYSGEN
dialog.)
•
Substitutes the OS/3 default values for those parameters that you specify
incorrectly or omit
•
Informs you of incorrect and defaulted parameters
•
Lists the OS/3 job streams that actually generate your system
The parameter processor gives you information on a printed summary listing. This
listing includes all the SYSGEN parameters (specified and defaulted), error
diagnostics, and instructions to proceed with SYSGEN .
Job
....,...,. .. c .... " ' .Streams
U nisys provides job control streams to execute the SYSGEN dialog and parameter
processor and to generate the system for you. In addition, the job control stream lets
you define alternate printer characteristics if your printer has features different from
the OS/3 default printer characteristics. These job streams eliminate the need for you
to
know the OS/3 job control language before generating your system.
The parameter processor lists the job control streams that you must run to build the
system elements you want.
It
bases this list on the
choices that you defined
through the SYSGEN dialog session.
The following SYSGEN job control streams are available:
•
SG$BLD - Initiates the SYSGEN dialog, accepts parameter choices and
selections, and stores these sets until the parameter processor needs them. When
you are ready to process the parameter choices at the end of your dialog session,
SG$BLD automatically executes the parameter processor.
•
IC$BLD - Initiates the ICAM portion of the SYSGEN dialog, accepts parameter
choices and selections, and stores these sets until the parameter processor needs
them. When you are ready to process them at the end of the ICAM portion of the
dialog session, IC$BLD automatically executes the parameter processor.
•
SG$P ARAM - Manually executes the parameter processor, verifies
processes
your SYSGEN parameter definitions, and lists the additional job streams you
should run, as well as parameter specifications, defaults, and error diagnostics.
•
SG$SUPMK - Initiates
routines that generate
new or remodeled
supervisor configurations and stores them in the system load
file
($Y$LOD) on the designated SYSRES.
•
SG$COMMK - Initiates the routine that creates and transfers the integrated
communications access method (ICAM) load module to the designated SYSRES.
•
SG$NTRMK - Creates a nine-thousand-remote (NTR) system utility load module
and stores it in the $Y$LOD library on the designated SYSRES.
•
SG$COBMK - Configures options for
ANSI '74 or '85 COBOL compiler.
•
SG$PRB - Equates nonstandard printer character sets and vertical format
characteristics to your operating system. If none of the printers in your system
uses a 63-STD, 48-BUS, or 48-SCI print cartridge, you must run this job control
stream before you can perform any software installation or system generation
procedure that gives a printed listing.
1
Installation Review
1-10
This review can help you better understand the relationships between the various
system installation facilities and procedures. Use the flowchart in Figure 1-1, and the
following list, to review the system installation process.
1.
Install any new release software that you receive from Unisys. Use the routines
and facilities you need
to install system control software and optional software.
2.
Perform post-software installation routines to complete the installation process.
See 2.3.
3.
Generate your system by
C!n£~ ... + ..,..,nNSYSGEN paJranrleters Use the SYSGEN
dialog to define
Those thoroughly familiar with the SYSGEN process can expedite the process
the
OS/3
editor to manually code or modify
sets.
Section 4.
4.
Run the SYSGEN parameter processor to validate the selected parameters and
list the SYSGEN job control streams you must run to generate the system
... JL.U ... ' ...
Make sure that each job terminates before initiating the next one.
5.
Run each of the job control streams in the order that the
processor
them. When all
job control streams are run, system generation is
completed.
your system, you should perform the applicable post-system
n'£lo1r"lOY'<:lT"nnprocedures to complete the system installation process. See details in 3.3.
PERFORM POST-SOFTWARE INST ALLA TION
PROCEDURES
RUN THE SYSGEN DIALOG
TO PREPARE YOUR SYSGEN
PARAMETER SETS
EXECUTE THE PARAMETER PROCESSOR
RUN SETREL/COPYREL·
RUN SU@RST
AND SU@PRP (IF NECESSARY)
RUN SG@CPYPD
FOR EACH PRODUCT
EXECUTE THE SYSGEN
JOB CONTROL STREAMS
NO RUN
SG$DMPTD
... Recommended to back up release software or copy it to another type of disk.
Figure 1-1. System Installation Process
This section
the ...
,""'''',ri".".''''''''standard and
OD1~1O]rlalsoftware from the release
you are - initial or
n..,..,,,,""~"'"2.
software you have to
st2l.llClar'Cl or
OP1~10l1al3.
you install your software from - ClU;k.ette or
1
software on diskettes or
you first build the
release 08/3 software. Then you can
2-1 shows
process
tosoftware
the process
toinstall
STANDARD
00/3
CONTROL SOFTWARE
Note:
1
STAND-ALONE INSTALLATION
ROUTINES
Solftw;are Installation
STAND-ALONE INSTALLATION
ROUTINES
Software Installation from
The stand-alone restore routine
ac(~emtsnOlFtre'mCWaOle
disk
OPTIONAL· SOFTWARE INSTALLATiON
PROGRAM
OPTIONAL-SOFTWARE INSTALLATION
PROGRAM
for an Initial User
•
An
entire new release
software
"',.,.+:~ ... '''' ... '''delivered on diskettes
To
OPTIONAL OS/3
SOFTWARE
OPTIONAL
OS/3
installed
Figure 2-3 shows
OPTIONAL OS/3
COMPONENT
installation of new optional
OS/3software.
OPTIONAL-SOFTWARE INST ALLA TION
PROGRAM SG@CPYPD
OPTIONAL SOFTWARE MUST BE AT SAME RELEASE LEVEL AS SYSTEM SOFTWARE
2-3. Installation of New n ... t· ... OS/3 Software
InS'talling a
New Release
Existing users who receive an entire new release of
OS/3must install this release to
update the system. The new release contains updated standard
OS/3release software
and updates
to
any optional software that you have. You should make a backup copy
of the existing SYSRES volume before installing the new release software. The
procedures
to
install a new release are similar
to
installing the initial release, with the
following exceptions:
•
First, terminate all jobs before you install the new software. Do not process any
other jobs until the new release software is installed.
•
Second, make copies on the SYSRES of your own software that you want to use
with the new release. Prepare these copies on disk or on diskettes, using the
following general procedures:
all program modules from
system libraries (including source
modules that contain SYSGEN parameter sets that are still valid with the
new release). Use the system librarians, LIBS and MLIB. (See the
System
Service Programs Operating Guide,
UP-8841, for
details
to
perform this
operation.)
Make copies of all program library files residing on the SYSRES (not system
library files), using the procedures described in Section 3. Specifically, use
the SG®DUFIL job stream, described in detail in that section,
tomake
backup copies on diskettes. Use LIBS or MLIB to make the copies on disk.
Use data utilities to make copies of any data files on your SYSRES. (See the
Data Utilities Operating Guide,
7004 4516.)
you install the new
copy the program modules
library files back to
the updated SYSRES. Use the same system facility that you used to prepare the
copies of this software. During subsequent SYSGEN operations, you can use these
SYSGEN parameter sets as input
to
the parameter processor.
1
This procedure lets you generate the system without defining all system parameters
as required for initial users.
2-4 shows the installation of a new release of OS/3.
Note:
This installation procedure represents one method of installing a new release
of
as
/3
for an existing user. There are other methods available. They are
discussed in 2.2.
The following guidelines assist you in tailoring your SYSRES. They are especially
useful when you are using the disks with the smaner capacities (8419 or 8430). These
guidelines provide information on file maintenance and the allocation of specific files
on disks other than the SYSRES.
•
Librarian format files are expanded if there is module replacement or updating
due
toSMC applications, system generations, ICAM generations, or extraneous
processing. The unused space in these files is recovered only either by packing the
file or by copying it to another disk and copying it back after initializing the file.
You can track the status of your file size and expansion by using the VTOC
command at defined intervals. The amount of expansion depends on the number
of generations or SMCs and is site specific.
•
The MAPPER@ data files do not have to reside on SYSRES. They can be placed
on a volume with the VSN of MAPPER.
•
The $Y$DUMP file does not have
toreside on
can be specified with
the DUMPVSN system generation parameter or on the dateltime screen at IPL
time. A system job stream, SG$SADMP, that will scratch a full $Y$DUMP file
and reallocate a minimum $Y$DUMP file on SYSRES is also available. A
minimum $Y$DUMP file
resides on your SYSRES.
•
The spool file can be allocated with the SPOOLVSN system generation parameter
or on the timeldate screen at IPL time.
•
Run files can be allocated on a non-SYSRES
with the RUNVSN system
generation parameter or on the dateltime screen at IPL time.
•
You can move additional selected modules/products from system files on your
SYSRES to files on a non-SYSRES disk. However, this should be done only with
assistance of your
Customer Support Center.
MAPPER is a registered trademark and service mark of Unisys Corporation.
STANDARD OS/3 SYSTEM
7004 5505-000
OR
USER SOFTWARE
OR
OPTIONAL OS/3
USER SOFTWARE
2-4. Installation of a New
a.
b.
Save all desired user software
Instan new OS/3 release software on your SYSRES
Copy user software back
2-6
You can build the SYSRES on any disk device the system supports, except for 8416 or
8418-1 (low-density) disks.
The following procedures let you install:
•
Standard release OS/3 software from diskettes or tapes using stand-alone
routines (2.2.1)
e
Optional program product software from diskettes (2.2.2)
•
Standard release OS/3 software from tapes using online dump/restore routines
(2.2.3)
1.. Installing
Release
or
Tapes
Stand .. Alone
The following procedure lets you install standard release OS/3 software on a system
that does not have an operable SYSRES. The stand-alone media contains the
SU@PRP and SU@RST routines necessary for this procedure.
The following procedure preps the disk you are going
touse as your SYSRES and then
installs the system control software (SCS). The SCS is installed by the restore routine
which transfers the SCS from the release media
tothe SYSRES disk.
If you are unfamiliar with these routines, you should review the considerations listed
at the end of the procedure.
To install OS/3 software using the stand-alone routines:
1.
Load the initial microprogram load (IMPL) code diskette containing the
"'·<Tc.4o", ...microcode supplied with the release diskettes into diskette drive
FDDO.diskette stays loaded in this drive permanently.
2.
Perform the system turn-on procedure as described in the
Operations Guide,
7004 5208, with the IPL switch set to manual.
3.
When the configuration frame appears, enter the device address (did) of your disk
candidate SYSRES disk. This establishes the disk as the default value for the
4.
Load the IPL diskette in an
diskette drive.
5.
Press ESC and
the M key to display the manual frame.
6.
Enter C (or G if you have an autoloader diskette) and the
the diskette drive containing the IPL diskette. Press XMIT.
address (did) of
7.
When the
OS/3
initial program load
screen is displayed, key in:
SU@PRP,L,did
where:
L
Specifies the option for loading stand-alone programs.
did
Is the device address of the diskette drive containing the IPL diskette.
8.
Press XMIT. The system loads the stand-alone disk prep routine into main
storage and requests information from you. For most applications of SU@PRP,
the following responses are valid. In some cases, you can choose options different
from the ones shown.
Note:
When you use the autoloader to load SU@PRP or SU@RST, a channel
reset is done by [PL. This ejects the diskette and an [
/0
error occurs.
Remount the diskette and reply R.
a.
When SU@PRP requests ENTER OUTPUT DISK DEVICE TYPE (nnnn),
key in the disk type and press XMIT.
h.
When SU@PRP asks WHAT DRIVE IS YOUR DISK ON?, key in the device
address (did) of your SYSRES disk device and press XMIT.
c.
If SU@PRP asks DOWNLINE MICROCODE TO DISK?, key in Y and press
XMIT. (This question does not appear for 8494 or M9720 disks.)
d.
IfSU@PRP asks WHAT DRIVE IS MICROCODE DSKT ON?, key in the
address (did) of the diskette drive containing the IDCU microcode
diskette for the disk you are prepping and press XM:IT. (This question does
not appear for 8494 or M9720 disks.)
e.
WHAT DISK VOL SERIAL NUMBER DO YOU
~~"-I
key in the
volume serial number you want
VOLllabel on the disk.
f.
If SU@PRP asks DO YOU WANT TO WRITE HOME ADDRESSES?
(YIN),key in Y for yes and press XMIT. (This question appears only during prep of
8470 disks.)
g.
asks DO YOU WANT SURFACE ANALYSIS?
(YIN),
key in Y for
yes and press XMIT. (This question does not appear for 8470 disks.)
h.
When SU@PRP asks DO YOU WANT FAST OR COMPLETE ANALYSIS?
(F/C),
key in C and press XMIT.
1.
When you are prepping an 8470 disk, SU@PRP asks IS THE
NEW
FROM
(NID).Key in one of the following:
N and press the Xl\HT
if the disk is factory fresh or if you suspect that
disk requires formatting. The disk will be formatted and basic surface
analysis performed. Any defects found during
surfac_e analysis are placed
into a new
condition table (TCT).
D
and press the XMIT key if the disk was previously prepped using OS/3
prep or SU@PRP.
TCT is not rebuilt. However, any defects found
during surface analysis are added to the TCT.
j
When you are prepping an 8494 or M9720 disk, SU@PRP asks IS THE SCT
NEW OR FROM DISK
(NID).Key in one of the following:
N and press the XMIT key if the disk is factory fresh or if you suspect that
the disk requires formatting. The disk will be formatted and basic surface
analysis performed. Any defects listed in the factory defect table, or found
during the surface analysis, are placed into a new sector condition table
(SCT).
D
and press the XMIT key if the disk was previously prepped using OS/3
disk prep or SU@PRP. The SCT is not rebuilt. However, any defects found
during surface analysis are added to the SeT.
k.
When you are prepping an 8417 disk, SU@PRP asks IS THE TCT NEW,
FROM DISK, OR FROM DISKETTE?
(NIDIK).Key in one of the following:
N and press the XMIT key
if
the disk is factory fresh or if you suspect that
the disk requires formatting. The disk will be formatted and basic surface
analysis performed. Any defects found during the surface analysis are placed
into a new track condition table (TCT).
D
or K and press the XMIT
if the disk was previously prepped using
OS/3 disk prep or SU@PRP
to
read the TCT from disk or diskette. The TCT
is not rebuilt. However, any
found
surface analysis are added
to the TCT.
1.
When SU@PRP requests that you ENTER INSERT (cccchhlENDINONE) or
ENTER INSERT (cccchhrrIENDINONE) for 8494 and M9720
key in
NONE and press XMIT.
Note:
If you know of defective tracks / records on the SYSRES disk, enter
the hexadecimal address of those tracks / records so the routine
formats them as defective.
After you provide SU@PRP with
informs you when it terminates.
information requested, it preps the disk
9.
When SU@PRP terminates normally, press XMIT to re-IPL the system.
10. When the
OS/3 IPL screen is displayed, key in:
SU@RST,L,did
where:
L
did
Specifies the option for loading
sr.ano··au)neprograms.
Is
device address of the diskette drive containing the IPL diskette.
Device address (did) values are site dependent and are configured
when your hardware is installed.
11. Press XMIT. The system loads the stand-alone disk restore program (SU@RST).
7004 5505-000
The program then requests information from you. Respond to these requests as
follows:
a.
When SU@RST requests ENTER OUTPUT DISK DEVICE TYPE (nnnn),
key in the disk type and press XMIT.
b.
When SU@RST asks WHAT DRIVE IS YOUR OUTPUT DISK ON? (did),
key in the device address (did) of the disk to be the SYSRES and press
XMIT.
c.
If SU@RST asks DOWNLOAD MICROCODE TO DISK?, key in N for no and
press Xl\UT. (This question does not appear for 8494 or M9720 disks.)
d.
When SU@RST asks IS INPUT MEDIUM TAPE OR DISKETTE?
(TAPEIDSKT), key in TAPE or DSKT and press XMIT.
If you enter TAPE, the message ENTER INPUT TAPE DEVICE TYPE
(NNNN) is displayed. Key in U xx or BT32.
e.
When SU@RST asks WHAT DRIVE IS
INPUT TAPEIDISKETTE
1.
Replace the IPL diskette with your first system control software
diskette or mount the first system control software tape on an available
drive.
If you are
an autoload diskette
the program loads the
diskettes automatically. Remember that the volumes must be in
order
by SU@RST for
program to copy them.
2.
in the device
<:lIrlr'l ... o."",·(did) of the drive containing your system
control software
diskette or tape.
2-10
3.
Press XM:IT.
Note:
If the input device is a Ull
(streamer) or U22 on a DMUX
channel
(Cor E), SU@RST asks DOWNLINE LOAD
MICROCODE TO DEVICE?
in
Y
and press XMIT.
When SU@RST asks WHAT DRNE IS MICROCODE DSKT
ON?, key in the device address (did) of the diskette drive
containing the ITCU microcode for the streamer tape and press
XMIT.
f.
When SU@RST asks ARE YOU INITIALIZING YOUR SYSTEM? ( YIN ),
key in Y and press XIVHT.
After you have provided SU@RST with the response information, it copies
the entire contents of the system control software release to the SYSRES.
The routine informs you of completion as it successfully copies your diskettes
or tapes and displays a message telling you where to mount the next volume.
g.
When SU@RST displays the MOUNT message, mount the requested tape or
diskette, key in R for ready, then press XMIT.
h.
After SU@RST copies all your release diskettes or tapes to the SYSRES, a
message informs you that the program terminated normally. (If SU@RST
does not terminate normally, use the SU@RSTrestartcapability.)Younow
have a functional SYSRES and you are ready to load the system with a
starter supervisor.
12. Press XMIT to re-IPL the system. At the IPL screen, key in:
13.
SY#BAS,S.did or
SY$BAS,S,did
where:
SY#BAS
Specifies
SY$BAS
for model
8.Specifies the starter supervisor for models 10 through 20.
S
option for lOaamlg a supervisor.
did
~P4::!cltles
the
""rt ... f ... o,~",of the SYSRES disk.
XIVIIT. The System Datelrime screen is displayed (Figure
2-5),A) DATE: YY/MM/DD TIME: HH:MM:SS ·B) RUN LIBS DVC ADDR: XXX (SYSRES)
C) FILE RECOVERY
JOB QUEUE (N,Y,H DEFAULT=N) ERROR LOG (N,Y DEFAUlT=Y) SPOOL FILES (N,A,C,L,H DEFAUlT=N) D) MODIFY SUPERVISOR# DEFAULT=N
E) SPOOLING DVC ADDR: XXX (SYSRES) F) DUMP FILE DVC ADDR: XXX (SYSRES)
TRANSMIT TO ENTER DEFAULTS. OTHERWISE ENTER THE LETTERS OF THE PARAMETER(S) TO BE CHANGED.
2-5.
Sys1temDisplay
14. Press XMIT to accept the defaults supplied by the system.
When the system displays header messages indicating OS/3 version number,
supervisor name, date, and time, it is ready for you to perform your next installation
task - either installing software or performing system generation.
Note:
If the documentation that accompanied your standard release software
instructs you to update loadable microcode, go to the post-installation task of
updating the system definition file in
2.3.1.
If you
do
not install optional
software or generate your own supervisor, the system is now ready for use.
Stand-alone Routines Considerations
When using the stand-alone routines to install SCS, you should be aware of the
following:
•
Initializing your disk destroys any files that are on your disk.
•
The
8LaIlu··aHHleSU@PRP routine does not destroy the factory defect table.
•
If you experience I/O errors loading from diskette or tape
rt.,· ...rrthe stand-alone
routine, use the restart capability of the SU@RST program.
Use the following
when necessary, to initiate the restart capability of
SU@RST. Note that all data successfully
to SYSRES when the error occurred
remains intact on SYSRES.
It
is preferable that you use a
diskette drive or tape unit, if possible, for the
restart operation in case the error was caused by a peripheral unit hardware problem.
1.
Press ESC and then the M key to display the manual
2.
Enter C
if the
aut~OlOlaaE~ris
... .;:)L>.'V ... vc;
drive
the IPL diskette.
3.
Press
Xl\lIITto re(11S]play the IPL screen.
4.
Reinitiate
5.
When
XM:IT.
6.
restore routine
lOin
press
you
enlCOtmterE~d... , ... "". For
eX~lmI)1e,in
009.Press
Xl\lIIT.7.
8.
INITIALIZING
information
entire contents
you
Oe]pell.Olug on
mE~ss:agE~s
are informational messages
informs you as it
you "' ...
JL.J ... JL,u.in
message, mount
tWID-cJhalracter message
R for
message
cOlnplonE~nt
you want to install.
OP1CIOllal COlnplonemts. you must run
once
It
takes approximately 2 to 10 minutes to install an optional program product or
programming aid,
upon the size
1.
Key in:
RV SG@CPYPD
2.
Press XMIT.
3.
When SOOCPYPD displays the message MOUNT VSN=A GO?, mount the first
component diskette.
4.
Key in GO SOOCPYPD and press XMIT. SOOCPYPD then initiates the
SOOMVPD routine, which moves the separate component software from its
release diskette to the SYSRES. If the component resides on more than one
release diskette, SG®MVPD asks you to mount the next volume.
5.
When SOOMVPD displays a MOUNT message:
a.
Mount the requested diskette.
b.
Key in the two-character message number and R for ready in the following
format:
nn R
where:
nn
Is the message number.
c.
Press XMIT.
When SOOMVPD successfully
your
software onto the SYSRES, it
a message to inform you that
routine terminated normally.
Installing Standard Release 05/3 Software from Tapes Using
Online Dump/Restore Routines
U nisys delivers (upon request) updated standard release OS/3 software on
dump/restore tapes. Existing users can install this updated software using the online
dump/restore routines if they
an active SYSRES and an additional free
The
free disk then becomes the new SYSRES. Following installation of the updated
software, perform post-installation and SYSGEN procedures as described in 2.3.
The job stream SG$DMPTD is
to transfer the software from the dump/restore
tape to the new SYSRES disk.
It
is important to note that the dump/restore tapes are
created to be used with a specific disk type.
To install OS/3 release
sottw~uefrom dump/restore
procedure:
perform
following
1.
Perform an initial program load (IPL) from the existing SYSRES to load either
the starter supervisor or a supervisor that you previously generated. Make sure
the free (output) disk is
before you perform the IPL.
2.
your output disk, using the
routine. For a full description of
disk prep functions, see the
System Service Programs Operating Guide,
UP-8841.
sample
prep job control stream that preps an 841 7 disk so that
release software can be installed on it is presented following this procedure. With
a few minor changes, you can also use this control stream to prep any disk.)
3.
Mount the release tape. If you have two release tapes, you can mount the second
tape on a second tape drive.
only have one tape drive, you must wait until
the first tape is read and rewound before you can mount the second tape.
4.
Initiate the SG$DMPTD installation job control stream by keying in:
RV SG$DMPTD
5.
SG$DMPTD now generates a series of prompts to allow you to complete the
installation procedure:
a.
When IS THE INPUT TAPE MULTI-VOLUME (N,Y)? is displayed, answer
N if you received the software on one tape or Y if you received the software
on more than one tape. Press Xl\1IT.
b.
If you responded Y, this message appears:
SPEED PROCESSING USE
ALTERNATE TAPE DRIVES TO DECREASE SETUP TIME. After a