Operations, Administration, and Maintenance
(OAM) Guide
910-6625-001 Revision A September 2013
Copyright 2013 Tekelec. All Rights Reserved. Printed in USA.
Legal Information can be accessed from the Main Menu of the optical disc or on the Tekelec Customer Support web site in the Legal Information folder of the Product Support tab.
1
Introduction
This chapter contains a brief description of the Operations, Administration, and Maintenance
Topics:
• About this Document...3 (OAM) feature. The contents include sections about
• Purpose of this documentation...3 the manual scope, audience, and organization; how to find related publications; and how to contact Tekelec for assistance.
• Scope and Audience...3
• Manual Organization...3
• Documentation Admonishments...4
• Customer Care Center...4
• Emergency Response...6
• Locate Product Documentation on the Customer Support Site...7
About this Document
This document describes the Operations, Administration, and Management (OAM) application. The following information is included:
• A functional description of the OAM • System-level administrative information
• Configuration information for the network topology
• Overview information on system alarms and events used for trouble notification • Security Log information
• Status and management information • Measurement information
Purpose of this documentation
This documentation:
• Gives a conceptual overview of the application's purpose, architecture, and functionality • Describes the pages and fields on the application GUI (Graphical User Interface)
• Provides procedures for using the application interface
• Explains the organization of, and how to use, the documentation
Scope and Audience
This manual is intended for anyone responsible for configuring and administering the Operations, Administration, and Maintenance options. Users of this manual must have a working knowledge of telecommunications and network installations.
Manual Organization
This document is organized into the following chapters:
• Administration contains information about the administration of users, passwords, groups, sessions, and other OAM functions.
• Configuration contains information about the configuration of network elements, services, resource domains, servers, server groups, places, place associations and networks on the OAM.
• Alarms and Events contains information about viewing, exporting and generating reports on active and historical alarms and events in OAM.
• Security Log contains information on the security log files included with OAM.
• Status and Manage contains information on the status and management of network elements, servers, high availablility servers, databases, KPIs, processes, tasks, and files on the OAM.
• Measurements contains information on the measurement elements on the OAM.
Documentation Admonishments
Admonishments are icons and text throughout this manual that alert the reader to assure personal safety, to minimize possible service interruptions, and to warn of the potential for equipment damage.
Table 1: Admonishments DANGER:
(This icon and text indicate the possibility of personal injury.)
WARNING:
(This icon and text indicate the possibility of equipment damage.)
CAUTION:
(This icon and text indicate the possibility of service interruption.)
Customer Care Center
The Tekelec Customer Care Center is your initial point of contact for all product support needs. A representative takes your call or email, creates a Customer Service Request (CSR) and directs your requests to the Tekelec Technical Assistance Center (TAC). Each CSR includes an individual tracking number. Together with TAC Engineers, the representative will help you resolve your request. The Customer Care Center is available 24 hours a day, 7 days a week, 365 days a year, and is linked to TAC Engineers around the globe.
Tekelec TAC Engineers are available to provide solutions to your technical questions and issues 7 days a week, 24 hours a day. After a CSR is issued, the TAC Engineer determines the classification of the trouble. If a critical problem exists, emergency procedures are initiated. If the problem is not critical, normal support procedures apply. A primary Technical Engineer is assigned to work on the CSR and provide a solution to the problem. The CSR is closed when the problem is resolved.
Tekelec Technical Assistance Centers are located around the globe in the following locations:
Tekelec - Global
Email (All Regions): [email protected] • USA and Canada
Phone:
1-888-FOR-TKLC or 1-888-367-8552 (toll-free, within continental USA and Canada) 1-919-460-2150 (outside continental USA and Canada)
TAC Regional Support Office Hours:
8:00 a.m. through 5:00 p.m. (GMT minus 5 hours), Monday through Friday, excluding holidays • Caribbean and Latin America (CALA)
Phone:
+1-919-460-2150
TAC Regional Support Office Hours (except Brazil):
10:00 a.m. through 7:00 p.m. (GMT minus 6 hours), Monday through Friday, excluding holidays • Argentina Phone: 0-800-555-5246 (toll-free) • Brazil Phone: 0-800-891-4341 (toll-free)
TAC Regional Support Office Hours:
8:00 a.m. through 5:48 p.m. (GMT minus 3 hours), Monday through Friday, excluding holidays • Chile Phone: 1230-020-555-5468 • Colombia Phone: 01-800-912-0537 • Dominican Republic Phone: 1-888-367-8552 • Mexico Phone: 001-888-367-8552 • Peru Phone: 0800-53-087 • Puerto Rico Phone: 1-888-367-8552 (1-888-FOR-TKLC) • Venezuela
Phone: 0800-176-6497
• Europe, Middle East, and Africa Regional Office Hours:
8:30 a.m. through 5:00 p.m. (GMT), Monday through Friday, excluding holidays • Signaling Phone: +44 1784 467 804 (within UK) • Software Solutions Phone: +33 3 89 33 54 00 • Asia • India Phone: +91-124-465-5098 or +1-919-460-2150 TAC Regional Support Office Hours:
10:00 a.m. through 7:00 p.m. (GMT plus 5 1/2 hours), Monday through Saturday, excluding holidays
• Singapore Phone: +65 6796 2288
TAC Regional Support Office Hours:
9:00 a.m. through 6:00 p.m. (GMT plus 8 hours), Monday through Friday, excluding holidays
Emergency Response
In the event of a critical service situation, emergency response is offered by the Tekelec Customer Care Center 24 hours a day, 7 days a week. The emergency response provides immediate coverage, automatic escalation, and other features to ensure that the critical situation is resolved as rapidly as possible. A critical situation is defined as a problem with the installed equipment that severely affects service, traffic, or maintenance capabilities, and requires immediate corrective action. Critical situations affect service and/or system operation resulting in one or several of these situations:
• A total system failure that results in loss of all transaction processing capability • Significant reduction in system capacity or traffic handling capability
• Loss of the system’s ability to perform automatic system reconfiguration • Inability to restart a processor or the system
• Corruption of system databases that requires service affecting corrective actions • Loss of access for maintenance or recovery operations
• Loss of the system ability to provide any required critical or major trouble notification
Any other problem severely affecting service, capacity/traffic, billing, and maintenance capabilities may be defined as critical by prior discussion and agreement with the Tekelec Customer Care Center.
Locate Product Documentation on the Customer Support Site
Access to Tekelec's Customer Support site is restricted to current Tekelec customers only. This section describes how to log into the Tekelec Customer Support site and locate a document. Viewing the document requires Adobe Acrobat Reader, which can be downloaded at www.adobe.com.
1. Log into the Tekelec Customer Support site.
Note: If you have not registered for this new site, click the Register Here link. Have your customer
number available. The response time for registration requests is 24 to 48 hours.
2. Click the Product Support tab.
3. Use the Search field to locate a document by its part number, release number, document name, or
document type. The Search field accepts both full and partial entries.
4. Click a subject folder to browse through a list of related files.
5. To download a file to your location, right-click the file name and select Save Target As.
Acronyms and Terminology
The following acronyms are used by OAM.
Table 2: Acronyms
DESCRIPTION ACRONYM
Automatic Performance Data Export APDE
Application Programming Interface API
Authentication Token AT
Client for URL CURL
Disaster Recovery DR
Graphical User Interface GUI
High Availability HA
JavaScript Object Notation JSON
Network Element NE
DESCRIPTION ACRONYM
Measurements, Events, Alarms and Logs MEAL
Model, View, Controller MVC
Operations, Administration, Maintenance and Provisioning OAM&P
Security Assertion Markup Language SAML
SSH File Transfer Protocol SFTP
Simple Object Access Protocol SOAP
Secure Shell SSH
Single Sign-On SSO
Universal Resource Identifier URI
Universal Resource Locator URL
Coordinated Universal Time UTC
eXtensible Markup Language XML
2
Administration
This section describes administrative tasks. These tasks are at the system-level and are limited to users
Topics:
• Options Administration...10 with administrative privileges. The associated menu
• Access Control...12 items do not appear in the user interface for non-administrative users.
• Software Management...44
Options Administration
The Options Administration page enables the administrative user to view a list of global options.
General Options Administration elements
This table describes the elements of the General Options Administration page.
Table 3: General Options Administration Elements
Description Element
Number of days of inactivity before a user account is disabled. (0 = never disable) [Default = 0; Range = 0-200]
LastLoginExpiration
Note: This feature is not enabled by default.
Number of days of prior warning before a software license key expires. (0 = no warning). LicenseKeyExprWarn
[Default = 7; Range = 0-90]
Amount of time (in minutes) in which exceeding the maximum number of consecutive failed logins LockoutWindow
will cause an account to be locked out. (0 = unlimited)
Maximum number of consecutive failed login attempts before account is disabled. (0 = never disable) [Default = 3; Range = 0-10]
MaxConsecutiveFailed
Maximum number of passwords maintained in history list before reuse of password is allowed. MaxPasswordHistory
(0 = no password history) [Default = 3; Range = 0-10]
The maximum number of records to display per page [Default = 20; Range = 10-100]
MaxRecordsPerPage
Time (in days) before passwords expire (0 = never) [Default = 90; Range = 0-90]
PasswordExpiration
Enables SAML authentication of users. (0 = disabled, 1 = enabled).
SAMLEnabled
[Default = 0]
The time (in minutes) before SAML authenticated sessions expire. (Range = 0 to 3600, 0 means no expiration).
SAMLInactivityTimeout
Description Element
Time (in minutes) before Single Sign-on Session expires [Default = 120]
SSOSessLife
Maximum number of allowed simultaneous WAN based bulk loads.
WanBulkLoadLimit
[Default = 1; Range = 1-2]
The durability state of the system where: DurableAdminState
• 1 = NO disk (data is replicated to the active NO only)
• 2 = NO pair (data is replicated to both the active and standby NOs)
• 3 = NO Disaster Recovery NO (data is replicated to the active and standby NOs, as well as the secondary NO)
[Default = 1; Range = 1-3]
Message displayed when attempting to login to a disabled account
DisabledAccount
Message displayed on failed login FailedLoginMessage
Configurable portion of IP Authorization Denied message
IpAuthDeniedMessage
Configurable portion of login message seen on the login screen
LoginMessage
Welcome message seen after successful login. WelcomeMessage
Replace a space in an export data filename or directory.(Default = underscore)
exportDataSpaceReplace
Viewing options
Use this procedure to view a list of global options: Select Administration > General Options.
The General Options Administration page appears. The General Options pane lists all global options on the system. You can view the details of each option.
Updating a current global option
Use this procedure to update a global option.
1. Select Administration > General Options.
The General Options Administration page appears.
3. Change the value of the option.
4. Click OK or Apply to submit the information.
This submits the information, updates the database tables, and allows you to input additional data. The global option is changed.
Access Control
The Access Control page enables you to perform functions such as adding, modifying, enabling, or deleting user accounts, passwords, groups, sessions, single sign-on certificates, IPs and SFTP user information.
Users administration
The Users Administration page enables you to perform functions such as adding, modifying, enabling, or deleting user accounts.
Each user who is allowed access to the user interface is assigned a unique Username. This Username and the associated password must be provided during login. After three consecutive, unsuccessful login attempts, a user account is disabled. The number of failed login attempts before an account is disabled is a value that is configured through Administrations > Options. For more information, see
Options Administration.
Each user is also assigned to a group or groups. Permissions to a set of functions are assigned to each group. The permissions determine the functions and restrictions for the users belonging to the group. A user must have user/group administrative privileges to view or make changes to user accounts or groups. The administrative user can set up or change user accounts and groups, enable or disable user accounts, set password expiration intervals, and change user passwords.
Add New User elements
The Insert User page displays the following elements:
Table 4: User Administration Elements
Data Input Notes Description
Element
Format: String A field for the Username. The
Username allows access to the GUI and must be unique. Username
Range: 5-16 lowercase
alphanumeric characters (a to z, 0 to 9)
Range: provisioned groups The groups to which the selected
Username is assigned. Groups Group
Default: admin define the permissions assigned
to the user. The permissions determine the functions and
Data Input Notes Description
Element
restrictions for the users belonging to the group.
Format: Checkbox
Range: Allow Remote Auth or Allow Local Auth
Authentication options used with the account. When using local authentication, the account is disabled until a password is Authentication Options
established. If using remote Default: Local Auth enabled, Remote Auth disabled authentication, an authentication
server must be configured.
Format: Checkbox Default: Account Enabled Whether the user account is
enabled. Access Allowed
Format: Checkbox
Default: NE Filter Preset Enabled Whether to use the NE filter
preset for this account. NE Filter
Default: All The preset value for the NE filter
NE Filter Preset
This feature cannot be enabled for users belonging to the admin group.
Maximum concurrent logins per user per server.
Maximum Concurrent Logins
Range: 0-50 Default: 0 0 = no limit Range: 0-3600 The time, in minutes, after which
login session expires. Session Inactivity Limit
Default: 120
0 = session never expires Format: Alphanumeric characters
A field for user-defined text about this account (100 character maximum). This field is optional. Comment
Range: 0-100 characters
Adding a new user
Note: Prior to performing this procedure, you should know to which user groups this user should
be assigned. The group assignment determines the functions that a user has access to. If you need to create a new group for this user, you should do so prior to adding the user (see Adding a group). Use this procedure to add a new user who will be allowed to log in to the user interface and access all or some of its functions:
1. Select Administration > Users.
The Users administration page appears.
The Insert User Page appears.
3. Enter a Username that consists of 5-16 characters.
For more information about Username, or any field on this page, see Add New User elements .
4. Select a Group or Groups for the user.
5. Select the Authentication Options to be used with this account.
6. Select whether the account is enabled using the Access Allowed checkbox. 7. Select whether the NE Filter is preset for this account.
8. Select the NE Filter Preset from the available options. 9. Enter the Maximum Concurrent Logins.
Note: Maximum Concurrent Logins cannot be enabled for users in the admin group. 10. Enter the Session Inactivity Limit.
11. Enter text about this user in the Comment field.
This field is required.
12. Perform one of the following actions:
• Click Apply.
A confirmation message appears at the top of the Insert Users page to inform you that the new user has been added to the database. To close the Insert Users page, click Cancel.
• Click OK.
The Users administration page re-appears with the new user displayed.
The new user is added to the database.
User Administration elements
The User Administration page displays the following elements:
Table 5: User Administration Elements
Description Element
The currently selected Username. The Username allows access to the GUI and must be unique. Username
Enabled or disabled. If a user account is disabled, the user is unable to log in until an administrative Account Status
user manually enables the account. If the user account is currently logged in, this action does not disrupt the session.
Whether remote authorization is enabled or disabled.
Remote Auth
Whether local authorization is enabled or disabled.
Description Element
The number of consecutive failed login attempts. Consecutive Failed Login Attempts
The number of concurrent logins allowed. Concurrent Logins Allowed
The limit set on account inactivity after login. Inactivity Limit
A check box that enables (checked) or disables (not checked) the preset NE Filter.
NE Filter Preset
The name of the global network element filter. NE Filter Value
An optional field for user-defined text about this account (64 character maximum).
Comment
The groups to which the selected Username is assigned. Also provides a pull down list of Groups
provisioned groups. A user's groups determine the permissions assigned to the user. The permissions determine the functions and restrictions for the users belonging to the group.
Viewing user account information
Use this procedure to view user account information.
1. Select Administration > Users.
The Users Administration page appears with the user account information displayed.
2. To view more detailed information, select Report.
The Users Report displays with detailed information on the user account.
Updating user account information
Use this procedure to update user account information on the user interface:
1. Select Administration > Users.
The Users administration page appears.
2. Select a user from the listing. 3. Select Edit.
4. Modify one or more of the user account information fields. 5. Click Ok or Apply.
The Users administration page re-appears. The user account information is updated in the database, and the changes take effect immediately.
Deleting a user
Use this procedure to delete a user from the database. The next time the user attempts to log in, the user will be unable to log in. If the user is currently logged in to the system, this operation will not
disrupt the user's current session. To stop a current user session, see Deleting user sessions, or to disable a user's account, see Enabling or disabling a user account.
1. Select Administration > Users.
The Users administration page appears.
2. Select the appropriate user from the listing. 3. Click Delete.
A confirmation box appears.
4. Click OK to delete the user.
The Users administration page re-appears.
The user has been deleted from the database and no longer appears in the Username menu.
Enabling or disabling a user account
The user interface automatically disables a user account after five consecutive failed login attempts. The administrative user can also manually disable a user account to prevent a user from logging on to the system. If a user account is disabled, the user is unable to log in until an administrative user manually enables the account.
Use this procedure to enable or disable a user account:
1. Select Administration > Users.
The Users administration page appears.
2. Select a Username from the listing. 3. Select Edit.
The Edit Users page appears.
4. Click the Account Enabled checkbox to enable/disable the account. A check mark indicates that
the account is enabled.
5. Click Ok.
The account is enabled/disabled as selected.
Changing a user's assigned group
Use this procedure to change a user's assigned groups. The group assignment determines the functions that a user has access to (see Groups Administration). The next time the user logs in, the new assignment takes effect. If the user is currently logged in to the system, this operation will not affect the user's current session.
1. Select Administration > Users.
The Users Administration page appears.
2. Select the appropriate user from the listing. 3. Select Edit.
The Edit Users page appears.
5. Click Ok.
The user's assigned groups are updated in the database and will take effect the next time the user attempts to log in to the user interface.
Generating a user report
A user account usage report can be generated from the Administration > User page. This type of report provides information about a user's account usage including last login date, the number of days since the user last logged in, and the user's account status. Use this procedure to generate a user account usage report.
1. Select Administration > Users.
The Users Administration page appears.
2. Click Report.
Note: It is unnecessary to select a particular user, because all users appear in the Users Report.
The Users Report is generated. This report can be printed or saved to a file.
3. Click Print to print the report. 4. Click Save to save the report to a file.
Passwords
Password configuration, such as setting passwords, password history rules, and password expiration, occurs in Administration. The application provides two ways to set passwords: through the user interface, see Setting a password from the Users Administration page, and at login, see Setting a password from the System Login page.
The user interface provides two forms of password expiration. The administrative user can configure password expiration on a system-wide basis. By default, password expiration occurs after 90 days. The administrative user can also disable the password expiration function. For procedural information on configuring password expiration, see Configuring the expiration of a password.
Password expiration is also forced the first time a user logs in to the user interface. During initial user account setup, the administrative user grants the user a temporary password. When the user attempts to log in for the first time, the software forces the user to change the password. The user is redirected to page where the user must enter the old password and then enter a new, valid password twice. A valid password must contain from 8 to 16 characters. A password must contain at least three of the four types of characters: numerics, lower case letters, upper case letters, or special characters (! @ # $ % ^ & * ? ~). A password cannot be the same as the Username or contain the Username in any part of the password (for example, Username=jsmith and password=$@jsmithJS would be invalid). A password cannot be the inverse of the Username (for example, Username=jsmith and
password=$@htimsj would be invalid).
Note: By default, a user cannot reuse any of the last three passwords.
Setting a password from the Users Administration page
Note: Only an administrative user may use this procedure. For information about how a
non-administrative user can change a password, see Setting a password from the System Login page.
1. Select Administration > Users.
The Users Administration page appears.
2. Select the appropriate user from the listing. 3. Click Change Password.
The Set Password page appears. The selected user appears in the New Password box.
4. Enter a password in the New Password and Retype New Password fields. For information on
valid passwords, see Passwords.
The system verifies that the values entered in both fields match.
5. Click Continue.
A confirmation message appears.
6. Select Administration > Users to return to the User Administration page.
The password has been updated in the database and will take effect the next time the user attempts to log in to the user interface.
Setting a password from the System Login page
Use this procedure to change a existing, non-administrative user's password on login.
Note: This procedure is for non-administrative users. For information about how an administrative
user can set a password, see Setting a password from the Users Administration page.
1. Select Change password checkbox on the System Login page. 2. Enter the user name and password.
3. Click Login.
The Password Change Requested page appears.
4. Enter a password in the New Password and Retype New Password fields. For information on
valid passwords, see Passwords.
The system verifies that the values entered are valid and that both fields match.
5. Click Continue.
The password has been updated in the database and will take effect the next time the user attempts to log in to the user interface.
You have now completed this procedure.
Configuring the expiration of a password
Use this procedure to change the variable that controls the length of time for password expiration:
1. Select Administration > Options.
2. Locate PasswordExpiration in the Variable column.
3. Enter an integer in the Value column. The integer indicates the number of days that elapse before
the password expires. To disable password expiration, enter 0.
4. Click OK or Apply to submit the information.
The password expiration variable is changed to the new value.
Groups Administration
The Groups Administration page enables you to create, modify, and delete user groups.
A group is a collection of one or more users who need to access the same set of functions. Permissions are assigned to the group for each application function. All users assigned to the same group have the same permissions for the same functions. In other words, you cannot customize permissions for a user within a group.
You can assign a user to multiple groups. You can add, delete, and modify groups except for the
Pre-defined user and group that come with the system.
The default group, admin, provides access to all GUI options and actions on the GUI menu. You can also set up a customized group that allows administrative users in this new group to have access to a subset of GUI options/actions. Additionally, you can set up a group for non-administrative users, with restricted access to even more GUI options and actions.
For non-administrative users, a group with restricted access is essential. To prevent non-administrative users from setting up new users and groups, be sure User and Group in the Administration Permissions section are unchecked. Removing the check marks from the Global Action Permissions section will not prevent groups and users from being set up. The following figure displays these sections of the
Figure 1: Global Action and Administration Permissions
Each permission option check box on the Groups Administration page corresponds to a menu option on the GUI main menu or a submenu. If a check box is checked for a group, the group has access to this option on the menu. If a check box is not checked, the group does not have access to this option, and the option is not visible on the GUI menu.
These check boxes are grouped according to the main menu's structure; most folders in the main menu correspond to a block of permissions. The exceptions to this are the permission option check boxes in the Global Action Permissions section.
The Global Action Permissions section allows you to control all insert (Global Data Insert), edit (Global Data Edit), and delete (Global Data Delete) functions on all GUI pages (except User and Group). For example, if the Network Elements check box is selected (in the Configurations Permissions section), but the Global Data Insert checkbox is not selected, the users in this group cannot insert a new Network Element.
By default, all groups have permissions to view application data and log files.
Pre-defined user and group
Table 6: Pre-defined User and Group
Description Group
User
Full access (read/write privileges) to all functions admin
guiadmin
including administration functions.
OAM Groups Administration permissions
This table describes the OAM groups administration permissions. The OAM groups administration permissions are available in all Tekelec XG products.
Table 7: OAM Groups Administration permissions
Description Permission
Global Action Permissions
Grants permission to insert or add data to database tables.
Global Data Insert
Grants permission to edit or modify data in database tables.
Global Data Edit
Grants permission to delete data from database tables.
Global Data Delete
Administration Permissions
Grants permission to set up new users. User
Grants permission set up user groups. Group
Grants permission to view and delete sessions information.
Session
Grants permission to insert and delete authorized IP addresses.
Authorized IPs
Grants permission to configure global options such as:
Options
• last login expiration
• maximum consecutive failed login attempts • password history
• maximum records per page • password expiration
• configuration of the login message • configuration of the welcome message Grants permission to add SNMP managers and enable traps.
Description Permission
Grants permission to transfer ISO files to be used in server installations and upgrades.
ISO
Grants permission to prepare, initiate, monitor, and complete server upgrades.
Upgrade
Grants permission to view software version data. Software Versions
Grants permission to use the export server Export Server
Grants permission for Single Sign On zones SSO Zones
Grants permission for Single Sign On LDAP servers
SSO LDAP Servers
Configuration Permissions
Grants permission to insert, edit, delete, lock or unlock Network Elements.
Network Elements
Grants permission to insert new servers or delete servers from the topology.
Servers
Grants permission to insert, edit and delete new services in the topology.
Services
Grants permission to group provisioned servers by role, function, and redundancy model. Server Groups
Grants permission to insert, edit, and delete new networks in the topology.
Networks
Grants permission to insert, edit, and delete new network devices in the topology.
Network Devices
Grants permission to insert, edit, and delete new network routes in the topology.
Network Routes
Alarms & Events Permissions
Grants permission to view active alarms. View Active Alarms
Grants permission to view alarm and event history.
View Event History
Grants permission to view SNMP trap log. SNMP Trap Log
Security Log Permissions
Grants permission to view security logs from all configured servers.
View Security Log
Status & Manage Permissions
Grants permission to view the status of Network Elements, as well as manage Customer Router Monitoring.
Description Permission
Grants permission to stop, reboot, and restart configured servers.
Servers
Grants permission to view detailed HA status. HA
Grants permission to disable provisioning to servers, inhibit database replication, perform Database
backups, compare a database to an archive, and restore a database.
Grants permission to view KPIs for all configured servers.
KPIs
Grants permission to view details about server processes.
Processes
Grants permission to view details about long running tasks.
Active Tasks
Grants permissions to view details about scheduled tasks.
Scheduled Tasks
Grants permission to display the file list for a network entity.
Files
Measurements Permissions
Grants permission to create and export measurement reports.
Report
IPFE Group Administration permissions
Table 8: IPFE Configuration Permissions describes the IP Front End (IPFE) Group Administration permissions.
Table 8: IPFE Configuration Permissions
Description Permission
Allows a user to create, edit, view, and delete IPFE Options Options
Allows a user to create, edit, view, and delete Target Sets and IP List TSAs
Target Sets
Communication Agent Group Administration permissions
Table 9: Communication Agent Configuration Permissions and Table 10: Communication Agent Maintenance Permissions describe the Communication Agent (ComAgent) Group Administration permissions.
Table 9: Communication Agent Configuration Permissions
Description Permission
Allows a user to create, edit, view, and delete Remote Servers Remote Servers
Allows a user to create, edit, view, and delete Connection Groups Connection Groups
Allows a user to create, edit, view, and delete Routed Services Routed Services
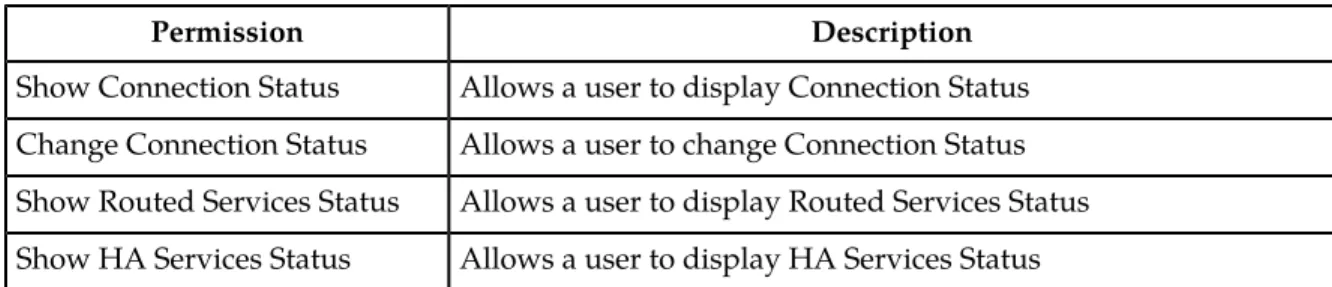
Table 10: Communication Agent Maintenance Permissions
Description Permission
Allows a user to display Connection Status Show Connection Status
Allows a user to change Connection Status Change Connection Status
Allows a user to display Routed Services Status Show Routed Services Status
Allows a user to display HA Services Status Show HA Services Status
DSR Diameter Group Administration permissions
The following tables describe the DSR Diameter Group Administration permissions:
Table 11: Diameter Configuration Permissions
Description Permission
Allows a user to create, edit, view, and delete Local Nodes Local Nodes
Allows a user to create, edit, view, and delete Peer Nodes Peer Nodes
Allows a user to create, edit, view, and delete Connection Configuration Sets
Connection Configuration Sets
Allows a user to create, edit, view, and delete Capacity Configuration Sets
Capacity Configuration Sets
Allows a user to create, edit, view, and delete Connections Connections
Allows a user to create, edit, view, and delete Route Groups Route Groups
Allows a user to create, edit, view, and delete Route Lists Route Lists
Allows a user to create, edit, view, and delete Peer Routing Rules Peer Routing Rules
Allows a user to create, edit, view, and delete Egress Throttle Groups
Egress Throttle Groups
Allows a user to define sets of Diameter Application Ids and Result Code AVP values that trigger Request message rerouting when an Answer response is received from a peer
Reroute on Answer
Allows a user to create, edit, view, and delete Application Routing Rules
Description Permission
Allows a user to view and edit System Options System Options
Allows a user to view and delete DNS Options DNS Options
Allows a user to create, edit, view, and delete Application Ids Application Ids
Allows a user to create, edit, view, and delete CEX Configuration Sets
CEX Configuration Sets
Allows a user to create, edit, view, and delete Message Priority Configuration Sets
Message Priority Configuration Sets
Allows a user to create, edit, view, and delete Egress Message Throttling Configuration Sets
Egress Message Throttling Configuration Sets
Allows a user to create, edit, view, and delete Peer Route Tables and Peer Routing Rules
Peer Route Tables
Allows a user to create, edit, view, and delete Routing Option Sets Routing Option Sets
Allows a user to create, edit, view, and delete Pending Answer Timers
Pending Answer Timers
Allows a user to create, edit, view, and delete CEX Parameters CEX Parameters
Allows a user to create, edit, view, and delete Command Codes Command Codes
Allows a user to view the Capacity Summary Capacity Summary
Allows a user to create, edit, view, and delete MP Profiles MP Profiles
Allows a user to create, edit, view, and delete DA-MP Profile Assignments
Profile Assignments
Allows a user to create, edit, view, and delete Message Copy Configuration Sets
Message Copy Configuration Sets
Allows a user to create, edit, view, and delete MCC Ranges Reserved MCC Ranges
Allows a user to create and delete Application Route Tables; and view and edit Rules in the tables
Application Route Tables
Allows a user to create, edit, view, and delete Trusted Network Lists for Topology Hiding
Trusted Network Lists
Allows a user to create, edit, view, and delete Path Topology Hiding Configuration Sets
Path Topology Hiding Configuration Sets
Allows a user to create, edit, view, and delete S6a/S6d HSS Topology Hiding Configuration Sets
S6a/S6d HSS Topology Hiding Configuration Sets
Allows a user to create, edit, view, and delete MME/SGSN Topology Hiding Configuration Sets
MME/SGSN Topology Hiding Configuration Sets
Allows a user to create, edit, view, and delete Protected Networks for Topology Hiding
Protected Networks
Allows a user to view the Connection Capacity Dashboard Connection Capacity Dashboard
Description Permission
Allows a user to provision the DSR system from an ASCII CSV (Comma Separated Values) text file
Import
Allows a user to "export" the DSR configuration data into a CSV (Comma Separated Values) file of the same format
Export
Table 12: Diameter Maintenance Permissions
Description Permission
Allows a user to view priority, capacity, Route Group assignment, and status information for Route Lists
Route Lists
Allows a user to view Initiator, Local Node, Peer Node, MP Server Hostname, Application ID, Admin State, Operational Status, and Connections
Operational Reason information for Connections. This permission also provides the ability to enable and disable Connections. Allows a user to view Admin State, Operational Status, Operational Reason, and other information for Egress Throttle Group Rate Limiting and Pending Transaction Limiting
Egress Throttle Groups
Allows a user to view Peer Node assignment, capacity, percent, and status information for Route Groups
Route Groups
Allows a user to view connection, status, and operation reason information for Peer Nodes
Peer Nodes
Allows a user to view status for DSR Applications Applications
Allows a user to view status for DA-MPs DA-MP Status
Table 13: Diameter Mediation Permissions
Description Permission
Allows an operator to define Mediation Rule Templates Rule Templates
Allows an operator to view and edit Mediation Enumerations Enumerations
Allows an operator to view and edit Mediation Triggers Triggers
Allows an operator to set the state of a Rule Template and configure settings for a Rule Template
State & Properties
Allows an operator to view the AVPs familiar to the system, add new AVPs, and change the definition of a basic AVP
AVP Dictionary
Allows an operator to view and add new vendors Vendors
Allows an operator to define Mediation Rule Sets Rule Sets
Table 14: Diameter Diagnostics Permissions
Description Permission
Allows diagnosis of test messages on a test connection Test Connections Diagnose
Allows reporting of diagnostic results Test Connections Report
Allows network operators to retrieve per MP SCTP statistics for MPs hosting Diameter connections.
MP Statistics (SCTP)
Policy DRA Group Administration permissions
Table 15: Policy DRA Configuration Permissions and Table 16: Policy DRA Maintenance Permissions describe the Policy DRA Group Administration permissions.
The Administration > Group GUI page displays permissions check boxes for all Policy DRA pages, both NOAM and SOAM pages.
• All of the permissions can be updated only on the NOAM Administration > Group page. • All of the permissions can be viewed but not updated on the SOAM Administration > Group page.
Table 15: Policy DRA Configuration Permissions
Description Permission
Allows a user to create, edit, view, and delete PCRFs PCRFs
Allows a user to assign Binding Key Priorities to Binding Key Types Binding Key Priority
Allows a user to create, edit, view, and delete Policy Clents from which PCRF names should be hidden
Topology Hiding
Allows a user to view and edit Network-Wide Options and Site Options
Options
Allows a user to view and edit Result Codes to be returned for Policy DRA error conditions
Error Codes
Allows a user to create, edit, view and delete Access Point Names Access Point Names
Allows a user to view and edit Congestion Options Congestion Options
Allows a user to view and edit Alarm Settings Alarm Settings
Table 16: Policy DRA Maintenance Permissions
Description Permission
Allows a user to view status for Policy SBRs Policy SBR Status
Allows a user to enter a Binding Key Type and Binding Key search value, and search for the specified Binding Key data
RBAR Group Administration permissions
Table 17: RBAR Configuration Permissions describes the Range-Based Address Resolution (RBAR) Group Administration permissions.
Table 17: RBAR Configuration Permissions
Description Permission
Allows a user to create, edit, view, and delete Applications Applications
Allows a user to create, edit, view, and delete Address Resolutions Address Resolutions
Allows a user to create, edit, view, and delete Address Tables Address Tables
Allows a user to create, edit, view, and delete Addresses Addresses
Allows a user to create, edit, view and delete Destinations Destinations
Allows a user to create, edit, view, and delete Exceptions Exceptions
Allows a user to view and edit RBAR System Options System Options
FABR Group Administration permissions
Table 18: FABR Configuration Permissions describes the Full Address-Based Resolution (FABR) Group Administration permissions.
Table 18: FABR Configuration Permissions
Description Permission
Allows a user to create, edit, view, and delete Applications Applications
Allows a user to create, edit, view, and delete Exceptions Exceptions
Allows a user to create, edit, view and delete Default Destinations Default Destinations
Allows a user to create, edit, view, and delete Address Resolutions Address Resolutions
Allows a user to view and edit RBAR System Options System Options
CPA Group Administration permissions
Table 19: CPA Configuration Permissions describes the Charging Proxy Application (CPA) Group Administration permissions.
Table 19: CPA Configuration Permissions
Description Permission
Allows a user to view and edit CPA System Options Cpa System Options
Allows a user to view and edit Message Copy elements for CPA Cpa Message Copy
Allows a user to view and edit SBR elements Cpa Sbr
Service Broker Group Administration permissions
This table describes elements of the Group Administration page.
Table 20: EAGLE XG NP Query Router
Description Permission
Allows access to Service Broker configuration settings Configuration
Allows users to query NP Query Router configuration tables Query
Allows access to maintenance tools including enabling/disabling NP Query Router
Maintenance
SSR Group Administration permissions
This table describes the SSR group administration permissions. The SSR group administration permissions are only available in the Tekelec XG SSR application.
Table 21: SSR Configuration Permissions
Description Permission
Grants permission to view, insert, and delete POPs. POPs
Grants permission to view, insert, and delete Domains. Domains
Grants permission to view, insert, edit, and delete Option Profiles. Option Profiles
Grants permission to edit default options. Defaults
Grants permission to view, insert, edit, and delete SUA Signaling Gateways.
SUA Signaling Gateways
Grants permission to view and edit DNS servers, and to view, insert, edit, and delete DNS cache pre-load records.
DNS
Grants permission to edit TCP and SCTP options. SIP Server
Grants permission to view, insert, and delete CAPM definitions and enumerations.
CAPM
Grants permission to view, insert, delete, and view Internal Components.
Internal Components
Table 22: SSR Routing Permissions
Description Permission
Grants permission to view, insert, edit, and delete Route Services. Route Service
Grants permission to view, insert, edit, and delete Routing Profiles. Routing Profile
Grants permission to view, insert, edit, and delete Routing Rules. Rules
Description Permission
Grants permission to view, insert, edit, and delete RS Prefix Screening
RS Prefix Screening
Grants permission to view, insert, edit, and delete NP Prefix Screening.
NP Prefix Screening
Grants permission to view, insert, edit, and delete CAPM Routing Task rules.
CAPM Tasks
Table 23: SSR Load Balancer Permissions
Description Permission
Grants permission to view, insert, edit, and delete Clusters and to assign Servers to Clusters and Clusters to MPs.
Clusters
Grants permission to view, insert, edit, and delete Servers for Load Balancing Clusters. Servers
Grants permission to view, insert, edit, and delete Load Balancer Routing Policies. Routing
Policies
Grants permission to set Load Balancer monitoring options and to monitor Load Balancer servers.
Monitoring
Table 24: SIP Timer Permissions
Description Permission
Grants permission to view, insert, edit, and delete SIP Timer Sets. Sets
Table 25: SSR Maintenance permissions
Description Permission
Grants permission to view the status of SUA Connections. SUA Connection Status
Grants permission to view and provision selective logging rules and rule assignments, to activate or deactivate selective logging, and to view and save logs to a file.
Selective Logging
Grants permission to view and flush the DNS cache and to add and delete DNS cache entries
DNS Cache
Grants permission to view and flush the IP Blacklist and to add an IP Blacklist entry.
IP Blacklist
Grants permission to view and flush the Heartbeat List and to add and delete Heartbeat List entries.
Heartbeat List
Grants permission to view the status of TCP connections. TCP Connections
Grants permission to view the status of SCTP Associations. SCTP Associations
Grants permission to view the status of SSR Configuration. SSR Configuration status
SS7/Sigtran Group Administration permissions
This table describes the SS7/Sigtran group administration permissions. The SS7/Sigtran group administration permissions are only available in Tekelec XG products that use the SS7/Sigtran plug-in.
Table 26: SS7/Sigtran Configuration Permissions
Description Permission
Grants permission to view, insert, and delete Adjacent Servers. Adjacent Servers
Grants permission to view, insert, edit, and delete Adjacent Server Groups.
Adjacent Server Groups
Grants permission to view, insert, edit, delete, and generate a report on Local Signaling Points.
Local Signaling Points
Grants permission to view, insert, delete, generate a report, and view status on Remote Signaling Points.
Remote Signaling Points
Grants permission to view, insert, delete, and view the status of Remote MTP3 Users.
Remote MTP3 Users
Grants permission to view, insert, delete, generate a report, and view status of Link Sets.
Link Sets
Grants permission to view, insert, edit, delete, generate a report, and view status of Associations. Grants permission to view, insert, edit, and delete an Association Configuration Set.
Associations
Grants permission to view, insert, delete, generate a report, and view status of a Link.
Links
Grants permission to view, insert, edit, delete, generate a report, and view status of Routes.
Routes
Grants permission to view and edit SCCP Options. SCCP Options
Grants permission to view and edit MTP3 Options. MTP3 Options
Grants permission to view and edit MTP3 Options. M3UA Options
Grants permission to view Local Congestion Options. Local Congestion Options
Grants permission to view, insert, delete, generate a report, and view status of the Local SCCP Users.
Local SCCP Users
Table 27: SS7/Sigtran Maintenance permissions
Description Permission
Grants permission to view the status of Local SCCP Users and to enable and disable LSUs.
Local SCCP Users
Grants permission to view the status of Remote Signaling Points and to reset the network status of routes.
Description Permission
Grants permission to view the status of Remote MTP3 Users and to reset the subsystem and point code status.
Remote MTP3 Users
Grants permission to view the status of Link Sets. Link Sets
Grants permission to view the status of Links and to enable and disable Links.
Links
Grants permission to view the status of Associations and to enable, disable, and block Associations.
Associations
Table 28: SS7/Sigtran Command Line Interface
Grants permission to use the Command Import page.
Command Import
Adding a group
Use this procedure to add a new group:
1. Select Administration > Group.
The Group Administration page appears.
2. Click New.
The Add Group page appears.
3. Enter a unique name in the Group field for the new group, and optionally, in the Description field,
enter text to describe the group.
4. To allow Insert, Edit, or Delete actions on all pages accessed from the GUI menu (except User and
Group), check mark to select the desired global actions.
5. Check mark the remaining menu permissions to which you want this group to have access. Note: To quickly select all permissions, click Check All. Check All automatically selects all of the
permissions in the section. Clear All automatically clears all permissions. For more information on the options displayed on the Group page, see OAM Groups Administration permissions .
6. Perform one of the following actions:
• Click Apply.
A confirmation message appears at the top of the Add Group page to inform you that the new group has been added to the database. To close the Create User Group page, click Cancel. • Click OK.
The Group Administration page re-appears with the new group displayed.
Note: The Group Members pane at the bottom of the page displays the entry None for a new
group. If you would like to add users to the new group now, double-click None to launch the
The new group is added to the database.
Viewing members of a group
Use this procedure to view a list of usernames assigned to a group:
1. Select Administration > Group.
The Group Administration page appears.
2. Select the appropriate group from the Group pulldown menu. 3. Scroll down if necessary to view the Group Members pane.
The Group Members pane lists all usernames assigned to the selected group. You can click a username to access the User Administration page for the selected username.
A list of group members is displayed.
Modifying a group
You cannot modify a predefined group provided by Tekelec. See Pre-defined user and group for more information on this group.
Use this procedure to modify a group:
1. Select Administration > Group.
The Group Administration page appears.
2. Select the appropriate group from the Group pulldown menu.
3. Make the modifications. For information on permission options, see OAM Groups Administration permissions .
4. Click Update.
The Update button grays out after the operation is performed.
The modifications are written to the database. The main GUI menu of the affected user(s) is not changed until the user logs out and back in to the system, or the user refreshes the menu (using the web browser's Refresh function). The change in accessibility to menu options for affected user(s) takes effect immediately.
Deleting a group
Note that you cannot delete a predefined group provided by Tekelec. See Pre-defined user and group
for more information on this group. Use this procedure to delete a group:
1. Select Administration > Group.
The Group Administration page appears.
2. Select the appropriate group from the Group pulldown menu. 3. Scroll to the Group Members pane at the bottom of the page.
The Group Members pane lists all usernames associated with the group. If there are usernames associated with the group, you must delete the usernames or assign them to another group prior to deleting the group.
4. Perform these steps to remove any associated usernames from the group:
a) Click a username. The User Administration page appears. The page is populated with data associated with the selected username.
b) To delete the username, click Delete User and then OK to confirm the deletion.
c) To change the group assignment for the username, select a group from the Group pulldown menu and then click Update.
d) Select Administration>Group to return to the Group Administration page.
e) Perform these substeps until all usernames are removed from the Group Members pane. TheGroup Members pane displays None when all username associations are remove
5. Click Delete.
A confirmation box appears.
6. Click OK to delete the group. The Delete button grays out after the operation is performed.
The group is removed from the database.
Sessions Administration
The Sessions Administration page enables the administrative user to view a list of current user sessions and to stop user sessions that are in progress. This function does not disable the user's login account. To end a user session that is in progress, delete the user session. For other methods of controlling user access to a system, see Enabling or disabling a user account and Deleting a user.
Sessions Administration elements
This table describes elements of the Sessions Administration page.
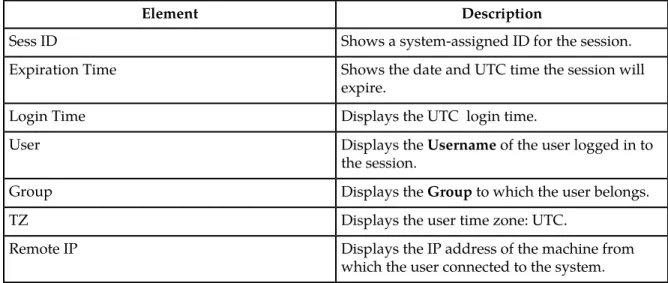
Table 29: Sessions Administration Elements
Description Element
Shows a system-assigned ID for the session. Sess ID
Shows the date and UTC time the session will expire.
Expiration Time
Displays the UTC login time. Login Time
Displays the Username of the user logged in to the session.
User
Displays the Group to which the user belongs. Group
Displays the user time zone: UTC. TZ
Displays the IP address of the machine from which the user connected to the system. Remote IP
Viewing user sessions
Use this procedure to view a list of user sessions: Select Administration > Sessions.
The Sessions Administration page appears. The Sessions page lists all active sessions on the system.
Deleting user sessions
Use this procedure to delete a user session.
Note: You cannot delete your own session. 1. Select Administration > Sessions.
The Sessions Administration page appears.
2. Click to select the appropriate session from the table.
To distinguish the appropriate session, locate either the Username or the IP address in the data string found in the Value field. For more information about data in the Value field, see Sessions Administration elements .
Note: You can select multiple rows to delete at one time. To select multiple rows, press and holdCtrl
as you click to select specific rows.
3. Click Delete.
The session is deleted, and the user is no longer logged in to the system. The next time the user attempts to perform an action, the user is redirected to the System Login page.
Certificate Management
The Certificate Management feature allows users to configure certificates for:
• HTTPS/SSL - allows secure login without encountering messages about untrusted sites
• LDAP (TLS) - allows the LDAP server's public key to encrypt credentials sent to the LDAP server • Single Sign-On (SSO) - allows users to navigate among several applications without having to
re-enter login credentials
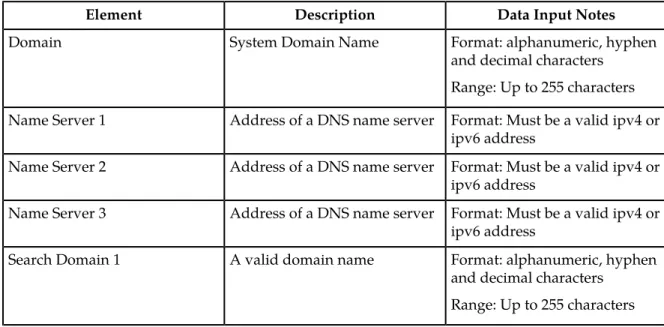
When setting up Certificate Management, you must first assign a system domain name for the DNS Configuration before importing any certificates. For more information, see the topic on Adding a DNS Configuration.
After assigning a system domain name, you must configure the LDAP authentication servers used for single sign on. For more information, see the topic on Configuring LDAP Authentication Servers.
Configuring single sign-on zones
The following sections outline the information necessary to configure the single sign-on zones. This includes zone elements and procedures on configuring, updating, viewing and deleting zone information.
Single sign-on zone elements
The following element is used when configuring single sign-on zones:
Table 30: Single Sign-On Zone Element
Data Input Notes Description
Element
Range: A to Z, a to z, 0-9 and periods - maximum 15 characters Name of the SSO-compatible
remote zone Zone Name
Configuring the single sign-on local zone
Before configuring a local zone, the single sign-on domain name must be configured. Use this procedure to configure the single sign-on local zone:
1. Select Administration > Access Control > Certificate Management.
The Establish SSO Zone page appears.
2. Select the Establish SSO Zone button at the bottom of the table.
The Establish SSO Zone page appears.
3. Enter a Zone Name that consists of 1-15 characters.
4. Select Apply to save the changes you have made and remain on this screen, or select OK to save
the changes and return to the Zones page. The new local zone is added to the database.
Re-establishing the single sign-on local zone
Re-establishing the local zone renders all of the certificates for this zone obsolete. After re-establishing the local zone, you will have to re-distribute the certificate for this zone to all the other remote zones in order to re-establish the trusted relationship and re-enable single sign-on between the zones. Use this procedure to re-establish the single sign-on local zone:
1. Select Administration > Access Control > Certificate Management.
The Certificate Management page appears.
2. Select the local zone from the listing. 3. Click Reestablish Local Zone.
A confirmation message appears stating that reestablishing a local zone will invalidate configured SSO key-exchanges involving this machine.
4. Select OK to continue
The local zone is re-established in the database.
Configuring the single sign-on remote zone
Use this procedure to configure the single sign-on remote zone:
1. Select Administration > Single Sign-On > Zones.
The Zones page appears.
The Insert Remote Zone page appears.
3. Enter a Zone Name that consists of 1-100 characters.
4. Enter the X.509 Certificate. The X.509 is generated from the public/private pair generation process
and has a maximum of 2048 characters.
5. Select Apply to save the changes you have made and remain on this screen, or select OK to save
the changes and return to the Zones page. The remote zone is configured in the database.
Deleting a single sign-on zone
Use this procedure to delete the single sign-on remote or local zone:
1. Select Administration > Access Control > Certificate Management. 2. Select the appropriate zone from the table listing.
3. Click Delete.
A confirmation box appears.
4. Click OK to delete the zone.
The zone is deleted from the database and no longer appears in the table listing.
Generating a Single Sign-On Zones Report
Use this procedure to generate a single sign-on zones report:
1. Select Administration > Access Control > Certificate Management. 2. Click to select the zone for which you want to create a report.
Note: If no certificate is selected, the report will contain data about all certificate. Alternately, you
can select multiple rows and generate a report using those. To select multiple rows, press and hold
Ctrl as you click to select specific rows. 3. Click Report.
The single sign-on zones report appears.
4. Click Print to print the report, or click Save to save a text file of the report.
Create CSR
The Certificate Management feature allows users to build certificate signing requests (CSRs)
A Certificate Signing request is a block of encrypted text that is generated on the single sign-on server. It contains information that will be included in your certificate such as your organization name, common name (domain name), locality, and country.
Create CSR elements
Table 31: Create CSR Elements
Data Input Notes Description
Element
Range: A to Z The 2-letter country code of
which the entity being described lives in
Country
Range: 1-100 character long string. Allowed characters are A-Z, a-z, spaces, and hyphens The state or province (full name)
which the entity being described lives in
State or Province
Range: 1-100 character long string. Allowed characters are A-Z, a-z, spaces, and hyphens. The locality name (eg. city) of the
entity being described Locality
Range: 1-100 character long string. Allowed characters are A-Z, a-z, spaces, and hyphens The common name of the entity
being described. Replacing a certificate marked visible or active will result in the browser Common Name
connection errors - which may then require a reload or restart of the browser to restore connectivity. The list includes only those entities that do not already have an associated certificate.
Range: 1-100 character long string. Allowed characters are A-Z, a-z, spaces, and hyphens The name of the organization
which the entity belongs to Organization
Range: 1-100 character long string. Allowed characters are A-Z, a-z, spaces, and hyphens The organizational unit name
(eg. section) which the entity belongs to
Organizational Unit
Range: 1-100 character long string. Allowed characters are A-Z, a-z, 0-9, '.', and '@' The email address of the entity
being described. Email Address
Creating a CSR
The following sections outline the information necessary to create a CSR. A CSR is a certificate signing request, and is sent from an applicant to a certificate authority in order to apply for a digital identity certificate.
1. Select Administration > Access Control > Certificate Management.
The Certificate Management page appears.
2. Click Create CSR.
3. Enter a two-character Country code for the entity.
4. Enter the full name of the State or Province. 5. Enter the Locality name, for example, the city.
6. Enter the Common Name for the entity being included in the CSR. 7. Enter the entity Organization.
8. Enter the entity Organizational Unit for the entity being included in the CSR. 9. Enter the entity Email Address.
10. Click Generate CSR to submit the information.
11. Click Back to return to the Certificate Management page. The CSR displays in the table.
Import Certificate
The Certificate Management feature allows users to import certificates in cases where this is preferred over configuring certificates. All imported certificates are appended to the Certificate Management table.
Import Certificate elements
The following elements are used when importing a certificate:
Table 32: Import Certificate Elements
Data Input Notes Description
Element
Range: 2048 characters PEM encoded X.509 certificate
X.509 Certificate
Range: 2048 characters PEM encoded Private Key
Private Key
The passphrase used to protect the Private Key
Passphrase
Importing a Certificate
The following steps outline the procedures necessary to import a certificate.
1. Select Administration > Access Control > Certificate Management.
The Certificate Management page appears.
2. Click Import.
3. Enter the X.509 Certificate.
For more information about any field on this page, see Import Certificate elements.
4. Enter the Private Key. 5. Enter the Passphrase.
6. Click OK to import the certificate.
Deleting a Certificate
Use this procedure to delete a certificate:
1. Select Administration > Access Control > Certificate Management. 2. Select the appropriate certificate from the table listing.