Introduction
The goal of insulin delivery is to regulate blood glucose levels to achieve normoglycemia. In someone without diabetes, pancreatic B-cells continuously secrete insulin throughout the day and night, providing a continuous insulin infusion or basal amount. In response to meals, the pancreas provides “bursts” of insulin referred to as boluses.
Pump therapy is intended to more closely mimic this pancreatic function. Continuous subcutaneous insulin infusion (CSII) utilizes only fast acting insulins (Humalog, Novolog) and eliminates the use of long-acting insulins (NPH, Ultralente, Lantus). Pumps can deliver insulin in 0.1 unit increments as a basal/continuous flow between meals and through the night. Basal rates can be increased or decreased at any point, allowing for exercise, illness, skipped meals, sensitivity to insulin and the dawn phenomenon. Boluses of insulin can be delivered via the pump to provide insulin to compensate for carbohydrate intake and hyperglycemic episodes when needed.
Insulin pump therapy gives people with diabetes the freedom to enjoy life, despite their chronic condition. The value of an improved lifestyle, increased flexibility and optimal diabetes control is obvious from the impact the insulin pump has made in the twenty-five years since its inception. The ability to control how and when insulin is delivered provides the “pumper” with increased flexibility in scheduling their day-to-day activities. For those people with erratic lifestyles, a desire to achieve optimal glycemic control (A1c ≤ 6.5%) and prevent chronic complications, the pump is an ideal choice.
indiCations for PumP theraPy
Clinical Indications
1. Inadequate glycemic control with MDI (Multiple Daily Injections) therapy 2. Recurrent severe hypoglycemia
3. Recurrent hyperglycemia 4. Hypoglycemia unawareness 5. Dawn phenomenon 6. Preconception 7. Pregnancy 8. Gastroparesis
9. Early neuropathy or nephropathy, when improvement in glucose control can reduce acceleration of complications
10. Renal transplantation
Therapy
11. Frequent DKA
12. Uncontrolled diabetes 13. Erratic Blood Glucose
14. Prevent or delay complications 15. Desire to improve lifestyle flexibility 16. A1c greater than 6.5%
Lifestyle indications
1. Erratic schedule 2. Varied work shifts
3. Desire for improved flexibility
4. Inconvenience of multiple daily injections
Advantages of Pump Therapy
1. More flexible lifestyle 2. Improved overall control 3. Prevent chronic complications
4. Improved control during exercise and “growth spurts” 5. Tight control during pregnancy
Characteristics of Pump Candidates
Ready, willing, and able
1. Is motivated — pump therapy requires a strong desire to improve one’s health and is a time investment for weeks or months in advance and during the initiation of pump therapy.
2. Has realistic expectations — a potential pump candidate must understand that the pump will not “fix” blood glucose variations automatically, nor will it grant freedom from frequent SMBG (self monitoring of blood glucose).
3. Demonstrates independent diabetes management — a thorough knowledge of diabetes and its management and the ability to demonstrate appropriate self-care behaviors provide the foundation for advanced self-management skills required by pump users.
4. Is practicing counting carbohydrates — has a willingness to practice the Carbohydrate (CHO or carb) Counting method, and an understanding of insulin actions and pre-meal bolus dosing
5. Has manual dexterity — able to use buttons on the pump and has good visual acuity to see the screen.
6. Has a good support system — emotional support is crucial to the success of pump therapy. 7. Demonstrates emotional stability — a potential pumper must attend education sessions and
attend to tasks that require routine attention. The patient must keep physician appointments.
Poor Candidates for Pump Therapy
1. Patients who are unwilling to comply with follow-up appointments. 2. Patients who are unwilling to receive diabetes education.
3. Patients who are unwilling to perform SMBG 8 times a day initially and then, 4-6 times a day after CSII therapy is established.
4. Patients who are unable or unwilling to count carbohydrates.
d ete r m i n i n g tota l da i ly d o s e a n d b a s a l r ate
Method #1:
Pre-pump Total Daily Dose (TDD)
Reduce pre-pump Total Daily Dose by 25%
Divide “pump” TDD in half: 50% for basal; 50% for bolus
Method #2:
Using Patients Weight Factor: Weight (lbs) X 0.1 = basal rate per hour Start with 1 basal rate per 24 hours.
Based on blood glucose results during the times listed below, it may be necessary to implement additional basal rates based on patient’s blood glucose (BG)
12:00 midnight – 3:00 a.m. 3:00 a.m. – 7:00 a.m. 7:00 a.m. – 12:00 noon 12:00 noon – 6:00 p.m. 6:00 p.m. – 12:00 midnight
Time Frame For Beginning Pump Therapy
1. 1–2 months before pump start:
u MD writes orders for insulin pump therapy. Contacts the insurance company for
pre-authorization of coverage.
u Patient is seen by a CDE/dietitian for carbohydrate counting instruction.
u Patient is seen by the pump trainer for knowledge assessment and education as needed —
to include: hypoglycemia, hyperglycemia and sick day management, prevention of DKA, patient’s responsibilities, and general knowledge regarding diabetes.
2. 1-2 weeks before pump start:
u Patient watches video/DVD on use of the pump several times to familiarize him/herself with
the pump.
u May attend “pump school” via the Internet if available.
u Meets with pump trainer for basal rates, boluses, insulin to carbohydrate ratio, and insulin
correction factor if not already done.
3. Day before pump start:
u Discontinue use of long-acting insulin (NPH, Lantus, Ultralente). u Continue injecting Novolog or Humalog before meals.
u Use “correction formula” to cover for “highs.” 4. Day of pump start:
u Eat breakfast and inject Humalog or Novolog as usual.
u Wear comfortable, loose-fitting clothing — preferably 2-piece outfit. u Allow 3 hours for training.
u Bring supplies with you to include:
Pump, User’s Manual, Infusion Sets — at least 2, Cartridges — at least 2, Skin Prep, Glucose Meter / Lancets / Strips, Alcohol Wipes, Insulin (Novolog or Humalog), Batteries, Carbohydrate Snack.
5. First Day of Pump therapy: u Begin “Four-Day Plan.”
u Call pump trainer with glucose levels and carbohydrate intake. 6. When “Four-Day Plan” completed:
u Come into office for first follow-up. Patients MUST bring: documentation of glucose
readings, boluses (for elevated glucoses or meals), diary of carbohydrate Intake.
u Begin “Three-Day Plan.”
7. Within 1–2 days after completing “three-Day Plan” u Call pump trainer with readings.
8. Weekly for four weeks:
u Call pump trainer and report complete record.
u Adjust basals, insulin to carbohydrate ratios as needed.
u Instruct on added features of the pump, i.e., Dual and Square Wave Boluses, utilizing
temporary basal rate, Easy Bolus, Audio Bolus.
u Adjust basal rates first, based on fasting glucoses. When fasting glucoses are at goal, adjust
boluses and/or insulin to carbohydrate ratios to achieve pre- and post-meal glucose goals.
te s ti n g b a s a l r ate s : fo u r day P l a n
First Day
1. Eat supper by 7 p.m. 2. Skip a bedtime snack.
3. Test blood sugar every 2 hours between supper and bedtime; at 12:00 Midnight, and at 3:00 a.m.
4. Record your results!
Second Day
1. Eat breakfast. 2. Skip lunch.
3. Test blood sugar every 2 hours between breakfast and supper. 4. Record your results!
Third Day
1. Skip breakfast.
2. Test blood sugar every 2 hours between waking up until lunch. 3. Do Not SLeeP IN!
4. Record your results!
Fourth Day
1. Skip supper.
2. Test blood sugar every 2 hours between lunch and your bedtime snack at 10:00 p.m. 3. Record your results!
Note: Do not “fix” a high blood sugar during the time you are checking every 2 hours. Correct at your next scheduled meal using your correction factor.
If you miss a day, continue the plan the next day. But try not to miss a day — the sooner the plan is completed, the sooner your basal rates will be set.
P r e - P u m P e d u Cati o n C h e C k li s t
Patient Name ____________________________________________ Date ___________________
Certified Pump Trainer ___________________________________________________________
MD’s Name ____________________________________________________________________
Pump Model ____________________________________ Serial # ________________________
understanding PumP theraPy nutrition
£ Theory £ Insulin Type £ Basal Rate £ Meal Bolus £ Insulin Sensitivity/ Correction Factor £ Carb. Counting £ Using Food Labels £ Insulin to Carb. Ratio £ Proper Snacks
blood gluCose testing exerCise
£ Schedule £ Alc £ Safety £ Hypoglycemia £ Proper Snacks £ BG Checks
hyPoglyCemia PumP theraPy resourCes
£ Protocol/”Rule of Fifteen £ Glucagon
£ User’s Guide
£ Pump School Online £ Websites
hyPerglyCemia when to Call your doCtor
£ Protocol £ Ketone Testing
dka when to Call 24 hour helP line
£ Causes
£ Signs and Symptoms £ Prevention
siCk day management
£ Protocol £ Supplies Notes:
d ete r m i n i n g b o lu s e s
Calculating Insulin Sensitivity Factor (ISF)
Also may be referred to as the Insulin Correction Factor (ICF)
The Insulin Sensitivity Factor (ISF) is the amount of blood glucose reduced by 1 unit of rapid or short acting insulin over a 2–4 hour period. Two commonly accepted formulas are used to determine the ISF: the 1800 Rule and the 1500 Rule. Endocrinologist Paul C. Davidson, MD developed the 1500 Rule. With the introduction of rapid-acting insulin, John Walsh, PA CDE modified the 1500 Rule into the 1800 Rule. Generally, the 1800 Rule is used for patients who are insulin sensitive or those who use rapid-acting insulin and the 1500 Rule for patients who are insulin resistant or those who use short-acting insulin. The Rules calculate the ISF by dividing either 1800 or 1500 by the TDD.
Amount of Blood Glucose lowered by 1 unit of insulin (1800 Rule) 1800 = ISF
TDD
Note: 1800 currently used with Humalog or Novolog instead of 1500 (1500 Rule)
Calculating Insulin to Carb Ratio (ICR)
This method of determining the Insulin:Carbohydrate ratio is based on Total Daily Insulin Dose (TDD). The TDD is divided into 500 and the result is the amount of carbohydrate that one unit of rapid- or short-acting insulin will cover. The goal is to bring blood glucose levels into the target range 3–4 hours after the meal.
Grams of carbs covered by 1 unit of insulin (500 Rule) 500 = ICR
TDD
t y P e s o f b o lu s e s Normal Bolus—total bolus infused at onset of meal
Square Wave—total bolus infused slowly over several hours; useful in cases of gastroparesis
Dual Wave—part of bolus is infused at onset of meal, and remainder is infused slowly over several hours; useful for high fat meal, i.e., pizza, Mexican food.
Adjusting/Fine Tuning Dosage
Empower patients to evaluate and adjust their BG. Resume intensive monitoring if necessary, i.e., 8 times a day. Start with overnight basals; promote low-fat, consistent carb content meals. Introduce high fat meals after ICR has been established or corrected. When high fat meals are consumed, consider utilizing Dual Wave bolus. Two-hour postprandial glucose goals should be 30 +/- points above preprandial BG. Patient may require a different ICR for each meal. BG targets should be determined by the provider and the patient and depending on age of the patient, concomitant
conditions and the patients’ ability and willingness to achieve tight control of their diabetes.
P o s s i b le C o m P li Cati o n s o f P u m P th e r a P y
Hypoglycemia — fewer episodes than with MDI. Possible improvement in hypoglycemic unawareness.
Diabetic Ketoacidosis — interruption in Humalog/Novolog delivery can lead to high BG and DKA in 4 +/- hours. Patient must check BG 4–6 times a day.
Skin Infections — meticulous skin care is necessary at infusion sites, which must be rotated every 2–3 days.
Weight Gain — could be a result of improved control or if patient liberalizes diet.
Initiation of CSII should be done by a Certified Pump Trainer (CPT) who is usually provided by the insulin pump manufacturer, or a Certified Diabetes Educator (CDE), who has received specialized training in insulin pump therapy. The various features of the pump should be demonstrated/ explained to the patient who should be provided with phone numbers of the insulin pump company and the provider. The patient should be encouraged to keep detailed records of BG, insulin dosage, carb intake, and other daily activities.
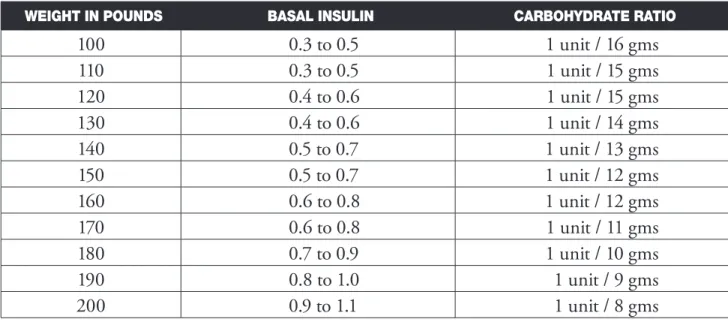
Table for Estimated Basal Rate and Insulin to Carbohydrate Ratio
weight in Pounds basal insulin Carbohydrate ratio
100 0.3 to 0.5 1 unit / 16 gms 110 0.3 to 0.5 1 unit / 15 gms 120 0.4 to 0.6 1 unit / 15 gms 130 0.4 to 0.6 1 unit / 14 gms 140 0.5 to 0.7 1 unit / 13 gms 150 0.5 to 0.7 1 unit / 12 gms 160 0.6 to 0.8 1 unit / 12 gms 170 0.6 to 0.8 1 unit / 11 gms 180 0.7 to 0.9 1 unit / 10 gms 190 0.8 to 1.0 1 unit / 9 gms 200 0.9 to 1.1 1 unit / 8 gms
Estimated Correction Factor
Current tdd CorreCtion faCtor
10 units 150 points 20 units 75 points 25 units 60 points 30 units 50 points 40 units 38 points 50 units 30 points 60 units 25 points 75 units 20 points 100 units 15 points 150 units 10 points
Carbohydrate Counting
Carbohydrate counting is a meal planning approach that works well with insulin pump therapy. It is a great way to add variety and flexibility in choices of meals and snacks. Carbohydrate counting has been proven to help achieve better glucose control.
Generally carbohydrate is the main food group that increases blood sugar. Protein has a sustaining effect and fat slows absorption.
It is essential that the patient understands and practices the techniques of carbohydrate counting prior to pump initiation.
Many references such as the materials included in Chapter 5 of Diabetes Life Skills Book or the “Daily Meal Planning Guide” by Eli Lilly are used by the CDE or Registered Dietitian to teach Carbohydrate Counting.
tools needed to count carbs:
1. Measuring cups 2. Food labels 3. Calculator
4. Carb counting book/guide
Carbohydrate containing foods include breads, pasta, rice, other grains, starchy vegetables (potatoes, corn, peas), crackers, cereals, fruit (fresh, canned, frozen, or juice), milk, yogurt & ice cream, cooked dried beans, cake, cookies, pie, sugar/honey.
one serving is considered 15 grams of carbohydrate and is contained in:
1/3 cup cooked rice, beans, or pasta
1 slice bread or 1 tortilla
1 small piece of fruit, ½ small banana, or ½ cup light canned fruit 1 cup milk
Using measuring cups and reading labels are highly recommended as the patient practices at home.
th e r u le o f 50 0
This method of determining the Insulin:Carbohydrate ratio is based on Total Daily Insulin Dose (TDD). The TDD is divided into 500 and the result is the amount of carbohydrate that one unit of rapid- or short-acting insulin will cover. The goal is to bring blood glucose levels into the target range 3–4 hours after the meal.
example:
TDD is 36 units
Glucose levels are within target range 500/36 = 13.8 (round up to 14 or 15) Insulin to carbohydrate ratio is 1:15
1 unit of insulin covers 15 gm carbohydrate
Some CDEs find that dividing 450 (rather than 500) by the TDD is more accurate for short-acting insulin and/or for people who are more insulin resistant.
Insulin Sensitivity
The Insulin Sensitivity Factor (ISF) is the amount of blood glucose reduced by 1 unit of rapid or short acting insulin over a 2–4 hour period. Two commonly accepted formulas are used to determine the ISF: the 1800 Rule and the 1500 Rule. Endocrinologist Paul C. Davidson, MD developed the 1500 Rule. With the introduction of rapid-acting insulin, John Walsh, PA CDE modified the 1500 Rule into the 1800 Rule. Generally, the 1800 Rule is used for patients who are insulin sensitive or those who use rapid-acting insulin and the 1500 Rule for patients who are insulin resistant or those who use short-acting insulin. The Rules calculate the ISF by dividing either 1800 or 1500 by the TDD.
example:
TDD is 34 units 1800/34 = 52.9
ISF is 52.9. One unit of rapid-acting insulin decreases glucose by 52.9 mg/dL This can be rounded to 55
Another method of calculating the ISF is to use the general “safe” starting point of 1 unit: 50 mg/dL. This method may work well with most lean to average adults.
An alternative method for Insulin:Carb ratio can be figured once the person’s ISF is calculated, multiplying it by 0.33 provides an insulin-to-carbohydrate ratio.
example:
ISF is 55 mg/dL
55 x 0.33 = 18.15 (round to 18) Insulin to carb ratio is 1:18
1 unit of insulin covers 18 g of carbohydrate
Verifying Insulin:Carb Ratio and Insulin Sensitivity
Prior to eating, the bolus insulin dose is partially based on the insulin to carbohydrate ratio. This ratio tells how many grams of carbohydrate are affected by one unit of insulin. The ratios can be verified with one of the methods described below:
Method 1: Food diary, insulin dose, and SMBG information The pump user is to keep 3 days of records, including:
1. Fasting, pre-meal, and 2-hour PPG results 2. Pre-meal insulin doses
3. Amount of carbohydrate consumed at meals and other times. It is helpful if the patient consumes the same amount of carbohydrate at each breakfast for 3 days, same amount of carbohydrate at each lunch for 3 days, etc.
4. Amount of all food and beverage consumed, as fat and protein moderately affect blood sugar. With these records, determine the amount of insulin the patient used to cover the carbohydrate consumed at each meal by dividing the total grams of carbohydrate by the number of units of insulin.
example:
Consumed 60 g carbohydrate
Injected (bolused) 5 u rapid-acting insulin
PPG is within 30 mg increase of pre-meal blood glucose 60/5 = 12
Insulin to carbohydrate ratio = 1:12 1 unit of insulin covers 12 g carbohydrate
Ca r b o h y d r ate C o u nti n g fo o d lo g
Write down all food or drink you consume for at least 3 days. Be sure to include portion sizes and the time you eat or drink. Estimate the amount of carbohydrates in each meal and snack; then record the amount of insulin you took. Bring this log with you on appointments to the pump trainer or the dietitian.
date/time blood sugar (2 hrs PP) food grams of Carbs insulin
date/time blood sugar (2 hrs PP) food grams of Carbs insulin
Calculating Total Grams of Carbohydrate in a Recipe
to determine the amount of carbohydrates in a recipe:
1. Make a table as noted below
2. List ALL the ingredients in the recipe
3. Using food labels or a nutrient composition book, list the total grams of carbohydrate in each ingredient (amount of fat and sodium can also be calculated)
4. Total the grams of carbohydrate from all ingredients
5. Divide the total grams of carbohydrate by the number of servings in the recipe
6. Note the total grams of carbohydrate PER SERVING on the recipe for future reference
Recipe Name: __________________________________________________________________
Ingredient Amount CarbohydrateGrams of Grams of Fat
example:
Corn Pudding (Makes 8 Servings)
Ingredient Amount CarbohydrateGrams of Grams of Fat
Cornstarch 2 Tablespoons 14 0
Egg Substitute ½ cup 2 0
Sugar ½ cup 100 0
Creamed Corn 16 oz. can 60 0
Evaporated Skim Milk 16 oz. can 60 0
totAL 236 0
Divide total carbohydrate by number of servings (236/8) 45
i d e nti f y i n g a n d m a n ag i n g h y P e r g lyC e m i a
Sick Day Management (Refer to “Sick Day Guidelines” in TDC Tool Kit)
During periods of illness, it may be more difficult to maintain good control of blood glucose. Examples of illness or “sick days” include: dental surgery, colds, sore throat, mild infections, nausea, vomiting, diarrhea, or fever. It is important to monitor blood glucose more frequently during a sick day and to take immediate action to prevent ketoacidosis.
Guidelines to follow:
Medication
Never omit insulin. Even if unable to eat, insulin need continues and may increase.
Continue the basal dose of insulin and make additional corrections using the Correction/Sensitivity Factor as needed. Urine ketone testing can further guide the correction doses.
Blood/Urine Testing
Check blood glucose before usual mealtimes and every 2 to 4 hours, keeping a written record of results.
Check urine for ketones if blood glucose is greater than 250 mg/dL or as directed by the physician.
Fluids/Meal Planning
Consuming adequate fluids is important during illness. Drink fluids every hour while awake and during blood glucose checks at night.
If able to eat, drink non-caloric beverages.
If unable to eat, alternate non-caloric beverages with those containing carbohydrate. Consume 10–15 grams of carbohydrate every 1–2 hours.
Severe high blood glucose and ketoacidosis (DKA) are serious medical problems that sometimes occur in diabetes. High blood glucose can exist for some time without triggering ketoacidosis. Ketoacidosis begins only after insulin levels in the body go very low. When insulin is low, glucose cannot be used as fuel. Glucose is the body’s first choice for energy, but if not available due to inadequate insulin levels, the body must start burning fat even though glucose is high in the blood. Ketones are the by-product of burning fat for energy and in high levels, cause nausea and vomiting. Vomiting, in combination with high blood sugars, can lead to dehydration.
Ketoacidosis can be triggered by: 1. Illness
· Dislodged infusion set · Site irritation or overuse
· Empty pump reservoir/cartridge · Expired insulin
· Incorrect bolus calculation · Missed bolus doses
· Inadequately programmed basal rates
A pump user needs to take a correction dosage using a syringe if spilling moderate to large ketones, then change the infusion set. Plenty of water should be consumed to help flush ketones from the body.
Call a physician for further instruction.
i d e nti f y i n g a n d m a n ag i n g h y P o g lyC e m i a
Causes:
Glucose levels can drop to dangerously low levels if there is not a balance between food, medication, and activity. It can occur very quickly and without warning. Not eating properly, delaying or skipping meals, an error in medication dose, or engaging in exercise that is too difficult or too strenuous are all causes of hypoglycemia.
Signs and Symptoms:
Shaking Sweating Weakness Anxiety Headache Blurred vision Dizziness Fast heartbeat Irritability Fatigue
“Rule of 15”
1. Immediately stop activity and check glucose levels. If driving, immediately pull off the road 2. If no glucose meter is available, treat regardless
3. Consume 15 gms of a fast-acting carbohydrate
• ½ cup juice • 5 sugar cubes • 4 glucose tablets • 6–7 lifesavers • ½ cup regular soda • 8 oz. skim milk • 2 tsp. sugar • 8–9 jellybeans • 1 tube glucose gel
4. Rest for 15–20 minutes
5. Retest glucose — if still below 70 mg/dl, repeat fast-acting carbohydrate. Or if no glucose meter is available, and symptoms are still present, repeat fast-acting carbohydrate
6. Continue steps 1 – 5 until glucose level is above 70 mg/dl
7. An extra snack consisting of a carbohydrate and protein may be needed if more than one treatment was required and no meal will be eaten within a half-hour. Examples are:
½ sandwich
Cheese and crackers Peanut butter and crackers
8. If several hypoglycemic episodes occur at the same time over a few days, the basal rate will need to be adjusted; notify the pump trainer immediately
9. ALWAYS carry a fast-acting carbohydrate in a place that is easily accessible
10. ALWAYS wear identification stating that you have diabetes and are being treated with an insulin pump
a P P e n d i x
P h ys i C i a n ’ s o r d e r s fo r i n s u li n P u m P s ta r t
Patient Name ____________________________________________ Date ___________________
Certified Pump Trainer ___________________________________________________________
These orders expire on ____________________________________________________________
Basal rates may be adjusted by 0.05 increments for BG above _________ and/or _________ below.
Starting Basal Rate:
Profile time Units per Hour
#1 12:00 a.m. ____________
Starting Bolus Doses
Insulin to Carbohydrate Ratio: 1 unit per ______________ gms. carbohydrate
Insulin Sensitivity Ratio
(Correction Factor): 1 unit of insulin will lower BG by _______ mg/dl
Target Blood Glucose Levels
3:00 A.M. _________ to _________ Fasting. _________ to _________ Before meals. _________ to _________ After meals. _________ to _________ Additional Instructions: Physician’s Signature _____________________________________________________________
Pati e nt i n s u li n P u m P C o ntr aC t
Patient Name ____________________________________________ Date __________________
Physician ______________________________________________________________________
I understand, as the patient, it is my responsibility to:
1. Maintain open communication with my physician, dietitian, and diabetes educator. This will include recording and reporting my glucose levels, carbohydrate intake, exercise, boluses, basal rate changes, and other information requested.
2. Perform glucose testing as requested.
3. I will change my infusion set every 2 to 3 days and follow the guidelines as set forth for proper pump management.
4. If hospitalized, I will bring all the needed equipment from home to ensure I have enough supplies. If I do not have the supplies, it is my responsibility to make arrangements to obtain them.
5. I will follow the formulas for meal boluses and correction factors prescribed to me by my physician and/or diabetes educator.
6. I will respond quickly and correctly to hypoglycemia and will report these to my health care team. I understand the “Rule of 15” to treat a low glucose with 15 grams of a fast-acting carbohydrate, retest in 15 minutes, and repeat the sequence if necessary.
7. I will respond quickly to hyperglycemia and prevent DKA by following the rules for sick-day management using my correction factor. I will report to my diabetes care team as needed, increase the frequency of monitoring, and test my urine for ketones if my glucose is over 240 mg/dl for 2 consecutive glucose readings.
8. I will not disconnect from the pump for longer than an hour. If I desire a “vacation” from the pump, I will first discuss this with my diabetes care team before doing so and follow their recommendations.
9. If I am having any difficulty with either pump use or carbohydrate counting, I will immediately call my diabetes care team for the proper assistance.
10. I will make sure that I have the proper supplies on hand at all times and that it is my responsibility to reorder supplies as I need them. I will also carry “emergency supplies” with me at all times, including syringes, in case my site becomes dislodged. I will also wear identification stating that I have diabetes and wear an insulin pump. This information will also include emergency contact, my doctor’s name, and telephone number.
let te r o f m e d i Ca l n e C e s s it y
Date ________________________________
RE: Patient Name _____________________________________ Phone ( ) _______________
Patient’s date of birth ___________________ Insurance identification # ____________________
To whom this may concern:
This letter serves as prescription and letter of medical necessity for the above referenced patient for an insulin infusion pump as a lifetime need.
Check the following:
£ Patient has had diabetes for ____ years
£ Patient has the ability to regularly monitor blood glucose ____ to ___ times per day.
£ Patient is motivated to achieve and maintain glycemic control and has the support needed to stay motivated.
£ Patient demonstrates compliance with dietary regimen.
£ Patient’s insulin regimen consists of ______ to ______ injections per day.
£ Patient has attempted several different regimens and/or has had multiple dose changes.
£ Patient uses the following type(s) of insulin: _________________________________________.
Patient exhibits one or more of the following:
£ A1c level ___% on ___/___/_____.
£ History of severe glycemic excursions and/or £ Nocturnal Hypoglycemia
£ Hypoglycemia unawareness £ Extreme insulin sensitivity or low insulin req.
£ Widely fluctuating blood glucose levels before meals. (e.g., pre-prandial BG levels commonly exceed 140 mg/dl and/or are below 70 mg/dl. The range of these blood glucose levels is from
_____ to _____.
£ Dawn Phenomenon where fasting blood glucose often exceeds ______ mg/dl.
£ Day to day schedule variations such as meal times, work schedules or activity level confound the
degree of regimentation required to self manage glycemia with Multiple daily injections.
£ Patient has been hospitalized or needed emergency assistance due to his/her diabetes. £ Patient has frequent hypoglycemic episodes, up to _____ times per week.
£ Pregnancy or preconception with a history of poor glycemic control.
£ Secondary complications requiring tighter glycemic control to slow or stop progression of
£ Retinopathy £ Neuropathy £ Nephropathy £ Other: _______________________ £ Sub-optimal glycemic and metabolic control post-renal transplant.
P h ys i C i a n n ote s
I certify that this information is complete and correct. __________________________________
I am an endocrinologist, internist or diabetes specialist: £ Yes £ No
I am prescribing an insulin infusion pump, insulin pump supplies, and diabetes supplies for the following patient. The supplies may be refilled as necessary for one year. Please dispense as written. Ph ys i c i a n n a m e Ph ys i c i a n s t r e e t Ph ys i c i a n c i t y, s tat e , Z i P Ph ys i c i a n s i g n at U r e m e D i ca l l i c e n s e n U m b e r U Pi n n U m b e r Pat i e n t n a m e Pat i e n t s t r e e t Pat i e n t c i t y, s tat e , Z i P Dat e Physician’s Signature
i n s u r a n C e C ov e r ag e fo r i n s u li n P u m P th e r a P y
Private Insurance
1. Contact pump company with information about the patient A. Insurance information
B. Indications that would require utilizing the insulin pump C. Must be on multiple insulin injections (2 or more a day) D. Cover type 1 and some type 2 diabetes
E. Prescription from MD
Medicare
1. Contact pump company with patient’s information 2. Must meet criteria for insulin pump therapy
A. C-Peptide of less than 0.6 mcg/L B. A1c over 7%
C. Monitoring 4 times a day
3. Medicare pays 80% for pump and supplies. Secondary insurance may cover the other 20%. If Medicare denies coverage, secondary may cover.
Medicaid
1. Contact pump company with insurance information 2. Must meet criteria for insulin pump therapy
2. Prescription from MD 4. Medicaid will cover 100%
Indications for Insulin Pump Therapy
1. Unable to normalize glucose levels A. Erratic glucose excursions B. A1c over 7%
2. Severe episodes of hypoglycemia or hypoglycemia unawareness 3. Preconception/pregnancy
4. Early chronic complications 5. Organ transplant
6. Patient desires better control 7. Prevent chronic complications
ov e r v i e w fo r P u m P i n g i n s u li n
Indications For Insulin Pump
1. Multiple episodes of severe hypoglycemia 2. Erratic glucose levels – “brittle diabetes” 3. Early complications
4. Organ transplant 5. Pregnancy
Advantages of The Pump
1. More flexible lifestyle 2. Improved overall control 3. Prevent chronic complications
4. Improve control during exercise and “growth spurts” 5. Tight control during pregnancy
Characteristics of Pump Candidate
1. Must be willing to monitor BG several times a day 2. Must be willing to count carbohydrates
3. Must have manual dexterity to use buttons on pump and have good visual acuity to see the screen
4. Good support system 5. Committed to self-care 6. Ability to problem solve
7. Good basic knowledge of diabetes
8. Reasonable expectations of what the pump can do
Time Line
1–2 months before pump start:
1. Assess patient’s current knowledge about diabetes
2. Assess whether or not patient meets the criteria for a “pumper” 3. MD contacts the pump company and writes orders for the pump 4. Patient is seen by dietitian for carbohydrate counting
q u e s ti o n n a i r e
Are you ready for pumping?
1. How motivated are you to achieve good control?
Not very 0 1 2 3 4 5 very
2. How many times do you test every day?
0 1 2 3 4 5 3. How many injections per day?
0 1 2 3 4 5 4. Do you keep a record?
Yes (5 points) No (0 points) 5. Do you adjust your insulin for test results?
Yes (5 points) No (0 points) 6. Do you adjust your insulin for meals?
Yes (5 points) No (0 points) 7. Do you adjust insulin for “highs”?
Yes (5 points) No (0 points) 8. Do you adjust your insulin for exercise?
Yes (5 points) No (0 points) 9. Do you get regular A1c tests?
Yes (5 points) No (0 points) 10. Do you call your doctor when you have a problem?
s C o r i n g
Score
What It Means
0–9 Are you in charge or someone else? 10–19 At least you’re honest!
20–29 Where can you improve? 30–39 Just a few minor changes 40–49 How soon can you start?
1–2 weeks before pump start
1. Patient watches video or DVD on pump use several times to begin familiarizing him/ herself with the pump
2. May attend “Pump School” via Internet
3. Meets with pump trainer for basal, bolus, correction factor, and insulin to CHO ratio
Day before pump start
1. Discontinue use of long-acting insulin
2. Continue injections of Humalog/Novolog before meals 3. Use “correction formula” to cover for highs
Day of pump start
1. Eat breakfast and take fast-acting insulin as usual 2. Wear comfortable clothing-preferably two-piece outfits 3. Allow 3 hours for training
4. Bring with you: Pump
User’s Manual
Infusion sets — at least 2 Cartridges — at least 2 Skin prep
Glucose meter/strips/lancets Alcohol wipes
First day after beginning pump therapy
1. Call Pump Trainer with glucose readings and grams of carbohydrate 2. Begin “4 Day Plan”
Within 3–5 days after pump training
1. Come in to office for follow-up
2. Continue “4 Day Plan” until basal rates are adjusted correctly
When basal rates correct,
1. Adjust insulin to carb ratio 2. Begin “3 Day Plan”
3. Call Pump Trainer with BG readings and CHO grams
Weekly for 4 weeks
1. Call Pump Trainer with BG’s and CHO grams for adjustment 2. Basals are adjusted first, then boluses
s ta r ti n g b e g i n n i n g b a s a l r ate total Daily Pre-pump Insulin x 75% = total Daily Insulin per Pump
(total pre-pump dose minus 25%)
Divide the new dose by 2
Half is basal; half is boluses
For basal, divide half by 24 = basal rate per hour Begin with 1 basal rate and adjust as needed
example:
TDD pre-pump — 50 units 50 – 25% = 38 — new dose
38 ÷ 2 = 19 (19 units for boluses; 19 units for basal)
i n s u li n to C h o r ati o : r u le o f 50 0 Divide 500 by the new total daily dose:
Example:
TDD = 25 units
500 ÷ 25 = 20 — 1 unit of insulin per 20 gms of CHO TDD = 45
500 ÷ 45 = 11 — 1 unit of insulin per 11 gms of CHO (may round down to 10 for ease)
i n s u li n C o r r e C ti o n faC to r : r u le o f 150 0 Divide new tDD into 1500
Example:
TDD = 45 units
1500 ÷ 45 = 33 (amount I unit of insulin will decrease glucose level by)
If target level is 100 and glucose level 289 mg/dL – how many units to get BG level to 100? 289 – 100 = 189 (189 points above target)
189 ÷ 33 = 5.7 units of insulin Used to correct for a high
May be added to regular mealtime bolus if high occurs right before eating a meal
m o n ito r i n g s C h e d u le For first few days to 2 weeks (or until basals and boluses adjusted)
1. Between 2:00–3 a.m. (Dawn Phenomenon)
2. Fasting (overnight basal) Goal 70 – 100 mg/dL 3. 2 hours after each meal Goal 140 mg/dL or less 4. Before and after exercise
5. Before driving
6. If hypoglycemia is suspected
a d j u s ti n g b a s a l s – “ 4 day P l a n ”
3. BG @ bedtime should be 100-150 mg/dL
4. Test BG every 2 hours between supper and bedtime, @ Midnight, and 3:00 a.m. 5. If BGs stay within 30 mg/dl basal OK — if more than 30, adjust
6. Divide night into 3 “test windows”
a. BEDTIME: 9:00 P.M. to midnight b. NIGHT: Midnight to 3:00 a.m. c. DAWN: 3:00 a.m. to 7:00 a.m.
Afternoon Basal
1. Eat breakfast and take bolus for food 2. NO lunch, NO bolus
3. Check BG every 2 hours between breakfast to supper 4. If BGs stay within 30 mg/dl, basal OK; if not, adjust
Morning Basal
1. NO breakfast, NO bolus
2. Test BG every 2 hrs from waking until lunch. DO NOT SLEEP IN! 3. If BGs stay within 30 mg/dl, basal OK; if not, adjust
Evening Basal
1. NO supper NO bolus
2. Test BG every 2 hrs between lunch & bedtime snack at 10:00 p.m. 3. If BGs stay within 30 mg/dl, basal OK; if not, adjust
Note — DO NOT “fix” a high glucose during the time you are checking your BGs every 2 hours. Correct at the next scheduled meal, using your correction factor. If you miss a day — continue the plan the next day. May need to repeat the “4 Day Plan” two or three times until the basal rates are corrected.
a d j u s ti n g i n s u li n to C h o r ati o
1. Check 2 hours after each meal
2. If BGs not over 140 mg/dL, ratio correct; if higher — increase, if lower — decrease
3. May have 2-3 different ratios during the day — may need 1 unit per 8 gms in a.m., 1 unit per 10 or 15 for lunch and dinner, or 1 per 8 in a.m., 1 per 10 for lunch, and 1 per 15 for dinner.
a d j u s ti n g C o r r e C ti o n faC to r
1. If hypoglycemia occurs after correcting for a high, lower correction factor 2. If BG still high after 3–4 hours, increase factor.
oth e r ti P s a n d s a f et y
1. Change site every 2–3 days (every other day with pregnancy). ALWAYS do site changes in the MORNING — NEVER at bedtime! Check BG 2 hours after a site change to ensure the “cath” is placed correctly and pump is functioning properly
2. Inspect site twice a day — if swelling, redness, pain, or drainage — CHANGE SITE! 3. ALWAYS carry extra supplies with you in case the catheter gets dislodged
4. ALWAYS have a supply of syringes on hand in case of pump malfunction
5. ALWAYS wear identification stating you have Diabetes and wear an insulin pump 6. If you have 2 BGs over 240 mg/dL in a row — inject insulin according to the correction
factor and CHANGE SITE. Retest 2 hours after
7. NEVER NEVER NEVER go to bed with a low battery
8. If you perspire heavily, may use a solid non-fragrance antiperspirant around site or try other types of tape that are available. Skin Tac “H”, Polyskin, Tegaderm, Hypafix, HyTape, Dermicell, SkinPrep, Mastasol, and toupee glue are other options to try.
g o i n g o f f th e P u m P
1. Be sure you check with your doctor before disconnecting from the pump for any length of time.
2. DO NOT disconnect for more than 1-2 hours unless you have the OK from MD. 3. Reasons to go off the pump may be due to pump malfunction — call 1-800-send pump
— the pump manufacturer will immediately send a loan pump until yours is repaired or replaced. Another reason may be just a desire to have a “vacation” from the pump.
time off Pump Action
1–1½ hrs No action unless CHO will be eaten or BG is high 1½–5 hrs. Before disconnecting, give a bolus to replace 80% of
the basal that will be lost
Inject before eating using insulin to CHO Ratio DAYTIME ONLY Give injection before each meal by using your insulin
to CHO ratio PLUS the basal insulin needed until the next meal
tr av e li n g
1. ALWAYS carry at least 1 weeks’ worth of extra supplies on top of what you will normally use — if you are staying for 2 weeks, carry supplies for 3 weeks.
2. NEVER check your supplies in baggage — CARRY them with you. 3. Carry snacks with you.
4. WEAR IDENTIFICATION stating you have diabetes and wear an insulin pump. 5. Remember to change the time on your pump if you will be crossing time zones.
6. Get a letter from your doctor explaining what to do for your diabetes, listing medications and devices that you may use. The letter should also state any food or medication allergies you may have. Also get a prescription to carry with you for any medications you may need. Know the name and number of an endocrinologist in the area where you’re traveling may prove useful.
7. Carry bottles of insulin IN THEIR BOXES with your name, doctor’s name, your pharmacy’s name, and medication on a pre-printed label.
8. Contact your airline for any specifics — different airlines have different rules regarding diabetes supplies — don’t be surprised!
9. The pump can be worn through the scanner at the airport without causing it harm. Don’t call attention to it.
h o s P ita li z ati o n s
1. Remove pump for X-rays, MRIs.
2. Be prepared beforehand — carry a letter from your endocrinologist with orders for you to keep the pump on, check your own glucose levels and do your own adjustments.
3. If you are unable to care for the pump, have a family member do so. If you have no family with you, the pump may be removed, but ONLY after the nurses have orders for insulin coverage. DKA can occur much faster after disconnecting from the pump because there is no long-acting insulin on board.
4. The pump gives better control during and after surgery, so ask doctors to allow that it stay connected. As soon as possible after surgery, ask to have the pump reconnected if it was discontinued during the surgery.
5. Pregnant patients will need to move insertion site to the thigh area immediately after beginning labor and leave the pump connected during labor. Insulin resistance dramatically decreases after the placenta is delivered — so be prepared to decrease basal rates. Basal rates will remain lower if the mother is breast feeding also.
s ta n da r d s o f Ca r e :
d i a b ete s e d u Cati o n a n d m a n ag e m e nt P r o g r a m
Insulin Pump Education: Up to 8 Visits
A. Initial visit/s prior to pump start, CDE:
1. Data collection & review; assessment of self-management skills, readiness to learn and barriers to learning
2. Prerequisites for successful pumping:
a. One month of multiple injection therapy with Lantus and Humalog or Novolog b. Many BGs showing testing at least 4 times a day for one month
c. Knowledge of pump function through watching video or doing on online pump program 3. Intro to pumps; basal & bolus rates, insertion sites
4. Refer to RD for dietary counseling and CHO counting assessment 5. Assess glucose meter skills
6. Resources: videos, books, pamphlets, web sites 7. Goal setting
B. Initial visit/s prior to pump start, RD:
1. Data collection & review; weight, food record 2. Review of meal planning and CHO counting
3. Validate ability to count carbs at home, at work or school, at restaurants and fast-food locations
4. Goal setting
C. Follow-up visit, day of pump start, CDE (3–4 hours):
1. Pump specifics; buttons, syringe filling, priming, insertion technique 2. Initial settings
3. Problem solving, alarms 4. Restocking supplies
5. Hypoglycemia and hyperglycemia management, DKA prevention 6. Review of tasks and follow-up plan
D. The CDE will emphasize that regulating basal and bolus rates and determining insulin to carb ratios is essential until the blood sugars are within the preset goal ranges. Telephone support for emergencies is available 24 hours per day.
E. Follow up visit, within one month or more frequently if needed, CDE: 1. Data collection & review; blood sugar trends, meter download 2. Review basal & bolus rates
3. Review of site adequacy & insertion technique 4. Confirm completion of basal rate testing 5. Sick day management/DKA prevention.
6. Status of goals and reinforcement of positive changes 7. Goal setting
F. Follow-up visits with RD as needed.
1. Data collection & review; blood sugar trends, food records 2. Review of meal plan and carb counting
3. Review of food adjustments for sick days and exercise 4. Status of goals and reinforcement of positive changes 5. Goal setting
G. Follow-up visits (quarterly for first year then annually) with CDE: 1. Data collection & review; blood sugar trends, A1c results 2. Self-management review and problem solving
3. Status of goals and reinforcement of positive changes 4. Goal setting
i n s u li n P u m P fo llow- u P
Patient Name ____________________________________________ Date ___________________
Certified Pump Trainer ___________________________________________________________
Pump Model ______________________________________ Serial # _______________________
basiC review site Change ProtoCol
additional features instruCted: notes
b lo o d g lu C o s e r e C o r d
Basal Rate Changes:
From 12 Midnight to ____________________ : __________________________ units per hour
From ___________________ to ___________________ : ___________________ units per hour
From ___________________ to ___________________ : ___________________ units per hour
From ___________________ to ___________________ : ___________________ units per hour
Pump Trainer Signature __________________________________ Date ____________________
i n s u li n P u m P C o ntaC t s
Trainer: _______________________________________________________________________
Phone: _______________________________________________________________________
Alternate trainer: _________________________________________________________________
r e f e r e n C e s
Bode, BW. Pumping Protocol A Physician’s Guide to Insulin Pump Therapy Initiation, Atlanta Diabetes Associates, Atlanta, Georgia
Bolderman, KM. Putting Your Patients on the Pump, American Diabetes Association, 2002 Alexandria, Virginia. ISBN 1-58040-148-1
Frederickson, L, ed. In. The Insulin Pump Therapy Book Insights From The Experts. MiniMed Technologies. Los Angeles, California. 1995 ISBN 0-9647837-0-3
Walsh, J & Roberts, R. Pumping Insulin Everything You Need To Know For Success With An Insulin
Pump, 3rd edition. ISBN 1-88480484-5
Amrhein, James A. MD and Hess, B, RN, BSN, CDE. Optimizing Glycemic Control with Diabetes
Technology. AADE 29th Annual Meeting, August 7, 2002, Philadelphia, Pennsylvania.
Brooks, AM, RN, CDE. St. Marks Hospital Diabetes Center, Salt Lake City, Utah and Kulkarni, K, MS, RD, BC-ADM, CDE, St. Marks Hospital Diabetes Center, Salt Lake City, Utah. Core
Curriculum for Diabetes Education, Fourth Edition. Diabetes Management Therapies, Chapter 6,