Single Mailbox Recovery 7.0
Administrative Server Administration Guide
NetApp, Inc. 495 East Java Drive Sunnyvale, CA 94089 U.S. Telephone: +1 (408) 822-6000 Fax: +1 (408) 822-4501
Support telephone: +1 (888) 463-8277 Web: www.netapp.com
Feedback: [email protected]
Part number: 215-07483_A0 September 2013
Single Mailbox Recovery software has been developed, copyrighted, and licensed by Kroll Ontrack, Inc. Use of the software is governed by the terms and conditions of the end user license agreement contained within the software.
This manual should not be construed as any representation or warranty with respect to the software named herein. Occasionally, changes or variations exist in the software that are not reflected in the manual.
Generally, if such changes or variations are known to exist and affect the product significantly, a release note or Read Me file will accompany the Administration Guide, or will be available on the web site. In that event, please read the release notes or Read Me file before using the product.
Contents
i
Introduction
1
Overview 1
Release Notes 1
Getting Help 1
Conventions in this Manual 2
Chapter 1: Single Mailbox Recovery Administrative Server
3
Overview 3
Looking at the Single Mailbox Recovery Management Console 3
Single Mailbox Recovery Management Console First Run Configuration 6
Server Configuration Page 7
Chapter 2: Mailbox Permissions Service
11
Overview 11
Multi-Tenant Background 11
Mailbox Permissions Service First Run Configuration 12
Permission Model 12
Horizontal Check 12
Vertical Check 13
Examples of Use 14
Specific (Internal) Tab 16
Location Column 17
Adding a Mailbox 18
Sorting the Permission Order 20
Specific (External) tab 21
Adding a Mailbox 22
Adding and Removing a User or Group 23
Setting Permissions for a Mailbox 25
Sorting the Permission Order 25
Mailbox Categories Tab 26
Setting the Mailbox Category 27
Adding and Removing a User or Group 27
Setting Permissions for Mailboxes Matching the Selected Category 30
Sorting the Permission Order 31
All Mailboxes Tab 31
Adding and Removing a User or Group 32
Setting Permissions for All Mailboxes 33
Sorting the Permission Order 34
Manage Refusals Tab 35
Allowing a Refusal 36
Clearing, Reloading, and Saving 38
Using the Wizard 38
Chapter 3: Application Auditing Service
45
Overview 45
Types of Activities that are Logged 45
Client Activities that are Logged 45
Server-Side Activities that are Logged 45
Audit Service First Run Configuration 46
Log Directory Tree 47
Audit Logs 47
Configuration Tab 52
Audit Store Root Path 52
24-Hour Log Rollover Time 54
Chapter 4: Settings Service
56
Overview 56
Setting the Security Values 56
Adding or Removing a User or Group 58
Appendix A: Activities to be Logged
60
Client-Side Activities to be Logged 60
Single Mailbox Recovery User Interface Actions 60
Single Mailbox Recovery Command Line Actions 61
Data Wizard 62
Single Mailbox Recovery ExtractWizard Actions 62
Logged Server-Side Activities 63
Server Log 63
Mailbox Permissions Service Session Log 63
Settings Service Session Log 64
Single Mailbox Recovery Management Console Session Log 64
Glossary
66
Copyright Information
68
Trademark Information
70
How to Send Your Comments
71
Overview
Welcome to NetApp® Single Mailbox Recovery Administrative Server 7.0. This application is a framework that can host centralized services to multiple clients and provide both client and server support for Single Mailbox Recovery 7.0 and Single Mailbox Recovery ExtractWizard users. Single Mailbox Recovery Administrative Server includes:
n Server Configuration:You can monitor the active connections and available services,
change ports, restart or stop server, and elect to be discovered in Active Directory.
n Mailbox Permissions Service:In order to reinforce your internal corporate security policies,
you can restrict access in Single Mailbox Recovery 7.0 to mailboxes contained within private EDB Exchange mailbox stores based on your authority.
n Application Auditing Service:Activities performed as part of Single Mailbox Recovery 7.0
and Single Mailbox Recovery ExtractWizard operations, as well as activities within Single Mailbox Recovery Administrative Server, are logged as part of an "audit trail."
n Settings Service:Provides you the ability to centrally administer the Single Mailbox
Recovery application's security preferences.
You can manage these services using the Single Mailbox Recovery Management Console, which is the main interface for using this product.
Release Notes
TheNetApp® Single Mailbox Recovery 7.0 Administrative Server Release Notesdocument contains additional information about the Single Mailbox Recovery Administrative Server, including:
n System requirements
n Installing and uninstalling Single Mailbox Recovery Administrative Server n Upgrading from previous versions
n Technical support
Getting Help
NetApp provides you with the following ways to get help for Single Mailbox Recovery Administrative Server:
n Online Help n Technical Support
Online Help
Online Help includes all of the information in the user guide and more, and it lets you quickly access this information by using one of three tabs. The Contents tab offers a hierarchical view of the contents of the user guide. The Search tab offers a full-text search of the user guide. The Index tab offers a keyword-based way to get to specific topics.
To start online Help
Do one of the following:n On theHelpmenu, clickContents. n Press theF1key.
Technical Support
If you have questions or problems not answered in the user guide or the online Help, call our Technical Support group. When reporting an issue, please include any information that might help us diagnose the problem. The following details are often the most helpful:
n The version of Single Mailbox Recovery Administrative Server you are using (on theHelp
menu, clickAbout).
n The versions of Windows that you are running.
n The version of Exchange Server that contained the Source EDB file. n The circumstances and sequence of steps that led to the problem.
n The text of the error messages (if any appeared), and the contents of theDetailswindow. n A list of other Windows programs that you were running when the error occurred.
Conventions in this Manual
This manual uses guidelines for commands available on the shortcut menu and in notes and tips.
Shortcut Menu
You can access many of the same commands available on the menu bar by right-clicking the mouse to display a shortcut menu. This manual seeks to teach you how to use commands on the menu bar, and does not always specify when you can use the shortcut menu. Once you
become familiar with Single Mailbox Recovery Administrative Server, the commands available to you on the shortcut menu should become apparent.
Notes and Tips
The notes and tips in this user guide follow the guidelines offered in theMicrosoft Manual of Style for Technical Publications, 3rd Edition. Redmond, WA: Microsoft Press, 2004.
Administrative Server
Overview
Single Mailbox Recovery Administrative Server activates mailbox permissions, centralizes administration of certain application settings, and provides auditing services for Single Mailbox Recovery and Single Mailbox Recovery ExtractWizard clients.
When you launch Single Mailbox Recovery 7.0, it attempts to connect to Single Mailbox
Recovery Administrative Server if it is activated. Single Mailbox Recovery Administrative Server is located automatically using a Service Connection Point (SCP) in the Active Directory, or a server whose details have been manually provided by you.
After connecting to the server, Single Mailbox Recovery can utilize the services you have opted to activate, including mailbox permissions service, application auditing service, or settings service. These services are configured and monitored using the Single Mailbox Recovery Management Console.
Looking at the Single Mailbox Recovery Management
Console
The Single Mailbox Recovery Management Console is the main user interface that allows you to configure and monitor Single Mailbox Recovery Administrative Server and the installed services. You can use the Single Mailbox Recovery Management Console to configure services and determine whether or not they are active and therefore made available to clients.
Multiple clients can simultaneously use the services hosted by the server. At a minimum, it supports 50 concurrent users.
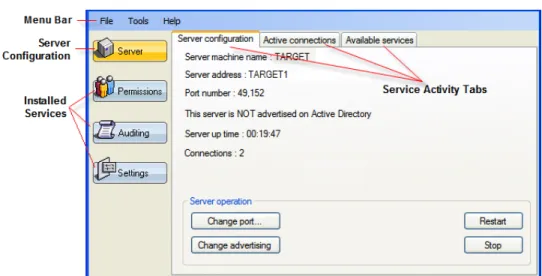
Single Mailbox Recovery Administrative Server opens to the Single Mailbox Recovery Management Console which contains a Server configuration button, the installed services buttons, and configuration pages for each service.
Figure 1-1: Single Mailbox Recovery Management Console main window
Menu Bar
In the menu bar, the options of Plugin Activation and Deactivate plugins are available under the Tools menu.
Figure 1-2: Plugin Activation/Deactive Plugins options
Plugin Activation
If you deactivate or skip a plugin during the Single Mailbox Recovery Administrative Server finalization (on Single Mailbox Recovery Management Console first run), you can activate it with the Plugin Activation menu item. Any deactivated/skipped plugins activate as a result of
selecting this option.
After selecting this option, Single Mailbox Recovery Management Console checks to see if any plugin is currently inactive. If the plugin is inactive, its finalization window appears.
Figure 1-3: Example of finalization window for Auditing
After you click Finish, Single Mailbox Recovery Management Console moves onto the next inactive plugin (if there is one). Once all plugins are activated, a message appears stating that Single Mailbox Recovery Administrative Server needs to be restarted for changes to take effect.
Figure 1-4: Confirm deactivation message
If you click Yes, the server restarts and the newly activated plugins are available, both for configuration and management within Single Mailbox Recovery Management Console and for client use.
If you click No, the server does not restart and the plugin(s) are not activated until the server is next restarted (for example, by clicking the Restart button on the server configuration page or by rebooting the system). For more information, see"Server Operation" on page 7.
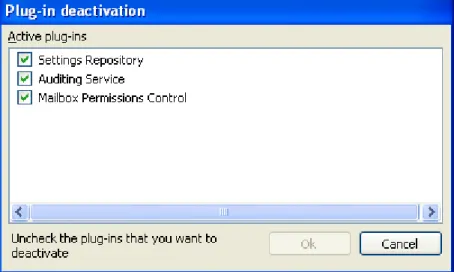
Deactivate Plugins
You can use the Deactivate Plugins menu item to deactivate any currently active plugins. The act of deactivation removes the plugin from the Single Mailbox Recovery Management Console so it cannot be configured or managed, and prevents client applications from using the service they provide. After you select Deactivate Plugins from the Tools menu, the Plug-in deactivation window appears.
Figure 1-5: Plug-in deactivation window
Clear the plugin or plugins that you want to deactivate. After you click OK, a message appears stating that Single Mailbox Recovery Administrative Server needs to be restarted for changes to take effect.
If you click Yes, the server restarts and the deactivated plugin(s) are no longer available, either for configuration/management or for client use. If you click No, the server does not restart and the plugin(s) are not deactivated until the server is next restarted (for example, by clicking the Restart button on the server configuration page or by rebooting the system). For more
information, see"Server Operation" on page 7.
Plugin deactivation (skipping during finalization) can be useful if you determine you want one service but not another. For example, your organization needs to audit activity, but does not need to enforce access permissions for mailboxes contained within EDB files or centrally administer application settings.
Single Mailbox Recovery Management Console First Run
Configuration
After installation, when Single Mailbox Recovery Management Console is run for the first time, it will prompt you to finalize the installation.
If you click No, Single Mailbox Recovery Management Console closes and clients will not be able to connect. If you click Yes, Single Mailbox Recovery Management Console finalizes each of the plug-ins. For details on the finalization for Mailbox Permissions and Applications Auditing, see"Mailbox Permissions Service First Run Configuration" on page 12and"Audit Service First Run Configuration" on page 46.
Server Configuration Page
The Server Configuration page is available by clicking the Server button in the main window of Single Mailbox Recovery Administrative Server. The right pane contains three tabs that you can use to configure the server, view the configuration settings, and monitor the activity of the services.
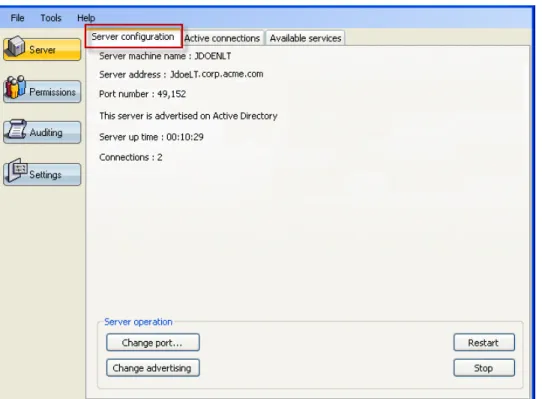
Server Configuration Tab
The Server Configuration tab displays your server machine name, the server address, the port number, whether the server is advertised on Active Directory, the server up time (which displays how long the Single Mailbox Recovery Administrative Server has been running in the current session), and the number of connections.
Figure 1-6: Server Configuration tab
Server Operation
The Server operation section allows you to change the current port, advertise on Active Directory (AD), restart the server, or stop the server connection.
Change port
You can change the server connection port by clicking the Change port button. A confirmation message appears if you have active connections.
Figure 1-7: Server Information
If the server is currently advertising on Active Directory, the port change immediately updates the Service Connection Point (SCP).
Note:In order to ensure correct operation of the Single Mailbox Recovery Administrative Server and any Single Mailbox Recovery and Single Mailbox Recovery ExtractWizard clients, firewall solutions must be configured to allow communication on the TCP port Single Mailbox Recovery Administrative Server is configured to use. The TCP port number can be configured via the Single Mailbox Recovery Management Console.
Change Advertising
Upon the first run, the Single Mailbox Recovery Administrative Server asks you if the Single Mailbox Recovery Administrative Server should be discoverable in Active Directory. You must have the authority to update the Active Directory. With the Change advertising button, this setting can be changed at any time.
A confirmation message appears if you change the setting. Restart
You can restart the server with the Restart button, which causes any connected clients to lose their connections to the server and close down. You will be prompted to confirm this action. Stop
You can terminate the connection to the server by clicking the Stop button. You will be prompted to confirm this action. Once the server is stopped, it cannot be connected to by client applications, and therefore are unable to run. You can start the server again by launching the Single Mailbox Recovery Management Console.
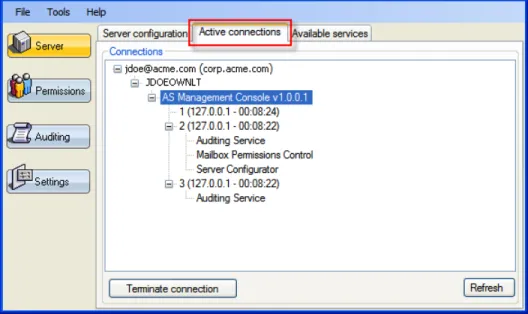
Active Connections Tab
Figure 1-8: Active Connections tab
Connections
The Active connections tree displays the user node, the name of the machine that you are currently running on, the application you are connected to, the session number, and the Single Mailbox Recovery Management Console plug-ins that are currently activated.
Terminate
You can break the connection to the server by clicking the Terminate connection button.
Refresh
You can update the information on the page by clicking the Refresh button. Note:The information on the page is automatically refreshed every 10 seconds.
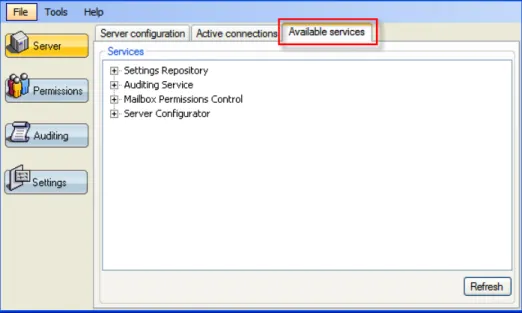
Available Services Tab
TheAvailable Servicestab lists all the installed services and shows which connections are currently using them.
Figure 1-9: Active Connections tab
Services
The Available services tab displays the same information as the Active connections tab, but it is arranged by service.
Refresh
You can update the information on the page by clicking the Refresh button. Note:The information on the page is automatically refreshed every 10 seconds.
Overview
Single Mailbox Recovery Administrative Server provides you the ability to restrict access to mailboxes contained within private Exchange mailbox stores to clients using Single Mailbox Recovery. To assist you in reinforcing your corporate security policies, you can set permissions on internal and external mailboxes to your forest, to groups or individuals, and in any configuration. Permissions fall into one of five categories:
n Internal Mailboxes:These permissions apply to specific mailboxes that exist within the
current forest.
n External Mailboxes:These permissions apply to specific mailboxes that do not exist within
the current forest.
n Mailbox categories:These permissions apply to mailboxes according to their category. n All Mailboxes:These permissions apply to all mailboxes.
n Refusals List:Any mailbox that does not find a match or are denied access end up in this
list.
Important: The Mailbox Permissions Service is supported for cases in which both server and client systems are joined to domains in the same forest (where domains have a two-way trust
relationship). The Mailbox Permission Service is not supported for scenarios in which the client system(s) are operating in a different forest to the server.
Note:The Mailbox Permissions Service is able to control access to individual mailboxes
contained within offline Microsoft Exchange EDB data stores originating from Microsoft Exchange 5.5, Microsoft Exchange 2000, Microsoft Exchange 2003, Microsoft Exchange 2007, and Microsoft Exchange 2010. Please note that mailboxes contained within an EDB data store from Microsoft Exchange 5.5 cannot be recognized as internal and will therefore always be treated as external.
Multi-Tenant Background
The mailbox permissions service includes support for both: 1. Multi-domain environments – and –
2. Exchange 2010 multi-tenant features, specifically:
a. /hosting deployments of Microsoft Exchange Server with Exchange Hosted Organizations
The support for these features includes identifying the location of mailboxes, users, and groups, and the ability to define rules to grant or deny permission to mailboxes associated with domains, Microsoft Exchange Server hosted organizations, and Address Book Policies. This support allows existing domain and multi-tenant configurations to be leveraged when creating permission rules to grant or deny access to mailboxes opened by Single Mailbox Recovery.
Mailbox Permissions Service First Run Configuration
When the permissions service plug-in is first installed using the Single Mailbox RecoveryManagement Console, a wizard appears allowing you to set up some initial permission settings. For more information, see"Using the Wizard" on page 38.
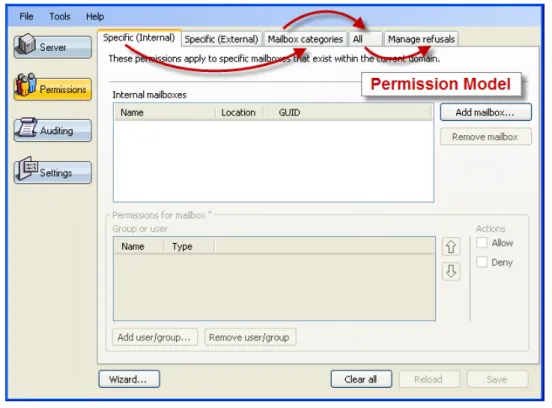
Permission Model
When a user in Single Mailbox Recovery attempts to access a mailbox contained within a private Exchange mailbox store (EDB file), the access request processes through the permission settings starting with Specific mailboxes (internal or external) and ending up with All mailboxes. Any user denied access at every level or finds no match ends up in the Manage refusals tab. This
processing system is called aPermission Model.
Figure 2-1: Mailbox Permission tabs
Horizontal Check
ThePermission Modelis based on a 3-tier check. The permissions for a particular mailbox or category contain a list of domain users and/or groups in the forest, each with a deny or allow permission designation.
Tier 1
n Specific (Internal) mailbox permissions:These are mailboxes that are within the
Administrator's forest and are in the Active Directory. If permission settings exist for the specific mailbox and the user, whetherDenyorAllow, these determine whether
permission is granted or denied. If there is no match (deny or allow), the access request goes toMailbox Categories (Tier 2)permissions.
n Specific (External) mailbox permissions:These are mailboxes that are outside the forest
and are not in the Active Directory. If permission settings exist for the specific mailbox and the user, whetherDenyorAllow, these determine whether permission is granted or denied. If there is no match (deny or allow), the access request goes toMailbox Categories (Tier 2) permissions.
Exchange Server 2010 SP1 Hosted Organization, or Microsoft Exchange Server 2010 SP2 Address Book Policy). Specific entries also exist for general categories of mailboxes that are internal and external to the forest. If permission settings exist in a category matching the mailbox for the user, whether Deny or Allow, these settings are used to determine whether permission is granted or denied. If there is no match (Deny or Allow), the access request applies to All (Tier 3) mailboxes.
Tier 3
n All mailboxes permissions:This is a catch-all listing of mailboxes that allows you to set
permissions for all mailboxes at one time. If permission settings exist for the user, whether DenyorAllow, these will determine whether permission is granted or denied. If there is no match or permission is denied, the mailbox goes to theManage Refusalslist.
Figure 2-2: Permission Model
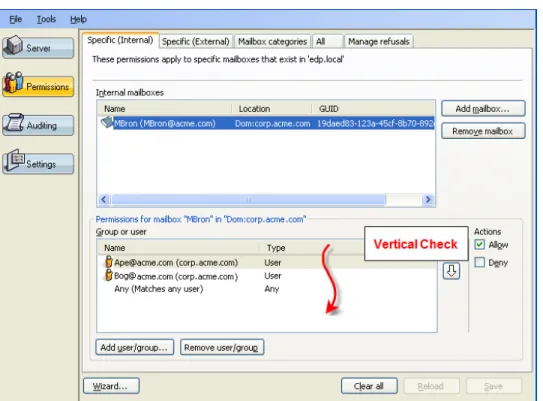
Vertical Check
As the requested mailbox name moves through each tab, the access request also processes vertically through the Permissions settings in the Group or user section. The user requesting
access to the mailbox moves through the list of domain users and/or groups in the forest from top to bottom until a match is found, to determine whether access has been allowed or denied.
Figure 2-3: Vertical Permission Check
If the access request finds a match, it stops searching and uses whatever permission setting is set for its match.
Note:If there is a match further down the list in another group and the permission is a different setting, the access request only uses the first hit of that match.
If the access request does not find a match in one tier, it continues on through each tier and the permissions settings for each tier. If there is no match in any tier or Group or user list, or it finds a match and the permission setting is "Deny," it lands in the Manage Refusals list.
Manage Refusals list tab
Any access request that moves through the 3-tier check and was not matched at any level or was matched and the permission setting is "Deny," the mailbox ends up in the Manage Refusals list.Temporaryorpermanentpermission can be set for any mailbox in the Manage Refusals list. For more information, see"Manage Refusals Tab" on page 35.
Examples of Use
1. Scenario #1:The Administrator sets the "Any" user permission setting on "Deny" in the All mailboxes tab. All mailboxes are inaccessible as a result. The Administrator needs access to the CEO's mailbox in an EDB file.
The CEO is internal to the Administrator's forest, and access should only be provided to this mailbox, while all other mailboxes remain inaccessible. He adds the CEO's mailbox into the Specific (Internal) mailbox list using the "Add Mailbox" button on that page. He then adds his user name to the users and/or group list using the "Add user/group..." button and sets the permission to "Allow."
Since the CEO's mailbox is listed on the specific internals list and this is processed first, when the Administrator uses Single Mailbox Recovery to open the EDB containing mailboxes from within his forest, the CEO's mailbox is accessible while all other mailboxes are inaccessible.
2. Scenario #2:The Administrator runs Single Mailbox Recovery and attempts to open an EDB containing a mailbox belonging to Paul Smith, an executive who is internal to the
Administrator's forest. It is inaccessible. It passes through the Specific Internal group or user listings and no match is found. It then processes through the Mailbox Categories and no match is found. It then moves to the All tab and processes through the Group or users list and no match is found. It ends up in the Manage Refusals list.
The client using Single Mailbox Recovery is performing some transactions requiring that Paul Smith's mailbox be accessible. Since the Administrator does not want access to Paul Smith's mailbox to be permanent, the temporary access is set for a day. The client
performs his tasks on Single Mailbox Recovery and when the time limit expires, Paul Smith's mailbox automatically reverts back to being inaccessible.
3. Scenario #3:The Administrator sets permissions so that he is allowed access to all external mailboxes in the Mailbox Category tab. These are mailboxes that are outside the
Administrator's forest. The Administrator runs Single Mailbox Recovery and opens an EDB containing mailboxes from within the forest.
Single Mailbox Recovery denies access to all mailboxes in this EDB. The Administrator then opens an EDB containing mailboxes from another environment. Single Mailbox Recovery allows access to all mailboxes in this EDB as they are external to the forest.
4. Scenario #4:The Administrator has freshly installed the Single Mailbox Recovery Administrative Server and has no mailboxes permission rules defined. As a result, all mailboxes are inaccessible. The Administrator has Address Book Policies defined for a number of different groups within his organization and has created group specific
administrator users. Each group administrator should be allowed access to the mailboxes within their group. For example, ‘Group Administrator ABP1’ should be able to access mailboxes listed in the Global Address List (GAL) for the Address Book Policy, ‘ABP1’. On the ‘Mailbox categories’ tab, the Administrator opens the Mailbox category list, selects “Internal to ABP ‘ABP1’”and then adds the ‘Group Administrator ABP1’ user name to the users and/or group list by clicking "Add user/group..." and sets the permission to "Allow."
When the ‘Group Administrator ABP1’ user runs Single Mailbox Recovery and opens an EDB containing mailboxes from the organization as a whole, only those mailboxes that are listed in the ABP1 Address Book Policy GAL are accessible. All other mailboxes are not accessible. Since no other mailbox permissions are defined when another user runs Single Mailbox Recovery and opens the same EDB, no mailboxes can be accessed.
5. Scenario #5:The Administrator clears mailbox permissions. All mailboxes are inaccessible as a result. The Administrator’s environment has deployed Microsoft Exchange Server 2010 with the ‘/hosting’ switch and has a number of Microsoft Exchange Server Hosted
Organizations defined. The Administrator has created hosted organization specific administrator users. Each hosted organization administrator should be allowed access to the mailboxes within their hosted organization. ‘Hosted Organization 1 Administrator’ should be able to access mailboxes from ‘Hosted Organization 1’ and ‘Hosted Organization 2 Administrator’ should be able to access mailboxes from ‘Hosted Organization 2’.
On the ‘Mailbox categories’ tab, the Administrator opens the Mailbox category list and selects “Internal to organization ‘Hosted Organization 1’”. He then adds the ‘Hosted Organization 1 Administrator’ user name to the users and/or group list by clicking "Add user/group..." and sets the permission to "Allow." He then repeats this process for ‘Hosted Organization 2’.
When the ‘Hosted Organization 1 Administrator’ user runs Single Mailbox Recovery and opens an EDB containing mailboxes from the environment as a whole, only the mailboxes from ‘Hosted Organization 1’ can be accessed. All other mailboxes are denied. When the ‘Hosted Organization 2 Administrator’ user runs Single Mailbox Recovery and opens that same EDB, only those mailboxes that are from ‘Hosted Organization 2’ can be accessed; he cannot access mailboxes from ‘Hosted Organization 1’ or anywhere else, just as ‘Hosted Organization 1 Administrator’ cannot access mailboxes from ‘Hosted Organization 2’.
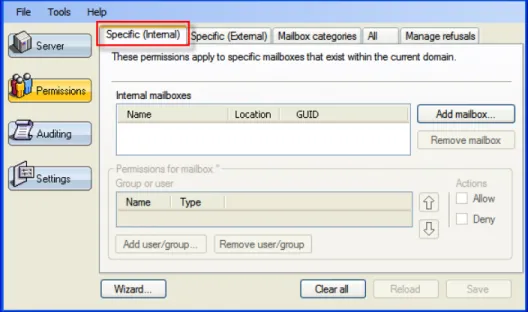
Specific (Internal) Tab
The Specific (Internal) tab presents a list of known internal mailboxes. By selecting one from the list, the permissions associated with that mailbox can be viewed and/or edited.
Figure 2-4: Specific (Internal) tab
Location Column
The Location column provides information relating to the location of a mailbox. This column is present in the following:
n Specific (Internal) page
n Choose Internal Mailboxes dialog box n Manage Refusals page
The location of a mailbox is determined in order of the following criteria:
1. Address book policy (ABP) with a Global Address List (GAL) that includes the mailbox owner.
2. Hosted organization membership 3. Domain membership.
The association of an ABP takes precedence over membership of a hosted organization which takes precedence over membership of a domain.
The location column consists of a prefix and location details in the form ‘<Location:><Details>’ as follows:
Abp:Mailbox owner is listed by the Global Address List of named address book policy or policies. Org:Mailbox owner is a member of the named hosted organization.
Dom:Mailbox owner is a member of the named domain.
Adding a Mailbox
You can add a mailbox to the Internal mailbox list. This list is used to apply permissions in the Permissions for mailbox section.
You can filter the list to help you in finding specific users in a large organization. The list is populated with all of the live mailboxes found in the forest, along with their location. You may select one or more of these mailboxes to add to the list.
To add internal mailboxes
1. Click theSpecific (Internal)tab.
2. ClickAdd Mailbox. TheChoose Internal Mailboxes to Addwindow appears.
Figure 2-5: Choose Internal Mailboxes to Add
3. Enter aName Filterand clickSearch. The list populates with mailboxes based on the filter you entered.
4. Do one of the following:
l ClickAllto select the whole list of mailboxes. l Select mailboxes individually.
l Clear mailboxes list by clickingNone.
5. ClickOK. TheInternal mailboxeslist is populated with selected mailboxes. 6. ClickSave.
Adding and Removing a User or Group
Figure 2-6: Add user/group button
To add a user or group
1. ClickAdd user/group. TheAdd Groups or Userswindow appears.
Figure 2-7: Add Groups or Users window
2. Select or clear theObject typesyou want to search,Users and/or Groups. 3. Do one of the following:
l Enter aName filterto narrow down the list and clickSearch.
Note:Single Mailbox Recovery Administrative Server inserts an "*" to create a wild card search.
l ClickAny user. TheAdd Groups and Userswindow closes andAnyis listed in theGroup
or userbox.
4. In the populated list, do one of the following:
l ClickAllto select the whole list of users and groups. l Select users and groups individually.
l Clear users and groups list by clickingNone.
5. ClickOK. 6. ClickSave.
To remove a user or group
1. Select one or more groups or users by clicking once in theGroup or userbox. Multiple groups or users can be selected using theShiftorCtrlkey.
2. ClickRemove user/group. 3. ClickSave.
Setting Permissions for a Mailbox
The Permissions for Mailbox section is used to set permissions for groups or users, add or remove groups or users, or change the order on which they are processed through.
Figure 2-8: Permissions for Mailbox section Group or user
The Group or user box lists the Name of the group or user and the Type, Group or User.
To set permissions on a group or user
1. Click once on a group or user in theGroup or userbox.
Note:Multiple users can be selected by holding down the Shift key. 2. SelectAlloworDenyunderActions.
Figure 2-9: Permissions applied to group or user
Sorting the Permission Order
You can change the order of Groups or users using the up and down arrows. The order of the group or user affects the order in which the permission model processes. For example, in the Figure below, if user "Administrator" has the permission setting of "Allow" and the group "Any" is set
Figure 2-10: "Administrator" is listed first in Group or user box and the permission setting is "Allow." In the next Figure, the group "Any" has been moved to the top of the list and is hit first. Any group or user listed beneath "Any," even if the permission setting is "Allow," does not get hit since "Any" was hit first and its setting is "Deny." Therefore, any group or user, no matter what the permission setting, is denied permission to access.
Figure 2-11: The Group "Any" has been moved to the top of the list and the permission setting is "Deny."
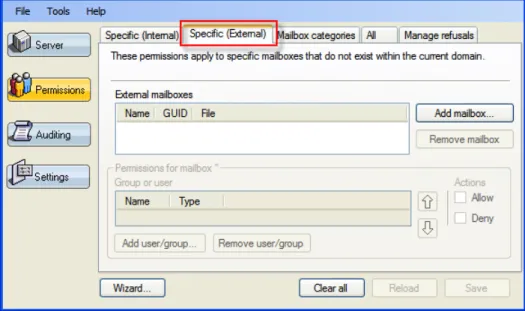
Specific (External) tab
External Mailboxes are mailboxes not found within the Administrator's forest that are not detailed in Active Directory. The Specific (External) mailboxes tab presents a list of known external
mailboxes. By selecting one from the list, the permissions associated with that mailbox can be viewed and/or edited.
Figure 2-12: Specific (External) tab
Adding a Mailbox
You can add external mailboxes to the External Mailbox list. You can use this list to apply permissions in the Permissions for mailbox section.
To add an external mailbox
1. Select theSpecific (External)tab.
2. ClickAdd mailbox. TheSelect an EDBwindow appears.
Figure 2-13: Select an EDB 3. Do one of the following:
l Browsefor anEDB File.
l Browse for aLog file directory.
Figure 2-14: EDB Parsing Progress window
Upon completion of loading the EDB file, theChoose External Mailboxes to Addwindow appears.
Figure 2-15: Choose External Mailboxes to Add window 5. Do one of the following:
l ClickAllto select the whole list of mailboxes. l Select mailboxes individually.
l Clear mailbox list by clickingNone.
6. ClickOK. The External mailboxes list is populated with selected mailboxes. 7. ClickSave.
To remove an external mailbox
1. Select one or more external mailbox(es) in the list. 2. ClickRemove mailbox.
3. ClickSave.
Figure 2-16: Add user/group button
To add a user or group
1. ClickAdd user/group. TheAdd Groups or Userswindow appears.
Figure 2-17: Add Groups or Users window
2. Select or clear theObject typesyou want to search,Usersand/orGroups. 3. Do one of the following:
l Enter aName filterto narrow down the list and clickSearch.
l ClickAny user. TheAdd Groups and Userswindow closes andAnyis listed in theGroup
or userbox.
4. In the populated list, do one of the following:
l ClickAllto select the whole list of users and groups. l Select users and groups individually.
l Clear users and groups list by clickingNone.
5. ClickOK. 6. ClickSave.
2. ClickRemove user/group. 3. ClickSave.
Setting Permissions for a Mailbox
The Permissions for Mailbox section is used to set permissions for groups or users, add or remove groups or users, or change the order on which they are processed through.
Figure 2-18: Permissions for Mailbox section Group or user
The Group or user box lists the Name of the group or user and the Type, Group or User.
To set permissions on a group or user
1. Click once on a group or user in theGroup or userbox.
Note:Multiple users can be selected by holding down the Shift key. 2. SelectAlloworDenyunderActions.
Figure 2-19: Permissions applied to group or user
Sorting the Permission Order
You can change the order of Groups or users by using the up and down arrows. The order of the group or user affects the order in which the permission model processes. For example, in the next Figure, if user "Administrator" has the permission setting of "Allow" and the group "Any" is set to "Deny," since "Administrator" is listed first, it will be "hit" first.
Figure 2-20: "Administrator" is listed first in Group or user box and the permission setting is "Allow." In the next Figure, the group "Any" has been moved to the top of the list and is hit first. Any group or user listed beneath "Any," even if the permission setting is "Allow," does not get hit since "Any" was hit first and its setting is "Deny." Therefore, any group or user, no matter what the permission setting, is denied permission to access.
Figure 2-21: The Group "Any" has been moved to the top of the list and the permission setting is "Deny."
Mailbox Categories Tab
Using the Mailbox Categories tab, you can set permissions to mailboxes categorized by their location. For more information about locations, see"Location Column" on page 17.
The mailbox categories available in a specific environment are dependent on the configuration and deployed features in that environment. Operation in a domain forest or when multi-tenant features like Address Book Policies and Exchange Hosted Organizations are in use will affect the categories listed.
Figure 2-22: Mailbox categories tab
Setting the Mailbox Category
Select the Mailbox Category to which you want the permission to apply from the following:
n Internal to ABP 'xxx':Referenced by this specific Address Book Policy Global Address List. n Internal to any ABP:Referenced by any Address Book Policy Global Address List.
n Internal to organization 'xxx':Member of a specific Microsoft Exchange Server hosted
organization.
n Internal to any organization:Member of any Microsoft Exchange Server hosted
organization.
n Internal to domain 'xxx' but not configured in an ABP or organization:Member of a specific
domain, but not referenced by an Address Book Policy Global Address List or member of a Microsoft Exchange Server hosted organization.
n Internal to forest but not configured in an ABP or organization:Member of any domain in
the forest, but not referenced by an Address Book Policy Global Address List or member of a Microsoft Exchange Server hosted organization.
n Internal to forest:Member of any domain in the forest. n External to forest:Member of a domain outside the forest.
Adding and Removing a User or Group
Figure 2-23: Add user/group button
To add a user or group
1. ClickAdd user/group. TheAdd Groups or Userswindow appears.
Figure 2-24: Add Groups or Users window
2. Select or clear theObject typesyou want to search,Usersand/orGroups. 3. Do one of the following:
l Enter aName filterto narrow down the list and clickSearch.
l ClickAny user. TheAdd Groups and Userswindow closes andAnyis listed in theGroup
or userbox.
4. In the populated list, do one of the following:
l ClickAllto select the whole list of users and groups. l Select users and groups individually.
To remove a user or group
1. Select one or more groups or users by clicking once in theGroup or userbox. Multiple groups or users can be selected using theShiftorCtrlkey.
2. ClickRemove user/group. 3. ClickSave.
A note on user and group naming and identification
In common with all controls within the Mailbox Permissions service that list users and groups information is displayed in a standardized form designed to disambiguate.
Users are identified by their User Principal Name (UPN) followed by additional information in parenthesis. The UPN is used to disambiguate and ensure the user can be uniquely identified. In parenthesis following the user name additional information is provided as follows:
n ‘<UPN> (<domain.name,<Loc:><LocationName>)’ – where l <UPN> is the User Principal Name (e.g. [email protected])
l <domain.name> is the domain where the user is defined (e.g. domain.com). l <Loc:><LocationName> can be:
o Org:<Exchange Hosted Org Name> o Abp:<Assigned ABP>
l e.g. [email protected] (corp.company.com) l e.g. [email protected] (hosted.local,Org:org1)
l e.g. [email protected] (domain.local,Abp:Abp_1)
Groups are identified by their name followed by additional information in parenthesis. The additional information is used to disambiguate and ensure the group can be uniquely identified. In parenthesis following the user name additional information is provided as follows:
n ‘<Group name> (<info>)’
l <Group name> is the name of group. l Where <info> can be:
o The domain where the user is defined (e.g. domain.com).
o ‘Well known SID’ – In multi-domain environments this is shown when the group is
an inbuilt security group identified by a well-known SID. Each domain will likely have its own instance of a well-known group so Single Mailbox Recovery Administrative Server aggregates them into a single object to avoid confusion.
o The special ‘Any’ group provided to match any user will display as ‘Any
(Matches any user)’
l e.g. Account Operators (Well known SID) l e.g. Any (Matches any user)
Note:If permissions are set for a user or group and that user or group is later deleted it will no longer be recognized. In this scenario the user/group name will be: ‘<user/group name> (Ext:)’.
Setting Permissions for Mailboxes Matching the Selected
Category
You can use this section to set permissions for groups or users, add or remove groups or users, or change the order on which they are processed through.
Group or user
The Group or user box lists the Name of the group or user and the Type, Group or User.
Figure 2-25: Permission for the category "Internal to forest" (any mailbox that is a member of any domain in the forest)
To set permissions on a group or user
1. Click once on a group or user in theGroup or userbox.
Note:Multiple users can be selected by holding down the Shift key. 2. SelectAlloworDenyunderActions.
Sorting the Permission Order
You can change the order of Groups or users by using the up and down arrows. The order of the group or user affects the order in which the permission model processes. For example, in the next Figure, if user "Administrator" has the permission setting of "Allow" and the group "Any" is set to "Deny," since "Administrator" is listed first, it will be "hit" first.
Figure 2-27: The "Administrator" user is at the top of the list and the Action is set to "Allow" permission.
In the next Figure, the group "Any" has been moved to the top of the list and is hit first. Any group or user listed beneath "Any," even if the permission setting is "Allow," does not get hit since "Any" was hit first and its setting is "Deny." Therefore, any group or user, no matter what the permission setting, is denied permission to access.
Figure 2-28: The Group "Any" has been moved to the top of the list and the Action is set to "Deny" permission.
All Mailboxes Tab
All Mailboxes is a general mailbox category that allows permissions to be set at a high level (e.g., allow a user or group to access any mailbox).
Figure 2-29: All mailboxes tab
Adding and Removing a User or Group
You can add a new group or user to the Group or user box in the All mailboxes tab.
To add a user or group
1. ClickAdd user/group. TheAdd Groups or Userswindow appears.
Figure 2-31: Add Groups or Users window
2. Select or clear theObject typesyou want to search,Usersand/orGroups. 3. Do one of the following:
l Enter aName filterto narrow down the list and clickSearch.
l ClickAny user. The Add Groups and Users window closes andAnyis listed in theGroup
or userbox.
4. In the populated list, do one of the following:
l ClickAllto select the whole list of users and groups. l Select users and groups individually.
l Clear users and groups list by clickingNone.
5. ClickOK. 6. ClickSave.
To remove a user or group
1. Select one or more groups or users by clicking once in theGroup or userbox. Multiple groups or users can be selected using theShiftorCtrlkey.
2. ClickRemove user/group. 3. ClickSave.
Setting Permissions for All Mailboxes
You can use this section to set permissions for groups or users, add or remove groups or users, or change the order on which they are processed through.
The Group or user box lists the Name of the group or user and the Type, Group, or User.
Figure 2-32: Group or user box
To set permissions on group or user
1. Click once on a group or user in theGroup or userbox.
Note:Multiple users can be selected by holding down the Shift key. 2. SelectAlloworDenyunderActions.
Figure 2-33: Permissions applied to group or user
Sorting the Permission Order
You can change the order of Groups or users by using the up and down arrows. The order of the group or user affects the order in which the permission model processes. For example, in the next
Figure 2-34: The "Administrator" is at the top of the list and the Action is set to "Allow" permission. In the next Figure, the group "Any" has been moved to the top of the list and is hit first. Any group or user listed beneath "Any," even if the permission setting is "Allow," does not get hit since "Any" was hit first and its setting is "Deny." Therefore, any group or user, no matter what the permission setting, is denied permission to access.
Figure 2-35: The Group "Any" has been moved to the top of the list and the Action is set to "Deny" permission.
Manage Refusals Tab
You can change the permission setting on a mailbox that has failed access attempts either through a "Deny" permission setting or by not finding a match. The server maintains a list of all the failed mailbox access attempts. These are listed in the Manage refusals tab of the Single Mailbox Recovery Management Console.
Figure 2-36: Manage refusals tab
The Manage refusals tab displays the following information:
n User Name:Name of the user that attempted the access.
n Mailbox Display Name:Name of the mailbox on which access was attempted. n Last Refused:Date and time of the last failed attempt.
n Access Granted Until:Date and time up to which access will be allowed. n Mailbox File:The path to the file where the mailbox originated.
n GUID:The unique identification of the mailbox.
n Mailbox Location:The location of the mailbox. For more information, see"Location
Column" on page 17.
Allowing a Refusal
There are two ways you can allow a refused mailbox access. A refusal can be temporarily allowed or permanently allowed.
Permanentlyallowing a refusal involves generating a permission entry for that access attempt. Temporarilyallowing a refusal requires that the user indicate the duration of the access.
To allow a refusal
1. In theManage Refusalstab, right-click a user name. A shortcut menu appears. 2. Do one of the following:
Figure 2-37: Right-click the mailbox to give temporary or permanent permission
l TheChoose duration of temporary allowwindow appears.
Figure 2-38: Choose the duration of temporary refusal allow 3. If you selectedTemporarily allow, select one of the following:
l Half an hour l An hour l A day
l Until the date/time specified below (Using the drop-down arrows, select the date and
time you want the temporary access to end.)
Figure 2-39: The Temporarily Allow date and time appears in the Access Granted Until column
5. ClickSave.
Clearing, Reloading, and Saving
The Clear all, Reload, and Save buttons are located on the bottom edge of the Single Mailbox Recovery Management Console.
Clear All
You can use the Clear all button to clear out all the mailboxes and settings in the Single Mailbox Recovery Management Console.
Reload
The Reload button loads the stored permissions set which removes any changes made since the last Save.
Save
The Save button saves the current (modified) permissions set. You need to click Save to activate any changes made to the permission settings.
Using the Wizard
You can set the initial permissions for your organization using a wizard which opens when the permissions plug-in is being installed. These settings can be modified later from the Permissions tabs.
1. ClickWizardon the main window of Single Mailbox Recovery Administrative Server. The wizard opens with a Welcome page.
Figure 2-40: Welcome page
2. ClickNext. The second page of the wizard used for specifically denying access to everyone appears.
Figure 2-41: Deny access for everyone
Note:This page of the wizard can offer protection to mailboxes the Administrator does not want anyone to access. The Administrator should ensure any sensitive or important
mailboxes are listed here. For example, the CEO's mailbox in Example #1 at"Examples of Use" on page 14.
3. ClickAddto list which mailboxes you want to specifically deny access for everyone. The Choose Internal Mailboxes to Addwindow appears.
Figure 2-42: Choose Internal Mailboxes
4. Enter aName filterto narrow down the list and clickSearch. 5. In the populated list, do one of the following:
l ClickAllto select the whole list of mailboxes. l Select mailboxes individually.
l Clear mailbox list by clickingNone.
6. ClickOK.
l Use theRemoveoption to delete any mailboxes from the list. l ClickClearto delete the entire list from the page.
Figure 2-43: Access to internal mailboxes
Note:This page of the wizard is there to allow access to any other mailboxes in the forest, with the exception of the mailboxes chosen on the second page of the wizard. Those users will have access to all other mailboxes internal to the forest. The Administrator should ensure only those users or groups specifically authorized to use Single Mailbox Recovery and access company mailboxes located in the EDB files are listed.
8. ClickAddto list users and groups that will have access to the mailboxes internal to your forest. TheAdd Groups or Userswindow appears.
Figure 2-44: Add Groups or Users
9. Select or clear theObject typesyou want to search,Usersand/orGroups. 10. Do one of the following:
l Enter aName filterto narrow down the list and clickSearch.
l ClickAny user. TheAdd Groups and Userswindow closes andAnyis listed in theGroup
or userbox.
11. In the populated list, do one of the following:
l ClickAllto select the whole list of mailboxes. l Select mailboxes individually.
l Clear mailbox list by clickingNone.
12. ClickOK.
l Use theRemoveoption to delete any mailboxes from the list. l ClickClearto delete the entire list from the page.
13. ClickNext. The add access to external mailboxes page in the wizard appears.
Figure 2-45: Access to external mailboxes
Important: This page of the wizard allows access to any mailboxes external to the forest at your choosing. In a large organization, the email system may be distributed along
operational or geographic lines and therefore a mailbox external to the Administrator's forest may still be internal to the organization as a whole. Carefully select users you want to have access to mailboxes external to your forest. An option is to leave this list empty and specifically add mailboxes later.
14. ClickAddto list users and groups that will have access to mailboxes that are external to your forest. TheAdd Groups or Userswindow appears.
Figure 2-46: Add Groups or Users
15. Select or clear theObject typesyou want to search,Usersand/orGroups. 16. Do one of the following:
l Enter aName filterto narrow down the list and clickSearch.
l ClickAny user. TheAdd Groups and Userswindow closes andAnyis listed in theGroup
or userbox.
17. In the populated list, do one of the following:
l ClickAllto select the whole list of mailboxes. l Select mailboxes individually.
l Clear mailbox list by clickingNone.
18. ClickOK.
l Use theRemoveoption to delete any mailboxes from the list. l ClickClearto delete the entire list from the page.
Figure 2-47: Mailbox Access Permissions complete 20. ClickFinish.
Note:These settings can be modified at a later time. If you use the wizard to modify the settings later, any previous settings are cleared. A message appears stating that running the wizard will clear all the existing permissions.
Figure 2-48: Confirmation message to clear all existing permission settings.
Terminate
Overview
The Application Auditing Service is a service plug-in that you can load into Single Mailbox Recovery Management Console. It is used to generate audit log files which record actions performed by users. Audit log files are protected so that tampering is detected.
Activities performed in Single Mailbox Recovery and Single Mailbox Recovery ExtractWizard, as well as the Single Mailbox Recovery Management Console and Mailbox Permissions Service, are logged as part of an audit trail.
Audit log files contain audit entries which are grouped by session. A session encompasses the actions performed by a particular user on a particular machine using a particular application.
Types of Activities that are Logged
Activities performed by users are logged as a singlestand aloneactivity or as part of a larger transactionprocess activity. Both client and server associated activities are logged.
n Stand alone Activities:For example, clicking "Next" on a wizard page.
n Transaction Activities:Activities that are logged as a pair of entries, the first entry of the
pair specifying what is about to happen, and the second entry of the pair specifying the result. For example, copying a folder containing 50 sub-folders and 1000 messages and pasting them to a target file. The copying process of each message is not logged, only the initial copy and result of the copy operation as a whole are logged.
Client Activities that are Logged
All activities affecting the source or target store are logged. In addition, all activities that affect what is viewable by you on the screen are logged.
In Single Mailbox Recovery and Single Mailbox Recovery ExtractWizard, the types of activities logged are those initiated from the user interface, command line interface, and Data Wizard. See"Activities to be Logged" on page 60for a list of Client activities that are logged.
Server-Side Activities that are Logged
On the server side, activities are logged for the Server, Mailbox Permissions Service, and the Single Mailbox Recovery Management Console.
Audit Service First Run Configuration
When the audit service plug-in is first installed using the Single Mailbox Recovery Management Console, a configuration screen allows you to change the audit store root path and the 24-hour log rollover time. For more information, see"Configuration Tab" on page 52.
Figure 3-1: Audit Service First Run
Skip Button
The "Skip" button can be used to skip finalization of the current plug-in. If a plug-in's finalization is skipped, it will not be available for configuration in the Single Mailbox Recovery Management Console and its service not provided to clients, as it is deactivated. Skipped plug-ins can be activated using the Plug-in Activation command on the Tools menu item at any time after finalization.
Advertising on Active Directory
After finalizing (or Skipping) each plug-in, you are prompted as to whether you want to advertise in Active Directory.
For more information, see"Server Operation" on page 7.
Manage Logs Tab
In the audit log file main window, you are presented with the directory tree of log files. You can view, copy, validate, and delete audit logs. When you select "View Log," the log is first verified, and then displays in a browser window.
Figure 3-3: Manage Logs tab
Note:The date and time used to form the name of the folder and log file are based on UTC (GMT+0), not local time.
Log Directory Tree
Note:A session log's folder name is determined by using client application name (e.g. Single Mailbox Recovery) followed by the date and time the session started (in UTC - GMT+0, not local time-zone). In cases when two clients connect within the same second, the folder name of the second connection will be suffixed with a lower case letter `a.' If a third connection occurred within the same second it would be suffixed with `b' and so on.
Audit Logs
The right pane displays the audit session logs.
n If the icon at the beginning of the log is and/or the log file name has a "@" at the end, it
indicates the session is still running and therefore the log is incomplete.
Note:A session log's name is determined using the date and time the session started (in UTC -GMT+0, not local time-zone) with an .xml file extension. Over time, log files will grow and so in order to prevent logs from growing so large that they become unwieldy, new `rollover' logs are created. The naming convention for these `rollover logs' is the original date and time name with a `_1' suffix for the first rollover log, a `_2' suffix for the second rollover log, and so on.
Refresh
You can update the information on the page by clicking the Refresh button.
View Log
You can open an audit log by selecting a log in the right pane and clicking the View Log button. It opens after a validation is performed. If the validation fails, the log is still viewable but a warning message is displayed.
Figure 3-4: Audit Session sample Session Data
This section includes:
n Application Name:The name of the application or service being audited (for example,
Single Mailbox Recovery).
n Session Start Time:Start of the Single Mailbox Recovery Administrative Server Audit Session
for that application.
n Session End Time:End of the Single Mailbox Recovery Administrative Server Audit Session
for that application.
n Session End Reason:The reason the session was ended: "Closed - Client Closed Session,"
the application closed: "Closed - Connection Lost," the connection failed unexpectedly (for example, network failure).
Figure 3-5: Activity Data in the Audit Log Activity Data
This section logs:
n Total Activity Entries:The total number of activities entered by the user. n Activity Id:Sequential number assigned to user activity.
n Server Time:The time of day according to the server. n Client Time:The time of day according to the client.
n Action:The type of activity based on the audit activities listed in Appendix A: Activities to
be Logged.
n Action Modifier:Either Stand alone or Transaction. See"Activities to be Logged" on page
60.
n Transaction Id:Sequential number assigned to the transactional activity. A Transactional
n Parameter Name:The type of parameter being audited.
n Parameter Value:The value of the type of parameter being audited.
Show Summary Report
You can request a Summary Report of the entire audit session by clicking the Show Summary Report button located at the bottom of the audit log.
Figure 3-6: Show Summary Report
Figure 3-7: Summary Report
The Activity Data list displays every transaction in the audit session describing the basics of each activity.
Figure 3-8: Activity Data in Summary Report
Copy Log
The Copy Log button copies the log file to an alternate location that you designate. It does not create or maintain a link to the file.
Validate Log
The Validate Log button displays the result of the validation of the file. If the validation fails, the log still displays but with a warning message.
Delete Log
The Delete Log button deletes a log file.
Configuration Tab
The Configuration tab allows you to set or edit the audit store root path and the 24-hour log rollover time.
Figure 3-9: Configuration tab
Audit Store Root Path
You can change the location where the audit logs are stored in the Audit Store Root Path section.
To change the audit store root path
1. ClickChange. TheBrowse For Folderwindow is displayed.
Figure 3-10: Select a different root path
2. ClickOK. AChange audit service store rootmessage appears.
Figure 3-11: Change audit service store root confirmation
3. ClickOK. TheAudit Store Root Pathchange takes effect the next time the server is
restarted. This can be achieved using the Restart button on the Server configuration page. See "Server Operation". Until the server is restarted, a warning message appears.
Figure 3-12: Example of warning message
24-Hour Log Rollover Time
This setting allows you to set the time of day the audit log rolls over into a new day.
To change the 24-hour log rollover time
1. ClickChange. TheAudit Service - Change 24 Hour Log Rollover Timewindow appears.
Figure 3-13: Change 24-Hour Log Rollover Time 2. Select one of the following:
l Midnight Server Local Time:Selecting this option automatically sets the rollover time to
midnight in the local time of the server location.
l Specified Server Local Time:Selecting this option allows you to set the local time of
the server to which you want the audit logs to rollover.
4. ClickOK. A Single Mailbox Recovery Administrative Server Auditing Servicemessage appears.
Figure 3-14: Audit log roll time configuration change message
5. The 24-Hour Log Rollover Time change takes affect the next time the server is restarted. You can do this by using the Restart button on the Server configuration page. Until the server is restarted, a warning message appears. For more information, see"Server Operation" on page 7.
Overview
The Settings Service is a service plug-in that you can load into Single Mailbox Recovery Management Console. It is used to centrally administer security preferences in the Single Mailbox Recovery application.
The Security tab on the Preference dialog box in Single Mailbox Recovery controls the level of information available to the user when restoring mailboxes and governs the tasks that person can perform. The Settings service on Single Mailbox Recovery Administrative Server enables you to centrally administer and lock the default security values on the Security tab for certain users or groups.
To set the security values
1. In the left pane, clickSettings.
Figure 4-2: Settings page
2. In theUserbox, select the user or group you want to assign the default security values. Note:ClickAddto add users using the Add Groups or Users dialog box. For more information, see"Adding or Removing a User or Group" on page 58.
Note:Selecting <Default User> displays the settings used by default when no settings are provided for the user or group.
3. In theApplicationbox, the default value "Single Mailbox Recovery" is selected.
4. In theApplication Settingslist, double-click the security setting you want to change for the selected user, group, or <Default User>.
5. In theSetting Editordialog box, view theNameandInformationof the selected security setting.
6. In theValuefield, do one of the following:
n SelectTrueto activate the setting n SelectFalseto de-activate the setting.
7. ClickOKto set the Value in the Application Settings list.
8. If you want to change additional security values, repeat steps 4 through 7.
Note:You can clickClear Allto return the Application Settings to the default security values or clickReloadto return the Application Settings to the most recently saved security values for the selected user.
9. When you have completed the setting the security values for the selected User, click Save.
Adding or Removing a User or Group
You can add a group or user to the User box on the Settings page with the Add Groups or Users dialog box.
To add a user or group
1. On theSettingspage to the right of theUserbox, clickAdd.
n Enter a name filter to narrow the list and clickSearch.
n ClickSearchand view all the selected object types within the forest.
4. In the populated list, do one of the following:
n Double-click the group or user you want to add. n Select the group or user you want to add and clickOk.
The selected group or user appears in the User Box on the Settings page.
To remove a user or group
n On the Settings page, use theUserbox to select the user or group you want to remove
and clickRemove.
The selected group or user clears from the User Box on the Settings page. For more information, see"A note on user and group naming and identification" on page 29.