Test Report
www.openvox.cn
1
Test on IX130 Performance
This document aims to report the performance of IX130. We design a few
scenarios where uses IX130, including gateway and PBX and how well the
performance of handling transcoding.
Test environments
OpenVox IPC 110 1.6GHz
CPU: Intel® Atom™ CPU Z530 @1.6GHz
Memory: 2GB
OpenVox IPC 110 1.1GHz
CPU: Intel® Atom™ CPU Z510 @1.1GHz
Memory: 2GB
Asterisk-1.8.9.0
WinSIP Version: 2.4.7
TestPC:
CPU: Intel 5300
Memory: 2GB
Test Report
www.openvox.cn
2
Contents
Test environments... 1
Chapter 1 IX130 as a Gateway ... 3
Test Steps... 3
Test Details ... 3
Test Results ... 10
Chapter 2 IX130 as a PBX ... 11
Test Results ... 11
Chapter 3 IX130 as a Gateway over OpenVox D230 ... 12
Test Results ... 12
Chapter 4 IX130 as PBX Over OpenVox D230... 13
Test Results ... 13
Chpater 5 Software Transcoding Test with IX130... 14
Test Results ... 14
Test Report
www.openvox.cn
3
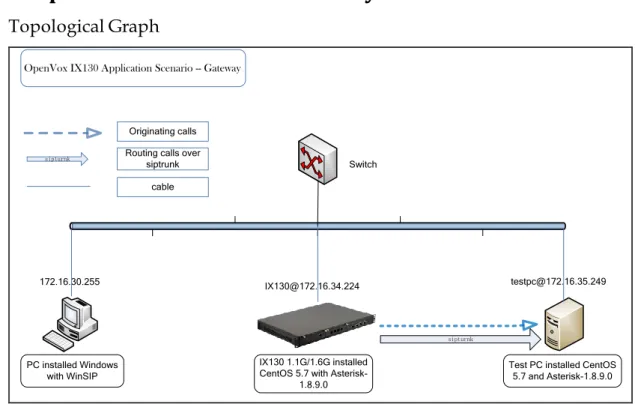
Chapter 1 IX130 as a Gateway
Topological Graph
IX130 1.1G/1.6G installed CentOS 5.7 with
Asterisk-1.8.9.0
Test PC installed CentOS 5.7 and Asterisk-1.8.9.0 Switch
PC installed Windows with WinSIP
[email protected] [email protected]
172.16.30.255
sipturnk
Originating calls Routing calls over
siptrunk cable
sipturnk
OpenVox IX130 Application Scenario -- Gateway
Figure 1 topological graph
Test Steps
1. Install CentOS-5.7 operation system on both machines IX130 and test PC. 2. Download and compile Asterisk-1.8.9.0 in both machines IX130 and test PC. 3. Generate and configure sip.conf and extensions.conf.
4. Set up siptrunk. 5. Configure WinSIP.
6. Originate calls and check related data. 7. Write down test results.
Test Details
We suppose you are done step 1 and step 2. We ignore them here. In order to generate many sip extensions and dialplan information, we come up with a method to generate them in shell script. Of course, you can use other methods to implement as well.
1. Shell script of generating sip extensions information: Bulk_generate_sip.sh #!/bin/sh
#This script is using for generating several sip accounts #Created on 2012-05-29
Test Report
www.openvox.cn
4
doecho "[$a]"
echo "type=friend" echo "username=$a" echo "qualify=yes" echo "port=5060" echo "nat=yes" echo "host=dynamic" echo "dtmfmode=rfc2833" echo "context=from-internal" echo "canreinvite=no" echo ""
echo "" done
2. Shell scrip of generating dialplan. Bult_generate_extensions.sh #!/bin/sh
#This script is using for generating several sip accounts #Created on 2012-05-29
for(( a=301; a<=601; a++)) do
echo "exten =>$a,1,Dial(SIP/siptrunk/$a)" echo "exten =>$a,2,Hangup()"
echo "" echo "" done
3. Regarding these two scripts, you will also be able to modify them to meet your own requirements.
4. Performing them like this: chmod a+x bulk_generate_sip.sh ./bulk_generate_sip.conf>> sip.conf chmod a+x bulk_generate_extensions.sh
./bulk_generate_extensions.sh>>extensions.conf
After finishing these steps, remember to increase context name for them. 5. Set up siptrunk. Please add these lines to the bottom of sip.conf to set up a
siptrunk. [siptrunk] type=friend
Test Report
www.openvox.cn
5
host=172.16.35.249context=from-sip ;disallow=all allow=ulaw insecure=invite secret=301 canreinvite=no fromuser=301 username=301 authname=301
Meanwhile, add this line: register=>301:[email protected] to next [general] text, it could be like this:
[general]
register=>301:[email protected] 6. Configure WinSIP.
a. It is supposed that you have already installed WinSIP.
b. Once you finished the installation, please start WinSIP and click [File] on the top of the menu tag and its sub-menu [New] to create a new call
configuration file. It will pop out a page like that:
Test Report
www.openvox.cn
6
As you can see from the [General] tag, what I want to change is [Calls], this option defines how many calls you would like to originate, and here I just take 301 (from extension 301 to 602) as an example. Other options just keep default. c. Click [Call Timers] option, a page will be seen as below.
Test Report
www.openvox.cn
7
In the above illustration, what I should change is [Initial Start Delay] option. Inmy case, I change it to “00:00:00:200”, which means that I originate 5 calls in each second.
Test Report
www.openvox.cn
8
There are a few options here, in this case, I just need to change [ID/Number] to301(extension number), and check [Address] option is my local system address. e. [Authentication] option, you have to input the username 301<Incremental>,
regarding [Password], right here, the password section depends on your sip.conf definition. If you didn’t define secret for each sip extension, then [Password] can be ignored here.
f. [Remote] option, [ID/Number] should be input the starting sip extension 301. [Address] option is a system address that used for originating calls. In this case, it is 172.16.34.244. Other options please keep default.
Test Report
www.openvox.cn
9
g. [Call Transfer] option, [ID/Number] should be input 301, and make sure [Address] is 172.16.34.244. Other tags are nothing to do with this test. Click [Apply] and [Yes] to save the configurations.
h. Click [Options] tag, and scroll it to [Settings]. Find out the [Media] sub-tag, at the Audio Capabilities section; you should select G.711 Ulaw or G.711 Alaw to the [Select] text box. Meanwhile, Outbound Audio Format should be selected G.711 Ulaw 64 kb/s or G.711 or G.711 Alaw 64 kb/s. Let other options be of them.
i. [Proxy/Register] option, at this page, make sure that [Outbound Proxy] is 172.16.34.244, register is 172.16.34.244 as well. Click [Apply] and [Yes] to confirm the settings. Read here for more settings about WinSIP.
j. After setting the relevant options, you will get the sip client ready. Starting both Asterisk system [email protected] and [email protected].
k. On the top of the tag, you will see [Mode] drop-down list, select [Initiate Calls] to originate calls from IX130 to test PC. Then, you can see all the channels’ status and how many calls have been started on the panel.
Test Report
www.openvox.cn
10
l. In command line, you can type “top” to check CPU usage ratio of Asterisk. Itis a main parameter what performance of the system. m. Write down all the related data and input to a data sheet.
Test Results
Result of Concurrent Calls On IPC110
Version
of
IPC110
Record
Channel
Number
Counts of
Concurrent
Calls
Voice of
Quality
Usages of
CPU
Types of
Hard
Disk
1.6 GHz
100
300
Good
197.90%
SATA
1.6 GHz
0
300
Good
159.10%
SATA
1.1 GHz
10
200
Good
168.90%
SATA
Test Report
www.openvox.cn
11
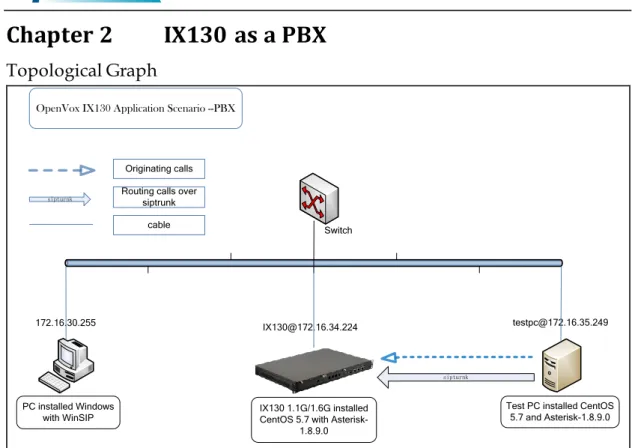
Chapter 2 IX130 as a PBX
Topological Graph
IX130 1.1G/1.6G installed CentOS 5.7 with
Asterisk-1.8.9.0
Test PC installed CentOS 5.7 and Asterisk-1.8.9.0 Switch
PC installed Windows with WinSIP
[email protected] [email protected]
172.16.30.255
sipturnk
Originating calls Routing calls over
siptrunk cable
sipturnk
OpenVox IX130 Application Scenario --PBX
Figure 2 IX130 as a PBX
In order to implement PBX functions, we suppose that IX130 have received calls from test PC. Compare to the previous case, we just change the call routing direction.
Test Results
IX130 as PBX over SIP
Version
of IPC110
Record
Channel
Number
Counts of
Concurrent
Calls
Voice of
Quality
Usages
of CPU
Types of
Hard Disk
1.6 GHz
0
300
Good
165.10%
SATA
Test Report
www.openvox.cn
12
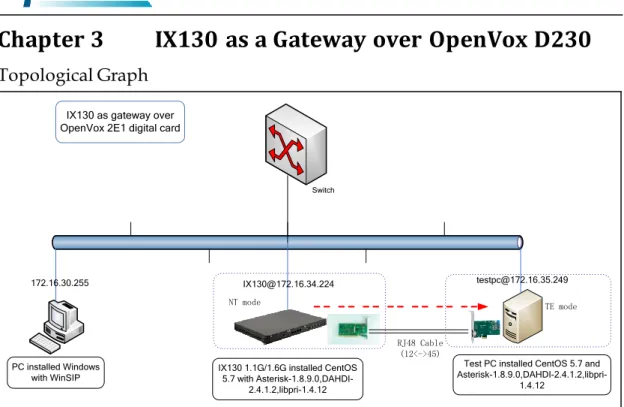
Chapter 3 IX130 as a Gateway over OpenVox D230
Topological Graph
PC installed Windows
with WinSIP IX130 1.1G/1.6G installed CentOS 5.7 with Asterisk-1.8.9.0,DAHDI-2.4.1.2,libpri-1.4.12
Test PC installed CentOS 5.7 and
Asterisk-1.8.9.0,DAHDI-2.4.1.2,libpri-1.4.12
172.16.30.255 [email protected] [email protected]
NT mode TE mode
RJ48 Cable (12<->45)
IX130 as gateway over OpenVox 2E1 digital card
Switch
Figure 3 IX130 as gateway over E1 card
In this scenario, we route calls from IX130 to test PC over OpenVox D230. And we configure IX130 as NT terminal, test PC as TE terminal. With the same method above, the test result is as follows.
Test Results
IX130 as Gateway Over 2E1 Digital Card
Concurrent
Calls
Record
Channel
Number
Version of
IX130
Voice of
Quality
CPU
Usage
Types of
Hard
Disk
Test Report
www.openvox.cn
13
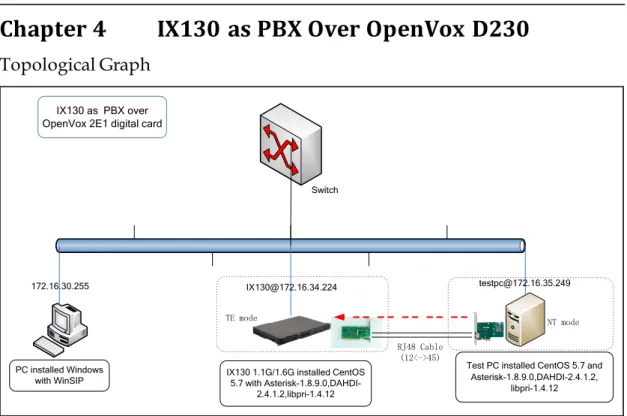
Chapter 4 IX130 as PBX Over OpenVox D230
Topological Graph
PC installed Windows
with WinSIP IX130 1.1G/1.6G installed CentOS 5.7 with Asterisk-1.8.9.0,DAHDI-2.4.1.2,libpri-1.4.12
Test PC installed CentOS 5.7 and Asterisk-1.8.9.0,DAHDI-2.4.1.2,
libpri-1.4.12
172.16.30.255 [email protected] [email protected]
NT mode RJ48 Cable
(12<->45)
Switch
TE mode
IX130 asPBX over OpenVox 2E1 digital card
Figure 4 IX130 as PBX over E1 card
In this scenario, we route calls from test PC to IX130 over OpenVox D230. Test PC sets as NT terminal, and IX130 sets as TE terminal.
Test Results
IX130 as PBX Over 2E1 Digital Card
Concurrent
Calls
Record
Channel
Number
Version of
IX130
Voice of
Quality
CPU Usage
Types of
Hard
Disk
Test Report
www.openvox.cn
14
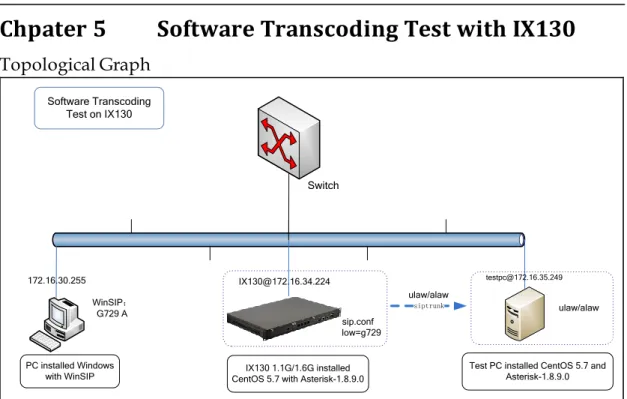
Chpater 5 Software Transcoding Test with IX130
Topological Graph
PC installed Windows
with WinSIP CentOS 5.7 with Asterisk-1.8.9.0IX130 1.1G/1.6G installed
Test PC installed CentOS 5.7 and Asterisk-1.8.9.0
172.16.30.255 [email protected] [email protected]
siptrunk WinSIP:
G729 A
sip.conf allow=g729
ulaw/alaw
ulaw/alaw
Software Transcoding Test on IX130
Switch
Figure 5 Software Transcoding on IX130
Here are some tests on the highest concurrent calls among g.711 alaw/ulaw, g722 and g.729. We download codes_g729.so binary from here.
Test Results
Transcoding on IX130
Type of codes
After
Transcoding
Concurrent
Calls
Version of
IX130
g.711
g.729
65
1.6GHz
g.722
g.729
50
1.6GHz
g.711
g.722
100
1.6GHz
Test Detail Methods
1. With regard to g.729 test, we download g729.so binary from Internet. In our case, IX130 integrates Intel Atom series of CPU, we use CentOS as Operation System, install Asterisk-1.8 on this platform. Therefore, and download
Test Report
www.openvox.cn
15
2. Change its name from codes_g729-ast-18-gcc4-glibc-atom.so to codes_g729.so,and give executing permission to it by command chmod a+x codes_g729.so. Then move it to directory /usr/lib/asterisk/modules/.
3. Set configuration files (g.729<-->alaw/ulaw).
a. sip.conf – Please add parameter allow=g729 to each extension definition. For instance, set 301 like that:
[301]
type=friend
username=301
qualify=yes
port=5060
nat=yes
host=dynamic
dtmfmode=rfc2833
context=from-internal
canreinvite=no
disallow=all
allow=g729
b. WinSIP configuration-Forward to [Option]->Media->Audio Capabilities. In these two text boxes, please select G.729 A for testing. Meanwhile, for “Outbound Audio Format” option, select “G.729 8kb/s”. The finished page will like that:
Test Report
www.openvox.cn
16
[siptrunk]
type=friend
host=172.16.35.249
context=from-sip
disallow=all
allow=ulaw insecure=invite
secret=301
canreinvite=no
fromuser=301
username=301
authname=301
d. After finishing the above three steps, you will be able to test transcoding between g.711 alaw/ulaw to g.729 in both machines.
e. Test g.722<-->g.711 by the same method above, what we have to change is the section of each sip extension in sip.conf. We must change parameter “allow” to ulaw. Meanwhile, “allow” value should be changed to g.722 in siptrunk setting of machine 172.16.34.224[sip.conf].
f. In g.722<--->g.711 test, you need to change is the section of Audio Capabilities. Please change it to g.722 so that the voice is transmitted in g.722 format over siptrunk between these two machines.
g. Install codes_g.729.so in both machines according to their CPU types in group of g.722<-->g.729 test. In my lab, my test PC’s CPU type is Pentium® Dual-Core E5300 @ 2.60 GHz. It is supposed that
codec_g729-ast18-icc-glibc-pentium4.so was the closest type of the CPU.
h. Regarding to WinSIP settings, change [audio capabilities] to g.729. And siptrunk setting of parameter “allow” should be changed to g.722.
i. With these steps, you will be able to test three groups of transcoding. Write down all data you want.