Avaya Solution & Interoperability Test Lab
Application Notes for Avaya Meeting Exchange™
Enterprise Edition 5.2 and Avaya Aura® Messaging 6.2
using Transport Layer Security and Secure Real-time
Transport Protocol with Third-party TLS Certificates -
Issue 1.0
Abstract
These Application Notes describe the steps to configure Avaya Meeting Exchange™
Enterprise Edition 5.2 and Avaya Aura® Messaging 6.2 to use Transport Layer Security (TLS) to secure SIP signaling and Secure Real-time Transport Protocol (SRTP) to encrypt media with the default Avaya TLS identity certificates replaced by new certificates generated by a third-party Certificate Authority.
Using TLS secures SIP signaling against interception and unwanted modification of SIP headers. SRTP protects the media portion of SIP calls from interception and recording by unauthorized parties. Replacing the default Avaya TLS certificates allows customers to uniquely define new identities for Avaya Meeting Exchange™ Enterprise Edition 5.2 and Avaya Aura® Messaging 6.2, further enhancing security against unwanted connections.
Avaya Aura® Messaging is Avaya’s next generation messaging product that allows users to flexibly manage their voicemail from easy to use interfaces. It offers new sophisticated capabilities and an enhanced user interface for increased flexibility and interactive collaboration between employees, partners and customers. Avaya Meeting Exchange™ Enterprise Edition 5.2 is a market-leading audio conferencing software solution optimized for IP networks. Avaya Meeting Exchange™ Enterprise Edition 5.2 integrates with Avaya Aura® Communication Manager using open standard SIP protocols and supports a broad range of conference types.
Information in these Application Notes has been obtained through Solution Integration compliance testing and additional technical discussions. Testing was conducted at the Avaya
1. Introduction
These Application Notes describe the configuration steps required to implement Transport Layer Security (TLS) for SIP signaling and Secure Real-time Transport Protocol (SRTP) for media security on Avaya Meeting Exchange™ Enterprise Edition 5.2 and Avaya Aura® Messaging 6.2. TLS adds authenticity to SIP sessions by enabling clients and servers to exchange verifiable identity certificates (Mutual Authentication) prior to engaging in encrypted communications. This offers the following security advantages:-
TLS prevents identity theft, where an interloper gains access by impersonating a trusted SIP endpoint in the network.
TLS implements signaling encryption to overcome eavesdropping (packet sniffing) and man-in-the-middle attacks (intruder interrupting the dialog or modifying the signaling data) by negotiating a dynamically generated symmetric key and using ciphers to encrypt TLS handshakes.
TLS uses X.509 certificates and cryptography to verify the identity of clients and servers, and to exchange a symmetric key (based on a shared secret) which encrypts data flowing between the parties across a network. X.509 identity certificates can be self-signed or signed by a Certificate Authority, the latter is an entity that issues digital certificates which confirm the ownership of a public key by the named subject of the certificate.
TLS operates on top of the TCP network layer. To ensure ongoing security, the connection may be renegotiated periodically.
SRTP is a variation of the standard RTP protocol with enhancements to provide message authentication and encryption, adding a layer of security to RTP. SRTP requires endpoints to agree on a cryptographic algorithm and to exchange keys prior to commencing transmission. Once secured, transmission is protected from replay attacks and alteration by unapproved sources.
SRTP uses the AES cipher to encrypt and decrypt messages and the HMAC-SHA1 algorithm to authenticate the message and protect its’ integrity.
Avaya Aura® Messaging (AAM) is a feature rich voicemail solution offering sophisticated capabilities and an enhanced user interface. Features include Unified Messaging, Speech Auto Attendant, Voice recognition and text message/email notification of voicemails.
Avaya Meeting Exchange™ Enterprise Edition 5.2 (MX) is an audio conferencing solution that uses SIP protocols to integrate with a communication network, providing enhanced features and support for event driven or ad-hoc conference types and supports integration with Lotus
2. Interoperability Testing
These Application Notes focus primarily on securing AAM and MX SIP communications with TLS and SRTP in an Avaya Aura® Communication Manager environment. Securing
administration functions (e.g., web management) are also presented where it further enhances security. It is assumed the basic configuration steps necessary to integrate AAM and MX in the communications environment have already been completed. Applicable documents are listed in the AdditionalReferences section (Section 9) at the end of this document.
Intended users of these Applications Notes should be familiar with Avaya installation procedures and necessary operating procedures. It is desirable to carry out procedures during a maintenance window as many configuration changes require restarting equipment and may result in a
temporary loss of service.
2.1. Test Description and Coverage
AAM test cases included forwarding of calls from internal and PSTN users to Avaya IP deskphones registered as SIP users on Session Manager (all using TLS and SRTP). Message notification, retrieval and deletion were also tested.
MX test cases included ad-hoc conferencing, scheduled conferencing, in-conference features (presenter/chair modes, mute/drop participants). Dial-out to both internal and PSTN users was tested.
2.2. Test Results and Observations
All test cases were successful.
Meeting Exchange 5.2 does not support shuffling when SRTP is used; all testing was performed in a non-shuffled environment (i.e., direct media only).
It was also noted the MX SRTP replay checkingfeature had to be disabled to get DTMF working for PSTN callers. See Section 6.3.
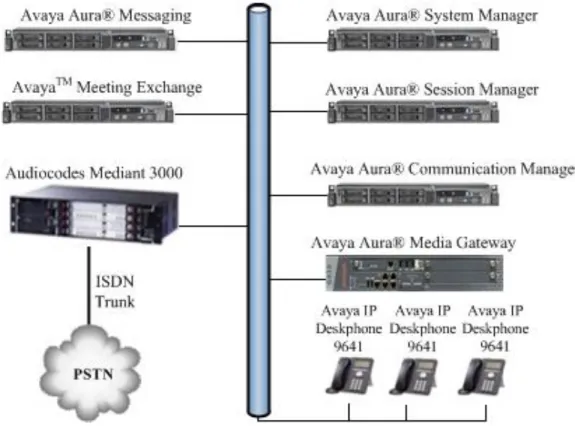
3. Reference Configuration
The diagram below shows the test configuration used. Avaya Aura® Messaging and Avaya Meeting ExchangeTM are installed in an Avaya Aura® communications infrastructure; with SIP proxy services provided by an Avaya Aura® Session Manager and PBX features supplied by an Avaya Aura® Communication Manager.
Avaya IP Deskphone 9641 users have mailboxes configured on Avaya Aura® Messaging, with the coverage feature on Communication Manager configured to route unanswered calls to Avaya Aura® Messaging.
User accounts were created on Meeting Exchange with a range of typical conferencing features.
4. Equipment and Software Validated
The following equipment and software were used for the sample configuration provided:
Equipment/Software Release/Version
Avaya Aura® System Manager on Avaya S8800 Server
Release 6.2 FP2 Version: 6.3.2.4.1399 Avaya Aura® Session Manager on Avaya
S8800 Server
Release 6.2 FP2 (6.3.2) Build 6.3.2.0.632023 Avaya Aura® Communication Manager
running on Avaya S8800 Server
Release 6.2 FP2
Version: 6.3.0.124.0-21000 Avaya Meeting ExchangeTM on Avaya
S8800 Server
5.2 SP2 plus
Bridge Patch 5.2.2.19.1 Avaya Aura® Messaging on Avaya S8800
Server
Release 6.2 SP2
Avaya 9641 IP Deskphone Avaya one-X® Deskphone SIP Release 6.3.0 Build: 96x1-IPT-SIP-R6_3_092313 AudioCodes Mediant 3000 Media
Gateway 3.0
R3.0 Firmware
Version 6.60A.026.001 Hewlett Packard Compaq 6000 Pro
Microtower PC
Microsoft Windows Server 2008 R2 Enterprise SP1 x64
5. Configure Avaya Aura® Messaging for TLS and SRTP
This procedure will demonstrate how to configure AAM to use a third-party Root Certificate which will replace the default Avaya certificate used to authenticate endpoints during TLS handshake negotiations. In addition, the default AAM identity certificate will be replaced with a new identify certificate generated by the third-party Certificate Authority (CA).
To ensure interoperation with other telecommunications endpoints, it is important to add (or replace) the new CA certificate on all SIP endpoints and on all other Avaya Aura® components such as Session Manager and Communication Manager in the communications network.
This procedure assumes basic AAM configuration has been carried out prior to implementing these steps.
5.1. Configure new Third-party Certificate on Avaya Aura® Messaging
Obtain a copy of the new third-party CA certificate from the telecommunications systems administrator. Use a Secure File Transfer Protocol (SFTP) client, such as Filezila or WinSCP, to connect to the AAM server IP address (using the administrator account). Copy the third-party Root CA Certificate from a local computer to the directory /var/home/ftp/pub on AAM.
Using a SSH terminal emulator application, (e.g., PuTTY), connect to AAM (not shown). Log into AAM using the administrator username and password. Enter the following command at the prompt:
tlscertmanage –I <third-party> </var/home/ftp/pub/third-party.pem>
where <third-party> is a descriptive name for the new CA certificate and
</var/home/ftp/pub/third-party.pem> is the full path and name of the .pem file copied from the local computer to AAM.
This command adds the new CA certificate into the AAM certificates store. It must be activated before it will be used for TLS.
Certificates certificate.key third-party.pem certificate.cer certificate.pem third-party.pem NextProject\Certs_PostApril2nd\
Logon to AAM using a web browser (Mozilla Firefox supported) and the administrator account (not shown). Select the Server (Maintenance) page from the Administration menu.
From the side menu, select SecurityTrusted Certificates and then click Add.
A new page opens. In the text box, enter the name of the CA .pem file previous installed (i.e.,
third-party.pem) and click the Open button.
The Trusted Certificates page opens. This page manages the installed trusted certificates and configures what services can use these certificates. Some information about the CA certificate is displayed, including Issued To, Issued By and Expiration Date. Type the third-party certificate name in the text box (third-party.pem) and check all the check boxes.
When ready, click the Add button.
The new trusted CA certificate is now added to AAM’s trusted certificates store and has been configured to authenticate against all services.
third-party.pem rootCA rootCA
5.2. Create a Certificate Signing Request for Avaya Aura® Messaging
The previous step added a new CA certificate to AAM. AAM also needs a new TLS identity certificate that is signed by the same CA. The new TLS identity certificate will be offered to clients/servers during TLS negotiations and will be authenticated by endpoints using their own root CA certificates. The first step is to generate a Certificate Signing Request (CSR) for AAM. Logon to the AAM Server using a web browser; select the Server (Maintenance) page from the
Administration menu. On the side menu, select SecurityCertificate Signing Request. Click on the New Request button (not shown). The Certificate Signing Request – Form opens. Complete the fields with appropriate values, as shown below. Select RSA Key size of 2048. Click the Generate Request button when ready.
US Colorado Denver
A new page opens showing the CSR. Copy all the text from ---BEGIN CERTIFICATE REQUEST--- up to and including ---END CERTIFICATE
REQUEST---Copy the text to a text editor (e.g., Notepad) and save the file as aam_csr.pem. When ready, click the Continue button (not shown).
The CSR is now ready for signing by a third-party CA. The signed CSR will later be imported into AAM to complete the procedure.
5.3. Sign the Avaya Aura® Messaging Certificate Signing Request
using a Third-party Root CA Server
There are many variants of root CA servers; the following procedure uses a Microsoft root CA server. Using a web browser, logon to the root CA server. A typical URL might be as follows:
https://<FQDN_of_certificate_server>/certsrv
If the administrator has not logged in previously, an access error occurs and administrator is required to enter appropriate login credentials in a Windows Security dialog box. Press the OK
button when ready.
The CA server home page opens. Click on the Request a certificate link.
On the next page (not shown), click the advanced certificate request link and a new page opens. Open aam_csr.pem created in Section 5.2 using Notepad and paste the contents into the
Saved Request: text edit box ensuring all text is copied. In the Certificate Template: area, select an appropriate template (e.g., Webserver-Enterprise) from the drop-down menu. Click on the Submit > button.
The CertificateIssued page opens. Ensure the Base 64 encoded radio button is checked. Click the Download certificate link, a file selector opens allowing the file to be saved. Save the file with a .cer extension and a descriptive name, e.g., aamsigned.cer.
5.4. Import the Signed Certificate into Avaya Aura® Messaging
Copy the signed certificate file aamsigned.cer to the /var//home/ftp/pub directory on AAM (see Section 5.1 for information on how to do this step).
On the AAM Server, select the Server (Maintenance) page from the Administration menu. Select SecurityServer/Application Certificates. Click the Add button.
In the next page (not shown), enter the name of the signed certificate file aamsigned.cer. Click the Open button. On the next page check all the Certificate Repositories and click Add.
Restart the AAM Server to complete the certificate installation.
5.5. Configure Avaya Aura® Messaging Telephony Integration
With new TLS certificates installed, AAM must be configured for TLS and SRTP (if not already done). The following procedure will show the important TLS and SRTP configuration settings. Using a web browser, logon to AAM (see Section 5.1) and select Messaging from the
Administration drop down menu. Select Telephony Settings (Application) Telephony Integration.
Configure the Basic Configuration values as shown in the red box. Ensure all ports are 5061. The IP addresses for Connection 1 and Connection 2 are the Session Manager(s) SM100 IP addresses. The SIP Domain value for both Messaging and Switch will be the same as the Session Manager SIP Domain.
192.168.1.64 192.168.1.66
192.168.1.133 2
Scroll down the page and click on the Show Advanced Options button (not shown). A new configuration area opens.
Ensure Media Encryption is using the same encryption algorithm as Communication Manager and that Media Encryption DuringCapNeg is Enabled. Click the Save button when ready. Restart the AAM server.
This completes configuration of Avaya Aura® Messaging for TLS and SRTP with third-party certificates.
6. Configure Avaya Meeting Exchange
TMfor TLS and SRTP
using Third-party Certificates
Since Avaya Meeting ExchangeTM 5.2 does not have a Web or GUI interface, configuration changes are made by editing text files and saving the new configuration to the MX server. The following procedure shows how to configure MX for TLS and SRTP using third-party
certificates.
6.1. Add a Trusted Root Certificate to Avaya Meeting Exchange
TMMX stores trusted root certificates in a certificate bundle (large flat file). To add a new certificate authority certificate, the certificate must be copied into the certificate bundle.
Certificates trusted by MX are stored in /usr/local/ssl/certs/CAcert.pem.
If only one trusted root certificate is being used, the trusted root CA certificate can replace CAcert.pem.
Obtain a copy of the root CA certificate used in Section 5.1 (third-party.pem) and open the file in a text editor (e.g., Notepad). Log into the MX command line interface using a SSH client (e.g., PuTTY or similar) using the craft account. Issue the command susroot and enter the sroot
password.
Issue the command:
vi /usr/local/ssl/certs/CAcert.pem
Paste the contents of third-party.pem to the bottom of the file.
Alternatively, clear all text from CAcert.pem and paste third-party.pem into it. Save CAcert.pem.
Restart MX bridge using the command:
6.2. Create new Private Keys and Generate a Certificate Signing
Request for Avaya Meeting Exchange
Log into MX Command Line interface as in Section6.1 as craft and su to sroot.
Copy the original certs and keys in /usr/local/ssl/certs to new files as backup using the following Linux commands: cd /usr/local/ssl/certs cp CliCert1.pem CliCert1.backup.pem cp ServCert1.pem ServCert1.backup.pem cp CliKey1.pem CliKey1.backup.pem cp ServKey1.pem ServKey1.backup.pem
Create a new private key called CliKey1.pem with password CliKey1.
Note: this is a default password and it must match the passphrase in the MX tlsdef.h header file. Create a CSR using CliKey1.pem private key. OpenSSL will be used to perform these actions, type the following at the command prompt:
openssl req -out MXCert1.csr -new -newkey rsa:2048 -nodes -keyout CliKey1.pem
Enter the various Certificate details when prompted (e.g., US, Colorado, Denver, etc.). Ensure the MX server FQDN is used for the common name.
Enter a passphrase for the private key (take note of this).
Create a new private key called ServKey1.pem with password ServKey1 (matching the passphrase in the header file) and create a CSR using ServKey1.pem private key:
openssl req -out MXServCert1.csr -new -newkey rsa:2048 -nodes -keyout ServKey1.pem
Enter the various Certificate details when prompted.
There are two CSR’s generated. Get both CSRs signed by the third-party CA, using the procedure described in Section 5.3.
Copy the signed certs back into /usr/local/ssl/certs directory (using SFTP or similar) on MX and rename them as ServCert1.pem and CliCert1.pem.
6.3. Configure Avaya Meeting Exchange
TMfor TLS and SRTP
MX may already be configured for TLS and SRTP. Use the following procedure to verify the configuration files. Logon to MX using a SSH client (PuTTY or similar) and su – sroot. Issue the command:
vi /usr/ipcb/config/system.cfg
Locate the following sections and ensure sips is being used, transport=tls and the port values is
5061.
# request we will be listening to
MyListener=sips:[email protected]:5061;transport=tls
# if this setting is populated will Overwrite the contact field in responses respContact=sips:[email protected]:5061;transport=tls
Issue the command:
vi /usr/ipcb/config/softMediaServer.cfg
Locate the following section:
#SRTP config
Ensure the settings are as shown here.
# [description: Whether or not SRTP should be used for audio streams. 0 = disabled 1 = enabled.]
# [type: int] # [runtime: false]
securityEnabled=1
# [description: Encryption and Authentication algorithms to use for SRTP with RTP.]
# [type: string] # [runtime: false]
Issue the command:
vi /usr/ipcb/config/audioPreferences.cfg
Examine the list of codecs and ensure the values match the codecs offered by other SIP endpoints in the communications infrastructure.
# audioPreferences.cfg
# This table is an ordered list of MIME subtypes specifying the codecs
# supported by this media server. The list is specified in the order in which # an SDP offer will list the various MIME subtypes on the m=audio line.
# For static payload type numbers (i.e. numbers between 0 - 96) please use # the iana registered numbering scheme.
# See: http://www.iana.org/assignments/rtp-parameters mimeSubtype payloadType Performance
PCMU 0 10 PCMA 8 10 #G722 9 85 G729 18 118 #iLBC30 97 140 #iLBC20 98 140 #wbPCMU 102 10 #wbPCMA 103 10 telephone-event 101 10 #iSAC 104 150 G726_16 105 54 #G726_24 106 54 #G726_32 107 54 #G726_40 108 54
Issue the command:
vi /usr/ipcb/config/softMediaServer.cfg
Add the following lines to the end of this file
# disables the MX SRTP replay checking (wi01021987)
srtpPacketReplayChecking=0
Issue the command:
service mx-bridge restart
Verify PSN100178 has been applied to MX server. See Section 9 for more information.
7. Verification Steps
7.1. Avaya Aura® Messaging
Place a call from an internal station to another internal station. Allow the call to go to coverage. Confirm the call diverts to AAM and the mailbox prompts are correct. Leave a voice message for the user.
On hang-up, confirm the called user’s message waiting lamp illuminates. Using the called phone, place a call to AAM, login to the user’s mailbox and listen to the message. Delete the voice mail, confirm the message waiting lamp extinguishes.
Repeat the above sequence except place the call from a PSTN location.
Logon to Avaya Aura® Session Manager using a SSH client and the craft account. At the command line, enter the following command:
traceSM –uni –dt (hit the enter key)
Place a call to an internal station from a PSTN phone and allow it to go to coverage.
Observe the outgoing call to AAM on the SIP trace. Confirm the call is using SIPS and the SDP
contains information on cryptographic options.
Logon to Avaya Aura® Communication Manager using the SAT interface (craft account) and enter the following command:
status trunk x (where x is the SIP trunk between Communication Manager and Session Manager). Page through the screens until the active trunk member is located. In the example below, member 0002/032 is active.
status trunk 2 Page 3 TRUNK GROUP STATUS
Member Port Service State Mtce Connected Ports Busy
0002/029 T00035 in-service/idle no 0002/030 T00036 in-service/idle no 0002/031 T00037 in-service/idle no
Issue the command status trunk 0002/032 and scroll to Page 3. Observe the SRTP encryption scheme in use, it should be as configured in Section 5.5.
status trunk 0002/032 Page 3 of 3 SRC PORT TO DEST PORT TALKPATH
src port: T00038
T00038:TX:192.168.187.37:35010/g711u/20ms/1-srtp-aescm128-hmac80
T00050:RX: 192.168.187.120:37118/g711u/20ms/1-srtp-aescm128-hmac80
7.2. Avaya Meeting Exchange
TMUsing a selection of stations (internal and PSTN), dial into a conference.
Confirm all users can hear each other and that bridge functions such as mute work.
Logon to Avaya Aura® Communication Manager using the SAT interface (craft account) and enter the following command:
status trunk x (where x is the SIP trunk between Communication Manager and Session Manager). Page through the screens until the active trunk member is located. In the example below, member 0002/032 is active.
status trunk 3 Page 3 TRUNK GROUP STATUS
Member Port Service State Mtce Connected Ports Busy
0003/11 T00007 in-service/idle no
0003/12 T00008 in-service/active no T00015
Issue the command status trunk 0003/032 and scroll to Page 3. Observe the SRTP encryption scheme in use; it should be as configured in Section 6.3.
status trunk 0002/032 Page 3 of 3 SRC PORT TO DEST PORT TALKPATH
src port: T00038
T00012:TX:192.168.187.37:35010/g711u/20ms/1-srtp-aescm128-hmac80
8. Conclusion
These Application Notes describe how to configure Avaya Aura® Messaging and Avaya Meeting ExchangeTM to use Transport Layer Security and Secure Real-time Transport Protocol as a security enhancement for networks that require high immunity from message interception and modification. One issue was found with Avaya Meeting ExchangeTM and DTMF from PSTN callers, see Section2.2 for details.
9. Additional References
Further Avaya Product documentation relevant to these Application Notes may be available at
http://support.avaya.com.
[1] Administering Meeting Exchange™ Servers Release 5.2.2 February 18, 2013 04-603708 Issue 1.
[2] Configuring Avaya Aura® System Manager 6.2 FP2 and Avaya Aura® Session Manager 6.2 FP2 to use Third-Party Security Certificates for Transport Layer Security.
[3] Administering Avaya Aura® Messaging Release 6.2 Issue 2.2 December 2013
[4] Administering Avaya Aura® System Manager Release 6.3 07 Oct 2013 [5] PSN100178 Oct 2013. See link below:
https://support.avaya.com/public/index?page=content&id=PSN100178&group=UG_PUBLIC
[6] RFC 5246 - The Transport Layer Security (TLS) Protocol - Available from http://www.ietf.org/
[7] RFC3711 - The Secure Real-time Transport Protocol (SRTP) - Available from http://www.ietf.org/
©2014 Avaya Inc. All Rights Reserved.
Avaya and the Avaya Logo are trademarks of Avaya Inc. All trademarks identified by ® and ™ are registered trademarks or trademarks, respectively, of Avaya Inc. All other trademarks are the property of their respective owners. The information provided in these Application Notes is subject to change without notice. The configurations, technical data, and
recommendations provided in these Application Notes are believed to be accurate and
dependable, but are presented without express or implied warranty. Users are responsible for their application of any products specified in these Application Notes.
Please e-mail any questions or comments pertaining to these Application Notes along with the full title name and filename, located in the lower right corner, directly to the Avaya Solution & Interoperability Test Lab at [email protected]