Order Management
Oracle FLEXCUBE Private Banking
Release 12.0.2.0.0
Part No. E49767-01
September 2013
Table of Contents
1. Preface
... 1-1
1.1 Introduction... 1-1
1.1.1 Key Benefits: ... 1-1
1.2 Scope ... 1-1 1.3 Audience... 1-1 1.4 Documentation Accessibility... 1-1 1.5 Organization of the Document... 1-1 1.6 Conventions Used ... 1-2
2. Equity Order Management ... 2-1
2.1 Equity Order Capture... 2-3
2.1.1 Focussed List PoPUp ... 2-11
3. Mutual Fund Order Management ... 3-1
3.1 Mutual Fund Order Capture - Subscription ... 3-1 3.2 Mutual Fund Order Capture - Redemption ... 3-8 3.3 Mutual Fund Order Capture - Transfer ... 3-12 3.4 MF Sys Plan Cancellation ... 3-14
4. Order Management for Insurance ... 4-1
4.1 Insurance Order Capture... 4-1
5. Order Management for Deposit ... 5-1
5.1 Deposit Order Capture - Booking ... 5-1 5.2 Deposit Order Capture – Rollover ... 5-6 5.3 Deposit Order Capture – Pre-mature Uplift ... 5-9
6. Order Management for Bonds ... 6-1
6.1 Bonds Order Capture: Buy ... 6-1 6.2 Bond Order Capture: Sell ... 6-9
7. Order Management for Commodities ... 7-1
7.1 Commodities Order Capture: Buy ... 7-1 7.2 Commodity Order Capture: Sell ... 7-7
8. Structured Products Order Management ... 8-1
8.1 Structured Products Order Capture - Buy ... 8-1 8.2 Structured Products Order Capture: Sell... 8-9
9. Order Management for PMS ... 9-1
9.1 PMS Order Capture: Buy... 9-1 9.2 PMS Order Capture: Sell... 9-5
10. Futures Order Management ... 10-1
10.1 Futures Order Capture ... 10-1
11. Options Order Management ... 11-1
11.1 Options Order Capture ... 11-1
12. Order Management for Forex ... 12-1
12.1 Forex Order Capture ... 12-1
13. Common Order Book ... 13-1
13.1 Cancellation of Orders – Rejected by External Source ... 13-6
14. Bulk Orders ... 14-1
14.2 Placement of Orders... 14-2
15. Order Bulking ... 15-1
1. Preface
1.1 Introduction
The objective of the current user manual is to clearly describe the functions available for Order Management feature of FCPB. Capabilities in this module include:
Pre-trade Compliance checks Order Origination
Order Tracking Order Bulking
Corpus Report generation and Bulk Order placement
Though this manual covers order management for all products available in FCPB, only those specific product types under order management are available to the bank as per the products licensed to the bank.
1.1.1 Key
Benefits:
Comprehensive instrument coverage for capturing the transactions for all security types Full support for multi-currency transactions
Pre-trade compliance checking
Electronic order routing and trade execution Supports online review of transaction history
1.2 Scope
The intention of this User Manual is to provide a comprehensive guide to the RM of the system. It can also be used as a trouble-shooting guide.
1.3 Audience
The potential readers of this document include but not limited to 1. The Relationship Manager and other users of the system. 2. Top and middle management executives.
3. Developers, database designers of the system for their reference. 4. Product and Functional teams
1.4 Documentation
Accessibility
For information about Oracle's commitment to accessibility, visit the Oracle Accessibility Program website at http://www.oracle.com/pls/topic/lookup?ctx=acc&id=docacc.
1.5
Organization of the Document
The Manual is organized into the following six chapters:
1.6 Conventions
Used
This sub-section explains the conventions followed in the preparation of the manual.
Chapter 2 Equity Order Management – Helps to understand the order management for Equity. Chapter 3 Mutual Fund Order Management - Helps to understand the order manage-ment for Mutual Funds. Chapter 4 Order Management for Insurance – Helps to understand the order man-agement for Insurance. Chapter 5 Order Management for Deposit – Helps to understand the order manage-ment for Deposits. Chapter 6 Order Management for Bonds - Helps to understand the order manage-ment for Bonds. Chapter 7 Order Management for Commodities - Helps to understand the order man-agement for Commodities. Chapter 8 Structured Products Order Management - Helps to understand the order management for Structured Products. Chapter 9 Order Management for PMS - Helps to understand the order management for PMS. Chapter 10 Order Management for Futures - Helps to understand the order manage-ment for Futures. Chapter 11 Order Management for Options - Helps to understand the order manage-ment for Options. Chapter 12 Order Management for Forex - Helps to understand the order manage-ment for Forex. Chapter 13 Common Order Book - Helps to understand the status of each order initi-ated by the RM. Chapter 14 Bulk Orders - Helps to understand the bulk order processing.
Chapter 15 Order Bulking - Helps to understand the clubbing of orders into a single order.
Text Description
Example Illustration of the concept
Bold Letters Command buttons or important text
2. Equity Order Management
Note
Please note that this feature would be available to you only if your license entitles you to Traded Securities module.
Description:
Equity represents a share of ownership in a corporation. As a unit of ownership, equity typically carries voting rights that can be exercised in corporate decisions. An owner of a company's equity is also entitled to share in the profits of that company. This participation usually takes place in two ways:
1. A dividend (distribution of earnings) paid by the company to the share owners
2. An appreciation in the price of the stock (capital gain) generated by the future prospects of the company
Equity has no maturity date; the shareholders are entitled to these earnings for as long as they own the shares and the company is in business.
Equity Markets:
An equity (or stock) market is the place where companies issue shares of stock and investors purchase and sell these shares. These markets usually have three types of participants: 1. Investors
2. Issuers
3. Financial intermediaries: brokers and dealers
Essentially, investors have capital and need opportunities to invest; issuers need capital. Brokers and dealers are financial intermediaries. Brokers arrange for the issuers and investors to complete a deal; dealers purchase securities from issuers and sell them to investors.
Equity Market Transactions
There are essentially three types of transactions in the equities market: 1. An initial public offering,
2. A seasoned offering (both 1 and 2 are primary market transactions), and 3. An investor-to-investor sale of securities.
Primary Market Transactions
Initial Public Offering (IPO): In an initial public offering, a privately-held company offers shares in the company through the equity markets for the first time. This is often referred to as "taking a company public."
Seasoned Offering: A company offers additional shares to investors after the initial public offering. This is called a "seasoned" offeringbecause shares of the company have been listed on an exchange and have been trading for some time.
IPOs and seasoned offerings are referred to as primary market transactions because companies sell stock directly to investors.
Note
FCPB currently does support for purchasing securities through IPO.
Secondary Market Transactions
Investor-to-investor Transactions: The third type of equity market transaction is the sale of a company's stock by one investor to another. The company does not receive or pay any money in this transaction, so it is often referred to as a secondary market transaction. For example, if one investor sells 100 shares of General Motors stock to another investor through an exchange, it is considered a secondary market transaction and has no effect on General Motors' balance sheet.
There are various methods of buying stocks in the secondary market. The most common means is through a stock broker. Most trades are actually done through brokers listed with a stock exchange. There are several markets (or exchanges) to buy and sell equity securities. A company's stock must be accepted for trading, or "listed," on a particular exchange. This acceptance is based on the ability of the company to meet certain minimum size requirements and also on the amount of capital the company has raised in the public markets.
Selling stock is procedurally similar to buying stock. Generally the investor wants to buy low and sell high, although a number of reasons may induce an investor to sell at a loss, e.g., to avoid further loss.
Investor can enter the orders using FCPB that can get executed either manually using execution screen or using an external third party order management system. Using Order book feature, Investors can track entered orders, modify selected order attributes or cancel the order based on execution/matched status.
FCPB provides flexibility to the investors in selecting time conditions for each order among available time conditions like Good till day, Immediate or cancel and applicable order types like Market Order, Stop Loss Order, Limit Order while placing orders.
Note
Every order initiated through the FCPB will have a unique transaction id associated to it. The FCPB assumes that this identification would be a common interfacing attribute be-tween the external broker system and the FCPB.
Note
If updating the risk score is mandatory in the bank parameters screen, then risk score of a client needs to be updated in FCPB before placing any order, else the system will display error and the user will not be able to place orders. This is applicable to all order capture screens.
Note
Exception approval can be taken from the designated authorities to place an order when the risk profile of the client is not updated and the approval is valid only for a day.
Note
Any order placed from customer login will display an order confirmation screen.
Note
If the restrictions are found while placing the order, system does not allow the user to place the order and displays an appropriate error message using the exception framework. These restrictions are validated only for Buy and SIP orders.
2.1 Equity
Order
Capture
User Access levels:
RM: RM can place orders for RM Managed, Self Managed, and Discretionary portfolios. ‘Portfolio Name’ field displays the list of Self Managed, RM Managed, and Discretionary portfolios based on the set up done for each portfolio type at the Admin level. Only portfolios for which – ‘Allow in OMS – RM’ is set to ‘Y’ " , gets displayed in the list
Screen:.
Figure 2.1: Equity Order Capture Screen
Screen Navigation:
Entry to the screen:
Option 1
Select the “Order Management” option on the main menu
Note
In case, you proceed to the Maintenance screen without selecting a customer, the system will force you to select a customer in the customer selection screen before automatically guiding you back to the Portfolio Management screen.
Rules for Commencement of an Order:
Orders can be placed only for customers in active status.
For initiating an order the customer should have either an RM portfolio or a Self
Managed portfolio coupled to his id.
The electronic trading account identification of the customer also needs to be updated
in the FCPB prior to initiating an order.
Similar to the electronic account information the customer also needs to include the
particulars of his bank account in the FCPB prior to order initiation.
Procedure for Placing of an Order:
Step 1:
If the user is navigating to the Order Capture screen for the first time after logging in to the system, the system forces to select a customer in the customer selection screen.
On the other hand, if the user is navigating to the screen from any other screen, the system auto-populates the name, no. and default portfolio name of the customer which is already in context.
Note
To change the customer, the user needs to click on the icon located at the top right hand side corner of the screen.
If the Income Tax ID Required and Risk Profiler Mandatory options are set to Yes in the Instrument Type screen of Admin login and the corresponding details for the selected customers are not updated, then the system displays the appropriate messages and will not allow the user to place the order.
Step 2:
RM – Subsequent to selecting the customer, the Portfolio Name drop-down list defaults to the default portfolio of RM Managed portfolio type. It is mandatory for the RM to decide on the appropriate portfolio prior to placing the order.
Step 3:
Click the icon next to the Source Code field.
When the user clicks on the icon next to the Source Code field, the Banker Source Code Search window appears. Enter the appropriate search criteria in the respective fields to search for the Source Code.
Step 4:
When the user clicks on the icon next to the Lead Generation Code field, the Banker Lead Code Search window appears. Enter the appropriate search criteria in the respective fields to search for the Lead Generation Code.
Step 5:
The subsequent step is to capture the security details. For placing the order, the user has to select the security and the exchange in which he wants to transact.
The user can select the security by using icon as explained in general characteristics section.
Note
The security search screen displays only securities which are in open status and which are approved by the bank. Securities which are suspended from trading will not be displayed in the search screen.
The user can view the Recommended instruments, Focussed instruments, House Views details and Instrument Analytics details by clicking on the respective icons next to the Security ID field as explained in General Characteristics section.
On picking a security through the search screen, the security name and currency get displayed in the subsequent ‘Security Name’, ‘Currency’, ‘Settlement Currency’, ‘Last Traded Price’, ‘Security Sub Type’, ‘Holding Quantity’ and Custody Fee fields in the order screen.
Step 6:
A company may have its stock listed on more than one exchange. Hence on selecting the security all the exchanges in which the security is listed are displayed in the drop down list. The user has to decide on the exchange before proceeding with entering the order particulars. The information of the exchanges in which the security is listed is updated by the administrator in the Instrument Exchange reference table.
Step 7:
Select the appropriate Trade Date and Settlement Date using the calendar icon.
The system validates the Trade Date selected by the user against restriction validity period and if it falls within that period, system displays an appropriate error message at the time of submitting the order.
Similarly, the FCPB system also validates the Trade Date against the restriction validity period for the Instrument Types Commodity, Bonds, Structured Products and Forex. In case of Mutual Fund, Insurance, PMS, Futures and Options instrument types, system validates the System Date against the restriction validity period.
In addition, if the Trade Date falls on the system holiday or exchange holiday the system gives an appropriate warning message, however it still allows the user to proceed further.
If the Settlement Date falls on the currency holiday then the system gives the appropriate error messages and auto-rollover the date to next valid business date while for system and exchange holidays the system gives the appropriate warning messages enabling the user to proceed further.
Note
The system validates Order Capture screens of all Instrument types for Trade and Settle-ment Dates and displays the appropriate messages.
Step 8:
The primary step in initiating an order is to opt for a type of transaction. The user can place either the bid/ask (buy/sell) order. While there is no restriction on the buy transaction, the sell transaction is restricted to the extent of balance quantity available for the security in the portfolio of the selected customer.
For multiple sale orders initiated on the same business day for a particular security within a portfolio for a customer under consideration, the balance quantity is construed by considering both the current holding of the customer as well as the quantities against the orders which are in open status (All the orders initiated by the users are said to be in ‘open’ status till the moment, they are transformed into any other status. The different order statuses are discussed in the next section)
For E.g.:
Total Holding = 1000 shares
Sale Transaction Ordered = 100 Executed = 10
Holding = 1000-10 = 990
Balance qty available for initiating sale = Holding – open qty = 990 – 90 = 900
Total Holding = 1000 shares
Sale Transaction Ordered = 100 Executed = 10 Cancelled = 90
Holding = 1000 -10 = 990
There are no orders in open status and hence the entire 990 is available to the user to initiate a sale transaction.
Step 9:
FCPB allows users to enter orders with various conditions attached to them as per their requirements. The conditions are broadly divided into Time conditions, quantity conditions and price conditions. Several combinations of the above are allowed thereby providing flexibility to users. The price conditions provided as a drop down list in the ‘order type’ field are summarized below:
Market Order: Market orders are orders for which price is specified as ‘Mkt’ at the time
order is entered. For such orders the trading system determines the price and hence the price field gets disabled on selection of this option. The screen displays this type of order as default order.
Note
For Market Order, the system should default the Time Condition field to GTC.
opting for the stop loss condition, the user has to enter both the trigger price in the ‘Trigger Price’ field and as well as the price in the ‘Price’ field. If the price is not specified, the trigger price is taken as the price for the order. The trigger price and the price mentioned should be in multiples of the tick size for that particular security and within the day’s minimum/maximum price range.
A sell order in the stop loss book gets triggered when the last traded price in the market reaches or falls below the trigger price of the order. On the other hand, the buy order in the Stop Loss book gets triggered when the last traded price in the normal market reaches or exceeds the trigger price of the order.
Example: If for stop loss buy order, the trigger price is Rs.93.00, the price is Rs.95.00 and the market (last traded) price is Rs.90.00, then this order is released into the system once the market price reaches or exceeds Rs.93.00.
Limit Order: On opting for this option, the user has the flexibility to enter any desired
price. If a user mentions a price, it should be in multiples of the tick size for that particular security and within the day’s minimum/maximum price range.
Note
For Limit Order also the system should default the Time Condition field to GTC.
IPO: If the system date is in the range of the selected instrument’s ‘New Issue Start
Date’ and ‘New Issue End Date’, then the instrument qualifies as an IPO. Once the instrument selected is classified as an IPO,
– Transaction should be defaulted to BUY – Order Type should be defaulted to IPO – Time condition should be defaulted to GTC – All the above fields should be disabled.
If the issue start and end date is null or if the issue end date is less than the current system date for the selected instrument then the user should not be allowed to place an Order Type IPO and it should display an error message as ‘Selected instrument is not available for IPO subscription.
The system also displays the Fee amount applicable for the given customer in the Transaction Fee display field. If no fee is applicable, it does not display any value in this field.
Step 10:
After selecting the ‘Order Type’, the user proceeds to enter the quantity for the transaction. Quantity mentioned should be in multiples of regular lot size for that security. To recap, for a sell transaction, the user will be restricted to the extent of balance quantity available in the security.
If the selected instrument does not follow the Model asset allocation for the customer, the system displays the message as ‘Model asset allocation is deviated. Do you want to proceed?’ The user can click the OK button to continue.
If no risk score is defined for the customer then there will not be any model asset allocation and hence system will not display any message.
Step 11:
Depending on the type of order selected the price field will be enabled or disabled. To summarize what we discussed, the price field will be enabled only for the Limit price and Stop Loss type of order. For the Limit price order the user can overwrite the market price with any
other desired price and in case of stop loss orders, a user has the flexibility of specifying a limit price along with the trigger price. The price should be quoted in multiples of the tick size.
Step 12:
To reiterate, the FCPB provides users with the flexibility of placing orders with Quantity conditions. An order with the Disclosed quantity order condition allows the user to disclose only a portion of the order quantity to the market.
For e.g.:
Order quantity = 10000 Disclosed quantity = 2000
Only 2000 are disclosed to the market.
The disclosed quantity should be less than equal to the order quantity. After this quantity is fully matched, a subsequent quantity of 2,000 is disclosed.
Step 13:
The trigger price field will be enabled on selection of the Stop Loss order. It is mandatory for the user to enter a value in this field, on selection of the stop limit price condition.
Step 14:
The user can set either of the following time conditions for his order. On accessing the screen, the field defaults to the Timed Order condition:
Timed Order: If the order is time bound, user needs to enter the date on which the order
should expire. By default, system considers the system date or current business date whichever is later as the order expiry date. On the date of order expiry, the system lapses the Active Timed Order. In this case, the expiry date has to be a valid business date i.e. the user needs to check for holiday master for System, Exchange or Currency holiday. In case, the expiry date falls on any of the holidays, the system displays an error message on the screen and next valid business date for order processing is displayed on the screen.
All Timed orders which have an expiry date can be renewed by the user. The system displays an alert message in the Alerts portlet of dashboard to the internal users before order expiry. The user can then choose to renew the order expiry date or make no changes. The system displays the order status of the expired order as ‘Expired’ in the order book.
IOC: An immediate or cancel order allows the user to buy or sell a security as soon as
the order is initiated, failing which the order will be cancelled by the broker’s (trading) system. Partial match is possible for the order, and the unmatched portion of the order will be cancelled immediately by the broker system.
Step 15:
The final step before submitting the order is to decide on the trading account details displayed in the drop down lists. These lists are displayed in the corresponding fields of the ‘account details’ section. The user needs to pick the DP Id, the customer id and the bank account number from the list of values displayed in the dropdown of the corresponding fields.
Note
The Bank Accounts drop-down list displays the bank accounts concatenated with the cor-responding bank currency.
If the instrument currency, settlement currency and bank account currency are different and post FX rate conversion if the bank account does not have sufficient funds to process the order, the system displays an appropriate error message on submission of the order.
Note
If the selected portfolio is of type Discretionary, the system defaults the Bank Account drop-down list to the bank account no. attached to it at the time of portfolio creation. The option is also provided whether the bank would prefer to do orders only in Omnibus account and / or allow trades in individual accounts also. An Omnibus Account is a pool account which has transactions of multiple clients. The user can select the appropriate account based on the flag selected at Instrument Type level and applicable for all Instrument Types.
Note
In case if the omnibus account number does not have a hyphen separated value (DP id – Client id); on click on order submit the order will not get saved and an error message will be displayed.
Note
FCPB assumes that the trading account utilized for transacting through FCPB would not be employed by the customer to make any transactions outside the FCPB system.
Step 16:
After entering all the fields in accordance to the outline given in the above steps, the user can proceed to click on the Submit button.
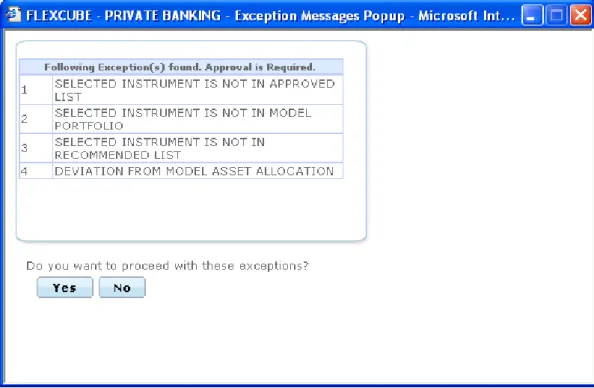
Once the user clicks on the Save button, system displays the Exception pop-up window if the order to be placed violates certain conditions such as
Selected instrument is not in Approved List Selected instrument is not in Model Portfolio Selected instrument is not in Recommended List Deviation from Model Asset Allocation
Trigger Price more/less than ‘x%’ of the LTP (where ‘x’ is the no. which is configurable) Bank A/C CCY and Settlement CCY are different.
Not enough balance to place the order.
Instrument Restriction for client country of domicile
Note
When such exceptions occur, the system collects all the exception levels and saves the order with maximum exception level.
If the maximum exception level is higher than logged in user’s exception level, the system displays a pop-up with all the exception messages, with caption “Exception Approval Required.”
Screen:
Figure 2.2: Equity – Exception Popup Window
If the user clicks ‘Yes’, the order goes for exception approval.
If the maximum exception level is less than then logged in user’s exception level, then the system displays the popup with all the exception messages. If the user clicks ‘Yes’, the order goes to checker for approval, if required.
In case any exception having exception level ‘99999’, the system displays the hard error. Hence the user will not be able to place the order.
Note
This Exception Approval process is similar for all instrument types and hence is not repeat-ed for all Order Capture screens.
Note
The ‘Pending for Authorization’ Orders would be displayed to RM’s having Roles with Or-der Checking Approval function.
Note
Depending on the given permissions, RM can approve Exceptions OR Order-checking OR perform Both OR Nothing at instrument type level.
Scenarios in Order Capture (All instrument types) – Exception Approval &
Or-der Approval
While Placing the Order
In case no exceptions occurred, order status becomes ‘OPEN’ in order book In case of any exception, order goes for exception approval
If the exception approved by Exception approver, order status changes to ‘OPEN’ in
order book table.
If the exception rejected by Exception approver, order status changes to ‘EXCEPTION
REJECTED’ in order book table, with entered reject reason. 2. For the chosen instrument type , if Maker checker is enabled In case no exceptions occurred, order goes to checker for approval.
If the checker approves the order, order status becomes ‘OPEN’. If the checker Rejects the order, order status becomes ‘REJECTED’
In case of any exception, order goes to exception approval.
If the exception approved by Exception approver, order status changes to ‘Pending for
Authorization’ in order book table. Then order goes to Checker for approval.
If the exception rejected by Exception approver, order status changes to ‘EXCEPTION
REJECTED’ in order book table, with entered reject reason.
For pending transfer requests e.g. unauthorized transaction requests, no further action is allowed for the respective CPIS or CPI type. Thus no orders are processed for the source customer.
2.1.1
Focussed List PoPUp
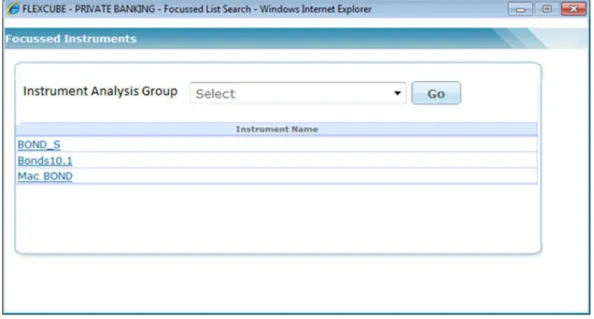
If you click on icon, the system displays the following pop up screen:
Screen:
Figure 2.3: Focussed Instruments PopUp Screen
Field Description
Field Description Mandatory
Instrument Analysis Group
Enables you to select ‘IAG’ descrip-tions where instruments are defined under banks focused list.
IF you select ‘Select + GO’ combination value, then the system displays message as
“Instrument Analysis Group - This is a required field”.
If you select any ‘IAG + GO’ combination value, then the system displays the relevant
focused list of instruments, applicable for the selected IAG on the screen.
Focused list of Instruments is applicable for the Instrument types applicable only for RM Login. The list is provided below:
Equity Mutual Funds Bonds Commodity
Structured Products Insurance
PMS Futures Options
3. Mutual Fund Order Management
Note
Please note that this feature would be available to you only if your license entitles you to Mutual Funds and Insurance module.
Description:
A mutual fund is just the connecting bridge or a financial intermediary that allows a group of investors to pool their money together with a predetermined investment objective. The mutual fund has a fund manager who is responsible for investing the gathered money into specific securities (stocks or bonds). When you invest in a mutual fund, you are buying units or portions of the mutual fund and thus on investing becomes a shareholder or unit holder of the fund.
3.1
Mutual Fund Order Capture - Subscription
User Access levels:
RM: RM can place orders for RM Managed, Self Managed, and Discretionary portfolios. The ‘Portfolio Name’ field displays the list of Self Managed, RM Managed, and Discretionary portfolios based on the set up done for each portfolio type at the Administrator level. Only portfolios for which – ‘Allow in OMS – RM’ is set to ‘Y’ ", displays in the list.
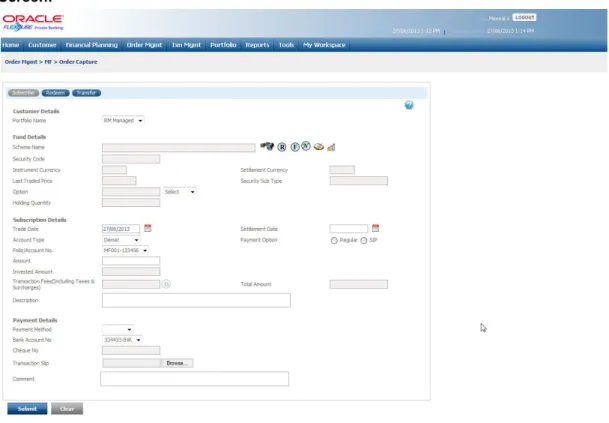
Screen:
Figure 3.1: Mutual Fund Order Capture – Subscription Screen
Screen Navigation:
Option 1
1. Select the “Order Management” option on the main menu
Mutual Fund
The screen will default the subscription tab
Rules for Commencement of an Order:
The rules for placing the Mutual Fund order are comparable to those stated for equity
Orders can be placed only for customers in active status.
For initiating an order the customer should have either an RM portfolio or a Self
Managed portfolio coupled to his/her id.
The bank account information of the customer also needs to be updated in the FCPB
prior to initiating an order.
Procedure for placing of an Order: Step 1:
If the user is navigating to the Order Capture screen for the first time after logging in to the system, the system forces to select a customer in the customer selection screen.
On the other hand, if the user is navigating to the screen from any other screen, the system auto-populates the name, no. and default portfolio name of the customer which is already in context.
Note
To change the customer, the user needs to click on the icon located at the top right hand side corner of the screen.
If the Income Tax ID Required and Risk Profiler Mandatory options are set to Yes in the Instrument Type screen of Admin login and the corresponding details for the selected customers are not updated, then the system displays the appropriate messages and will not allow the user to place the order.
Step 2:
RM – Subsequent to selecting the customer, the system displays the default portfolio in the Portfolio Name drop-down list. .
Step 3:
Click the icon next to the Source Code field.
When the user clicks on the icon next to the Source Code field, the Banker Source Code Search window appears. Enter the appropriate search criteria in the respective fields to search for the Source Code.
Step 4:
Click the icon next to the Lead Generation Code field.
When the user clicks on the icon next to the Lead Generation Code field, the Banker Lead Code Search window appears. Enter the appropriate search criteria in the respective fields to search for the Lead Generation Code.
Step 5:
The subsequent step is to capture the fund–scheme details.
For placing the order, the user has to select the fund-scheme to transact. The user can select the fund-scheme either by directly entering the name of the fund-scheme or by searching for the fund-scheme by clicking the button.
Note
The fund-scheme search screen displays only the schemes which are in open status and which are approved by the bank. Securities which are suspended from trading will not be displayed in the search screen.
The user can view the Recommended instruments, Focussed instruments, House Views, NFO details and Instrument Analytics details by clicking on the respective icons next to the Security ID field as explained in General Characteristics section.
Once the Scheme name is selected, the system populates the Security Code which is the alternate id of the selected instrument, Security Sub Type fields.
Step 6:
Mutual fund generally offers two options on dividend: payout and reinvestment. In the dividend payout option, the dividend is given to the investor from time to time whereas in the reinvest option, all the dividends declared by the fund are ploughed back into the scheme. The next field ‘Dividend’ provides the user with the option to select either of the options Dividend payout or Dividend reinvest. Please note that it is not essential that all the fund-schemes provide with both the options on dividend. The options will be made available to the user to select, based on the alternatives offered under a particular fund-scheme. These options are maintained in the system in the MF Instrument Master table in the database.
Step 7:
The next field enables the user to select the appropriate exchange name from Exchange drop-down list.
Step 8:
Select the appropriate Trade Date and Settlement Date using the calendar icon.
In case if the user is initiating the order (SIP/SWP/STP) post cut off time, the system does not allow the user to place the order and displays an appropriate warning message asking the user to place the order for some other date.
This is applicable only if the commencement date is same as the system date and the cut off time for that Instrument/IAG is less than the current time. Also the validation is applicable only for first order.
Step 9:
From the Account Type drop-down list, select the appropriate account. The account types available are Demat and Non-Demat.
The system defaults the Account Type based on the Flags selected at Instrument Type level. If Demat option is selected, then the system displays Omnibus A/c or Client A/c or both in the Folio No. field.
If Non Demat option is selected than system displays the existing Folio No. in the drop-down or provides an additional text box next to account number drop-down field to enter a new folio number/account number.
Step 10:
There are two ways in which you can invest in a mutual fund.
A one-time outright payment (Regular): In this type of investment the user just hand over the entire amount and get the fund units depending on the value of the units on that particular day. Periodic investments or this is also referred to as a SIP: is a periodic investment in a mutual fund. At every frequency, the user will have to commit to put in a fixed amount/ purchasing certain units.
FCPB offers the users with the flexibility to invest in both the payment options. These options are provided as radio buttons next to the field ‘Payment Option’.
Step 11:
After you place an investment order in any Mutual Fund, the fund house generates a folio number for that particular fund. The folio number generated by the Fund house is analogous to a Customer Id, and is generally generated for every unique combination of name and date of birth. However there is a great disparity in the approach adopted by the various fund houses in the industry. While some fund houses are inclined to map all the additional investments of the customer into the same folio number in-spite of the customer not declaring the folio number in his future applications. Others tend to generate a new folio number for every application without the folio number mentioned in it.
Apart from this there is also an inconsistency in the levels at which the folio numbers are issued. While some fund houses issue separate folio number for every Fund-scheme combination, others issue a new folio number for every fund-scheme-option combination. FCPB provides its users the option to choose the existing folios numbers within the fund. On picking a fund-scheme through the search screen, all the existing folio number/s affiliated to the fund-scheme in the portfolio of the selected customer are displayed in the ‘Folio No’ dropdown field. The user has the option either to select any of the existing folio number for making additional purchase or proceed to make a purchase exclusive of any of the existing folio numbers. For first time purchase, the dropdown will not have any values in it.
Note
If the flag ‘Folio at Issuer Level’ is maintained as Y at an Instrument Issuer level, then FCPB system also checks if there are any holdings across the portfolios (excluding held away) where the issuer is same as the issuer of the selected instrument. If so, then it dis-plays the existing folios in the drop-down list to select the one from it and in addition also provides the option to select the new folio using the select option of the drop-down list. Hence the user can choose either the existing folio or invest in a new folio.
Note
If there are multiple folio’s available for the same issuer; then the system defaults the folio to the omnibus (if applicable and depending on the Omnibus /client level flag) else defaults it to the first available folio.
Note
Every order initiated through the FCPB will have a unique transaction id associated to it. The id would be generated for every customer-portfolio-order combination. FCPB as-sumes that this identification would be a common interfacing attribute between the exter-nal system and the FCPB.
Note
FCPB assumes that the fund house would generate a separate folio number for every cus-tomer-portfolio combination. Hence investments made by the same customer into the same fund but in different portfolios would be issued with two separate folio numbers by the fund house.
Note
The FCPB would update the folio number, as received from the fund house, against each order id. Hence multiple orders, associated with the same folio number would be clubbed by FCPB to display the net outcome.
Note
FCPB assumes that the folio number attained for a holding in the FCPB would not be uti-lized by the customer to make any transactions outside the FCPB system.
On selecting the fund –scheme name the currency and the current NAV of the scheme will be displayed in the corresponding ‘Currency’ and ‘NAV’ fields in the order screen.
Step 12:
The next text fields enable the user to enter the Application No. and Cheque No. respectively. The user can enter either Application No or Cheque No.
The next field is the amount field. If the payment option is selected as Regular, the system validates the amount with the minimum – maximum subscription limit rule established for the particular fund-scheme. These subscription limits are maintained by the administrator in the MF Instrument Master table in the database.
Once the user enters the amount, the system populates the data in the following fields as per the Fee structure set up for the Client Segment and IAG combination.
Indicative Total Investment – For Regular payment option, the values for Amount and
Indicative Total Investment are same but for SIP, the Indicative Total Investment is obtained by multiplying the value in the Amount field with no. of transfers. The system validates the amount entered here against the amount set up in the Maximum Amount for Buy field of Product Master, if any. If it is greater than the value set up at product master, system displays an appropriate error message.
In case of SIP order, the system validates the amount entered in the Invested Amount field against the amount set up in the Maximum Amount field of SIP Details pop up of Product Master. If it is greater than the value set up in the Product Master, system displays an appropriate error message.
Transaction fee (including taxes and surcharge) – The value in this field is displayed
Total Amount – It displays the amount obtained by adding Indicative Total Investment
and Transaction fee. If no fee is applicable the amount in this field is same as Total Indicative Investment.
If the selected instrument does not follow the Model asset allocation for the customer, the system displays the message as ‘Model asset allocation is deviated. Do you want to proceed?’ The user can click the OK button to continue.
If no risk score is defined for the customer then there will not be any model asset allocation and hence system will not display any message.
Step 13:
The subsequent field, ‘Frequency’ gets enabled only for SIP payments. The user needs to select the frequency (monthly / quarterly / semi-annually) from the drop down list provided. Let’s say that the user has opted for a fund A with an investment amount of $500 with monthly frequency, subsequently the effective monthly investment would be $500.
Step 14:
Similar to the ‘Frequency’ field, the next field ‘Commencement Date’ also gets enabled only for SIP payments. The commencement date is a pre-determined date on which the SIP instruction would be executed by the fund house at a frequency defined by the user. If the Frequency is selected as Weekly in SIP pop-up of Product Master with few days mentioned in the select-box and if the Investment Dates have not been specified, then while placing the order, if the user selects the date/month or year which does not fall on the one of the specified days of Product Master then system display an appropriate an error message. Similarly, an error message will be displayed if the selected date does not fall on the Investments dates specified in the Product Master.Both the frequency and Commencement date are mandatory fields to be captured by the user on opting for SIP payment. Also, based on the Commencement date and No. of transfers, the system auto-populates the SIP End Date.
The user will be restricted from initiating an SIP instruction for a date earlier than the current business date.
Please note that once the instruction is initiated by the user, the fund house does not require any further instructions from the user to execute the forthcoming SIP instructions. However, FCPB would receive updates on the revised quantity of units from the fund house after execution of every SIP instruction.
Step 15:
There should be a gap of one month for the auto generation of orders for SIPs to start. This is based on the requirement from most of the AMCs that there should be a gap of a particular number of working days before the SIP auto debit starts. The number of days differ from AMC to AMC. For example, if a customer wants to enroll for an SIP on 10th of every month, for Rs. 1000 per month for 6 months. He/she books the order on the 20th of January. His/her first order goes through on the 20th Jan but since gap between 20 Jan and 10th Feb. (the date on which the auto generation of orders should have started) is not one month, FCPB skips auto generation of order for 10th Feb, and the auto generation will start from 10th March.
Step 16:
The user also needs to select the appropriate counterparty by clicking on the icon next to the Counterparty field. It helps to recognize the customer records in transaction files sent by different counterparties.
Step 17:
If the selected scheme is an NFO scheme then for a regular order the system displays an ASBA option. If this option is selected, FCPB system sends a unique status i.e. Hold or Blocked to the core banking system after placing the order. If the option is not selected, the system continues with the current interface which continues to debit the user’s bank account and sends the status as ‘Debit’.
Step 18:
The user then finally proceeds to capture the bank details. Both the fields in this section are mandatory. The ‘Debit From’ field provides the information to the fund house on the account details for debiting the due amount for subscription. The ‘Direct Credit’ account provides the fund house with the information on the bank details for crediting the proceeds of the
redemption.
Step 19:
The system also facilitates the user to attach the Transaction Slip. To attach, click on the Browse button and attach the appropriate Transaction slip.
Step 20:
After entering all the fields in accordance to the outline given in the above steps, the user can proceed to click on the button.
Once the user clicks on the Submit button, system displays the Exception displays pop-up window if the order to be placed violates certain conditions such as
Selected instrument is not in Approved List Selected instrument is not in Model Portfolio Selected instrument is not in Recommended List Deviation from Model Asset Allocation
KYC is not verified
If the user clicks on the ‘Yes’ button in the Exception pop-up window, the order undergoes exception approval process as explained in Equity order capture.
In case no exceptions occurred, order goes to checker for approval.
Note
If the order is to be placed in the minor’s investment account, the system first checks if the ‘KYC Check for Signatories’ and if it maintained as ‘Y’, the guardian KYC check is manda-tory for placing the order. Here, if the user tries to place the order and if the guardian KYC is not done, the system does not allow the user to place the order and displays an appro-priate exception message. If the flag is maintained as ‘N’ then KYC check for Signatories is not required.
If the order is to be placed in a portfolio where there are joint holders, the system first checks if the ‘KYC Check for Joint Holder’ is maintained as ‘Y’, then the Joint Holder KYC check is mandatory for placing the order. Here, if the user tries to place the order and if KYC check of any or all joint holders is not done, the system does not allow the user to place the order and displays an appropriate exception message. If the flag is maintained as ‘N’ then KYC check for Joint Holder is not required.
If the order is placed successfully, the system displays the message as “Order placed successfully. Reference id - xyz”. Here, xyz is the order id which can be used later to track the order. This id is displayed on the screen along with the message as and when the order is modified, approved and also if the fund reversal is initiated and approved.
If the user changes the decision on the order, he/she can clear the entire details captured earlier by clicking on the button.
3.2
Mutual Fund Order Capture - Redemption
User Access levels:
RM:
RM can place orders for RM Managed, Self Managed, and Discretionary portfolios. The ‘Portfolio Name’ field displays the list of Self Managed, RM Managed, and Discretionary portfolios based on the set up done for each portfolio type at the Administrator level. Only portfolios for which – ‘Allow in OMS – RM’ is set to ‘Y’ , displays in the list.Screen:
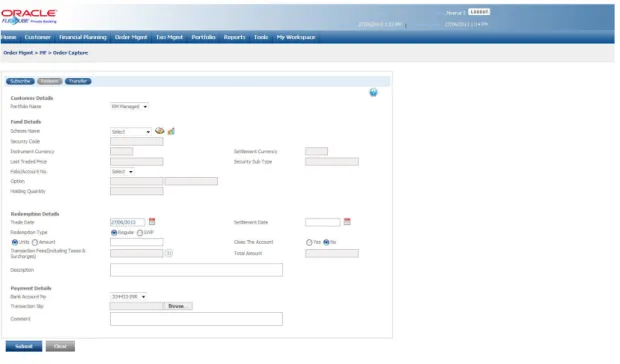
Figure 3.2: Mutual Fund Order Capture – Redemption Screen
Screen Navigation:
After logging in the system, select Order Management Mutual Fund Redemption The screen will however default the subscription tab
Rules for Commencement of Redemption:
Redemption orders can be placed only for customers in active status.
The bank account information of the customer is mandatory for initiating a redemption
order.
Procedure for placing of a Redemption Order:
Though most of the fields for redemption are analogous to subscription, for simplicity, the particulars of the fields have been repeated again in this section.
Step 1:
If the user is navigating to this screen for the first time after logging in to the system, the system forces to select a customer in the customer selection screen.
On the other hand, if the user is navigating to the screen from any other screen, the system auto-populates the name, no. and default portfolio name of the customer which is already in context.
Note
To change the customer, the user needs to click on the icon located at the top right hand side corner of the screen.
Step 2:
RM – Subsequent to selecting the customer, the Portfolio Name drop-down list defaults to the default portfolio of RM Managed portfolio type. It is mandatory for the RM to decide on the appropriate portfolio prior to placing the order.
Step 3:
Click the icon next to the Source Code field.
Step 4:
Click the icon next to the Lead Generation Code field.
Step 5:
The subsequent step is to select the fund –schemes.
For placing the order, the user has to select the fund-scheme in which he wants to transact from the Scheme Name drop-down list.
Note
The fund-scheme drop-down displays only the schemes which are in open status.
Step 6:
On picking a fund-scheme through the search screen, all the existing folio number/s affiliated to the fund-scheme in the portfolio of the selected customer will be displayed in the ‘Folio No’ dropdown field. Please note only the folio’s in which the customer currently has holdings will be displayed in the drop down list. It is obligatory for the user to select one of the folio numbers displayed in the list.
Note
Every order initiated through the FCPB will have a unique transaction id associated to it. The id would be generated for every customer-portfolio-order combination. FCPB as-sumes that this identification would be a common interfacing attribute between the exter-nal system and the FCPB.
On selecting the fund –scheme and the folio number, the currency, the current NAV and the dividend option of the scheme will be displayed in the corresponding ‘Currency’, ‘NAV’, ‘Counterparty’ and ‘Dividend’ fields in the order screen.
Step 7:
Select the appropriate Trade Date and Settlement Date using the calendar icon.
Step 8:
The next field has a radio button adjacent to it. The user has the option to opt between units and amount to redeem. Thus the user has the alternative either to redeem an amount or redeem certain units.
For either of the options, the system validates against the balance number of units or the value of the balance units available in the folio. The value of the units is determined by considering the latest NAV available for the particular fund-scheme.
For multiple redemption orders initiated on the same business day, for the same fund-scheme-folio number in a customer’s portfolio, the balance qty is validated by netting the current holding of the customer against the quantities in open status. (All the orders initiated by the users are said to be in ‘open’ status till the moment, they are transformed into any other status. The different order statuses are discussed in the next section)
For E.g.:
Total Holding = 1000 units Redemption Order units = 100 Status = Open
Balance qty available for initiating sale = Holding – open qty = 1000 – 100 = 900
If the Amount option is selected and if the ‘Close the Account’ flag is set to ‘N’, the system validates the amount with the maximum redemption limit rule established if any for the particular fund-scheme. These redemption limits are maintained by the administrator in the Product Master.
If ‘Close the Account’ flag is ‘Y’ then the system does not validate the amount with the maximum redemption limit rule.
In case of SWP order, if the ‘Close the Account’ flag is set to ‘No’ then the system validates the amount with the value entered in Maximum Amount field of SWP Details pop up of Product Master. If the amount entered here is greater than the amount set up in Product Master, system displays an appropriate error message.
Please note the units in mutual fund can encompass up to 4 decimal places.
Step 9:
Analogous to subscription, FCPB provides two approaches to redeem the holdings in a fund A one-time redemption (Regular): In this type the user redeem over your entire holding. Periodic redemptions or this is also referred to as a SWP: It is a periodic redemption in a mutual fund. At every frequency, the user will have will have to commit to redeem fixed amount/units. The FCPB also facilitates the user to start a new SWP though he has already STP running in the system.
FCPB offers the user with the flexibility to redeem by both the payment options. These options are provided as dropdown in the field ‘Redemption Type’.
Step 10:
The subsequent field, ‘Frequency’ gets enabled only for SWP redemptions. The user needs to select the frequency (monthly / quarterly / semi-annually) from the drop down list provided.
Step 11:
Similar to the ‘Frequency’ field, the next field ‘Commencement Date’ also gets enabled only for SWP redemptions. The commencement date is a pre-determined date on which the SWP instruction would be executed by the fund house at a frequency defined by the user. Both the frequency and Commencement date are mandatory fields to be captured by the user on opting for SWP redemption.
The user will be restricted from initiating an SWP instruction for a date earlier than the current business date.
If the Frequency is selected as Weekly in SWP pop-up of Product Master with few days mentioned in the select-box and if the Investment Dates have not been specified, then while placing the order, if the user selects the date/month or year which does not fall on the one of the specified days of Product Master then system display an appropriate an error message. Similarly, an error message will be displayed if the selected date does not fall on the Investments dates specified in the Product Master.
Please note that once the instruction is initiated by the user, the fund house does not require any further instructions from the user to execute the forthcoming SWP instructions. However, FCPB would receive updates on the revised quantity of units from the fund house after execution of every SWP instruction.
The calendar for selecting the date has been provided adjacent to the ‘Commencement Date’ field. Click on the icon , in order to open the calendar and select the suitable date. Also, based on the Commencement date and No. of transfers, the system auto-populates the SWP End Date.
Step 12:
The next field tenure is also associated only with SWP redemptions and is enabled on selection of the SWP option. It is mandatory for the user to capture data in this field.
Step 13:
The user then finally proceeds to capture the bank details. This field is a mandatory field for the user. The ‘direct credit’ account provides the fund house with the information on the bank details for crediting the proceeds of the redemption.
Step 14:
The user also needs to select the appropriate counterparty by clicking on the icon next to the Counterparty field. Also, the user needs to enter the appropriate reference number in the Counterparty Ref No. text box.
Step 15:
After entering all the fields in accordance to the outline given in the above steps, you can proceed to click on the submit button. On submitting the order you will be displayed with a confirmation message on the screen.
captured earlier by clicking on the button. On the contrary, if you are accessing the order screen through the ‘Portfolio Management’ menu (navigation - through ‘Option 2’), the clear button will clear only the editable fields in the screen.
Note
On submitting the order, the system will validate if the particular fund-scheme is open for redemption. Error message will be displayed on non compliance of the same.
Note
The system does not validate the KYC check for Joint Holder while placing the redemption order.
Note
Existence of restriction instruction for redemption on the particular fund-scheme will curtail the user from initiating a redemption order.
Note
System will display an error message if the user initiates a redemption request for a fund-scheme during its lock –in period.
3.3
Mutual Fund Order Capture - Transfer
User Access levels:
RM:RM can place orders for RM Managed, Self Managed, and Discretionary portfolios. The ‘Portfolio Name’ field displays the list of Self Managed, RM Managed, and Discretionary portfolios based on the set up done for each portfolio type at the Admin level. Only portfolios for which – ‘Allow in OMS – RM’ is set to ‘Y’ , displays in the list.
Screen:
Figure 3.3: Mutual Fund Order Capture – Transfer Screen
Note
The user can also transfer the fund details from one Scheme Name to another Scheme Name by clicking on the Transfer tab. Enter the appropriate details in the From section as well as in the To section and click on the Submit button.
If the Amount option is selected and if the ‘Close the Account’ flag is set to ‘N’, then the system validates the amount against the Maximum Amount for Switch-Out maintained at the Product Master, if any for From Fund. These limits are maintained by the administrator in the Product Master.
If ‘Close the Account’ flag is ‘Y’ then the system does not validate the amount against the Maximum Amount for Switch-Out maintained at the Product Master.
Also, while placing the STP order, if the ‘Close the Account’ flag is set to ‘No’ then the system validates the Amount with the value entered in Maximum Amount field of STP Details pop up of Product Master for From Fund. If the amount entered here is greater than the amount set up in Product Master, system displays an appropriate error message.
In case of STP order, if ‘Close the Account’ option is set to ‘No’ and if Units option is selected then the system validates the amount obtained by multiplying quantity with the Latest Trade Price of From Fund with the ‘Min Amount of Buy / Min First Purchase Amount for To Fund. For example,if the customer already has holdings in the ‘To Fund’ and that folio is selected, then the “Min Amount of Buy’ of ‘To Fund’ is validated. However, if the ‘To fund’ has no holdings then ‘Min First Purchase Amount’ of ‘To Fund’ is validated against the amount obtained.
Note
The system validates KYC check for Joint holders while placing the transfer order. Once the user clicks on the Save button, the system displays the message “MF Order Placed successfully”.
For pending transfer requests e.g. unauthorized transaction requests, no further action is allowed for the respective CPIS or CPI type. Thus no orders are processed for the source customer.
3.4
MF Sys Plan Cancellation
User Access levels:
RM: can cancel the Systematic Plan
Screen:
Figure 3.4: MF Sys Plan Cancellation Screen
Screen Navigation:
After logging into the system, select Order Management MF Systematic Plan Cancellation
Procedure for Systematic Plan Cancellation Step 1:
Enter the appropriate customer no. in the Customer No. text box.
The user can also search for the customer no. by clicking on the icon next to the Customer No. text box. When the user clicks on the icon, the CUSTOMER SEARCH window appears. Enter the appropriate search criteria in the respective fields to search for the Customer No. Select the appropriate customer no. from the list.
Step 2:
From the Portfolio Name drop-down list, select the appropriate portfolio for the selected customer.
Step 3:
From the Transaction Type drop-down list, select the appropriate transaction type.
Step 4:
From the Scheme Name drop-down list, select the appropriate scheme.
Step 5:
Click the Search button.
Once the user clicks on the Search button, the details of the selected transaction appears.
Step 6:
4. Order Management for Insurance
Note
Please note that this feature would be available to you only if your license entitles you to Mutual Funds and Insurance module.
4.1
Insurance Order Capture
User Access levels:
RM: RM can place orders for RM Managed, Self Managed, and Discretionary portfolios. ‘Portfolio Name’ field displays the list of Self Managed, RM Managed, and Discretionary portfolios based on the set up done for each portfolio type at the Administrator level. Only portfolios for which – ‘Allow in OMS – RM’ is set to ‘Y’, appears in the list
Screen:.
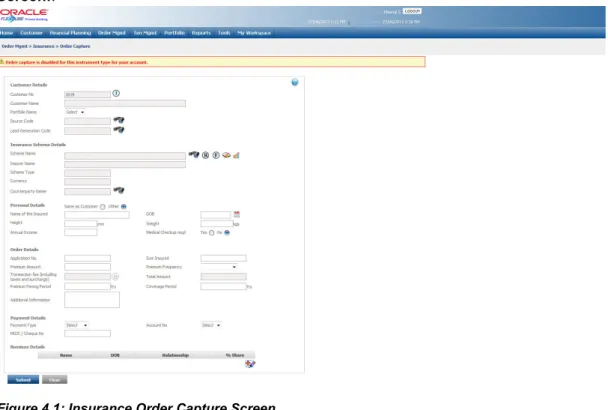
Figure 4.1: Insurance Order Capture Screen
Screen Navigation:
After logging into the system, select Order Management Insurance Order Capture
Rules for commencement of an Order:
Insurance orders can be placed only for customers in active status. The rules for placing the Insurance order are
The orders can be placed only for RM Managed portfolio.
The bank account information of the customer also needs to be updated in the FCPB
If there is an Open order in the system with a particular CPIS, another order cannot be
placed for the same CPIS.
Field Description Mandatory
Customer Details
Customer No Enables the user to select the customer by clicking on the search icon available next to the Customer No field
Y
Customer Name Displays the Customer Name for the selected Customer No
Y Portfolio Name Displays the list of the portfolio names for
the customer in the drop-down list
Y Source Code Displays the Source Code for the banker
who has sourced the transaction
Y Lead Generation
code
Displays the Lead Generation Code for the banker who has provided the lead for the transaction
Y
Instrument Details
Scheme Name Enables the user to select the appropriate Scheme Name by clicking on the search icon
Y
Insurer Name Displays the Insurer Name for the selected scheme name. Once the user selects the Scheme Name, system auto-populates this field.
Scheme Type Displays the Scheme Type for the selected Scheme Name. Once the user selects the Scheme Name, system auto-populates this field.
Currency Displays the Currency for the selected Scheme Name. Once the user selects the Scheme Name, system auto-populates this field.
Counterparty Enables the user to select the appropriate counterparty using the search icon.
Personal Details
Same as Customer/ Other
Enables the user to select whether the Insured person is customer or some other person. If the Other option is selected, the system allows the user to enter the appro-priate details.
Name of the Insured If the user selects the Same as Customer option above then system populates the Name of the Insured field. If the Other option is selected, enables the user to enter the appropriate name
Y
DOB If the user selects the Same as Customer option above then system populates the DOB field. If the Other option is selected, enables the user to enter the appropriate DOB
Y
Height Enables the user to enter the height in the Height text box
Y Weight Enables the user to enter the weight in the
Weight text box
Y Annual Income Enables the user to enter the customer
annual income in the Annual Income text box.
Medical Checkup reqd
Enables the user to select the appropriate option for the Medical Checkup reqd field by using the radio button
Y
Order Details
Application No Enables the user to enter the Application No Y Sum Insured Enables the user to enter the appropriate
amount in the Sum Insured field
Y Premium Amount Enables the user to enter the appropriate
amount in the Premium Amount field
Y Premium Frequency Enables the user to enter the appropriate
frequency for the premium amount. The options available are Annually, Monthly, Quarterly, Semi Annually, and Single Pre-mium
Y
Transaction Fee Displays the total fee applicable if any for the selected customer.
Total Amount Displays the user to enter the appropriate total amount
Premium Paying Period
Enables the user to enter the appropriate premium paying period
Y Coverage Period Enables the user to enter the appropriate
coverage period
Y Additional
Informa-tion
Enables the user to enter the additional information, if any
Procedure for Placing of an Order: Step 1:
If the user is navigating to the Order Capture screen for the first time after logging in to the system, the system forces to select a customer in the customer selection screen.
On the other hand, if the user is navigating to the screen from any other screen, the system auto-populates the name, no. and default portfolio name of the customer which is already in context.
Note
To change the customer, the user needs to click on the icon located at the top right hand side corner of the screen.
If the Income Tax ID Required and Risk Profiler Mandatory options are set to Yes in the Instrument Type screen of Admin login and the corresponding details for the selected customers are not updated, then the system displays the appropriate messages and will not allow the user to place the order.
Step 2:
RM – Subsequent to selecting the customer, the system displays the 1st Portfolio name in alphabetical order of Portfolio type ‘RM Managed’.
Step 3:
Click the icon next to the Source Code field.
Payment Details
Payment Type Displays the payment type for selected scheme. The options available are ECS, Cheque, and DD
Y
Account No Enables the user to enter the appropriate Account No from the drop-down list
Y MICR/Cheque No Enables the user to enter the appropriate
MICR/Cheque No in the text box
Y
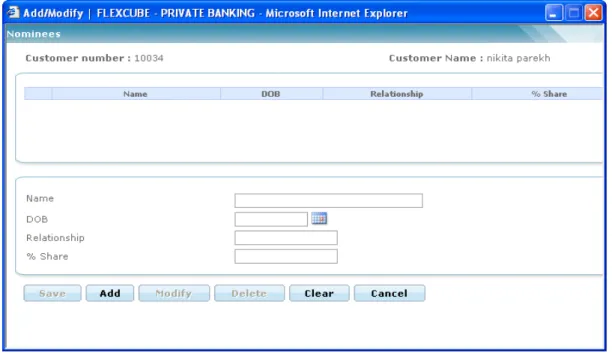
Nominee Details
Name Displays the name of the nominee DOB Displays the DOB of nominee
Relationship Displays the relationship of nominee with the insured person
% Share Displays the % of share allocated to nomi-nee by the insured person
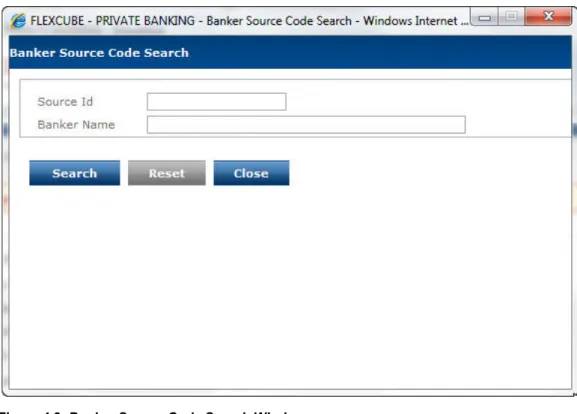
When the user clicks on the icon next to the Source Code field, the Banker Source Code Search window appears. Enter the appropriate search criteria in the respective fields to search for the Source Code.
If Check Certificate for Source is set to Yes in Instrument Type Master screen, then the system checks for certificate and its expiry. If it is set to No system does not check for the certificate and allows the user to proceed further
Screen:.
Figure 4.2: Banker Source Code Search Window
Step 4:
Click the icon next to the Lead Generation Code field.
When the user clicks on the icon next to the Lead Generation Code field, the Banker Lead Code Search window appears. Enter the appropriate search criteria in the respective fields to search for the Lead Generation Code.
Screen:
Figure 4.3: Banker Lead Code Search Window
If Check Certificate for Lead Generator is set to Yes in Instrument Type Master screen, then the system checks for certificate and its expiry. If it is set to No system does not check for the certificate and allows the user to proceed further.
Step 5:
Click the icon next to the Scheme Name field.
When the user clicks on the icon next to the Scheme Name field, Scheme Search window appears. Enter the appropriate search criteria in the respective fields to search for the Scheme Name.
Once the user selects the Scheme Name, following fields are populated with the respective data.
Issuer Name Scheme Type Currency
The user can view the Recommended instruments, Focussed instruments, House Views details and Instrument Analytics details by clicking on the respective icons next to the Security ID field as explained in General Characteristics section.
Step 6:
Select the appropriate option for the Personal Details category.
The options available here are same as Customer and Other. If the user selects the same as Customer option, the Name of the Insured and DOB fields populate with the appropriate customer data.