1
AvePoint Record Rollback for Microsoft Dynamics CRM
Installation and Configuration Guide
Revision F
Issued April 2014
AvePoint Record Rollback 3.1.2
2
AvePoint Record Rollback for Microsoft Dynamics CRM
Table of Contents
Overview ... 3
Obtaining the Record Rollback Solution Package ... 4
Supported and Unsupported Web Browsers ... 5
Importing the Record Rollback Solution ... 6
Setting Privileges for Security Roles ... 9
Applying a License ... 11
3
AvePoint Record Rollback for Microsoft Dynamics CRM
Overview
AvePoint Record Rollback for Microsoft Dynamics CRM implements audit record management mainly through three functions: Record Rollback, Recycle Bin, and Version History. AvePoint Record Rollback enables users to manage the audit records of entities, search the audit records of a specific entity, view all of the historical audit records of an entity, and roll back a specific record to restore the entity’s previous values.
AvePoint Record Rollback for Microsoft Dynamics CRM supports Microsoft Dynamics CRM 2013 and Microsoft Dynamics CRM 2011.
Before using AvePoint Record Rollback for Microsoft Dynamics CRM, you need perform the following steps:
1. Obtaining the Record Rollback Solution Package
2. Importing the Record Rollback Solution
3. Setting Privileges for Security Roles
4
AvePoint Record Rollback for Microsoft Dynamics CRM
Obtaining the Record Rollback Solution Package
Obtain the AvePoint_Record_Rollback_for_Dynamics_CRM_Serial_Number.zip file from an AvePoint representative.
5
AvePoint Record Rollback for Microsoft Dynamics CRM
Supported and Unsupported Web Browsers
Before you begin to import and configure the Record Rollback solution, refer to the table below for detailed information of supported and unsupported Web browsers for the Record Rollback solution.
Web Browser Support Status
Internet Explorer 8 Supported
Internet Explorer 9 Supported
Internet Explorer 10 Supported
Google Chrome Supported
Firefox Supported
6
AvePoint Record Rollback for Microsoft Dynamics CRM
Importing the Record Rollback Solution
The Record Rollback solution must be imported into Dynamics CRM before any of its functionality can be leveraged. Follow the steps below to import the Record Rollback solution into Microsoft Dynamics CRM 2013 or Microsoft Dynamics CRM 2011.
1. Log into Microsoft Dynamics CRM 2013 or Microsoft Dynamics CRM 2011.
*Note: The screenshots in this guide were captured in a Microsoft Dynamics CRM 2013 environment using Microsoft Internet Explorer.
2. If using Microsoft Dynamics CRM 2013, navigate to SETTINGS > CUSTOMIZATIONS > Solutions. If using Microsoft Dynamics CRM 2011,navigate to Settings > Customization > Solutions. 3. Click Import to import the Record Rollback solution. The Select Solution Package page appears.
Figure 1: Importing the Record Rollback solution (Dynamics CRM 2013 environment shown). 4. On the Select Solution Package page, click Browse…. Select the
AvePoint_Record_Rollback_for_Dynamics_CRM_Serial_Number.zip file that contains the solution, and then click Next.
5. View the solution’s information in the Solution Information page to verify the solution Name, Publisher, and Package Type.
a. If desired, click View solution package details for more details.
• Solution Details – Displays the version, package type, and so on.
• Publisher Details – Displays the publisher information.
• Solution Components – Displays the components that will be imported. b. Click Close to return to the Solution Information page.
7
AvePoint Record Rollback for Microsoft Dynamics CRM
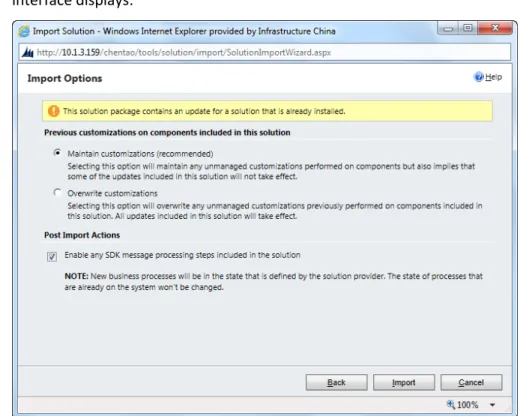
6. This step is optional. If you have a prior version of AvePoint Record Rollback, the Import Options interface displays:
Figure 2: The Import Solutions interface (Dynamics CRM 2013 environment shown). Select one of the following radio buttons:
• Maintain customizations (recommended) – Maintains any unmanaged customizations performed on components. Some of the updates included in this solution will not take effect.
• Overwrite customizations – Overwrites any unmanaged customizations previously performed on components included in this solution. All updates included in this solution will take effect.
7. If using Microsoft Dynamics CRM 2013, select the Enable any SDK message processing steps included in the solution checkbox shown below to complete the import process.
If using Microsoft Dynamics CRM 2011, this checkbox is Activate any processes and enable any SDK message processing steps included in the solution.
8
AvePoint Record Rollback for Microsoft Dynamics CRM
*Note: If the checkbox described above is not selected, then the steps to install the plug-in will not be activated and the process cannot be completed.8. If using Microsoft Dynamics CRM 2013, click Import and wait for the operation to complete. If using Microsoft Dynamics CRM 2011, this button is Next.
9. After the solution imports successfully, click Close to close the Importing Solution page. 10. Verify that Record Rollback is displayed in the All Solutions list.
9
AvePoint Record Rollback for Microsoft Dynamics CRM
Setting Privileges for Security Roles
In order for users to leverage the Record Rollback functions, their security role privileges must first be configured. Only users whose security roles have the required permissions can use the Record Rollback solution. Follow the steps below to set the required privileges for the security roles that will be using the Record Rollback solution.
1. Log into Dynamics CRM as a user with administrative access.
2. If using Microsoft Dynamics CRM 2013, navigate to SETTINGS > ADMINISTRATION > Security Roles.
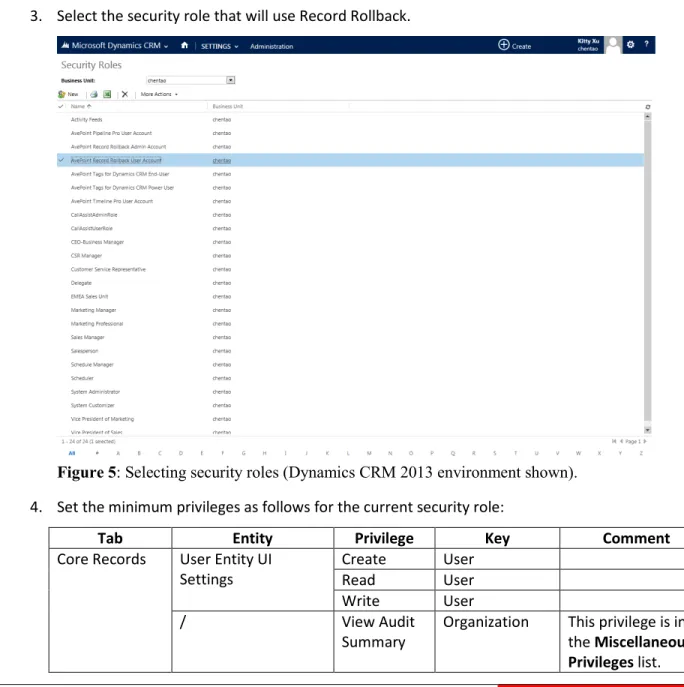
If using Microsoft Dynamics CRM 2011, navigate to Settings > Administration > Security Roles. 3. Select the security role that will use Record Rollback.
Figure 5: Selecting security roles (Dynamics CRM 2013 environment shown). 4. Set the minimum privileges as follows for the current security role:
Tab Entity Privilege Key Comment
Core Records User Entity UI
Settings Create Read User User
Write User
/ View Audit
Summary Organization This privilege is in the Miscellaneous Privileges list.
10
AvePoint Record Rollback for Microsoft Dynamics CRM
Tab Entity Privilege Key Comment
Custom Entities Configure Record
Rollback Create Organization This enables end users to use the Rollback function. Read Organization
Write Organization
Roll back Records Create User This enables users to apply a license for this solution.
Read User
Write User
Customization Entity Read Organization
Field Read Organization
Customizations Read Organization
System Chart Read Organization
System Form Read Organization
View Read Organization
Web Resource Read Organization
Relationship Read Organization
Business
Management User Settings Read User
5. Click Save and Close.
6. Repeat steps 3 through 6 for all desired security roles.
*Note: In the current version of Record Rollback, the default roles AvePoint Record Rollback User Account and AvePoint Record Rollback Admin Account are created to avoid issues with setting user privileges. The user who has the default security role of AvePoint Record Rollback User Account can access Recycle Bin, and the user who has the default security role of AvePoint Record Rollback Admin Account can access Record Rollback and Recycle Bin.
11
AvePoint Record Rollback for Microsoft Dynamics CRM
Applying a License
Record Rollback provides a built-in license which enables you to freely use Record Rollback for 30 days. After the 30-day trial, you must apply a new license to continue using Record Rollback.
Follow the steps below to apply the license. 1. Log in to Dynamics CRM.
2. If using Microsoft Dynamics CRM 2013, navigate to SETTINGS > RECORD ROLLBACK.
If using Microsoft Dynamics CRM 2011, navigate to Settings > Customization > Record Rollback. 3. Click License Manager to access the Record Rollback Registration interface.
4. Open the license file using Notepad and copy all contents within it into the blank text box. 5. Click Apply. The End-User License Agreement page appears.
6. Read the license agreement carefully and select I accept the terms in the license agreement. Click Next to apply the license.
7. After the license has been applied successfully, the license information will be displayed in the License Details field.
• Product – Displays the product name, which is AvePoint Record Rollback.
• License Type – There are two license types:
o Demo– The demo license is for your trial and limits the validity period.
o Enterprise– The formal license to register the product. The account number and the validity period in this license are according to your purchase.
• Number of Licenses – The maximum number of the users that are able to use the solution meanwhile.
• Organization GUID – The GUID of the organization that has installed the Record
Rollback solution, which is used to limit the organizations that can register the solution.
12
AvePoint Record Rollback for Microsoft Dynamics CRM
Notices and Copyright Information
Notice
The materials contained in this publication are owned or provided by AvePoint, Inc. and are the property of AvePoint or its licensors, and are protected by copyright, trademark and other intellectual property laws. No trademark or copyright notice in this publication may be removed or altered in any way. Copyright
Copyright © 2013-2014 AvePoint, Inc. All rights reserved. All materials contained in this publication are protected by United States copyright law and no part of this publication may be reproduced, modified, displayed, stored in a retrieval system, or transmitted in any form or by any means, electronic,
mechanical, photocopying, recording or otherwise, without the prior written consent of AvePoint, 3 Second Street, Jersey City, NJ 07311, USA or, in the case of materials in this publication owned by third parties, without such third party’s consent.
Trademarks
AvePoint®, DocAve®, the AvePoint logo, and the AvePoint Pyramid logo are registered trademarks of AvePoint, Inc. with the United States Patent and Trademark Office. These registered trademarks, along with all other trademarks of AvePoint used in this publication are the exclusive property of AvePoint and may not be used without prior written consent.
Microsoft, MS-DOS, Internet Explorer, Microsoft Dynamics, Microsoft Office SharePoint Servers 2007/2010, SharePoint Portal Server 2003, Windows SharePoint Services, Windows SQL server, and Windows are either registered trademarks or trademarks of Microsoft Corporation.
Adobe Acrobat and Acrobat Reader are trademarks of Adobe Systems, Inc.
All other trademarks contained in this publication are the property of their respective owners and may not be used such party’s consent.
Changes
The material in this publication is for information purposes only and is subject to change without notice. While reasonable efforts have been made in the preparation of this publication to ensure its accuracy, AvePoint makes no representation or warranty, expressed or implied, as to its completeness, accuracy, or suitability, and assumes no liability resulting from errors or omissions in this publication or from the use of the information contained herein. AvePoint reserves the right to make changes in the Graphical User Interface of the AvePoint software without reservation and without notification to its users. AvePoint, Inc.
Harborside Financial Center, Plaza 10 3 Second Street, 9th Floor
Jersey City, New Jersey 07311 USA