Page 1 of 17 DRAFT – Last Modified June 5, 2009 g. chilton / n. dowell
ERMes: an Access-Based ERM
ERMes Website: http://murphylibrary.uwlax.edu/erm/ ERMes Blog: http://ermesblog.wordpress.com/
William T. Doering
University of Wisconsin–La Crosse
Galadriel Chilton
University of Wisconsin–La Crosse [email protected]
Norma J. Dowell Iowa State University [email protected]
Table of Contents
Introduction ... 2
Software Requirements ... 2
Anatomy of ERMes (or ERMes’ Table Structure) ... 2
Using ERMes ... 4
ERMes’ Navigation Bar ... 5
Data Entry ... 5
Retrieving Information ... 7
Reports ... 8
Page 2 of 17 DRAFT – Last Modified June 5, 2009 g. chilton / n. dowell
Introduction
ERMes is a basic ERM system that was created to help organize management of our Electronic Resources at UW-La Crosse. You are welcome to use ERMes to suit your own needs. You are also welcome to change the ERMes database in any way to suit your local needs. I only ask that you do not re-distribute ERMes or ERMs based on ERMes to others.
If you make changes to ERMes, you should keep track of those changes so that you recreate those changes in any future release of ERMes. If you have suggestions, pass them along to me and I will try to accommodate and redistribute. Additionally, if you want to contribute code, let me know and I will set up a time for you to have exclusive rights to the code, thus making code reconciliation easier. - William Doering, May 2009
Software Requirements
ERMes is a Microsoft Access database and that requires Access 2007 (Windows) or Access 2008 (Mac) to operate, as the database utilizes functionality not available in previous versions of Microsoft Access.
Anatomy of ERMes (or ERMes’ Table Structure)
ERMes is a relational database; content in different tables connects to/works with content in other tables.
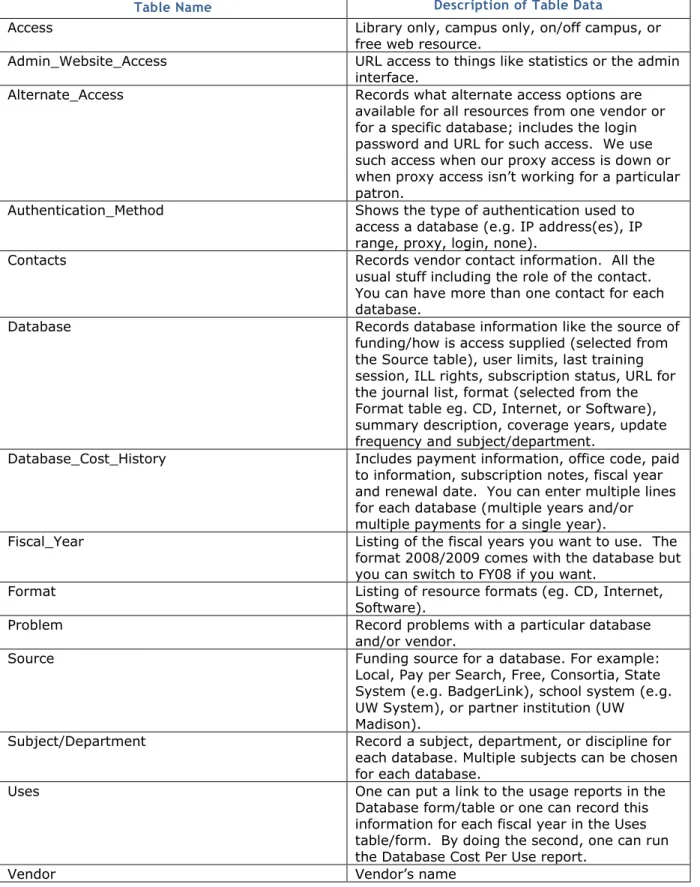
Page 3 of 17 DRAFT – Last Modified June 5, 2009 g. chilton / n. dowell This table lists (alphabetically) the names of each table and a description of what kind of data populates it.
Table Name Description of Table Data
Access Library only, campus only, on/off campus, or
free web resource.
Admin_Website_Access URL access to things like statistics or the admin
interface.
Alternate_Access Records what alternate access options are
available for all resources from one vendor or for a specific database; includes the login password and URL for such access. We use such access when our proxy access is down or when proxy access isn’t working for a particular patron.
Authentication_Method Shows the type of authentication used to
access a database (e.g. IP address(es), IP range, proxy, login, none).
Contacts Records vendor contact information. All the
usual stuff including the role of the contact. You can have more than one contact for each database.
Database Records database information like the source of
funding/how is access supplied (selected from the Source table), user limits, last training session, ILL rights, subscription status, URL for the journal list, format (selected from the Format table eg. CD, Internet, or Software), summary description, coverage years, update frequency and subject/department.
Database_Cost_History Includes payment information, office code, paid
to information, subscription notes, fiscal year and renewal date. You can enter multiple lines for each database (multiple years and/or multiple payments for a single year).
Fiscal_Year Listing of the fiscal years you want to use. The
format 2008/2009 comes with the database but you can switch to FY08 if you want.
Format Listing of resource formats (eg. CD, Internet,
Software).
Problem Record problems with a particular database
and/or vendor.
Source Funding source for a database. For example:
Local, Pay per Search, Free, Consortia, State System (e.g. BadgerLink), school system (e.g. UW System), or partner institution (UW Madison).
Subject/Department Record a subject, department, or discipline for
each database. Multiple subjects can be chosen for each database.
Uses One can put a link to the usage reports in the
Database form/table or one can record this information for each fiscal year in the Uses table/form. By doing the second, one can run the Database Cost Per Use report.
Page 4 of 17 DRAFT – Last Modified June 5, 2009 g. chilton / n. dowell
Using ERMes
ERMes opens with a rights statement and switchboard. From the switchboard, you can retrieve data entry forms, search for information, and run reports.
!
To make ERMes fully functionally, you will need to enable all content: 1. To the right of the Security Warning at the topof the screen, click the Options button. 2. Select the radio button next to Enable this
Content and click OK
You can enable the options each time you open ERMes, or you can adjust the MS Access Trust Center Settings permanently as follows:
1. Click the Microsoft Office Button and then click Access Options.
2. Click Trust Center > then Trust Center Settings > and then click Macro Settings. 3. Click the option to “Enable all macros” if you are comfortable doing so. Please refer to MS
Office help for additional information.
Page 5 of 17 DRAFT – Last Modified June 5, 2009 g. chilton / n. dowell
ERMes’ Navigation Bar
Once you have left the switchboard, navigation buttons will appear at the top of the screen.
Exception: The Preliminary Information screen only includes an exit/return to switchboard button.
Known Bug: Right now, the find record function does not work to search by database title from a Database / Cost History screen. [gc June 2, 2009]
Data Entry
It is best to categorize your data as primary or secondary data and then enter it accordingly. New primary/base data can always be added; but because of how ERMes works, the entry of primary data at the onset facilitates access to it later. For example, if you have not entered a master list of authentication methods and payments sources, you cannot attribute such designations to a database.
Primary or Base Data
Data that you should enter first and in this
order:
1. Preliminary Information: o Access o Fiscal Year o Authentication Method o Formatso Source (e.g. who pays the subscription)
2. Vendor Name 3. Vendor Contacts
4. Subject/Discipline Departments/Codes 5. Databases
Preliminary Information Tables
Previous Record Next Record Go to First Record Go to Last Record Create New Record Find Record Exit, Return to Switchboard
Page 6 of 17 DRAFT – Last Modified June 5, 2009 g. chilton / n. dowell
Secondary Data
Data that you should enter only
after
primary data:
Note: All of these data elements need not be entered for all databases; it’s really up to you how richly you wish to populate ERMes.
Licensing terms (ILL, E-Reserve, etc.) Cost histories
Admin access urls, logins/passwords Alternate access urls, logins/passwords Problem reports
User Limits
Last Training Session Subscription Status
Link to journal title and coverage list Access
You can enter data via forms or directly into a table. To view or access all available tables, click the double daggers to the left of the Switchboard tab.
Use the buttons at the top of the switchboard to access forms for primary data entry.
Tip: When migrating data from a previous version, you might try cutting and pasting the data table by table and field by field or by writing an update query.
See It: Add a new database to ERMes for an existing vendor:
Step 1: Add Database NameStep 2: Add Database Info
How to access a list of tables in ERMes 1
Page 7 of 17 DRAFT – Last Modified June 5, 2009 g. chilton / n. dowell
Retrieving Information
The following section of the switchboard lists buttons you should use to retrieve data from ERMes or enter secondary data such as
licensing terms, cost histories, alternate and admin access, and problem reports.
Once you have entered into one of these components (e.g.
Database/Cost History), you can search for / retrieve records in a variety of ways:
1. The search box at the bottom of the screen
2. The Find Record button on the navigation bar
When using the Find Record button, be sure and experiment with the “Look In” and “Match” drop down menus:
3. MS Access Filter functions
So far, we have found the MS Access Filter functions to be the most robust and flexible means of retrieving data. Not only does filtering provide you with prompts to guide search/filter construction, but these functions also allow pull from existing field-specific data (e.g. user limits, format,
authentication method, etc.) depending on which field your cursor is when you click the filter button! See It: A filtered search for all databases from two different vendors
Page 8 of 17 DRAFT – Last Modified June 5, 2009 g. chilton / n. dowell
!
Note: After applying an MS Access Filter, the filter remains intact unless you click the “Filtered” button at the bottom of the screen.Reports
Report Name
Report Description
Year-to-year Compare Lists all of the databases for which Renewal
Date in the Database_Cost_History table fall between the user specified dates. This report can be used to determine what renewals you have outstanding and for which you need to make a renewal decision.
Year-to-year Compare Shows the price increases for databases
between two fiscal years that the user specifies.
Payments Generates a list of all payments for all
databases by fiscal year.
Payments Crosstab Shows a spreadsheet view of all payments
made for all databases. This report is only available from the switchboard.
Database Uses for Fiscal Year Calculates a cost per use for each
database by the user specified date range. This assumes you have manually entered the use statistics into ERMes
COUNTER DB1 By Year Generates a report based on COUNTER
DB1 statistics.
Note: See instructions for Developing a COUNTER report in ERMes
Page 9 of 17 DRAFT – Last Modified June 5, 2009 g. chilton / n. dowell
Developing a COUNTER report in ERMes
While compiling reports for database usage can be cumbersome, there are some shortcuts we can take using ERMes. The following setup is a bit time-consuming at first; however, once it is set up, the monthly collection of statistics does not take as long.
There are two ways to collect and keep statistics. This will show you how to link an Excel table to read in Access. (NOTE: There is a table in the original ERMes database called Uses that you may
alternatively work with if your number of databases and data is not as large as some. Also, a table called COUNTERStats is provided so that you can see the basic layout of the Excel table).
1. Create an Excel table with the following headings (Figure 1): Year - Year of the statistics set
Title - Title of the Database
Platform - Platform or vendor who provides the database Type - Searches Run or Sessions
One column for each month of the year Totals - totals for that year
Figure 1 - Column Headings in Excel 2. RENAME the datasheet DB1Stats.
3. SAVE your new local workbook in a location where you can get to it, and so can other interested staff. Remember what you named the workbook. For this tutorial, the workbook is named StatsDemo.xlsx
4. If you already receive COUNTER compliant statistics, select one of the following reports (depending on what the vendor provides):
1st Preference: Database Report 1: Total Searches and Sessions by Month and Database 2nd Preference: Database Report 3: Total Searches and Sessions by Month and Service 3rd Preference: Journal Report 4: Total Searches Run by Month and Service
4th Preference: Whatever the vendor will provide for searches and sessions as close to database as possible (if all they provide is by journal, you may want to skip the vendor for this report)
5. Select a delivery format that is an xls or csv format. It will look similar to the Excel table you have already created. The vendor will either provide you with a download, an HTML version of the report you requested, or open an Excel table with the data supplied.
6. Even though a publisher/vendor will provide COUNTER compliant data, the layout may differ and you may need to hand input some information at first to get everything in the same format within your Excel table. Otherwise, you can cut and paste DB1 and DB2 reports into your Excel table, leaving the first column blank to input the year. Here is an example of a DB1 report (
7. 8.
Page 10 of 17 DRAFT – Last Modified June 5, 2009 g. chilton / n. dowell Figure 2 - COUNTER DB1 report sample
10.When cutting and pasting this data into our local Excel file, we would type “2009” into A6, and then copy A6 through P6 into our local Excel sheet. In subsequent months, we would simply log in to the vendor’s stats page, find the report, and add the new month’s data to our local spreadsheet.
a. COPY A6 through P6 (note we are not copying the total column)
b. PASTE into our local Excel sheet:
c. TOTAL column E through P in column Q (or pull-down total from previous row):
d. ADD new each month by hand if you like, or copy over the row of data from the downloaded report:
This can be done for any smaller sets of data; however, what happens when there are many rows of data from a single publisher? The next section covers how to accomplish this for standard sets of data.
Page 11 of 17 DRAFT – Last Modified June 5, 2009 g. chilton / n. dowell
Mass Input of Large Accounts or Accounts with Multiple Lines
It is possible to cut and paste all of the data in one mass group. This works for DB1 and DB3 reports. Open StatsDemo.xlsx and SORT
DB1Stats using a CUSTOM sort: Year
Platform Title Type
FILTER the sheet by year and platform.
Open a downloaded DB1 report. For this publisher’s download (Ebsco) there is a line break between each set of records in the report. We need to remove the line breaks before cutting and pasting this into our local file. This tends to be a common issue, so we will take care of it first.
Select all the records in the downloaded report EXCLUDING the header information
Page 12 of 17 DRAFT – Last Modified June 5, 2009 g. chilton / n. dowell Perform an A-Z sort on the
selected data set
Delete the blank rows above the titles and below the header row.
Before
Page 13 of 17 DRAFT – Last Modified June 5, 2009 g. chilton / n. dowell Delete rows 1-4 and the Publisher column (not needed for this report structure) Insert a column before the first
column and label it “Year” Populate the first column with the year in question (this one is 2009)
Label the second column “Title” Label the fourth column “Type” Copy all the data under the column headings EXCLUDING the column headings, empty data columns and totals
Go to StatsDemo.xlsx and PASTE OVER the existing records for that title. USE THIS STEP WITH CAUTION!!!!
If you are unsure that you have all the records you should have, delete all of the old records for that YEAR and PLATFORM, and paste the new ones onto the end of the local datasheet.
PANIC BUTTON: ctrl-z will undo any errant changes!
Page 14 of 17 DRAFT – Last Modified June 5, 2009 g. chilton / n. dowell
Linking your Excel database to ERMes
Open ERMes
Click on the External Data tab
Under the Import section, click on Excel
Browse for the workbook file name you saved your data under in step 3 above and select it
Click on the Link to the data source be creating a linked table radio button.
Click OK
Select DB1Stats from the worksheet box at the top of the popup window
Page 15 of 17 DRAFT – Last Modified June 5, 2009 g. chilton / n. dowell Make sure First Row
Contains Column Headings checkbox is checked
Click the Next button
Click OK - Linked Name Table should be DB1Stats if all the previous steps were taken, and show in the Tables list as a linked table
Page 16 of 17 DRAFT – Last Modified June 5, 2009 g. chilton / n. dowell Open the Query menu
and open
statsByDatabaseQry in Design View
ADD the DB1Stats table to the query
CHANGE all of the fields at the bottom that currently say COUNTERstats for the Table name to DB1Stats.
REMOVE the table
COUNTERstats from the query
LINK The Title in DB1Stats to the Database_Name in Database table as shown Test the query.
!
Note: You must have the database names existing in the database table for the stat tables to show up in this query!!!If the query works, save and close the query
Page 17 of 17 DRAFT – Last Modified June 5, 2009 g. chilton / n. dowell
Known Issues
Issue
Resolution/Future Development
If the vendor subscription of databases changes, it will affect the user’s ability to cut and paste large numbers of records.
An update query will be developed to replace and update database to vendor information.
If a database is not listed in the main Database table or misspelled in relation to the DB1Stats table, it will not appear in the statistics report
An update procedure to cross check for such issues will be developed.