– Improper installation or repair of Webasto heating and cooling systems can cause fire or the leakage of deadly carbon monoxide leading to serious injury or death. – Installation and repair of Webasto heating and cooling systems requires special
Webasto training, technical information, special tools and special equipment. – NEVER attempt to install or repair a Webasto heating or cooling system unless you
have successfully completed the factory training course and have the technical skills, technical information, tools and equipment required to properly complete the necessary procedures.
– ALWAYS carefully follow Webasto installation and repair instructions and heed all WARNINGS.
– Webasto rejects any liability for problems and damage caused by the system being installed by untrained personnel.
Service and Repair
Manual
Coolant Heaters
DBW 2010
DBW 2020
DBW 300
Circulation Pumps
U4810
U4814
U4846
U4851
DBW 2010/2020/300 COOLANT HEATERS
TABLE OF CONTENTS
Contents
Page
1. Introduction 7
1.1 Scope and Purpose . . . 7
1.2 Applicability of Manual . . . 7
1.3 Meaning of Warnings, Cautions and Notes . . . 7
1.4 Additional Documentation to be used. . . 7
1.5 Safety Information and Regulations . . . 7
1.5.1 General Safety Notes. . . 7
1.6 Legal Provisions for Installation . . . 8
1.7 Corrections and Improvements . . . 8
2. General Description 9 2.1 Parts of the Heater . . . 12
2.1.1 Electronic Control Unit (1) . . . 12
2.1.2 Overheat Fuse (15) . . . 12
2.1.3 Temperature Limiter (17) . . . 12
2.1.4 Temperature Control Thermostat (16) . . . 12
2.1.5 Flame Detector (23). . . 13
2.1.6 Combustion Air Intake (26) . . . 13
2.1.7 Combustion Air Fan (5) and Motor (2) . . . 14
2.1.8 Coupling (4) . . . 15
2.1.9 Toothed Gearing (6) . . . 15
2.1.10 Fuel Pump (24) . . . 15
2.1.11 Fuel Control Valve and Solenoid (8) . . . 15
2.1.12 Fuel Nozzle and Nozzle Holder (14) . . . 16
2.1.13 Fuel Line Connections (25) . . . 16
2.1.14 Electronic Ignition Unit (3) . . . 16
2.1.15 Ignition Electrodes (13) . . . 16
2.1.16 Combustion Chamber (20), Combustion Air Swirler (21) . . . 17
2.1.17 Heat Exchanger (19) . . . 17
2.1.18 Preheat Thermostat (7) . . . 17
2.1.19 Pre-heater Cartridge (10). . . 17
2.1.20 Coolant Circulating Pump . . . 18
3. Functional Description 19 3.1 Switch ON . . . 19
3.2 Heating Operation . . . 19
3.3 Switch Off . . . 19
4. Technical Data 20 4.1 Technical Data of the Heaters . . . 21
4.2 Technical Data of the Circulating Pumps . . . 22
4.3 Permissible Extension of the Connections . . . 22
5. Troubleshooting 23 5.1 Quick Check Troubleshooting Matrix. . . 23
5.2 Tester Instructions (Tester P/N 1302691A) . . . 23
5.2.1 Test Procedures . . . 23
5.3 Instructions for Fault Finding. . . 26
5.3.1 Combustion Starts Immediately When Heater Is Switched ON . . . 26
5.3.2 Heater Does Not Start When Switched ON . . . 26
5.3.3 After Switching ON, The Heater Switches OFF after Approx. 30 Seconds On Fault . . . 27
TABLE OF CONTENTS
DBW 2010/2020/300 COOLANT HEATERS
5.3.5 Heater Switches Off By Itself During Operation . . . .28
5.3.6 Heater Smokes . . . .29
5.3.7 Heater Smokes . . . .30
5.3.8 Heater Cannot Be Switched Off . . . .30
6. Functional Adjustments 31 6.1 General. . . .31
6.2 Adjustments . . . .31
6.2.1 Adjustment of CO2 Contents . . . .31
6.2.2 Flame Detector Resistance Check. . . .32
6.2.3 Ignition Electrode Check and Setting . . . .32
6.2.4 Ignition Coil Check . . . .33
6.2.5 Fuel Pump Check. . . .33
6.2.6 Fuel Solenoid Valve Check . . . .34
6.2.7 Nozzle Block Pre-heater Check. . . .34
7. Circuit Diagrams 35 7.1 DBW 2010 12 V and 24 V - Early Canadian Version. . . .35
7.2 DBW 2010 12 V and 24 V - Present North American Version . . . .36
7.3 DBW 2020 / 300 12 V and 24 V - without Nozzle Preheat . . . .37
7.4 DBW 2020 / 300 12 V and 24 V - with Nozzle Preheat . . . .38
7.5 Scholastic Heater 12 V - with On/Off Switch . . . .39
7.6 Scholastic Heater 12 V - with 7-Day Timer Model 1529 . . . .40
7.7 Scholastic Heater 12 V - with 7-Day Timer Model 1531 . . . .41
7.8 Control Unit - Identification of Terminals . . . .42
8. Servicing 43 8.1 General. . . .43
8.2 Heater Servicing . . . .43
8.3 Vehicle Servicing . . . .43
8.4 Heater Test Run. . . .43
8.5 Maintenance. . . .43
8.5.1 Burner Head Opening and Closing. . . .43
8.6 Visual Inspections and Regulations for Installation . . . .45
8.6.1 Connection to Vehicle Cooling System. . . .45
8.6.2 Connection to Vehicle Fuel System. . . .45
8.6.2.1 Fuel Lines . . . .45
8.6.2.2 Fuel Filter . . . .45
8.6.3 Combustion Air Supply . . . .45
8.6.4 Exhaust Line . . . .46
8.7 Removal and Installation . . . .46
8.7.1 Heater, Removal and Installation . . . .46
8.7.1.1 Removal . . . .46
DBW 2010/2020/300 COOLANT HEATERS
TABLE OF CONTENTS
9. Repair 49
9.1 General Information . . . 49
9.1.1 Work on Components after Disassembly . . . 49
9.1.1.1 Visual Inspection, General . . . 49
9.1.1.2 Combustion Chamber, Visual Inspection . . . 49
9.1.1.3 Heat Exchanger, Visual Inspection . . . 49
9.1.1.4 Combustion Air Fan Wheel, Visual Inspection . . . 50
9.2 Disassembly and Assembly . . . 50
9.2.1 Overheat Fuse, Replacement . . . 50
9.2.1.1 Removal . . . 50
9.2.1.2 Installation . . . 50
9.2.2 Temperature Control Thermostat, Replacement . . . 50
9.2.2.1 Removal . . . 50
9.2.2.2 Installation . . . 50
9.2.3 Temperature Limiter, Replacement . . . 51
9.2.3.1 Removal . . . 51
9.2.3.2 Installation . . . 51
9.2.4 Control Unit, Replacement . . . 51
9.2.4.1 Removal . . . 51
9.2.4.2 Installation . . . 51
9.2.5 Burner, Replacement . . . 51
9.2.5.1 Removal . . . 51
9.2.5.2 Installation . . . 51
9.2.6 Fuel Valve and Solenoid, Replacement . . . 53
9.2.6.1 Removal . . . 53
9.2.6.2 Installation . . . 53
9.2.7 Fuel Pump, Replacement . . . 53
9.2.7.1 Removal . . . 53
9.2.7.2 Installation . . . 53
9.2.8 Fuel Nozzle, Replacement . . . 54
9.2.8.1 Removal . . . 54
9.2.8.2 Installation . . . 54
9.2.9 Flame Detector, Replacement . . . 54
9.2.9.1 Removal . . . 54
9.2.9.2 Installation . . . 54
9.2.10 Ignition Electrodes, Replacement . . . 55
9.2.10.1 Removal . . . 55
9.2.10.2 Installation . . . 55
9.2.11 Ignition Coil, Replacement . . . 55
9.2.11.1 Removal . . . 55
9.2.11.2 Installation . . . 55
9.2.12 Drive Motor, Replacement . . . 56
9.2.12.1 Removal . . . 56
9.2.12.2 Installation . . . 56
9.2.13 Combustion Air Fan, Replacement . . . 57
9.2.13.1 Removal . . . 57
9.2.13.2 Installation . . . 57
9.2.14 Fan Replacement. . . 58
9.2.15 Fan Shaft, Bearings and Gearing, Exploded View (DBW 2010) . . . 59
TABLE OF CONTENTS
DBW 2010/2020/300 COOLANT HEATERS
9.2.17 Combustion Chamber, Replacement . . . .61
9.2.17.1 Removal . . . .61
9.2.17.2 Installation . . . .61
9.2.18 Heat Exchanger, Replacement . . . .61
9.2.18.1 Removal . . . .61
9.2.18.2 Installation . . . .61
9.3 Coolant Circulating Pump Repair. . . .62
9.3.1 Removal . . . .62
9.3.2 Disassembling . . . .62
9.3.3 Assembling . . . .62
9.3.4 Installing . . . .62
9.4 MP School Bus Circulation Pump . . . .64
9.4.1 Removal . . . .64
9.4.2 Disassembling . . . .64
9.4.3 Assembling . . . .64
9.4.4 Installing . . . .64
10.Instruments and Tools 65 10.1 Setting Gauge. . . .65
10.2 Tester . . . .65
10.3 CO2 Test Apparatus . . . .65
10.4 Smoke Number Test Apparatus . . . .65
10.5 Nozzle Wrench . . . .66
10.6 Fuel Pressure Gauge . . . .66
10.7 Grease and Locking Varnish . . . .66
11.Product Information 67 11.1 ISS “White” Timer for the Scholastic Heater™ . . . .67
DBW 2010/2020/300 COOLANT HEATERS
INTRODUCTION
1.
INTRODUCTION
1.1
S
COPEANDP
URPOSEThis repair shop manual is intended to support
familiarized personnel in the repair of water heaters DBW 2010, 2020 and 300.
The water heater may only be operated with the fuel specified on the model plate and the relevant designated type of electrical connection.
1.2
A
PPLICABILITYOFM
ANUALThis manual is applicable only for heaters identified on the title page.
1.3
M
EANINGOFW
ARNINGS, C
AUTIONS ANDN
OTESWARNINGS, CAUTIONS, and NOTES in this manual have the following meaning:
DANGER: This heading and text style is used to highlight that non-compliance with instructions or procedures will cause injuries or lethal accidents to personnel.
WARNING: This heading and text style is used to highlight that non-compliance with instructions or procedures may cause injuries or lethal accidents to personnel.
CAUTION: This heading and text style is used to highlight that non-compliance with instructions or procedures may cause damage to equipment.
NOTE: This heading and text style is used to highlight and draw attention to information we feel you would like to have. It could have to do with procedures and tips that will help you work more efficiently.
1.4
A
DDITIONALD
OCUMENTATIONTO BEUSED This workshop manual contains all information and procedures necessary for the repair of heaters DBW 2010, 2020 and 300.The use of additional documentation is normally not necessary.
Operating instructions and installation instructions may be used as complementary information as necessary.
1.5
S
AFETYI
NFORMATIONANDR
EGULATIONS The general safety regulations for the prevention of accidents and the relevant operating safety instructions have to be observed at all times."General Safety Regulations" beyond the scope of these regulations are detailed in the following.
The specific safety regulations applicable to this manual are highlighted in the individual chapters by Warnings, Cautions, and Notes.
1.5.1
G
ENERALS
AFETYN
OTESThe year of first operation must be permanently marked on the identification label by removing the relevant number of the year.
The heaters are cleared for heating the vehicle engine and the passenger cabin. The use of the heater in vehicles not subject to the EU Directive 70/156/EEC (e.g. ships) is partly governed by regional regulations.
The heater may only be fitted in vehicles or in
independent heating systems with a minimum coolant capacity of 10 liters for DBW 2010 and 15 liters for DBW 2020 and 300.
The heater must not be installed in the passenger or driver compartments of vehicles. Should the heater nevertheless be installed in such a compartment, the installation box must be sealed tight against the vehicle interior.
There must be sufficient ventilation of the installation box from the exterior in order not to exceed a maximum temperature of 85° C (185 °F) in the installation box. Excessive temperatures may cause malfunctions.
WARNING: Due to the danger of
poisoning and suffocation the heater must not be operated, not even with timed operation, in enclosed areas such as garages or workshops not equipped with an exhaust venting facility.
WARNING: At filling stations and fuel depots the heater must be switched off to prevent explosions.
CAUTION: Where flammable fumes or dust may build up (e.g. in the vicinity of fuel, coal, wood, cereal depots, or similar installations) the heater must be switched off to prevent explosions.
The heater must not be operated near flammable materials such as dry grass and leaves, cardboard boxes, paper, etc.
INTRODUCTION
DBW 2010/2020/300 COOLANT HEATERS
In the vicinity of the water heater a temperature of 85° C (185 °F) must not be exceeded under any circumstances (e.g. during body paint work).
A violation of this temperature limit may cause permanent damage to the electronics.
When checking the cooling water level proceed in accordance with the vehicle manufacturer’s instructions. The water in the heating circuit of the heater must contain a minimum of 20% of a quality brand anti-freeze.
Additives in the heating circuit must not affect metals, plastics and rubber and must leave no deposits. The opening pressure in the vehicle cooling system - normally indicated on the radiator filler cap - must be between 0.4 and 2.0 bar above operating pressure (also applicable to separate heating circuits).
1.6
L
EGALP
ROVISIONSFORI
NSTALLATION DBW series heaters have been type-tested and approved in accordance with EG Directives 72/245/EWG (EMV) and 2001/56/EG (heater) with the following EG permit numbers:e1*2001/56*0006*xx
Installation is governed above all by the provisions in Annex VII of Directive 2001/56/EC.
NOTE: The provisions of these Directives are binding within the territory governed by EU Directive 70/156/EEC and should similarly be observed in countries without specific regulations.
(Extract from Directive 2001/56/EC Annex VII)
“1.7.1. A clearly visible indicator within the user's field of vision must show when the heater is switched On or Off.”
NOTE: For further notes and provisions relating to the installation of the heater in vehicles, refer to the installation instructions.
Installation Instructions for Webasto fuel tanks for the fuel supply of water heaters in vehicles:
• in vehicles the installation is not permitted in the passengers’ or driver’s compartment.
• the fuel filler neck must not be located in the passengers’ or driver’s compartment of any vehicle. • fuel containers must either be equipped with a vent
cap or any other type of ventilation (vent line). Only vent caps in accordance with DIN 73400 may be used.
All fuel containers offered in the Webasto Accessories Catalogue are suitable for a maximum operating pressure of 0.15 bar overpressure.
All fuel containers offered in the Webasto Accessories Catalogue are subjected during manufacture to individual pressure testing with at least 0.3 bar overpressure.
• The operational state of the heater, i.e. at least an indication "on" or "off" must be easily and clearly visible.
For heaters in vehicles not ruled by the EU Directive but other regulations, the acceptance by the relevant authority is required as applicable.
1.7
C
ORRECTIONSANDI
MPROVEMENTSDeficiencies, improvements, or proposals for correction of this workshop manual are to be mailed to:
WEBASTO PRODUCT NORTH AMERICA, INC.
TECHNICAL DOCUMENTATION GROUP
15083 NORTH ROAD
DBW 2010/2020/300 COOLANT HEATERS
GENERAL DESCRIPTION
2.
GENERAL DESCRIPTION
The water heaters Webasto DBW 2010, DBW 2020, DBW 300 and Scholastic Heater™ are used in
combination with the vehicle’s own heating installation to:
– heat the passenger compartment – defrost the windshield
– preheat water-cooled engines
– in self-contained cargo heating applications
The water heater operates independent from the vehicle engine and is connected to the vehicle cooling system, the fuel system and the electrical system.
The heater is designed to the heat exchanging principle and operates intermittently, controlled by the
temperature control thermostat.
The heaters DBW 2010, DBW 2020, DBW 300 and Scholastic Heater™ basically consist of:
– the combustion air intake (adjustable) – the combustion air fan and motor – the fuel pump
– the fuel control valve and solenoid – the nozzle holder and nozzle
– the ignition coil and ignition electrodes – the combustion chamber
– the heat exchanger
For control and monitoring, the heater includes: – a control unit
– an overheat fuse (non-reset) – a temperature limiter
– a temperature control thermostat – a flame detector (photo eye)
A coolant circulating pump is installed directly to the heater or inside an enclosure or on a tray mount.
The heaters may also be equipped with an optional cold starting aid consisting of:
– a preheat thermostat
– a nozzle holder preheat cartridge – a relay and wiring harness
GENERAL DESCRIPTION
DBW 2010/2020/300 COOLANT HEATERS
DBW 2010
1
2
3
4
5
6
7
8
9
1
0
11 1
2
1
3
1
4
1
5
16
1
7
18
1
9
20
2
1
22
23
24
25
2
6
1. Electronic control unit 2. Motor
3. Electronic ignition unit 4. Coupling (clutch) 5. Combustion air fan 6. Toothed gearing
7. Preheat thermostat (blue and green wires)
8. Fuel control valve and solenoid 9. Electrode holder 10. Pre-heater 11. Coolant outlet 12. Bleeding valve 13. Ignition electrodes 14. Fuel nozzle
15. Overheat fuse (white wires) 16. Temperature control thermostat
(green and red wires)* 17. Temperature limiter
(green wires)
18. Coolant inlet 19. Heat exchanger 20. Combustion chamber 21. Combustion air swirler 22. Exhaust outlet
23. Flame detector 24. Fuel pump 25. Fuel pipes
26. Combustion air intake with adjusting shutter
DBW 2010/2020/300 COOLANT HEATERS
GENERAL DESCRIPTION
DBW 2020
DBW 300
1
2
3
4
5
6
7
8
9
1
0
11
1
3
1
4
1
5
16
1
7
18
1
9
20
2
1
22
23
24
25
2
6
1. Electronic control unit 2. Motor
3. Electronic ignition unit 4. Coupling (clutch) 5. Combustion air fan 6. Toothed gearing
7. Preheat thermostat (blue and green wires)
8. Fuel control valve and solenoid 9. Electrode holder 10. Pre-heater 11. Coolant outlet 12. Bleeding valve 13. Ignition electrodes 14. Fuel nozzle
15. Overheat fuse (white wires) 16. Temperature control thermostat
(green and red wires) 17. Temperature limiter
(green wires)
18. Coolant inlet 19. Heat exchanger 20. Combustion chamber 21. Combustion air swirler 22. Exhaust outlet
23. Flame detector 24. Fuel pump 25. Fuel pipes
26. Combustion air intake with adjusting shutter
GENERAL DESCRIPTION
DBW 2010/2020/300 COOLANT HEATERS
2.1
P
ARTSOF THEH
EATER2.1.1
E
LECTRONICC
ONTROLU
NIT(1)
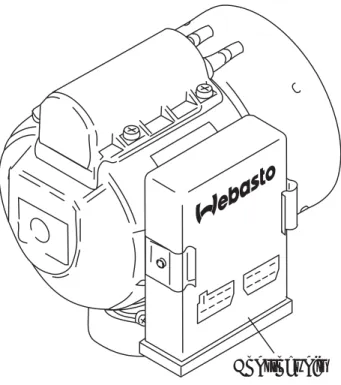
The control unit SG 1553 in 12 volt and 24 volt versions is the central component to ensure controlled operation and monitoring of combustion.
Figure 1: Control Unit
2.1.2
O
VERHEATF
USE(15)
The overheat fuse protects the heater from too high and inadmissible temperatures. The overheat fuse contains a fusible link that reacts when the temperature exceeds 138° C (280° F), and switches the heater off with a purge cycle.
2.1.3
T
EMPERATUREL
IMITER(17)
The temperature limiter is a thermostat that responds (opens) at a temperature of 95° C (203° F). The
temperature limiter will automatically reset (closes) once temperature falls well below 95° C (203° F). Once the limiter has reset, the heater will have to be switched off and back on to restore operation.
Figure 3: Temperature Limiter
2.1.4
T
EMPERATUREC
ONTROLT
HERMOSTAT(16)
After the operating temperature has been reached, the temperature control thermostat opens and shuts off the heating cycle and a purge cycle begins. Once the operating temperature drops to the lower temperature threshold of the control thermostat, the thermostat closes and another heating cycle begins, thus, maintaining a consistent coolant temperature.Control unit
Temperature Limiter (green wires) Switching temperature
– opens at 95° C (203° F)
Temperature Control Thermostat
Version 1 (red and green wires) – opens at 75 ± 3° C (167 ± 6° F) – closes at 68 ± 5° C (154 ± 9° F)
Version 2 (orange and white wires) – opens at 70 ± 3° C (158 ± 6° F) – closes at 60 ± 5° C (140 ± 9° F)
DBW 2010/2020/300 COOLANT HEATERS
GENERAL DESCRIPTION
2.1.5
F
LAMED
ETECTOR(23)
Figure 5: Flame Detector and Photo Disc
The flame detector is a photosensitive, varying resistance element that supplies a “flame” or “no flame” signal to the control unit.
IMPORTANT! The photo disc to which the flame detector is attached must be flat and free floating over the nozzle and electrodes.
2.1.6
C
OMBUSTIONA
IRI
NTAKE(26)
The air intake socket provides regulation of thecombustion air quantity to the fuel quantity atomized by the high-pressure atomizer nozzle.
Figure 6: Combustion Air Intake Bellows
Flame Detector Photo Disc
Screw
Locking screw Combustion air
GENERAL DESCRIPTION
DBW 2010/2020/300 COOLANT HEATERS
2.1.7
C
OMBUSTIONA
IRF
AN(5)
ANDM
OTOR(2)
The combustion air fan supplies the air necessary for combustion.There are two different fan designs in use: DBW 2010 — lateral canal fan
DBW 2020/300 — radial fan
The motor, through a coupling, drives the combustion air fan, and through a toothed gearing, the fuel pump. Rated motor r.p.m.: DBW 2010 4500 RPM DBW 2020 5000 RPM DBW 300 5800 RPM
DBW 20
1
0
DBW 2020/300
Drive motor
Fan wheel
Cap
DBW 2010/2020/300 COOLANT HEATERS
GENERAL DESCRIPTION
2.1.8
C
OUPLING(4)
The coupling (clutch) provides the mechanical connection between the motor and the combustion air fan.
Figure 8: Motor to Fan Coupling (Clutch)
NOTE: Before reusing the coupling, it has to be checked for cracks, wear and the condition of the flat portion of the center shaft hole. Too much play on the shaft will result in a load continuous noise.
2.1.9
T
OOTHEDG
EARING(6)
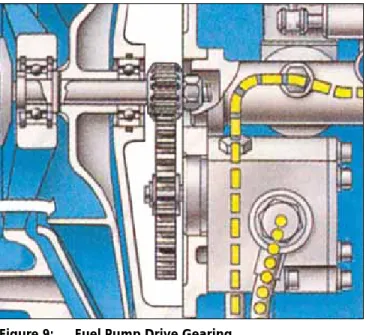
The gears drive the fuel pump with a gear ratio of 1:3.5.
Figure 9: Fuel Pump Drive Gearing
NOTE: If signs of wear are showing within the sector of the toothed gearing as well as at the flat portion of the shaft hole of the large gear, the gears will have to be replaced.
2.1.10 F
UELP
UMP(24)
The fuel pump (single-staged toothed gear pump) delivers the fuel from the tank to the heater and brings it to a pressure of 10 ± 0.5 bar (145 ± 7 psi) for DBW 2010*, DBW 2020 and DBW 300.
*DBW 2010 equipped with a 0.35 Gal/hr. nozzle only. For DBW 2010 with 0.40 Gal/hr. nozzle, the fuel pressure should be set to 8 – 0.5 bar (116 – 7 psi).
Figure 10: Fuel Pump Assembly
2.1.11 F
UELC
ONTROLV
ALVEANDS
OLENOID(8)
The fuel solenoid valve interrupts the fuel supply to the atomizer nozzle when the heater is switched off and during a control pause period. When there is no current present, the solenoid valve is closed.Figure 11: Fuel Solenoid Assembly
Strainer
Pressure Regulation Valve
GENERAL DESCRIPTION
DBW 2010/2020/300 COOLANT HEATERS
2.1.12 F
UELN
OZZLEANDN
OZZLEH
OLDER(14)
The fuel atomizing nozzle is screwed into the nozzle holder. Under pressure, the fuel nozzle atomizes the fuel entering the combustion chamber.Figure 12: Nozzle Holder and Nozzle
2.1.13 F
UELL
INEC
ONNECTIONS(25)
Fuel lines from the fuel tank are connected to the suction and return pipes of the heater in the case of the DBW 2010/2020/300.
The Scholastic Series heater use a single fuel line that is connected to the suction pipe of the heater. There is no return fuel line on this model.
2.1.14 E
LECTRONICI
GNITIONU
NIT(3)
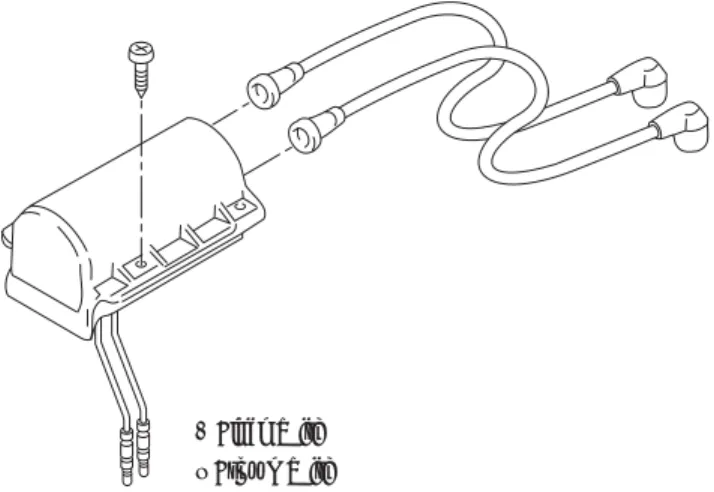
The electronic ignition unit develops high voltage of approximately 8000 volts to produce a spark at the tips of the ignition electrodes. The electronic ignition unit is only in operation during the starting phase.
IMPORTANT! Never switch on the electronic ignition unit without being connected to the ignition electrodes!
Figure 14: Electronic Ignition Unit
2.1.15 I
GNITIONE
LECTRODES(13)
The ignition spark is formed between the points of the ignition electrodes, thus starting the combustion process.
Nozzle Nozzle Holder
Dual Line System (DBW 2010/2020/300)
+ Black Wire – Brown Wire
DBW 2010/2020/300 COOLANT HEATERS
GENERAL DESCRIPTION
2.1.16 C
OMBUSTIONC
HAMBER(20), C
OMBUSTIONA
IRS
WIRLER(21)
Within the burner tube of the combustion chamber, the air-fuel mixture is burned.
Figure 16: Combustion Chambers
2.1.17 H
EATE
XCHANGER(19)
The heat, produced by the combustion process, is transferred to the coolant (water-antifreeze mixture) flowing through the heat exchanger.
Figure 17: Heat Exchangers
2.1.18 P
REHEATT
HERMOSTAT(7)
The preheat thermostat is installed in the burner head on the back wall (DBW 2010) or on the photo disc (DBW 2020/300). It switches the nozzle holder pre-heating element (10) on which warms the fuel inside the nozzle holder to ensure fuel atomization in severe cold
conditions.
Figure 18: Preheat Thermostat
2.1.19 P
RE-
HEATERC
ARTRIDGE(10)
The pre-heater is a heating element located in the fuel nozzle holder. Operated by the preheat thermostat (7), it heats the fuel inside the nozzle holder when the
temperature drops below 0° C (32° F).
Figure 19: Heating Cartridge
DBW 2010 DBW 2020/300 Air Swirler DBW 2010 DBW 2020/300
Preheat Thermostat
(blue and green wires)
Switching temperature – closes at 0° C (32° F) – opens at 8° C (48° F)
Power consumption
130 Watts
Red - 12 V
Green - 24 V
GENERAL DESCRIPTION
DBW 2010/2020/300 COOLANT HEATERS
2.1.20 C
OOLANTC
IRCULATINGP
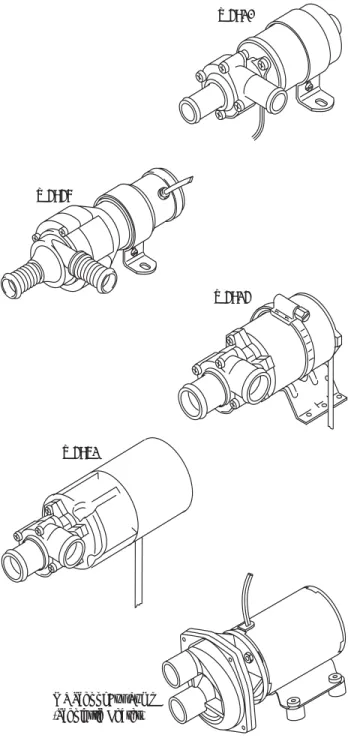
UMPThe externally mounted circulation pump ensures proper coolant circulation in the vehicle and heater circuit. The pump is activated by the control unit to operate as long as the heater is in operation.
The heaters may be operated with circulation pump U 4810 or U 4846 for the DBW 2010 heater, the U 4814, or U 4851 for the DBW 2020 and 300 heaters and a school bus specific, MP coolant pump for the Scholastic Heater™.
Figure 20: Coolant Circulating Pumps
U 4810
U 4846
U 4814
U 4851
MP School Bus Pump (Scholastic Heater)
DBW 2010/2020/300 COOLANT HEATERS
FUNCTIONAL DESCRIPTION
3.
FUNCTIONAL DESCRIPTION
3.1
S
WITCHON
Upon switching on the Webasto heater, the operation indicator lamp (A) comes on, the heater motor (C) and the coolant circulating pump (B) begin to run. After about 10 - 25 seconds, the solenoid valve (E) opens and fuel is sprayed into the combustion chamber. At the same time, the electronic ignition unit (D) produces high voltage (8000V) and the fuel - air mixture in the
combustion chamber is ignited by the spark on the ignition electrodes. The flame is detected by the flame detector (F), then the electronic ignition unit stops producing high voltage and combustion continues on its own (spark on electrodes is required only to ignite the flame). At this time the heater is working and produces heat.
3.2
H
EATINGO
PERATIONAfter reaching operating temperature the control unit in conjunction with the temperature control thermostat takes over to provide controlled operation by activation and deactivation of the burner in order to maintain a nearly constant temperature of the heat exchanger (coolant).
The heating operation is terminated as soon as the upper operating point on the temperature control thermostat is exceeded.
The heater now starts the control idle period. Heater operation is resumed when the temperature drops below the lower operating point of the temperature control thermostat.
CONTROLIDLEPERIOD
A rise in temperature above the upper operating point makes the solenoid valve in the fuel pump shut off the fuel supply initiating the run-down. The flame
extinguishes, the combustion air fan and the circulation pump however continue their operation. After
approximately 150 seconds run-down is completed with deactivation of the combustion air fan.
The circulation pump remains in operation during the control idle period. The operating indicator light also remains on.
3.3
S
WITCHO
FFSwitching off the heater stops combustion. The operating indicator light remains on and run-down commences. The combustion air fan and circulation pump are deactivated after approximately 150 seconds. The operating indicator light goes out to indicate the heater is now fully off.
Reactivation of the heater during run-down is permitted. The burner immediately resumes operation after the run-up time. A B C D E F G 10 - 25s 5 - 25s ~150s 10 - 25s 5 - 25s ~150s 1 2 3 4 5 2 3 6 7 8 9 10 8 9 10 1. Switch on 2. Start 3. Combustion 4. Control pause starts 5. Control pause ends
6. Switch off 7. Heater stops 8. Initial cycle 9. Safety delay time 10. Purge cycle A. Green light: operation
indicator, control thermostat B. Coolant circulation pump,
negative heater C. Heater motor
D. Electronic ignition unit E. Fuel solenoid valve
F. Flame detector G. Control thermostat
TECHNICAL DATA
DBW 2010/2020/300 COOLANT HEATERS
4.
TECHNICAL DATA
Unless tolerances are shown within the technical data table, a tolerance of ± 10% applies at an ambient temperature of +20 °C (+68 °F) and at the rated voltage and conditions.
ELECTRICAL COMPONENTS
Control unit, fan and circulation pump motors, solenoid valve, ignition coil, heater cartridge for nozzle block pre-heater and timer are designed either for 12-volt or 24-volt operation. Temperature limiter, overheat fuse, flame detector (photo eye), temperature control thermostat, preheat thermostat and switches are voltage
independent components.
NOTE: The allocation of circulation pumps to heater units must be in accordance with coolant resistances.
FUELFOR DBW SERIES (DIESEL/HEATING OIL/KEROSENE): Diesel fuel, heating oil and kerosene are suitable fuels for the heater.
The Diesel fuel specified by the vehicle manufacturer is suitable as fuel for the heater. Any negative effect caused by additives is not known. When the fuel for the heater is drawn from the vehicle’s fuel tank, the vehicle manufacturer’s specifications concerning additives are to be observed. Any addition of waste oil is not permitted. When changing to cold-resistant fuels, the heater must be operated for approx. 10 minutes to ensure that the fuel pump, nozzle holder, nozzle and lines are filled with the new fuel.
When using fuel from a separate fuel tank and at temperatures below 0° C, winter Diesel fuel must be used.
DBW 2010/2020/300 COOLANT HEATERS
TECHNICAL DATA
4.1
T
ECHNICALD
ATAOFTHEH
EATERSNOTE: Specifications for the Scholastic Heater are the same as the DBW 2010 heater unless otherwise specified.
HEATER DBW 2010 DBW 2020 DBW 300
DESIGN Coolant heater with high-pressure nozzle
HEAT OUTPUT kW (Btu/h) 13.0 (45,000) 23.3 (80,000) 30.0 (104,000)
FUEL Diesel #1, #2, Arctic and Kerosene
FUEL CONSUMPTION l/h (gal/h – US) (gal/h – Imp.) 1.5 (0.4) (0.3) 3.0 (0.8) (0.7) 4.0 (1.2) (0.9) RATED VOLTAGE V 12 or 24 OPERATING VOLTAGE V 10-14 or 20-28 POWER CONSUMPTION OF HEATER
(WITHOUT COOLANT CIRCULATION PUMP) 60 Watts 120 Watts 130 Watts
PERMISSIBLE AMBIENT TEMPERATURE DURING OPERATION OF HEATER, CONTROL UNIT AND COOLANT CIRCULATION PUMP:
°C (°F)
– 40... + 60 (– 40... + 140)
PERMISSIBLE STORAGE TEMPERATURE
CONTROL UNIT: °C (°F)
HEATER, COOLANT CIRCULATION
PUMP: °C (°F)
+ 85 max. (+ 185 max.)
– 40... + 85 (– 40... + 185) MIN. CAPACITY OF COOLING SYSTEM liter
(gal. – US) (gal. – Imp.) 10 2.65 2.2 15 3.96 3.3 PERMISSIBLE OPERATING PRESSURE OF
THE COOLANT bar (psi) 0.4-2.0 (6-29)
CO2 IN EXHAUST GASES% BY VOL. 10.5... 11.0
CO IN EXHAUST GASES% BY VOL. 0.2 max.
SMOKE NUMBER (BOSCH) 3.0 max.
DIMENSIONS OF THE HEATER L
INCL. CONTROL UNIT W
mm (inch) H 584 (23) 205 (8.1) 228 (9.0) 680 (26.7) 240 (9.5) 279 (11.0) WEIGHT OF HEATER INCL. CONTROL UNIT
TECHNICAL DATA
DBW 2010/2020/300 COOLANT HEATERS
4.2
T
ECHNICALD
ATAOFTHEC
IRCULATINGP
UMPS*Choice of circulating pump depends on resistance of coolant circuit.
4.3
P
ERMISSIBLEE
XTENSIONOF THEC
ONNECTIONS*Other dimensions upon request.
**Heaters built until model number DBW 2020.31 and DBW 300.10 inclusively.
CIRCULATING PUMP U 4810 U 4846 U 4814 U 4851 MP Pump
FLOW RATE l/h (gal/h – US) 1600 (7.0)
against 0.15 bar 1650 (7.26) against 0.15 bar 5200 (22.9) against 0.2 bar 6000 (26.4) against 0.4 bar 3406 - 4542 (15 - 20) NOMINAL VOLTAGE 12 or 24 12 or 24 12 or 24 24 12 OPERATING VOLTAGE 10-14 or 20-28 10-14 or 20-28 10-14 or 20-28 20-28 10-14
POWER CONSUMPTION Watt 25 30 104 209 72
DIMENSIONS L mm (inch) W H 166 (6.5) 94 (3.7) 77 (3.0) 180 (7.0) 74 (2.9) 112 (4.4) 248 (9.76) 100 (3.9) 106 (4.17) 285 (11.22) 115 (4.53) 118 (4.64) 214 (8.42) 106 (4.16) 106 (4.16) WEIGHT kg (lb) 0.8 (1.8) 22 (48.5) 2.1 (4.6) 2.8 (6.17) 2.5 (5.5)
RECOMMENDED FOR HEATER* DBW 2010 DBW2010 DBW 2020
DBW 300 DBW 2020 DBW 300 Scholastic Heater™ HEATER DBW 2010 DBW 2020 DBW 300 Scholastic Series FUEL LINE:
internal diameter mm (inch)
maximum length m (ft) suction head m (ft) 6* (0.25) 10 (33) 2 (6.6) 6* (0.25) 10 (33) 2 (6.6) 6* (0.25) 10 (33) 2 (6.6) 6* (0.25) 10 (33) 2 (6.6) COMBUSTION AIR INTAKE PIPE:
internal diameter mm (inch)
maximum length m (ft)
maximum degree of bends total m (ft)
80 (3.2) 5 (16.5) 270° 80 (3.2) 5 (16.5) 270° 80 (3.2) 5 (16.5) 270° 80 (3.2) 5 (16.5) 270° EXHAUST PIPE:
internal diameter mm (inch)
maximum length m (ft)
maximum degree of bends total m (ft)
38 (1.5) 5 (16.5) 270° 70 or 80** (2.75 or 3.2**) 5 (16.5) 270° 70 or 80** (2.75 or 3.2**) 5 (16.5) 270° 38 (1.5) 5 (16.5) 270° HOSE CONNECTIONS - INLET/OUTLET
outside diameter mm (inch) 18 (0.75) 38 (1.5) 38 (1.5) 25 (1.0)
TEMPERATURE DIFFERENCE BETWEEN INLET
DBW 2010/2020/300 COOLANT HEATERS
TROUBLESHOOTING
5.
TROUBLESHOOTING
5.2
T
ESTERI
NSTRUCTIONS(T
ESTERP/N 1302691A)
The tester unit has been designed to quickly check the proper operation of the various heater components. By using the tester in place of the heater control unit, you are able to manually control the heater to test
components and actually operate the unit in heating mode.
The actual testing is completed in two steps, first you perform an individual component test and then a manual start and run test, both designed to pinpoint actual problems in the heater system.
The tester should be used in conjunction with this Service and Repair Manual (P/N 699745) which details complete troubleshooting and repair procedures.
5.2.1
T
ESTP
ROCEDURES SETUP:A. Remove connector blocks from heater control unit, inspect for loose wires, corrosion and proper wire connections.
B. Plug control unit connector blocks into tester. C. Set heater switch/timer to “ON” and turn vehicle
heater valve to “FULL” mode (if equipped). D. Proceed to component test procedures.
5.1
Q
UICKC
HECKT
ROUBLESHOOTINGM
ATRIXPROBLEM
Switch On No Function
Control Light OFF after 30 Seconds
Blower Motor in Unit Inoperative
Blower Motor in Unit No Prime Cycle
Blower Motor in Unit No After-run
Coolant Circulating Pump Inoperative
Ignition Spark Absent
Combustion Does Not Take Place
Combustion Stops After 30 Seconds
Combustion Cannot Be Stopped
During Combustion Light Color Smoke
During Combustion Dark Color Smoke
Heating Unit Overheating
Electrical Fuse Elect rical Har ness and Connections Inertia Switch (Sch olastic Hea ter Only) ON /OFF Switch or Wiring Overhea tFu se (W hit eW ires ) Temperatur eLimi ter (Gr een Wir es) Contr ol T hermosta t(Gr een and Red Wir es) Flame Det ector (Photo -cell) Contr ol U nit Ignition Electr odes Ignition Coil –Coil Wir es Electric Motor Fuel Sup ply Fuel Pump Fuel Solenoid Valve High Pressur eN ozzle Coo lant Cir cula ting Pump Combus tio nA irIn take Exhau stSystem Heating System Vo ltag eSu pp ly
CHECK, REPAIR OR REPLACE AS NECESSARY
TESTER 440280 for DBW 2010/2020/300 in 12 or 24 Volt Appareil de Contrôle 440280 pour DBW 2010/2020/300 in 12 or 24 Volt
+ – On (Ouvert) On (Ouvert) Control Thermostat (Aquastat) Flame Control (Cellule photoélectrique) Water Pump (Pompe de circulation) Motor
(moteur) Ignition Coil(Centrale d'allumage) Solenoid Valve (Aimant d’électrovanne)
1
2
5
4
3
6
7
1 LED – input power to heater 2 LED – control thermostat 3 LED – flame detector 4 On/Off switch – water pump 5 On/Off switch – motor
6 Push Button – ignition spark coil 7 Push Button – fuel solenoid valve
TROUBLESHOOTING
DBW 2010/2020/300 COOLANT HEATERS
COMPONENT TEST PROCEDURES:
* I
NERTIAS
WITCH:
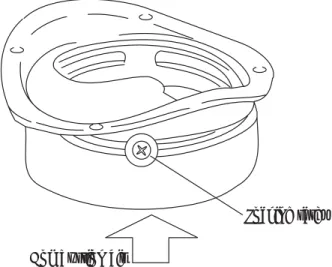
All Scholastic heaters are equipped with a manual reset inertia switch located on the tray floor near the coolant pump. The switch has a round red diaphragm and about the size of a 25 cent piece on top.
The purpose of this switch is to stop heater operation in the event the vehicle is involved in an accident or receives a strong impact shock, e.g. hitting a curb. When the switch responds, the fan motor circuit is interrupted thus stopping air and fuel delivery.
Always check to make certain the inertia switch has not been tripped. Resetting is accomplished by depressing the red diaphragm on top of the switch. You should hear an audible click whenever the switch is reset.
MANUAL TEST RUN OF HEATER:
NOTE: Hold IGNITION SPARK COIL button (5) ON until FLAME DETECTOR LED (3) lights or combustion is heard, then release; in any case do not hold button on for more than 15 seconds or damage to the coil may result.
TEST RESULTS:
1. LED (3) lights and combustion achieved – operation normal
2. Combustion achieved but no LED (3) light – check flame detector
3. Combustion not achieved and no LED (3) light – check fuel nozzle
– check fuel pressure
– check for blocked fuel lines (dirt or ice)
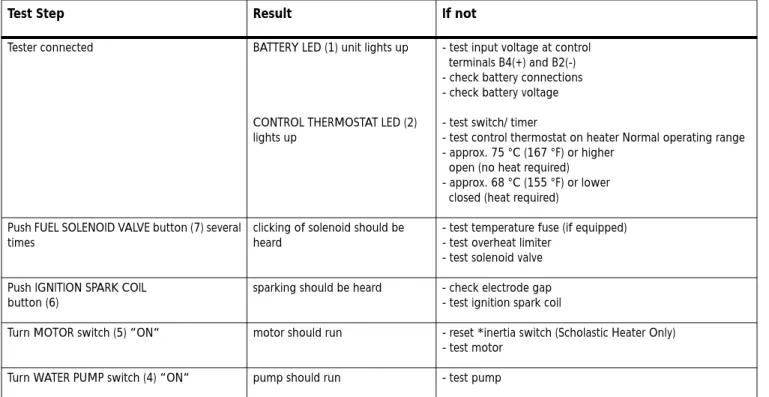
Test Step Result If not
Tester connected BATTERY LED (1) unit lights up
CONTROL THERMOSTAT LED (2) lights up
- test input voltage at control terminals B4(+) and B2(-) - check battery connections - check battery voltage
- test switch/ timer
- test control thermostat on heater Normal operating range - approx. 75 °C (167 °F) or higher
open (no heat required) - approx. 68 °C (155 °F) or lower closed (heat required)
Push FUEL SOLENOID VALVE button (7) several times
clicking of solenoid should be heard
- test temperature fuse (if equipped) - test overheat limiter
- test solenoid valve
Push IGNITION SPARK COIL button (6)
sparking should be heard - check electrode gap
- test ignition spark coil
Turn MOTOR switch (5) “ON“ motor should run - reset *inertia switch (Scholastic Heater Only)
- test motor
Turn WATER PUMP switch (4) “ON“ pump should run - test pump
DBW 2010/2020/300 COOLANT HEATERS
TROUBLESHOOTING
NOTE: If flame does not stop when the FUEL SOLENOID VALVE button (7) is released, turn MOTOR switch (5) OFF to stop heater. Check and repair fuel solenoid valve accordingly.
F. Once the manual test run has been successfully completed, set the heater switch or timer to OFF, remove the tester and reconnect the control unit. Once done, set the switch or timer to ON. If the heater or a heater component does not respond, the control unit is defective. Replace the control unit and retest the heater.
NOTE: Since the heater operates in the 68 °C (155 °F) to 75 °C (167 °F) On to Off / Off to On range, and the vehicle engine may be hot [e.g. coolant above 75 °C (167 °F)], the heater will not start until the coolant temperature is below 68 °C (155 °F). THIS IS NORMAL and does not indicate a problem.
TROUBLESHOOTING
DBW 2010/2020/300 COOLANT HEATERS
5.3
I
NSTRUCTIONSFORF
AULTF
INDING5.3.1
C
OMBUSTIONS
TARTSI
MMEDIATELYW
HENH
EATERI
SS
WITCHEDON
5.3.2
H
EATERD
OESN
OTS
TARTW
HENS
WITCHEDON
YE
S
NO
Electronic control unit defective
Voltage on terminal B1, B2 and B4?
Are electric fuses defective? Volume on control thermostat? Volume on control thermostat after cooling of coolant in the cycle? Control thermostat defective?
Are electric fuses defective? Replace fuses and switch heater ON; does fuse release?
Feed connection defective
Temperature in the cooling cycle too high
Voltage too low? < 18 ± 1V resp. < 9 ± 0.5V
Voltage on motor? Voltage across terminal C2 and C5 of control unit? Under-voltage
protection in the control unit has reacted; charge battery
Control unit defective, replace.
Check feed
connections to motor for circuit interruptions
Motor defective; internal fault
Replace defective fan Is the motor easy to
spin up?
Is the motor easy to spin up with the nozzle holder plate removed?
Is the motor shaft easy to spin up when removed from mounting?
Motor defective; internal fault
DBW 2010/2020/300 COOLANT HEATERS
TROUBLESHOOTING
5.3.3
A
FTERS
WITCHINGON, T
HEH
EATERS
WITCHESOFF
AFTERA
PPROX. 30 S
ECONDSO
NF
AULTYE
S
NO
Overheat fuse opened? Has temperature limiter (green wires) opened?Can you detect the buzzing sound of the ignition coil after approx. 20 seconds? Voltage across terminal C8 and C5? Check feed connections of control unit for open or interruption
Is there the same effect with a new ignition spark coil?
Insulator of electrode defective
Remove intruption or open in circuit
Ignition spark coil defective Remove cause for
release, e.g. lack of coolant; replace overheat fuse or allow temp.
limiter to reset. Does flame
detector show
resistance >100 kȍ
when dark?
Flame detector defective
Control unit defective
Is combustion noise audible?
Is fuel splashing out of the fuel nozzle?
Does the fuel solenoid valve in the heater open?
Magnetic coil of fuel solenoid valve defective
Does fuel nozzle produce good fuel atomization?
Volume on solenoid valve?
Fuel solenoid valve defective Voltage on solenoid valve? Check feed connections Are ignition electrodes correctly set with gauge?
Adjust ignition electrodes to correct setting with gauge
Fuel in the tank? Refill fuel tank
Are all fuel lines tightly connected? Does the pump
deliver fuel?
Fuel nozzle is blocked, replace nozzle
Tighten lines, repair leaks or replace leaking gaskets
Is the gasket surface of the fuel valve piston or of the air relief drill hole dirty?
Remove fuel pump; is the shaft seal okay?
Clean or replace Fuel suction line
blocked or fuel waxing or water in fuel freezing or fuel tank vent blocked Fuel quality or grade not appropriate for cold weather operation. Switch to a winter grade. Replace fuel pump Viscosity below 20 centiStokes? Fuel nozzle is blocked, replace? Check air intake and exhaust outlet for blockage. Clean if necessary
Flame detctor defective, replace
Does the fuel solenoid valve in the heater open? Does flame detector show
resistance >1.56 kȍ
under bright 50 Lux light?
Magnetic coil of fuel solenoid valve defective
TROUBLESHOOTING
DBW 2010/2020/300 COOLANT HEATERS
5.3.4
H
EATERS
TARTSO
NLYA
FTERS
EVERALS
TARTINGA
TTEMPTS5.3.5
H
EATERS
WITCHESO
FFB
YI
TSELFD
URINGO
PERATIONYE
S
NO
Does smoke emit from the exhaust pipe after failed attempts to start?
Possible leakage in fuel suction or return fuel lines
Repair leakage points Continue fault finding according
to section 5.3.7
Does the ignition spark flash over on the high voltage wire?
Does the ignition spark flash over on the electrode insulation?
Ignition spark coil defective
High voltage wire defective Ignition electrode(s) defective
Possible leakage in fuel suction or return fuel lines resulting in air pockets
Does the heater start after repeated starting attempts?
Does heater reteact at all? Continue fault finding according to section 5.3.2
Fuel supply from tank has been interrupted for an extended period of time
Heater switches OFF after approx. 30 sec. on fault; continue fault finding according to section 5.3.3
DBW 2010/2020/300 COOLANT HEATERS
TROUBLESHOOTING
5.3.6
H
EATERS
MOKESYE
S
NO
Is combustion air intake or exhaust outlet dirty?Are the gas passages (fins) of the heat exchanger highly soiled?
Motor r.p.m. too low
Clean if necessary, correct installation according to instructions Clean according to instructions. (see Sec. 9.1.1.3)
Does heater smoke only during start-up?
Has the air intake bellows been incorrectly set?
Are there restrictions or kinks in the fuel return line?
Has the correct fuel been used according to the operating instructions? Observe the recommendations in the operating instructions
Because of the return fuel pressure, the flow of the fuel nozzle is too high
Let heater burn freely (warm up to temp.)
Are the permissible combustion values adjustable? (see section 10.3)
Does the heater continue to smoke after adjustment?
Motor r.p.m. too low
Gap distance between the impeller and the housing too great (DBW 2010 and Scholastic only)
Check fuel pump pressure; is the pump pressure too high?
Is battery voltage, when charged, below 10 V resp. 20 V Charge battery Adjust according to instructions. (see Sec. 6.2.5)
TROUBLESHOOTING
DBW 2010/2020/300 COOLANT HEATERS
5.3.7
H
EATERS
MOKES5.3.8
H
EATERC
ANNOTB
ES
WITCHEDO
FFYE
S
NO
Does heater smoke more than 20 seconds?
Does heater smoke after switching OFF?
Fuel solenoid valve piston is leaky Does heater smoke
during operation (also in waves)?
Are ignition electrodes set correctly according to setting gauge?
Replace fuel nozzle
Set ignition electrodes correctly with setting gauge
Did other unsuccessful start attempts precede?
Flow through fuel nozzle insufficient, - replace; does heater continue to smoke?
Any accumulated fuel in the combustion chamber must be allowed to burn off; Does heater continue to smoke? Open burner, remove combustion chamber; are there coke deposits visible in the combustion chamber?
Clean combustion chamber
Replace fuel nozzle
Is there current through the switch or timer when switched OFF?
Does heater continue to run more than 180 sec. after switching OFF? Do exhaust gases still
emit from the exhaust pipe after switching OFF?
Electronic control unit defective
DBW 2010/2020/300 COOLANT HEATERS
FUNCTIONAL ADJUSTMENTS
6.
FUNCTIONAL ADJUSTMENTS
6.1
G
ENERALThis section describes the tests and adjustments on the heater in installed and removed condition to prove its serviceability.
WARNING: The heater must not be operated in closed areas like garages or workshops with no exhaust ventilation facilities.
To prevent fires do not switch heater on with burner swung open.
6.2
A
DJUSTMENTS6.2.1
A
DJUSTMENTOFCO
2C
ONTENTSIt is allowed to change the manufacturer’s setting for combustion air quantity by rotation of the setting ring. Measurement of the CO2 value of the exhaust gas must be performed followed by an adjustment of the
combustion air quantity as required in case of: – repairs to the burner head
– irregularities in combustion – functional checks
– nozzle replacement
6.2.1.1 S
ETTINGPROCEDURE– Measure control unit power supply voltage – Operate heater for approximately 5 min. – Measure CO2 contents and compare with CO2
diagram
Figure 21: Combustion Air / Fuel Mixture Adjustment – Loosen locking screw (refer to Figure above) and
reposition shutter with locking screw until rated value is obtained
– Tighten locking screw with 1.0 +0.5 Nm and apply screw seal varnish to mark new position
NOTE: CO2 setting depends on fuel (viscosity) and on geodetic altitude (0.1% per 100 m).
If proper setting cannot be obtained, proceed as follows: – Check burner head air side for damage and replace if
required
– Check fuel pump pressure and replace pump if required
– Check fuel filter and strainer in fuel pump for contamination and replace if required
– Adjust fuel pressure – Replace fuel nozzle
– Measure burner motor speed DBW 2010 (Nozzle: 0.35 gph)
DBW 2020 (Rev. .33) DBW 300
Fuel pump pressure set to 10 bar (145 psi)
CO 2 (V o l. -% ) 18 20 22 24 26 28 30 6 7 8 9 10 11 12 13 9 10 11 12 13 14 15 Voltage
CO2 - setting at 500 m above sea-level
+
–
CO2
CO2
FUNCTIONAL ADJUSTMENTS
DBW 2010/2020/300 COOLANT HEATERS
6.2.2
F
LAMED
ETECTORR
ESISTANCEC
HECKNOTE: The glass bulb of the flame detector and the viewing glass of the window (refer to Fig. 22) are to be cleaned if contaminated.
In case of damage, cracked glass bulb or not obtaining the rated values, replace the flame detector.
CHECK
– Swing burner head open (see Sec. 8.5.1) – Disconnect flame detector leads
– Connect flame detector leads to ohm meter – Cover flame detector glass bulb with your thumb – Check resistance (rated value: < 20 kOhm) – Uncover flame detector and expose to strong light – Check resistance (rated value: < 200 Ohm)
ALTERNATE METHODUSING TESTER (P/N 1302691A)
– Exchange control unit with tester and swing burner head open (see Sec. 8.5.1).
– Watch “Flame Control” LED while holding your thumb over the flame detector glass bulb. LED will darken considerably.
– Remove your thumb, LED will brighten considerably. (Shine a bright light on the flame detector if in a dimly lit area.)
– The fluctuation of the LED between dim and bright will indicate the flame detector is working properly.
6.2.3
I
GNITIONE
LECTRODEC
HECKANDS
ETTINGNOTE: The insulation body of the ignition electrodes must not show any damage. Damaged insulation of the electrodes requires their replacement. Setting ignition electrodes with a spacing beyond the tolerances shown in Fig. 23 may or will cause ignition failures.
NOTE: The ignition electrodes can be set with the setting gauge as shown. In addition the front edge of the setting gauge must rest against the atomizer nozzle and the tips of the electrodes in both notches.
CHECK
– Swing burner head open (see Sec. 8.5.1) – Insulation body of the ignition electrodes for
damages
– Electrode spacing with setting gauge according to Fig. 23.
CAUTION: Do not touch the nozzle drilling while measuring the electrode spacing. Keep the electrode setting gauge clean and free of contaminates.
SETTING
– Place setting gauge over nozzle as shown.
– Loosen clamp bolt until electrode can be moved with slight effort
– If necessary, electrodes can be bent slightly to conform to the setting gauge notches. Grip with pliers at the bending point only.
– Once set, snug up clamp bolt and check electrode spacing once again to confirm setting.
CAUTION: Do not over-tighten or bottom out clamp bolt. Doing so will distort the clamp causing the electrodes to spread apart.
Window
Screw Disc
DBW 2010/2020/300 COOLANT HEATERS
FUNCTIONAL ADJUSTMENTS
6.2.4
I
GNITIONC
OILC
HECKWARNING: In some cases, high tension voltage of approx. 8,000 volts produced at the ignition electrodes can be fatal.
CAUTION: Do not operate the ignition coil without connection to the ignition
electrodes. Doing so will cause damage to the ignition coil.
CHECK
NOTE: Take care when connecting DC voltage to the ignition coil leads. Connect positive to the black lead and negative to the brown lead.
– Swing burner head open (see Sec. 8.5.1)
– Supply DC voltage to coil leads. Positive to black lead and negative to brown lead.
– With ignition coil energized, an ignition spark will jump the ignition electrodes.
ALTERNATE METHODUSING TESTER (P/N 1302691A)
– Exchange control unit with tester and swing burner head open (see Sec. 8.5.1).
– Press and hold the ignition button to activate the ignition coil and observe spark condition.
CAUTION: Do not energize ignition coil for a period longer than 15 seconds.
Figure 24: Ignition Coil Check
6.2.5
F
UELP
UMPC
HECKA pressure gauge and the tester P/N 1302691A is required for performing this test. A suitable gauge with a range from 0 to 15 bar (0 to 220 PSI) can be procured from your authorized Webasto dealer.
NOTE: The fuel pump and the fuel hoses must be replaced every 5 years.
CHECK
– Exchange control unit with tester and swing burner head open (see Sec. 8.5.1).
– Remove nozzle.
– Screw pressure test gauge into nozzle holder. – Switch on heater motor via tester.
– Press fuel solenoid button on tester.
– Read pressure gauge. If adjustment is required, release button and turn pump pressure screw 1/8 of a turn at a time in or out to increase or decrease pressure (see Fig. 10 for location of pressure screw). – Repeat testing and adjustment steps until pressure is
within specified range.
– Switch off heater switch on tester. – Unscrew pressure test gauge.
CAUTION: Do not damage nozzle bore.
– Screw in nozzle and torque to 20 Nm. (15 lb-ft)
Figure 25: Fuel Pressure Check
+ Black Wire – Brown Wire 0 40 80 120 160 200 220
+
-Pressure Test Gauge P/N 600190 Nozzle Holder
DBW 2010 w/ 0.40 gph nozzle 8 –0.5 bar (116 –7 psi) DBW 2010 w/ 0.35 gph nozzle 10 ±0.5 bar (145 ±7 psi) DBW 2020 & DBW 300 10 ±0.5 bar (145 ±7 psi)
Gauge Face Fuel Pump
Pressure Regulator
FUNCTIONAL ADJUSTMENTS
DBW 2010/2020/300 COOLANT HEATERS
6.2.6
F
UELS
OLENOIDV
ALVEC
HECKNOTE: A leaking solenoid valve seat or valve results in a rather long smoke emission period during run-down. In this case fuel keeps dripping through the fuel nozzle.
Short smoke emissions are normal caused by clearing the area between the solenoid valve and the nozzle bore.
CHECK
– Exchange control unit with tester P/N 1302691A and swing burner head open (see Sec. 8.5.1).
– Press fuel solenoid button on tester several times. You should hear an audible clicking sound indicating that the fuel solenoid valve is functioning. If no clicking can be heard, valve and or solenoid may require replacement (see Sec. 9.2.6).
6.2.7
N
OZZLEB
LOCKP
RE-
HEATERC
HECKAt a temperature of <0° C (<32° F) the heater cartridge in the nozzle block is activated. The heating period depends on the heat reflected within the combustion chamber.
Preheating is deactivated when the thermostat ambient temperature is +8° C (46° F).
Power consumption is 130 ±13 Watts. CHECK
– Swing burner head open (see Sec. 8.5.1) – Disconnect electrical connector
– Connect ohmmeter to connector
– Using cooling spray to cool down thermostat – Resistance (max. 4.5
Ω
).DBW 2010/2020/300 COOLANT HEATERS
CIRCUIT DIAGRAMS
7.
CIRCUIT DIAGRAMS
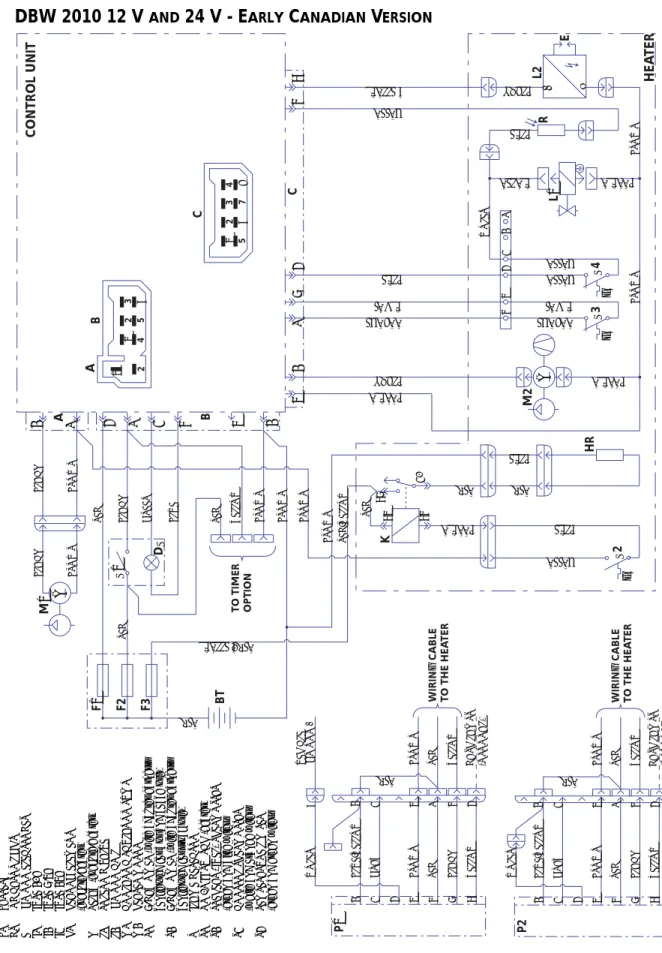
7.1
DBW 2010 12 V
AND24 V - E
ARLYC
ANADIANV
ERSIONFigure 26: Schematic - DBW 2010 Early Canadian Version
BLACK BLUE VIOLET GREEN GREEN ORANGE WHITE ORANGE WHITE BROWN BLACK BLUE GREEN YELLOW BROWN BROWN VIOLET BROWN BROWN RED RED BLUE GREEN BLUE RED BLACK BROWN BLACK BROWN
RED BLACK GREEN BLUE RED YELLOW BROWN BROWN BROWN
BROWN RED/YELLOW RED RED RED/YELLOW BROWN L 1 R L2 E S 4 S 3 M2 HR S 2 K P 1 BT F 1 F2 F3 S1 D S M 1 A B C C A B M M 1 2 4 1 3 6 5 2 52 1 7 4 68 65 3 4 2 1 85 86 87 30 + – CONTROL UNIT HEA TER 1 2 3 45 6 2 1 1 2 3 4 5 6 7 8 2 3 5 1 6 4 2 3 4 5 6 7 8 BLUE/YELLOW VIOLET GRA Y
BROWN RED BLACK
BROWN RED YELLOW
YELLOW
9
VEHICLE IGNITION + DASH LAMPS (OPTIONAL)
RED WIRIN G CABLE TO THE HEA TER TO TIMER OPTION P2 2 3 5 1 6 4 2 3 4 5 6 7 8 BLUE/YELLOW VIOLET GRA Y
BROWN RED BLACK
BROWN RED YELLOW
YELLOW
DASH LAMPS (OPTIONAL)
RED WIRIN G CABLE TO THE HEA TER t° t° t° BT BA TTER Y DS INDICA TOR LIGH T E IGNITION ELECTRO DES F1 FUSE 20A F2 FUSE 7.5A F3 FUSE 25A HR HEA TING ELEMEN T (fuel pr e-heater) K RELA Y (fuel pr e-h eater) L1 SOLENOID V AL VE L2 IGNITION COIL M1 COOLANT CIRC ULA TION PUMP M2 HEA TER MOTOR P1 7-DA Y TIMER (
with adapter har
ness
configur
ed for b
us and coach use
)
P2
7-DA
Y TIMER (
with adapter har
ness configur ed for tru ck use) R FLAME DETECTOR S1 ON / OFF SWITCH (heater) S2 PREHEA T (FUEL) THERMOST A T (gr een and b lue wir es) S3 CONTROL THER MOST A T (white and o range wir es) S4 TEMPERA TUR E LIMITER (gr een and g reen wir es)
CIRCUIT DIAGRAMS
DBW 2010/2020/300 COOLANT HEATERS
7.2
DBW 2010 12 V
AND24 V - P
RESENTN
ORTHA
MERICANV
ERSIONB A C BLACK BLUE VIOLET GREEN GREEN ORANGE WHITE ORANGE WHITE BLACK BLUE GREEN YELLOW BROWN BROWN BROWN BLUE BLUE GREEN RED RED BROWN BLACK
BLACK VIOLET GREEN RED/BLACK RED/YELLOW
BROWN BROWN RED BROWN L 1 R L2 E S 4 S 3 M2 HR S 2 K M 1
A
B
C
C A B M 2 1 1 3 4 5 2 6 52 1 7 4 68 65 3 4 2 1 85 86 87 30 + – CONTROL UNIT HEA TER 1 2 3 45 6 2 1 1 2 3 4 5 6 7 8 BROWN M B D C E F G H J F4 F3 F2 F 1 X 1 VIOLET t° t° t° A BROWN BROWN BROWN YELLOW RED REDRED RED BROWN
BROWN VIOLET WHITE BROWN BROWN
X2 M1 COOLANT CIR CULA TION PUMP M2 HEA TER MOT OR R FLAME DETECT OR S1 ON / OFF SWITCH (heater) S2 PREHEA T (FU EL) THERMOST A T (gr een and blue wir es) S3 CONTROL THE RMOST A T (white and orange wir es) S4 TEMPERA TUR E LIMITER (gr een and gr een wir es) X1 9-PIN HARN ESS CONNECTOR (r o und) X2 3-W A Y INTERF A CE CONNECTOR 1 2 3 4 8 7 6 5
DBW 2010/2020/300 COOLANT HEATERS
CIRCUIT DIAGRAMS
7.3
DBW 2020 / 300 12 V
AND24 V -
WITHOUTN
OZZLEP
REHEATFigure 28: Schematic - DBW 2020 / 300 Without Nozzle Preheat
BT BATTERY DS INDICATOR LIGH T E IGNITION ELECTRO D ES F1 FUSE 15A F2 FUSE 20A F3 FUSE 15A F4 OVERHEAT FUSE 138°C F5 FUSE 30A F6 FUSE 15A K1 RELAY (on / off switch) L1 SOLENOID VALVE L2 IGNITION COIL M1 COOLANT CIRC ULATION PUMP M2 HEATER MOTOR R FLAME DETECTOR S1 ON / OFF SWITCH (heater) S3 CONTROL THER MOSTAT (green and re d wires) S4 TEMPERATUR E LIMITER (green and g reen wires) X1 9-PIN HARNE SS CONNECTOR (rou nd) X2 2-WAY CONNEC TOR X3 2-WAY CONNEC TOR BROWN BROWN BROWN RED RED RED BT E F G J C B A S1 D S F5 X 1 H
WHITE GREEN BLACK RED
WHITE VIOLET F4 t° t° BLACK BLUE VIOLET GREEN GREEN GREEN RED ORANGE WHITE BLACK BLUE GREEN YELLOW BROWN BROWN BROWN
BLACK BROWN GREEN BLACK
ORANGE
GREEN
BROWN BROWN BROWN
BROWN BROWN BROWN RED RED BROWN L 1 R L2 E S 4 S 3 M2 M 1