Using
Pen Point
DEVELOPER RELEASECopyright © 1991 GO Corporation. All rights reserved. No part of this publication may be reproduced, transmitted, transcribed, stored in a retrieval system, or translated into any language in any form by any means without the written permission of GO Corporation, 950 Tower Lane, Suite 1400, Foster City, CA 94404.
Printed in the United States of America.
Your license agreement with GO Corporation, which is included with the product, specifies the permitted and prohibited uses of the PenPoineM
operating system. Any unauthorized duplication or use of the PenPoint operating system in whole or in part is forbidden. Infor-mation in this document is subject to change without notice and does not represent a commitment on the part of GO Corporation.
GO, the GO logo, PenPoint, the PenPoint logo, and First Experience are trademarks of GO Corporation.
Words are checked against the 77,000 word Proximity/Merriam-Webster Linguibase, © 1983 Merriam-Webster. © 1983. All rights reserved, Proximity Technology, Inc. The spelling portion of this product is based on spelling and thesaurus technology from Franklin Electronic Publishers. All other products or services mentioned in this document are identified by the trademarks or service marks of their respective companies or
organizations.
Warranty Disclaimer and Limitiation of Liability
GO Corporation makes no warranties, express or implied, including without limitation the implied warranties of merchantability, fitness for a particular purpose and non-infringement, regarding PenPoint software or anything else. GO Corporation does not warrant, guarantee, or make any representations regarding the use or the results of the use of the PenPoint software or other products or documentation in terms of its correct-ness, accuracy, reliability, currentcorrect-ness, or otherwise. The entire risk as to the results and performance of the PenPoint software or other products or documentation is assumed by you. The exclusion of implied warranties is not permitted by some states. Therefore, the above exclusion may not apply to you.
In no event will GO Corporation, its directors, officers, employees, or agents be liable to you for any consequential, incidental, or indirect damages (including damages for loss of business profits, business interruption, loss of business information, cost of procurement of substitute goods or technology, and the like) arising out of the use of or inability to use the PenPoint software or other products or documentation or defects therein even if GO Corporation has been advised of the possiblity of such damages, whether under theory of contract, tort (including negligence), products liability, or otherwise. Because some states do not allow the exclusion or limitation of liability for consequential or incidental damages, the above limitations may not apply to you. GO Corporation's liability to you for actual damages from any cause whatsoever, and regardless of the form of the action (whether in contract, tort (including negligence), product liability or otherwise), will be limited to $50.
Note
This equipment has been tested and found to comply with the limits for a Class A digital device, pursuant to Part 15 of the FCC rules. These limits are designed to provide
Todd Agulnick Deborah Hodge Mike Schwartz Chris Glazek Bonnie Albin Tony Hoeber David Serna Steven Hales Roland Alden Greg Hullender Danny Shader Tom Hall Fannie Allen Steve Isaac Robbie Shepard Mimi Hathaway Josh Axelrod Jerry Kaplan Ed Soloko Lynn Henry Celeste Baranski Merri-Lynn Kubota Peter Stahl Madeleine Kahn Steve Bartlett Roy Kumar Peggy Stok Susan Kare Simon Bate Ilona Leale Craig Taylor Donna Kelley Sandy Benett Mark Lentczner Sue Toeniskoetter Ira Kleinberg John Bennett Charlie Leu Bob Vallone Henry Korman Sharin Blair Debra Levesque Doug van Duyne Gary Lang Arnold Blinn Dan'l Lewin Joe Vierra Tom Lindsey Joe Bosurgi Kris Lincicome Tim Wiegman Chris Metcalfe Murray Bowles David Low Rick Wolfe Mike McGeoy Carol Broadbent Pete Ma Phil Ydens Keith McCandless Alex Brown Arjen Maarleveld Eddie Yee Marie Moreland Howard Brunnings Henry Madden Peter Yorgin Signe Ostby Kurt Buecheler Cary Masatsugu John Zussman Andrew Osterman Robert Carr Holli Maxwell Dan Petri
Chia Lun Chang Janet McCandless
~
~
_____________
co_n_t_e_nt_s ___________
~
CHAPTER 1 / 1
G
to Use This Book
Using Procedures / 2
CHAPTER 2 / 5
Fur damentals
Documents in the Notebook / 8
Giving Commands with Gestures and Menus / 10 Making a Selection / 12
Working with Notebook Objects / 13 Dismissing an Object / 13
Moving a Notebook Object / 14 Making an Object Bigger or Smaller / 15 Seeing What's on the Bookshelf / 16
Help / 16 Preferences / 17 Tools / 18 Stationery / 20 Disks / 20 Keyboard / 21 Installer / 21
In Box and Out Box / 22
Using Option and Dialog Sheets / 23 Displaying Option Sheets / 24
Choosing Options / 25 Using Dialog Sheets / 27
Copying and Moving Notebook Objects / 28 Getting Help / 30
Getting Quick Help / 30 Using the Help Notebook / 31
CHAPTER 3 / 3 3
Drt?;wing Gestures
Using Gestures / 34 Using Gesture Profiles / 35 PenPoint Gestures / 36
CHAPTER 4 / 6 5
Ins ailing Applications and
De ices
Finding Out What's Installed in the Notebook / 67
Installing an Application or Utility from Disk / 68 Automatic Installation / 70
Creating Personalized Versions of Utilities / 71 Saving Your Changes / 74
Deactivating Applications and Utilities / 76 Deactivating Fonts / 77
Changing the Home Volume / 78 Setting Up Printers / 79
Connecting a Printer / 79 Setting Printer Options / 81 Printing a Document / 82
CHAPTER 5 / 8 3
Cr ting and Using Documents
Using the Create Menu to Create a Document / 85
Using the Stationery Notebook to Create a Document / 87
CONTENTS
Creating Stationery I 89
Creating Customized Stationery / 89 Managing the Stationery Notebook I 91
Deleting or Purging Stationery / 92 Scrolling a Document I 93 Floating a Document I 97
Moving and Resizing Floating Documents I 99
Zooming a Document I 100
Using Documents I 102 Renaming a Document / 102
Saving and Deleting Documents / 104 Embedding a New Document 1105
Embedding an Existing Document I 106 Embedding a Tool / 106
Working with Embedded Documents I 107 Setting Document Options / 107
Moving an Embedded Document / 107 Making an Embedded Document a Full-page Document / 107
Floating an Embedded Document / 108 Printing an Embedded Document / 109 Using the Cork Margin I 111
Customizing a Document 1113
C HAP T E R 6 / 115
Wri ing in the Notebook
Learning to Write on the Computer Screen I 116
Printing in Writing Pads I 117 Some Tips on Writing in Pads / 119 Printing in Upper Case / 121
Translating Your Handwriting I 122
Correcting the Translation I 124
Correcting the Translation in the Writing Pad / 124 Correcting the Translation with the Proof Sheet / 125
Getting a Writing Pad I 126
Choosing a Writing Pad Style I 128 Choosing Boxed Pads / 128
Choosing a Ruled Pad / 129 Choosing a Ruled-Boxed Pad / 131
Choosing a Writing Pad Size and Shape / 133 Using a Keyboard to Write 1134
Typing Text Directly onto the Page / 134
Correcting Text in the Writing Pad by Typing / 135 Customizing Your Handwriting I 136
Using a Customization Set / 138 Analyzing Your Progress / 140 Accommodating Multiple Users / 141
C HAP T E R 7 / 143
Editing and Formatting
Text
Selecting Text / 144 Edi ting Text I 146
Adding Text / 147 Deleting Text / 148
Inserting Spaces in Text / 148 Editing Text in Edit Pads / 149
Editing Text in Labels and Document Titles / 150 Editing Text in Fields / 150
Moving and Copying Text / 152 Moving Text / 152
Copying Text / 153 Styling Text I 154
Styling Text Directly / 154
Styling Text with Text Option Sheets / 156 Formatting Text I 157
Setting Margins / 157 Changing Line Spacing / 158 Positioning Text / 159 Setting Tab Stops / 160
Viewing Text / 163 Viewing Text / 163 Magnifying the Text / 164 Checking Your Spelling / 165
Adding a Word to the Dictionary / 166
Adding your Signature to a Document / 167
C HAP T E R 8 / 169
Fin ing and Replacing Text
Finding Text / 170 Replacing Text / 171 Defining The Search / 173
Setting the Search Range and Direction / 173 Refining the Search / 175
C HAP T E R 9 / 177
Managing the Notebook
Seeing What's in Your Notebook / 179 Finding Out More about a Document / 180
Using the Show menu / 180
Using the Document Option Sheets / 181 Sorting the Table of Contents / 182 Rearranging the Notebook / 183
Moving Pages / 183
Grouping Documents into Sections / 184 Creating a Section / 184
Moving a Document into a Section / 185 Creating a Subsection / 186
Creating Multiple Notebooks / 186 Turning to a Page / 187
Using Notebook Tabs to Mark Pages / 189 Attaching and Deleting Notebook Tabs / 189 Attaching Several Notebook Tabs / 190 Displaying Notebook Tabs / 191
Using Hyperlink Buttons to Move between Pages / 192
Setting Preferences / 194 Setting the Time / 195 Setting the Date / 196
Setting the Response Time / 196 Using the Auto Shut Off Option / 197 Turning On the Warning Beep / 197
Choosing PenPoint Fonts and Field Fonts / 198 Choosing a Screen Layout / 199
Moving Items on the Bookshelf / 200 Customizing the Help Notebook / 201 Using the Clock / 202
Changing the Display / 203 Setting the Alarm / 204
C HAP T E R 1 0 / 205
[
pr~ting,
5enaing, ana Receiving
!?_~guments
Printing a Document / 207 Choosing a Page Layout / 207 Adding Headers and Footers / 208 Printing a Document / 209 Printing from the Out Box / 211 Printing Embedded Documents / 211 Sending and Receiving Documents / 213
C HAP T E R 1 1 / 215
Fili ng Documents
Using The Disk Manager /218
Finding Out More About What's on a Disk / 221 Creating New Directories / 222
CONTENTS
Transferring Documents / 224
Transferring Documents and Sections to and from the Notebook / 224
Transferring Documents Between Disks / 226
Copying and Duplicating Disks / 228
Converting a PenPoint Document to a
PC Format / 230
Converting a PC Document to a PenPoint
Document / 233
Formatting a Floppy Disk / 235
Saving Documents / 236
Backing Up Your Notebook / 237
Restoring Your Notebook /238
CHAPTER 1 2 / 2 4 1
'--l
l
Le~rning
More
About PenPoint
~~-~
Managing Memory / 242
Finding Out How Much Memory Something Uses / 242
Things You Can Safely Delete or Deactivate / 243 Other Ways to Use Memory Efficiently / 243 When You Get an Out of Memory Message / 244
Restarting PenPoint When a Document
Freezes / 245
Booting PenPoint When PenPoint Freezes / 246
Accommodating Multiple Users / 247
Creating Individual Notebooks / 247
Tips on Navigating and Using Documents / 249
Turning the Table of Contents into a Control Panel / 249
Creating a Customized Index / 251
C HAP T E R 1 3 / 253
5e1.,ting Up Your Computer
Recharging the Battery /255
Using the GO Travel Charger / 256 Using the GO Quick Charger / 257
Replacing the Battery / 258
Removing a Battery / 258 Installing a Battery / 259
Connecting to a Printer / 260
Connecting Directly to a Serial Printer / 260 Serial Printer Connectors And Adapters / 261
Connecting to a Serial Printer Through the GO Quick Charger / 262
Using a GO Floppy Drive / 263
Connecting a GO Floppy Drive through the GO Quick Charger /263
Connecting Directly to a Disk Drive / 264
Using Floppy Disks / 265
Manually Ejecting a Disk from the GO Floppy Drive / 266
Using a Hard Drive / 267
Connecting to a PC / 268
Connecting Directly to a TOPS flashCard / 269 Connecting to a TOPS flashCard through the GO Quick Charger / 270
Using Option Cartridges / 271
Connecting A Keyboard / 272
Caring For Your GO Computer / 273
H A R D WAR E A P PEN D I X / 275
G LOS S A R Y / 281
How to
2
U SIN G PEN POI N T
Using PenPointexplains how to work with your PenPoint computer. Each chapter covers some aspect of working with the PenPoint™ operating
system-creating documents, writing in the Notebook, copying documents to disk, or setting up the computer. The chapters themselves are broken up into procedures. Each procedure details the steps to accomplishing a specific task, such as editing text in fields, using Handwriting Customization, or installing an application.
The chapter introduction gives you a framework for understanding the
procedures it contains. Each procedure gives you step-by-step instructions and shows you what you'll see on screen when you do the steps.
Usin
~
Procedures
For example, here's the procedure for using this book. It has a brief introduction followed by an illustration with several steps.
Usingme.Q.;eate Menu:toCreatt:ra Dociurient/85
lJsiAgthe Stati(>lteryN{itel)o~ktQ Cre~t~ a
DocUment ·/81
Cr
e
atingStationery/S9:ploatinga])octllIleIlt I 97
Movillgana·lt¢sizingFloatillgp()c:u.ni~nts.199
Zooming a Dociurierit /100
Using Do(:uri:lent$llQ2
1
Use the book's table of contents to find a specific task, such as how torename a document .
... When you look up the procedure you'll see a picture next to the steps. The picture illustrates your actions and the results you'll see on the screen .
... Text preceded by a triangle like this one tells you more about the step above.
Notebook: Contents ... Document Edit Create Vie ... ·' Show Sort
~
IJ
Current Products ... !}j Inventory' .D
Standard Order FormIJ
Proposed New Products !}j New Product Ideas .!}j Ce.pers
!}j Chili Mixes
IJ
Sales!}j Proposed NeVi Design t8R,.91) ~ Bottle Desigt1 Sketch.
'~Revised Bottle FAX".
!}j CONTRACT
!}j I'oJew Product Draft " ..
, ' , ' , ' " ' "
" " " '
~ 2 3 4 5 6 7 8 9 10 i 1
12 13 14 15 16 17 18
•• , ' A . 19
" ' V .20
.. .. 22
2
The procedure for renaming a document has steps like this: Draw a circle c over the tide to display an edit pad and change it there.A. The illustration shows both the
circle c over the title and the result: the edit pad. Every time we tell you to use a gesture (such as a circle) we illustrate that gesture: c.
."
~ 0
IA
A. The sample documents that we
use in these screen illustrations ro
Q.
z are not all included in the
ro
,:;
'"U Samples section on your
[
Q. computer.
IA (f) ~ lr 0 z
3
When you need more information about drawing gestures, or about
!4-0
~
~
where they'll work, see chapter 3, Drawing Gestures .
Z Itt ,:; til §l: 16"
.&. You'll find a gesture profile for
each gesture (arranged
~ alphabetically), and some tables
il::i'
'" that divide the gestures into
logical groups.
4
Procedures are grouped by topic, so if you want to know more about a task, look at the other procedures in that section or chapter.You'll often draw gestures when you're following the steps in a procedure. Other basic skills include choosing commands from menus, working with option and dialog sheets, and using items on the Bookshel£ Read chapter 2, Fundamentals to learn about them before you go on to use the individual procedures in the rest of this book.
6
USING PENPOINT
The PenPoint™ operating system organizes information you keep in the
computer in a Notebook. When you turn the computer on you'll see a page of the Notebook. At the bottom of the screen is a Bookshelf which contains tools that are useful when you're working with documents. They're represented by icons (small pictures).
The first page of the Notebook is the Table of Contents, which tells you what's in the Notebook.
Commands in the menus on the menu line are instructions that tell PenPoint what to do next.
You can also give commands by drawing gestures on the screen. For example, to turn to a document, you tap
J
its page number.Tabs let you turn quickly to a page from anywhere in the Notebook.
The first page of the Notebook is the Table of Contents which lists every document and section. To turn to a document directly, you tap)-lightly touch-its page number or its tab with the GO pen. An icon next to each title tells you the type of document it is, in other words which application was used to create it.
You use the pen to write in the Notebook and to tell PenPoint what you want to do next-create a new document, copy a paragraph to another page, or edit text, for example. To do any of these things you can either choose a command from a menu or draw a gesture (a symbol or letter) on the screen.
8
USING PENPOINT
Documents in the Notebook
Each page of the Notebook contains a different document. You can have as many pages in the Notebook as you want (up to the amount of available memory).
A document can be longer than what you see on the screen.
To bring the hidden part into view you scroll the document.
No te boo k: Co nte nts Docume nt Ed it Cre ate View 8how 80 rt
t:l..aro.f..
or
Current Products,[j Inve nta ty
D
8tand ard Or-de r Fa rm1 >
~ ~
,2 ;. ,3 ~
C)
,,4 ~
a
-0
or
Proposed New Products, _~ _ _ _ ~~ _ _...liI--~---[j New Productldees ,6 [
<:
7
a-[j Capers
,,8 -0
2i "0
::2
[j l2hili Mixes,
or
stirs "-,, ,-"-,,,-, ,,-,,-, r r ! + J -12 0. ~ 13 ~-0
14 2i 0.
or
Customers,[j Chain 8tares, [j Complaints to ,A,cton,
or
New Bottle Design 15 ~ 16 to (l>~
[j 8 als e,Co nd i me nts [j Pe.cke,ge Design Letter",
[j Proposed New Design (3l2t91),-, ---~--t~---~ , n 8J.-..etch
I~ Revised Bottle F,B,X
BJ
CONTRACT, " " " " " «[j New Product Draft
~
VI 0;0'
::>
Tap
J
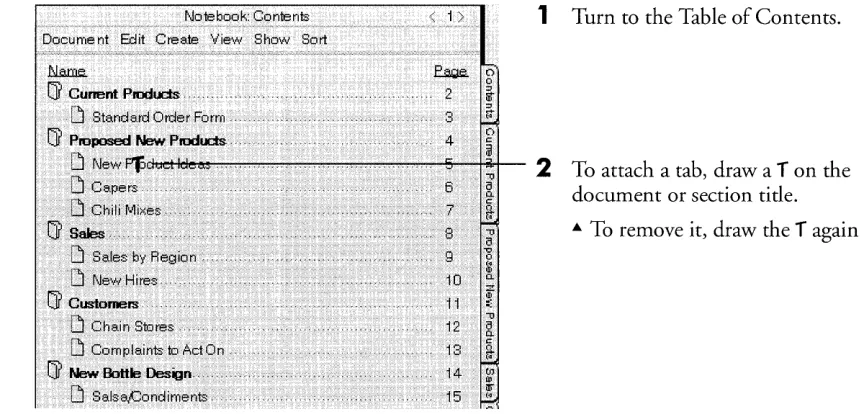
the Contents tab to see the Table of Contents for the entire Notebook.Section tides are in bold.
.. To see all the documents in a section, double tap :"the section title.
.. Double tap it again to hide the tides.
Document titles are plain. .. The document's page number.
.. The document icon which shows what type of application you used to create the document.
8' To turn to a document:
_:lJ
....
11ill:9
[5)1mil
,~! ~.!..!.Hel~' Preferences Tools: Statbnety Disks Keyboatd lt1st'l.I~r In OlAt
.. Tap either its page number or its Icon .
.. You can also turn to it by tapping
J
its tab, if it has one.You can find out how to make the tap
J
1 0
USING PENPOINT
Giving Commands with Gestures and Menus
There are two ways to tell PenPoint what you want to do next: choose a menu command or draw a gesture (a symbol or letter) on the screen. Generally, each menu item has an equivalent gesture. For example, to delete a word you can choose Delete from the Edit menu or cross it out X.
When you work with the documents in your Notebook, you:
Choose menu commands. To do so: ... Tap
J
a menu name to open itand see its choices.
Dimmed commands are currently unavailable .
... Tap
J
again to choose a command.To close the menu without choosing a command, tap anywhere outside it.
Draw gestures. For example, to delete a word, you draw a cross out gesture X on it.
Chapter 3, Drawing Gestures, shows you how to draw each gesture and tells you where it's used. The gesture profile for cross out is shown below.
Cross Out
Deletes a word or selection in text, or any object directly beneath the X.• What Works
Make an X using two distinct strokes (top to bottom) over the selection or object that you want to delete.
1
Draw the first stroke;barely lift the pen from the screen
2
Quickly draw the second stroke.• Where It Works
• What D06an't
Work
Drawing the gesture in one stroke (connecting the two lines).
Drawing strokes that are not clean lines.
Making a + instead of an X.
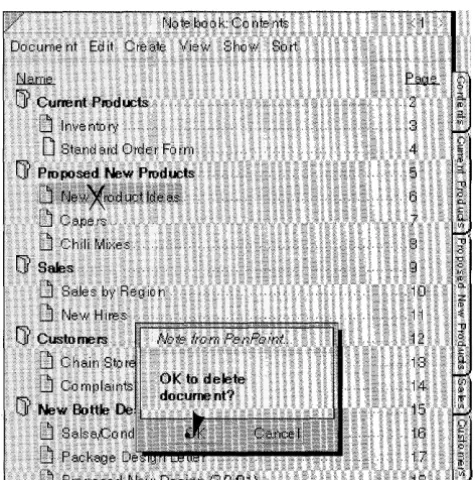
Deletes the contents of a field, documents from the Table of Contents, and icons from the Bookshelf. When you draw it over a document's title line, it deletes the document. When you draw it over a disk icon or disk name in the Disk Manager, it ejects the disk.
If you draw a gesture and PenPoint doesn't recognize it, you see a starburst where you drew it. If you draw a gesture that PenPoint recognizes, but it doesn't work where you used it, you see a series of concentric circles followed by a starburst.
When you choose a command or draw a gesture, PenPoint lets you know it's carrying out the instruction by giving you visual feedback. For example, when you tap
J
the page turn arrow, it darkens while the page is turning.If carrying out the command takes more than an instant, you see a busy clock during the process. For example, when you tap
J
an icon on the Bookshelf, the busy clock appears.x
1 2
USING PENPOINT
Making a Selection
You
often need to specify what you want a command to affect before you give that command. You do this by selecting the object. For example, you select a document in the Table of Contents before you tell PenPoint to print it.When you select something it looks different; usually it gets highlighted. For example, if you select a word by double tapping:, it, the background behind the word turns gray, highlighting it.
To make a selection go away, you deselect it, usually by tapping it.
To select a tide on the Table of Contents, tap
J
it.A. Tap it again to deselect it.
To select a word, double tap :, it.
A. Tap it to deselect it.
To select a choice from a multiple check list (a list with double lines next to it), tap
J
it.A. Tap it again to deselect it.
Working with Notebook Objects
As you work with documents, you often use Notebook objects, such as items on the Bookshelf, and option and dialog sheets. If any of these hides part of the page you want to see, you can move, resize, or dismiss it.
To see the contents of an item on the Bookshelf, tap
J
its icon. To use a dialog or option sheet, you choose the appropriate menu command or draw a gesture. (Read "Using Dialog and Option Sheets" in this chapter for more details.)DiStl issing an
Object
When you're finished looking at or using a Bookshelf item or option or dialog sheet, you can dismiss it.
Iiame.
CJ
MinITextOK to delete Business from Statio ne ry?
You can also PUlge this
docume nt. which deletes: it from its: disk Home as we II as from Sta.tionery.
EI
MiniText 8 0CJ
BusinessCJ
Memo"""'"'' ", .. ,,' ""," 4
CJ
'Drawing Paperi
'Drawing Paper5 6
« , , - « « < H " '7
o o
o
1>
If it has a button:
Tap
J
the button labeled Close or Cancel. This closes the item without changing anything.If it has a close corner (a triangle in the upper left corner):
1 4
USING PENPOINT
WORKING WITH NOTEBOOK OBJECTS
Moving a Notebook Object
If an object obscures part of the page you want to see, you can move it to a more convenient location on the screen by dragging the title line.
To move an object:
1
Pressr
the title (touch the pen firmly to the screen) and hold it there. Wait until the border turns dark to tell you it's ready to be moved.2
Then, without lifting the pen, drag the item to its new location.Making an Object Bigger or Smaller
Notebook objects have handles that you can drag to expand or reduce your view of their contents. Some, such as option sheets, have only one handle at the bottom; others, such as the Stationery notebook, have both a bottom and corner handle.
I:.l.at:a.e..
[J Minifext
[J MiniText. ... 3 [J Business.. ... 4
[J r'."e rno 5
[J DrawingPaper 6
~ Drawing Paper... . " ... 7
---~---~
. Text () pt i(J ~s .. " . Characte r
Font: i> Roman (UR'vV)
Size: i? 12
Style: Bold Italic 8mailCaps 8trihe -thru Uncle dine He a.vy Unde rline IHidden
If it has a corner handle:
1
Pressr
the handle with the pen. You see an outline surrounding the handle, telling you it's ready to beresized.
2
Without lifting the pen, drag the handle to the right to widen it, down to lengthen it, or diagonally to increase it in both directions . .. Do the reverse to make it smaller.If it has a bottom handle:
1
Pressr
the handle with the pen. You see an outline surrounding the handle telling you it's ready to be resized.2
Without lifting the pen, drag the handle down to lengthen the object, or up to shorten it.1 6
Help
USING PENPOINT
Seeing What's on the Bookshelf
The
Bookshelf at the bottom of the screen holds tools and notebooks that you use for tasks such as creating new documents, choosing preferences, and installing applications.1
TapJ
the Help icon to open it.You see the Quick Help sheet and a button labeled Help Notebook.
While the Quick Help sheet is showing, you can get help about anything on the screen by tapping
J
it. The contents of the sheet change according to what you tap.To get more detailed help, organized by topic and task, tap
J
Help Notebook.2
TapJ
Done to close Quick Help.r - - - - l
fref rences
~Jo iB bo 0 k: Co niB nts Doeume nt Edit CreaiB View Show Sort
I.'.JI.e.me..
[J Re ad Me First"
[J First Expe de nee
Cj( Samples".. .
[J New Prod uet Ide as· .
[J Pack.8fle Design LetiBr"", ..
H and writing Pen
Fo nts & Layo ut Time DaiB
2 3 4 5 6
< 1 >
1
TapJ
the Preferences icon to open it. These sheets let you set options for PenPoint.You'll see the first Preference option sheet, PenPoint.
2
To see a list of the option sheets, tapJ
the arrow in the tide line.A Tap the name of the option sheet
you want to see.
A You can set options for such
things as handwriting, screen fonts and layout.
3
TapJ
Close to close Preferences without changing any preset options.A To apply your choices and
continue using the sheet, tap Apply.
A To apply your choices and close
the sheet, tap Apply & Close.
To find out more about how to use option sheets, read "Using Option and Dialog Sheets" in this chapter.
USING PENPOINT
1 8 SEEING WHAT'S ON THE BOOKSHELF
Tool~D
Tools contains accessories that you use in working with your Notebook.
See "Working with Notebook Objects" in this chapter for information about how to move, resize, and close the tools.
1
2
3
4
Tap
J
the Tools icon to open it. (You may see tools other than those pictured here if you've installed different ones on your computer.)To see each tool, tap to open it.
The tools include:
.. A Clock displays the time and date and also lets you set an alarm with a reminder message .
.. A Personal Dictionary contains words that you add to it while proofing or checking the spelling of your work.
.. Handwriting Customization contains sentences that you copy to show PenPoint how you write . .. A Letter Practice sheet lets you
get used to writing on the screen . .. A so ftware Keyboard lets yo u
enter text into a document by tapping
J
the keys ... A Disk Manager allows you to transfer documents to and from the Notebook.
.. A Printers sheet lets you configure the printers you've installed.
To close a tool, tap its close corner or the Close button.
Chapter 9, Managing the Notebook tells you more about Tools in general. You'll find an explanation of how to use each individual tool in the appropriate section of this manual:
• Clock: "Using the Clock" in chapter 9 (Managing the Notebook).
• Personal Dictionary: "Adding Words to the Dictionary" in chapter 6 (Writing in the Notebook).
• Letter Practice: "Learning to Write on the Computer Screen" in chapter 6 (Writing in the Notebook).
• Handwriting Customization: "Customizing Your Writing" in chapter 6 (Writing in the Notebook).
• Keyboard: "Using a Keyboard" in chapter 6 (Writing in the Notebook).
• Disk Manager: "Displaying the Disk Manager" in chapter 11 (Filing Documents).
USING PENPOINT
20 SEEING WHAT'S ON THE BOOKSHELF
Sta1~ionery
Disk~
Read chapter 5, Creating and Using Documents, to find out how to use stationery. Chapter 11, Filing Documents, explains how to transfer documents with the Disk Manager.
1
TapJ
the Stationery icon to open it.You see the Stationery notebook's table of contents.
The Stationery notebook contains pieces of stationery for the different applications you've installed. Each application has its own section in the Stationery notebook.
2
TapJ
the close corner to close the Stationery notebook.1
TapJ
the Disks icon to open the Disk Manager.If you have connected the PenPoint computer to a disk drive, you see an icon with the name of the disk. Tap
J
the icon to see what's on the disk.Use the Disk Manager to transfer documents to and from the Notebook.
Keyboard
Inst~~lIer
1J
Help
Edit Home (iftsta
f:iaroe.. Dictio naries Clock 2 Fo nts Drawing Pape r Services HWC1l8TOM 86
Keyboard 11)J47 PDICT 8..450 Snapshot 28,B94
.1£
Ifts~ller 1ft . (:iyt
1
Tap) the Keyboard icon to open the software keyboard so you can tap to add text to a document.2
Tap) the close corner to close the keyboard.1
Tap) the Install icon to open the Installer.You see a sheet showing you what's installed in the computer. Each install sheet contains information about a different category.
2
Tap) the arrow on the title line to see a list of the install sheets . ... Tap the name of the install sheetyou want to see.
3
Tap) the close corner to close the Installer.To find out how to use the keyboard, see "Using the Keyboard" in chapter 6 (Writing in the Notebook). Chapter 4, Installing Applications and Devices, explains how to use the Installer to coPy applications,
22
USING PENPOINT
SEEING WHAT'S ON THE BOOKSHELF
In Box and
Out
Box
When you finish working with a document, you can send it to someone or print it. If you're not connected to a printer or modem when you choose the Print or Send command from the Document menu, PenPoint places the documents in the Out box. Mter you connect the computer to the equipment, you can automatically print or send the documents in the Out box.
The In box stores incoming documents such as faxes and electronic mail.
You open the In or Out box the same way. This example shows the Out box.
1
TapJ
the Out box icon to open it.The documents you've asked PenPoint to print or send are listed under the service you've installed.
The Out box remains empty until you install the appropriate service and choose the Send or Print command.
2
TapJ
the close corner to close the Out box.Using Option and Dialog Sheets
When you choose a menu command that's followed by an ellipsis (three dots) you see a dialog or option sheet.
Dialog sheets prompt you for further information before carrying out the command. For example, when you choose Find, you'll see a dialog sheet that asks you what to find. You fill in the requested information by writing in a text field or by choosing options. When you have finished, tap) the appropriate button, and PenPoint carries out the command.
Option sheets allow you to set attributes for a document or for a selection in a document. For example, you can choose an option that prevents a document from being accidentally deleted or choose a font style for the text in a document.
24
USING PENPOINT
USING OPTION AND DIALOG SHEETS
Disp aying Option Sheets
To display an option sheet, you choose a menu command or draw a check V-on an object.
Some option sheets have more than one sheet. For example, Text options include Character, Paragraph, Tab Stop, and View option sheets. An arrow on the title line tells you there's more than one sheet. Tap
J
it to see a list of the other ones.To display a text option sheet:
1
Draw a check V- on a word to display the text option sheet for it.2
TapJ
the arrow on the tide line to see a list of the other sheets . .. Tap on the one you want to see.B S i n
g
Options
After displaying an option sheet, you choose options from a check list, multiple check list, or pop-up menu. Sometimes you write information in fields. For example, on the paragraph option sheet you might write the number of inches to indent the first line of a paragraph.
Once you've chosen the options, you tap
J
the Apply button to apply the options. If you're selecting options from more than one sheet, be sure to tap the Apply button to accept the options before going on to another sheet.~.~.k~.€:lq!9~iblt: .. ~tt!9L ... . < 17>
Document Edit Insert Case Format
New World Foods 19271 Palm Blvd.
Ms. Elena Huerta FastPak Design 3535 Mission St
Houston TX45321
We need a new condiments.
Recently J an executi:Vf:
of our samples our line, He briefly his son raninto itvri
Our bottles should
Los j\l1geles) CA 90036
February 17) 1991
tricyCle povvered bya threeyearold;:Butfour of
our !leW salsa broke J spilling thE;"lir conrents aU; over the
floor.
The executive ineyer gota chance tbtt''jour product
Can you design alight¥rei,ghtJ recyClable} Soz.plastic
bottlethatwon't breakun~rmoderate .impact?I'll.be
tmvelli~g nex~Y'reek)but ypucan fa]! me suggested
1J ... .
<¥'il.
it¥J...cil.
a. .
...
~I.
... ..[)..!..!
Hi!' IpPl<if.;-tefloi!'$ToolS S~tb n~w Dis IGI<:~yboatdln$tal""r }t'l 0 wtTo choose an option from a pop-up list:
... Tap
J
the arrow next to the option to see the other options . ... Tap to select another option.You can also choose options from check lists and multiple check lists: ... A check list has a single line
which indicates that you can only choose one option from it; tap
J
to make a choice.
26
USING PENPOINT
USING OPTION AND DIALOG SHEETS
Option sheets may also have text fields in which you write
information .
.&. Enter text by writing on the line .
.&. If something is already written
there, draw a cross out X through the text and write in the new text.
After making your choices or filling in the information, tap
J
the appropriate action button:.&. To apply your choices and
continue using the sheet, tap Apply .
.&. To apply the changes and close
the sheet, tap Apply & Close .
.&. To close the sheet without
applying the choices, tap Close.
If the option sheet covers up something you want to see on the page, you can reposition it by dragging its title line, or resize it by dragging the corner or bottom handle as explained in the section "Working with Notebook Objects" earlier in this chapter.
Option sheets show you the current settings for what you've selected. On a pop-up list, the choice that's showing is the current setting.
On a multiple check list, a gray checkmark tells you which option is currently set. When you select a new option, PenPoint displays a black checkmark next to it. (If an option is unavailable, the label is dimmed, and you won't be able to choose it.)
Tapping Apply applies only what you've changed.
Usin0 Dialog Sheets
Dialog sheets work like option sheets, but their purpose is slightly different. Option sheets set the attributes of a selection or document. Dialog sheets ask you for information that's needed before carrying out a command, such as what text to find.
You display dialog sheets and enter information on them the same way you do option sheets. That is:
• To display a dialog sheet, choose a command or draw an equivalent gesture. For example, to check the spelling in a document, you can choose Spell from the Edit menu or draw an 5 on the document title line.
• Display the choices on a pop-up list by tapping it; tap to choose one.
• Choose an option on a check list by tapping it.
• Choose one or more options on a multiple check list by tapping them; tap an option again to deselect it.
• Enter information in a field by writing in it.
• Reposition it by dragging its title line.
• Resize it by dragging the corner or bottom handle.
Mter choosing options or filling in the requested information, tap the
28
USING PENPOINT
Copying and Moving Notebook Objects
You can choose commands from the Edit menu or draw equivalent gestures to copy or move:
• a document to another location in the Notebook
• information to another place on the page or to a different page
• items on the Bookshelf to another location on the Bookshelf.
To move an icon on the Bookshelf:
1
Use the press ~ gesture. Put the pen down on the icon and hold it there until you see a marquee ananimated line surrounding the icon.
(If you decide not to move it, tap the icon.)
2
Without lifting the pen, drag the icon to the new location.P a.c keg e De s ig n Le tte r Docume nt Edit Insert Case Format
<5>
New World Foods 19271 Palm Blvd. Los i\ngeles, CA 90036
Ms. Elena Huerta FastF'ak Design 3535 Mission St
Houston TX 45321
RE: New package design
Dear Ms. Huerta:
February 17, 1991
fusupply design services and techniCal
Idr.:a.'wini:1!". toNew'?/orld.Thedesignsan~drawings
tlieproperqof New Worlduponpayruentfot your se!'V'ices;
To copy a sentence from one page to the following page:
1
Triple tapir
anywhere in the sentence to select it.... Barely lift the pen between taps.
2
Tap press.t
the selected sentence. (Tap the selection and then immediately press until you see a double line marquee.)... Barely lift the pen between the tap and the press .
... When you copy or move more than a line of text, PenPoint surrounds a few characters of the selected text in a marquee to make it easier to drag.
Tap the page turn arrow to turn to the next page. When you turn to the page, the text in the marquee follows.
3
Drag the text in the marquee to the new location.... PenPoint inserts it where you lift your pen.
30
USING PENPOINT
Getting Help
You can get two kinds of help from PenPoint: Quick Help and the Help notebook. Use Quick Help when you see something on the screen you want to know more about, and the Help notebook when you want to look up a topic.
Get-f"ing Quick Help
Quick Help briefly describes the part of the Notebook or page you asked about.
1
TapJ
the Help icon on the Bookshelf to see the Quick Help sheet .... You'll see instructions on using the Quick Help sheet.
2
TapJ
on the part of the Notebook or page you want information about .... You see a brief description. Some explanation include a list of gestures you can use in this area.
3
TapJ
Done to close Quick Help . ... Or, if you want to use the HelpNotebook, tap Help Notebook to open it and close Quick Help.
Usin
~
the Help Notebook
The Help notebook organizes information topically so that you can find out how to use different features of PenPoint, the computer, or the applications you've installed on it. You can continue working while displaying the Help notebook.
New Product Ideas
He Ip: Co nte nts
Di~
I'v Cjf Using He Ip
~. ;g~fi~aoo~:~,."
ve
o
Recharging the Be.tter~l,o
Removing the BatteIY',o
Installing a Sa,ttety[j Applicatio ns: '
,.S
~~j
Keyboatd
1
Double tap:, the Help icon on the Bookshelf.... Or, tap the icon to open Quick Help and then tap Help Notebook.
You'll see the Help table of contents.
2
Double tap :, a section tide to see the topics, as you would in the Notebook Table of Contents . ... Or, tap the page number for asection to see the section table of contents.
3
TapJ
the page number of the topic you want to see.4
TapJ
the close corner to close the notebook.... The next time you use it, the Help notebook opens to the last page you used.
34
USING PENPOINT
Using Gestures
You use gestures to give commands to PenPoint and to edit text in a document or text field. Most gestures have corresponding menu commands, but you'll find that the gesture is usually faster.
This chapter contains gesture profiles which tell you what each gesture does and how it works. The gesture profiles are in alphabetical order. For quick reference, you can look in the table at the beginning of the chapter. It lists the gestures by their functions (such as copying and moving things). You'll also find there a table of the core gestures-the ones you'll most often use.
PenPoint recognizes gestures the same way it does your handwriting. Thus you'll get the best results if you draw gestures with a light, firm touch, and make clean lines free of hooks or extensions. The gesture is complete when you lift your pen away from the screen or pause for more than a few seconds. If a gesture has more than one part (a double flick, for example), keep the pen very close to the screen, and complete the gesture quickly.
You can set the amount of time that PenPoint gives you between lifting the pen tip and recognizing a gesture by choosing a number for the Timeout category in Preferences.
If you draw a gesture and PenPoint doesn't recognize it, you'll see a small starburst. If the gesture is correct, but you've tried to use it somewhere it won't work, you'll see a series of concentric circles on the screen.
I
USint Gesture Profiles
We've used several conventions in these gesture profiles which should help you:
• The drawing in the box shows how big the gesture should be in relation to letters on the screen.
• The letters in the box rest on a baseline. This should help you draw the gestures correctly above or below the line of text on the screen.
• If the direction of a stroke is important one end will be thicker than the other. Start drawing the gesture where you see the thicker line, and draw in the direction of the line's tapering.
• The drawings for gestures that involve tapping or pressing include a symbol for the pen tip. For example, the symbol for double tap shows two dots and the pen tip :~. Whenever you use more than one tap, or tap and then press, make sure you make all the taps or the tap and press in the same spot on the screen.
36
USING PENPOINT
PenPoint Gestures
This table briefly describes PenPoint gestures by function and location. The gestures are arranged alphabetically within each category. Some gestures work in several places, and so are repeated in several categories. The categories are:
• Basic Gestures
• Copying and Moving Text & Objects • Deleting Text & Objects
• Editing Text in Documents • Editing Text in Edit Pads
• Editing Text in Boxed & Ruled Writing Pads • Editing Overwrite Fields on Forms
• Editing Fill-in Fields on Forms
• Getting Help
• Basic
Gestures
Bracket left selects text or adjusts the selection.
Bracket right selects text or adjusts the selection.
Caret opens a writing pad or creates a document.
Check displays options for selected text or objects.
Circle opens an edit pad.
Cross out deletes selected text or objects.
Flick scrolls a Notebook page or pop-up list.
Insert space adds a blank space in text or boxed pads.
Pigtail deletes a character in text or boxed pads.
Press sets an insertion point or gets text or an object ready to move.
• Working with Embedded Documents
• Scrolling
• Setting Options for Documents, Text, & Objects
• On the Bookshelf
• In the Document Title Line • On Notebook Tabs
• In the Scroll Margin • In the Table of Contents
Basic Gestures (continued)
Tap selects text or chooses menus and options.
Tap press gets text or an object ready to be copied.
• Copying and Moving
Text
& Objects
Press and drag moves a selection or object.
Tap press and drag copies a selection or object .
• Deleting
Text
& Objects
Cross out deletes words, selected text and objects in documents or tables of contents.
Line through deletes characters in edit pads.
Scratch out deletes words in text and ruled writing pads.
Arrow up or down increases or decreases the
size of a word or selected text.
Bold makes words or selected text bold.
Bracket left selects the word to the right of the bracket; extends or reduces selections.
Bracket right selects the word to the left of the bracket; extends or reduces selections.
Caret opens a small writing pad.
Caret tap opens a large embedded writing pad.
Check displays options for the selected text.
Check tap displays options for an embedded document.
Circle opens an edit pad for a word or text selection.
Circle line opens a blank edit pad so you can replace a word or text selection.
Cross out deletes words and selected text.
Double caret creates an embedded document.
Double flick left or right scrolls to the
extreme right or left of a document.
Double flick up or down scrolls to the
bottom or top of a document.
Double tap selects a word.
Find searches for a specific word in a document or selection, and allows you to replace it.
Flick left or right scrolls to the right or left
of the screen.
Flick up or down scrolls a line to the top or bottom of the screen.
Hyperlink (circle tap) creates a hyperlink button.
Insert space adds a space.
Initial caps formats text with initial capital letters.
Insert character opens a box for adding a single letter.
Insert tab inserts a tab.
Italics italicizes words or selected text.
Lower case formats text as lower case.
New line inserts a line break.
New paragraph inserts a paragraph break.
Normal makes a word or selection plain text.
Pigtail deletes one character.
Press and drag selects text.
Proof displays alternate spellings of a word.
Quadruple tap selects a paragraph.
Scratch out deletes words.
Spell checks the spelling of a document or selection.
38
USING PENPOINT
Editing Text in Documents (continued)
Triple tap selects a sentence.
Underline underlines words or selected text.
Upper case formats text as upper case.
• Editing Text in Edit Pads
Insert space adds one or more spaces.
Line through deletes characters.
Pigtail deletes one character.
Press makes a character box active.
• Editing Text in Boxed
&
Ruled
Writing Pads
Insert space adds one or more spaces.
Line through deletes characters in boxed pads.
Pigtail deletes one character.
Press makes a character box active.
Scratch out deletes characters in ruled pads.
• Editing Overwrite Fields on Forms
Insert space inserts one or more spaces.
Line through deletes the characters beneath the gesture.
Pigtail deletes a single character.
Editing Overwrite Fields on Forms (continued)
Scratch out deletes the characters beneath the gesture.
• Editing FiII .. in Fields on Forms
Caret opens a writing pad.
Circle opens an edit pad.
Cross out deletes the contents of the field.
Double tap selects the contents of the field.
Insert space inserts a space.
Pigtail deletes a character.
Press sets an insertion point for keyboard entry.
Press and drag moves text from one field to another.
Scratch out deletes the contents of the field.
Tap press and drag copies text from one field to another.
Tap opens an edit pad.
• Getting Help
Double tap on the Help icon opens the Help Notebook.
Question Mark on icons, option sheet controls, and other objects displays Quick Help.
Documents
'&
Borders hides the borders.Check tap displays options when borders are hidden.
Double caret creates an embedded document.
• Scrolling
Double flick left or right scrolls to the extreme right or left of a document.
Double flick up or down scrolls to the bottom or top of a document.
Flick left or right scrolls the document right or left.
Flick up or down scrolls a line to the top or bottom of the screen.
• Setting Options for Documents,
Text,
&
Objects
Check displays options.
Check tap displays options for an embedded document when borders are hidden.
• On the Bookshelf
Caret opens the pop-up Create menu to create a document or notebook.
Check displays options for a Bookshelf Icon.
Circle opens an edit pad for the title of an Icon.
Cross out deletes a Bookshelf icon.
Hyperlink (circle tap) creates a hyperlink button.
+:"
Plus selects Bookshelf icons.;;'l'}~fi:y:
Press and drag moves Bookshelf icons.:""",,;~
Tap opens an item on the Bookshelf.
Tap press and drag copies a Bookshelf icon.
• In the Document Title Line
Borders hides a document's borders and menus. To show them again, check tap
v:
in the document and use the Access option sheet.Check displays options for the document.
Circle opens an edit pad for the document title.
Cork margin shows or hides the cork margIn.
Cross out deletes the document.
Find searches for a specific word in the document and lets you replace it.
Flick up or down zooms or reduces the page view, if that preference is set.
Menu shows or hides the document's menu line.
Press and drag moves a floating document.
40
USING PENPOINT
• On Notebook Tabs
Double tap floats a document, if that preference is set.
Circle opens an edit pad for the tab's name.
Double flick up or down moves overlapped Notebook tabs to the top or bottom of the column.
Flick left on any Notebook tab displays all the tabs at once.
Flick up moves a Notebook tab up to show the overlapped tab below. Or flick down reveals an overlapped tab.
• In the Scroll Margin
Flick left or right scrolls to the right or
left.
Flick up or down scrolls a screen length to the top or bottom.
Double flick left or right scrolls to the far right or
left
of a document.Double flick up or down scrolls to the bottom or top of a document.
• In the Table of
Contents
Caret opens the pop-up Create menu to create a new document.
Check displays options for the document.
In the Table of Contents (continued)
Circle opens an edit pad for the document title.
Cross out deletes the document.
Double flick left or right scrolls to the far right or left of the Table of Contents.
Double flick up or down scrolls to the bottom or top of the Table of Contents.
Double tap expands or collapses section contents. On a page number it floats a document, if that preference is set.
Flick left or right scrolls to the right or left.
Flick up or down scrolls a line to the top or bottom of the screen.
Hyperlink (circle tap) creates a hyperlink button.
Press and drag on a document title moves the document.
Tap on a document's page number or icon turns to that page; on a document title selects the document.
Arrow Up
Increases the point size of a word or text selection.Arrow Down
Decreases the point size .., What Works •
What
Doeentt WorkUse two strokes to draw an arrow.
1 Draw the arrow tip.
2
Then barely lift the pen and quickly draw the arrow shaft.~ Be sure to make the arrow tip in one stroke from left to right.
~ The tip of the arrow must touch the word you want to change.
Arrows made with one stroke.
Pausing too long between strokes.
Targeting incorrectly.
Too much angle on the arrow shaft.
Making a loop at the arrow tip.
Starting the arrow tip from the right. Cluttering the gesture with extra hooks or wiggles.
next
--====~>increases
Bold/Borders
Makes text bold.Hides an embedded document's border.
., To Make Text Bold
Make an uppercase B over the word or selected text that you want to appear as bold text.
'",)0':::1<
"{··~r·d
C'kJJ.~'" ,,~. u,
>
one
word."
--=====:::» Bold
~ll"letltil""e selection"
., To Hide an Embedded Document's Borders
Make an uppercase B in the title line of the embedded document.
t
/
42
USING PENPOINT
Bracket, Left
Selects textm If no text is selected, a left bracket drawn anywhere on a word selects it. If there's already a text selection and you draw the bracket facing the selection, the selection gets extended to the bracket. If you draw it on a word that's part of an existing selection, it reduces the selection to that word .
• What Works
Draw it in one stroke. Start at the top and draw three sides of a rectangle, leaving it open to the left.
a[word,
Adjusts~ i~~~;ie~~~~~l~~:~
Bracket, Right
Selects text>
>
m If no text is selected, a right bracket drawn anywhere on a word selects it. If there's already a text selection and you draw the bracket facing the selection, the selection gets extended to the bracket. If you draw it on a word that's part of an existing selection, it reduces the selection to that word .
• What Works
Draw it in one stroke. Start at the top and draw three sides of a rectangle, leaving it open to the right.
a word]
-~=========:;>
Ca ret
Opens a small writing pad in text for adding a word .., What Works • What Doe6n't Work
Starting the gesture at the lower left, draw a sIan ted line up and then down to the right. The caret tip must point at the space between words.
A writing pad pops up above the tip of the gesture. New text appears at that same point.
., Where It Works
Making two strokes.
"'-Creating a loop at the tip.
A
Starting on the right side of the caret.Cluttering the gesture with extra A
hooks or wiggles. I \r
In a table of contents, a cork margin, or the Bookshelf, opens the Create menu to create new documents.
Caret Tap
Opens an embedded writing pad in text .., What Works
1 Starting the gesture at the lower left, draw a sIan ted line up and then down to the right. The caret tip must point at the space between words.
2
Barely raising the pen, quickly tap over the caret tip to complete the gesture.~ The caret tip sets the insertion point for the new text.
• What Doeen't Work
Tapping too far off~center.
Making the tap too far inside the caret.
A
44
USING PENPOINT
Check
Displays options for a word, object, or selection in text.II
What WorksDraw the check in one gesture, with the beginning of the first downward stroke on the word or selection whose options you want to see.
or
II
Where It WorksDisplays options for objects and icons.
When you draw it in the title line of a document or accessory you see options for that thing.
Check Tap
Displays options for an embedded document when you've hidden its borders and title line.~ Choose Show from the Access sheet to redisplay the embedded document's borders.
II
What Works1 Anywhere in the embedded document, draw the checkmark in one stroke.
A
Circle
Opens an edit pad for a word or selection in text,text fields, and labels.
• What Works •
What
Doean't Work
Start at the top of the character, word, or series of words that you want to edit.
Draw a neatly closed, counter-clockwise circle. Ovals also work.
~worktoo.
An
edit pad appears containing the circled characters, word, or words.• Where It Works
Not starting the circle from the top.
0
Overlapping parts of the circle too
much (overlapping a little is okay).
c::5
Not closing the circle.
C
Opens an edit pad for a document tide, or a label on a tab, icon, or hyperlink button.
Circle Line
Opens a blank writing pad to replace a word or selection in text.• What Works
lOver the word or within the selection that you want to replace, draw a circle or oval.
2
Then, barely lifting the pen from the screen, quickly make a horizontal line across the middle of the circle.~ On a single word:
g~e
V\rith text.
a
~ On a selection:
~ You may begin the line from either the right or left.
Lifting the pen too farbeforedrawingth~ line~
Pausingtpo long between drawing the circle and the line.
Not makingthe.circle correctly, (See.circle gesture.)
46
USING PENPOINT
Circle
Tap
Creates a hyperlink button.• What Works
1
First select the text, document, or object that you want the button to link to.2
Make a circle where you want the hyperlink button to appear.3
Then, barely lifting the pen, tap in the center of the circle.The link button will appear where you make the tap.
• Where It Works
You can create hyperlink buttons almost anywhere, including documents, cork margins, and on the Bookshelf
Cork Margin
Shows or hides the cork margin at the bottom of a document.• What Works
Cross Out
Deletes a word or selection in text, or any object directly beneath theX.
• What Works
Make an X using two distinct strokes (top to bottom) over the selection or obj ect that you want to delete.
1 Draw the first stroke;
barely lift the pen from the screen
2
Quickly draw the second stroke.• Where It Works
• What Doe6n't Work
Drawing the gesture in one stroke (connecting the two lines).
Drawing strokes that are not clean lines.
Making a + instead of an X.
Deletes the contents of a field, documents from the Table of Contents, and icons from the Bookshelf. When you draw it over a document's title line, it deletes the document. When you draw it over a disk icon or disk name in the Disk Manager, it ejects the disk.
Double Caret
• What Works
Displays the Create menu to create a document embedded within an existing document.
x
+
Two carets, one nested beneath the other. (Either upper or lower can be made first.)
Using more than.twoistrokes.·to·ma,kethe two
1 Each caret gesture should be drawn from left to right with one stroke.
2
After drawing the first caret, barely lift the pen from the screen and quickly draw the second caret.carets;
Ma~ing;eithei:c~retJromiight totert. Making stroke.swithextrahooks.Qfwiggles.
UiftingthepeIl. tip .tooJafb~foieimakirlgthe second caret.
Pallsing too Jong betweendiaWingthe s~cond. caret.
T()oin~¢~oYerlappihg ...
48
USING PENPOINT
Double Flick Left
Scrolls to the left edge of a document.Double Flick Right
Scrolls to the right edge.11
What Works1
Start the first flick on the column where you want the scroll to begin and draw a short, straight line, making a snappy flick with your pen.2
Barely lift the pen tip and quickly make a second flick.Flick left to scroll to the right edge; flick right to scroll to the left edge.
m Make your flicks as if you're pushing a real piece of paper with them.
11
Where It WorksYou can flick anywhere in a document (except draw and paint documents) including tables of contents.
Dou ble Flick
Up
Scroll to the bottom of a document.Double Flick Down
Scrolls to the top.11
What Works1
Start the flick on the line where you want the scroll to begin and draw a short, straight line, making a snappy flick with your pen.2
Barely lift the pen tip and quickly make a second flick.Flick down to scroll to the top of the document; flick up to scroll to the bottom of the document.
m Make your flicks as if you're pushing a real piece of paper with them.
11
Where It WorksSelects a word in text.
Double Tap
Expands or collapses sections in the Table of Contents. Floats a page (if that preference is set).
• What Works
Touch the screen firmly twice in the same spot, barely lifting the pen between taps. Then lift the pen.
II Double tap on a word to select the word.
se~t
a
~ord~. --~==========~
_
What Doeen't Work
Lifting the pen tip too far between taps.
Pausing between taps.
Tapping on two different objects or words.
a
II Double tap on a section title in the Table of Contents to show documents in the section.
III
s:l'..
. ... .. ...
9~
III
SaJes .... ... ... ... ... ... 9[j Customer.!:. . ... 12
B
Sales by Region 10lIb Chain Stores 13 lIb f~ewHires. ..11
B
Complaints to Acton 14 [j Customer.!:.. " 12[j New Bottle Design".. " ... "" 15 lIb Chain Stores 13
• Where It Works
Double tap on a word to select the word. Double tap on a section title in the Table of Contents to show section contents. On a table of contents page number, floats the page. On a tab, floats the tabbed page. On a hyperlink button floats the page attached to the hyperlink button.
Eject/Export
• In the Disk Manager
In the Disk Manager, ejects a floppy disk. In a Table of Contents, exports a document.
-What Doeentt Work
Make a capital E over the disk icon or disk label. MakingtheE differently from the way you pta¢tked it ihHahdwriting Custorrtization .
~
[j'Penpoint
• In a Table of Contents
....•.
~~
...~
Dir
Make a capital E over the title of the document you wish to export. A double marquee appears around the document title. Then, drag it to the Disk Manager to export it.
• Where It Works