by Doug Lowe
PowerPoint® 2013 For Dummies® Published by
John Wiley & Sons, Inc.
111 River Street Hoboken, NJ 07030-5774
www.wiley.com
Copyright © 2013 by John Wiley & Sons, Inc., Hoboken, New Jersey Published by John Wiley & Sons, Inc., Hoboken, New Jersey Published simultaneously in Canada
No part of this publication may be reproduced, stored in a retrieval system or transmitted in any form or by any means, electronic, mechanical, photocopying, recording, scanning or otherwise, except as permit-ted under Sections 107 or 108 of the 1976 Unipermit-ted States Copyright Act, without either the prior written permission of the Publisher, or authorization through payment of the appropriate per-copy fee to the Copyright Clearance Center, 222 Rosewood Drive, Danvers, MA 01923, (978) 750-8400, fax (978) 646-8600. Requests to the Publisher for permission should be addressed to the Permissions Department, John Wiley & Sons, Inc., 111 River Street, Hoboken, NJ 07030, (201) 748-6011, fax (201) 748-6008, or online at http:// www.wiley.com/go/permissions.
Trademarks: Wiley, the Wiley logo, For Dummies, the Dummies Man logo, A Reference for the Rest of Us!, The Dummies Way, Dummies Daily, The Fun and Easy Way, Dummies.com, Making Everything Easier, and related trade dress are trademarks or registered trademarks of John Wiley & Sons, Inc. and/or its affiliates in the United States and other countries, and may not be used without written permission. PowerPoint is a registered trademark of Microsoft Corporation in the United States and/or other countries. All other trademarks are the property of their respective owners. John Wiley & Sons, Inc. is not associated with any product or vendor mentioned in this book.
LIMIT OF LIABILITY/DISCLAIMER OF WARRANTY: THE PUBLISHER AND THE AUTHOR MAKE NO REP-RESENTATIONS OR WARRANTIES WITH RESPECT TO THE ACCURACY OR COMPLETENESS OF THE CONTENTS OF THIS WORK AND SPECIFICALLY DISCLAIM ALL WARRANTIES, INCLUDING WITHOUT LIM-ITATION WARRANTIES OF FITNESS FOR A PARTICULAR PURPOSE. NO WARRANTY MAY BE CREATED OR EXTENDED BY SALES OR PROMOTIONAL MATERIALS. THE ADVICE AND STRATEGIES CONTAINED HEREIN MAY NOT BE SUITABLE FOR EVERY SITUATION. THIS WORK IS SOLD WITH THE UNDERSTAND-ING THAT THE PUBLISHER IS NOT ENGAGED IN RENDERUNDERSTAND-ING LEGAL, ACCOUNTUNDERSTAND-ING, OR OTHER PRO-FESSIONAL SERVICES. IF PROPRO-FESSIONAL ASSISTANCE IS REQUIRED, THE SERVICES OF A COMPETENT PROFESSIONAL PERSON SHOULD BE SOUGHT. NEITHER THE PUBLISHER NOR THE AUTHOR SHALL BE LIABLE FOR DAMAGES ARISING HEREFROM. THE FACT THAT AN ORGANIZATION OR WEBSITE IS REFERRED TO IN THIS WORK AS A CITATION AND/OR A POTENTIAL SOURCE OF FURTHER INFORMA-TION DOES NOT MEAN THAT THE AUTHOR OR THE PUBLISHER ENDORSES THE INFORMAINFORMA-TION THE ORGANIZATION OR WEBSITE MAY PROVIDE OR RECOMMENDATIONS IT MAY MAKE. FURTHER, READ-ERS SHOULD BE AWARE THAT INTERNET WEBSITES LISTED IN THIS WORK MAY HAVE CHANGED OR DISAPPEARED BETWEEN WHEN THIS WORK WAS WRITTEN AND WHEN IT IS READ.
For general information on our other products and services, please contact our Customer Care Department within the U.S. at 877-762-2974, outside the U.S. at 317-572-3993, or fax 317-572-4002. For technical support, please visit www.wiley.com/techsupport.
Wiley publishes in a variety of print and electronic formats and by print-on-demand. Some material included with standard print versions of this book may not be included in e-books or in print-on-demand. If this book refers to media such as a CD or DVD that is not included in the version you purchased, you may download this material at http://booksupport.wiley.com. For more information about Wiley products, visit www.wiley.com.
Library of Congress Control Number: 2012956420
ISBN 978-1-118-50253-2 (pbk); ISBN 978-1-118-50260-0 (ebk); ISBN 978-1-118-50259-4 (ebk); ISBN 978-1-118-50261-7 (ebk)
About the Author
Doug Lowe has written enough computer books to line all the birdcages in California. His other books include Word 2010 All-in-One For Dummies, Java All-in-One For Dummies, and Networking For Dummies, 9th Edition.
Although Doug has yet to win a Pulitzer Prize, he remains cautiously optimis-tic. He is hopeful that James Cameron will pick up the film rights to this book and suggests Avatar II: The Phantom Presentation as a working title.
Dedication
Author’s Acknowledgments
I’d like to thank the whole crew at Wiley who helped with this edition, espe-cially Blair Pottenger who did a great job keeping the entire project moving along when deadlines came and chapters didn’t. Copy editor Beth Taylor dotted all the t’s and crossed all the i’s, or something like that, and managed to get my crude prose readable. Ryan Williams gave the entire manuscript a thorough technical review and made many excellent suggestions. And, of course, many other people pitched in.
Publisher’s Acknowledgments
We’re proud of this book; please send us your comments at http://dummies.custhelp.com. For other comments, please contact our Customer Care Department within the U.S. at 877-762-2974, out-side the U.S. at 317-572-3993, or fax 317-572-4002.
Some of the people who helped bring this book to market include the following:
Acquisitions and Editorial
Project Editor: Blair J. Pottenger
Acquisitions Editor: Amy Fandrei
Copy Editor: Beth Taylor
Technical Editor: Ryan Williams
Editorial Manager: Kevin Kirschner
Editorial Assistant: Annie Sullivan
Sr. Editorial Assistant: Cherie Case
Cover Photo: © Goldmund Lukic / iStockphoto
Composition Services
Project Coordinator: Katie Crocker
Layout and Graphics: Jennifer Creasey, Joyce Haughey
Proofreaders: Lindsay Amones, Debbye Butler
Indexer: BIM Indexing & Proofreading Services
Publishing and Editorial for Technology Dummies
Richard Swadley, Vice President and Executive Group Publisher
Andy Cummings, Vice President and Publisher
Mary Bednarek, Executive Acquisitions Director
Mary C. Corder, Editorial Director Publishing for Consumer Dummies
Kathleen Nebenhaus, Vice President and Executive Publisher Composition Services
Contents at a Glance
Introduction ... 1
Part I: Getting Started with PowerPoint 2013... 7
Chapter 1: Welcome to PowerPoint 2013 ... 9
Chapter 2: Editing Slides ... 33
Chapter 3: Working in Outline View ... 49
Chapter 4: Proofing Your Presentations ... 55
Chapter 5: Don’t Forget Your Notes! ... 65
Chapter 6: Show Time! ... 71
Part II: Creating Great-Looking Slides ... 87
Chapter 7: All about Fonts and Text Formatting ... 89
Chapter 8: Designing Your Slides... 105
Chapter 9: Animating Your Slides ... 119
Chapter 10: Masters of the Universe Meet the Templates of Doom ... 135
Part III: Embellishing Your Slides ... 155
Chapter 11: Inserting Pictures ... 157
Chapter 12: Drawing on Your Slides ... 175
Chapter 13: Charting for Fun and Profit ... 193
Chapter 14: Working with SmartArt ... 211
Chapter 15: Lights! Camera! Action! (Adding Sound and Video) ... 223
Chapter 16: More Things to Insert on Your Slides ... 235
Part IV: Working with Others ... 261
Chapter 17: Collaborating in the Cloud... 263
Chapter 18: Using a Slide Library and Other Ways to Reuse Slides ... 275
Chapter 19: Exporting Your Presentation to Other Formats ... 281
Part V: The Part of Tens ... 293
Chapter 20: Ten PowerPoint Commandments ... 295
Chapter 21: Ten Tips for Creating Readable Slides ... 299
Chapter 22: Ten Tips for Creating Readable Slides ... 303
Table of Contents
Introduction ... 1
About This Book ... 1
How to Use This Book ... 2
What You Don’t Need to Read ... 3
Foolish Assumptions ... 3
How This Book Is Organized ... 3
Part I: Basic PowerPoint 2013 Stuff ... 4
Part II: Creating Great-Looking Slides ... 4
Part III: Embellishing Your Slides ... 4
Part IV: Working with Others ... 4
Part V: The Part of Tens ... 4
Icons Used in This Book ... 4
Where to Go from Here ... 5
Part I: Getting Started with PowerPoint 2013 ... 7
Chapter 1: Welcome to PowerPoint 2013 . . . .9
What in Sam Hill Is PowerPoint? ... 9
Introducing PowerPoint Presentations ... 11
Presentation files ... 12
What’s in a slide? ... 12
Starting PowerPoint ... 14
Navigating the PowerPoint Interface ... 15
Unraveling the Ribbon ... 18
The View from Here Is Great ... 19
Taking the Backstage Tour ... 20
Creating a New Presentation ... 21
Editing text ... 22
Adding a new slide ... 22
Moving from slide to slide ... 24
Choosing a design ... 24
Displaying Your Presentation ... 25
Saving Your Work ... 26
Opening a Presentation ... 27
Closing a Presentation ... 29
Getting Help ... 30
xiv
PowerPoint 2013 For Dummies
Chapter 2: Editing Slides . . . .33
Moving from Slide to Slide ... 34
Working with Objects ... 34
Selecting objects ... 35
Resizing or moving an object ... 36
Editing a Text Object ... 38
Selecting Text ... 39
Using Cut, Copy, and Paste ... 40
Duplicating an Object ... 41
Using the Clipboard Task Pane ... 41
Oops! I Didn’t Mean It (The Marvelous Undo Command) ... 42
Deleting a Slide ... 43
Duplicating a Slide ... 43
Finding Text ... 44
Replacing Text ... 45
Rearranging Your Slides in Slide Sorter View ... 47
Chapter 3: Working in Outline View . . . .49
Calling Up the Outline ... 49
Selecting and Editing an Entire Slide ... 51
Selecting and Editing One Paragraph ... 51
Promoting and Demoting Paragraphs ... 51
Adding a New Paragraph ... 52
Adding a New Slide ... 53
Moving Text Up and Down ... 53
Collapsing and Expanding the Outline ... 54
Chapter 4: Proofing Your Presentations . . . .55
Checking Spelling As You Go ... 55
Spell Checking After-the-Fact ... 57
Using the Thesaurus ... 59
Capitalizing Correctly ... 60
Using the AutoCorrect Feature ... 61
Chapter 5: Don’t Forget Your Notes! . . . .65
Understanding Notes ... 66
Adding Notes to a Slide ... 67
Adding an Extra Notes Page for a Slide ... 68
Adding a New Slide from Notes Page View ... 69
Printing Notes Pages ... 69
Displaying Notes on a Separate Monitor ... 70
Chapter 6: Show Time! . . . .71
The Quick Way to Print ... 72
Printing from Backstage View ... 72
Printing more than one copy ... 73
xv
Table of Contents
Printing part of a document ... 73
Using Print Preview ... 74
Setting Up a Slide Show ... 75
Starting a Slide Show ... 76
Working in Presenter View ... 77
Keyboard and Mouse Tricks for Your Slide Show ... 79
Using Presentation Tools ... 80
Using the Laser Pointer ... 80
Scribbling on Your Slides ... 80
Rehearsing Your Slide Timings ... 81
Using Custom Shows ... 82
Creating a custom show ... 82
Showing a custom show ... 83
Hiding slides ... 84
Showing Your Presentation Online ... 84
Part II: Creating Great-Looking Slides ... 87
Chapter 7: All about Fonts and Text Formatting . . . .89
Changing the Look of Your Text ... 90
Two ways to apply formatting ... 92
Changing the size of characters ... 92
Choosing text fonts ... 92
Adding color to your text... 93
Adding shadows ... 93
Big Picture Text Formatting ... 94
Biting the bulleted list ... 94
Creating numbered lists ... 96
Setting tabs and indents ... 97
Spacing out ... 98
Lining things up... 99
Making columns ... 100
Creating Fancy Text with WordArt ... 100
Chapter 8: Designing Your Slides . . . .105
Looking at the Design Tab ... 105
Working with Themes ... 106
Applying themes ... 107
Using theme colors ... 108
Using theme fonts ... 112
Applying theme effects... 113
Changing the Slide Size ... 113
Using Background Styles ... 115
Using a gradient fill ... 115
xvi
PowerPoint 2013 For Dummies
Chapter 9: Animating Your Slides . . . .119
Using Slide Transitions ... 119
Using the Animations Tab ... 122
Customizing Your Animation ... 124
Understanding custom animation ... 124
Using the Animation pane ... 126
Adding an effect ... 127
More about animating text ... 129
Timing your animations ... 130
Making Text Jiggle ... 133
Using the Animation Painter ... 133
Chapter 10: Masters of the Universe Meet the Templates of Doom . . .135
Working with Masters ... 135
Modifying the Slide Master ... 137
Working with the Slide Master and Edit Master tabs ... 138
Adding recurring text or other elements ... 139
Applying themes to your Masters ... 140
Adding new layouts ... 141
Adjusting the Handout and Notes Masters ... 141
Changing the Handout Master ... 141
Changing the Notes Master ... 143
Using Masters ... 144
Overriding the Master text style ... 144
Hiding background objects... 144
Using Headers and Footers ... 145
Adding a date, number, or footer to slides ... 146
Adding a header or footer to notes or handouts pages ... 147
Editing the header and footer placeholders directly ... 147
Yes, You Can Serve Two Masters ... 147
Creating a new Slide Master ... 148
Applying Masters ... 149
Preserving your masters ... 150
Restoring Lost Placeholders ... 151
Working with Templates ... 152
Creating a new template ... 152
Creating a presentation based on a template ... 153
Working with Presentation Sections ... 153
Part III: Embellishing Your Slides ... 155
Chapter 11: Inserting Pictures . . . .157
Exploring the Many Types of Pictures ... 158
Bitmap pictures ... 158
xvii
Table of Contents
Using Pictures ... 160
Dropping in a picture ... 160
Moving, sizing, and stretching pictures ... 162
Inserting Pictures from a File ... 163
Cropping a Picture ... 165
Adding Style to Your Pictures ... 166
Applying a picture border ... 167
Applying picture effects ... 167
Correcting Sharpness, Brightness, and Contrast ... 168
Adjusting Color ... 168
Applying Artistic Effects ... 169
Compressing Your Pictures ... 170
Removing Picture Backgrounds ... 172
Chapter 12: Drawing on Your Slides . . . .175
Some General Drawing Tips ... 175
Zooming in ... 176
Displaying the ruler, gridlines, and guides ... 176
Sticking to the color scheme ... 177
Saving frequently ... 177
Remembering Ctrl+Z ... 177
Drawing Simple Objects ... 177
Drawing straight lines ... 179
Drawing rectangles, squares, ovals, and circles ... 179
Creating Other Shapes ... 180
Drawing a shape ... 180
Drawing a polygon or free-form shape ... 182
Drawing a curved line or shape ... 184
Creating a text box ... 185
Styling Your Shapes ... 185
Setting the shape fill ... 185
Setting the shape outline ... 186
Applying shape effects ... 187
Flipping and Rotating Objects ... 187
Flipping an object ... 187
Rotating an object 90 degrees ... 188
Using the rotate handle ... 188
Drawing a Complicated Picture ... 189
Changing layers ... 189
Line ’em up ... 190
Using the grids and guides ... 191
Group therapy ... 192
Chapter 13: Charting for Fun and Profit . . . .193
Understanding Charts ... 193
Adding a Chart to Your Presentation ... 194
Adding a new slide with a chart ... 195
Adding a chart to an existing slide ... 198
xviii
PowerPoint 2013 For Dummies
Changing the Chart Type ... 200
Working with Chart Data ... 200
Switching rows and columns ... 201
Changing the data selection ... 202
Editing the source data ... 202
Refreshing a chart ... 203
Changing the Chart Layout ... 203
Changing the Chart Style ... 204
Embellishing Your Chart ... 205
Chapter 14: Working with SmartArt . . . .211
Understanding SmartArt ... 211
Creating a SmartArt Diagram ... 214
Tweaking a SmartArt Diagram ... 216
Editing the SmartArt Text ... 218
Working with Organization Charts ... 219
Adding boxes to a chart ... 220
Deleting chart boxes ... 221
Changing the chart layout ... 221
Chapter 15: Lights! Camera! Action! (Adding Sound and Video) . . . . .223
Getting Ready to Add Sound to a Slide ... 224
Investigating sound files ... 224
Inserting an audio sound object ... 225
Setting Audio Options ... 227
Controlling when a sound is played ... 228
Looping a sound ... 228
Hiding the sound icon ... 228
Fading the sound in and out ... 228
Trimming an audio clip ... 228
Adding Video to Your Slides ... 229
Setting Video Options ... 231
Controlling when a video is played ... 231
Looping a video ... 232
Trimming a video clip ... 232
Playing the video full screen ... 232
Fading the video’s sound in and out ... 233
Adding a bookmark... 233
Chapter 16: More Things to Insert on Your Slides . . . .235
Inserting Tables ... 235
Creating a table in a Content placeholder ... 236
Inserting a table on a slide ... 237
Drawing a table ... 238
Applying style to a table ... 240
Working with the Layout tab ... 242
xix
Table of Contents
Using Hyperlinks ... 246
Creating a hyperlink to another slide... 247
Creating a hyperlink to another presentation or to a website... 248
Adding Action Buttons ... 249
Assigning button actions ... 250
Choosing button shapes ... 250
Creating a button ... 251
Creating a navigation toolbar ... 253
Inserting Equations ... 254
Part IV: Working with Others ... 261
Chapter 17: Collaborating in the Cloud . . . .263
Sharing a Presentation in the Cloud ... 263
Sharing a Presentation with Other Users ... 265
Sharing a Presentation on Social Networks ... 268
Sending Slides for Review Via E-mail ... 269
Using Comments ... 271
Comparing Presentations ... 273
Chapter 18: Using a Slide Library and Other Ways to Reuse Slides . . . .275
Stealing Slides from Another Presentation ... 276
Saving Slides in a Slide Library ... 277
Stealing Slides from a Slide Library ... 279
Chapter 19: Exporting Your Presentation to Other Formats . . . .281
Creating a PDF File ... 281
Crafting a Video ... 282
Adding timings and narration ... 283
Creating a video ... 286
Packaging Your Presentation on a CD ... 287
Creating Word Handouts ... 290
Part V: The Part of Tens ... 293
Chapter 20: Ten PowerPoint Commandments . . . .295
I. Thou Shalt Frequently Savest Thy Work ... 295
II. Thou Shalt Storeth Each Presentation in Its Proper Folder ... 295
III. Thou Shalt Not Abuseth Thy Program’s Formatting Features ... 296
IV. Thou Shalt Not Stealeth Copyrighted Materials ... 296
V. Thou Shalt Abideth by Thine Color Scheme, Auto-Layout, and Template ... 296
xx
PowerPoint 2013 For Dummies
VII. Keep Thy Computer Gurus Happy ... 297 VIII. Thou Shalt Backeth Up Thy Files Day by Day ... 297 IX. Thou Shalt Fear No Evil, for Ctrl+Z Is Always with Thee ... 297 X. Thou Shalt Not Panic ... 297
Chapter 21: Ten Tips for Creating Readable Slides . . . .299
Try Reading the Slide from the Back of the Room ... 299 Avoid Small Text ... 299 No More Than Five Bullets, Please ... 300 Avoid Excessive Verbiage Lending to Excessively Lengthy TextThat Is Not Only Redundant but Also Repetitive and Reiterative ... 300 Use Consistent Wording ... 300 Avoid Unsightly Color Combinations ... 301 Watch the Line Endings ... 301 Keep the Background Simple ... 301 Use Only Two Levels of Bullets ... 301 Avoid Bullets Altogether If You Can ... 301 Keep Charts and Diagrams Simple ... 302
Chapter 22: Ten Ways to Keep Your Audience Awake . . . .303
Don’t Forget Your Purpose ... 303 Don’t Become a Slave to Your Slides ... 304 Don’t Overwhelm Your Audience with Unnecessary Detail ... 304 Don’t Neglect Your Opening ... 304 Be Relevant ... 304 Don’t Forget the Altar Call ... 305 Practice, Practice, Practice ... 305 Relax! ... 305 Expect the Unexpected ... 306 Don’t Be Boring ... 306Introduction
W
elcome to PowerPoint 2013 For Dummies, the book written especially for people who are lucky enough to use this latest and greatest version of PowerPoint and want to find out just enough to finish that presentation that was due yesterday.Do you ever find yourself in front of an audience, no matter how small, flipping through flip charts or shuffling through a stack of handwritten transparencies? You need PowerPoint! Have you always wanted to take your notebook com-puter with you to impress a client at lunch, but you haven’t known what to do with it between trips to the salad bar? You really need PowerPoint!
Or maybe you’re one of those unfortunate folks who bought Microsoft Office because it was such a bargain and you needed a Windows word processor and spreadsheet anyway, and hey, you’re not even sure what PowerPoint is, but it was free. Who can resist a bargain like that?
Whichever circumstance you find yourself in, you’re holding the perfect book right here in your formerly magic-marker-stained hands. Help is here, within these humble pages.
This book talks about PowerPoint in everyday — and often irreverent — terms. No lofty prose here; the whole thing checks in at about the fifth-grade reading level. I have no Pulitzer expectations for this book. My goal is to make an otherwise dull and lifeless subject at least tolerable, and maybe even kind of fun.
About This Book
This isn’t the kind of book that you pick up and read from start to finish as though it were a cheap novel. If I ever see you reading it at the beach, I’ll kick sand in your face. This book is more like a reference — the kind of book you can pick up, turn to just about any page, and start reading. It has 22 chapters, each one covering a specific aspect of using PowerPoint — such as printing, animating your slides, or using clip art.
2
PowerPoint 2013 For Dummies
For example, the chapter on using charts contains nuggets like these:
✓ Understanding charts
✓ Adding a chart to your presentation
✓ Pasting a chart from Excel
✓ Changing the chart type
✓ Working with chart data
You don’t have to memorize anything in this book. It’s a need-to-know book: You pick it up when you need to know something. Need to know how to create an organization chart? Pick up the book. Need to know how to over-ride the Slide Master? Pick up the book. After you find what you’re looking for, put it down and get on with your life.
How to Use This Book
This book works like a reference. Start with the topic that you want to find out about: To get going, look for it in the table of contents or in the index. The table of contents is detailed enough that you should be able to find most of the topics that you look for. If not, turn to the index, where you find even more detail.
When you find your topic in the table of contents or the index, turn to the area of interest and read as much or as little as you need or want. Then close the book and get on with it.
This book is loaded with information, of course, so if you want to take a brief excursion into your topic, you’re more than welcome. If you want to know all about Slide Masters, read the chapter on templates and Masters. If you want to know all about animation, read the chapter on animation. Read whatever you want. This is your book — not mine.
On occasion, this book directs you to use specific keyboard shortcuts to get things done. When you see something like Ctrl+Z, this instruction means to hold down the Ctrl key while pressing the Z key and then release both together. Don’t type the plus sign.
3
Introduction
Whenever I describe a message or information that you see onscreen, it looks like this:
Are we having fun yet?
Anything you’re instructed to type appears in bold like so: Type a:setup in the Run dialog box. Type exactly what you see, with or without spaces.
Another nice feature of this book is that whenever I discuss a certain button that you need to click in order to accomplish the task at hand, the button appears either in the margin or in a helpful table that summarizes the but-tons that apply to a particular task. This way, you can easily locate it on your screen.
What You Don’t Need to Read
Some parts of this book are skippable. I carefully place extra-technical infor-mation in self-contained sidebars and clearly mark them so that you can give them a wide berth. Don’t read this stuff unless you just gots to know. Don’t worry; I won’t be offended if you don’t read every word.
Foolish Assumptions
I make only three assumptions about you:
✓ You use a computer.
✓ It’s a Windows computer — not a Macintosh. This book works just as well whether you’re using Windows 8 or Windows 7. (PowerPoint 2013 requires at least Windows 7.)
✓ You use or are thinking about using PowerPoint 2013.
Nothing else. I don’t assume that you’re a computer guru who knows how to change a controller card or configure memory for optimal use. These types of computer chores are best handled by people who like computers. My hope is that you’re on speaking terms with such a person. Do your best to stay there.
How This Book Is Organized
4
PowerPoint 2013 For Dummies
order if you want. But you don’t have to read the book that way; you can flip it open to any page and start reading.
Here’s the lowdown on what’s in each of the five parts:
Part I: Getting Started with PowerPoint 2013
In this part, you review the basics of using PowerPoint. This is a good place to start if you’re clueless about what PowerPoint is, let alone how to use it.
Part II: Creating Great-Looking Slides
The chapters in this part show you how to make presentations that look good. Most important are the chapters about themes (Chapter 8), and Masters and templates (Chapter 10). Get the theme, template, and Masters right, and everything else falls into place.
Part III: Embellishing Your Slides
One of the nifty new features of PowerPoint 2013 is the Insert tab on the Ribbon. It’s loaded with things you can insert into your presentations. The chapters in this part explore the various goodies to be found here, such as pictures, clip art, charts, SmartArt objects, sounds, movies, tables, Ginsu knives, and more!
Part IV: Working with Others
The chapters in this part show you how to use PowerPoint’s many collabora-tion features, such as sharing files in the Cloud via Microsoft’s new SkyDrive feature, creating slide libraries, and exporting slide shows to other formats.
Part V: The Part of Tens
This wouldn’t be a For Dummies book without lists of interesting snippets: ten PowerPoint commandments, ten tips for creating readable slides, and ten ways to keep your audience awake.
Icons Used in This Book
5
Introduction
Watch out! Some technical drivel is just around the corner. Read it only if you have your pocket protector firmly attached.
Pay special attention to this icon — it tells you that some particularly useful tidbit is at hand, perhaps a shortcut or a way of using a command that you might not have considered.
Danger! Danger! Danger! Stand back, Will Robinson!
Did I tell you about the memory course I took? Paragraphs marked with this icon simply point out details that are worth committing to memory.
Where to Go from Here
Part I
2013
PowerPoint
getting started
with
In this part . . .
✓ Get a bird’s-eye view of PowerPoint 2013 and what you can do
with it.
✓ Find out how to edit the content on PowerPoint slides, from the
text itself to text objects to other types of objects, such as clip art pictures or drawn shapes.
✓ Understand how to work in Outline View so you can focus on
your presentation’s main points and subpoints without worrying about appearance.
✓ Learn to proof your presentation with PowerPoint and avoid
embarrassing mistakes.
✓ Discover how to create speaker notes to help you get through
your presentation.
✓ Know how to finish the final preparations by printing copies of
your slides, notes, and handouts, as well as how to set up a projector and actually deliver your presentation.
✓ Visit www.dummies.com for great Dummies content
1
Welcome to PowerPoint 2013
In This Chapter
▶ Discovering PowerPoint
▶ Firing up PowerPoint
▶ Making sense of the PowerPoint screen and the Ribbon
▶ Visiting backstage
▶ Creating a presentation
▶ Viewing presentation outlines
▶ Saving and closing your work
▶ Retrieving a presentation from the hard drive
▶ Getting help
▶ Getting out of PowerPoint
T
his chapter is a grand and gala welcoming ceremony for PowerPoint 2013, Microsoft’s popular slide-presentation program.This chapter is sort of like the opening ceremony of the Olympics, in which all the athletes parade around the stadium and people make speeches in French. In much the same way, this chapter marches PowerPoint 2013 around the stadium so you can get a bird’s-eye view of what the program is and what you can do with it. I might make a few speeches, but not in French (unless, of course, you’re reading the French edition of this book).
What in Sam Hill Is PowerPoint?
10
Part I: Getting Started with PowerPoint 2013
depending on which edition of Office you buy, you might get other goodies as well, such as Access, Publisher, a complete set of Ginsu knives, and a Binford VegaPneumatic Power Slicer and Dicer. (Always wear eye protection.)
You know what Word is — it’s the world’s most loved and most hated word processor, and it’s perfect for concocting letters, term papers, and great American novels. I’m thinking of writing one as soon as I finish this book. Excel is a spreadsheet program used by bean counters the world over. Outlook is that program you use to read your e-mail. But what the heck is PowerPoint? Does anybody know or care? (And as long as I’m asking ques-tions, who in Sam Hill was Sam Hill?)
PowerPoint is a presentation program, and it’s one of the coolest programs I know. It’s designed to work with a projector to display presentations that will bedazzle your audience members and instantly sway them to your point of view, even if you’re selling real estate on Mars, season tickets for the Oakland Raiders, or a new increase to a congressman in an election year. If you’ve ever flipped a flip chart, you’re going to love PowerPoint.
Here are some of the many uses of PowerPoint:
✓ Business presentations: PowerPoint is a great timesaver for anyone who makes business presentations, whether you’ve been asked to speak in front of hundreds of people at a shareholders’ convention, a group of sales reps at a sales conference, or your own staff or co-workers at a business meeting. ✓ Sales presentations: If you’re an insurance salesperson, you can use
PowerPoint to create a presentation about the perils of not owning life insurance and then use your laptop or tablet computer to show it to hapless clients.
✓ Lectures: PowerPoint is useful for teachers or conference speakers who want to reinforce the key points in their lectures with slides.
✓ Homework: PowerPoint is a great program to use for certain types of homework projects, such as those big history reports that count for half your grade.
✓ Church: People use PowerPoint at churches to display song lyrics on big screens so everyone can sing or to display sermon outlines so everyone can take notes. If your church still uses hymnals or prints the outline in the bulletin, tell the minister to join the 21st century.
✓ Information stations: You can use PowerPoint to set up a computerized information kiosk that people can walk up to and use. For example, you can create a museum exhibit about the history of your town or set up a tradeshow presentation to provide information about your company and products.
11
Chapter 1: Welcome to PowerPoint 2013
Introducing PowerPoint Presentations
PowerPoint is similar to a word processor such as Word, except that it’s geared toward creating presentations rather than documents. A presentation is kind of like those Kodak Carousel slide trays that your grandpa filled up with 35mm slides of the time he took the family to the Grand Canyon in 1965. The main difference is that with PowerPoint, you don’t have to worry about dumping all the slides out of the tray and figuring out how to get them back into the right order.
Word documents consist of one or more pages, and PowerPoint presenta-tions consist of one or more slides. Each slide can contain text, graphics, ani-mations, videos, and other information. You can easily rearrange the slides in a presentation, delete slides that you don’t need, add new slides, or modify the contents of existing slides.
You can use PowerPoint both to create your presentations and to actually present them.
You can use several different types of media to actually show your presentations:
✓ Computer screen: Your computer screen is a suitable way to display your presentation when you’re showing it to just one or two other people. ✓ Big-screen TV: If you have a big-screen TV that can accommodate computer
input, it’s ideal for showing presentations to medium-sized audiences — say 10 to 12 people in a small conference room.
✓ Computer projector: A computer projector projects an image of your computer monitor onto a screen so large audiences can view it.
✓ Webcast: You can show your presentation over the Internet. That way, your audience doesn’t all have to be in the same place at the same time. Anyone with a web browser can sit in on your presentation.
✓ Printed pages: Printed pages enable you to distribute a printed copy of your entire presentation to each member of your audience. (When you print your presentation, you can print one slide per page, or you can print several slides on each page to save paper.)
✓ Overhead transparencies: Overhead transparencies can be used to show your presentation using an overhead projector. It’s a little old-school to be sure, but some people still do it this way.
✓ 35mm slides: For a fee, you can have your presentation printed onto 35mm slides either by a local company or over the Internet. Then, your presenta-tion really is just like your grandpa’s old Kodak Carousel slide tray!
12
Part I: Getting Started with PowerPoint 2013
features in your presentation. Printed pages, overheads, and 35mm slides can show only static content.
Presentation files
A presentation is to PowerPoint what a document is to Word or a worksheet is to Excel. In other words, a presentation is a file that you create with PowerPoint. Each presentation that you create is saved on your computer’s hard drive as a separate file.
PowerPoint 2013 presentations have the special extension .pptx added to the end of their filenames. For example, Sales Conference.pptx and History Day.pptx are both valid PowerPoint filenames. When you type the filename for a new PowerPoint file, you don’t have to type the .pptx extension, because PowerPoint automatically adds the extension for you. Windows may hide the .pptx extension, in which case a presentation file named Conference.pptx often appears as just Conference.
I recommend you avoid the use of spaces and special characters, especially percent signs (%), in your filenames. If you want the effect of a space in a filename, use an underscore character instead. Spaces and percent signs in filenames can cause all kinds of problems if you post your presentation files to the Internet, either on a web page or even as a File Transfer Protocol (FTP) upload.
Versions of PowerPoint prior to 2007 save presentations with the extension .ppt instead of .pptx. The x at the end of the newer file extension denotes that the new file format is based on an open XML standard data format that makes it easier to exchange files among different programs. PowerPoint 2013 can still save files in the old .ppt format, but I recommend you do so only if you need to share presentations with people who haven’t yet upgraded to PowerPoint 2007 or later. (You can download a program called the Microsoft Office Compatibility Pack from http://www.microsoft.com/en-us/ download/details.aspx?id=3 that enables PowerPoint 2002 or 2003 to read and write files in .pptx format. This program enables you to share your .pptx files with people who haven’t yet upgraded.)
PowerPoint is set up initially to save your presentation files in the Documents folder, but you can store PowerPoint files in any folder of your choice on your hard drive or on any other drive. You can also save your presentation to online file storage, such as Microsoft’s SkyDrive. And, if you wish, you can write a presentation to a USB flash drive or a writable CD or DVD disc.
What’s in a slide?
13
Chapter 1: Welcome to PowerPoint 2013
✓ Slide layouts: Every slide has a slide layout that controls how informa-tion is arranged on the slide. A slide layout is simply a collecinforma-tion of one or more placeholders, which set aside an area of the slide to hold infor-mation. Depending on the layout that you choose for a slide, the place-holders can hold text, graphics, clip art, sound or video files, tables, charts, graphs, diagrams, or other types of content.
✓ Background: Every slide has a background, which provides a backdrop for the slide’s content. The background can be a solid color; a blend of two colors; a subtle texture, such as marble or parchment; a pattern, such as diagonal lines, bricks, or tiles; or an image file. Each slide can have a different background, but you usually want to use the same back-ground for every slide in your presentation to provide a consistent look. ✓ Themes: Themes are combinations of design elements such as color
schemes and fonts that make it easy to create attractive slides that don’t look ridiculous. You can stray from the themes if you want, but you should do so only if you have a better eye than the design gurus who work for Microsoft.
✓ Slide Masters: Slide Masters are special slides that control the basic design and formatting options for slides in your presentation. Slide Masters are closely related to layouts — in fact, each layout has its own Slide Master that determines the position and size of basic title and text placeholders; the background and color scheme used for the presenta-tion; and font settings, such as typefaces, colors, and sizes. In addition, Slide Masters can contain graphic and text objects that you want to appear on every slide.
You can edit the Slide Masters to change the appearance of all the slides in your presentation at once. This helps to ensure that the slides have a consistent appearance.
All the features described in the preceding list work together to control the appearance of your slides in much the same way that style sheets and tem-plates control the appearance of Word documents. You can customize the appearance of individual slides by adding any of the following elements:
✓ Title and body text: Most slide layouts include placeholders for title and body text. You can type any text that you want into these placeholders. By default, PowerPoint formats the text according to the Slide Master, but you can easily override this formatting to use any font, size, styles like bold or italic, or text color that you want.
✓ Text boxes: You can add text anywhere on a slide by drawing a text box and then typing text. Text boxes enable you to add text that doesn’t fit conveniently in the title or body text placeholders.
14
Part I: Getting Started with PowerPoint 2013
✓ Illustrations: You can illustrate your slides by inserting clip art, photo-graphs, and other graphic elements. PowerPoint comes with a large col-lection of clip art pictures you can use, and Microsoft provides an even larger collection of clip art images online. And, of course, you can insert photographs from your own picture library.
✓ Charts anddiagrams: PowerPoint includes a slick diagramming feature called SmartArt that enables you to create several common types of diagrams, including organization charts, cycle diagrams, and others. In addition, you can insert pie charts, line or bar charts, and many other chart types. ✓ Video and Sound: You can add sound clips or video files to your slides.
You can also add background music or a custom narration.
Starting PowerPoint
Here’s the procedure for starting PowerPoint in Windows 8:
1. Get ready.
Light some votive candles. Take two Tylenol. Put on a pot of coffee. If you’re allergic to banana slugs, take an allergy pill. Sit in the lotus position facing Redmond, Washington, and recite the Windows creed three times: Bill Gates is my friend. Resistance is futile. No beer and no TV make Homer
something something . . . .
2. Press the Windows key on your keyboard.
The Windows key is the one that has the fancy Windows flag printed on it. On most keyboards, it’s located between the Alt and Tab keys. When you press this button, Windows brings up the Windows 8 Start screen, which lists your commonly used applications in large tiles.
3. Click the PowerPoint 2013 tile.
That’s all there is to it — PowerPoint starts up in a flash. (Note that you might have to scroll the Start screen to the right to find the PowerPoint 2013 tile.)
If you’re using Windows 7, the procedure is a little different:
1. Click the Start button.
15
Chapter 1: Welcome to PowerPoint 2013
If you can’t find the Start button, try moving the cursor all the way to the bottom edge of the screen and holding it there a moment. With luck on your side, you see the Start button appear. If not, try moving the cursor to the other three edges of the screen: top, left, and right. Sometimes the Start button hides behind these edges.
2. Point to All Programs on the Start menu.
After you click the Start button to reveal the Start menu, move the cursor up to the words AllPrograms and hold it there a moment. Yet another menu appears, revealing a bevy of commands.
3. Choose Microsoft Office➪Microsoft Office PowerPoint 2013.
Your computer whirs and clicks and possibly makes other unmention-able noises while PowerPoint comes to life.
If you use PowerPoint frequently, it might appear in the Frequently Used Programs list directly on the Start menu so you don’t have to choose All Programs➪Microsoft Office to get to it. If you want PowerPoint to always appear at the top of the Start menu, choose Start➪All Programs➪Microsoft Office. Then, right-click Microsoft Office PowerPoint 2013 and choose the Pin to Start Menu command.
If you hate clicking through menus but don’t mind typing, another way to start PowerPoint is to press your keyboard’s Windows key (usually found between the Ctrl and Alt keys), type the word powerpoint, and press the Enter key. (Note that this trick works only in Windows 7.)
Navigating the PowerPoint Interface
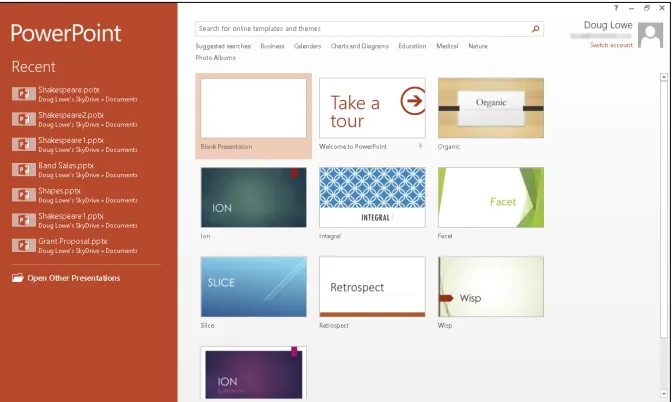
When you start PowerPoint, it greets you with the screen shown in Figure 1-1. This screen lets you create a blank presentation, open a recently used pre-sentation, or create a new presentation based on a template. You can also take a video tour of PowerPoint.
16
Part I: Getting Started with PowerPoint 2013
Figure 1-1: PowerPoint’s opening screen.
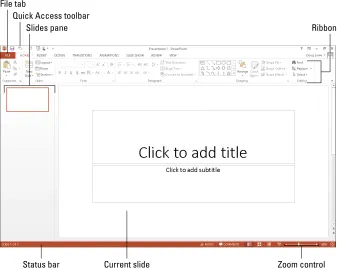
Figure 1-2 shows the basic PowerPoint screen in all its cluttered glory. The following list points out the more important parts of the PowerPoint screen:
✓ The Ribbon: Across the top of the screen, just below the Microsoft PowerPoint title, is PowerPoint’s main user-interface gadget, called the Ribbon. If you’ve worked with earlier versions of PowerPoint, you were probably expecting to see a menu followed by one or more toolbars in this general vicinity. After meticulous research, Microsoft gurus decided that menus and toolbars are hard to use. So they replaced the menus and toolbars with the Ribbon, which combines the functions of both. The Ribbon takes some getting used to, but after you figure it out, it actually does become easier to use than the old menus and tool-bars. The deepest and darkest secrets of PowerPoint are hidden on the Ribbon. Wear a helmet when exploring it.
Note that the exact appearance of the Ribbon varies a bit depending on the size of your monitor. On smaller monitors, PowerPoint may com-press the Ribbon a bit by using smaller buttons and arranging them differently (for example, stacking them on top of one another instead of placing them side by side).
17
Chapter 1: Welcome to PowerPoint 2013
File tab
Quick Access toolbar
Ribbon Slides pane
[image:39.531.123.460.91.363.2]Status bar Current slide Zoom control
Figure 1-2: PowerPoint’s cluttered screen.
✓ The File tab: The first tab on the Ribbon is called the File tab. You can click it to switch the program into a special mode called Backstage View, which provides access to various functions such as opening and saving files, creating new presentations, printing, and other similar chores. For more information, see the section “Taking the Backstage Tour,” later in this chapter.
✓ Quick Access toolbar: Just above the Ribbon is the Quick Access toolbar, also called the QAT for short. Its sole purpose in life is to provide a con-venient resting place for the PowerPoint commands you use the most often.
Initially, this toolbar contains just three: Save, Undo, and Redo. However, you can add more buttons if you want. To add any button to the QAT, right-click the button and choose Add to Quick Access Toolbar. You can also find a pull-down menu at the end of the QAT that lists several fre-quently used commands. You can use this menu to add these common commands to the QAT.
18
Part I: Getting Started with PowerPoint 2013
✓ Slides pane: To the left of the slide is an area that shows thumbnail icons of your slides. You can use this area to easily navigate to other slides in your presentation.
✓ Task pane: To the right of the slide is an area called the task pane. The task pane is designed to help you complete common tasks quickly. When you first start PowerPoint, the task pane isn’t visible, so you can’t see it in Figure 1-1. However, it appears whenever it’s needed, and you can see plenty of examples of it throughout this book.
✓ Status bar: At the very bottom of the screen is the status bar, which tells you the slide that is currently displayed (for example, Slide 1 of 1). You can configure the status bar by right-clicking anywhere on it. This right-click reveals a list of options that you can select or deselect to determine which elements appear on the status bar.
✓ Zoom control: PowerPoint automatically adjusts its zoom factor so that Slide View displays each slide in its entirety. You can change the size of your slide by using the zoom control slider that appears at the bottom right of the window.
You’ll never get anything done if you feel that you have to understand every pixel of the PowerPoint screen before you can do anything. Don’t worry about the stuff that you don’t understand; just concentrate on what you need to know to get the job done and worry about the bells and whistles later.
Unraveling the Ribbon
The Ribbon is Microsoft’s primary user interface gadget. Across the top of the Ribbon is a series of tabs. You can click one of these tabs to reveal a set of controls specific to that tab. For example, the Ribbon in Figure 1-2 (earlier in the chapter) shows the Home tab. Figure 1-3 shows the Ribbon with the Insert tab selected.
Figure 1-3: The Ribbon with the Insert tab selected.
19
Chapter 1: Welcome to PowerPoint 2013
Table 1-1
Basic Tabs on the Ribbon
Tab Actions You Can Perform
File Open, close, print, and share presentations Home Create and format slides
Insert Insert various types of objects on slides Design Tweak the layout of a slide
Transitions Change the transition effects that are applied when you switch from one slide to the next
Animations Add animation effects to your slides Slide Show Present your slide show
Review Proof and add comments to your presentations View Change the view
Besides these basic tabs, additional tabs appear from time to time. For exam-ple, if you select a picture, a Picture Tools tab appears with commands that let you manipulate the picture.
The commands on a Ribbon tab are organized into groups. Within each group, most of the commands are simple buttons that are similar to toolbar buttons in previous versions of PowerPoint.
The View from Here Is Great
Near the right edge of the status bar is a series of four View buttons. These buttons enable you to switch among the various views, or ways of looking at your presentation. Table 1-2 summarizes what each View button does.
Table 1-2
View Buttons
Button What It Does
Switches to Normal View, which shows your slide, outline, and notes all at once. This is the default view for PowerPoint. Switches to Slide Sorter View, which enables you to easily rear-range slides and add slide transitions and other special effects. Switches to Reading View, which displays your slide show within a window.
20
Part I: Getting Started with PowerPoint 2013
Taking the Backstage Tour
Every summer, I attend plays at the Oregon Shakespeare Festival in Ashland, Oregon. A few years ago, I took the special backstage tour, which revealed all kinds of nifty secrets worthy of a Dan Brown novel.
[image:42.531.124.461.224.426.2]This section takes a brief look at PowerPoint’s Backstage View feature, which provides access to document management features previously found on the File menu. When you click the File tab in the top-left corner of the PowerPoint window, PowerPoint switches to Backstage View, as shown in Figure 1-4.
Figure 1-4: Backstage View.
Initially, Backstage View displays information about the current presentation. However, the menu on the left — which bears a striking resemblance to what used to be called the File menu back in the day when programs had plain menus instead of fancy ribbons — provides access to the hidden features of PowerPoint available only to those who venture backstage.
You find out how to use the most important of these commands later in this chapter, and several of the more advanced commands on this menu are pre-sented in later chapters.
21
Chapter 1: Welcome to PowerPoint 2013
Shake. And if you count 46 words backwards from the end of the Psalm, you get the word Spear. Which clearly means that there’s a treasure buried directly beneath the stage in Ashland’s outdoor theater. Next year I’m taking a shovel.
Creating a New Presentation
The simplest way to create a new presentation is to start PowerPoint, click Blank Presentation on the opening screen (see Figure 1-1), and then edit the blank presentation to your liking.
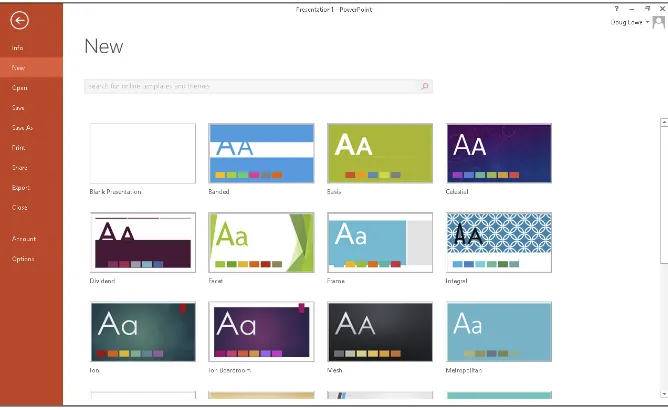
After PowerPoint is started, you can also create a new presentation by clicking the File tab to switch to Backstage View and then clicking the New command. This action brings up the screen shown in Figure 1-5, which offers several ways to create a new presentation:
✓ Choose Blank Presentation: Double-click Blank Presentation to start a new presentation from scratch.
✓ Choose a template: You can select one of the displayed templates to create a new presentation based on the template’s design. Several tem-plates are displayed on the New screen.
[image:43.531.124.458.399.604.2]✓ Search for a template: You can type a search phrase into the Search text box and then click the magnifying glass icon. Doing this opens a list of templates that match your search criteria. Double-click one of these templates to create a presentation based on it.
22
Part I: Getting Started with PowerPoint 2013
Editing text
In PowerPoint, slides are blank areas that you can adorn with various objects. The most common type of object is a text placeholder, a rectangular area that’s specially designated for holding text. (Other types of objects include shapes, such as circles or triangles; pictures imported from clip art files; and graphs.)
Most slides contain two text objects: one for the slide’s title and the other for its body text. However, you can add more text objects if you want, and you can remove the body text or title text object. You can even remove both to create a slide that contains no text.
Whenever you move the cursor over a text object, the cursor changes from an arrow to the I-beam, which you can use to support bridges or build air-craft carriers. Seriously, when the cursor changes to an I-beam, you can click the mouse button and start typing text.
When you click a text object, a box appears around the text, and an insertion pointer appears at the spot where you clicked. PowerPoint then becomes like a word processor. Any characters that you type are inserted into the text at the insertion pointer location. You can press Delete or Backspace to demolish text, and you can use the arrow keys to move the insertion pointer around in the text object. If you press Enter, a new line of text begins within the text object.
When a text object contains no text, a placeholder message appears in the object. For example, a title text object displays the message Click to add title. Other placeholders display similar messages. The placeholder mes-sage magically vanishes when you click the object and begin typing text.
If you start typing without clicking anywhere, the text that you type is entered into the title text object — assuming that the title text object doesn’t already have text of its own. If the title object is not empty, any text that you type (with no text object selected) is simply ignored.
After you finish typing text, press Esc or click anywhere outside the text object.
In Chapter 2, you find many details about playing with text objects, but hold your horses. You have more important things to attend to first.
Adding a new slide
23
Chapter 1: Welcome to PowerPoint 2013
✓ On the Home tab, click the New Slide button in the Slides group, as shown in Figure 1-6.
✓ Press Ctrl+M.
✓ Right-click in the Slides pane on the left and then choose New Slide.
[image:45.531.124.461.241.443.2]In all three cases, PowerPoint adds a blank slide with a standard layout that includes a title and content area, as shown in Figure 1-5. If you want to choose a different layout, click the Layout button in the Home tab to display the gallery of slide layouts. This pane enables you to pick from several types of slide layouts. Just click the one that you want to use, and PowerPoint sets the new slide to the layout of your choosing.
Figure 1-6: Choosing a slide layout.
24
Part I: Getting Started with PowerPoint 2013
Figure 1-7: A typical text slide.
Moving from slide to slide
You have several ways to move forward and backward through your presen-tation, from slide to slide:
✓ Click one of the double-headed arrows at the bottom of the vertical
scroll bar. Doing so moves you through the presentation one slide at a time.
✓ Press the Page Up and Page Down keys. Using these keys also moves one slide at a time.
✓ Use the scroll bar. When you drag the box in the scroll bar, a tooltip appears to display the number and title of the current slide. Dragging the scroll bar is the quickest way to move directly to any slide in your presentation.
✓ In the list of slides on the left side of the window, click the thumbnail for the slide that you want to display. If the thumbnails are not visible, click the Slides tab above the outline.
Choosing a design
25
Chapter 1: Welcome to PowerPoint 2013
apply one of these themes, just select the Design tab on the Ribbon and then click the theme you want to apply in the Themes group. Figure 1-8 shows a presentation after a theme has been applied.
[image:47.531.124.460.208.412.2]Because of space constraints, PowerPoint doesn’t display all the available themes on the Ribbon at the same time. But just to the right of the themes is a scroll bar that you can use to scroll through the themes. And the button at the bottom of the scroll bar brings up a gallery that displays all the themes that come with Office 2013.
Figure 1-8: A slide after a theme has been applied.
Displaying Your Presentation
When your masterpiece is ready, you can show it on the screen. Just follow these steps:
1. Choose the Slide Show tab on the Ribbon and then click the From Beginning button in the Start Slide Show group (shown in the margin).
There are several shortcuts to this command. You can also start the show by pressing F5 or by clicking the Slide Show button, located with the other view buttons in the lower-right corner of the screen.
26
Part I: Getting Started with PowerPoint 2013
3. Press Enter to advance to the next slide.
You can keep pressing Enter to call up each slide in the presentation. If you don’t like the Enter key, you can use the spacebar instead.
If you want to go back a slide, press Page Up.
4. Press Esc when you’re done.
You don’t have to wait until the last slide is shown. If you find a glaring mistake in a slide or if you just get bored, you can press Esc at any time to return to PowerPoint.
For the complete lowdown on showing your presentation, kindly turn to Chapter 6.
Saving Your Work
Now that you’ve spent hours creating the best presentation since God gave Moses the Ten Commandments, it’s time to save your work to a file. If you make the rookie mistake of turning off your computer before you’ve saved your presentation, poof! Your work vanishes as if David Copperfield were in town.
Like everything else in PowerPoint, you have at least four ways to save a document:
✓ Click the Save button on the Quick Access toolbar.
✓ Click the File tab to switch to Backstage View and then choose Save.
✓ Press Ctrl+S.
✓ Press Shift+F12.
If you haven’t yet saved the file to your hard drive, the magical Save As dialog box appears. Type the name that you want to use for the file in the Save As dialog box and click OK to save the file. After you save the file once, subse-quent saves update the hard drive file with any changes that you made to the presentation since the last time you saved it.
Also note that after you save a file for the first time, the name in the presenta-tion window’s title area changes from Presentation to the name of your file. This is simply proof that the file has been saved.
27
Chapter 1: Welcome to PowerPoint 2013
✓ Put on your Thinking Cap when assigning a name to a new file. The file-name is how you can recognize the file later on, so pick a meaningful name that suggests the file’s contents.
✓ Don’t work on your file for hours at a time without saving it. I’ve learned the hard way to save my work every few minutes. After all, I live in California, so I never know when a rolling blackout will hit my neighbor-hood. Get into the habit of saving every few minutes, especially after making a significant change to a presentation, such as adding a covey of new slides or making a gaggle of complicated formatting changes. ✓ If you want to save a copy of the presentation you’re working on using
a different filename, choose File➪Save As. Type a new name for the file and then click Save.
✓ The File➪Save As command includes a Save As Type option that lets you change the file format your presentation file is saved in. The most impor-tant use of this option is to save your file as a PDF or XPS file. A PDF file is a widely used file format that lets any user display the contents of the file whether or not he or she owns a copy of the software used to create the file. PDF was developed and marketed by Adobe. XPS has a similar purpose, but was developed and marketed by Microsoft.
✓ One of the best new features of Office 2013 is SkyDrive, which provides an online location for you to save your files. When you save a file to your SkyDrive account, you can later retrieve it from any other computer that has an Internet connection. To save to SkyDrive, just click on SkyDrive in the Save As dialog box, type a name for your file, and click Save.
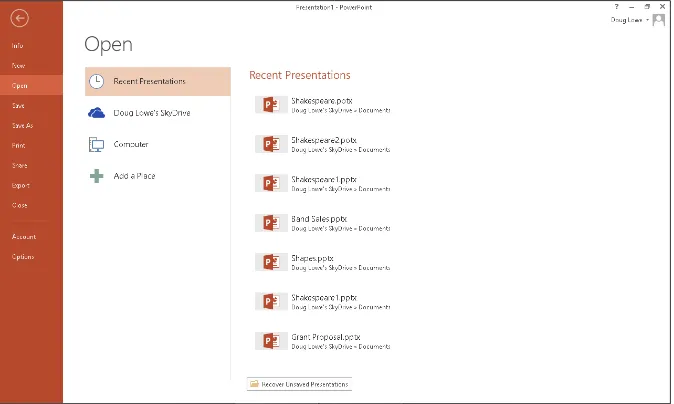
Opening a Presentation
After you save your presentation to your hard drive, you can retrieve it later when you want to make additional changes or to print it. As you might guess, PowerPoint gives you about 2,037 ways to accomplish the retrieval. Here are the two of the most common:
✓ Click the File tab to switch to Backstage View and then choose the Open command.
✓ Press Ctrl+O.
28
Part I: Getting Started with PowerPoint 2013
Figure 1-9: Opening a file in Backstage View.
[image:50.531.122.461.89.293.2]To browse your computer for a file, double-click Computer. This brings up a standard Open dialog box, as shown in Figure 1-10. The Open dialog box has controls that enable you to rummage through the various folders on your hard drive in search of your files. If you know how to open a file in any Windows application, you know how to do it in PowerPoint (because the Open dialog box is pretty much the same in any Windows program).
29
Chapter 1: Welcome to PowerPoint 2013
If you seem to have lost a file, rummage around in different folders to see whether you can find it. Perhaps you saved a file in the wrong folder by accident. Also, check the spelling of the filename. Maybe your fingers weren’t on the home row when you typed the filename, so instead of Shakespeare1.pptx, you saved the file as Djslrd[rstr2.pptx. I hate it when that happens.
The fastest way to open a file from the Open dialog box is to double-click the file. This spares you from having to click the file once and then click OK. Double-clicking also exercises the fast-twitch muscles in your index finger.
PowerPoint keeps track of the files you’ve recently opened and displays them on the File menu. To open a file that you recently opened, click the File tab, select Recent in Backstage View, and then inspect the list of files on the right side of the menu. If the file that you want is in the list, click it to open it.
Closing a Presentation
Having finished and saved your presentation, you have come to the time to close it. Closing a presentation is kind of like gathering your papers, putting them neatly in a file folder, and returning the folder to its proper file drawer. The presentation disappears from your computer screen. Don’t worry: It’s tucked safely away on your hard drive where you can get to it later if you need to.
To close a file, click the Close button that appears at the top right of the PowerPoint window. Alternatively, you can click the File tab and then choose Close, or use the keyboard shortcut Ctrl+W. But clicking the Close button is the easiest way to close a file.
You don’t have to close a file before exiting PowerPoint. If you exit
PowerPoint without closing a file, PowerPoint graciously closes the file for you. The only reason that you might want to close a file is that you want to work on a different file and you don’t want to keep both files open at the same time.
If you’ve made changes since the last time you saved the file, PowerPoint offers to save the changes for you. Click Save to save the file before closing or click Don’t Save to abandon any changes that you’ve made to the file.
30
Part I: Getting Started with PowerPoint 2013
Getting Help
The ideal way to use PowerPoint would be to have a PowerPoint expert sit-ting patiently at your side, answering your every question with a straight-forward answer, gently correcting you when you make silly mistakes, and otherwise minding his or her own business. All you’d have to do is occasion-ally toss the expert a Twinkie and let him or her outside once a day.
Short of that, the next best thing is to find out how to coax PowerPoint itself into giving you the answers you need. Fortunately, PowerPoint includes a nice built-in Help feature that can answer your questions. No matter how deeply you’re lost in the PowerPoint jungle, help is never more than a few mouse clicks or keystrokes away.
As with everything else in Office, more than one method is available for calling up help when you need it. The easiest thing to do would be to yell, “Skipper!!!” in your best Gilligan voice. Otherwise, you have the following options:
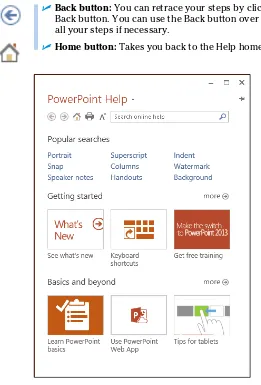
✓ Press F1 or click the Help button, located just above the right edge of the Ribbon. This activates PowerPoint’s main Help system, shown in Figure 1-11.
✓ Whenever a dialog box is displayed, you can click the question mark button in the top-right corner of the dialog box to summon help.
✓ When you hover the mouse over an item in the Ribbon, a tooltip appears explaining what the item does. Many of these tooltips include the phrase “Press F1 for more help.” In that case, you can press F1 to get help spe-cific to that item.
The Help dialog box in Figure 1-11 offers several ways to access the help you need. The following paragraphs describe the various ways you can work your way through PowerPoint’s Help feature:
✓ Help window links: You can click any of the links that appear in the Help window to display help on a particular topic. For example, if you click the Working with Charts link, you’ll find a page of useful informa-tion about creating charts.
✓ Search: If you can’t find what you’re looking for, try entering a word or phrase in the Search text box and clicking the Search button. This dis-plays a list of topics that pertain to the word or phrase you entered. ✓ Pushpin icon: Normally, the Help window always displays on top. In
31
Chapter 1: Welcome to PowerPoint 2013
✓ Back button: You can retrace your steps by clicking the Help window’s Back button. You can use the Back button over and over again, retracing all your steps if necessary.
[image:53.531.89.350.87.472.2]✓ Home button: Takes you back to the Help home page.
Figure 1-11: Help!
Exiting PowerPoint
Had enough excitement for one day? Use either of these techniques to shut down PowerPoint:
✓ Click the X box at the top-right corner of the PowerPoint window.
✓ Press Alt+F4.
32
Part I: Getting Started with PowerPoint 2013
You should know a couple things about exiting PowerPoint (or any application):
✓ PowerPoint doesn’t let you abandon ship without first considering whether you want to save your work. If you’ve made changes to any presentation files and haven’t saved them, PowerPoint offers to save the files for you. Lean over and plant a fat kiss right in the middle of your monitor — PowerPoint just saved you your job.
2
Editing Slides
In This Chapter
▶ Moving around in a presentation
▶ Working with objects and editing text
▶ Undoing a mistake and deleting slides
▶ Finding and replacing text
▶ Rearranging slides
I
f you’re like Mary Poppins (“Practically Perfect in Every Way”), you can skip this chapter. Perfect people never make mistakes, so everything that they type in PowerPoint comes out right the first time. They never have to press Backspace to erase something they typed incorrectly, or go back and insert a line to make a point they left out, or rearrange their slidesbecause they didn’t add them in the right order to begin with.
If you’re more like Jane (“Rather Inclined to Giggle; Doesn’t Put Things Away”) or Michael (“Extremely Stubborn and Suspicious”), you probably make mis-takes along the way. This chapter shows you how to go back and correct those mistakes.
Reviewing your work and correcting it if necessary is called editing. It’s not a fun job, but it has to be done. A spoonful of sugar usually helps.
34