3D-model annotation
for Computer Aided Design in
augmented reality
Max van IJsselmuiden
B.Sc. Thesis Creative Technology
July 9, 2018
Faculty of Electrical Engineering,
Mathematics and Computer Science
Supervisor
dr. J. Zwiers dr. R.J.F. Ordelman
Contents
Abstract ... 6
Acknowledgements ... 7
List of abbreviations ... 8
1. Introduction ... 9
1.1 Context ... 9
1.2 Problem statement ... 9
1.2.1 Research questions ... 11
2. State of the Art ...12
2.1 Garment simulation ... 12
2.1.1 The early days ... 12
2.1.2 Recent advances ... 12
2.2 Tangible interaction in Augmented Reality ... 12
2.3 Feedback methods ... 12
2.3.1 Feedback forms ... 18
2.3.2 Content of feedback ... 18
2.3.3 Timing of feedback ... 19
2.3.4 Constructive feedback ... 19
2.4 Annotation in Augmented Reality ... 19
2.5 Hardware ... 21
2.5.2 AR versus VR ... 21
2.5.3 Chosen hardware for prototype ... 22
2.5.4 Background information of the Meta 2 ... 23
2.5 Conclusion ... 23
3. Methods and techniques ... 25
3.1 Design processes ... 25
3.2 Methods ... 26
3.2.1 Stakeholder analysis ... 26
3.2.2 PACT analysis ... 26
3.2.4 User and expert interviews ... 27
4. Ideation ... 28
4.1 Stakeholder analysis ... 28
4.1.1 Hecla Professional Audio & Video Systems ... 29
4.1.2 PVH ... 29
4.2 PACT analysis ... 30
4.3 Brainstorm ... 33
4.4 User Interfaces ... 33
4.5 Concept ideas ... 34
4.5.1 Summarizing voice input in a word cloud ... 34
4.5.2 Skype sessions during feedback recording ... 34
4.5.3 Different models for fitting ... 34
4.5.4 Grouping annotations based on location ... 35
4.5.5 Multi-user annotating ... 35
4.5.6 Filtering of annotations ... 35
4.5.7 ‘Step in’ interaction with the garment ... 35
4.5.8 ‘Pushpin’ selection interaction ... 35
4.5.9 Exploded view ... 36
4.6 Observations ... 36
4.6.1 General observations ... 36
4.6.2 Interaction observations ... 37
5. Specification ... 38
5.1 Prototype description ...38
5.2 Product and user requirements (MoSCoW) ... 39
6. Realization ... 41
6.1 Prototype ... 41
6.1.1 First iteration ... 41
6.1.2 Second iteration ... 41
6.1.3 Final iteration... 41
6.2 First iteration ... 42
6.2.1 Iteration requirements ... 42
6.3 Second iteration ... 45
6.3.1 Iteration requirements ... 45
6.3.2 Procedure ... 45
6.4 Third iteration ... 48
6.4.1 Iteration requirements ... 48
6.4.2 Procedure ... 48
6.5 System structure ... 51
6.5.1 User interface ... 51
6.5.2 User interaction ... 51
6.6 Implementation ... 53
6.6.1 Software ... 53
6.6.2 Hardware ... 54
7. Evaluation ... 56
7.1 First prototype ...56
7.2 Second prototype ... 57
7.3 Final prototype ... 58
7.4 Functional Testing ... 60
7.2 User evaluation ... 61
7.3 Internal evaluation ... 63
7.3.1 Project processes ... 63
7.3.2 Final prototype ...64
8. Conclusions ... 65
8.1 State of the Art ...65
8.2 Stakeholder identification and PACT analysis ...65
8.3 Ideation and specification ...65
8.4 Realization and evaluation ... 66
8.5 Research question ... 67
9. Future work ... 68
9.1 Implementation at Tommy Hilfiger Europe ... 68
9.2 Addition of new features ... 68
9.2.1 Collaborative annotating ... 68
9.2.2 Summarizing, grouping and filtering annotations ... 69
9.3 Professionalization ... 69
Appendices ... 70
Appendix A: Creative Technology Design Methodology ... 70
Appendix B: Semi-structured user test ... 71
Appendix C: Ethical Reflection report ... 72
Immersive Augmented Reality and Artificial Intelligence: an ethical review ... 72
Appendix D: C# code ... 77
MainController.cs ... 77
AnnotationController.cs ... 78
HUDController.cs ... 84
ButtonInteraction.cs ... 87
SaveLoad.cs ...88
PushPinController.cs ... 89
Appendix E: Concept designs for tutorial interface ... 90
Abstract
An augmented reality application allowing for annotation of 3D models suited for CAD, focused on the fashion industry, has been designed. The goal of the annotation application is to improve the performance of fashion designers. To achieve this, research has been done in the domains of augmented reality, interaction methods for immersive XR, cloth simulation and feedback methods. A state of the art research was conducted, where several interaction methods were evaluated based on selected criteria. Based on the state of the art research, several ideas were developed that are suited for the context of the project. These ideas have been evaluated and selected.
From the selection of the ideas, a specification has been made. The specification described to develop a prototype of an augmented reality application allowing for annotation, workout out in Unity using the Meta 2 AR device. The best interaction method that has been suited for the functionalities of the application has been determined after three prototype iterations. The interaction method that had proven to be best, was a self-developed ‘pushpin’ method, which makes use of the SLAM-tracking of the Meta 2 device.
Acknowledgements
List of abbreviations
CAD
Computer Aided DesignAR
Augmented RealityVR
Virtual RealityXR
X Reality / Cross RealityHUD
Heads-up DisplayHWD
Head-worn DisplayHMD
Head-mounted DisplayPACT
People, Activities, Context and TechnologySLAM
Simultaneous Localization And MappingSDK
Software Development KitAPI
Application Programming Interface1. Introduction
1.1 Context
“To design an annotation-interaction system, that supports the feedback processes of fashion design CAD software.”
The context of this project lies in the fashion design processes. We explore the possibilities of annotating cloth design using 3D Augmented Reality (AR) environments, with a goal of finding the best annotation model to be used in the context. The AR environment that the model has been annotated in exploits state-of-art AR hardware, in the form of Meta 2 glasses, that enable a wide field of view compared to existing solutions like the HoloLens developed by Microsoft.
In the fashion industry, design processes are relatively traditional. It is a long and expensive road from ‘mold’ to the finished product. This bachelor project focuses on the feedback-loop during the creation of a new garment. This research assumes that the design process makes use of state-of-the-art CAD-models [3] (3D-models) with proper textures for the best experience.
1.2 Problem statement
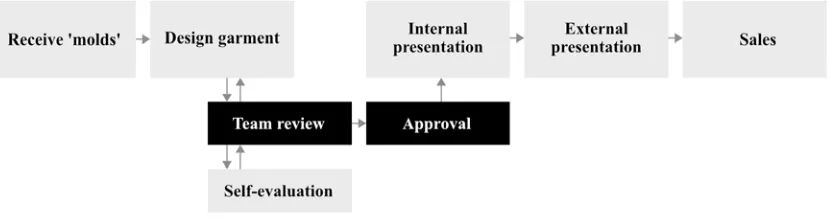
Figure 1.1 – Abstract structure of the design processes for Tommy Hilfiger Europe.
Figure 1.2 – Abstract structure of the design processes for Tommy Hilfiger Europe, after introducing the feedback application.
[image:10.612.80.495.204.313.2]1.2.1 Research questions
This problem statement has lead to the following research question:
“How to best design an interaction model to allow annotation of 3D-models in an augmented reality environment?”
For this research questions, several sub-questions are defined to properly structure the research process. These sub-questions are as follows:
“What methods of interaction are used by existing augmented reality installations?”
and
“Which interaction method(s) work best for annotation of 3D-models?”
and
2. State of the Art
Designing a multimodal interaction model to provide feedback during the design process of garments, requires some research in several fields. This research is done in the fields of virtual garment design, feedback methods, and tangible AR interaction. Lastly, an overview of the currently available hardware devices for AR development is given. Literature is stated to give a decent overview of what is currently researched and/or developed relating to this project.
2.1 Garment simulation
To be able to provide feedback on a garment design, the design has to be displayed properly. To simulate the prototype design of the garment in the AR-environment, high-quality and real time garment simulation is an important requirement. One of the first types of garment simulation date back to little over 30 years ago, such as Weil’s approach in simulating an approximation of the proper shape and surface rendering [5]. The older approaches are relatively simplistic, as the performance of computing technologies was limited. Evidently, the better performance of computing nowadays (Moore’s Law [6]) has led to more realistic, high-resolution simulations.
2.1.1 The early days
The first applications for computer-aided garment simulation started in the 1990’s. A combination of several researched technologies such as cloth simulation, body modeling and animation [7], and collision detection and response [8]. These applications show virtual garment patterns, sewed together around a character.
2.1.2 Recent advances
Over the years, the accuracy and efficiency of the garment simulations were optimized. Mechanical models, reproducing the mechanical behavior of cloth were advancing in quality, where several implementation techniques originated. Researchers found that the most efficient and simplest way to properly display a garment with proper mechanical behavior was through particle systems [9]. However, such accurate models did take a lot of processing power as the required calculations are numerous. To be able to show the proper mechanical behavior in real-time, the efficiency of these models had to increase significantly. Desbrun et al. allowed fast simulation of mechanical properties of cloth. However, the computation speed still remains relatively slow for more complex garments, as the number of polygons are still limited due to the processing power.
2.2 Tangible interaction in Augmented Reality
years ago [2], interaction design for AR in three-dimensional environments is a relatively new and unknown field to designers. Earlier researches mostly are focused on the actual visual augmentations of the reality [3] via heads-up display systems (HUDs) [4], head-worn displays (HWDs), head-mounted displays (HMDs) or other wearable technologies [5]. Evidently, to be able to interact with the information projected via one’s HUD, HWD or HMD, firstly the information has to be displayed properly.
Although in comparison to visual augmentation using HUDs, HWDs or HMDs, the number of studies regarding tangible interaction interfaces for AR-applications is relatively low, there are still numerous different interaction techniques researched throughout the years. These systems make use of various interaction techniques, ranging from eye tracking [6], finger tracking [7] or hand tracking [8] to voice input [9]. This literature review discusses the existing body of empirical research of interaction design in Augmented Reality applications, with the goal of determining which types of interactions are best suited for which purposes. To reach this goal, several peer-reviewed research papers describing ways to interact with AR interfaces will be discussed and their results will be relativized to the overall outcome of these papers.
Abstractly, all tangible interaction techniques can be divided into two categories: tracking-based and controller-tracking-based. Most of the tangible interaction techniques are developed for specific applications, meeting a specific requirement for the application. For example, the flexible pointer, researched by Alex Olwal and Steven Feiner, was presented to improve the selection and indication progress while manipulating 3D-objects [10]. Likewise, FingARtips is a gesture interaction technique researched by Buchmann et al. to improve the interaction with virtual content using hand gestures [8]. Many other specific techniques have been researched with the purpose of improving a certain aspect of existing interaction techniques or developing an entirely new technique.
All of the interaction techniques discussed in this literature review, can be divided into two categories: tracking-based and controller-based. Each of the mentioned interaction systems will be evaluated based on specified criteria: performance, applicability and ease of use. Later, the evaluation process for each criterion is explained in more detail.
Firstly, most interactions in AR-environments are tracking-based, making use of advanced tracking systems. These tracking systems exist out of sensors that can perform exact eye-tracking, finger tracking or hand tracking. In this paper, all of the techniques that primarily require precise tracking will fall under the category ‘tracking-based interaction’.
category ‘controller-based interactions’ and will be discussed and compared to the tracking-based interaction systems.
To discuss the findings of every study discussed in this paper, every interaction system will be looked at critically. Criteria for evaluation of the systems are: performance, applicability and ease of use. Each criterion will be evaluated using a simple scale: low, medium and high. The first criterion, performance, refers to the precision and abilities of the tracking-based or controller-based system. The more precise a user is able to perform a ‘select’ action, the higher the precision is, thus the better the performance. Following, the ‘applicability’ criterion refers to the extent to which the system is applicable to every-day usage. For example, if the system requires lots of calibration – for every use – the system is not highly applicable. Lastly, the ‘ease of use’ criterion speaks for itself: the easier the system is to use, the better the ease of use is.
Interaction techniques in 3D-environments are all about positioning. For input by hand or fingers to work, the AR-system must know where the user’s hands or fingers are in the environment. Furthermore, the position coordinates of the user’s hands or fingers must be mapped properly to the digital environment, to be able to connect both worlds. In order to achieve a proper mapping of the coordinates, AR-systems make use of many sensors that are able to gain this necessary context-awareness. The more precise the positioning, the more accurate the interactions with the virtual world can be. The faster the tracking process takes place, the better the AR-experience will be.
Opening, several researchers that have designed tracking-based interactions in their studies will be discussed. Following, controller-based interactions will be discussed and evaluated.
Evaluating the ‘digital desk’, there are several things to conclude. First, the calibration process required for every object, combined negatively influences the applicability, hence scoring a low for applicability. Second, the performance of the system is low, despite the heuristic function the tracking process appeared to be imprecise. Finally, the improvised ‘mouse down’ actions result in a low score for ‘ease of use’ as well. All in all, the ‘digital desk’ by Crowley, Berard and Coutaz did not perform well.
FingARtips takes fingertip-tracking just a bit further, by placing fiducial markers on the hand of the person, and a simple haptic feedback device to be able to ‘feel’ virtual objects and interact with them [8]. The researchers focus on gesture-based interaction, a technique that has been popular in VR environments, while being less common in AR applications. Buchmann et al. researched a system allowing grabbing, pressing, dragging and releasing interactions. They put the system to use in an urban planning workspace, where a single hand suffices for all the necessary interactions. Buchmann et al. created a glove, containing the simple haptic feedback device and having three fiducial markers attached to it. Other than the ‘digital desk’, the FingARtips system does not require calibration for each object to detect, as it merely has to be calibrated once to calibrate the glove. The markers exist out of black and white squares, similar to the more familiar QR-codes. Via the open-source ARToolKit library, the position of these markers and their relative distances are calculated. Using two algorithms, gesture coordination is handled. In the glove developed for the system, the buzzer provides haptic feedback when a virtual button is pressed by the user. The main drawback of this system is having to put on gloves with special markers for the system to work. The advantage of this tracking method is the advanced gesture coordination possibilities. A simple one-handed glove provides numerous interaction methods.
Evaluating, FingARtips has done a significantly better job than the ‘digital desk’. The ability to track a hand in 3D-space, where ‘digital desk’ was only able to track objects in 2D-space, results in a medium score for performance of FingARtips. Secondly, the lack of calibration required for every startup of the application, results in a medium score for applicability. Unfortunately, the glove with the fiducial markers does have its drawbacks: having to put on a glove decreases the ‘freedom of hand’, therefore resulting in a low score for ease of use.
Falling under the second category, controller-based interactions, some applications require an advanced control over input, where precision in positioning is a high priority. A separate physical controller, can provide this precision. There are two categories that divide the physical controller interaction: dumb and smart devices. The devices falling under the ‘dumb’ category, contain almost no technology and merely act as a support for the system to work. The devices falling under the ‘smart’ category do exist out of technology such as sensors or analog buttons or controls.
similar to the shape of a traffic controller. The Magic Paddle contains a black square, so that the system can track its position properly. Using the Magic Paddle, virtual objects can be moved from place to place. The Magic Paddle is an ‘accessory’ to a book, where several distinguishable squares printed on the book make the system render virtual objects. The Magic Paddle can then be used to move the objects around. This interaction approach is fairly limited, as it does not offer any way to particularly interact with the shown 3D-models, other than moving the objects.
Evaluating the Magic Paddle, the system has its perks and flaws. Unfortunately, there was little information concerning the performance of the Magic Paddle. Considering the abilities of the system, as it does not offer any way to interact with the 3D-models, the score for performance can be noted as low. Furthermore, the applicability is limited to books, it is straightforward to also criticize the applicability of the Magic Paddle as low as well. However, the Magic Paddle application does its job as an accessory for books, which results in a medium score for applicability, in its field. The ease of use score can be argued to be high, as the system is fairly limited in its interactions, the usability of the system is extremely high – as the actions to perform are easy to perform. Therefore, Magic Paddle does not outperform the systems mentioned earlier, however, it does prove to be extremely easy to use.
Continuing, the approach of Wright et al. take the usage of a physical controller a step further. Their research lies within the medical field, where already plentiful of augmented reality projects have been researched to provide surgical simulation. This particular project makes use of a Leap Motion (LM) hand controller, which is a device that detects the movement and position of the user’s hand when held above the sensor [14]. Usually, the Leap Motion controller is used for virtual reality environments, as it was developed to work with these systems. However, the approach of Wright et al. combines the virtual reality controller with Vuforia, the aforementioned ‘simplistic’ augmented reality technology, to transform the LM controller to work with augmented reality. The controller is compared to a popular physical controller in the medical field named ‘NeuroTouch’. The NeuroTouch controller does not work with augmented reality and is merely a physical controller. The LM hand controller has a fingertip position accuracy of 0.01 mm, making the controller extremely accurate [14]. Evidently, this accuracy is of high importance in the medical field. Wright et al. report a more intuitive 3D interactive experience using the LM controller, rather than the NeuroTouch stylus. Wright et al. also report that heir affordable, easily accessible simulator has great potential for future use, when it is tested further and the tracking accuracy is improved.
learning curve, meaning that users were getting exponentially better and better over time [14].
Unfortunately, it is difficult to determine which of these interaction types is the most time-efficient and productive, as all of the mentioned applications have different requirements and different measures of success. Even so, not every research project has measured ‘task completion times’. Nor had every project the possibility of any quantifiable measure. Therefore, for each discussed paper, the results will be discussed briefly to determine which of the used interaction methods is the most practical and intuitive.
Firstly, the digital desk by J. Crowley, F. berard and J. Coutaz in 1995 [7], has quite a large limitation. Since the tracking system is limited to detect an x –and y-position in 2D-space, there is no real interaction possible in 3D-space. Hence, this interaction method can be stated as unsuccessful, even though it was a success at the time. Furthermore, the three ‘low’ scores for the earlier-mentioned criteria do not help either.
The approach of Buchmann et al. has more potential, as it allows users to grab, drag, rotate, drop, push and point objects in 3D-space. Moreover, the researchers report a low learning rate. However, the usage of fiducial trackers does have a specific drawback: the requirement to wear a glove containing these trackers is impractical and the fiducial trackers seem to not always work properly, causing usability concerns [8]. The ability to have haptic feedback did provide good results, while the absence of depth cues made interaction difficult. Compared to the digital desk, the approach of Buchmann et al. is a step forward, though it lacks ease of use.
The ‘Magic Paddle’ dumb controller, researched by Kawashima et al., is a limited approach. The developed system also makes use of fiducial trackers, showing similar problems to Buchmann et al. The interaction required a piece of carbon containing a fiducial tracker without any sensors or other technology, making the controller device ‘dumb’ and its interaction methods fairly limited [15]. However, the Magic Paddle resulted in a low – medium – high score for performance – applicability and respectively ease of use, meaning that it is a large step forward regarding the ‘ease of use’ criteria, compared to the approach of Buchmann et al.
All in all, there are several interaction methods discussed. The older methods (Magic Paddle [15], Table-top [16], Buchmann [8], Crowley, Berard and Coutaz in 1995 [7]) seem to have a preference for the use of fiducial markers, causing tracking errors and limiting the interaction possibilities. The newest interaction method, by Wright et al., using the Leap Motion controller device, shows best results and performance.
Coming back to the goal of this literature review, to determine which types of interactions are best suited for which purposes, several conclusions can be drawn. First of all, tracking-based interaction types can lack precision, reliability and ease of use, while excelling in applicability for specific scenarios. On the other hand, controller-based interaction types excel in precision and reliability, while they do cope with a learning curve – having a better ‘ease of use’ over time.
Which interaction type is best suited for which purpose, can be concluded. If the focus of the purpose is on precision: using a controller-based interaction will most likely be the most successful. Then again, if a desired goal of the application is more related to applicability, both tracking-based and controller-based interactions can be used. The applicability of an interaction system is highly dependent of the scenario of the application. Finally, if the focus of the application lies with ‘ease of use’, it depends on the frequency and duration the users will use the application. If users will use the application frequently and for longer periods of time, then a controller-based interaction system will provide best results. If, however, the users will only use the system once, for a short duration, tracking-based interaction systems are proven to be more intuitive and easy to use – hence providing better results.
2.3 Feedback methods
2.3.1 Feedback forms
Feedback can be given in different forms, such as written, verbal and numerical. Augmented reality adds another important level of feedback, similar to one-on-one conversations: non-verbal. ‘The format of feedback is often directly related to the context’ [26]. Written feedback related to a written assessment may be of greater help than verbal feedback. Even so, written feedback carries more weight rather than verbal comments. Feedback on paper should be short and brief, to not lose the message of the feedback. The solution to understanding long, complex feedback is scaffolding. By scaffolding, the user receives feedback along with prompts, clues, solutions and instructions. This divides the overall ‘improve’ task into several smaller tasks, to make it easier to understand and to act for the user [27].
2.3.2 Content of feedback
2.3.3 Timing of feedback
‘Timing and frequency of feedback are equally important for quality of feedback to be delivered’ [26]. Feedback sessions are meant for improving the performance. Ideally, feedback related to a performance should be given as close to the event as possible. In the context of this project, this would conclude that the feedback should be given as soon as a new prototype is finished. The ‘learners’, or in context, the designers receiving feedback, should be actively involved in the feedback process.
2.3.4 Constructive feedback
There are several key features of constructive feedback. Firstly, the given feedback works best when the reviewer, is committed and engaged in the process. Therefore, to increase engagement and commitment to the prototyping process, the reviewer should be related to the same prototype over several frequent time periods. Once the reviewer starts noticing positive results related to the previous feedback session, the reviewer will be more committed to the garment prototype in particular.
Secondly, both the reviewer and the reviewee must be aware of the criteria that will be assessed. Even though in fashion design, most criteria given to the garments will be based upon opinions, there are still a lot of ‘standard’ criteria that should be met in a prototype. If the designer does not meet these criteria, this should be made clear by the feedback given by the reviewer.
Thirdly, the reviewer must focus on specific flaws or strong points, rather than giving general feedback. For example, feedback such as ‘It looks good.’ will do nothing to improve the performance of the designer, other than positively showing that the garment is approved, while feedback such as ‘The pattern on the chest pocket is well worked out and has a nice feel to it’ will make the designer recognize and memorize its positive performance.
2.4 Annotation in Augmented Reality
There have been found several applications and study’s related to 3D model annotations, while the number of study’s that were related to 3D model annotation in an augmented reality environment was limited. Alducin-Quintero et al. have analyzed the impact of 3D model annotations on CAD (Computer Aided Design) user productivity in the context of the New Product Development Process [28]. Their approach resulted in a 13-26% reduction of time needed to perform engineering changes in existing models [28]. The annotations in the research paper of Alducin-Quintero were intended to improve the understanding of the intentions of the design. The findings of Alducin-Quintero et al. show that the productivity impact through CAD annotations depends on several factors, such as the geometrical complexity of the 3D model, and the quality of information in the annotation.
2.5 Hardware
2.5.2 AR versus VR
Evidently, to be able to create a working prototype, a device to support the application is necessary. To determine which device is most suited to the context of the application, first the differences between AR and VR must be made clear. The most important advantages and disadvantages are shown in Table 2.1.
Aspect AR VR Win?
Advantages Disadvantages Advantages Disadvantages Processing
power - Requires ‘a lot’ of processing power Requires less processing power than AR-devices
- VR
Visuals
High-quality display and textures Low FOV comes with limitations in virtual environment size
-
Low-resolution displays
AR
Contextual
awareness Complete contextual awareness
Can distract the user from the application
Better
ability to focus
No contextual awareness AR
[image:21.612.74.544.197.478.2]Interaction Intuitive hand interaction: hands free Specific tracking is difficult to calculate Mostly controller based: specific No hands-free interaction AR
Table 2.1 – Advantages and disadvantages for AR versus VR devices per category.
2.5.3 Chosen hardware for prototype
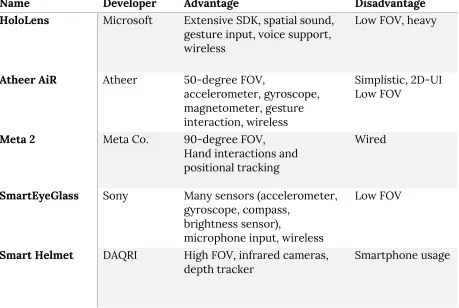
Now that AR has been selected as the scope for our application, the following aspect to be researched is which AR device to use. In table 2.2 the most common AR devices that are currently available for sale are displayed.
Name Developer Advantage Disadvantage
HoloLens Microsoft Extensive SDK, spatial sound, gesture input, voice support, wireless
Low FOV, heavy
Atheer AiR Atheer 50-degree FOV,
accelerometer, gyroscope, magnetometer, gesture interaction, wireless
Simplistic, 2D-UI Low FOV
Meta 2 Meta Co. 90-degree FOV,
Hand interactions and positional tracking
Wired
SmartEyeGlass Sony Many sensors (accelerometer, gyroscope, compass,
brightness sensor),
microphone input, wireless
Low FOV
Smart Helmet DAQRI High FOV, infrared cameras,
[image:22.612.78.537.155.463.2]depth tracker Smartphone usage
Table 2.2 – An overview of the most common augmented reality glasses.
The two devices that stand out in this table are the popular HoloLens and the Meta 2. The HoloLens stands out because of its popularity, where the Meta 2 stands out for its recent release date. Due to the popularity of the HoloLens, many libraries are available, a broad documentation allows for a quick understanding of the software kit and the large community can be of help during the programming. One can say the opposite for the Meta 2 device, as the device is new, the support compared to the Meta 1 and the HoloLens is less extensive. However, it possibly will pay off to look into the Meta 2 further, as the specifications of the device are remarkable. The device offers a 90 degrees FOV (field-of-view), the largest of any of the listed devices. Even so, the high-quality display of 2560 by 1440 pixels allows for high definition visuals in the virtual overlay. Compared to the maximum FOV and display quality of the HoloLens, the Meta 2 stands out.
the Meta 2 SDK were the key factors to decide that the device that will be used for the prototype is the Meta 2.
Figure 2.1 (a, b, c from left to right) –
a: Sketch of application in VR environment,
b: Sketch of application in AR environment supporting the Meta 2 device, c: Sketch of application in AR environment supporting the HoloLens.
2.5.4 Background information of the Meta 2
The Meta 2 is the second version of the AR-glasses that have been developed by the team of Meta Co. The Meta Company started in 2012, as the founder of Meta Co. envisioned a world without screens. In 2013 the team of Meta launched a Kickstarter crowdfunding campaign, pledging $194,444. Not long thereafter Meta launched its first development kit. The second version of the Meta glasses, Meta 2, was announced in February 2016. The Meta 2 glasses feature an industry-leading field of view of 90 degrees, a 2.5K screen resolution and direct hand interactions.
2.5 Conclusion
Several conclusions can be made from the state-of-the-art chapter for this project. First, garment simulation has been researched thoroughly and therefore a proper high-quality garment simulation should be feasible to implement in Unity 3D for the prototype. Garment simulation is a key subject, as it should replace the physical production-quality garment with a virtual garment. However, the focus of this project lies in the annotating of 3D-models, so the garment simulation can be put aside, to a certain extent.
Second, interaction methods for augmented reality have been researched extensively as well, over the past decade. A few methods such as Magic Paddle [23], table-top [24] or the approach of Buchmann [16] or Crowley, Berard and Coutaz [15] make use of fiducial markers, as the tracking solution for these markers are relatively easy to work with. Making use of an external controller, such as the Leap Motion controller, allows for great precision in the interaction input. It is still unclear what the precision is of the current tracking methods of the Meta 2 wearable device, this has to be researched in the project.
[image:23.612.75.536.111.198.2]external headset. Henceforth, there should be researched what other forms of feedback would be more suitable, as the time limit of this project does not allow implementing this. Moreover, Alducin-Quintero et al. have analyzed the impact of 3D model annotations on CAD (Computer Aided Design) user productivity in the context of the New Product Development Process [28]. The research shows that an increase in productivity is possible via decent annotation methods. Furthermore, as Nuernberger et al. have acknowledged: the problem of drawing in 3D, when the perspective of the camera is dynamic was difficult to solve. Nuernberger et al. have presented a new approach to solving this problem. Most likely, implementing this approach or a variant of this approach will be difficult and perhaps not feasible. Whether implications should be made in implementing annotations via drawing input, should be researched.
3. Methods and techniques
To be able to answer the research questions of this project, it is necessary to design different prototypes with different interactions, where each user interface has a slightly different UX design. For each prototype iteration, an experiment can be conducted via user testing. Evaluating these results in a general conclusion and a discussion of future work.
3.1 Design processes
The design processes that will be used in this graduation project, consists of four phases: Ideation, Specification, Realization and Evaluation. The phases are documented in the research paper by Mader and Eggink [30]. Creative Technology students of the University of Twente often make use of these methods (Design Methods of Creative Technology) during their graduation projects. When following these processes, a well-defined, well-researched prototype will be the result.
The Design Methods of Creative Technology makes use of a combination between a classical model for creative design processes: divergence followed by convergence and a more modern design approach: a spiral model. In the classical model, described by Jones in 1970, firstly the design space is opened up and defined, in which broad, out-of-the-box ideas are thought of and written down by the designer. Secondly, during the converging phase, the design space is ‘reduced’, until a specific solution or problem is reached. Between the divergent phase and the convergent phase, design decisions have been made based on the knowledge of the designer.
In the spiral model, however, the sequence of steps (divergence, decision and convergence) are interwoven, not allowing a logical order. ‘Each design problem unfolds a sequence of questions that is specific to the starting problem and the context’, according to Mader and Eggink [30]. In the Design Methods of Creative Technology, the interwovenness of design and knowledge questions is emphasized, meaning that outcomes of the last phase can have an influence on the phase before that, and so forth.
Firstly, the starting point of the Creative Technology method is the ideation phase. The problem statement is determined, followed by one or multiple brainstorm sessions where creative ideas come forward. Sources of inspiration for the creative ideas are related work and the outcome of the brainstorm session. The result of the ideation phase is an elaborated project idea, together with the problem requirements. Moreover, ideas on the interaction and overall experience of the product or prototype are also part of the result.
Thirdly, the realization phase will focus on creating a prototype. The ideas and requirements from the ideation and respectively the specification phase have led to a clear implementation. For this project, the realization phase will focus on creating a user interface to work with the Meta 2 in Unity3D.
And lastly, after the prototype has been constructed, the evaluation phase allows for the testing of the prototype and reflection on the design processes. Two types of evaluation will be concerned: functional and user evaluation. The results of this evaluation will lead to a general discussion and a consideration of possible further research for the future.
3.2 Methods
3.2.1 Stakeholder analysis
A stakeholder identification and analysis is performed, with the goal to understand the environment and context of the project. The analysis will point out who is involved and possibly affected by the project. Moreover, it will identify the end-users of the project. The stakeholder analysis will be performed based on theory of Dix et al. [31] and Sharp [32], where the definition of a baseline stakeholder is cited as ‘anyone whose jobs will be altered, who supplies or gains information from it, or whose power or influence within the organization will increase or decrease’.
According to Sharp et al. [32], the most important group for the stakeholder identification is called the ‘baseline stakeholders’. The people involved in this group have the most influence over the product and vice versa. In the theory by Sharp et al. [32], the group of stakeholders exists out of four groups: users (distinguished by primary, secondary and possibly tertiary groups), developers, legislators and decision-makers. Evidently, the user group refers to the possible end-users of the product. The developer group refers to the technical experts that are involved: programmers and technicians. Furthermore, the people that fit in the ‘legislators’ group are those who could affect the product through rules and regulations. Lastly, the decision-makers group exists out of all related individuals or groups that have the largest influence within the management of the company that will be using the product.
3.2.2 PACT analysis
PACT stands for ‘People, Activities, Context and Technology’, acknowledged by Benyon et al. in 2005. A PACT analysis has been worked out during the ideation and respectively the specification phase. Performing a PACT analysis is useful to be able to better understand the current situation and to determine where there is room for improvement. Placing the product or prototype in a concrete situation allows for greater resemblance to the ‘real’ context. Theory of Moran et al. has been used to support this analysis [33].
3.2.3 Product and user requirements (MoSCoW)
non-functional requirements. Because of the limited timespan of this project, it will be unfeasible to implement all of the possible functionalities. Therefore, the list of requirements will be prioritized using the MoSCoW method developed by Dai Clegg [34]. The MoSCoW method is a prioritization technique used in management and often-used in software development. The MoSCoW term is an acronym derived from the first letters of each of the four prioritization categories: ‘Must have’, ‘Should have’, ‘Could have’ and ‘Won’t have’. At the end of this project, the final prototype will feature all the ‘Should have’ and ‘Could have’ requirements.
3.2.4 User and expert interviews
4. Ideation
[image:28.612.111.490.193.340.2]During the ideation phase, a concrete project idea has emerged from a brainstorm session and other inspiration sources. The project idea was meant to fulfill the needs set by the target group. In order to identify the needs set by the target group, the target group has been specified first. Via a stakeholder analysis, the requirements for the idea are made clear.
Figure 4.1 – The diagram for the ‘ideation’ phase found in ‘Design Methods for Creative Technology’ by Mader and Eggink [30].
4.1 Stakeholder analysis
To identify the stakeholders related to this project, the stakeholder identification method of Sharp, Finkelstein and Galal [32] is applied.
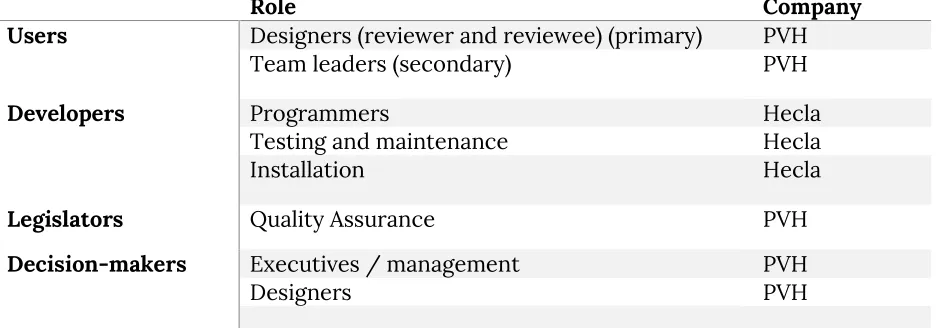
The stakeholders that have been identified are given in table 3. The stakeholders have been divided into four categories: users, developers, legislators and the decision-makers. A brief explanation of the companies is followed below. As shown in the first category, the product potentially has three types of end-users: designers and team leaders. Evidently, designers are the primary target group for this project, as the application is intended to be used by fashion designers. It is expected that in a later stage of development, the team leaders of the design groups of PVH will make use of the application as well, to further improve the performance of the fashion designers.
Role Company Users Designers (reviewer and reviewee) (primary) PVH
Team leaders (secondary) PVH
Developers Programmers Hecla
Testing and maintenance Hecla
Installation Hecla
Legislators Quality Assurance PVH
Decision-makers Executives / management PVH
[image:29.612.74.547.76.240.2]Designers PVH
Table 4.1 – Baseline stakeholders, divided into categories
4.1.1 Hecla Professional Audio & Video Systems
The assignment for this bachelor project was provided by Hecla [35], a company situated in (amongst other locations) Hengelo, Overijssel. Hecla specializes in professional audio-visual systems and acts in the market of ‘audio-visual integrators’, where the goal of the company’s projects is to combine different audio-visual technologies to achieve the best possible solution for its clients. Their clients include some big names such as the University of Twente
in the education field and PVH in the fashion industry.
4.1.2 PVH
4.2 PACT analysis
Use case 1: First usage of application
Title First usage of application
Description The user has received a 3D-model to review and wants to review the model.
Primary actor Fashion design reviewer
Pre-conditions User wants to review the model.
Post-conditions User knows how to use the application, and is satisfied with reviewing the model successfully.
PACT
People Brad, a professional fashion designer of age 32 working at Fashion Company A is looking to review the garment design of a younger, newer colleague of the company.
Activities Providing feedback via the review application using the Meta 2. Context The Meta 2 is attached to a computer, located in the same office
where several designers work together.
Technology Meta 2 AR glasses are used to display and interact with the 3D-model. Voice input is made possible via a gaming headset.
Scenario 1. Brad enters the office, sees on his computer that there is a design to be reviewed, and sends the design to the Meta computer.
2. Brad walks to the Meta 2 device, powers it on and puts the device on his head, such that the vision is clear.
3. After putting on the Meta 2, Brad puts on the gaming headset.
4. The applications boots up and the 3D-model to be reviewed is shown.
5. The user selects the feedback button to start the review process.
6. Once selected, the system starts recording. 7. The user provides feedback.
8. The user stops the recording.
Use case 2: Using the application to review a very specific area of the 3D-model. Title Reviewing a specific area of a 3D-model
Description The user has received a 3D-model to review and wants to review a specific area of the model.
Primary actor Fashion design reviewer
Pre-conditions User wants to review a specific area of the model.
Post-conditions User knows how to use the application, and is satisfied with reviewing the model successfully, having provided sufficient feedback for the specific area.
PACT
People Brad, a professional fashion designer of age 32 working at Fashion Company A is looking to review the garment design, in particular the chest pocket of the garment. The garment was designed by a younger, newer colleague of the company.
Activities Providing specific and accurate feedback via the review application using the Meta 2.
Context The Meta 2 is attached to a computer, located in the same office where several designers work together.
Technology Meta 2 AR glasses are used to display and interact with the 3D-model. Voice input is made possible via a gaming headset.
Scenario 1. Brad enters the office, sees on his computer that there is a design to be reviewed, and sends the design to the Meta computer.
2. Brad walks to the Meta 2 device, powers it on and puts the device on his head, such that the vision is clear.
3. After putting on the Meta 2, Brad puts on the gaming headset.
4. The applications boots up and the 3D-model to be reviewed is shown.
5. The user selects a specific area of the shown 3D-model. 6. Once selected, the system starts recording.
7. The user provides feedback.
8. The user stops the recording and proceeds to review the 3D-model.
Use case 3: Viewing the given feedback of a 3D-model
Title Viewing the given feedback of a 3D-model
Description The user has received a reviewed 3D-model and wants to see and hear the given feedback.
Primary actor Fashion designer
Pre-conditions User wants to view the given feedback of the model.
Post-conditions User knows how to use the application, and is satisfied with understanding the given feedback.
PACT
People Leroy, a professional fashion designer of age 24 working at Fashion Company A has made a garment design. His colleague, Brad, has reviewed the design. Leroy is curious to the given feedback and wants to see and hear it.
Activities Selecting the given feedback per area, and listening and seeing the given feedback.
Context The Meta 2 is attached to a computer, located in the same office where several designers work together.
Technology Meta 2 AR glasses are used to display and interact with the 3D-model. Voice input is made possible via a gaming headset.
Scenario 1. Brad enters the office, sees on his computer that there is a design to be reviewed, and sends the design to the Meta computer.
2. Brad walks to the Meta 2 device, powers it on and puts the device on his head, such that the vision is clear.
3. After putting on the Meta 2, Brad puts on the gaming headset.
4. The applications boots up and the 3D-model to be reviewed is shown.
5. The user selects a specific area of the shown 3D-model. 6. Once selected, the system starts recording.
7. The user provides feedback.
8. The user stops the recording and proceeds to review the 3D-model.
4.3 Brainstorm
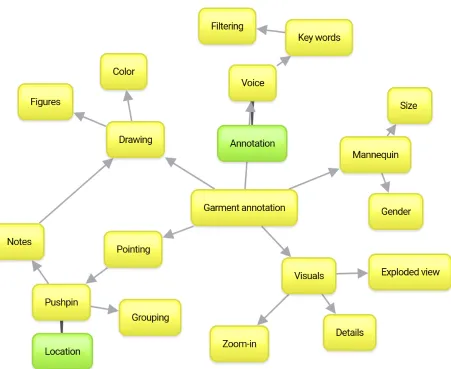
Figure 4.2 – Brainstorm diagram workout in an early brainstorm session.
4.4 User Interfaces
4.5 Concept ideas
During the ideation phase, many concept ideas are thought out to ‘spur’ the creativity for the project. Most of these ideas are ‘out-of-the-box’, and infeasible for the current timespan of the project, hence these ideas are not worked out or added to the prototype. The future work section in the ‘Discussion’ chapter will continue on these ideas. Some ideas, however, are well-suited for the current context and are, therefore, added to the prototype.
4.5.1 Summarizing voice input in a word cloud
After the system has recorded a feedback ‘moment’, which the user has entered via voice input, the voice recording has to be played back in some way. Obviously, this can be done via direct playback of the recording. However, direct playback has certain disadvantages. First, the duration of understanding the content is as long as the recording, making it not time-efficient at all. Second, there can be several problems in understanding the voice recording, since the user can no longer interrupt the reviewer as if it were a real conversation. Third, if the user wants to hear feedback about a specific aspect of the garment (other than the area), the user has to listen to the complete feedback entirely.
To overcome these problems or disadvantages, the voice input can be analyzed and processed via an algorithm. There are several possibilities for transforming voice input into something understandable. One of the key ideas for this process was to ‘summarize’ the voice input, by targeting several keywords and displaying these, in the form of a word cloud, below the recording. Each keyword would represent a part of the recording or a combination of the recording. For example, the reviewer has mentioned the color of the chest pocket of a garment several times. The user would like to hear the feedback about the color in particular. To do this, the user can simply select the chest pocket area, where after he or she can select the ‘color’ keyword shown in the word cloud. The system then replays the specific parts of the recording containing the word ‘color’.
4.5.2 Skype sessions during feedback recording
One of the key problems in the feedback loop over distance is not being able to have a one-to-one conversation. One-one-to-one conversations can be useful since the reviewer and the designer can tell each other their opinions, hereby resolving possible conflicts as fast as possible. To be able to have these one-to-one conversations over distance, an application such as Skype or similar to Skype can be implemented into the system. During the process of giving feedback, when the reviewer would like to know more about the decisions that were made, he or she can call the designer via Skype.
4.5.3 Different models for fitting
implementing this feature is having to alter the 3D model of the garment so that it fits the chosen model, realistically.
4.5.4 Grouping annotations based on location
Having plentiful annotations for a single garment can make the interface unclear and unorganized. Therefore, an improvement to organize the interface further would be to group several annotations that are close to each other. These grouped annotations would show a slightly larger pin, possibly with the number of annotations attached to the pin.
4.5.5 Multi-user annotating
One of the advantages of AR over VR is being able to see the environment while working with the AR goggles. Hence, the AR technology allows continuation of the usual person-to-person interactions simultaneously with annotating the garment via the AR interface. Plenty of possible co-op interactions would be made possible, having multiple Meta 2 devices linked to the same software. User A could start annotating a certain aspect of the garment while user B supplements or criticizes this annotation.
4.5.6 Filtering of annotations
This idea continues on the first-mentioned idea: summarizing voice input in a word cloud. Once the voice input has been analyzed via speech-to-text software, every annotation can be tagged. A helpful addition to the application would be to implement real time filtering options, with which the user can ‘highlight’ or leave out a specific selection of the annotations. This allows the user to find the annotations related to the subject that the user is interested in more quickly.
4.5.7 ‘Step in’ interaction with the garment
Augmented Reality has the main advantage of the user being able to see his or her environment. Therefore, the body of the user can also be seen by the user. To be able to see how the garment would fit the user, hypothetically speaking, the user could simply ‘step into’ the garment. A virtual mirror would then allow the user to see what the garment looks like on his or her personal body. The key difficulty for this idea is the virtual mirror: the software would have to combine the camera data with the virtual overlay with precise positioning. Moreover, the disadvantage would be for the user to see the limited quality of the camera in the virtual mirror, hereby almost fully neglecting the advantage of being able to see the garment as realistically as possible.
4.5.8 ‘Pushpin’ selection interaction
4.5.9 Exploded view
Another visual-related idea is to implement an ‘exploded view’. This view method is often used in the mechanical industry. The exploded view can possibly have the similar advantages for the fashion industry. Allowing to let the user see the garment from the inside-out might be a way to perceive the details of the garment better.
4.6 Observations
4.6.1 General observations
Below are stated the general observations made during this project.
4.6.1.1 Drawbacks of Augmented Reality
Immersive augmented reality has many perks. The user can perceive an altered version of the real environment. Combining the digital world with the real world can simultaneously ‘improve’ the context, while maintaining the possibilities of the real world, such as one-to-one conversations. This is the main advantage of augmented reality over virtual reality, as the more immersive experience of virtual reality leads to a lack of engulfment of the real environment. However, there are several drawbacks for both virtual reality and augmented reality environments. One of the most important drawbacks is motion sickness. Having a perceived motion in the digital world, that is different than the actual motion in the real world, leads to a misunderstanding of context in the human brain, causing motion sickness.
4.6.1.2 Lack of reliability of the Meta 2 software
Unfortunately, the Meta 2 device has some disadvantages. As Meta Co. is relatively new to the market, the Meta 2 SDK documentation is fairly limited. Moreover, the Meta 2 device seemed to only work with the latest hardware. Some driver-related issues caused instable effects of the software, such as freezing every AR application after about one minute of uptime. Other than that, the Meta 2 software seems to ‘stutter’ on lower-end computers. When this stuttering behavior is experienced, it is simply not possible for the user to work with the AR applications as wished.
4.6.1.3 Tracking performance related to environment
4.6.2 Interaction observations
The main focus of this application lies within the interaction with the user interface in the 3D space that is created by Augmented Reality. Since Augmented Reality is a high-tech solution, many necessities have to be met in order to make the technology work properly. The requirements for setting up the Meta 2 device to work properly, have been mentioned in Table 4.2.
Rule type Description
Environment The walls of the room should contain distinguishable, non-repetitive patterns.
The room should contain a few objects with characteristic shapes. The room should have a size of at least 8 m2 for the user to be able to walk around slightly.
Lighting The lighting should be similar to the lights of a 300 lum lightbulb. More lighting results in better tracking, yet slightly less visible AR objects. Less lighting results in slightly worse tracking and better visible AR objects.
Calibration The Meta 2 device should be properly calibrated for every user. Even though the calibration process takes some time, this time-investment is worth every penny during application usage.
5. Specification
[image:38.612.107.396.170.291.2]During the specification phase, the product design space is explored. The product requirements will be described based on prototyping and discussion with experts or end-users.
Figure 5.1 – The diagram for the ‘specification’ phase found in ‘Design Methods for Creative Technology’ by Mader and Eggink [30].
5.1 Prototype description
The prototype that has been built is a ‘3D-model-viewer’ application, allowing for annotation, developed with Unity using the Meta 2 SDK. The goal of the prototype is to be able to record several voice annotations, for specific areas of a 3D model of a garment. The application is written in C# and integrated to work with the Meta 2 augmented reality glasses. The interface of the application has been optimized for immersive augmented reality, mixing 3D interface elements with 2D interface elements.
Upon the first startup of the application, a basic tutorial, to be always-in-view, displayed via ‘flat’ imaging, explains how to use the application properly. The 3D model of the garment is displayed above and anchored to a round plate, which interacts as a turntable to be able to move or rotate the 3D model. The user is able to select a specific area of the 3D model via a pushpin selection interaction method, where dragging and dropping of a ‘floating’ pushpin allows for accurate selection of a location on the garment. After selecting the location, the user is able to start a new annotation, via a sequence of 2D interface elements that are located next to the location of the new annotation. The sequence of the interface elements existed out of the following actions: confirm location, start recording, stop recording. An annotation exists out of a location, instanceID and a generated id of a pushpin on the 3D model, combined with a voice recording. The voice recording is linked to the annotation via the same instanceID. The voice recording is managed via an external headset with a high-quality microphone. Since the headset will cover the ears of the user, the audio output of the application should be mapped through the headset as well.
to select a previously recorded annotation, by hovering his or her hand over the location to re-play the annotation.
5.2 Product and user requirements (MoSCoW)
From the outcomes of the feedback moments and the interview, a list of requirements can be constructed. The list has been separated into functional and non-functional requirements. Due to the timespan of the project, the focus has been set on the functional aspects of the prototype. As mentioned before, the prioritization of the requirements has been done via the MoSCoW methodology. The prioritized categories were (ranging from high to low priority): ‘Must haves’, ‘Should haves’, ‘Could haves’ and finally ‘Won’t haves’.
No. Requirement description Priority
Functional requirements
1 The user is able to wear the Meta 2 device and walk around properly in
an area of at least 4 m2. Must
2 The user is able to read the instructions of the application Must 3 The user is able to view the chosen garment through the application, in
sufficient detail Must
4 The user is able to rotate the chosen garment through simple turn-table
interaction Must
5 The user is able to walk closer and farther away from the garment, while
the garment and table remain in the same place Must 6 The user is able to select a specific area of the garment Must 7 The user is able to start a voice recording after having selected a specific
area Must
8 The user is able to control the recording (play, pause, stop) when
wanted Must
9 The user is able to open and view the newly added annotation on the
3D-model Must
10 The user is able to stop the playing recording of the annotation and go
back to the overview Must
11 The application contains ‘grouping’ functionality, where a relatively dense area of the garment with plenty of annotations is grouped into one larger pushpin
Should
12 The application uses speech-to-text software to summarize the
annotations Could
13 The user is able to filter the annotations based on subject or date Could 14 The application allows to dynamically load a new 3D-garment with a
separate set of annotation Could
Non-functional requirements
A The user interface and interaction of the application should be clear and
intuitive Must
B After the basic tutorial, the user should understand all the explained
interactions properly Must
C The application should detect the users hands properly Must D The user should be able to successfully create annotations Must E The annotations should have clear sound recordings, with
understandable speech Should
6. Realization
[image:41.612.188.394.169.290.2]In this section, the technical and practical details of all iterations of the prototype are explained. After each iteration, a short evaluation shows the improvements to be made for the next iteration.
Figure 6.1 – The diagram for the ‘realization’ phase found in ‘Design Methods for Creative Technology’ by Mader and Eggink [30].
6.1 Prototype
There are several iterations that this project has went through.
6.1.1 First iteration
The first version of the prototype of the application started with simply testing out the hardware and software of the Meta. Since the software and hardware of the Meta 2 is relatively new and the documentation for the Unity SDK by the Meta Co. was fairly limited, the progress for the first prototype for the application was slow. The goal of the prototype was to display the garment properly and to be able to move the garment around and, if feasible, select a certain area of the garment to start annotation.
6.1.2 Second iteration
In the second iteration, a basic tutorial explaining the interaction of the application has been implemented, a selection method for annotation has been implemented and all requirements of the first iteration have been met. Furthermore, the second iteration has improved the issues found in the first iteration.
6.1.3 Final iteration
6.2 First iteration
The goals of the first iteration are to set-up the Meta 2 device to work properly with Windows 10 and Unity, start programming the application and to implement a 3D-model of a garment designed by PVH. All requirements for this prototype, set up by the researcher, are stated in table 6.1. Following the table, a paragraph explaining the steps involved during the realization of this prototype.
6.2.1 Iteration requirements
No. Description
1 Set up the Meta 2 device to work properly with Windows 10 and Unity 2 Create an application in Unity that allows to see objects through the Meta 2 3 Implement a 3D-model of a garment designed by PVH so that all visuals are similar
to a real-life version of the garment
4 Implement an interaction to be able to move, rotate or resize the 3D garment Table 6.1 – Requirements for the first iteration of the prototype.
6.2.3 Procedure
In order to set up the Meta 2 device to work properly with Windows 10 and Unity, the Meta 2 SDK should be installed on the system. The Meta 2 SDK installs all necessary drivers for the Meta 2, the Meta 2 Utility and extracts the Meta 2 assets required for Unity to work with the device. The Meta 2 Utility is software existing out of multiple programs. The software set contains a calibration program, a program to set up the display of the Meta 2 properly, a program to view the camera output of the Meta 2 (combined with the virtual overlay) and multiple tutorials and demos to start with.
After the successful set up of the SDK, and managing to get a grip and feel of the Meta 2 device by following the set-up tutorials and demos by the Meta Co, all preparations were made to start working on the first version of the AR application. After creating a new project in Unity and importing all assets of the Meta 2 SDK, the integration with the Meta 2 device can be established. Importing the MetaCameraRig into the project allows for integration with Unity and the Meta 2 device.
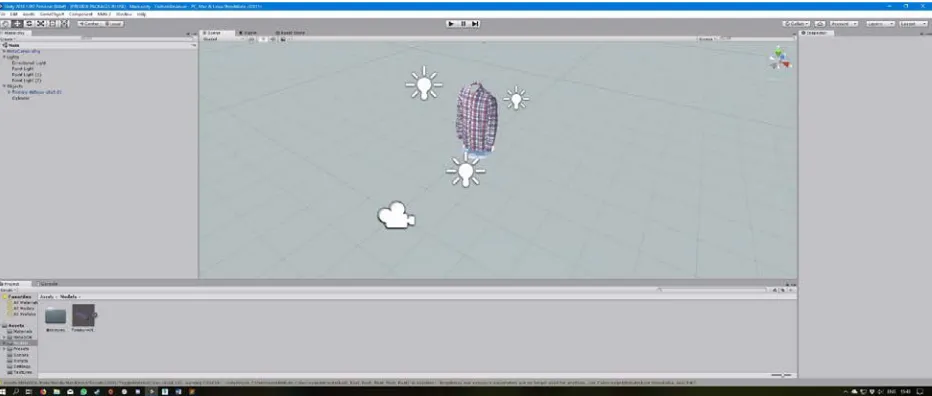
3DSMAX seemed to be the most successful. The .max scene created by 3DSMAX could be imported into the Unity project and a successful import of the 3D model of the garment was achieved, as seen in figure 6.2. The visuals of the 3D garment were astonishing and more realistic than expected, found by the researcher and user testing.
Figure 6.2 – Unity project set up to display the 3D model of the garment in .max format
6.3 Second iteration
The goals of the second iteration is to be able to select an area of the garment for annotation. The selection procedure is critical, as the more specific a selection point can be, the more detailed the reviewer can provide its message. Furthermore, the second iteration will improve on the issues caused by the first iteration.
6.3.1 Iteration requirements
No. Description
1 Improve the turn table interaction to exclude unexpected behavior
2 Implement a selection interaction in which the user can select a specific area of the garment
3 Implement a basic tutorial in the application to explain to the user how the interaction and the UI works
Table 6.3 – Requirements for the second iteration of the prototype.
6.3.2 Procedure
The first goal or requirement for this iteration is to improve the turn table interaction. The observed unexpected behavior was the system detecting trigger events for the turn table, when the hands of the user were not touching the table, combined with the system not
Figure 6.4 – A diagram displaying the effect of the extended box collider.
Figure 6.4 explains best how the incorrect margins of the Meta hand tracking are compensated by the Collider for the turn table. As displayed in the diagram, the extension of the Box Collider component of the object in Unity, is virtually approximately just as large as the error margin caused by the hand tracking of the Meta. Therefore, in practice, the touching of the turn table should feel more genuine and intuitive.
The second requirement for this iteration is to implement a selection procedure, so that the user is able to select a specific area of the garment to annotate. As the location of the annotation is an important factor, the more specific the selection procedure can be, the better. As the timespan for the project is relatively short, the attention span for the selection procedure should be sufficient, yet not too extensive. Hence, there was chosen to implement a ‘quick’ solution. The 3D model provided by PVH exists out of several parts, where each part represents a different area of the garment. For each area of the garment, a Box or Mesh Collider was made, allowing for detection of Hand Triggers. Each time a user’s hand collides
with the Colliders of the parts of the garment, the Trigger event is called. Upon triggering of this event, the color of the part is changed, which makes the part highlighted and selected. To select another area, the user simply has to touch another area.


![Figure 4.1 – The diagram for the ‘ideation’ phase found in ‘Design Methods for Creative Technology’ by Mader and Eggink [30]](https://thumb-us.123doks.com/thumbv2/123dok_us/9687554.470134/28.612.111.490.193.340/figure-diagram-ideation-design-methods-creative-technology-eggink.webp)
![Figure 5.1 – The diagram for the ‘specification’ phase found in ‘Design Methods for Creative Technology’ by Mader and Eggink [30]](https://thumb-us.123doks.com/thumbv2/123dok_us/9687554.470134/38.612.107.396.170.291/figure-diagram-specification-design-methods-creative-technology-eggink.webp)
![Figure 6.1 – The diagram for the ‘realization’ phase found in ‘Design Methods for Creative Technology’ by Mader and Eggink [30]](https://thumb-us.123doks.com/thumbv2/123dok_us/9687554.470134/41.612.188.394.169.290/figure-diagram-realization-design-methods-creative-technology-eggink.webp)