TRADESHOW
BOOTH
INSTRUCTIONS
CONTENTS
>>
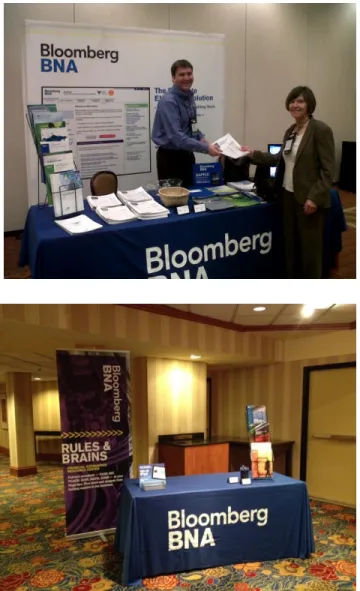
Booth Set Up Examples
// page 3>>
Booth Checklist
//page 6>>
Booth Set Up Instructions
// page 7 • With V-Burst Display //page 7• With Banner Stand //page 12
• Key/Other Booth Set Up Instructions //page 13
>>
Booth Dismantle Instructions
// page 14>>
Return Shipping Instructions
// page 17BOOTH SET UP EXAMPLES
3
10x10 INLINE BOOTH
Typical inline 10x10 booth space with 8x10 backdrop, one 6’ table with BBNA table throw, C8 lit rack, raffle sign with raffle basket and rented computer counter.
10x10 INLINE BOOTH – example 2
Typical inline 10x10 booth space with 8x10 backdrop, one 6’ table with BBNA table throw, two C8 lit racks, raffle sign with raffle basket and rented computer counter.
BOOTH SET UP EXAMPLES
10x10 AISLE BOOTH
Typical aisle10x10 booth space with 8x10
backdrop, one 6’ table with BBNA table throw, two C8 lit racks, raffle sign with raffle basket and rented computer counter.
COMPUTER COUNTER
BBNA mouse pad, BBNA pens in clear plastic pencil holder, generic BBNA customer service business cards in business card holder (2
located in each supply box sent to the show) and post-it giveaways.
BOOTH SET UP EXAMPLES
5
HALLWAY BOOTH SPACE
Typical booth space located in a hotel hallway, without the pipe and drape from a larger show. 8x10 backdrop, one 6’ table with BBNA table throw, C8 lit rack, raffle sign with raffle basket. Laptop computer was used on the table – monitor may be provided.
BOOTH CHECKLIST
•
Check booth to ensure all show services are there.
• Refer to show itinerary for list. May include table, 2 chairs, carpet, wastebasket, computer counter, electricity, internet, etc.
•
Make sure all boxes/cases are at the booth.
• Refer to show itinerary for quantity and tracking info. If any boxes are not accounted for, check with show management to find them.
•
Materials:
•
Placement:
• The 6’ table should be placed against the side of the booth near the pipe and drape. The counter should be near to the front of the booth, parallel to the table. The chairs should be placed behind the table near the booth display. This leaves the center area of the booth open so people can walk into the booth.
•
In display case, the manila envelope contains the list of services
ordered information from show management, a color copy of the
booth display, instructions for setting up the booth, the bill of
lading, and shipping labels to adhere to booth display case.
•
Refer to the following set up and dismantle instructions.
Showtime: Booth display, table throw, raffle sign, lit rack, cords, etc.
BOOTH SET UP
7
1. Clear booth space of boxes/cases, table, chairs etc. for open area to set up display.
2. Open display shipping case. Remove lit rack, table throw, etc.; set aside on table.
3. Remove lights + cords from lid compartment; set aside on table.
4. Remove V-Burst bag and place on floor. Open and remove display frame.
BOOTH SET UP cntd.
5. Begin expanding frame. Graphic side should be facing up.
6. Once frame is expanded, connect “J” hooks around perimeter of display.
7. Lift frame up to standing, upright position. Connect center “J” hooks.
8. Attach ends to sides of display. Tilt frame to fasten Velcro, pulling fabric taut.
BOOTH SET UP cntd.
9
9. Check lights: plug cords in base of
fixtures. Plug power strip into power source, plug cords into strip. Turn on.
10. Leaving lights on, attach to frame: Tilt frame to reach top. Hook lights on right side of “X” and frame adapter hooks on crossbar.
11. Be sure light fixtures are secure on frame. Set frame upright.
12. Move frame into position at back of booth space.
Note: Turn switch on light cords to on position. If light does not turn on, you may need to replace the bulb.
Note: If display is wrinkled, use
steamer from display case (add water, let heat and then steam over the wrinkles). Be sure all water is emptied prior to putting back into box.
BOOTH SET UP cntd.
13. Move table, chairs, etc. back into booth. 14. Remove all items from packaging and
place packaging inside case. Close shipping case and store behind display.
15. Place blue throw on table followed by lit rack, raffle sign + basket, collateral and
giveaways. Store boxes under table.
16. If needed, plug extension cord into power strip, run cord behind display.
BOOTH SET UP cntd.
11
17. Optional:
• If using an iMac or monitor, refer to
Tradeshow Computer Instructions to set up.
• If using a computer counter, put counter
into place within booth space and set up iMac by following Tradeshow Computer Instructions
18. Make sure all shipping materials, trash etc. is removed from space.
• If needed, ask show management if staff
will vacuum carpeted space prior to the start of the conference.
BOOTH SET UP cntd.
BOOTH SET UP: OTHER
13
LEAD RETRIEVAL
• If the Show Services Checklist indicates that we secured a lead retrieval device you need to go to the show services area and pick it up. You will need to plug in the scanner at the booth, test it out by scanning your own badge; show your booth colleagues how to use it.
• If there are no lead retrieval devices at the show you can collect business cards in the raffle basket.
BUSINESS CARDS
• In the supplies box there are business card holders and some BBNA cards. These cards are blank on the back so people can write their contact info. Please put them out on the computer counter.
• If you are offering a trial for a specific publication please write the code or pub name on business card.
*IN THE MORNING*
• Arrive 20-30 minutes before exhibit hours.
• Turn the computer on.
• Put out the wireless keyboard and mouse.
• Turn on the lights on the display.
• Log into the bookmarked resource centers.
• Put the giveaways out on the table.
• Replenish any publications as needed. The extras should be in the boxes under the table.
• Take a few photos of the booth on your smart phone and send them to Laura at
[email protected] text them to 571-319-7055.
*AT THE END OF EACH DAY*
• Turn off the computer monitor.
• Hide the wireless keyboard and mouse under the table or in the computer counter.
• Turn off the lights on the display.
• Put the giveaways in the box under the table.
• Put the business cards under the table. There is a manila envelope in the supplies box that you can use.
BOOTH DISMANTLE
1. Move extra furniture out of booth. Turn off lights & remove from frame.
2. Unplug cords and bundle them up.
3. Unhook 4 center “J” hooks; unhook Velcro.
4. Lay frame down and fold ends over. Unhook “J” hooks around perimeter. Note: You may
want to turn off lights approx. 20 minutes prior to break down to let them cool off before packing them up.
Note: If any cords were at booth prior to
arrival/provided by show
management, leave them be.
BOOTH DISMANTLE cntd.
15
5. Gently collapse frame and place into bag. Zip bag close and place in shipping crate.
6. Pack up remaining collateral into boxes from under table. Dispose of any dated publications.
• Be sure raffle basket and pen jar are gently placed in and will not be
destroyed during shipment.
7. Place lit rack in box, fold up table throw and place in ziplock. Put lit rack box into case next to v-burst bag. Then place
Showtime’s extension cords, power strips at bottom of case. Put table throw on top of cords.
8. Place cooled lights gently back into shipping case lid. Secure lid with Velcro to hold lights in place.
Note: If you feel resistance when collapsing display, check that all “J” hooks are undone.
BOOTH DISMANTLE cntd.
9. Remove labels on display/computer case(s). Replace them with the shipping labels provided in manila envelope.
10. Place raffle sign between Velcro with provided instructions and any remaining documents to be returned to Showtime.
11. Close lid to shipping case and fasten latch into “Close” position.
RETURN SHIPPING
17
1. Showtime has made arrangements with Team Air to pick up materials from booth.
• Show management may require you to
complete a Material Handling Agreement for the return ship. This must be filled out in addition to the Shipping Waybill provided by Showtime in the manila envelope. Be sure to write “the designated carrier-Team Air” in the carrier box on the form.
2. Please use the Team Air Shipping Waybill in the manila envelope when completing this form.
• Fill in the final piece count on the Waybill and Material Handling Form (i.e. 1 gray case, 1 computer case, 1 box, etc.)
• Show management will try to get you to use their shipping company, but please indicate on the form that Team Air is our shipping
company since we have already paid for their services.
3. Return the Material Handling Agreement and the Waybill to the service desk or show management. Inform them that the
shipment will be picked up by Team Air.
4. Ship Showtime in the display case and the computer case include: the table throw, lit rack, extension cord, 2 power strips, raffle sign, steamer, and booth display in the
display case. The Mac, wireless keyboard and mouse in the computer case.
Note: If the tear down or “force out” times change during the show, notify Showtime at 800-720-5753 to make new arrangements with the carrier.
RETURN SHIPPING
5. There are Fed Ex and UPS labels already filled out in the supplies box. Please ship any remaining brochures, the supplies box, and any leftover giveaways back to Laura using these forms.
• UPS Account number is 5V47A9
• Fed Ex account number is 0200-47267
6. Most conference centers may require you to bring these boxes to the onsite FedEx or UPS office. If not, leave the taped boxes in booth space with Showtime shipping cases.
7. Leave a copy of the completed Waybill on top of the display in booth area.
8. Hand carry the business cards collected at the show back to the office and give them to Laura immediately upon your arrival back in the office.
Please do not ship business cards back with the other materials!
Note: If there are any problems with shipping or receiving, please call Showtime at 800-720-5753.
CONTACT INFORMATION
Laura Falacienski
Director, Event Operations
703.341.5966 //office 571.319.7055 //cell
Jessica Kozel
Associate Manager, Event Operations
703.341.5906 //office 571.458.6417 //cell