TopBraid Composer ™
Getting Started Guide
Version 2.0
Revision History
Date Version Revision August 1, 2006 1.0 Initial version
September 20, 2006
Correction to Exercise 18 July 21, 2007 2.0 Update with respect to the latest
Table of Contents
GETTING STARTED GUIDE ...1
VERSION 2.0 ...1
1
INTRODUCTION...5
1.1 CONVENTIONS...5
2
INSTALLATION AND SET UP ...7
2.1 REQUIREMENTS...7
2.2 INSTALLATION
...7
2.2.1
Windows Platform Installation ...7
2.2.2
Mac OS X Platform Installation...7
2.2.3
Non Windows Platforms Installation ...7
2.3 WORKSPACE CONFIGURATION
...7
2.3.1
Create an Eclipse Project ...7
2.3.2
Download Example Ontologies ...10
2.3.3
Becoming familiar with TBC Views ...12
2.3.4
Organize the workspace...14
2.3.5
Open existing local ontologies ...15
2.3.6
Set up preferences ...17
3
BUILDING YOUR FIRST ONTOLOGY WITH TOPBRAID COMPOSER...19
3.1 CREATE CLASSES
...19
3.2 CREATE PROPERTIES
...24
3.3 CREATE INSTANCES...30
3.4 EXECUTE SPARQL QUERIES
...32
3.5 EXTEND THE ONTOLOGY
...37
4
WORKING WITH IMPORTS AND MULTIPLE ONTOLOGIES ...39
5
DEFINING CLASSES WITH OWL DL ...46
5.1 RESTRICTION KEYWORDS
...50
5.2 BOOLEAN CLASS CONSTRUCTORS
...50
5.3 ENUMERATED CLASSES
...50
5.4 COMPLEX CLASS EXPRESSIONS...52
APPENDIX A: SEMANTIC WEB STANDARDS ...53
A.1 RDF ...53
A.2 RDFS ...54
A.3 OWL ...55
A.4 SPARQL...57
Figures
Figure 1: Selecting TopBraid Perspective...8
Figure 2: Creating Eclipse Project - step 1 ...9
Figure 3: Creating Eclipse Project - step 2 ...9
Figure 4: Import dialog ...10
Figure 5: Downloading example OWL/RDFS libraries ...11
Figure 6: geotravel.owl in TopBraid Composer ...12
Figure 7: Using hyperlinks to navigate ...13
Figure 8: Opening multiple ontologies ...14
Figure 9: Creating a folder in the workspace ...15
Figure 10: Creating a linked folder ...17
Figure 11: Preferences dialog for classes...18
Figure 12: Create OWL/RDF file dialog ...19
Figure 13: Initial screen after creating person ontology ...20
Figure 14: Classes view - menu options ...21
Figure 15: Creating the first class ...22
Figure 16: Initial class hierarchy for the Person Ontology ...23
Figure 17: Classes view buttons...24
Figure 18: Buttons and options available for TBC forms ...24
Figure 19: Properties view buttons ...25
Figure 20: Create new property...25
Figure 21: Create firstName property with an automatically generated rdfs:label...26
Figure 22: Defined firstName property...27
Figure 23: Domain view for the Person class ...28
Figure 24: Instances view...31
Figure 25: Resource form for William Shakespeare...31
Figure 26: SPARQL View ...32
Figure 27: SPARQL View ...34
Figure 28: Inferences for hasChild property ...35
Figure 29: SPARQL Query Library...36
Figure 30: Imports view buttons ...39
Figure 31: Import local OWL/RDF file dialog ...40
Figure 32: Travel ontology with import of the person ontology...41
Figure 33: Re-factoring name changes ...41
Figure 34: New shakespeare.rdf file ...43
Figure 35: Moving resources in to shakespeare.rdf file...44
Figure 36: Confirm move resources dialog...44
Figure 37: Edit Restriction dialog ...47
Figure 38: Defining someValuesFrom Restriction for the Adventurer class...47
Figure 39: Defining Adventurer Class as an intersection of a restriction and Person class.48
Figure 40: Inferred class hierarchy for the Adventurer class...49
Figure 41: Create enumerated class members...51
Figure 42: ActivityRating with the created enumerated class ...52
Figure 43: RDF Graph - example 1...53
Figure 44: RDF Graph - example 2...54
1 Introduction
This guide introduces TopBraid Composer™ for defining, testing and managing semantic models using the W3C standard languages RDFS, OWL, SWRL and SPARQL.
Throughout this document the terms TopBraid Composer™, TBC and Composer are used interchangeably.
Section 2 provides detailed installation and configuration instructions for TBC. It shows how to open existing ontologies, how to download ontologies from the web as well as how to set up virtual folders for working with ontologies outside of the workspace.
Section 3 focuses on building a simple ontology (limited to RDFS vocabulary) and running test queries. It contains an exercise involving RDFS inferencing.
Section 4 explains import features and approaches to working with multiple ontologies. Section 5 describes key OWL constructs including restrictions.
Appendix A provides additional information on the standards supported by TBC: RDF, RDFS, OWL, SPARQL and SWRL. Readers who are new to these technologies will benefit from starting with the Appendix prior to moving on to section 2.
Composer is shipped with a comprehensive Help system. Many features not covered by this guide are explained in the help files. To access them, select Help - > Help Contents menu and then click on TopBraidComposer.
1.1 Conventions
Class, property and individual names are written in a sans serif font like this.
Names for user interface widgets and menu options are presented in a style like this. Where exercises require information to be typed into TBC a verdana font is used like this. Exercises and required tutorial steps are presented like this:
Exercise N: Accomplish this
1. Do this. 2. Then do this. 3. Now do this.
Potential pitfalls and warnings are presented like this.
General notes are presented like this.
Advanced features are presented like this. We recommend that readers skip advanced features when they first follow this guide.
2 Installation and set up
2.1 Requirements
TopBraid Composer is implemented as an Eclipse plug-in. Eclipse is a powerful open-source platform for all kinds of modeling and programming languages. The integration of Composer into this platform means that you can exploit the benefits of an integrated development environment. Eclipse also provides an update mechanism that allows users to conveniently update plug-ins such as TopBraid Composer when a new version becomes available.
System requirements are the same as for the Eclipse 3.2 platform. Eclipse 3.1 will work as well, but we would strongly recommend using Eclipse 3.2.
2.2 Installation
2.2.1 Windows Platform Installation
You can get a TopBraid Composer installer available on: http://www.topbraidcomposer.com/download.html.
This installer includes a suitable Java Virtual Machine. You can just run the installer to install TopBraid Composer on your computer.
2.2.2 Mac OS X Platform Installation
For Mac OS X, you can get a preconfigured Eclipse 3.2 installation with TopBraid Composer from the zip file available on:
http://www.topbraidcomposer.com/download.html.
Unzip the file, for example to /Applications/TopBraidComposer directory and execute eclipse.exe. By default your workspace directory is located at [TopBraid Composer directory]/workspace. You can change this at File - > Switch Workspace…
2.2.3 Non Windows Platforms Installation
If you want to install TopBraid Composer on any non-Windows platform, or you want to add the Composer plugin to an existing Eclipse installation, please follow the steps described on the download web page: http://www.topbraidcomposer.com/download.html
2.3 Workspace Configuration
(For Windows installer and Mac OS X zip file, the workspace is initially configured in lines of the following two sections, so if you want, you can skip to the section Becoming familiar with TBC Views)
2.3.1 Create an Eclipse Project
Project is Eclipse’s notion; it is not something TopBraid Composer generally uses. TBC stores all ontologies in either .rdf or .owl files. In addition to the file mode, TBC offers database backends. Using a database backend, ontologies can be stored in a number of supported DBMS systems. Project is used by TopBraid Composer only to store customizable information.
Even though Composer does not use .project files, you will need to create at least one project for the Workspace to be operational.
When you first start Eclipse, you may see the Welcome screen. Close it.
Select Window - > Open Perspective - > Other; then select TopBraid from the dialog.
Figure 1: Selecting TopBraid Perspective Select File - > New - > Project... from the menu.
On the next screen select General / Project (or Simple / Project in Eclipse 3.1) and enter a suitable name.
Figure 2: Creating Eclipse Project - step 1
Figure 3: Creating Eclipse Project - step 2 You now can:
download example ontologies from the web
copy your existing files into the workspace
2.3.2 Download Example Ontologies
Right-click on the project you have just created and select Import... Alternatively, select File - > Import… menu.
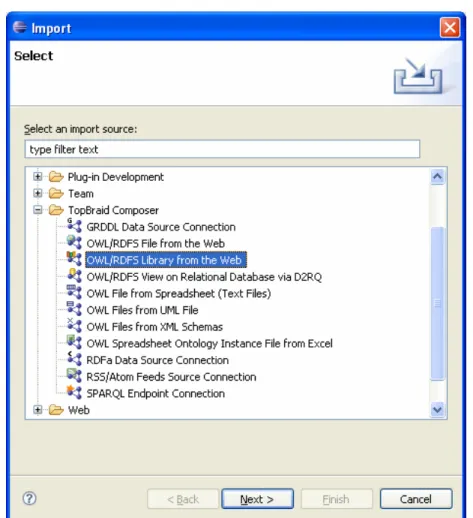
Expand Other to see the select options.
Figure 4: Import dialog
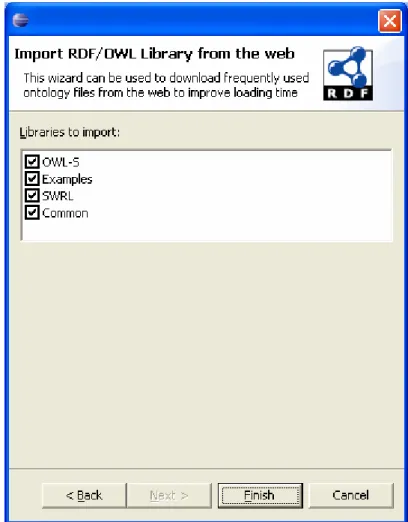
If you select OWL/RDFS File from the Web, you will need to enter the URL of the file. You can also select OWL/RDFS Library from the Web. TopQuadrant maintains a set of example ontologies on its site. Picking the ‘library’ option will download these files.
As you can see, TBC can import not just web ontologies, but it can also import (convert) information from other sources like UML and XML Schema files. Consult the help files for details on specific import options.
Figure 5: Downloading example OWL/RDFS libraries
After the library of files have been downloaded, go to the Navigator view, open the Examples folder and double-click on any example file to open it, for example geotravel.owl (called travel.owl in older versions).
Figure 6: geotravel.owl in TopBraid Composer
2.3.3 Becoming familiar with TBC Views
TBC consists of the following main views:
The Navigator shows the files in the Eclipse workspace
Classes, Properties and Associations views display the hierarchies of the current model
Instances shows the instances of the class selected in the Classes View
Domain shows those properties that have the selected class in their domain
Inheritance shows the superclasses and inherited restrictions of the current class
Imports shows the imports of the ontology (hierarchically)
Change History shows the recent edit steps
Resource Editoris the main work area, it shows the currently selected resource:
o It includes tabs for a Form, Graph and Source Code
o When selected resource is a class, there is also a Diagram tab
o When selected resource is an ontology, there are tabs for Statistics and
Overview
SPARQL provides an interface to run SPARQL queries
Rules shows all rules in the model (either in SWRL or Jena format)
File Registry shows a list of all files together with their namespaces
In the default configuration not all the views are shown. To display a hidden view, select Window -
> Show view. All Composer views can be dragged and rearranged as necessary. They can also be resized, collapsed and expanded.
To move a view, click on the tab with the view’s name (the tab color will become blue) and move it to the desired location.
There is always one ‘selected’ ontology model, and one ‘selected’ ontology resource (class, property, individual, etc). The selected resource must always be from the selected model. The Resource Editor displays the currently selected resource, which is also shown in the toolbar.
Exercise 1: Navigating in TBC
1. Select Accommodation class. This can be done in a number of ways: a. Double-click on Accommodation in the Classes view. b. Single click on a gold circle icon in front of Accommodation.
c. Alternatively, if a tree or list of resources has the keyboard focus, you can press Alt+UP/DOWN to change the global selection.
d. Finally, you can enter Accommodation in the toolbar field right above the classes view. Here, CTRL+Space will help you enter a full name if you only enter the first few characters.
2. Now select BackpackersDestination class.
3. Note the expression in the owl:equivalentClass widget in the Class Form. Hover over
hasAccommodation property in the expression and press CTRL. As shown in the next figure, hasAccommodation will become hyperlinked. Click on it. You should now have
hasAccommodation displayed in the form.
4. Notice backward and forward arrows on Composer's tool bar. They enable quick navigation between current and previously selected resources. Click on the backward arrow. Now click on the forward arrow.
Exercise 2: Switching between ontologies
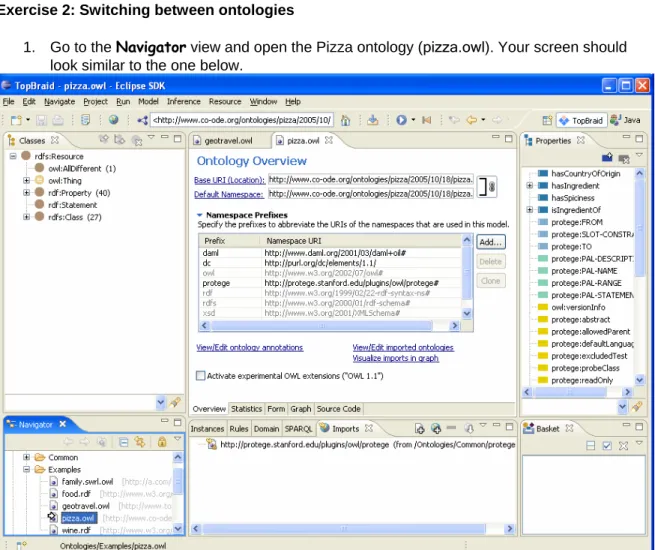
1. Go to the Navigator view and open the Pizza ontology (pizza.owl). Your screen should look similar to the one below.
Figure 8: Opening multiple ontologies
2. Note that pizza.owl is your currently selected ontology, but geotravel.owl is still open. Switch back to the travel ontology by clicking on the tab with its name.
3.
Close the travel ontology. This can be done by either clicking on a cross next to its name or by using File - > Close menu.2.3.4 Organize the workspace
Exercise 3: Create folders in the workspace
1. Select Navigator view, right-click on the project you have just created and select New ->
Folder
2. Alternatively, select File - > New -> Folder menu
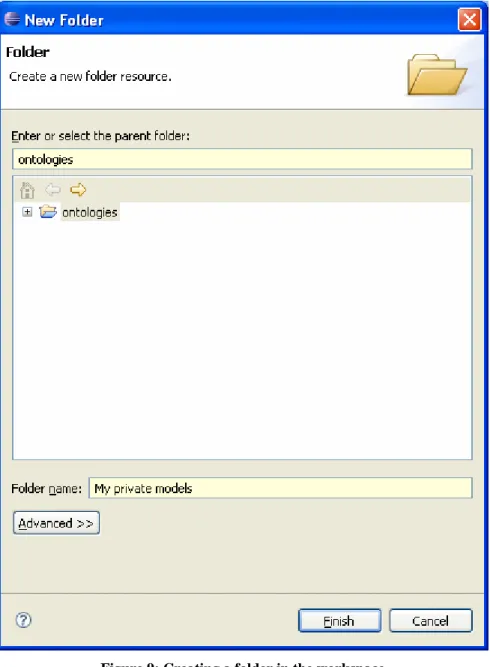
3. Give your new folder a name of your choosing and click Finish 4. You will see a new folder appear in the Navigator view.
5. Open your operating system’s file management system (such as Windows Explorer) and navigate to your workspace directory, observe that a new folder has been created
Figure 9: Creating a folder in the workspace
2.3.5 Open existing local ontologies
2.3.5.1
Copy ontologies in to the workspace
Exercise 4: Copy file to the workspace and open it
1. Place a file you want to add to the workspace in to a copy buffer (by selecting any of the copy commands supported by your operating system)
2. Select Navigator view, right-click on the folder you have just created and select Paste 3. You can now double click on the file to open it
You can also copy the file to any of the workspace folders using your computer’s file management system such as Windows Explorer. However, you will not see the file in the Navigator view until you refresh the appropriate folder.
Right click on a folder and select Refresh
If you update a file using a different program, TBC will not know that the file version has changed unless you do a refresh.
2.3.5.2
Create linked folders
Sometimes, you may want to work with files that are stored outside of the workspace. For example, you may be sharing CVS or another version control system with the other team members. Instead of duplicating these files in the workplace, you can access them in place by using ‘linked’ folders.
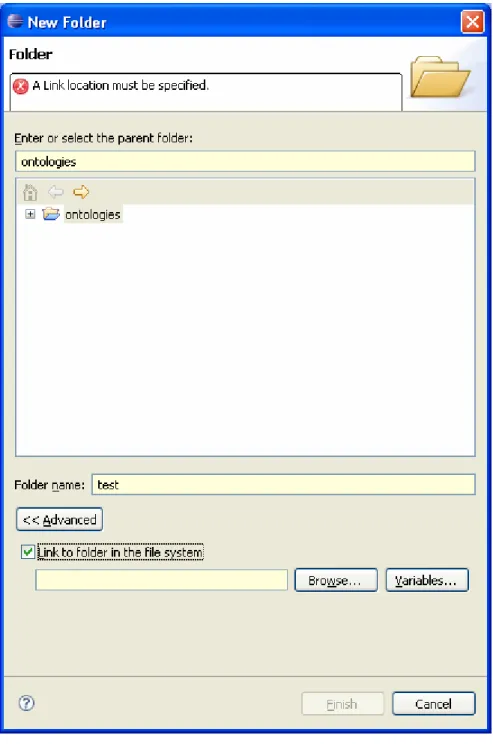
Exercise 5: Create a linked folder
1. Select Navigator view, right-click on the project you have just created and select New ->
Folder
2. Alternatively, select File - > New -> Folder menu
3. Give your new folder a name of your choosing and click Advanced 4. Check Link to folder in the file system
5. Click Browse 6. Select any folder 7. Click Finish
Figure 10: Creating a linked folder
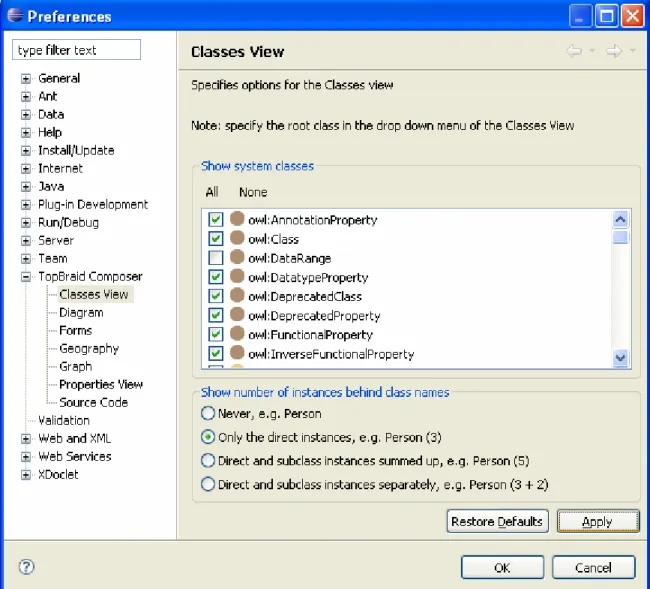
2.3.6 Set up preferences
TBC is highly configurable. What is shown in many of the views is governed by the user preferences. Preferences are accessible from Window - > Preferences… menu. Expand the tree under TopBraid Composer to see available preferences dialogs. Preference dialog for Classes view is shown in the next diagram.
3 Building Your First Ontology with TopBraid Composer
This chapter describes how to create a very simple ontology about people and their children.
Exercise 6: Create a new file
1. Select Navigator view, right-click on any of the folders you have created and select New
-> OWL/RDFS File
2. Type in the Base URI and the file name in the Create dialog 3. Click Finish
Figure 12: Create OWL/RDF file dialog After a short amount of time, a new file will be created.
3.1 Create classes
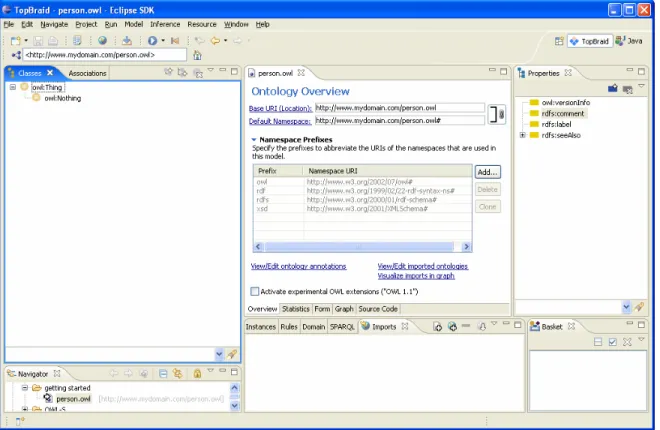
When a new file is created, the screen should resemble the screen in the next figure. The initial Classes view should contain two classes - owl:Thing and owl:Nothing. Depending on your setup, rdfs:Resource is maybe its root class, but you can change this in the drop down menu of the Classes view.
Figure 13: Initial screen after creating person ontology
OWL classes are interpreted as sets of individuals (or sets of objects). The class owl:Thing represents the set containing all individuals. Because of this all classes are subclasses of owl:Thing.
Let’s add some classes to the ontology.
Exercise 7: Create classes Person, FemalePerson and MalePerson
1. Right click on owl:Thing
2. Press the Create subclass button shown in the next figure. This button is used to create a new class as a subclass of the selected class (in this case we want to create a subclass of owl:Thing).
Figure 14: Classes view - menu options
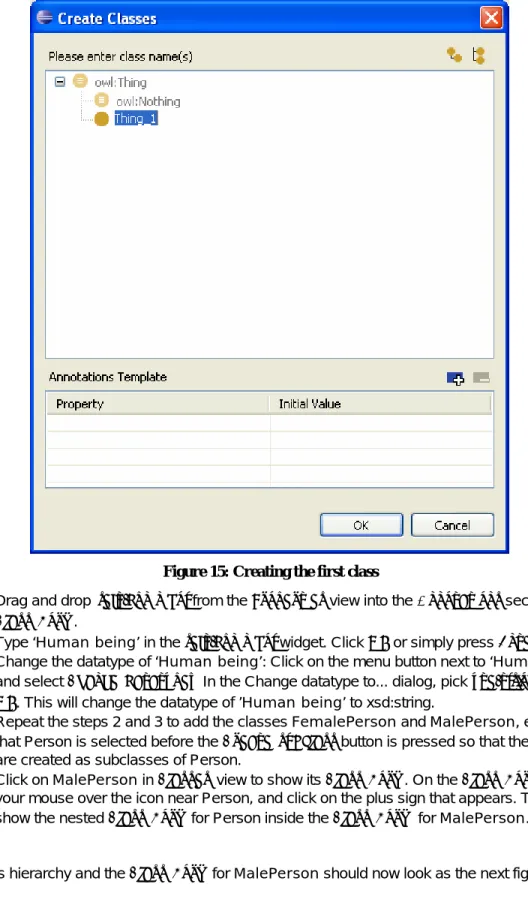
3. The default name shown in Create classes dialog will be Thing_1. Rename it to Person and click OK.
Figure 15: Creating the first class
4. Drag and drop rdfs:comment from the Properties view into the Annotations section of the
Class Form.
5. Type ‘Human being’ in the rdfs:comment widget. Click OK or simply press Enter.
6. Change the datatype of ‘Human being’: Click on the menu button next to ‘Human being’ and select Change datatype… In the Change datatype to... dialog, pick xsd:string and click
OK. This will change the datatype of ’Human being’ to xsd:string.
7. Repeat the steps 2 and 3 to add the classes FemalePerson and MalePerson, ensuring that Person is selected before the Create subclass button is pressed so that the classes are created as subclasses of Person.
8. Click on MalePerson in Classes view to show its Class Form. On the Class Form, hover your mouse over the icon near Person, and click on the plus sign that appears. This will show the nested Class Form for Person inside the Class Form for MalePerson. The class hierarchy and the Class Form for MalePerson should now look as the next figure.
Figure 16: Initial class hierarchy for the Person Ontology
9. Notice a star in front of ontology name above the Class Form - *person.owl. This means that ontology has been modified, but not saved. Select File - > Save.
In Composer classes have a gold circle icon displayed in front of the class name. Selected class (the one currently shown in the form) has an arrow overlaying the gold circle icon. Observe that
MalePerson in Figure 16 has an arrow in the icon.
Classes view has a number of buttons as explained in the next figure. Add new class as a subclass
of selected class
Add new class as a sibling of selected class
Delete selected property Show Classes view menu
Figure 17: Classes view buttons
Form has a number of buttons and options; these are explained in the next figure.
Figure 18: Buttons and options available for TBC forms
3.2 Create Properties
OWL Properties represent relationships between two individuals. There are two main types of properties, Object properties and Datatype properties. Object properties link an individual to an individual. Datatype properties link an individual to an XML Schema Datatype value.
OWL also has a third type of property – Annotation properties. Annotation properties are typically used to store information that is irrelevant for reasoning tools, for example to add information (metadata— data about data) to classes, individuals and object/datatype properties. In exercise 5 we have used an annotation property rdfs:comment to add a comment to the Person class.
In Composer, properties have rectangular icons displayed in front of their names. Object properties are indicated using blue icons, datatype properties have green icons and annotation properties have yellow icons. The property currently shown in the form has an arrow overlaying the rectangular icon.
Add new property Delete selected property
Show Properties view menu
Figure 19: Properties view buttons
Properties may be created using the Create property button in the Properties view shown in the next figure. Irrespective of what kind of property is being created, the same button is used. The property type is selected in the Create property dialog.
Exercise 8: Create datatype properties called firstName and lastName
1. Press Add new property button. Create property dialog will appear as shown in the next figure.
2. Select owl:DatatypeProperty. Rename the new property to firstName.
Add row button
Figure 20: Create new property 3. Click the add row button in the Annotations Template section
4. A Select annotation screen will pop up. Select rdfs:label and click OK.
Figure 21: Create firstName property with an automatically generated rdfs:label 6. Click OK.
7. Observe that the new property now has an automatically generated ‘first name’ label 8. Add Person class to the domain of the newly created property. This can be done in one of
the following ways:
a. Drag Person class and drop it over rdfs:domain in the form
b. Click on a Show widget menu button next to rdfs:domain and select Add empty
row. (Show widget menu button is located next to each widget on the form as shown in Figure 18.) Type Person and click OK.
c. Click on a Show widget menu button next to rdfs:domain and select Add
existing... Select Person from the tree in the dialog and click OK.
9. Add xsd:string to the range of the newly created property. Click on a Show widget menu button next to rdfs:range and select Set to xsd:string.
Figure 22: Defined firstName property 11. Repeat the steps above to create lastName property. 12. Select Person class.
13. Click on the Domain view. Observe (as shown in the next figure) that the newly created properties appear in the view.
Figure 23: Domain view for the Person class Properties can be organized as hierarchies.
Exercise 9: Create object properties called hasDaughter, hasSon and hasChild
1. Press the Add new property button. Create property dialog will appear.
2. Select owl:ObjectProperty. Rename the new property to hasDaughter and click OK. 3. Set the domain of the newly created property to be Person and range to be FemalePerson. 4. Add another object property called hasSon.
5. Set domain of the newly created property to be Person and range to be MalePerson. 6. Add a third object property called hasChild.
7. Make hasChild a parent of hasDaughter and hasSon. It can be done in either of the following ways:
a. Select hasDaughter. Drag and drop hasChild over rdfs:subPropertyOf widget. b. In the Properties view select hasSon, drag and drop it under hasChild.
Declaring domain and ranges has certain meaning in RDFS. For example, the definitions we have just made mean that individuals that are subjects of an RDF triple that has predicate
hasDaughter (or are used ‘on the left hand side’ of the hasDaughter property) will be inferred to be members of the class Person. Any individuals that are objects of such triple (or are used ‘on the right hand side’ of the hasDaughter property) will be inferred to be members of the class
FemalePerson.
Consult RDFS section of Appendix A for additional information.
It is possible to specify multiple classes as the domain or range for a property. One can, for example, drag and drop multiple classes over rdfs:domain widget. Multiple properties are interpreted as intersection. For example, if the domain of a property has two classes MalePerson and FemalePerson, any instance that is in the domain of the property will be inferred as being of both types. See example in the figure below.
If you want to say that domain is a union of both sets where an instance can be either a
MalePerson or a FemalePerson, you should put MalePerson and FemalePerson on the same line and type ‘or’ between them as shown in the figure below.
Try both definitions and click on the Source Code tab to see the difference between the two versions. To delete the extra domain click Show widget menu button at the end of the line you want to delete and select Delete value. Alternatively you can just delete the text from the line and click OK.
Keep in mind that while you have full control over your own ontology and can ensure unions for multiple domains and ranges, merging ontologies that use the same properties and specify
domains or ranges for them, will result in the intersections of domains and ranges. This is often not the desired or expected behavior. For this and other reasons we recommend that domains and ranges be used judiciously.
3.3 Create instances
We are now ready to add a few instances to the ontology.
Exercise 10: Create instances of the Person class: SusannaShakespeare, JudithShakespeare, HamnetShakespeare and WilliamShakespeare.
1. Select FemalePerson class
2. Click on the Instances view. Press the Add new instance button shown in the next figure. When the Create FemalePerson dialog pops up, replace the default name of new instance with SusannaShakespeare.
Show Instances view menu
Add new instance Delete instance
Figure 24: Instances view 3. Repeat for JudithShakespeare
4. Select the MalePerson class and add instances HamnetShakespeare and
WilliamShakespeare. At this point your screen should look similar to the one shown in the next figure.
Figure 25: Resource form for William Shakespeare
5. Drag HamnetShakespeare over hasSon widget in the William Shakespeare form. 6. State that Judith and Susanna are William’s daughters. This can be done in a number of
ways. Try each to experience different ways of working with TBC: a. Use a basket:
Select FemalePerson class
Click on the Instances view
Drag JudithShakespeare and SusannaShakespeareinto the Basket view
If you do not see the Basket view, go to Window - > Show view and select
Select the MalePerson class. Click on the Instances viewand select
WilliamShakespeare
Drag JudithShakespeare and SusannaShakespearefrom the Basket view over hasDaughter widget in the William Shakespeare form.
b. Use ‘add existing’ menu option:
Click on a Show widget menu button next to hasDaughter and select Add
existing…
Select JudithShakespeare and SusannaShakespeare from the Add existing screen and click OK
c. Type in the required information:
Click on a Show widget menu button next to hasDaughter and select Add
empty row.
Type in JudithShakespeare
Repeat for Susanna trying an auto-complete feature. Type in Sus and hold the CTRL key while pressing SPACE.
You can easily change the type of any resource after it has been created. Let’s say, for example, that you have created SusannaShakespeare as an instance of a Person. You want to say she is a FemalePerson. Simply select SusannaShakespeare and drag FemalePerson over the
rdf:type widget.
3.4 Execute SPARQL Queries
SPARQL is a proposed standard for querying RDFS/OWL data. TBC comes with a built-in query engine. Let’s try some queries now.
Exercise 11: Run a default query.
1. Click on the SPARQL view. Its options and layout are explained in the next figure
2. A sample query is already in the query panel. It will retrieve all triples of the following pattern ‘x rdfs:subClassOf y’ and will display x and y. In other words, it will get all resources that are subclasses of another class. The result will include resources (subjects) as well as the classes they are subclasses of (object).
3. Run the query. Observe that results include classes we have just created as well as built-in OWL and RDFS classes.
Let’s write are query to retrieve all people who have daughters. Following example above a query to return all parents with their daughters should look like:
SELECT ?subject ?object
WHERE { ?subject hasDaughter ?object }
There is one issue with this query. The SPARQL syntax requires all names to be explicitly qualified with a namespace. Even if we talk about resource names from the default namespace like
hasDaughter, we need to use a prefix. In the simplest case we need to enter :hasDaughter with a leading ‘:’ character. Alternatively we could either use a fully qualified URI
‘http://www.mydomain.com/person.owl#hasDaughter’ or create a prefix for the namespace we are using and append it to the property name, for example, person:hasDaughter.
Introducing a new prefix is particularly useful if you are working on a project that consists of multiple namespaces and modules.
To see how this works in Composer, let’s create a prefix for the namespace http://www.mydomain.com/person.owl#.
Exercise 12: Create a namespace prefix.
1. In the form click on the Show form menu button (shown on Figure 18). Select Navigate
to ontology.
2. You will see an Ontology Overview form. Press Add button.
3. Type person in the Prefix column. Type http://www.mydomain.com/person.owl# in the Namespace URI column.
4. Press Enter.
Exercise 13: Query for all parents of females.
1. Click on the SPARQL view and type the query.
2. Press Run query button. Your screen should look similar to the one shown in the next figure.
Figure 27: SPARQL View 3. Change person:hasDaughter to person:hasChild. 4. Run the query. You should receive no results
Why have we received no results? hasDaughter and hasSon are sub properties of hasChild, therefore according to RDFS inference rules (explained in Appendix A), the query should have returned William Shakespeare with all his children.
There is a simple explanation. We have been making queries over the asserted (or stated) triples only, but not on the inferred triples. Let’s now run the inferencing and see how it changes query results.
Exercise 14: Run inferences and query for all parents.
1. Select Inference - > Run Inferences… menu option
2. Inferred triples will appear in the Inferences view. Your screen should look similar to the one shown in the next figure.
Figure 28: Inferences for hasChild property
3. In SPARQL view, click on the Toggle between using currently configured inferences
or not using them button (shown on Figure 26). This will enable the inferences to be used in the next query. Then run the query from the previous exercise again. You should see William Shakespeare with all three of his children.
4. Click on WilliamShakespeare, observe that his form now has inferred properties. These are shown in the light blue-gray background.
TBC maintains asserted and inferred graphs. If you were to close the ontology now and re-open it again, you will see that all inferred statements disappear.
It is possible, however, to make the individual inferred statements persistent by turning them in to assertions. An entire inferred graph can also be saved:
By clicking on a Show widget menu button next to an inferred statement, you can select
Assert inferred statement option.
Alternatively, menu option Inference - > Save inference graph… will save the entire graph. 5. Save the query for future use:
Open Imports view and at the view, click on the world button with the plus sign, which is the Import from URL… button. (Imports view will be explained later in detail) At the dialog, Import from URL… , enter the following URL and click on OK :
After you add the import, you will see sparql:query property at the Properties view.
Select person:hasChild property.
Add sparql:query to the form by dragging and dropping it or by right clicking in the body of the Annotations section of the form and selecting sparql:query.
Enter the query in the comment field. Press OK or ENTER.
There are two ways to run this query:
a. Click on the Show widget menu button next to the text you have just entered. Select Execute as SPARQL query.
b. Select the Query Library tab at the SPARQL view, where you will see this and other saved queries in the ontology. Make sure that the checkbox near this query is checked and the Toggle between using currently configured
inferences or not using them button is selected. Run the query using Run
query button. The Query Library tab will appear with the result as in the following figure:
Figure 29: SPARQL Query Library
TBC will recognize SPARQL syntax in the sparql:query fields and provide menu options to execute them.
3.5 Extend the ontology
In this section we will add two more object properties and observe the inferences they entail.
Exercise 15: Create an object property called hasSpouse
1. Press the Add new property button. The Create property dialog will appear. 2. Expand the tree under owl:ObjectProperty. Select owl:SymmetricProperty. 3. Rename the new property to person:hasSpouse.
4. Set the rdfs:domain field of the newly created property to be Person
5. Observe that the owl:inverseOf property and rdfs:range of hasSpouse are automatically inferred
Prior to this exercise only RDFS vocabulary has been used in the person ontology (see Appendix A for more information on RDFS and OWL). This is the first time an OWL construct is being used.
Even though we have defined classes as OWL classes and properties as OWL
properties, we have not done any modeling that required OWL expressivity. All the exercises thus far could have been accomplished without using any of the OWL statements. For example, instead of creating subclasses of owl:Thing, we could have created subclasses of rdfs:Resource which are declared as RDFS classes.
Composer can be configured as RDFS-only editor by ‘hiding’ all of OWL constructs. This can be done by selecting Window -> Preferences… then making appropriate selections under
TopBraid Composer -> Classes View and Properties View.
Symmetric property entails the following inferences:
1. If property p is symmetric and there is triple a p b, it will be inferred that b p a. In our example, if a hasSpouse b then b hasSpouse a.
2. From this rule it can be concluded that if p rdfs:domain a then p rdfs:domain b. Similarly, if
p rdfs:range a then p rdfs:range b.
Most inferences will only appear in Composer, if you explicitly run the inferencing. However, there are a limited number of trivial inferences that Composer performs interactively or ‘just in time’. These are:
Coordination of inverses. If it is stated that property p owl:inverseOf q, TBC will infer that property qowl:inverseOf property p
Coordination of domains and ranges of inverse properties. If it is stated that p rdfs:domain a and p owl:inverseOf q, TBC will infer that q rdfs:range a
Since saying that p rdf:type owl:SymmetricProperty is the same as saying p owl:inverseOf p, TBC will (as demonstrated by the previous exercise) infer that p owl:inverseOf p and if p
rdfs:domain a then p rdfs:range a
Because TBC maintains these automatic inferences we recommend that if you use inverse properties, you should specify domains and ranges only for the properties ‘going in one direction’
Exercise 16: Prove that the second inference is true
1. Prove the second inference rule for symmetric properties as described in the General Note. Use information in the Appendix A and/or any other sources on RDFS and OWL.
Exercise 17: Create object property called hasFamilyMember
1. Press Add new property button. Create property dialog will appear.
2. Select owl:ObjectProperty. Rename the new property person:hasFamilyMember. 3. Make hasChild and hasSpouse subproperties of hasFamilyMember
When subproperties have their domains and ranges defined, it is usually unnecessary and even not advisable to define domain and ranges for the parent property. Another ontology design pattern (less commonly used, but applicable in some cases) is to define domain and range for a parent property and leave out domain and range definitions for subproperties.
4 Working with Imports and multiple ontologies
In this chapter, we will connect geotravel.owl and person.owl models connecting them to describe the fact that people may be interested in different leisure activities.
The geotravel.owl ontology in the Examples folder of the downloaded library already describes different activities. Rather than replicate this information in the person.owl, we will show how to import and re-use it. The end goal may be to create an application that will recommend vacation destinations to people based on their preferences and the preferences of their family members. OWL ontologies may import one or more other OWL ontologies. When an ontology imports another ontology, not only can classes, properties and individuals be referenced by the importing ontology, the axioms and facts that are contained in the ontology being imported are actually included in the importing ontology. OWL allows ontology imports to be cyclic so for example travel ontology may import person ontology and person ontology may import travel ontology. For our exercise we have decided to import the person ontology.
Notice the distinction between referring to classes, properties and individuals in another ontology using namespaces, and completely importing an ontology.
Exercise 18: Import person ontology and make changes
1. In the Navigator view, open geotravel.owl file
2. Click on the Imports view and press Import local file… button shown in the next figure Import from URL
Import local file
Remove selected import
Download model to local file
Show import view menu
Figure 30: Imports view buttons
3. When the Import local file dialog pops up, expand the workspace folders until you’ve located person ontology, select it and click OK. The dialog should look similar to the following figure. Alternatively you can drag and drop the person.owl file from the Navigator into the Imports view.
Figure 31: Import local OWL/RDF file dialog
4. Your screen should now look similar to the one shown in the next figure. Note that some classes and properties (such, for example, Person) are displayed using ‘washed out’ icons and fonts. These are the resources that come from imported model.
5. Create an object property called hasFavoriteActivity. Set its domain to Person and its range to Activity. You have just created a bridge between two models!
Figure 32: Travel ontology with import of the person ontology
7. Select the Person class and modify its name to be person:HumanBeing. Press ENTER. 8. The dialog shown in the next figure will pop up. Press OK.
Figure 33: Re-factoring name changes
9. Close all ontologies you have open by using File -> Close All.
10. A dialog will pop-up offering to save the changes. Since we do not want to save the most recent change, click on Deselect All then press OK.
When working with multiple ontologies, it is important to know where the new statements and/or changes to the old statements are saved. Composer follows these rules:
New statements are added into the currently selected ontology. The property
hasFavoriteActivity was added to geotravel.owl.
Forms for imported resources can be edited. Any changes to the existing statements are written into the ontology they come from. For example, if we were to modify the fact that
FemalePerson is a subclass of Person (essentially remove the triple that says person:Person
rdfs:subClassOfperson:FemalePerson) the change would go into the person.owl file.
If we were to say that domain of hasSon is no longer a Person, but Parent (a new class we can define for this purpose), the location where the new triple will go depends on how the change is made:
o If we were to overtype Person with Parent, the change would be saved in the person.owl as an update to the previously existing triple in that file
o If we were to delete the entry about the domain and then add a new one, the deletion would be done in the person.owl and the new triple would be saved in the geotravel.owl
When we changed the URI of the person:HumanBeing class to person:HumanBeing, the change was made to the Person class definition in the person.owl. TBC resolved and updated all the references to this class in the person.owl. It also scanned to see if there are any other ontologies that import it.
When working with modular imported ontologies, it is, therefore, possible to intentionally or
accidentally make changes to imported files. If imported files come from the web, such changes will be lost when you close the model. With local files they can be saved.
Composer keeps a log of all changes – accessible from the Change History view. Unsaved changes can be rolled back using Edit - > Undo.
When working with the local models that belong to other parties, a good practice is to lock them (make them read only) to prevent accidental updates. This can be done by clicking on the file in the
Navigator view and pressing the lock button.
The person ontology has some general (schema level) information about people. It also has some very specific information about the Shakespeare family. Since we are interested in the general cases of relationships between people and their travel interests, it makes sense to separate information about the Shakespeare family into a file of its own.
Exercise 19: Move resources between ontologies
1. In the Navigator view, create a new RDF file, call it shakespeare.rdf. Invent a base URI of your choice.
2. Import person.owl. Your screen should now look similar to the one shown in the next figure.
Figure 34: New shakespeare.rdf file
3. Select File - > Save All menu option. Notice that stars in front of the file names disappear.
4. Open person.owl
5. Select MalePerson class and click on the Instances view.
6. Drag WilliamShakespeare and HamnetShakespeare into the Basket. 7. Select FemalePerson class.
8. Drag JudithShakespeare and SusannaShakespeare into the Basket.
9. Select all 4 resources in the Basket and drag and drop them over the Shakespeare.rdf file in the Navigator as shown in the next figure
Figure 35: Moving resources in to shakespeare.rdf file 10. Confirm move resources dialog will pop up. Press Yes.
Figure 36: Confirm move resources dialog
11. Observe that classes in the person.owl no longer have instances associated with them. 12. Switch to shakespeare.rdf file and locate William Shakespeare resource. Observe that
Notice that in the previous exercise all 4 individuals were moved at once. Let’s examine what would happen if we were to move person:WilliamShakespeare first and then move
person:SusannaShakespeare:
Saying ‘yes’ to the ‘should the namespace be adjusted’ question would change the record id of
person:WilliamShakespeare to shakespeare:WilliamShakespeare
Record id for person:SusannaShakespeare would stay the same. Therefore, the
Shakespeare.rdf file would now have the following triple: shakespeare:WilliamShakespeare
person:hasDaughter person:SusannaShakespeare
If we were now to move Susanna and say ‘yes’ to the namespace adjustment, her record id would change to shakespeare:SusannaShakespeare and connection between her and William would be lost.
If you are able to move all resources at once, Composer will maintain relationships between connected resources as their URIs are modified. Say ‘yes’ to the adjusting the namespace question.
If you are not able to move all the connected resources at once, for all the moves except for the very first one, say ‘no’ to the adjusting the namespace question and modify the resource ids so that they include correct namespaces manually after the move.
As demonstrated in the exercise 18, if you change the URI of a resource, TBC will check to see if there are any files that import this model and may therefore be impacted by renaming. The dialog with (potentially) impacted models will be shown. Under your direction, TBC will propagate the change to all affected files.
For a more granular control over moving operation use the Triples view access by selecting
5 Defining Classes with OWL DL
As noted before, all RDFS declarations about properties are global. If it is stated that Person is in the domain of hasChild property, this declaration remains true everywhere hasChild property is used. In other words, it defines the property hasChild and not the class Person.
Let’s consider the following example:
We have already said that Person hasFavoriteActivity Activity
We now want to define a special class of people – adventurers and say that at least some of their favorite activities are adventure activities
If we re-use the same property and say that Adventurer hasFavoriteActivity Adventure then any statement of the form x hasFavoriteActivity y, will result in the inferences: x rdfs:type
Adventurer and y rdfs:type Adventure. Everyone who has a favorite activity will become an adventurer and any activity liked by anyone will become an adventure
This is where OWL restrictions come in. Unlike domains and ranges, restrictions define classes. They are used to restrict the individuals that belong to a class. OWL supports the following restrictions:
Quantifier Restrictions – allValuesFrom1 and someValuesFrom2
Cardinality Restrictions – minCardinality, cardinality and maxCardinality
hasValue Restrictions
In addition to selecting a type of restriction, a decision will need to be made whether restriction is to be declared using rdfs:subClassOf or owl:equivalentClass statements. Consider the difference:
Saying that US Citizen is a subclass of all things for which the value of nationality property equals (hasValue) ‘USA’, means that:
o if it is known that an individual is US Citizen, it can be inferred that his nationality is ‘USA’
Saying that US Citizen is equivalent to all things for which the value of nationality property equals (hasValue) ‘USA’, means that:
o if it is known that an individual is US Citizen, it can be inferred that his nationality is ‘USA’ AND
o if it is known that an individual’s nationality is ‘USA’, it can be inferred that he is US Citizen.
Let’s use example introduced in the beginning of the section and create a restriction.
Exercise 20: Create someValuesFrom restriction using the Edit Restriction dialog
1. Create Adventurer class in the person ontology 2. Open the travel ontology and select Adventurer class
3. At the Class Form, near the owl:equivalentClass widget, click on the Show widget menu button (shown in Figure 18) and select Create Restriction… The Edit Restriction dialog will pop up.
4. At the dialog, select hasFavoriteActivity property from the On Property tree and
someValuesFrom (some) from the Restriction Type options. At the Filler, enter the value: Adventure. Click on OK. The dialog will look as in the following figure:
1
Figure 37: Edit Restriction dialog
5. Alternatively, you can enter the above restriction by adding an empty row in the
owl:equivalentClass widget and entering your value. Your screen should now look like the one shown in the next figure:
We want to further qualify a definition of Adventurer by saying that adventurers are people that like some adventure activities.
One option would be to make Adventurer a subclass of Person. This, however may result in unexpected inferences – any time it is asserted that x hasFavoriteActivity y and y rdf:type
Adventure, it would be inferred that x rdf:type Person, even if it is known that x is, for example, a dog.
Instead, let’s define Adventurer as an equivalent class to all people who like some adventures.
Exercise 21: Combine someValuesFrom restriction with a Boolean operator
1. Place your cursor right after the Adventure and type ‘and person:Person’
2. Press OK or ENTER. The Class Form should now look like the one shown in the next figure.
Figure 39: Defining Adventurer Class as an intersection of a restriction and Person class 3. Select Inference - > Run Superclass Inferences only and notice that, as shown, in the
next figure, it has been inferred that Adventurer is a subclass of Person. 4. Notice the list of inferred triples in the Inferences view.
Figure 40: Inferred class hierarchy for the Adventurer class
Restrictions and any expressions can also be dragged and dropped. Try the following: grab the icon and drag the expression over to rdfs:subClassOf.
The sections that follow explain keywords can be used in TBC to create restrictions and complex expressions.
5.1 Restriction KeyWords
OWL DL
Symbol
TBC Syntax
Keyword Example Usage
someValuesFrom some hasChild some Man
When used with owl:equivalent class, enables classification of a
subject of a triple
allValuesFrom all hasSibling allWoman
Enables classification of an object of a triple. Should
not be used with owl:equivalent class.
hasValue has hasCountryOfOrigin has England
When used with owl:equivalent class, enables classification of a
subject of a triple
minCardinality min hasChild min 3
When used with owl:equivalent class, enables classification of a
subject of a triple
cardinality exactly hasChild exactly 3
When used under the open world assumptions, does
not result in any classification inferences
maxCardinality max hasChild max 3
When used under the open world assumptions, does
not result in any classification inferences Note that OWL allows hasValue restrictions to have a datatype literal as filler. Examples for the syntax for these in TopBraid Composer are as follows:
"value" for xsd:string literals
42 for xsd:int literals
4.2 for xsd:float literals
true or false for xsd:boolean literals
5.2 Boolean Class Constructors
OWL DL
Symbol
TopBraid Composer
Syntax Keyword Example
intersectionOf and Doctorand Female
unionOf or Man or Woman
complementOf not not Child
5.3 Enumerated classes
Enumerated classes using the owl:oneOf operator can be entered through the Create
enumerated class members… dialog. The following exercise will show you how to create enumerated class members:
Exercise 22: Create enumerated class members
1. Open geotravel.owl.
2. Create a class named ActivityRating and open its Class Form.
3. Click on Show form menu button and select Create enumerated class members… You can also alternatively click on Resource -> Create enumerated class members… from the top menu.
4. At the dialog, enter the values Adventurous, Relaxing and Energetic as one value per line and click on OK. The dialog would look like the following figure:
Figure 41: Create enumerated class members
5. You will see that {Adventurous Relaxing Energetic} is created as a value of
owl:equivalentClass. This means, the value {Adventurous Relaxing Energetic} defines the class ActivityRating to consist of only these three ratings.
6. In the Class Form, hover over the newly created enumerated class icon, , and click on the plus sign that appears. You will see a nested Class Form for the newly created enumerated class. The following figure shows how it would look like:
Figure 42: ActivityRating with the created enumerated class
5.4 Complex Class Expressions
Complex class expressions can be constructed using the above boolean constructors and restrictions. For example,
Person and hasChild some (Person and (hasChild all Man) and (hasChild some Person)) describes the set of people who have at least one child that has some children that are only men (i.e., grandparents that only have grandsons). Note that brackets should be used to disambiguate the meaning of the expression.
Appendix A: Semantic Web Standards
A.1 RDF
The Resource Description Framework (RDF) is a language for representing information
about resources that reside in and can be accessed via the internet infrastructure. Each RDF
resource has a unique ID that is based on standard Web identifiers called Uniform
Resource Identifiers (URIs) (URIs are unique symbolic strings similar to URLs, but they
don't have to resolve to actual locations.)
RDF has an XML syntax and many who are familiar with XML will think of RDF in terms
of that syntax. This is not a correct understanding of RDF. RDF should be understood in
terms of its data model. RDF data can be represented in XML, but understanding the
syntax is secondary to understanding the data model. In fact, RDF can be represented in a
number of other serialization syntaxes, such as N3 and Turtle.
RDF statements are often called 'triples' because they consist of 3 entries: subject
(rdf:subject), predicate (rdf:predicate) and object (rdf:object). Each entry is an RDF
resource. Statements that contain resources with the same IDs are merged. For example,
the following three triples can be brought together:
• FlightDL210 hasDestination London
• London rdf:type City
• John livesIn London
The resulting in the graph shown below.
Figure 43: RDF Graph - example 1
RDF data should be thought of as a graph of nodes and arcs where nodes are subjects and
objects and arcs are predicates. A triple statement itself can be given a resource ID using
instances of the
rdf:Statement
class. This makes it possible in RDF to say things
about statements.
The predicate of one statement can be a subject or an object of another statement as shown
in the graph below where livesIn, a predicate in one of the statements of the first graph
(above), is a subject of the livesIn rdf:type
owl:ObjectProperty
statement in the
second graph (below).
Figure 44: RDF Graph - example 2
You can generate diagrams like these using the Graph Panel in the Composer's Resource
Editor View.
The prefixes in front of resource IDs (for example, rdf: or owl:) shown in the graph
represent namespaces. There exists a comprehensive (and somewhat arcane) set of syntax
rules for using XML namespaces in RDF. Composer implements these rules for you. The
only thing you need to do as a user is to provide a namespace for each ontology.
Additional information about naming conventions for Namespaces is available in the help
file on Naming_Conventions_and_Namespaces.
While RDF includes an
rdf:type
property, the RDF data model does not provide a way
to express custom schemas for RDF data - that is, there is no notion of classes or class
definitions in RDF. Schemas are provided by the languages that build on and are layered
on top of RDF - RDFS and OWL.
All built-in RDF language constructs are available for your use in Composer. These can be
seen in the Classes View and the Properties View. Use the Classes View Preferences and
the Properties View Preferences to configure which RDF elements should be visible.
A.2 RDFS
RDFS is a schema language for RDF. RDFS is a rather small vocabulary. Among others, it
defines the following resources that are commonly used in ontology development:
• rdfs:Class
• rdfs:subClassOf
• rdfs:subPropertyOf
• rdfs:Resource
RDFS also defines 4 annotation properties as well as a few other much less commonly
used statements such as
rdfs:Container
.
All statements in the RDFS vocabulary are available in TopBraid Composer. They are
shown in either Classes View or Properties View.
Unlike XML Schema, RDFS can not be used for validation. It is used to infer additional
information based on the ontology schema and given (asserted) statements. An RDFS
ontology can never be semantically invalid.
Syntactical errors are possible (and even likely) when creating RDF in a text editor. Using
ontology development tools such as TopBraid Composer ensures that there are no syntactic
errors.
RDFS and OWL have formally defined semantics. It is defined in terms of inferences
entailed by each RDFS or OWL statement. By entailed we mean inferences that result
from an asserted statement in RDF. RDFS definitions are as follows:
• rdfs:subClassOf
If
a rdf:type rdfs:Class1
and
rdfs:Class1 rdfs:subClassOf
rdfs:Class2
,
then
a rdf:type rdfs:Class2
• rdfs:subPropertyOf
If
a property1 b
and property1 rdfs:subpropertyOf property2
,
then
a property2 b
• rdfs:domain
If Class1 rdfs:domain property1
and
a property1 b
,
then
a rdf:type
Class1
• rdfs:range
If
Class2 rdfs:range property1
and
a property1 b
,
then
b rdf:type
Class2
A.3 OWL
The OWL Web Ontology Language is a W3C standard language for defining and
instantiating Web Ontologies. OWL vocabulary is defined on top of the RDFS vocabulary:
• While RDFS properties are instances rdf:Property, OWL introduces
owl:ObjectProperty and owl:DatatypeProperty which are both subclasses of
rdf:Property
• OWL Object properties link two resources within the ontology. For example, the property
livesIn might link John (an instance of the Person class) with London (an instance of the City class).
• OWL Datatype properties link a resource to an XML Schema Datatype value or an RDF literal. For example, the property hasTelephoneNumber might link John to the string literal 44-10-1233400.
Additionally, OWL offers a way to specify properties that are:
• Functional (any instance using this property can have only one distinct value for the property)
• Inverse Functional
• Transitive (if partOf is an owl:TransitiveProperty and a partOf b and b partOf c, then a partOf c)
• Symmetric (if siblingOf is an owl:SymmetricProperty and a siblingOf b, then b siblingOf a)
These are called global restrictions since they apply everywhere a property is used. All
classes you create in your OWL ontology are subclasses of the
owl:Thing
class which is
in turn a subclass of
rdfs:Resource
.
All OWL language constructs are available in TopBraid Composer. The screenshot below
shows built-in OWL classes described in this help topic.
Figure 45: OWL and RDFS classes
In addition to global restrictions, OWL provides a vocabulary for creating local restrictions
specific to a class.
OWL formal semantics specifies how to derive logical consequences (inferences) of the
statements made in the ontology, i.e. facts not literally present in the ontology, but
entailed
by the semantics. Composer provides support for generating OWL inferences. This is done
using either a built-in OWL DL inferencer, Pellet, or other inference engines that can be
configured for use with Composer.
The current OWL standard describes 3 species (subset languages) of OWL:
• OWL Lite - the smallest subset. It puts certain constraints on RDFS semantics, so that not every RDFS model is an OWL Lite model.
• OWL DL - a slightly bigger subset. It includes OWL Lite and places the same constraints on RDFS semantics as those of OWL Lite.
• OWL Full - this is a 'complete' OWL. It includes OWL DL and it embraces all of RDFS semantics.
Differences between OWL Lite and OWL DL are relatively insignificant. For example,
OWL Lite supports only cardinality restrictions equal to 0 or 1, while OWL DL allows any
integer value for the cardinality restriction.
Differences between OWL DL and OWL Full are more substantial. The main difference
between OWL DL and OWL Full is that in OWL Full a given resource can be at the same
time a class, an instance and a property. For example:
• Boeing747 can be a class (a set) of all individual planes that are Boeings 747.
• At the same time, it can be an instance of a class of airplane models - Boeing 747. In talking about the instance we can capture information about how long it took to design Boeing 747, the year it was first introduced, etc.
In its ability to have a resource be of different built-in types, OWL Full is in complete
alignment with RDF and RDFS where, for example, a subject of one statement can be a
predicate in another. In OWL DL, on the other hand, there is a strict separation between
classes, properties and instances.
Use the
Inference -> Validate OWL speciesmenu option to determine which subset of
OWL your model falls within.
A.4 SPARQL
SPARQL is a W3C standard recommendation to query RDF graphs. It comes with a
notation similar to the relational database query language SQL, but focuses on triple
matching. Please check the SPARQL specification online for a precise language
description:
http://www.w3.org/TR/rdf-sparql-query/
A.5 SWRL
The name OWL-Full is potentially misleading in that it, too, has its expressive limitations.
For example, there is no explicit operator for composing relations. This implies that there
is no way of making statements about relationships between one composite relation and
another (e.g., stating that
uncle
is the composition of
brother
and
parent
.) There is also no
way to use computed values or arithmetic comparisons (e.g., stating that
teenager
is a
person
with age
between 13 and 19)
.
For this reason, there is ongoing work on extending OWL with a rule language that would
have far greater expressiveness. A rule language is a format for stating rules of the form
if
A then B
. The way in which the rule is interpreted in an application can vary. For example,
it could mean that in order to establish B as a true fact, it suffices to establish A.
Alternatively, it could mean that the system is obligated to
make
B true if it discovers that
A is true.
The Semantic Web Rule Language (SWRL) is a proposed standard for standardizing the
expression of such rules in the context of OWL, meaning that the A and B of the rule
consist of statements in OWL. For more information, visit
http://www.w3.org/Submission/2004/SUBM-SWRL-20040521/
SWRL is based on a combination of the OWL DL and OWL Lite sublanguages of the
OWL Web Ontology Language with the Unary/Binary Datalog RuleML sublanguages of
the Rule Markup Language. SWRL includes a high-level abstract syntax for Horn-like
rules in both the OWL DL and OWL Lite sublanguages of OWL.
To create and execute SWRL rules In TopBraid Composer, make sure that your ontology
imports SWRL namespaces:
http://www.daml.org/rules/proposal/swrlb.owl
http://www.daml.org/rules/proposal/swrl.owl
SWRL rules are instances of swrl:Imp and can be created in Composer in two ways:
1. Select swrl:Imp, edit body and head. For example, enter:
o (?a hasChild ?c) for swrl:body
o Parent(?a) for swrl:head
2. Define a property with swrl:Imp as its range. Call it, for example, hasRule. You can now edit the full rule. Select hasChild property, drag and drop hasRule on the form. In the resulting widget type:
o parenthood: (?a hasChild ?c) -> Parent(?a)
Supported SWRL Atoms
Atom TopBraid Composer
Syntax Example
Class Class(?a) Person(?a)
Property (?a Property ?c) (?a hasChild ?c) sameAs equal(?a, ?b)
differentFrom notEqual(?a, ?b)
Results of reasoning over SWRL rules are displayed in the Rules View. In the Rules View
SWRL rules are shown in Jena format.