INSTALL GUIDE
2
TABLE OF CONTENTS
Why
this
guide?
03
Pre-Installation
03
Hardware
and
Software
Requirements
03
Installing
Microsoft
.NET
Framework
3.5
SP1
03
Installing
.NET
3.5
03
Installing
SQL
Server
08
Launching
The
Setup
08
Installation
10
Enter
Product
Key
11
Accept
License
11
Global
Rules
12
Microsoft
Update
13
Product
Updates 14
Install
Setup
Files
14
Install
Rules
15
Setup
Role
16
Feature
Selection
17
Feature
Rules
20
Instance Configuration
20
Server Configuration
22
Database Engine Configuration
24
Feature Configuration Rules
27
Ready
to
Install
27
Installation
Progress
28
Complete
29
Post
Installation 30
Configuration
30
Monitoring
30
Maintenance
30
Monitoring
30
Resources
30
INSTALL GUIDE
WHY THIS GUIDE?
SQL Server issues related to security, performance, and even recoverability are often due to installation and configuration choices. This guide is meant to help people make informed decisions when it comes to all the available options.
For the purposes of this document, we are going to install SQL Server 2014 onto a server that has had a fresh install of Windows Server 2012. Installation of SQL Server onto Server Core is outside the scope of this document.
PRE-INSTALLATION
Before installation is started, review the hardware and software requirements for both SQL Server as well as for the application(s) that will be using the instance of SQL Server. It is a good idea to include any security, disaster recovery, and performance requirements at this time.
Hardware and Software Requirements
Details about the hardware and software requirements for SQL Server 2014 can be found at: https://msdn.microsoft.com/en-us/library/ms143506(v=sql.120). aspx#hwswr.
Installing Microsoft .NET Framework 3.5 SP1
When launching the SQL 2014 setup you are greeted with the screen as shown in Figure 1.
Everything you would need for the installation of SQL Server 2014 is contained on this screen. The hyperlinks o the right of the globe icons take you to MSDN articles. So, if you wanted to review the details for hardware and software requirements you can quickly do so.
There is also a system checker tool you can launch from this screen. It will perform a check of the server to make certain it is compatible. Running that first you should find a similar result screen to Figure 2.
The main screen also allows for you to install the SQL Server Upgrade Advisor (SSUA). We won’t be covering the SSUA here, but for details on the SSUS you can go to: http://msdn.microsoft.com/en-us/library/ee210467.aspx
One often overlooked item for installing SQL Server is the requirement that the legacy .NET 3.5 framework must be installed on the server for any one of the following items:
• Database Engine • Reporting Services • Master Data Services • Data Quality Services • Replication
• SQL Server Management Studio
Even though the latest Windows Server 2012 O/S comes with .NET 4.0, SQL Server setup will not complete for any of the above features without .NET 3.5 SP1 being installed.
4 Installing .NET 3.5
To install the .NET 3.5 Service Pack 1 on Windows Server 2012 navigate to the Server Manager screen (Figure 1).
Click on ‘Add roles and features’ in the middle of the screen and a wizard will launch (Figure 2). Figure 1
Click next and select the ‘Role-based or Feature-based installation’ option (Figure 3).
Click Next and select the server name from the server pool list. Here we have a single name in the pool. (Figure 4). Figure 3
6
Click Next and the Server Roles screen appears (Figure 5).
We don’t have a role to add for this exercise, so we click Next and advance to the Features screen (Figure 6). Figure 5
We will select the .Net 3.5 framework and then click Next to advance to the Confirmation screen (Figure 7).
We are being prompted to provide an alternate path to the source files for this installation. However, we can also allow for Windows Update to locate the necessary files for us. That is what we will do here, and we will get started by pressing the Install button. We then wait for the install to complete (Figure 8).
Once you have completed these steps, and verified your server meets all the other additional hardware and software requirements, you are ready to proceed with installing SQL Server.
Figure 7
8
INSTALLING SQL SERVER
Locate the ‘Setup’ icon located in the root directory of the SQL Server installation media and double-click to get started.
Launching The Setup
When launching the SQL 2014 setup we see the Planning screen as shown in Figure 9.
Everything needed for the installation of SQL Server 2014 is contained on this screen. The hyperlinks to the right of the globe icons redirect to MSDN articles allowing for quick access to review the details for hardware and software requirements if needed.
There is also a system checker tool on this screen (middle of the window, with the wrench and hammer icon). Launching this tool will perform a check of the server to make certain it is compatible for installing SQL Server. When completed the result should look similar to Figure 10.
The main screen also allows for you to install the SQL Server Upgrade Advisor (SSUA). We won’t be covering the SSUA here, but for details on the SSUS you can go to: http://msdn.microsoft.com/en-us/library/ee210467.aspx
Lastly, there is a link to download the SQL Server Data Tools. We will discuss this and other components in a later section.
After verifying that the server meets the requirements for SQL Server 2014, click on the “Installation” link in the upper left of the window, as shown in Figure 11.
The remaining sections shown in Figure 11 (Maintenance, Tools, Resources, Advanced, Options) are beyond the scope of this paper. Figure 11
10
Installation
After clicking on the “Installation” link (Figure 3) the screen shown in Figure 12 should appear.
To install SQL Server, click on the top most link as shown in Figure 13. Doing so will initiate the installation wizard.
Figure 12
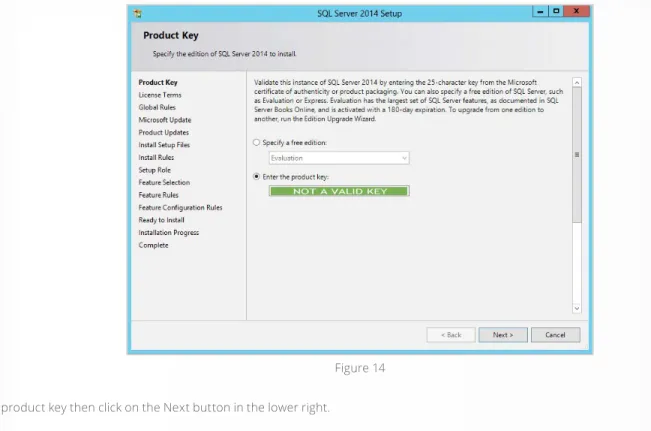
Enter Product key
Depending on how SQL Server 2014 was purchased (direct purchase, evaluation version, volume licensing) the product key may already be present. Figure 14 shows the Product Key screen.
Enter the product key then click on the Next button in the lower right.
Accept License
The next screen is the Accept License page. Fairly intuitive, the license agreement must be checked in order to use the software (Figure 15). Figure 14
12
The Customer Experience Improvement Program (CEIP) is entirely optional. Additional details on the CEIP can be found at: http://www.microsoft.com/ products/ceip/en-us/default.mspx
There is also a link here for to review Microsoft’s Privacy Statement.
After making selections here, proceed by clicking the Next button in the lower right.
Global Rules
The Global Rules check is next. If no issues are found the install will skip to the next screen (named Microsoft Update). To see what the Global Rules performed checks for just click the Previous button in the lower right. The wizard returns to the Global Rules screen (Figure 16) and the rule check will run again.
To see the details of what was checked, click on the Show Details button as shown in Figure 16. The install GUI will then display the full list of items that were checked (Figure 17).
Figure 16
Each hyperlink that says, “Passed” will display additional info on the rule that was checked. Furthermore, you can click on the “View Detailed Report” (highlighted in Figure 16 previously) to view even more information regarding the Global Rules. You will be brought to a web page as shown in Figure 18.
This screen also lists the directory for where the installation logs are being kept. In the example here, that directory is C:\Program Files\Microsoft SQL Server\120\Setup Bootstrap\Log
After reviewing the details, return to the install GUI and click Next to return to the Microsoft Update screen.
Microsoft Update
Here we decide whether if we want to allow for the automatic updates (Figure 19). Figure 18
14
Unlike the license terms checkbox, this checkbox does not need to be enabled in order to continue with the installation. However, as indicated, it is recommend.
The hyperlinks underneath the checkbox provide more information about what enabling this option means, as well as details on the Microsoft Update Privacy Statement.
If you have already enabled automatic updating with Windows Update then by enabling the checkbox on this screen you will continue to receive updates according to whatever preference you have configured for the server operating system (install automatically, download but let user decode when to install, check but do not download, and never check).
If automatic updates are not enabled for the server then enabling the checkbox on this screen will do that for you. Windows will download and install updates for you automatically.
If it is preferred to manually install updates, then after the installation is complete go into the Control Panel and customize the settings for Windows Update. After making selections for Microsoft Updates on this screen click Next in the lower right corner.
Product Updates
The Product Updates screen is next. This check for product updates here and in the next section (Install Setup Files) were added in SQL Server 2012 as a “smart install” enhancement. The idea is that if a user is installing SQL Server many months (or years) after it has been released, it would be a good idea to also prompt to download any critical updates now, to avoid there being issues with the instance after the install was completed.
If no SQL Server product updates are detected, the install will skip to the Install Setup Files screen.
Install Setup Files
The Install Setup Files screen is next. If there are no Setup updates found, this screen (Figure 20) will complete and skip to the next screen, Install Rules.
You can see the ‘Scan for product updates’ was completed. This is different than the previous Product Updates screen. This screen is looking specifically for updates to the installation setup files only. Since it found none, the next two (‘Download Setup files’, ‘Extract Setup files’) are skipped. At that point the setup files are installed and the install GUI skips to the next screen, Install Rules.
Install Rules
The Install Rules screen runs some additional checks and reports back the status. Any failures at this point must be corrected. In Figure 21 we see there is a warning for this server.
Issues flagged as warning do not need to be corrected before continuing. However, it is a good idea to understand more about the issue(s). More details are available by either viewing the detailed report (as we did previously) or by clicking on the “Warning” hyperlink in the Status column. In this case we see the result in Figure 22.
Figure 21
16
This server is currently using the default Windows Firewall settings. The installer wants to make it clear that the firewall could present connectivity issues later, but it is not a critical issue that should stop the installation from being completed.
For this specific warning, enabling the correct ports will not cause this message to disappear upon a re-run of the rules. Only disabling the Firewall will cause this warning to disappear as shown in Figure 23. Please note that it is not recommended to disable Windows Firewall.
Click Next and advance to the Setup Role screen.
Setup Role
The Setup Role screen is shown in Figure 24.
Figure 23
There are three options listed, the first is the SQL Server Feature Installation. This is the standard installation and will be the focus for this document. The second option is SQL Server PowerPivot for SharePoint, and is outside the scope of this paper. The third option is to install everything using default values for all service accounts.
Click Next and advance to the Feature Selection screen.
Feature Selection
This screen in the install process requires more attention to detail (Figure 25) than previous screens. It is here that services and features of SQL Server will be selected to be installed.
While the screen looks busy, it’s not too difficult to understand what is being communicated by breaking it down into sections. First, there is the section that displays the entire list of features (Figure 26).
18
The list is broken down into two sections: Instance Features and Shared Features. The Instance Features section contains items like the core database engine (what is usually referred to as ‘SQL Server’), Analysis Services (SSAS), and Reporting Services (SSRS).
The Shared Features section lists all the features that the Instance Features will be sharing. For example, one of the shared features would be SQL Server Management Studio (SSMS), which is included within the ‘Management Tools’ checkbox.
We know SSMS is included with that checkbox because the installer helps by providing details inside the ‘Features description section’ about what was selected (Figure 27).
In Figure 27 only the ‘Management Tools – Complete’ option is selected and the Feature description has changed to display the details. The checkbox does not need to be checked, just that line needs to be selected for the Feature description to be shown.
Below the Feature description section in the right column of the screen there are two other sections. The middle section lists the prerequisites for the selected option. The bottom section shows the disk space requirements. In Figure 27 these are blank, because these two sections are only populated when the checkbox is enabled (Figure 28).
Figure 27
By selecting the checkbox you can see the sections are populated in Figure 28.
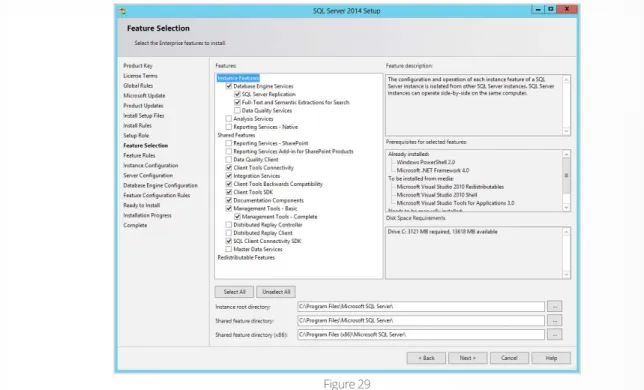
The section at the bottom of the screen allows for selecting the file location for the instance, the shared features, and the shared feature x86 directory. You will notice that in Figure 28 the instance root directory is greyed out. This is because no instance features have been selected. Once an instance feature is selected the instance root directory will be enabled as seen in Figure 29.
For your server, place the SQL Server installation files (i.e., the ‘binaries’) to a different drive other than the OS drive. Please note that these file locations are only for the binary executable files at this time; the option to place data and log file locations will come later.
Figure 29 does not show the entire list of selections, the complete list is here: • Database Engine Services
o SQL Server Replication
o Full-Text and Semantic Extractions for Search • Client Tools Connectivity
• Integration Services
• Client Tools Backwards Compatibility • Client Tools SDK
• Documentation Components • Management Tools – Basic
o Management Tools – Complete • SQL Client Connectivity SDK
Those options were chosen as a basic example of a database engine install for this paper, not something that should be deployed to every production server without question.
Click Next and advance to the Feature Rules screen.
20
Feature Rules
The Feature Rules screen runs more checks, this time for rules that are tied to the features chosen in the previous screen. If the check is successful then the wizard should show something similar to Figure 30.
Now we will click Next and advance to the Instance Configuration screen.
Instance Configuration
The Instance Configuration screen configures a default instance or a named instance of SQL Server (Figure 31). Figure 30
Choosing a default instance installation will mean that any client wishing to connect to this instance will be able to do so by using the name of the server only. By choosing a named instance clients will need to connect using both the server name and the name of the instance. For example, SERVERNAME\ INSTANCENAME.
If choosing a named instance, then the SQL Browser will be enabled and running after the install is complete. The SQL Browser is a service that helps to redirect client connections to the correct named instance. For default instance installs, the SQL Browser service is installed but left disabled.
By default, SQL Server will install as a default (or, unnamed) instance. However, for SQL Server Express installs, the default is to install as a named instance SERVERNAME\SQLEXPRESS.
More details about these options is available at: http://msdn.microsoft.com/en-us/library/ms143531.aspx
The middle of this screen is a section that shows the location for the SQL Server directory. You cannot edit this location on this screen; it is taking the ‘instance root directory’ location selected back on the Feature Selection screen (Figure 29). If changes here are necessary, go back to the Feature Selection screen and make edits there.
Lastly, the bottom window shows the currently installed instances on the server. This is a new installation on a new server, so nothing is listed here in this example.
We are going to assign a name (SQL2014) to this instance (Figure 32).
After entering in the name SQL2014 the Instance ID field is populated. It is possible to have different names for the instance name and the instance ID. The instance name is what clients will use to connect to this instance. The instance ID is used in the file directory structure, seen in Figure 31.
Click Next and move to the Server Configuration screen.
22
Server Configuration
The Server Configuration screen has two tabs, one for Service Accounts and another for Collation (Figure 33).
Let’s start with the Service Accounts tab. Listed in Figure 33 are the five services that are going to be installed based upon the features selected. The services are:
• SQL Server Agent
• SQL Server Database Engine • SQL Server Integration Services 12.0 • SQL Full-text Filter Daemon Launcher • SQL Server Browser
As noted before, the SQL Server Browser is installed regardless this is a default or named instance. If installing a default instance the SQL Browser service would be set to ‘Disabled’ for the Startup Type. With a named instance, the Startup Type for the SQL Browser service is set to Automatic. For those that require a hardened SQL Server installation, the SQL Server Browser service should be left disabled. Clients can still connect to SQL Server by specifying the port number the instance uses. For example, if SERVERNAME\INSTANCENAME is using port 8123, then clients would connect by using: SERVERNAME\INSTANCENAME, 8123
There are five default Account Names assigned by the installer. They are, in order: • NT Service\SQLAgent$SQL2014
• NT Service\MSSQL$SQL2014 • NT Service\MsDtsServer120
• NT Service\MSSQLFDLauncher$SQL2014 • NT AUTHORITY\LOCAL SERVICE
If choosing a named instance (our example is ‘SQL2014’ as the instance name), the string ‘$SQL2014’ is found in three of the above account names. For default instance installations, the account names would have a different format. More details about the default service accounts used by SQL Server 2014 can be found at http://msdn.microsoft.com/en-us/library/ms143504.aspx
It is a common security recommendation that dedicated and distinct domain accounts are used for the services being installed, and to not rely on the default accounts. If domain accounts are not available during install the accounts can be updated later using SQL Server Configuration Manager (SSCM).
Note that the account names for the SQL Full-text Filter Daemon Launcher and SQL Server Browser cannot be changed at this time. If needed they can also be changed later using SSCM. More details on all possible the service account configurations can be found at: http://msdn.microsoft.com/en-us/ library/cc281953.aspx
If using domain accounts at this time the Password textbox will be enabled. Enter the correct password in order to proceed with the installation. Next, let’s look at the Collation tab (Figure 34).
This is where the default collation for the instance is configured. Click Next and advance to the Database Engine Configuration screen.
24
Database Engine Configuration
The Database Engine Configuration screen has three tabs (Figure 35). One for Server Configuration, another for Data Directories, and a third for Filestream.
On the Server Configuration tab the Authentication Mode for the instance is configured. The options are Windows Authentication mode or Mixed Mode (which allows for both Windows Authentication and SQL Server logins).
The recommended setting is to use Windows Authentication mode. However, that requires all users to be a member of the same domain (or trusted domains). For some companies with outward facing applications this is not possible. Therefore, Mixed Mode is the choice they prefer. You can read more details about these options at: http://msdn.microsoft.com/en-us/library/cc281849.aspx
If the Mixed Mode option on this screen is enabled then a password for the ‘sa’ account must be chosen. The password must be more than 8 characters in length and satisfy at least three of the following four criteria:
• It must contain uppercase letters. • It must contain lowercase letters. • It must contain numbers.
• It must contain non-alphanumeric characters; for example, #, %, or ^. Figure 35
At least one Windows account must be specified as an administrator for this instance before you are allowed to advance to the next screen. In previous versions of SQL Server the local Administrators group was given access here by including the BUILTIN\ADMINISTRATORS group by default. That is no longer the case. We are currently logged in with the Administrator account, which is a bad thing and you shouldn’t repeat what we did here (Figure 36).
The Data Directories tab is where the default data and log file directories are configured for new databases created on this instance (Figure 37). Figure 36
26
It’s well documented that for purposes of Disaster Recovery (DR) you want to have your data, log, and backup files on distinct storage devices. The last tab is for Filestream (Figure 38).
Here we can configure this instance to use Filestream, if desired. You can read more about Filestream at http://msdn.microsoft.com/en-us/library/ gg471497.aspx. You can also enable Filestream later using SSCM.
After having reviewed all three tabs, click Next and advance to the Feature Configuration Rules screen. Figure 38
Feature Configuration Rules
Unless there is an error in the rules being checked, this screen will skip ahead. Click on the Previous button to go back and review the rules that were run (Figure 39).
The details of what was checked can be reviewed by clicking one the View Detailed Report link. Click Next and you will be taken to the Ready to Install screen.
Ready to Install
The Ready To Install screen shows a summary of the features and options selected (Figure 40). Figure 39
28
Here every choice that we made in the previous screens is listed. Review every detail such as instance name, instance ID, service accounts, features, and data file directories to make sure they are as expected.
This screen also shows the configuration file path, where the configuration.ini file is stored. Some of the contents of this file are displayed in Figure 41.
The configuration.ini file not only shows what has been selected, it also details the other options that were available. Use a configuration.ini file to standardize installations, if desired. More information on the use of this file is available at http://msdn.microsoft.com/en-us/library/dd239405.aspx. Click Install to start the installation process.
Installation Progress
The duration of the installation process will vary from server to server. Track the progress of the install if desired (Figure 42), or go get yourself a cup of bacon while you wait.
At some point the installation will complete and the installer will proceed to the final screen. Figure 41
Complete
Congrats! The install of SQL Server 2014 is complete! A screen similar to Figure 43 should appear.
Every feature selected should be listed as a line item in the top section along with a status of ‘Succeeded’. The Details section provides information regarding product documentation. Review those details which include: • Link to the Books Online
• Details on setting up Microsoft Update
• Link to sample databases, including ones for Hekaton
• A readme file
• Link to .NET 3.5 SP1
• Details on the Surface Area Configuration
There is also a link to the Summary Log file (Figure 44). For this install it was located at C:\Program Files\Microsoft SQL Server\120\Setup Bootstrap\ Log\20140611_194105\ Summary_SQL2014_20140611_194105.txt
30
POST INSTALLATION
After the installation has finished, and before the instance is turned over to users, there are additional tasks to complete.
Configuration
Review the configuration options listed in sys.configurations. Some of these options need to be adjusted depending upon your workload. Here is a partial list of things to review and set as needed:
• min and max memory settings • cost threshold for parallelism • max degree of parallelism • optimize for ad-hoc workloads • backup compression
Maintenance
Configure maintenance for this instance, either by using a Maintenance Plan, custom scripts, or a 3rd party product. The number one job for any DBA is to be able to recover data, so make certain backups are running and that you have a proper recovery plan in place.
Index maintenance is another item that needs to be configured, along with the updating of statistics.
Monitoring
Use Database Performance Analyzer (DPA) to capture details pertaining to performance monitoring and metrics.
RESOURCES
For more information on installing and configuring SQL Server:
• Planning SQL Server installs: msdn.microsoft.com/en-us/library/bb500442(v=sql.120).aspx
• “Configuring SQL Server For Performance Like a Microsoft Certified Master”, a free webinar with Tom LaRock and Tim Chapman
• 8 Tips for Faster SQL Server Performance infographic: solarwinds.com/resources/infographics/8-tips-faster-sql-server-performance.aspx
HOW CAN DATABASE PERFORMANCE ANALYZER HELP?
Database Performance Analyzer (DPA) from SolarWinds (NYSE: SWI) provides the fastest way to identify and resolve database
performance issues. DPA is part of the SolarWinds family of powerful and affordable IT solutions that eliminate the complexity in
IT management software. DPA’s unique Multi-dimensional Database Performance Analysis enables you to quickly get to the root
of database problems that impact application performance with continuous monitoring of SQL Server, Oracle, SAP ASE and DB2