209
■ ■ ■
Tracing, Logging, and Error
Handling
N
o software can run free from error, and ASP.NET applications are no exception. Sooner or later your code will be interrupted by a programming mistake, invalid data, unexpected circumstances, or even hardware failure. Novice programmers spend sleepless nights worrying about errors. Professional developers recognize that bugs are an inherent part of software applications and code defensively, testing assumptions, logging problems, and writing error handling code to deal with the unexpected.In this chapter, you’ll learn the error handling and debugging practices that can defend your ASP.NET applications against common errors, can track user problems, and can help you solve mysterious issues. You’ll learn how to use structured exception handling, how to use logs to keep a record of unrecoverable errors, and how to configure custom web pages for common HTTP errors. You’ll also learn how to use page tracing to see diagnostic information about ASP.NET pages.
Common Errors
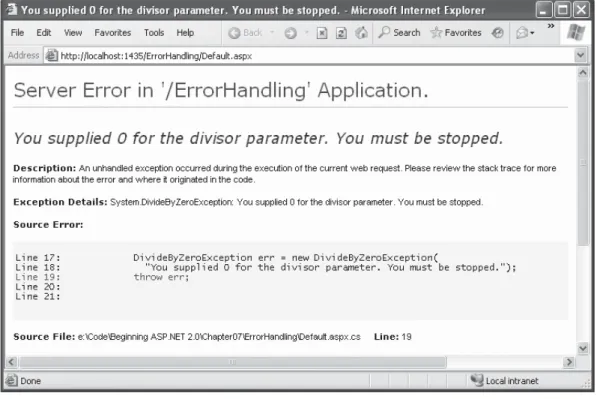
Errors can occur in a variety of situations. Some of the most common causes of errors include attempts to divide by zero (usually caused by invalid input or missing information) and attempts to connect to a limited resource such as a file or a database (which can fail if the file doesn’t exist, the database connection times out, or the code has insufficient security credentials).
Figure 7-1. A sample error page
Dim conOne As SqlConnection
' The next line will fail and generate a null reference exception. ' You cannot modify a property (or use a method) of an object that ' doesn't exist!
conOne.ConnectionString = "..."
Dim conTwo As New SqlConnection()
' This works, because the object has been initialized with the New keyword. conTwo.ConnectionString = "..."
Even if an error is the result of invalid input or the failure of a third-party component, an error page can shatter the professional appearance of any application. The application users end up with a feeling that the application is unstable, insecure, or of poor quality— and they’re at least partially correct.
If an ASP.NET application is carefully designed and constructed, an error page will almost never appear. Errors may still occur because of unforeseen circumstances, but they will be caught in the code and identified. If the error is a critical one that the appli-cation cannot solve on its own, it will report a more useful (and user-friendly) page of information that might include a link to a support e-mail or a phone number where the customer can receive additional assistance. You’ll look at those techniques in this chapter.
Exception Handling
Most .NET languages support structured exception handling. Essentially, when an error occurs in your application, the .NET Framework creates an exception object that repre-sents the problem. You can catch this object using an exception handler. If you fail to use an exception handler, your code will be aborted, and the user will see an error page.
Structured exception handling provides several key features:
Exceptions are object-based: Each exception provides a significant amount of diagnostic information wrapped into a neat object, instead of a simple message and error code. These exception objects also support an InnerException property that allows you to wrap a generic error over the more specific error that caused it. You can even create and throw your own exception objects.
Exceptions are caught based on their type: This allows you to streamline error handling code without needing to sift through obscure error codes.
Exception handlers use a modern block structure: This makes it easy to activate and deactivate different error handlers for different sections of code and handle their errors individually.
Exception handlers are multilayered: You can easily layer exception handlers on top of other exception handlers, some of which may check only for a specialized set of errors.
The Exception Class
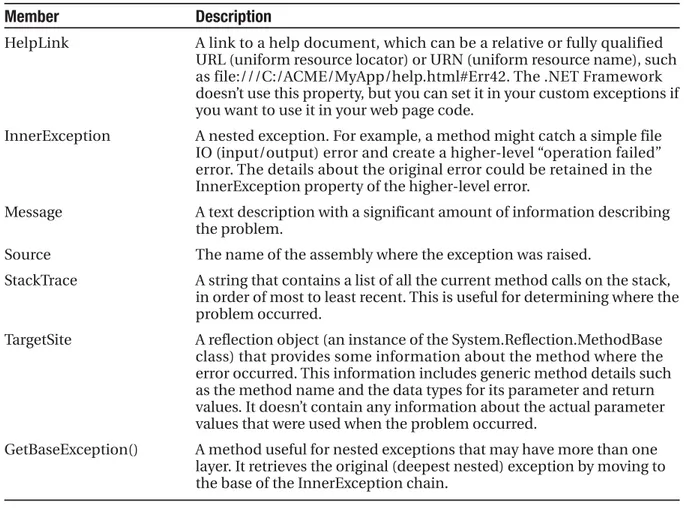
Every exception class derives from the base class System.Exception. The .NET Framework is full of predefined exception classes, such as NullReferenceException, IOException, SqlException, and so on. The exception class includes the essential functionality for identifying any type of error. Table 7-1 lists its most important members.
Table 7-1. Exception Properties
Member Description
HelpLink A link to a help document, which can be a relative or fully qualified URL (uniform resource locator) or URN (uniform resource name), such as file:///C:/ACME/MyApp/help.html#Err42. The .NET Framework doesn’t use this property, but you can set it in your custom exceptions if you want to use it in your web page code.
InnerException A nested exception. For example, a method might catch a simple file IO (input/output) error and create a higher-level “operation failed” error. The details about the original error could be retained in the InnerException property of the higher-level error.
Message A text description with a significant amount of information describing the problem.
Source The name of the assembly where the exception was raised.
StackTrace A string that contains a list of all the current method calls on the stack, in order of most to least recent. This is useful for determining where the problem occurred.
TargetSite A reflection object (an instance of the System.Reflection.MethodBase class) that provides some information about the method where the error occurred. This information includes generic method details such as the method name and the data types for its parameter and return values. It doesn’t contain any information about the actual parameter values that were used when the problem occurred.
GetBaseException() A method useful for nested exceptions that may have more than one layer. It retrieves the original (deepest nested) exception by moving to the base of the InnerException chain.
When you catch an exception in an ASP.NET page, it won’t be an instance of the generic System.Exception class. Instead, it will be an object that represents a specific type of error. This object will be based on one of the many classes that inherit from System.Exception. These include diverse classes such as DivideByZeroException, ArithmeticException, IOException, SecurityException, and many more. Some of these classes provide additional details about the error in additional properties.
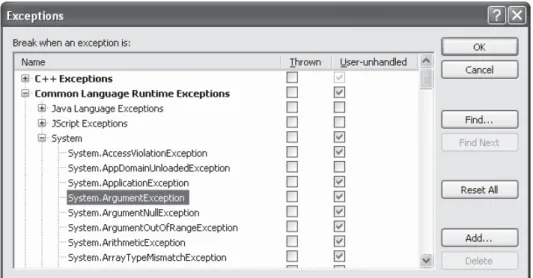
Figure 7-2. Visual Studio’s exceptions viewer
The Exceptions dialog box allows you to specify what exceptions should be handled by your code when debugging and what exceptions will cause Visual Studio to enter break mode immediately. That means you don’t need to disable your error handling code to troubleshoot a problem. For example, you could choose to allow your program to handle a common FileNotFoundException (which could be caused by an invalid user selection) but instruct Visual Studio to pause execution if an unexpected DivideByZero exception occurs.
To set this up, add a check mark in the Thrown column next to the entry for the DivideByZero exception. This way, you’ll be alerted as soon as the problem occurs. If you don’t add a check mark to the Thrown column, your code will continue, run any exception handlers it has defined, and try to deal with the problem. You’ll be notified only if an error occurs and no suitable exception handler is available.
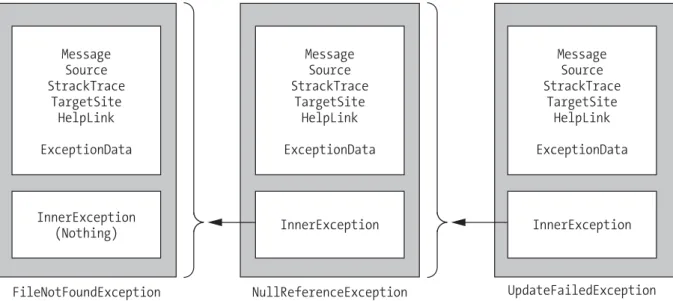
The Exception Chain
The InnerException property is an extremely useful tool for component-based programming. Generally, it’s not much help if a component reports a low-level problem such as a null reference or a divide-by-zero error. Instead, it needs to communicate a more detailed message about which operation failed and what input may have been invalid. The calling code can then often correct the problem and retry the operation.
On the other hand, sometimes you’re debugging a bug that lurks deep inside the component itself. In this case, you need to know precisely what caused the error—you don’t want to replace it with a higher-level exception that could obscure the root problem. Using an exception chain handles both these scenarios: you receive as many linked exception objects as needed, which can specify information from the least to the most specific error condition.
Handling Exceptions
The first line of defense in an application is to check for potential error conditions before performing an operation. For example, a program can explicitly check whether the divisor is 0 before performing a calculation, or if a file exists before attempting to open it:
If Divisor <> 0 Then
' Safe to divide some number by Divisor. End If
If System.IO.File.Exists("myfile.txt") Then ' You can now open the myfile.txt file.
' However, you should still use exception handling because a variety of ' problems can intervene (insufficient rights, hardware failure, etc.). End If
Even if you perform this basic level of “quality assurance,” your application is still vulnerable. For example, you have no way to protect against all the possible file access problems that occur, including hardware failures or network problems that could arise spontaneously in the middle of an operation. Similarly, you have no way to validate a user ID and password for a database before attempting to open a connection—and even if there were, that technique would be subject to its own set of potential errors. In some cases, it may not be practical to perform the full range of defensive checks, because they may impose a noticeable performance drag on your application. For all these reasons, you need a way to detect and deal with errors when they occur.
The solution is structured exception handling. To use structured exception handling, you wrap potentially problematic code in the special block structure shown here:
Try
' Risky code goes here (i.e. opening a file, connecting to a database). Catch
' An error has been detected. You can deal with it here. Finally
' Time to clean up, regardless of whether there was an error or not. End Try
The Try statement enables error handling. Any exceptions that occur in the following lines can be “caught” automatically. The code in the Catch block will be executed when an error is detected. And either way, whether a bug occurs or not, the Finally section of the code will be executed last. This allows you to perform some basic cleanup, such as closing a database connection. The Finally code is important because it will execute even if an error has occurred that will prevent the program from continuing. In other words, if an unrecoverable exception halts your application, you’ll still have the chance to release resources.
The act of catching an error neutralizes it. If all you want to do is render a specific error harmless, you don’t even need to add any code in the Catch block of your error handler. Usually, however, this portion of the code will be used to report the error to the user or log it for future reference. In a separate component (such as a business object), this code might handle the exception, perform some cleanup, and then rethrow it to the calling code, which will be in the best position to remedy it or alert the user. Or it might actually create a new exception object with additional information and throw that.
Catching Specific Exceptions
Try
' Database code goes here.
Catch err As System.Data.SqlClient.SqlException
' Catches common database problems like connection errors. Catch err As System.NullReferenceException
' Catches problems resulting from an uninitialized object. End Try
An exception will be caught as long as it’s an instance of the indicated class or if it’s derived from that class. In other words, if you use this statement:
Catch err As Exception
you will catch any exception, because every exception object is derived from the System.Exception base class.
Exception blocks work a little like the Select/Case block structure. This means as soon as a matching exception handler is found, the appropriate Catch code is invoked. Therefore, you should organize your Catch statements from most specific to least specific:
Try
' Database code goes here.
Catch err As System.Data.SqlClient.SqlException
' Catches common database problems like connection errors. Catch err As System.NullReferenceException
' Catches problems resulting from an uninitialized object. Catch err As System.Exception
' Catches any other errors. End Try
Ending with a Catch statement for the generic exception class is often a good idea to make sure no errors slip through. However, in component-based programming, you should make sure you intercept only those exceptions you can deal with or recover from. Other-wise, it’s better to let the calling code catch the original error.
Nested Exception Handlers
When an exception is thrown, .NET tries to find a matching Catch statement in the current method. If the code isn’t in a local structured exception block, or if none of the Catch statements matches the exception, the CLR will move up the call stack one level at a time, searching for active exception handlers.
Protected Sub Page_Load(ByVal sender As Object, _ ByVal e As EventArgs) Handles Me.Load
Try
DivideNumbers(5, 0)
Catch err As DivideByZeroException ' Report error here.
End Try End Sub
Private Function DivideNumbers(ByVal number As Decimal, _ ByVal divisor As Decimal) As Decimal
Return number/divisor End Function
In this example, the DivideNumbers() function lacks any sort of exception handler. However, the DivideNumbers() function call is made inside an exception handler, which means the problem will be caught further upstream in the calling code. This is a good approach because the DivideNumbers() routine could be used in a variety of circumstances (or if it’s part of a component, in a variety of different types of applications). It really has no access to any kind of user interface and can’t directly report an error. Only the calling code is in a position to determine whether the problem is a serious one or a minor one, and only the calling code can prompt the user for more information or report error details in the web page.
You can also overlap exception handlers in such a way that different exception handlers filter out different types of problems. Here’s one such example:
Protected Sub Page_Load(ByVal sender As Object, _ ByVal e As EventArgs) Handles Me.Load
Try
Dim Average As Integer = GetAverageCost(DateTime.Now) Catch err As DivideByZeroException
' Report error here. End Try
End Sub
Private Function GetAverageCost(saleDate As Date) As Integer Try
' Use Database access code here to retrieve all the sale records ' for this date, and calculate the average.
Finally
' Close the database connection. End Try
End Function
Dissecting the Code...
You should be aware of the following points:
• If an SqlException occurs during the database operation, it will be caught in the GetAverageCost() function.
• If a DivideByZeroException occurs (for example, the function receives no records but still attempts to calculate an average), the exception will be caught in the call-ing Page.Load event handler.
• If another problem occurs (such as a null reference exception), no active exception handler exists to catch it. In this case, .NET will search through the entire call stack without finding a matching Catch statement in an active exception handler and will generate a runtime error, end the program, and return a page with exception information.
Exception Handling in Action
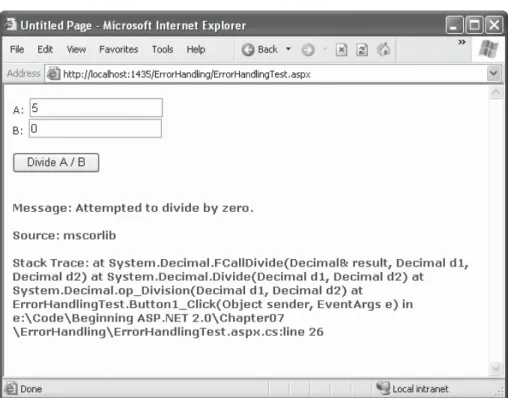
You can use a simple program to test exceptions and see what sort of information is retrieved. This program allows a user to enter two values and attempts to divide them. It then reports all the related exception information in the page (see Figure 7-4).
Figure 7-4. Catching and displaying exception information
Here’s the page class code for this example:
Public Partial Class ErrorHandlingTest Inherits System.Web.UI.Page
Protected Sub cmdCompute_Click(ByVal sender As Object, _ ByVal e As EventArgs) _
Handles cmdCompute.Click
Try
Dim A, B, Result As Decimal A = Val(txtA.Text)
B = Val(txtB.Text) Result = A / B
lblResult.Text = Result.ToString() lblResult.ForeColor = Color.Black Catch err As Exception
lblResult.Text = "<b>Message:</b> " & err.Message & "<br /><br />" lblResult.Text &= "<b>Source:</b> " & err.Source & "<br /><br />" lblResult.Text &= "<b>Stack Trace:</b> " & err.StackTrace
End Try End Sub
End Class
Note that as soon as the error occurs, execution is transferred to an exception handler. The code in the Try block isn’t completed. It’s for that reason that the result for the label is set in the Try block. These lines will be executed only if the division code runs error-free.
You’ll see many more examples of exception handling throughout this book. The data access chapters in Part 3 of this book show the best practices for exception handling when accessing a database.
Mastering Exceptions
Keep in mind these points when working with structured exception handling:
Break down your code into multiple Try/Catch blocks: If you put all your code into one exception handler, you’ll have trouble determining where the problem occurred. You have no way to “resume” the code in a Try block. This means that if an error occurs at the beginning of a lengthy Try block, you’ll skip a large amount of code. The rule of thumb is to use one exception handler for one related task (such as opening a file and retrieving information).
Report all errors: During debugging, portions of your application’s error handling code may mask easily correctable mistakes in your application. To prevent this from hap-pening, make sure you report all errors, and consider leaving out some error handling logic in early builds.
Don’t use exception handlers for every statement: Simple code statements (assigning a constant value to a variable, interacting with a control, and so on) may cause errors during development testing but will not cause any future problems once perfected. Error handling should be used when you’re accessing an outside resource or dealing with supplied data that you have no control over (and thus may be invalid).
Throwing Your Own Exceptions
You can also define your own exception objects to represent custom error conditions. All you need to do is create an instance of the appropriate exception class and then use the Throw statement.
the DivideByZeroException class to indicate the problem, rather than attempt the opera-tion. Depending on the code, this pattern can save time by eliminating some unnecessary steps, or it can prevent a task from being initiated if it can’t be completed successfully.
Protected Sub Page_Load(ByVal sender As Object, _ ByVal e As EventArgs) Handles Me.Load
Try
DivideNumbers(5, 0)
Catch err As DivideByZeroException ' Report error here.
End Try End Sub
Private Function DivideNumbers(ByVal number As Decimal, _ ByVal divisor As Decimal) As Decimal
If divisor = 0 Then
Dim err As New DivideByZeroException() Throw err
Else
Return number/divisor End If
End Function
Alternatively, you can create a .NET exception object and specify a custom error message by using a different constructor:
Private Function DivideNumbers(ByVal number As Decimal, _ ByVal divisor As Decimal) As Decimal
If divisor = 0 Then
Dim err As New DivideByZeroException( _
"You supplied 0 for the divisor parameter. You must be stopped.") Throw err
Else
Return number/divisor End If
End Function
Throwing an error is most useful in based programming. In component-based programming, your ASP.NET page is creating objects and calling methods from a class defined in a separately compiled assembly. In this case, the class in the component needs to be able to notify the calling code (the web application) of any errors. The component should handle recoverable errors quietly and not pass them up to the calling code. On the other hand, if an unrecoverable error occurs, it should always be indicated with an exception and never through another mechanism (such as a return code). For more information about component-based programming, refer to Chapter 24.
If you can find an exception in the class library that accurately reflects the problem that has occurred, you should throw it. If you need to return additional or specialized information, you can create your own custom exception class.
Custom exception classes should always inherit from System.ApplicationException, which itself derives from the base Exception class. This allows .NET to distinguish between two broad classes of exceptions—those you create and those that are native to the .NET Framework.
When you create an exception class, you can add properties to record additional information. For example, here is a special class that records information about the failed attempt to divide by zero:
Public Class CustomDivideByZeroException Inherits ApplicationException
' Add a variable to specify the "other" number.
' Depending on the circumstance, this might help diagnose the problem. Public DividingNumber As Decimal
End Class
You can throw this custom error like this:
Private Function DivideNumbers(ByVal number As Decimal, _ ByVal divisor As Decimal) As Decimal
If divisor = 0 Then
Dim err As New CustomDivideByZeroException() err.DividingNumber = number
Throw err Else
Return number/divisor End If
End Function
To perfect the custom exception, you need to supply it with the three standard constructors. This allows your exception class to be created in the standard ways that every exception supports:
• On its own, with no arguments
• With a custom message
• With a custom message and an exception object to use as the inner exception
These constructors don’t actually need to contain any code. All these constructors need to do is forward the parameters to the base class (the constructors in the inherited ApplicationException class) using the MyBase keyword, as shown here:
Public Class CustomDivideByZeroException Inherits ApplicationException
' Add a variable to specify the "other" number.
' Depending on the circumstance, this might help diagnose the problem. Public DividingNumber As Decimal
Public Sub New(ByVal message As String) MyBase.New(message)
End Sub
Public Sub New(ByVal message as String, ByVal inner As Exception) MyBase.New(message, inner)
End Sub
End Class
The third constructor is particularly useful for component programming. It allows you to set the InnerException property with the exception object that caused the original problem. The next example shows how you could use this constructor with a component class called ArithmeticUtility:
Public Class ArithmeticUtilityException Inherits ApplicationException
Public Sub New() MyBase.New() End Sub
Public Sub New(ByVal message As String) MyBase.New(message)
End Sub
Public Sub New(ByVal message as String, ByVal inner As Exception) MyBase.New(message, inner)
End Sub End Class
Public Class ArithmeticUtility
Private Function Divide(ByVal number As Decimal, _ ByVal divisor As Decimal) As Decimal
Try
Return number/divisor Catch err As Exception
' Create an instance of the specialized exception class,
' and place the original error in the InnerException property. Dim errNew As New ArithmeticUtilityException("Divide by zero", _
err)
End Try End Function End Class
Remember, custom exception classes are really just a standardized way for one class to communicate an error to a different portion of code. If you aren’t using components or your own utility classes, you probably don’t need to create custom exception classes.
Logging Exceptions
In many cases, it’s best not only to detect and catch errors but to log them as well. For example, some problems may occur only when your web server is dealing with a particu-larly large load. Other problems might recur intermittently, with no obvious causes. To diagnose these errors and build a larger picture of site problems, you need to log errors automatically so they can be reviewed later.
The .NET Framework provides a wide range of logging tools. When certain errors occur, you can send an e-mail, add a database record, or create and write to a file. We describe many of these techniques in other parts of this book. However, you should keep your logging code as simple as possible. For example, you’ll probably run into trouble if you try to log a database error to another table in the database.
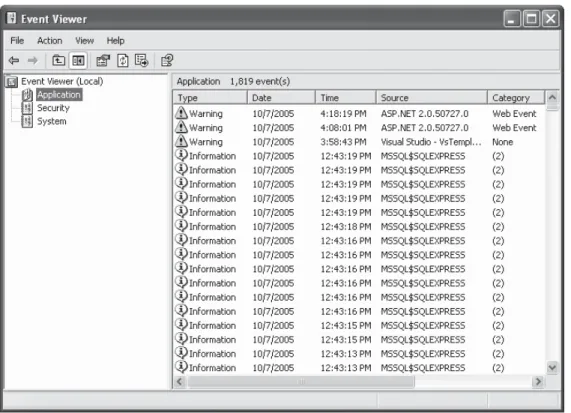
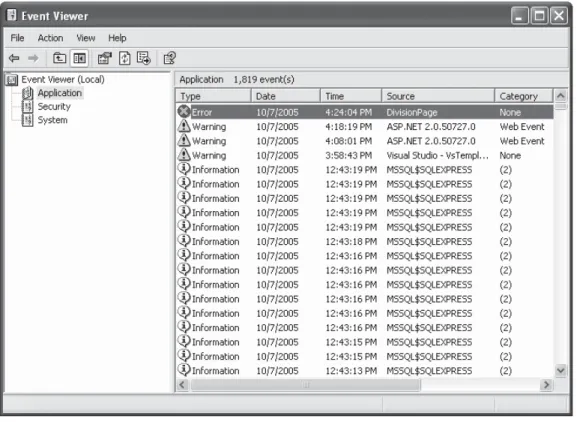
One of the best logging tools is provided in the Windows event logs. To view these logs, select Settings ➤Control Panel ➤Administrative Tools ➤Event Viewer from the Start menu. By default, you’ll see three logs, as shown in Figure 7-6.
You can right-click a log to clear the events in the log, save log entries, and import an external log file. Table 7-2 describes the logs.
Table 7-2. Windows Event Logs
Log Name Description
Application log Used to track errors or notifications from any application. Generally, you’ll use this log or create your own.
Security log Used to track security-related problems but generally used exclusively by the operating system.
System log Used to track operating system events.
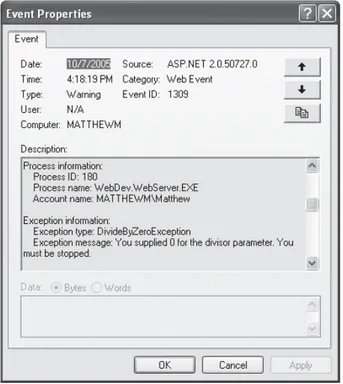
Each event record identifies the source (generally, the application or service that cre-ated the record), the type of notification (error, information, warning), and the time the log entry was inserted. You can also double-click a record to view additional information such as a text description. Figure 7-7 shows an example of an unhandled error in an ASP.NET page.
Figure 7-7. Event information
be used to track information that is valuable only for a short amount of time. For exam-ple, you can use event logs to review errors and diagnose strange behavior immediately after it happens, not a month later.
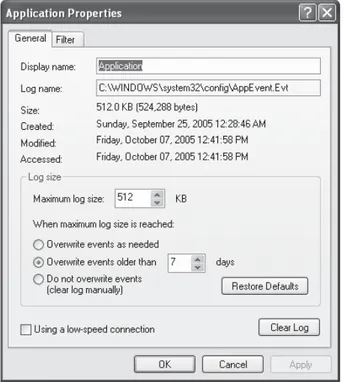
You do have some ability to configure the amount of time a log will be retained and the maximum size it will be allowed to occupy. To configure these settings, right-click the application log, and select Properties. You’ll see the Application Properties window shown in Figure 7-8.
Figure 7-8. Log properties
Generally, you should not disable automatic log deletion, because it could cause a large amount of wasted space and slow performance if information isn’t being regularly removed. Instead, if you want to retain more log information, set a larger disk space limit.
Using the EventLog Class
You can interact with event logs in an ASP.NET page by using the classes in the System.Diagnostics namespace. Import the namespace at the beginning of your code-behind file:
Imports System.Diagnostics
Public Partial Class ErrorTestLog Inherits System.Web.UI.Page
Protected Sub cmdCompute_Click(ByVal sender As Object, _ ByVal e As EventArgs) _
Handles cmdCompute.Click
Try
Dim A, B, Result As Decimal A = Val(txtA.Text)
B = Val(txtB.Text) Result = A / B
lblResult.Text = Result.ToString() lblResult.ForeColor = Color.Black Catch err As Exception
lblResult.Text = "<b>Message:</b> " & err.Message & "<br /><br />" lblResult.Text &= "<b>Source:</b> " & err.Source & "<br /><br />" lblResult.Text &= "<b>Stack Trace:</b> " & err.StackTrace
lblResult.ForeColor = Color.Red
' Write the information to the event log. Dim Log As New EventLog()
Log.Source = "DivisionPage"
Log.WriteEntry(err.Message, EventLogEntryType.Error) End Try
End Sub
End Class
EVENT LOG SECURITY
This logging code will run without a hitch when you try it in Visual Studio. However, when you deploy your application to a web server (as will be described in Chapter 12), you might not be so lucky. The problem is that the ASP.NET service runs under a Windows account that has fewer privileges than an average user. If you’re using IIS 5, this user is the account named ASPNET, which ordinarily won’t have the permissions to create event log entries.
To remedy this problem, you can use a different account (as explained in Chapter 12), or you can grant the required permissions to the account that ASP.NET is already using (like the ASPNET account). To do the latter, you need to modify the registry as described in these steps:
1. Run regedit.exe, either by using a command-line prompt or by choosing Run from the Start menu.
2. Browse to the HKEY_Local_Machine\SYSTEM\CurrentControlSet\Services\EventLog section of the registry.
3. Select the EventLog folder if you want to give ASP.NET permission to all areas of the event log. Or select a specific folder that corresponds to the event log ASP.NET needs to access.
4. Choose Security ➤Permissions.
5. Add the account that ASP.NET is using to the list. If you’re using IIS 5, this is the ASPNET account. To add it, click the Add button, type in ASPNET, and then click OK. (If you’re using IIS 6, you need to add permissions to the IIS_WPG group instead of the ASPNET account.)
6. Give the ASPNET account Full Control for this section of the registry by selecting the Allow check box next to Full Control.
Custom Logs
You can also log errors to a custom log. For example, you could create a log with your company name and add records to it for all your ASP.NET applications. You might even want to create an individual log for a particularly large application and use the Source property of each entry to indicate the page (or web service method) that caused the problem.
Accessing a custom log is easy—you just need to use a different constructor for the EventLog class to specify the custom log name. You also need to register an event source for the log. This initial step needs to be performed only once—in fact, you’ll receive an error if you try to create the same event source. Typically, you’ll use the name of the application as the event source.
Here’s an example that uses a custom log named ProseTech and registers the event source DivideByZeroApp:
' Register the event source if needed.
If Not EventLog.SourceExists("DivideByZeroApp") Then
' This registers the event source and creates the custom log, ' if needed.
EventLog.CreateEventSource("DivideByZeroApp", "ProseTech") End If
' Open the log. If the log does not exist, it will be created automatically. Dim Log As New EventLog("ProseTech")
log.Source = "DivideByZeroApp"
log.WriteEntry(err.Message, EventLogEntryType.Error)
■
Tip
Event logging uses disk space and takes processor time away from web applications. Don’t store unimportant information, large quantities of data, or information that would be better off in another type of storage (such as a relational database). Generally, you should use an event log to log unexpected conditions or errors, not customer actions or performance-tracking information.Retrieving Log Information
One of the disadvantages of the event logs is that they’re tied to the web server. This can make it difficult to review log entries if you don’t have a way to access the server (although you can read them from another computer on the same network). This problem has several possible solutions. One interesting technique involves using a special administration page. This ASP.NET page can use the EventLog class to retrieve and display all the information from the event log.
Figure 7-11 shows in a simple web page all the entries that were left by the ErrorTestCustomLog page. The results are shown using a label in a scrollable panel (a Panel control with the Scrollbars property set to Vertical). A more sophisticated approach would use similar code but with one of the data controls to be discussed in Chapter 15.
Here’s the web page code you’ll need:
Public Partial Class EventReviewPage Inherits System.Web.UI.Page
Protected Sub cmdGet_Click(ByVal sender As Object, _ ByVal e As EventArgs) Handles cmdGet.Click
lblResult.Text = ""
' Check if the log exists.
If Not EventLog.Exists(txtLog.Text) Then
lblResult.Text = "The event log " & txtLog.Text & _ " does not exist."
Else
Dim log As New EventLog(txtLog.Text)
For Each entry As EventLogEntry In log.Entries ' Write the event entries to the page.
If chkAll.Checked Or entry.Source = txtSource.Text Then lblResult.Text &= "<b>Entry Type:</b> "
lblResult.Text &= entry.EntryType.ToString()
lblResult.Text &= "<br /><b>Message:</b> " & entry.Message lblResult.Text &= "<br /><b>Time Generated:</b> "
lblResult.Text &= entry.TimeGenerated lblResult.Text &= "<br /><br />" End If
Next End If End Sub
Protected Sub chkAll_CheckedChanged(ByVal sender As Object, _ ByVal e As EventArgs) Handles chkAll.CheckedChanged
' The chkAll control has AutoPostback = True. If chkAll.Checked Then
txtSource.Text = "" txtSource.Enabled = False Else
txtSource.Enabled = True End If
End Sub
End Class
If you choose to display all the entries from the application log, the page will perform slowly. Two factors are at work here. First, it takes time to retrieve each event log entry; a typical application log can easily hold several thousand entries. Second, the code used to append text to the Label control is inefficient. Every time you add a new piece of infor-mation to the Label.Text property, .NET needs to generate a new String object. A better solution is to use the specialized System.Text.StringBuilder class, which is designed to handle intensive string processing with a lower overhead by managing an internal buffer or memory.
Here’s the more efficient way you could write the string processing code:
' For maximum performance, join all the event ' information into one large string using the ' StringBuilder.
Dim sb As New System.Text.StringBuilder()
For Each entry As EventLogEntry In log.Entries ' Write the event entries to the StringBuilder.
If chkAll.Checked Or entry.Source = txtSource.Text Then sb.Append("<b>Entry Type:</b> ")
sb.Append(entry.EntryType.ToString()) sb.Append("<br /><b>Message:</b> ") sb.Append(entry.Message)
sb.Append("<br /><b>Time Generated:</b> ") sb.Append(entry.TimeGenerated.ToString()) sb.Append("<br /><br />")
End If Next
' Copy the complete text to the web page. lblResult.Text = sb.ToString()
■
Tip
You can get around some of the limitations of the event log by using your own custom logging sys-tem. All the ingredients you need are built into the common class library. For example, you could store error information in a database using the techniques to be described in Chapter 13.Error Pages
This error page is shown only for local requests that access the ASP.NET application through the http://localhostdomain. (This domain always refers to the current com-puter, regardless of its actual server name or Internet address.) ASP.NET doesn’t create a rich error page for requests from other computers; they receive the rather unhelpful generic page shown in Figure 7-13.
This generic page lacks any specific details about the type of error or the offending code. Sharing that information with end users would be a security risk (potentially exposing sensitive details about the source code), and it would be completely unhelpful, because clients are never in a position to modify the source code themselves. Instead, the page includes a generic message explaining that an error has occurred and describing how to enable remote error pages.
Error Modes
Remote error pages remove this restriction and allow ASP.NET to display detailed information for problems regardless of the source of the request. Remote error pages are intended as a testing tool. For example, in the initial rollout of an application beta, you might use field testers. These field testers would need to report specific information about application errors to aid in the debugging process. Similarly, you could use remote error pages if you’re working with a team of developers and testing an ASP.NET application from a live web server. In this case, you might follow the time-honored code/compile/upload pattern.
To change the error mode, you need to modify the <customErrors> section in the web.config file. By default, Visual Studio creates a web.config with this section but com-ments it out. However, the default settings are equivalent to this:
<configuration> <system.web>
<customErrors mode="RemoteOnly" /> ...
</system.web> </configuration>
Table 7-3 lists the options for the mode attribute.
Table 7-3. Error Modes
Error Mode Description
RemoteOnly This is the default setting, which uses rich ASP.NET error pages only when the developer is accessing an ASP.NET application on the current machine.
Off This configures rich error pages (with source code and stack traces) for all unhandled errors, regardless of the source of the request. This setting is helpful in many development scenarios but should not be used in a deployed application.
On ASP.NET error pages will never be shown. When an unhandled error is encoun-tered, a corresponding custom error page will be shown if one exists. Otherwise, ASP.NET will show the generic message explaining that application settings prevent the error details from being displayed and describing how to change the configuration.
A Custom Error Page
In a deployed application, you should use the On or RemoteOnly error mode. Any errors in your application should be dealt with through error handling code, which can then present a helpful and user-oriented message (rather than the developer-oriented code details in ASP.NET’s rich error messages).
However, you can’t catch every possible error in an ASP.NET application. For example, a hardware failure could occur spontaneously in the middle of an ordinary code statement that could not normally cause an error. More commonly, the user might encounter an HTTP error by requesting a page that doesn’t exist. ASP.NET allows you to handle these problems with custom error pages.
You can implement custom error pages in two ways. You can create a single generic error page and configure ASP.NET to use it by modifying the web.config file as shown here:
<configuration> <system.web>
<customErrors defaultRedirect="DefaultError.aspx" /> </system.web>
ASP.NET will now exhibit the following behavior:
• If ASP.NET encounters an HTTP error while serving the request, it will forward the user to the DefaultError.aspx web page.
• If ASP.NET encounters an unhandled application error and it isn’t configured to display rich error pages, it will forward the user to the DefaultError.aspx. Remote users will never see the generic ASP.NET error page.
• If ASP.NET encounters an unhandled application error and it is configured to dis-play rich developer-targeted error pages, it will disdis-play the rich error page instead.
■
Note
What happens if an error occurs in the error page itself? In a custom error page (in this case, DefaultError.aspx), ASP.NET will not be able to handle an error. It will not try to reforward the user to the same page. Instead, it will display the normal client error page with the generic message.Specific Custom Error Pages
You can also create error pages targeted at specific types of HTTP errors (such as the infa-mous 404 Not Found error or Access Denied). This technique is commonly used with websites to provide friendly equivalents for common problems. Figure 7-14 shows how one site handles this issue.
To define an error-specific custom page, you add an <error> element to the <customErrors> element. The <error> element identifies the HTTP error code and the redirect page.
<configuration> <system.web>
<customErrors defaultRedirect="DefaultError.aspx"> <error statusCode="404" redirect="404.aspx" /> <customErrors>
</system.web> </configuration>
In this example, the user will be redirected to the 404.aspx page when requesting an ASP.NET page that doesn’t exist. This custom error page may not work exactly the way you expect, because it comes into effect only if ASP.NET is handling the request.
For example, if you request the nonexistent page whateverpage.aspx, you’ll be redirected to 404.aspx, because the .aspx file extension is registered to the ASP.NET service. However, if you request the nonexistent page whateverpage.html, ASP.NET will not process the request, and the default redirect setting specified in IIS will be used. Typically, this means the user will see the page c:\[WinDir]\Help\IISHelp\common\404b.htm. You could change the set of registered ASP.NET file types to include .html and .htm files, but this will slow down performance. Optionally, you could change your ASP.NET application to use the custom IIS error page:
<configuration> <system.web>
<customErrors defaultRedirect="/DefaultError.aspx"> <error statusCode="404" redirect="/Errors/404b.htm" /> <customErrors>
</system.web> </configuration>
When an error occurs that isn’t specifically addressed by a custom <error> element, the default error page will be used.
Page Tracing
Code entanglement: It’s difficult to separate the ordinary code from the debugging code. Before the application can be deployed, you need to painstakingly search through the code and remove or comment out all the Response.Write() statements.
No single point of control: If problems occur later down the road, you have no easy way to “reenable” the write statements. Response.Write() statements are tightly inte-grated into the code.
User interface problems: Response.Write() outputs information directly into the page. Depending on the current stage of page processing, the information can appear in just about any location, potentially scrambling your layout.
You can overcome these problems with additional effort and some homegrown solu-tions. However, ASP.NET provides a far more convenient and flexible method built into the framework services. It’s called tracing.
Enabling Tracing
To use tracing, you need to explicitly enable it. There are several ways to switch on tracing. One of the easiest ways is by adding an attribute to the Page directive in the .aspx file:
<%@ Page Trace="True" ... %>
You can also enable tracing using the built-in Trace object (which is an instance of the System.Web.TraceContext class). Here’s an example of how you might turn tracing on in the Page.Load event handler:
Protected Sub Page_Load(ByVal sender As Object, _ ByVal e As EventArgs) Handles Me.Load
This technique is particularly useful because it allows you to enable or disable tracing for a page programmatically. For example, you could examine the query string collection and enable tracing only if a special Tracing variable is received. This could allow develop-ers to run tracing diagnostics on deployed pages, without revealing that information for normal requests from end users.
Protected Sub Page_Load(ByVal sender As Object, _ ByVal e As EventArgs) Handles Me.Load
If Request.QueryString("Tracing") = "On" Trace.IsEnabled = True
End If End Sub
Note that by default, once you enable tracing it will only apply to local requests. That prevents actual end users from seeing the tracing information. If you need to trace a web page from an offsite location, you should use a technique like the one shown previously (for query string activation). You’ll also need to change some web.config settings to enable remote tracing. Information about modifying these settings is found at the end of this chapter, in the “Application-Level Tracing” section.
WHAT ABOUT VISUAL STUDIO?
Visual Studio provides a full complement of debugging tools that allow you to set breakpoints, step through code, and view the contents of variables while your program executes. Though you can use Visual Studio in conjunction with page tracing, you probably won’t need to do so. Instead, page tracing will become more useful for debugging problems after you have deployed the application to a web server. Chapter 4 discussed Visual Studio debugging.
Tracing Information
On its own, this page does very little, displaying a single line of text. However, if you click the button, tracing is enabled. When the page is rendered, it will include a significant amount of diagnostic information, as shown in Figure 7-16.
Tracing information is provided in several different categories, which are described in the following sections. Depending on your page, you may not see all the tracing infor-mation. For example, if the page request doesn’t supply any query string parameters, you won’t see the QueryString collection. Similarly, if there’s no data being held in application or session state, you won’t see those sections either.
■
Tip
If you’re using style sheets, your rules may affect the formatting and layout of the trace information, potentially making it difficult to read. If this becomes a problem, you can use application-level tracing, as described later in this chapter (see the “Application-Level Tracing” section).Request Details
This section includes some basic information such as the current session ID, the time the web request was made, and the type of web request and encoding (see Figure 7-17).
Trace Information
Trace information shows the different stages of processing that the page went through before being sent to the client (see Figure 7-18). Each section has additional information about how long it took to complete, as a measure from the start of the first stage (From First) and as a measure from the start of the previous stage (From Last). If you add your own trace messages (a technique described shortly), they will also appear in this section.
Control Tree
The control tree shows you all the controls on the page, indented to show their hierarchy (which controls are contained inside other controls), as shown in Figure 7-19. In this simple page example, the only explicitly created controls are the label (lblMessage) and the web page. However, ASP.NET adds literal controls automatically to represent spacing and any other static elements that aren’t server controls (such as text or ordinary HTML tags). One useful feature of this section is the Viewstate column, which tells you how many bytes of space are required to persist the current information in the control. This can help you gauge whether enabling control state is detracting from performance, particularly when working with data-bound controls such as the GridView.
Figure 7-17. Request details
Session State and Application State
These sections display every item that is in the current session or application state. (Figure 7-20 shows the session state section.) Each item in the appropriate state collection is listed with its name, type, and value. If you’re storing simple pieces of string information, the value is straightforward—it’s the actual text in the string. If you’re storing an object, .NET calls the object’s ToString() method to get an appropriate string representation. For complex objects that don’t override ToString() to provide anything useful, the result may just be the class name.
Cookies Collection
This section displays all the cookies that are sent with the response, and the content and size of each cookie in bytes (see Figure 7-21). Even if you haven’t explicitly created a cookie, you’ll see the ASP.NET_SessionId cookie, which contains the current session ID. If you’re using forms-based authentication, you’ll also see the security cookie.
Figure 7-19. Control tree
Figure 7-20. Session state
Headers Collection
This section lists all the HTTP headers (see Figure 7-22). Generally, you don’t need to use this information, although it can be useful for troubleshooting unusual network problems.
Form Collection
This section lists the posted-back form information (see Figure 7-23).
Query String Collection
This section lists the variables and values submitted in the query string (see Figure 7-24). Generally, you’ll be able to see this information directly in the address box in the browser, so you won’t need to refer to the information here.
Figure 7-22. Headers collection
Figure 7-23. Form collection
Server Variables
This section lists all the server variables and their contents. You don’t generally need to examine this information. Note also that if you want to examine a server variable pro-grammatically, you can do so by name with the built-in Request.ServerVariables collection or by using one of the more useful higher-level properties from the Request object.
Writing Trace Information
The default trace log provides a set of important information that can allow you to monitor some important aspects of your application, such as the current state contents and the time taken to execute portions of code. In addition, you’ll often want to generate your own tracing messages. For example, you might want to output the value of a variable at various points in execution so you can compare it with an expected value. Similarly, you might want to output messages when the code reaches certain points in execution so you can verify that various procedures are being used (and are used in the order you expect).
To write a custom trace message, you use the Write() method or the Warn() method of the built-in Trace object. These methods are equivalent. The only difference is that Warn() displays the message in red lettering, which makes it easier to distinguish from other messages in the list. Here’s a code snippet that writes a trace message when the user clicks a button:
Protected Sub cmdWrite_Click(ByVal sender As Object, _ ByVal e As EventArgs) Handles cmdWrite.Click
Trace.Write("About to place an item in session state.") Session("Test") = "Contents"
Trace.Write("Placed item in session state.") End Sub
You can also use an overloaded method of Write() or Warn() that allows you to specify the category. A common use of this field is to indicate the current method, as shown in Figure 7-26.
Protected Sub cmdWriteCategory_Click(ByVal sender As Object, _ ByVal e As System.EventArgs) Handles cmdWriteCategory.Click
Trace.Write("cmdWriteCategory_Click", _
"About to place an item in session state.") Session("Test") = "Contents"
Trace.Write("cmdWriteCategory_Click", _ "Placed item in session state.") End Sub
Alternatively, you can supply category and message information with an exception object that will automatically be described in the trace log, as shown in Figure 7-27.
Protected Sub cmdError_Click(ByVal sender As Object, _ ByVal e As EventArgs) Handles cmdError.Click
Try
DivideNumbers(5, 0) Catch err As Exception
Trace.Warn("cmdError_Click", "Caught Error", err) End Try
End Sub
Private Function DivideNumbers(ByVal number As Decimal, _ ByVal divisor As Decimal) As Decimal
Return number/divisor End Sub
By default, trace messages are listed in the order they were written by your code. Alternatively, you can specify that messages should be sorted by category using the TraceMode attribute in the Page directive:
<%@ Page Trace="True" TraceMode="SortByCategory" %>
or the TraceMode property of the Trace object in your code:
Trace.TraceMode = TraceMode.SortByCategory
Application-Level Tracing
Application-level tracing allows you to enable tracing for an entire application. To do this, you need to modify settings in the web.config file, as shown here:
<configuration> <system.web>
<trace enabled="true" requestLimit="10" pageOutput="false" traceMode="SortByTime" localOnly="true" />
</system.web> </configuration>
Table 7-4 lists the tracing options.
Table 7-4. Tracing Options
Attribute Values Description
enabled true, false Turns application-level tracing on or off.
requestLimit Any integer (for example, 10) Stores tracing information for a maximum number of HTTP requests. Unlike page-level tracing, this allows you to collect a batch of information from multiple requests. When the maximum is reached, the information for the oldest request is abandoned every time a new request is received.
pageOutput true, false Determines whether tracing information will be displayed on the page (as it is with page-level tracing). If you choose false, you’ll still be able to view the collected information by requesting trace.axd from the virtual directory where your application is running.
traceMode SortByTime, SortByCategory Determines the sort order of trace messages.
localOnly true, false Determines whether tracing information will be shown only to local clients (clients using the same computer) or can be shown to remote clients as well. By default, this is true and remote clients cannot see tracing information.
mostRecent true, false Keeps only the most recent trace messages if true. When the requestLimit maximum is reached, the information for the oldest request is abandoned every time a new request is received. If false (the default), ASP.NET stops collecting new trace messages when the limit is reached.
the request and interprets it as a request for the tracing information. It will then list the most recent collected requests, provided you’re making the request from the local machine or have enabled remote tracing (see Figure 7-28).
You can see the detailed information for any request by clicking the View Details link. This provides a useful way to store tracing information for a short period of time and allows you to review it without needing to see the actual pages (see Figure 7-29).
The Last Word
The difference between an ordinary website and a professional web application is often in how it deals with errors. In this chapter, you learned the different lines of defense you can use in .NET, including structured error handling, logging, custom error pages, and tracing.
In the next chapter, you’ll tackle some of ASP.NET’s most interesting web controls.