Oracle® Database Firewall
Administration Guide
Release 5.1
E22686-04Oracle Database Firewall Administration Guide Release 5.1 E22686-04
Copyright © 2003, 2012, Oracle and/or its affiliates. All rights reserved.
Contributors: Tammy Bednar, Paul Betteridge, Andrey Brozhko, Marek Dulko, Paul Hackett, Gigi Hanna, K. Karun, Paul Laws, Valarie Moore, Steve Moyle, Gian Sartor, Stuart Sharp, James Spooner, Nithin Gomez, Tom Taylor, James Wilson
This software and related documentation are provided under a license agreement containing restrictions on use and disclosure and are protected by intellectual property laws. Except as expressly permitted in your license agreement or allowed by law, you may not use, copy, reproduce, translate, broadcast, modify, license, transmit, distribute, exhibit, perform, publish, or display any part, in any form, or by any means. Reverse engineering, disassembly, or decompilation of this software, unless required by law for interoperability, is prohibited.
The information contained herein is subject to change without notice and is not warranted to be error-free. If you find any errors, please report them to us in writing.
If this is software or related documentation that is delivered to the U.S. Government or anyone licensing it on behalf of the U.S. Government, the following notice is applicable:
U.S. GOVERNMENT RIGHTS Programs, software, databases, and related documentation and technical data delivered to U.S. Government customers are "commercial computer software" or "commercial technical data" pursuant to the applicable Federal Acquisition Regulation and agency-specific supplemental regulations. As such, the use, duplication, disclosure, modification, and adaptation shall be subject to the restrictions and license terms set forth in the applicable Government contract, and, to the extent applicable by the terms of the Government contract, the additional rights set forth in FAR 52.227-19, Commercial Computer Software License (December 2007). Oracle America, Inc., 500 Oracle Parkway, Redwood City, CA 94065.
This software or hardware is developed for general use in a variety of information management applications. It is not developed or intended for use in any inherently dangerous applications, including applications that may create a risk of personal injury. If you use this software or hardware in dangerous applications, then you shall be responsible to take all appropriate fail-safe, backup, redundancy, and other measures to ensure its safe use. Oracle Corporation and its affiliates disclaim any liability for any damages caused by use of this software or hardware in dangerous applications.
Oracle and Java are registered trademarks of Oracle and/or its affiliates. Other names may be trademarks of their respective owners.
Intel and Intel Xeon are trademarks or registered trademarks of Intel Corporation. All SPARC trademarks are used under license and are trademarks or registered trademarks of SPARC International, Inc. AMD, Opteron, the AMD logo, and the AMD Opteron logo are trademarks or registered trademarks of Advanced Micro Devices. UNIX is a registered trademark of The Open Group.
This software or hardware and documentation may provide access to or information on content, products, and services from third parties. Oracle Corporation and its affiliates are not responsible for and expressly disclaim all warranties of any kind with respect to third-party content, products, and services. Oracle Corporation and its affiliates will not be responsible for any loss, costs, or damages incurred due to your access to or use of third-party content, products, or services.
Contents
Preface
... xiiiAudience... xiii
Documentation Accessibility ... xiii
Related Documents ... xiii
Conventions ... xiv
1 Introducing Oracle Database Firewall
Downloading the Latest Version of This Manual... 1-1 Oracle Database Firewall System Architecture... 1-1
About the Oracle Database Firewall System Architecture... 1-1
High-Availability Resilient Pairs ... 1-2
Ways to Connect Oracle Database Firewall to a Database Network... 1-3
Integrating Oracle Database Firewall with Third-Party Products... 1-4 Using the Oracle Database Firewall Administration Console... 1-4
About the Oracle Database Firewall Administration Console ... 1-4
Which Administration Console Should I Use? ... 1-5
Tasks Performed in a Standalone Database Firewall Administration Console... 1-5
Tasks Performed in a Managed Database Firewall Administration Console ... 1-6
Tasks Performed in a Management Server ... 1-6
Logging in to the Administration Console... 1-7
Administration Console Tabs... 1-9 Security Guidelines... 1-10
2 Configuring an Oracle Database Firewall
About Configuring an Oracle Database Firewall... 2-1 Step 1: Set the Database Firewall Date and Time... 2-1 Step 2: Specify the Database Firewall System Settings... 2-3 Step 3: Enable Secure Log Access in the Standalone Database Firewall... 2-5 Step 4: Configure the Standalone Database Firewall Syslog Destinations... 2-5 Step 5: Configure the Standalone Database Firewall Enforcement Points... 2-6 Step 6: Configure the Database Firewall Bridge IP Address... 2-8 Step 7: Test the Standalone Database Firewall System Operation... 2-9 What’s Next? ... 2-10
3 Configuring a Database Firewall Management Server
About Configuring an Oracle Database Firewall Management Server-Based System... 3-1 Step 1: Perform Initial Tasks for Each Database Firewall Management Server... 3-2
Step 1A: Specify the Management Server System Settings... 3-2
Step 1B: Enable Secure Log Access ... 3-4
Step 1C: Set the Database Firewall Management Server Date and Time... 3-5
Step 1D: Configure the Management Server Syslog Destinations... 3-6 Step 2: Perform Tasks for Each Oracle Database Firewall... 3-7
Step 2A: Configure the Database Firewall System and Time Settings ... 3-7
Step 2B: Enter the Database Firewall Management Server Certificate and IP Address ... 3-8 Step 3: Complete the Final Database Firewall Management Server Tasks... 3-8
Step 3A: Specify Management Server Partner Settings (Resilient Pair Only) ... 3-8
Step 3B: Add Each Oracle Database Firewall to the Management Server... 3-9
Step 3C: Define Resilient Pairs of Oracle Database Firewalls... 3-11 Step 4: Configure the Management Server Enforcement Points... 3-12 Step 5: Test the Management Server System Operation... 3-14 What’s Next?... 3-14
4 Configuring Oracle Database Firewall for High Availability
About Using High Availability with Oracle Database Firewall... 4-1
How Does High Availability Work with the Oracle Database Firewall Components? ... 4-1
Incorporating Resilient Pairs of Oracle Database Firewall Management Servers... 4-2
Adding Paired Enforcement Points... 4-3
Network Communication for the Resilient Pairs ... 4-3 Configuring a Resilient Pair of Oracle Database Firewall Management Servers... 4-3
Procedure for Configuring a Pair of Resilient Database Firewall Management Servers ... 4-4
Swapping the Primary and Secondary Database Firewall Management Servers ... 4-4 Configuring a Resilient Pair of Oracle Database Firewalls... 4-5
Procedure for Configuring a Pair of Oracle Database Firewalls... 4-5
Swapping the Primary and Secondary Oracle Database Firewalls ... 4-5 Pairing Enforcement Points... 4-5 Archiving Data... 4-6 Updating the Oracle Database Firewall Software in Resilient Pairs... 4-6
5 Configuring Stored Procedure Auditing
About Stored Procedure Auditing (SPA)... 5-1 Setting User Permissions for SPA... 5-1
Setting SPA User Permissions on Oracle Databases ... 5-1
Setting SPA User Permissions for SQL Server Databases ... 5-2
Setting SPA User Permissions for MySQL Databases ... 5-5
Setting SPA User Permissions for Sybase ASE Databases ... 5-5
Setting SPA User Permissions for Sybase SQL Anywhere Databases ... 5-6
Installing the Sybase SQL Anywhere ODBC Driver for Linux ... 5-7
Setting Stored Procedure Auditing User Permissions... 5-7
Setting SPA User Permissions for IBM DB2 SQL Databases ... 5-8 Enabling SPA on the Database Firewall... 5-9
Disabling SPA... 5-10
6 Configuring and Using Role Auditing
About User Role Auditing (URA)... 6-1 Setting User Permissions for URA... 6-1
Setting URA User Permissions for Oracle Databases ... 6-1
Setting URA User Permissions for SQL Server Databases... 6-2
Setting URA User Permissions for MySQL Databases ... 6-5
Setting URA User Permissions for Sybase ASE Databases ... 6-5
Setting URA User Permissions for Sybase SQL Anywhere Databases ... 6-6
Installing the Sybase SQL Anywhere ODBC Driver for Linux ... 6-7
Setting URA User Permissions... 6-7
Setting URA User Permissions for IBM DB2 SQL Databases ... 6-8 Enabling URA on the Database Firewall... 6-9 Disabling URA... 6-10
7 Configuring and Using Local Monitoring
About Local Monitoring... 7-1 Installing Local Monitoring... 7-2
Accessing the Scripts Required to Install Local Monitoring... 7-2
Database Accounts Created for Local Monitoring ... 7-2
Installing Local Monitoring in an Oracle Database... 7-3
Installing Local Monitoring in a Microsoft SQL Server Database ... 7-4
Installing Local Monitoring in a Sybase ASE Database... 7-4 Enabling Local Monitoring... 7-5 Disabling Local Monitoring... 7-6
8 Configuring and Using Remote Monitoring
About Remote Monitoring... 8-1 Installing and Enabling Remote Monitoring... 8-2
Step 1: Configure the Remote Monitor in the Administration Console... 8-2
Step 2: Access and Run the remote-agent Remote Monitor Script ... 8-3
Step 3: Ensure That the Remote Monitor Is Active ... 8-4 Disabling Remote Monitoring... 8-4
9 Configuring and Using Direct Database Interrogation
About Direct Database Interrogation (DDI)... 9-1
Using DDI to Interrogate SQL Server and SQL Anywhere Databases ... 9-1
Using DDI to Monitor Oracle Databases That Use Oracle Advanced Security ... 9-1 Configuring DDI for SQL Server and Sybase SQL Anywhere Databases... 9-2
Setting DDI User Permissions in a Microsoft SQL Server Database ... 9-2
Setting DDI User Permissions in a Sybase SQL Anywhere Database... 9-3
Enabling DDI in an Enforcement Point for SQL Server or SQL Anywhere Databases ... 9-4 Configuring DDI for an Oracle Database With Oracle Advanced Security... 9-4
Providing a Public Key to the Oracle Database... 9-5
Enabling DDI in an Enforcement Point for an Oracle Database ... 9-6 Enabling DDI... 9-6 Disabling DDI... 9-7
10 Configuring and Using Database Response Monitoring
About Database Response Monitoring... 10-1 Configuring Database Response Monitoring... 10-2
Enabling Database Response Monitoring... 10-2
Setting Up Login/Logout Policies in the Analyzer ... 10-2
11 Using Oracle Database Firewall with BIG-IP ASM
About the Integration of Oracle Database Firewall with BIG-IP ASM... 11-1 Key Benefits of Integrating Oracle Database Firewall with BIG-IP ASM... 11-2 How the Integration Works... 11-3 Deploying the Oracle Database Firewall-BIG-IP ASM Integration... 11-3
About the Deployment... 11-4
System Requirements ... 11-4
Configuring Oracle Database Firewall... 11-4
Configuring BIG-IP ASM ... 11-5
Logging Profile ... 11-5
Policy Settings... 11-6
Developing a BIG-IP ASM iRule... 11-6
Required Syslog Message Format ... 11-8
Configuring syslog-ng.conf ... 11-8 Presentation of Data in Oracle Database Firewall... 11-9
Administration Console Dashboard... 11-9
Viewing the Traffic Log Generated by BIG-IP ASM... 11-10
Understanding the Attributes ... 11-11
Web Application Firewall (WAF) Reports ... 11-11
12 Using Oracle Database Firewall with ArcSight SIEM
About the Integration of Oracle Database Firewall with ArcSight SIEM... 12-1 Enabling the Oracle Database Firewall-ArcSight SIEM Integration... 12-1 Oracle Database Firewall-ArcSight SIEM Syslog Mapping Tables... 12-2
About the ArcSight SIEM Integration ... 12-3
DBFW:3 (Heartbeat)... 12-3
DBFW:4 (Property Change) ... 12-4
DBFW:8 (Database Audit)... 12-5
DBFW:9 (Statement Alert) ... 12-6
DBFW:10 (Statement Alert (WAF)) ... 12-7
DBFW:11 (Login Alert)... 12-9
DBFW:12 (Logout Alert) ... 12-10
13 System Administration
Security Guidelines... 13-1 Using the Dashboard... 13-1 Configuring Oracle Database Firewalls... 13-2 Configuring Protected Databases... 13-3
About Configuring Protected Databases ... 13-3
Configuring User Settings for Protected Databases... 13-5 Listing, Creating, and Configuring Enforcement Points... 13-6
About Working with Enforcement Points... 13-6
Managing Enforcement Points... 13-7
Finding the Status of an Enforcement Point... 13-7
Changing the Settings of an Enforcement Point... 13-7
Configuring BIG-IP Application Security Manager Settings... 13-9 Configuring a Resilient Pair of Enforcement Points... 13-9 Configuring Traffic Sources... 13-9 Configuring Database Firewall as a Traffic Proxy... 13-9 Changing the Network Configuration... 13-11 Configuring the System... 13-12 Archiving Data... 13-13
About Archiving Data ... 13-13
Defining Archiving Destinations ... 13-14
Creating an Archive Schedule... 13-16
Starting an Archive Job Manually ... 13-16
Starting a Configuration Archive Job... 13-17
Restoring an Archive ... 13-18
Restoring a Configuration in which the Pass Phrase was not Archived ... 13-18 Viewing the Logs... 13-19 Configuring Connectors to Third-Party Systems... 13-20 Configuring E-Mail Alerts... 13-21
Configuring the SMTP Server ... 13-22
Configuring E-Mail Recipients... 13-22
Example E-Mail Alert Notification ... 13-23 Configuring Users... 13-23
About Configuring Users... 13-23
Creating a New User Account... 13-24
Creating Password Policies ... 13-25 Viewing and Capturing Network Traffic in an Individual Database Firewall... 13-26
Viewing Network Traffic ... 13-26
Capturing Network Traffic ... 13-26 Monitoring the Database Firewall’s Embedded Oracle Database... 13-27
A Oracle Database Firewall Database Schema
About the Oracle Database Firewall Schema... A-1 Summary Tables... A-1
About the Summary Tables ... A-2
database_user_addresses Table ... A-2
database_users Table ... A-2
dictionary Table... A-3
protected_database_addresses Table ... A-3
protected_databases Table... A-4
sources Table... A-4
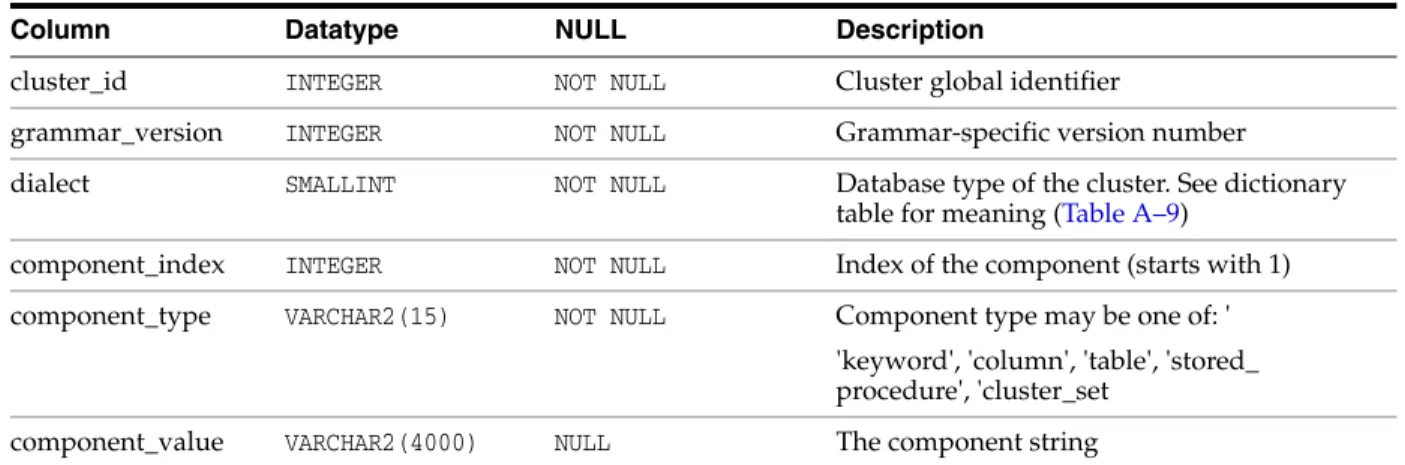
summary_clusters Table ... A-5
cluster_components Table ... A-6
summary_records Table... A-6
summary_sessions Table... A-7
summary_statement_attributes Table... A-8
traffic_events Table ... A-9
traffic_summaries View ... A-11
Relationship Diagram of the Summary Tables... A-14 Log Forensic Tables... A-15
About the Forensic Tables... A-15
traffic_log_queries Table ... A-15
traffic_log_query_results Table... A-16 Stored Procedure and User Role Audit Tables... A-21
About the Stored Procedure and User Role Audit Tables ... A-21
doa_approved_edits Table... A-22
doa_approved_objects Table ... A-23
doa_edit_comments Table ... A-24
doa_edits Table... A-24
doa_pending_approvals Table... A-25
doa_tag_definitions Table... A-26 Report-Related Functions... A-27
B Syslog Message Format
About Syslog Messages... B-1 Message Format... B-1
Message ID = 1 (General Messages) ... B-2
Message ID = 3 (Heartbeat) ... B-2
Message ID = 4 (Property Change)... B-3
Message ID = 8 (Database Audit Summary)... B-3
Message ID = 9 (Statement Alerts) ... B-4
Message ID = 10 (F5 BIG-IP ASM Alerts) ... B-5
Message ID = 11 (Login Alert) ... B-8
Message ID = 12 (Logout Alert) ... B-9
C Traffic Log Attributes
Transaction Status... C-1 Performance... C-2 Context... C-2 Attributes (F5)... C-2
Glossary
Index
List of Figures
1–1 Enterprise Architecture Using a Database Firewall Management Server ... 1-2 1–2 Oracle Database Firewall High Availability ... 1-3 1–3 Dashboard Page of the Management Server Administration Console ... 1-5 4–1 High Availability Using a Resilient Pair of Oracle Database Firewalls ... 4-2 4–2 High Availability Using a Resilient Pair of Management Servers and Database Firewalls ....
4-3
10–1 Database Response Monitoring ... 10-1 11–1 Oracle Database Firewall with F5 BIG-IP ASM Data Flow Unit... 11-2 13–1 Dashboard Page of the Management Server Administration Console ... 13-2 13–2 Appliances Tab for Configuring Oracle Database Firewalls ... 13-3 13–3 Configuring a Protected Database... 13-4 13–4 Protected Database Settings ... 13-4 13–5 Finding Existing Enforcement Points ... 13-7 13–6 Changing Settings of an Enforcement Point ... 13-8 13–7 Archiving Data ... 13-13 13–8 Managing Logs... 13-19 13–9 Syslog Settings... 13-21 13–10 Configuring Users... 13-24 13–11 Viewing Network Traffic from a Database Firewall... 13-26 A–1 Relationship Diagram of the Summary Tables... A-14
List of Tables
12–1 Message Types Sent to ArcSight SIEM ... 12-3 12–2 DBFW:3 (Heartbeat) CEF Header Fields ... 12-3 12–3 DBFW:3 (Heartbeat) Extension Fields ... 12-4 12–4 DBFW:4 (Property Change) CEF Header Fields... 12-4 12–5 DBFW:4 (Property Change) Extension Fields... 12-4 12–6 DBFW:8 (Database Audit) CEF Header Fields ... 12-5 12–7 DBFW:8 (Database Audit) Extension Fields ... 12-5 12–8 DBFW:6 (Statement Alert) CEF Header Fields ... 12-6 12–9 DBFW:6 (Statement Alert (WAF)) Extension Fields ... 12-7 12–10 DBFW:7 (Statement Alert (WAF)) CEF Header Fields ... 12-8 12–11 DBFW:7 (Statement Alert (WAF)) Extension Fields ... 12-8 12–12 DBFW:11 (Login Alert) CEF Header Fields ... 12-9 12–13 DBFW:11 (Login Alert) Extension Fields... 12-9 12–14 DBFW:12 (Logout Alert) CEF Header Fields... 12-10 12–15 DBFW:12 (Logout Alert) Extension Fields ... 12-10 12–16 DBFW:system (System Message) CEF Header Fields ... 12-11 12–17 DBFW:system (System Message) Extension Fields... 12-11 A–1 applied_baselines Table ... A-2 A–2 database_user_addresses Table ... A-2 A–3 database_users Table... A-2 A–4 dictionary Table... A-3 A–5 protected_database_addresses Table ... A-4 A–6 protected_databases Table... A-4 A–7 sources Table ... A-5 A–8 summary_clusters Table ... A-5 A–9 cluster_components Table ... A-6 A–10 summary_records Table... A-6 A–11 summary_sessions Table ... A-8 A–12 summary_statement_attributes Table... A-8 A–13 traffic_events Table... A-9 A–14 traffic_summaries View ... A-12 A–15 traffic_log_queries Table... A-15 A–16 traffic_log_query_results Table... A-16 A–17 doa_approved_edits Table ... A-22 A–18 doa_approved_objects Table... A-23 A–19 doa_edit_comments Table ... A-24 A–20 doa_edits Table... A-24 A–21 doa_pending_approvals Table... A-25 A–22 doa_tag_definitions Table... A-26 C–1 Transaction Status... C-1 C–2 Performance... C-2 C–3 Context... C-2 C–4 Attributes (F5)... C-2
Preface
Welcome to Oracle Database Firewall Administration Guide. This section contains:
■ Audience
■ Documentation Accessibility ■ Related Documents
■ Conventions
Audience
This guide has been written for system administrators who are responsible for the initial deployment and day-to-day administration of Oracle Database Firewall. It includes:
■ An introduction to the concepts and components of Oracle Database Firewall ■ Instructions on how to set up the system for the first time
■ Details of routine tasks such as monitoring the system, deploying policies,
producing archives and running reports
This guide does not provide detailed information about the Oracle Database Firewall Analyzer software. Oracle Database Firewall Security Guide is provided for that purpose.
Documentation Accessibility
For information about Oracle's commitment to accessibility, visit the Oracle Accessibility Program website at
http://www.oracle.com/pls/topic/lookup?ctx=acc&id=docacc.
Access to Oracle Support
Oracle customers have access to electronic support through My Oracle Support. For information, visit http://www.oracle.com/pls/topic/lookup?ctx=acc&id=info or visit http://www.oracle.com/pls/topic/lookup?ctx=acc&id=trs if you are hearing impaired.
Related Documents
For more information, see the following documents in the Oracle Database Firewall Release documentation set:
■ Oracle Database Firewall Installation Guide ■ Oracle Database Firewall Security Guide ■ Oracle Database Firewall Licensing Information
Conventions
The following text conventions are used in this document:
Convention Meaning
boldface Boldface type indicates graphical user interface elements associated with an action, or terms defined in text or the glossary.
italic Italic type indicates book titles, emphasis, or placeholder variables for which you supply particular values.
monospace Monospace type indicates commands within a paragraph, URLs, code in examples, text that appears on the screen, or text that you enter.
1
1
Introducing Oracle Database Firewall
This chapter contains:
■ Downloading the Latest Version of This Manual ■ Oracle Database Firewall System Architecture
■ Using the Oracle Database Firewall Administration Console ■ Security Guidelines
Downloading the Latest Version of This Manual
You can download the latest version of this manual from the Oracle Database Firewall Web site, which is in the Database section of Oracle Technology Network. The URL is as follows:
http://www.oracle.com/technetwork/indexes/documentation/index.html
Oracle Database Firewall System Architecture
This section contains:
■ About the Oracle Database Firewall System Architecture ■ High-Availability Resilient Pairs
■ Ways to Connect Oracle Database Firewall to a Database Network ■ Integrating Oracle Database Firewall with Third-Party Products
About the Oracle Database Firewall System Architecture
The typical Oracle Database Firewall architecture has the following main components:
■ The database network, containing the database server and its clients: You are
not required to install Oracle Database Firewall onto the database server or clients. However, if needed, you can install the Database Firewall Local Monitoring on the database server, which enables the Database Firewall to monitor SQL traffic originating from the users or processes that have direct access (for example, through the console) to the database computer.
■ The Database Firewall: This is a dedicated server that runs the Oracle Database
Firewall software. Each Database Firewall collects SQL data from SQL databases, and then sends this SQL data to the Database Firewall Management Server to be analyzed in reports. After the Database Firewall sends the SQL data to the
Oracle Database Firewall System Architecture
Management Server, it deletes it locally. The SQL data is then stored in the Management Server.
■ Database Firewall applications and other third-party applications: These
applications perform system configuration, monitoring, and administration. If necessary, you can use a single computer to operate these applications. However, typically, there is a separate computer for each application, because applications are often used by different people or from different locations.
Examples of Database Firewall applications include the Oracle Database Firewall Administration Console and Oracle Database Analyzer. For details about the Analyzer, see the Oracle Database Firewall Security Guide.
You must use a Database Firewall Management Server to control one or more
Database Firewall installations. Figure 1–1 shows an architecture for such a system. A Database Firewall Management Server is suitable for larger enterprise installations that protect multiple databases at different sites.
Figure 1–1 illustrates the position of the Management Server in the Database Firewall architecture.
Figure 1–1 Enterprise Architecture Using a Database Firewall Management Server
Note:
■ This figure shows only one protected database for simplicity. A
typical architecture will have many protected databases.
■ Generally, Database Firewalls use different network ports
(network devices and therefore, network paths) to connect to the Management Server. The Network Switch in this diagram shows two port connections for each of the Database Firewalls.
High-Availability Resilient Pairs
You can configure pairs of Database Firewalls or pairs of Database Firewall
Management Servers, or both, to provide a high-availability system architecture. These pairs are known as resilient pairs. The resilient pair configuration works in Database Activity Monitoring (DAM) mode only.
Oracle Database Firewall System Architecture
During system configuration, one device is nominated as the primary device and the other as the secondary device. The primary device carries out all normal operations while the secondary device monitors traffic, but gives alerts only if the primary device fails.
Both primary and secondary Database Firewalls:
■ Receive the same span traffic
■ Have the same configuration (the Management Server synchronizes this) ■ Create log files according to the policy applied
Only the primary Database Firewall:
■ Sends out real-time alerts
■ Runs user role audits (URA) and stored procedure audits (SPA)
The Management Server collects logs from the Primary Database Firewall, and deletes the log files from both Database Firewalls.
If the Primary Database Firewall is not available or cannot be contacted by the
Management Server, it collects the log files from the Secondary Database Firewall and promotes the Secondary Database Firewall to be the Primary (so it will start sending out real-time alerts and running SPA/URA).
Figure 1–2 shows a pair of Oracle Database Firewalls and a pair of Database Firewall Management Servers being used to protect a single database.
Figure 1–2 Oracle Database Firewall High Availability
Ways to Connect Oracle Database Firewall to a Database Network
Oracle Database Firewall can connect to the database network in one of two ways:
■ Through a hub, tap or network switch configured with a "spanning port": This
method sends a copy of all database traffic to the Database Firewall. This configuration enables a Database Firewall to operate as an off-line audit and monitoring system, and produce warnings of potential attacks, but it cannot block unwanted traffic.
Using the Oracle Database Firewall Administration Console
For more information about connecting hubs, taps or switches, see the following Web site:
http://www.sans.org/security-resources/idfaq/switched.php
■ Inline between the database clients and database: This method enables Database
Firewall to both block potential attacks and/or operating as an audit or monitoring system.
Integrating Oracle Database Firewall with Third-Party Products
You can integrate Oracle Database Firewall with the following third-party products:
■ BIG-IP Application Security Manager (ASM): This product from F5 Networks,
Inc. is an advanced Web Application Firewall (WAF) that provides comprehensive edge-of-network protection against a wide range of Web-based attacks. It analyzes each HTTP and HTTPS request, and blocks potential attacks before they reach the Web application server. For more information, see Chapter 11, "Using Oracle Database Firewall with BIG-IP ASM."
■ ArcSight Security Information Event Management (SIEM): This product is a
centralized system for logging, analyzing, and managing syslog messages from different sources. For more information, see Chapter 12, "Using Oracle Database Firewall with ArcSight SIEM."
Using the Oracle Database Firewall Administration Console
This section contains:
■ About the Oracle Database Firewall Administration Console ■ Which Administration Console Should I Use?
■ Logging in to the Administration Console ■ Administration Console Tabs
About the Oracle Database Firewall Administration Console
The Administration Console is a Web browser-based application that you use to configure, manage, and monitor Oracle Database Firewall. It is available on each Database Firewall (either standalone or managed) and Management Server.
The Administration Console is intended for use by network or system administrators who are responsible for IT systems deployment, maintenance, monitoring, and reporting.
Figure 1–3 shows the top portion of the status page of a managed Database Firewall Administration Console. (For a standalone Database Firewall, see "Step 1: Set the Database Firewall Date and Time" on page 2-1.)
Using the Oracle Database Firewall Administration Console
Figure 1–3 Dashboard Page of the Management Server Administration Console
You use the Administration Console to:
■ Deploy policies that were created in the Analyzer, by creating enforcement points
for your site’s protected databases
■ Configure system settings for the Oracle Database Firewall. ■ Configure ArcSight SIEM connectors.
■ Create, find, and configure password security policies for users. ■ View and capture logged data.
All users of the Administration Console must enter a valid login ID and password before access is granted.
Because the Administration Console is a browser-based application, you can use it from any computer that has a supported Web browser, such as Internet Explorer. You can restrict this access by IP address.
Which Administration Console Should I Use?
There are three possible Administration Consoles that you can use: one for a standalone Database Firewall, one for a Database Firewall that is managed by a Management Server, or one used by the Management Server itself.
The tasks that you perform in each are as follows:
■ Tasks Performed in a Standalone Database Firewall Administration Console ■ Tasks Performed in a Managed Database Firewall Administration Console ■ Tasks Performed in a Management Server
Tasks Performed in a Standalone Database Firewall Administration Console
Tasks performed in a standalone Database Firewall Administration Console are as follows:
■ Using the Dashboard to view the overall system behavior
■ Management functions such as suspending, resuming, and changing Database
Using the Oracle Database Firewall Administration Console
■ System settings, such as changing the IP address, time, and keyboard settings ■ Checking the status of the standalone Database Firewall server
■ Configuring e-mail setup, such as the SMTP server address ■ Time synchronization and time offsets
■ Configuring public key synchronization
■ Configuring the Management Server certificate (this determines whether this is a
standalone or managed Database Firewall)
■ Managing log files ■ Viewing system events ■ Summarizing traffic log files
■ Viewing and filtering the administration log ■ Repairing log files
■ Configuring, viewing, and approving changes found in stored procedure or user
role auditing
■ Managing syslog and ArcSight SEIM connectors, and e-mail alerts ■ Creating and managing user accounts
■ Showing network traffic and capturing it to a file; finding traffic sources ■ Creating enforcement points and configuring protected databases ■ Uploading policies
■ Scheduling reports ■ Archiving jobs
Tasks Performed in a Managed Database Firewall Administration Console
Tasks performed in a managed Database Firewall Administration Console are as follows:
■ Viewing and updating system settings
■ Checking the status of the managed Database Firewall
■ System and network settings, such as changing the IP address, time, and keyboard
settings
■ Time synchronization and time offsets ■ Configuring public key synchronization
■ Configuring the Management Server certificate (this determines whether this is a
standalone or managed Database Firewall)
■ Configuring the ArcSight connector ■ Creating and managing user accounts
■ Showing network traffic and capturing it to a file
Tasks Performed in a Management Server
Tasks performed in a Management Server:
Using the Oracle Database Firewall Administration Console
■ Management functions such as suspending, resuming, and changing Database
Firewall controls or restarting a Database Firewall
■ Configuring resilient pairs of Management Servers
■ System settings, such as changing the IP address, time, and keyboard settings ■ Checking the status of the Management Server server
■ Configuring e-mail setup, such as the SMTP server address and so on ■ Time synchronization and time offsets
■ Configuring public key synchronization ■ Managing log files
■ Viewing system events ■ Summarizing traffic log files
■ Viewing and filtering the administration log ■ Repairing log files
■ Managing log files
■ Configuring, viewing, and approving changes found in stored procedure or user
role auditing
■ Managing syslog and ArcSight SEIM connectors, and e-mail alerts ■ Creating and managing user accounts
■ Creating enforcement points and configuring protected databases ■ Uploading policies
■ Scheduling reports ■ Archiving jobs
Logging in to the Administration Console
To log in to the Administration Console:
1. Open a Web browser from any computer that has network access to Oracle Database Firewall.
2. Enter the following URL: https://ip_address/user/login
Provide the IP address for the server on which Oracle Database Firewall is installed. For example:
https://192.0.2.206/user/login
If you change the user interface port number (by using the System Settings page of the Administration Console), then you must also include this port number in the URL. Use the following syntax:
https://ip_address:port/user/login For example:
Using the Oracle Database Firewall Administration Console
Add this address to your Favorites to make it easy to access.
3. If you see the following prompt in Internet Explorer, click OK.
4. If you see the following message, click Continue to this website:
5. Enter the user name and password for an account that has System Administrator privileges.
The Administration Console appears. The following screen shows how the Administration Console appears for a managed Database Firewall.
When you log into the Management Server, the Administration Console appears as follows. You use the Appliances tab to manage individual Database Firewalls.
Using the Oracle Database Firewall Administration Console
Administration Console Tabs
The Administration Console contains a collection of tab along the top of the page, which contains the following options:
■ Dashboard. (Management Server and standalone Database Firewall only)
Provides a high-level view of important information about the databases being protected, such as the threat status, throughput, and top ten threats (see
Chapter 13, "System Administration"). Key indicators are shown in charts, which are intended to be used by IT and security managers who are responsible for the day-to-day monitoring of the system.
The Dashboard also provides Quick Start options that allow the system's configuration settings to be set up with ease.
■ Appliances. (Management Server only) Enables you to define each Oracle
Database Firewall that the Oracle Database Firewall Management Server is required to manage (see "Configuring Oracle Database Firewalls" on page 13-2).
■ Monitoring. (Management Server and standalone Database Firewall only) Allows
you to configure enforcement points, set up the details of the protected databases, and deploy policies. See the following sections for more information:
– "Listing, Creating, and Configuring Enforcement Points" on page 13-6
– "Configuring BIG-IP Application Security Manager Settings" on page 13-9
– Oracle Database Firewall Security Guide for information about listing and uploading policies
■ Reporting. (Management Server and standalone Database Firewall only) Allows
you to generate a wide variety of different types of reports. The reports can be generated and displayed as Adobe Acrobat PDF documents or Microsoft Excel (XLSX) spreadsheets.
You can schedule reports to run automatically at defined intervals, such as every day, week or month. Scheduled reports are automatically forwarded to named e-mail addresses. See the Oracle Database Firewall Security Guide for how to schedule reports.
Oracle Database Firewall provides a large number of data access, management, security, system, Sarbanes-Oxley (SOX), Payment Card Industry (PCI), Data Protection Act (DPA), Gramm-Leach-Bliley Act (GLBA) and Health Insurance
Security Guidelines
Portability and Accountability Act (HIPAA) report types by default, giving full traceability of all essential information over a selected date and time range.
■ Archiving. (Management Server and standalone Database Firewall only) Provides
options that enable important data to be archived to prevent loss of data in the unlikely event of a disk or other system error (see "Archiving Data" on
page 13-13).
■ System. (Management Server, standalone Database Firewall, and managed
Database Firewall) Allows initial configuration of Oracle Database Firewall, such as IP addresses and time settings. These options are used during initial
deployment of Oracle Database Firewall (see "Configuring the System" on page 13-12).
Most pages accessed from the top bar contain a menu of further sub-options along the left side of the page.
Security Guidelines
Consult the Oracle Database Firewall Security Guide for information on protecting your data and general recommendations about deploying Database Firewall in a network and in special configurations.
2
2
Configuring an Oracle Database Firewall
This chapter contains:
■ About Configuring an Oracle Database Firewall ■ Step 1: Set the Database Firewall Date and Time ■ Step 2: Specify the Database Firewall System Settings
■ Step 3: Enable Secure Log Access in the Standalone Database Firewall ■ Step 4: Configure the Standalone Database Firewall Syslog Destinations ■ Step 5: Configure the Standalone Database Firewall Enforcement Points ■ Step 6: Configure the Database Firewall Bridge IP Address
■ Step 7: Test the Standalone Database Firewall System Operation ■ What’s Next?
About Configuring an Oracle Database Firewall
This chapter explains how to configure a standalone Oracle Database Firewall. Where indicated, a procedure also applies to a managed Oracle Database Firewall. For more information on which tasks can be done on which type of Database Firewall, see these topics:
"Tasks Performed in a Standalone Database Firewall Administration Console" on page 1-5
"Tasks Performed in a Managed Database Firewall Administration Console" on page 1-6
If you want to configure a standalone Database Firewall to be managed by a Management Server, see Chapter 3, "Configuring a Database Firewall Management Server."
Before you start, ensure that the Database Firewall has been installed, as described in the Oracle Database Firewall Installation Guide.
Note: Some error messages that may occur during configuration require that your Web browser have JavaScript enabled.
Step 1: Set the Database Firewall Date and Time
It is important to ensure that the Database Firewall uses the correct date and time so that log event times are accurate and scheduled tasks, such as archiving and reports,
Step 1: Set the Database Firewall Date and Time
function correctly. Correct time settings are also needed so that Database Firewall Analyzer uses the correct time ranges when training on log data.
To set the Database Firewall date and time:
1. In the Database Firewall Administration Console, select the System tab.
2. Click Date and Time under the System menu on the left, and then scroll down and click the Change button.
3. Enter the correct date and time.
If a managed Database Firewall and Management Server are in different time zones, then the audit reports and summary reports will use the time zone of the Database Firewall that created the log file.
4. Use the Time Offset menu to select your local time with respect to Coordinated Universal Time (UTC).
For example, UTC-5 is five hours behind UTC. It is essential to select the correct setting to ensure that the time is set accurately during synchronization.
If you do not select the correct setting, the time will be set incorrectly when time synchronization occurs.
5. (Optional) Select Enable NTP Synchronization.
Selecting Enable NTP Synchronization keeps the time synchronized with the average of the time recovered from the time servers specified in the Server 1/2/3
fields, which can contain an IP address or name. If a name is specified, the DNS server specified in the System Settings page is used for name resolution.
Step 2: Specify the Database Firewall System Settings
6. Use the default server addresses, or enter the addresses of your preferred time servers.
Note: If using names instead of IP addresses, you must have DNS already configured, otherwise name resolution will not work.
Test Server displays the time from the server, but does not update the time at the Oracle Database Firewall Management Server or Oracle Database Firewall. Selecting Synchronize Time After Save causes the time to be synchronized when you click Save.
WARNING: In DPE (blocking) mode, Synchronize Time After Save causes all enforcement points to restart, thereby dropping existing connections to protected databases. This would cause a temporary traffic disruption.
7. Click Save.
To enable time synchronization, you also must specify the IP address of the default gateway and a DNS server, as described in "Step 2: Specify the Database Firewall System Settings" on page 2-3.
Step 2: Specify the Database Firewall System Settings
You specify system settings from each Database Firewall’s administration console. System settings consist of network and services configuration as shown in the following procedures.
To configure the Database Firewall network settings:
1. In the System tab, select Network from the System menu on the left.
2. In the Network Configuration page, click the Change button.
3. Complete the fields as necessary, then click Save.
■ IP Address: The IP address of the currently accessed Database Firewall. This
IP address connects to the Administration Console, or accesses the unit from Oracle Database Firewall applications such as the Analyzer. An IP address was set during installation. If you want to use a different address, then you can change it now. The IP address is static and must be obtained from the network administrator.
■ Network Mask: The subnet mask of Oracle Database Firewall.
■ Gateway: (optional) The IP address of the default gateway (for example, for
internet access). The default gateway must be on the same subnet as the host.
■ Name: Enter a descriptive name for this Database Firewall, such as Database Firewall to monitor Oracle Database.
■ Link properties: Leave the setting at the default, unless your network has
been configured not to use autonegotiation. To configure the Database Firewall services:
Step 2: Specify the Database Firewall System Settings
2. Click the Change button.
3. Complete the following fields as necessary, then click Save.
Caution: When allowing access to the Database Firewall you must be careful to take proper precautions to maintain security. See the Security Guidelines chapter in Oracle Database Firewall Security Guide
for a list of recommendations before completing this step.
■ DNS Servers: (optional) The IP addresses of up to three DNS servers on the
network. These are used to resolve any network names that may be used by Oracle Database Firewall. Keep the fields blank if there is no DNS server, otherwise system performance may be impaired.
■ Web Access: If you want to allow only selected computers to access the
Administration Console, enter their IP addresses in the box. Using the default of all allows access from any computer in your site.
■ Terminal Access: You can specify a list of IP addresses that are allowed to
access Oracle Database Firewall from a remote console. Entering all allows access from any computer in your site. The default of disabled prevents console access from any computer.
■ SNMP Access: Specifies a list of IP addresses that are allowed to access the
network configuration of Oracle Database Firewall through SNMP (settings as per Terminal Access). The SNMP community string is gT8@fq+E.
Step 4: Configure the Standalone Database Firewall Syslog Destinations
■ Secure Log Access (Reporting): Specifies a list of IP addresses that are
allowed to access the log data held on the Oracle Database Firewall
Management Server, for example, to report using external reporting systems (settings as per Terminal Access). If you complete this setting, then ensure that you complete "Step 3: Enable Secure Log Access in the Standalone Database Firewall" on page 2-5.
■ Traffic Log Access (Analyzer): Specifies a list of IP addresses of computers
running the Analyzer software that are allowed to access the traffic log on the Oracle Database Firewall Management Server (settings as per Terminal Access).
Step 3: Enable Secure Log Access in the Standalone Database Firewall
If you changed the default settings in the Secure Log Access (Reporting) field in "Step 2: Specify the Database Firewall System Settings" on page 2-3, then you must enable the access in the Database Firewall server.
1. Log in to the Database Firewall server as user root.
2. Change to the oracle user. su - oracle
3. Execute the following command: . oraenv
4. When prompted, enter dbfwdb for the Oracle SID.
5. The following message is displayed:
The Oracle base has been set to /var/lib/oracle
6. Log in to the database on this server using SQL*Plus. sqlplus / as sysdba
7. Enable the dbfw_report account and grant this user a password. ALTER USER dbfw_report ACCOUNT UNLOCK IDENTIFIED BY password;
8. Exit SQL*Plus.
Step 4: Configure the Standalone Database Firewall Syslog Destinations
Use the following procedure to configure the types of syslog messages to send from this Database Firewall (for example, to signal blocked statements).
1. In the standalone Database Firewall Administration Console, click the System tab.
2. Click Syslog in the Connectors menu. The following page appears.
Step 5: Configure the Standalone Database Firewall Enforcement Points
3. Complete the fields, as necessary:
■ Syslog Destinations (UDP): Use this box if you are using User Datagram
Protocol (UDP) to communicate syslog messages. Enter the IP address of each computer that is permitted to receive the syslog messages.
■ Syslog Destinations (TCP): Use this box if you are using Transmission
Control Protocol (TCP) to communicate syslog messages. TCP guarantees that the packets are sent and received correctly. Enter the IP address and port number of each machine that is permitted to receive the syslog messages.
■ Syslog Categories: You can select the types of syslog messages to generate.
The syslog messages are in the following categories:
– System: System messages generated by Oracle Database Firewall or other software, which have a syslog priority level of at least "INFO".
– Alerts: Oracle Database Firewall and F5 alerts (Oracle Database Firewall syslog message IDs 9, 10, 11 and 12).
– Info: General Oracle Database Firewall messages and property changes (Oracle Database Firewall syslog message IDs 1, 4 and 8).
– Debug: Engineering debug messages (for Oracle support use only).
– Heartbeat: Oracle Database Firewall heartbeat message and current statistics (Oracle Database Firewall syslog message ID 3). Oracle Database Firewall sends a heartbeat every second for each Enforcement Point that you have configured for this system. (If you select this check box, be aware of the potential volume issues when you enable the Heartbeat
feature.)
4. Click Apply.
Step 5: Configure the Standalone Database Firewall Enforcement Points
You must configure each enforcement point that the standalone Database Firewall will use. (For a managed Database Firewall, you use the Management Server.) To configure the enforcement points:
1. In the standalone Database Firewall Administration Console, select the
Monitoring tab.
Step 5: Configure the Standalone Database Firewall Enforcement Points
The Enforcement Point Wizard: Step 1 page appears.
3. Enter the following information:
■ Name: Enter a name for the enforcement point.
■ Use a builtin enforcement point (Monitor locally): The number of currently
available enforcement points you can create, up to 80, is displayed.
4. Click Next.
The Enforcement Point Wizard: Step 2 page appears.
5. Select one or more traffic sources you want this enforcement point to monitor. If you select a proxy traffic source, you cannot select any other traffic sources. If
Management appears in the list, then the Management Interface can be configured and used as a proxy.
6. Enter the following information:
■ Protected Database: Select Create New or choose from the list of available
Step 6: Configure the Database Firewall Bridge IP Address
■ Name: If creating a new protected database, enter a name for the database to
be monitored.
■ Database Type: If creating a new protected database, select the database type. ■ Address and Port: If creating a new protected database, specify the IP address
and port number of the database management system (i.e. the IP settings used by database clients to send traffic to the database), then click Add. If the protected database has more than one interface and/or port, enter the additional Address and Port details, then click Add again. If you are using a Domain Name Server (DNS), you can enter a hostname instead of an IP address.
7. Click Next.
The Enforcement Point Wizard: Step 3 page appears.
8. Enter the following settings:
■ Monitoring Mode: Select Database Activity Monitoring (DAM) if the
enforcement point is to be used only to log statements and provide warnings of potential attacks. Select Database Policy Enforcement (DPE) if the
enforcement point is also required to block potential attacks. Database Policy Enforcement is available only if you upload a policy (as described next). If you have selected a traffic proxy as a traffic source for this Enforcement Point, then DPE mode is required and you cannot select DAM mode.
Note 1: When you use a Database Firewall in DPE mode, you must configure any IP or MAC address spoofing detection rules so that they ignore database IP or MAC address changes made by that Database Firewall.
Note 2: When you set a Database Firewall to DPE mode (through Enforcement Point Settings or by restarting a Database Firewall with network passthrough), ensure that all connections to the database are forced to reconnect. In addition, in DPE mode, if you change
Enforcement Point Settings, you must also force all database connections to reconnect.
■ Policy: Select a baseline policy. To upload a custom policy developed using
the Analyzer software, click Browse to select the file, then Upload. Use the text box to add a description. If this is the first time you are creating a baseline policy, then Oracle recommends that you select the unique.dna policy.
9. Click Next.
The Enforcement Point Wizard: Step 4 page appears.
10. Check your settings, and if you are satisfied, then click the Finish button.
Step 6: Configure the Database Firewall Bridge IP Address
If you want Oracle Database Firewall to block potential attacks, and Database Firewall is not in proxy mode, then you must allocate an additional IP address that is unique to the database network. This is used as a bridge IP address to redirect traffic within the Database Firewall. When Database Firewall is used as a proxy (proxy mode) you do
Step 7: Test the Standalone Database Firewall System Operation
not need to allocate this additional IP address. See "Configuring Database Firewall as a Traffic Proxy" on page 13-9 for details.
Note 1: The IP address of the bridge must be on the same subnet as all protected databases deployed in DPE mode on that bridge. This restriction does not apply to protected databases deployed in DAM mode.
Note 2: If the Database Firewall Management Server and the Bridge are connected to physically separate networks that are on the same subnet, Database Firewall may route responses out of the wrong interface. If physically separate networks are required, use different subnets.
To configure the standalone Database Firewall bridge IP address:
1. In the Database Firewall Administration Console, click the System tab, then click
Network under the System menu on the left.
2. Click the Change button.
3. In the Traffic Sources section, find the network that you want to configure.
4. Select Bridge Enabled for this network.
5. Specify an IP address and subnet mask if either of the following is true:
■ The pair of network interface ports connect the Oracle Database Firewall
in-line between the database and clients (whether Database Policy Enforcement or Database Activity Monitoring mode is used).
■ The network interface ports are used to monitor traffic with the Oracle
Database Firewall Local Monitoring software.
The IP address must be unique to the network, and is used as a bridge IP address to redirect traffic within the Database Firewall.
Enabled is automatically selected if the network interface ports are currently used to monitor traffic for enforcement points that have the Local Monitoring or DPE (Database Policy Enforcement) mode selected.
6. Click Save.
Step 7: Test the Standalone Database Firewall System Operation
You should verify that the standalone Database Firewall configuration is fully operational before you begin monitoring your protected database SQL traffic. To test the system operation:
1. In the standalone Database Firewall Administration Console, click the Monitoring
tab, and then from the Enforcement Points menu, select List to display the list of configured enforcement points. Check the status as follows:
a. Click the Status button for the appropriate enforcement point.
b. In the Appliances area, ensure that you see a green check-mark indicator in the Status column against the device that is performing the monitoring.
2. Click the Dashboard tab, and check that Number of statements increases every minute. This setting indicates that statements are being recognized.
What’s Next?
3. Click the System tab, then in the Logs menu, click Traffic Log Files.
Check that the log files exist. If you want to see the statements, create Log Search Results (in the Reporting tab, under the Traffic Log menu).
4. Verify that data can be obtained from the traffic log.
See Oracle Database Firewall Security Guide for information about accessing and viewing the traffic log.
What’s Next?
The tasks in chapter complete the initial configuration of a Database Firewall. Your next step is to configure the Management Server, described in Chapter 3, "Configuring a Database Firewall Management Server." Depending on site requirements, you may need to configure other features, such as stored procedure auditing, user role auditing and local monitoring. These features are explained in later chapters of this guide. After you have configured the standalone Database Firewall, users will be able to begin analyzing data. Once a policy has been developed, you must upload it. The
Oracle Database Firewall Security Guide covers these tasks in detail.
Chapter 13, "System Administration," explains system administration tasks, including how to set up new users, monitor the system and produce reports.
3
3
Configuring a Database Firewall
Management Server
This chapter contains:
■ About Configuring an Oracle Database Firewall Management Server-Based
System
■ Step 1: Perform Initial Tasks for Each Database Firewall Management Server ■ Step 2: Perform Tasks for Each Oracle Database Firewall
■ Step 3: Complete the Final Database Firewall Management Server Tasks ■ Step 4: Configure the Management Server Enforcement Points
■ Step 5: Test the Management Server System Operation ■ What’s Next?
About Configuring an Oracle Database Firewall Management
Server-Based System
This chapter explains how to configure a Management Server for one or more Database Firewalls in your system.
Before you start, make sure that each device has been installed, as described in Oracle Database Firewall Installation Guide.
There are five main steps involved in the configuration process:
1. Perform the initial configuration tasks at the Oracle Database Firewall
Management Server, for example, to confirm the Database Firewall Management Server IP address and set the date and time.
2. Configure each managed Database Firewall (for example, install the certificate from the Management Server).
3. Add each Oracle Database Firewall at the Oracle Database Firewall Management Server.
4. Run the Enforcement Point Wizard at the Oracle Database Firewall Management Server.
5. Check that the system is functioning correctly.
Each of these steps is described next. If resilient pairs of Oracle Database Firewall Management Servers or Oracle Database Firewalls are required, some of the above steps must be completed for each device.
Note: Some error messages that may occur during configuration require that your Web browser have JavaScript enabled.
Step 1: Perform Initial Tasks for Each Database Firewall Management Server
Step 1: Perform Initial Tasks for Each Database Firewall Management
Server
If you plan to use two Management Servers as a resilient pair for a high-availability environment, then perform the following steps for each Management Server.
■ Step 1A: Specify the Management Server System Settings ■ Step 1B: Enable Secure Log Access
■ Step 1C: Set the Database Firewall Management Server Date and Time ■ Step 1D: Configure the Management Server Syslog Destinations
Step 1A: Specify the Management Server System Settings
System settings consist of network and services configuration as shown in the following procedures.
To configure the Management Server network settings:
1. Log in to the Management Server Administration Console.
See "Logging in to the Administration Console" on page 1-7 for more information. The Management Server Administration Console appears:
2. Select the System tab.
3. In the System menu, click Network.
4. In the Network Configuration page, click the Change button.
5. Complete the fields as necessary, then click Save.
■ IP Address: The IP address of the Oracle Database Firewall Management
Server for use by Oracle Database Firewall applications such as the Analyzer, or to connect to the Administration Console. An IP address was set during the installation of the Oracle Database Firewall Management Server; if you want to use a different address, you can change it now. The IP address is static and must be obtained from the network administrator.
Step 1: Perform Initial Tasks for Each Database Firewall Management Server
The specified IP Address may need to be added to routing tables to enable traffic to go between the Database Firewall Management Server and Oracle Database Firewall applications.
■ Network Mask: The subnet mask of the Oracle Database Firewall
Management Server.
■ Gateway: (optional) The IP address of the default gateway (for example, to
access the management interface from another subnet). The default gateway should be on the same subnet as the host.
■ Name: Enter the host name for the Management Server. The host name must
start with a letter, can contain a maximum number of 24 characters, and cannot contain spaces in the name.
■ Link properties: Leave the setting at the default, unless your network has
been configured not to use autonegotiation. To configure the Management Server services:
1. In the System tab, under the System menu, click Services.
2. Click the Change button.
3. Complete the following fields as necessary, then click Save.
Caution: When allowing access to the Database Firewall you must be careful to take proper precautions to maintain security. See the Security Guidelines chapter in Oracle Database Firewall Security Guide
Step 1: Perform Initial Tasks for Each Database Firewall Management Server
■ DNS Servers: (optional) The IP addresses of up to three DNS servers on the
network. These are used to resolve any network names that may be used by Oracle Database Firewall Management Server. Keep the fields blank if there is no DNS server, otherwise system performance may be impaired.
■ Web Access: If you want to allow only selected computers to access the
Administration Console, enter their IP addresses in the box. Using the default of all allows access from any computer in your site.
■ Terminal Access: You can specify a list of IP addresses that are allowed to
access Oracle Database Firewall Management Server from a remote console. Entering all allows access from any computer in your site. The default of
disabled prevents console access from any computer.
■ SNMP Access: Specifies a list of IP addresses that are allowed to access the
network configuration of Oracle Database Firewall Management Server through SNMP (settings as per Terminal Access). The SNMP community string is g T 8 @ f q + E.
■ Secure Log Access (Reporting): Specifies a list of IP addresses that are
allowed to access the log data held on the Oracle Database Firewall
Management Server, for example, to report using external reporting systems (settings as per Terminal Access). If you complete this setting, then ensure that you complete "Step 1B: Enable Secure Log Access" on page 3-4.
■ Traffic Log Access (Analyzer): Specifies a list of IP addresses of computers
running the Analyzer software that are allowed to access the traffic log on the Oracle Database Firewall Management Server (settings as per Terminal Access).
Step 1B: Enable Secure Log Access
If you changed the default settings in the Secure Log Access (Reporting) field in "Step 1A: Specify the Management Server System Settings" on page 3-2, then you must enable the access in the Database Firewall server.
1. Log in to the Database Firewall server as user root.
2. Change to the oracle user. su - oracle
3. Execute the following command: . oraenv
4. When prompted, enter dbfwdb for the Oracle SID.
5. Log in to the database on this server using SQL*Plus. sqlplus / as sysdba
Enter password: password
6. Enable the dbfw_report account and grant this user a password. ALTER USER dbfw_report ACCOUNT UNLOCK IDENTIFIED BY password;
Step 1: Perform Initial Tasks for Each Database Firewall Management Server
Step 1C: Set the Database Firewall Management Server Date and Time
It is important to ensure that the date and time set for the Management Server are correct, because events performed by the Management Server are logged with the date and time at which they occur. In addition, archiving occurs and specified intervals based on the time settings. Correct time settings are also needed so that Database Firewall Analyzer uses the correct time ranges when training on log data.
To set the Database Firewall Management Server date and time:
1. In the Management Server Administration Console, select the System tab.
2. Click Date and Time under the System menu on the left, and then scroll down and click the Change button.
3. Enter the correct date and time.
If a managed Database Firewall and Management Server are in different time zones, then the audit reports and summary reports will use the time zone of the Database Firewall that created the log file.
4. Use the Time Offset menu to select your local time with respect to Coordinated Universal Time (UTC).
For example, UTC-5 is five hours behind UTC. It is essential to select the correct setting to ensure that the time is set accurately during synchronization.
If you do not select the correct setting, the time will be set incorrectly when time synchronization occurs.
Step 1: Perform Initial Tasks for Each Database Firewall Management Server
Selecting Enable NTP Synchronization keeps the time synchronized with the average of the time recovered from the time servers specified in the Server 1/2/3
fields, which can contain an IP address or name. If a name is specified, the DNS server specified in the System Settings page is used for name resolution.
6. Use the default server addresses, or enter the addresses of your preferred time servers.
Test Server displays the time from the server, but does not update the time at the Oracle Database Firewall Management Server or Oracle Database Firewall. Selecting Synchronize Time After Save causes the time to be synchronized when you click Save.
WARNING: In DPE (blocking) mode, Synchronize Time After Save causes all enforcement points to restart, thereby dropping existing connections to protected databases. This would cause a temporary traffic disruption.
7. Click Save.
To enable time synchronization, you also must specify the IP address of the default gateway and a DNS server, as described in "Set or Change Network Configuration or Services" on page 3-8.
Step 1D: Configure the Management Server Syslog Destinations
Use the following procedure to configure the types of syslog messages to send from the Oracle Database Firewall Management Server (for example, to signal blocked statements).
1. In the Management Server Administration Console, click the System tab.
2. In the Connectors menu, select Syslog. The following page is displayed.