A Guide to Using EViews with
Using Econometrics:
A Practical Guide
Written By
R. R. Johnson
∗University of San Diego
Introduction
In the Introduction:
1. Purpose of this guide 2. EViews help
3. EViews basics and objects
4. Mathematical expressions in EViews 5. Areas in EViews main window
Purpose of this guide:
Econometrics is defined by A. H. Studenmund1 to be "the quantitative measurement and analysis of actual economic and business phenomena." This definition highlights the importance of learning econometrics by working through examples. This guide demonstrates how to use
EViews to complete the econometric analysis illustrated in the text. EViews output can be copied and pasted into word processing files to facilitate the research report writing process.
Each chapter in this guide corresponds to a chapter in Using Econometrics: A PracticalGuide (UE), by A. H. Studenmund. All of the econometric processes examined in a chapter are reproduced in the corresponding chapter of this guide, using EViews whenever a data set is provided.2 This guide is a do-it-yourself manual and students should be able to reproduce the econometric analysis described in UE, without further assistance from the instructor. Best results are achieved when the text chapter is read first and then the operations are performed as you read the guide. Most procedures described in this guide are explained in a step-by-step manner so that even the novice user should be able to follow. The reader is advised to consult the owner's manual or the help function in EViews in cases where: a deeper understanding of EViews' functions is desired, a description of how EViews performs the calculations is desired, or references to the source of the econometric theory applied by EViews is sought.
∗ I would like to thank A. H. Studenmund for his helpful comments and a special thanks to Pat Johnson for her superb editorial assistance and for making sure that the instructions in this guide are clear and easy to follow. Your feedback is very valuable - send your comments about this site and this guide to mailto:[email protected].
1 A. H. Studenmund, Using Econometrics, A PracticalGuide (fourth edition), Addison Wesley, 2000, p. 3. 2 For a variety of reasons, data sets for some of the examples presented in the text are not available.
EViews help:
For additional information, open the EViews program and select Help/EViews Help Topics…
and a list of help categories is revealed (see the graphic below). Each help category contains a list of subtopics that are revealed by double clicking the book icon in front of the category. Other topics and subtopics can be viewed by scrolling down and clicking the subject of interest. If you know the specific subject matter, you can view the Contents listed in alphabetical order or use
Find to locate the topic of interest. EViews uses standard Windows Help, the on-line manual is fully searchable and hypertext linked. The Help system contains updates to the documentation that were made after the manuals went to press. In addition to the information provided in the manuals and the help system, go to http://www.eviews.com on the World Wide Web and review the Frequently Asked Questions (FAQ) section, where you can find answers to common questions about installing, using, and getting the most out of EViews.
EViews basics and objects:
The EViews program is designed around the concept of objects. Objects are collections of related information and operations that are bundled together in an easy-to-use unit. Virtually all of your work in EViews will involve using and manipulating various objects. Think of an object as a filing cabinet or organizer for the item with which you are working. The most important object in EViews is the workfile and your first step in any project will be to create a new workfile or to load an existing workfile into memory. Each object consists of a collection of information related to a particular area of analysis. Objects associated with a particular concept are said to be of a given type, where the type name is used to identify the subject of analysis. Associated with each type of object is a set of views and procedures which can be used in association with the information contained in the object. For example, a series object is a collection of information related to a set of observations on a particular variable. An equation object is a collection of information related to the relationship between a collection of variables. Since an equation object contains all of the information relevant to an estimated relationship, you can move freely between a variety of equation specifications simply by choosing to work with a different equation object. You can examine results, perform hypothesis and specification tests, or generate forecasts at any time. Managing your work is simplified since only a single object is used to work with an entire collection of data and results. Tip: Name all objects that you think you want to view later. Then the object can be recalled by double clicking the named object in the workfile.
The most fundamental objects in EViews are workfiles, series, and equation objects. There are, however, a number of other objects that serve special functions. A list of EViews objects includes: Coefficient Vector, Databases, Equation, Graph, Group, Model, Pool (Time Series / Cross-Section), Sample, Series, State Space, System, SYM (Symmetric Matrix), Table, Text, VAR (Vector Autoregression), Vector/Row, and Vector Scalar. All objects, except workfiles and databases, have their own icons that are displayed in the workfile window (see object types below along with their respective icons). When a new workfile is created, two objects are displayed in the workfile window – the Coefficient Vector (filled with zeros) and the residual series (filled with NA's).
To create an object: select Objects/New Object from the main menu or workfile menu, click on the type of object that you want to create, provide a name and then click on OK. For some object types, another dialog box will open, prompting you to describe your object in more detail. For most objects, however, the object window will open immediately. A workfile must be open before an object can be created. The process of creating a workfile and objects will be explained later in this guide.
Mathematical expressions in EViews:
EViews contains an extensive library of built-in operators and functions that allow you to perform complicated mathematical operations with your data using just a few keystrokes. In addition to supporting standard mathematical and statistical operations, EViews provides a number of specialized functions for automatically handling the leads, lags, and differences that are commonly found in time series data. All of the operators described below may be used in expressions involving series and scalar values. When applied to a series expression, the operation is performed for each observation in the current sample.
EViews follows the usual order in evaluating expressions from left to right, with operator precedence order (from highest precedence to lowest):
1. ^ 2. *, /
3. +, subtraction (-) 4. <, >, <=, >=, = 5. and, or
For a list and description of all of the operators and special functions available in EViews, click on: Help/Function Reference.
The table below explains the function of each mathematical operator used by EViews. Expression Operator Description
+ add x+y adds the contents of X and Y
– subtract x–y subtracts the contents of Y from X * multiply x*y multiplies the contents of X by Y / divide x/y divides the contents of X by Y ^ raise to the power x^y raises X to the power of Y
> greater than x>y takes the value 1 if X exceeds Y, and 0 otherwise < less than x<y takes the value 1 if Y exceeds X, and 0 otherwise = equal to x=y takes the value 1 if X and Y are equal, and 0 otherwise <> not equal to x<>y takes the value 1 if X and Y are not equal, and 0 if they are
equal
<= less than or equal to x<=y takes the value 1 if X does not exceed Y, and 0 otherwise >= greater than or equal to x>=y takes the value 1 if Y does not exceed X, and 0 otherwise and logical and x and y takes the value 1 if both X and Y are nonzero, and 0
otherwise
or logical or x or y takes the value 1 if either X or Y is nonzero, and 0 otherwise
Refer to the graphic above as you read a description of the various areas of the EViews window below. References to these areas will be made throughout this guide.
The title bar: The title bar, labeled EViews Student Version, is at the very top of the main window.
The main menu: Just below the title bar is the main menu. If you move the cursor to an entry in the main menu and click on the left mouse button, a drop-down menu will appear. Clicking on an entry in the drop-down menu selects the highlighted item. Some of the items in the drop-down menu may be listed in black and others in gray. In menus, black items may be executed while the gray items are not available.
The command window: Below the main menu bar is an area called the command window where EViews commands are typed. The command is executed as soon as you hit ENTER.
The status line: At the very bottom of the window is a status line, which is divided into four sections. The left section will sometimes contain status messages sent to you by EViews. These status messages can be cleared manually by clicking on the box at the far left of the status line. The next section shows the default directory that EViews will use to look for data and programs. The last two sections display the names of the default database and workfile.
The work area: The area in the middle of the window is the work area where EViews will display the various object windows that it creates. Think of these windows as similar to the sheets of paper you might place on your desk as you work. The windows will overlap each other with the foremost window being in focus or active. Only the active window has a darkened titlebar.
Chapter 1: An Overview of Regression Analysis
In this chapter:
1.
A simple example of regression analysis (UE 1.4): a) Creating an EViews workfileb) Entering data into an EViews workfile c) Creating a group in EViews
d) Graphing with EViews
e) Generating new variables in EViews
2.
ExercisesSection 1.4 describes how a weight guesser can use regression analysis to make better guesses about a person's weight (Y) based only on a person's height (X). The data for this example are printed in UE1,Table 1.1, p. 20, and available in the EViews workfile named htwt1.wf1. However, since some data sets may not be in EViews file format, the process of creating an EViews workfile and entering data into the new workfile will reviewed here. The process of creating an EViews workfile and importing data into the new workfile from an Excel file will be reviewed in Chapter 2.
Creating an EViews workfile:
To create a new workfile for the weight (Y) versus height (X) data set printed in columns (2) and (3) of (UE,Table 1.1, p. 20):
Step 1. Select File/New/Workfile on the EViews main menu bar.
Step 2. Set the Workfile frequency: to Undated or irregular.
Step 3. Since there are 20 observations in the data set, set the Start observation to 1 and End observation to 20 (refer to areas highlighted in yellow in the figure on the right).2
Step 4. Once you have selected the appropriate frequency and entered the information for
the workfile range, click OK. EViews will create an untitled workfile, and will display the workfile window in the main work area of the EViews screen. The workfile window displays two pairs of numbers highlighted in yellow: one for the Range: of data contained in the workfile, and the second for the current workfile Sample:. Both the workfile range and sample can be
1 Using Econometrics, A Practical Guide (fourth edition), by A. H. Studenmund will be referred to as (UE) when
referenced in this handbook.
2 For monthly, quarterly, or annual time series data, with observations ranging from the beginning of 1980 to the end
of 1996, select from the following options: for monthly data, set the Workfile frequency: to monthly, and specify the
Start date, 1980:01, and the End date, 1996:12. For quarterly data, set the Workfile frequency: to quarterly, and specify the Start date, 1980:1, and the End date, 1996:4. For annual data, set the Workfile frequency: to annual, and specify the Start date, 1980, and the End date, 1996. See Help/Contents/EViews Basics/Workfile Basics for more information about creating and using workfiles in EViews.
changed after the workfile has been created. Note that all new workfiles will contain two objects boxed in red: the coefficient vector named c and the residual series named resid. (see the figure below).
Step 5. To save your workfile, select Save on the workfile menu bar or File/Save or
File/Save As on the main menu bar and enter htwt1.wf1 in the File name: window, select the destination drive in the Save in: window and click OK. It is advisable to save the workfile after it is created and frequently thereafter.
Entering data into an EViews workfile:
Complete the section entitled Creating an EViews workfile
before attempting this procedure. To enter the data for height (inches above 5') and weight from columns (2) and (3) of Table 1.1, (UE,p. 20) into the newly created workfile, follow the steps below.
Step 1. To create a new series for the weight (Y) variable, select Objects/New Object/Series from the main menu or the workfile menu, enter Y in the Name for Object: window and click OK. All of the observations in the series will be assigned the missing value code 'NA'.3
Step 2. To enter data into the newly created series, double click the series in the workfile window and click edit+/- on the series window menu bar. The numbers from the table can be entered to replace the NA's in the spreadsheet, pressing Enter after each entry. After the numbers have been entered, click edit+/- on the series window menu bar to save the changes and exit the edit function. The series window can be closed by clicking the button in the upper right corner of the series window.
Step 3. Repeat the process for the height (X) variable.
Step 4. To save changes to your workfile, click Save on the workfile menu bar.
Most data are available in spreadsheet file or ASCII text file format, which can be imported directly into the workfile. The procedure for importing the weight and height data from an ASCII text file will be explained in Chapter 2. The edit procedure described above is mostly used to adjust data series after they are imported. In cases where expressions can be used to assign values for the series, click on Quick/Generate Series or click on Genr on the workfile window menu bar and enter the expression defining the series. For more information on how to generate a series using expressions, see Help/Contents/EViews Basics/Working with Series.
3 A series can also be created by clicking on
Quick/Generate Series on the main menu bar or by clicking on Genr
Creating a group in EViews:
EViews provides specialized tools for working with groups of series. Follow these steps to create a group object containing the Y & X series:
Step 1. Open the EViews workfile named htwt1.wf1 by selecting File/Open/Workfile on the main menu and click on the file name.
Step 2. To create a group object for the X and Y variables, hold down the Ctrl button and click on X
and Y and then select Show from the workfile toolbar.
Step 3. To name a group, click Name or Object/Name on the group menu bar and enter GROUP01
in the Name to identify object: window.4 Some features of groups are described in the footnote at the bottom of this page.5
Step 4. To save changes to your workfile, click Save on the workfile menu bar.
Graphing with EViews:
The weight guesser in section 1.4 (UE) hypothesized a positive relationship between weight and height. As a first step, plot Y against X in order to visually confirm the hypothesis.
Step 1. Open the EViews workfile named htwt1.wf1.
Step 2. To plot Y against X, open the two series in a group window (enter X before Y because EViews specifies the first variable selected in a group as the "X" axis
variable and the second as the "Y" axis variable).
Step 3. Select View/Graph/Scatter/Scatter with Regression and click OK to reveal Figure 1a. EViews shows a graph with Y
on the vertical axis and X on the horizontal axis as well as a line representing the regression equation between the two variables (i.e., plots UE,Equation 1.21, p. 21). As you can see in Figure 1a, a positive relationship between Y and X is
visually confirmed but the relationship is distorted because EViews uses Optimal-Linear Scaling as the graph default setting.
Step 4. To change the graph scaling, click the right mouse button anywhere in the graph and select Options.
Step 5. Change the Graph Scaling option to Linear - Force Through Zero.
4
You must name a group object if you want to keep its results. Unnamed objects are labeled “UNTITLED” and the results are lost when the object window or the workfile is closed. To name a group, click Name on the group menu bar and enter the name in the Name to identify object: window. Once named, a 'group object' is saved with the workfile and can be viewed by double clicking its icon (i.e., ) in the workfile window.
5
Features of Groups: A group is simply a list of series identifiers, not a copy of the data in the series. If you change the data for one of the series in the group, you will see the changes reflected in the group. If you delete a series from the workfile, it will disappear from any group that included the series. If the deleted series is the only series in a group, the group will also be deleted. Renaming a series changes the reference in every group containing the series. Groups, like other EViews objects, contain their own views and procedures. A detailed description can be found in Help/Contents/Statistical Views and Procedures/Group Views and Procs.
120 140 160 180 200 220 4 6 8 10 12 14 16 X Y Figure 1a
Step 6. Click OK to get the graph in Figure 1b.
Note that the graph no longer gives a distorted view of the relationship between Y and X. The equation represented in Figures 1a & 1b has the following formula (see UE Equation 1.21, p. 21): Estimated weight (Y) = 103.40 + 6.38 * Height in inches above five feet (X)
Generating new variables in EViews:
Follow the steps below to generate the data in columns (4) through (7) of UE,Table 1.1,p. 20:
Step 1. Open the EViews workfile named htwt1.wf1.
Step 2. To generate a new variable named predicted, with the data printed in column (4) of UE,
Table 1.1, click Genr on the workfile menu and enter the formula (predicted=103.4+6.38*X) in the Enter Equation: window. Click OK and a new variable named predicted appears in the workfile window with the values in column (4) of Table 1.1.
Step 3. To generate a new variable named residual, with the data printed in column (5) ofTable 1.1, click Genr on the workfile menu and enter the formula (residual=Y-predicted) in the Enter Equation: window. Click OK and a new variable named residual will appear in the workfile window with the values in column (5) ofTable 1.1.
Step 4. To generate a new variable named gainorloss, with the data printed in column (6) ofTable 1.1, click Genr on the workfile menu and enter the formula gainorloss=.5*(residual>=-10 and residual<=10)-.6*(residual<-10 or residual>10) in the Enter Equation: window.6 Click OK and a new variable named gainorloss will appear in the workfile window with the values in column (6) ofTable 1.1.
Step 5. Create a group with x, y, predicted, residual, and gainorloss in order. Click
View/Spreadsheet to view the data in Table 1.1.
Step 6. Type =@sum(gainorloss) in the command window, press Enter, view the net amount gained on the status line in the lower left of the screen (i.e., ).
6 The conditional value typed within a set of parenthesis is equal to one when the condition is true and zero if the
condition is false. Thus, the condition (residual>=-10 and residual<=10) is equal to one if the residual falls within the range -10 to +10 and zero if it is outside of this range. The condition (residual<-10 or residual>10) is equal to one if the residual is less than -10 or greater than +10 and zero if it falls within the range -10 to +10.
0 50 100 150 200 250 0 5 10 15 20 X Y Figure 1b
Exercises:
13. a. b. c.
d. The data for this exercise are available in an EViews file named help1.wf1. However, it is a good idea to take this opportunity to make sure that you understand how to create a workfile and enter data. If you want to skip these steps, open the EViews workfile named
help1.wf1 and skip steps 1 through 6 below.
Follow these steps to create a new workfile for the help-wanted advertising index (hwi) and unemployment rate (ur) data set printed in the table accompanying exercise 13.
Step 1. Select File/New/Workfile on the EViews main menu bar. Set the workfile frequency to
Quarterly. Enter 1962:1 for the Start date: and 1967:4 for the End date: (see footnote 2). Click
OK to open a new untitled workfile.
Step 2. To save your workfile, select Save on the workfile menu bar or File/Save or File/Save As on the main menu bar and enter help1.wf1 in the File name: window, select the destination drive in the Save in: window, and click OK.
Step 3. To create a new series for the help-wanted advertising index (hwi) variable, select
Objects/New Object/Series from the main menu or the workfile menu, enter hwi in the Name for Object: window and click OK. All of the observations in the series will be assigned the missing value code 'NA'.
Step 4. To enter data into the newly created series, double click the series in the workfile window and click edit+/- on the series window menu bar. The numbers from the table can be entered to replace the NA's in the spreadsheet, pressing Enter after each entry. After the numbers have been entered, click edit+/- on the series window menu bar to save the changes and exit the edit function. The series window can be closed by clicking the button in the upper right corner of the series window.
Step 5. Repeat the process for the unemployment rate (ur) variable.
Step 6. To save changes to your workfile, click Save on the workfile menu bar.
The process of running a regression is explained, in detail, in Chapter 2, but a short description of the process is presented here. Follow these steps to run the regression between hwi and ur:
Step 1. Open the EViews workfile named Help1.wf1.
Step 2. Select Objects/New Object/Equation and click OK (or Quick/Estimate Equation from the main menu).
Step 3. Enter the dependent variable (hwi), the constant (c) and the independent variable (ur) in the Equation Specification: window that appears, using spaces between each term. It is important to enter the dependent variable first (hwi in this case).
Step 4. Select the estimation method {LS - Least Squares (NLS and ARMA)}. EViews uses this as the default setting because it is selected most of the time.
Step 5. The workfile sample range is automatically entered but it can be changed if another sample range is desired.
Chapter 2: Ordinary Least Squares
In this chapter:
1. Running a simple regression for weight/height example (UE 2.1.4) 2. Contents of the EViews equation window
3. Creating a workfile for the demand for beef example (UE, Table 2.2, p. 45) 4. Importing data from a spreadsheet file named Beef 2.xls
5. Using EViews to estimate a multiple regression model of beef demand (UE 2.2.3) 6. Exercises
Ordinary Least Squares (OLS) regression is the core of econometric analysis. While it is important to calculate estimated regression coefficients without the aid of a regression program one time in order to better understand how OLS works (see UE,Table 2.1, p.41), easy access to regression programs makes it unnecessary for everyday analysis.1 In this chapter, we will estimate simple and multivariate regression models in order to pinpoint where the regression statistics discussed throughout the text are found in the EViews program output. Begin by opening the EViews program and opening the workfile named htwt1.wf1 (this is the file of student height and weight that was created and saved in Chapter 1).
Running a simple regression for weight/height example (UE 2.1.4):
Regression estimation in EViews is performed using the equation object. To create an equation object in EViews, follow these steps:
Step 1. Open the EViews workfile named htwt1.wf1 by selecting File/Open/Workfile on the main menu bar and click on the
file name.
Step 2. Select Objects/New Object/Equation from the workfile menu.2
Step 3. Enter the name of the equation (e.g., EQ01) in the Name for Object: window and click OK.
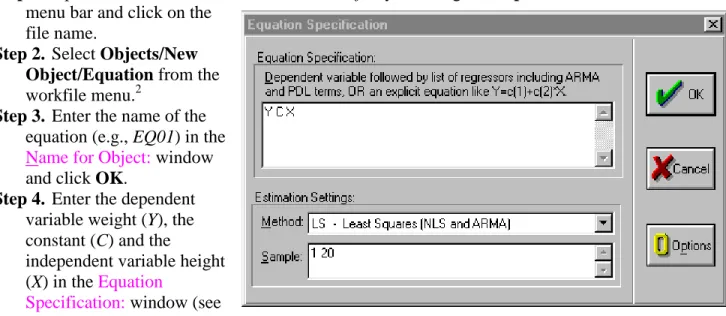
Step 4. Enter the dependent variable weight (Y), the constant (C) and the
independent variable height (X) in the Equation
Specification: window (see
figure on right). It is important to enter the dependent variable first (Y in this case).
1 Using Econometrics, A Practical Guide (fourth edition), by A. H. Studenmund will be referred to as (UE) when
referenced in this guide.
2
Alternately, select Quick/Estimate Equation from the main menu. If this method is used, the equation must be named to save it. Click Name on the equation menu bar and enter the desired name and click OK.
Step 5. Select the estimation Method {LS - Least Squares (NLS and ARMA)}. This is the default that will be used most of the time.
Step 6. The workfile sample range is automatically entered but it can be changed if another sample range is desired. Click OK to view the EViews Least Squares regression output table.
Step 7. To save changes to your workfile, click Save on the workfile menu bar.
Contents of the EViews equation window:
Most of the important statistical information relating to a regression is reported in the EViews equation window (see the figure below). General information concerning the regression is printed in the top few lines, the coefficient statistics are reported in table format (middle five columns), and summary statistics are printed in table format (bottom four columns) of the equation window.
General Information Printed in the Top Portion of the Equation Output: The first five or six lines identify (see arrow
in figure on right):
Line 1. Name of the dependent variable.
Line 2. Regression method used.
Line 3. Date & time the regression was executed.
Line 4. Sample range used in the regression.
Line 5. Number of observations included in your regression.
Line 6. Number of excluded observations.
Line 6 is not reported in this
case because no observations are excluded (i.e., no variable, included in the regression, has missing observations or is lagged with data not available for the pre-sample period).
Coefficient Results: Key information regarding the estimated regression coefficients is reported in a table displayed in the middle of the regression output (see area highlighted in yellow). The first column identifies each variable (C for the constant and X for height) and the second column reports the estimated coefficient values (i.e., βˆo & βˆ1). Note that the estimated coefficients are the same as those printed in (UE, Equation 1.21, pp. 20 & 21). The data printed in columns (3) - (6) are the standard error of the coefficient, the t-statistic and the probability respectively. We will not discuss these now, but they will be very important when Hypothesis Testing is discussed in Chapter 5.
Summary Statistics: Key summary statistics are reported in four columns below the equation output (see area outlined in red). Each will be defined and the page reference to where it is discussed in UE is identified in parenthesis.
1. 2
R : coefficient of determination is the fraction of the variance of the dependent variable explained by the independent variables (p. 50);
2. 2
R : adjusted R2 (p. 51);
3. Standard Error of the Regression (S.E. of regression): called Standard Error of Estimate (SEE) in UE (p. 105t & 392t);
4. Sum of squared resid: OLS selects the value of the coefficients to minimize this (pp. 37−38); 5. Log likelihood: useful in hypothesis testing;
6. Durbin-Watson stat: test statistic for serial correlation in the residuals (p.324);
7. Mean dependent var: measure of central tendency for the dependent variable (pp. 522-526); 8. S.D. dependent var: measure of dispersion (Standard Deviation) for the dependent variable
(pp. 526-529);
9. Akaike info criterion: used in model selection (pp. 195-197); 10. Schwarz criterion: used in model selection (pp. 195-197);
11. F-statistic: tests the hypothesis that all of the slope coefficients (excluding the constant, or intercept) in a regression are zero (pp. 142−145);
12. Prob(F-statistic): (pp. 144−145).
Multivariate Regression (2.2.3):
Multivariate regression is executed the same as simple regression in EViews and the output is identical. In this section we create a workfile, import data from a spreadsheet and estimate a multivariate regression model using the Beef example (UE, p. 45).
Creating a workfile for the demand for beef example (UE, Table 2.2, p. 45):
Note that Table 2.2 reports annual data for the price and quantity of beef and disposable personal income for the period 1960 through 1987. To create an EViews workfile:
Step 1. Select File/New/Workfile on the main menu.
Step 2. Set the Workfile frequency: to Annual.
Step 3. Enter the Start date: (1960) and End date: (1987).
Step 4. Click OK.
Importing data from a spreadsheet file named Beef2.xls:
Once the workfile has been created, it is a simple matter to import data from another file. However, you must first know the location of the data in the spreadsheet file.
To view the location of the data in the spreadsheet file:
Step 1. Open the Excel program and then open the Excel spreadsheet file named Beef2.xls, located on the Addison Wesley Longman web site. You can get there by clicking this
http://occ.awlonline.com/bookbind/pubbooks/studenmund_awl/ URL. Click on the Student Resources/Data Sets/Data Sets-Excel. You must be connected to the internet for this link to work.
Step 2. Note that the first data series starts in cell A2 and that the data are in three contiguous columns (see the figure below).
Follow these steps to import the data from the
Beef2.xls Excel file into your new EViews file:
Step 1. Close the spreadsheet file (two programs cannot access the same file at the same time).
Step 2. Click Procs/Import/Read Text-Lotus-Excel
on the workfile menu bar3.
Step 3. Select the drive and folder location in the Look in: window.
Step 4. Select Excel.xls in the Files of type: window.
Step 5. Double click on the file named Beef2.xls.
Step 6. Fill in A2 for the upper left data cell and 3 for the number of series (note that when you enter the number of series, EViews will enter the names of the series that are printed in the row above each data series).
Step 7. The sample range is set to the workfile sample by default. The screen should look like the figure on the right.
Step 8. Click OK to complete the import process. If you get an error message that reads 'Unable to open file …' it means that you probably have not closed the file in
Excel. If the error message does not display, the data was successfully imported.
Using EViews to estimate a multiple regression model of beef demand (UE 2.2.3):
To Regress Beef Demand (B) on the Constant (C), the Price of Beef (P) and Per Capita Disposable Income (Yd):
Step 1. Open the EViews workfile named Beef2.wf1.
Step 2. Select Objects/New Object/Equation on the workfile menu bar and enter B C P Yd in the Equation Specification: window. Do not change the default settings for Method and Sample.
3 If you know the location and name for the spreadsheet file, you can skip steps 3−5. Instead, fill in the File name
Step 3. Click OK to get the regression results shown in the table on the right. Check the coefficients in column 2 of the EViews, Least Squares output table (highlighted in yellow) with the results reported in UE, Equation 2.10, p. 44.
Describing the Overall Fit of the Estimated Model (UE 2.4):
R2, the coefficient of determination and R2, the adjusted R2, are located right
under the coefficients column of the table printed in the middle of the EViews regression output (outlined in red). In this case, R2 = 0.66 andR2 = 0.63.
Exercises:
4. Follow the steps described in Chapter 1 of the EViews guide to create an EViews workfile and enter the data into an EViews workfile. Follow the steps described in Running a simple regression for weight/height example of the EViews guide to regress per capita income as a function of percent of labor in agriculture on farms.
Chapter 3: Learning To Use Regression Analysis
In this chapter:
1. Displaying the spreadsheet view of a group of variables(UE, Table 3.1) 2. Displaying the descriptive statistics for a group of variables (UE, Table 3.1)
3. Displaying the simple correlation coefficients between all pairs of variables in a group (UE, Table 3.1)
4. Running a simple regression for Woody's Restaurants example (UE, Table 3.2) 5. Documenting the results
6. Displaying the actual, fitted, residual, and a plot of the residuals (UE, Table 3.2)
The Woody's Restaurants data will be used to show how EViews can be used to do the items listed above. The steps required to display the 'spreadsheet view', descriptive statistics, and simple correlation coefficients between all pairs of variables in a group are as follows:
Displaying the spreadsheet view of a group of variables (UE, Table 3.1):
Step 1. Open the EViews workfile named Woody3.wf1 by clicking File/Open/Workfile on the main menu and double click on the file named Woody3.wf1.
Step 2. To Create an EViews group for the Woody's Restaurants example, hold down the Ctrl button, click on Y, N, P & I, select Show from the workfile toolbar, and click OK.
Step 3. When you click OK, EViews displays the spreadsheet view of the data for the variables included in the group (i.e., Y, N, P & I in this case). EViews allows you to change the view with the click of a button. If you are in another view, you can display the spreadsheet view by clicking
View/Spreadsheet on the group window menu bar.
Step 4. Click Name on the group menu bar and enter GROUP01 in the Name to identify object: window.1
Displaying the descriptive statistics for a group of variables (UE, Table 3.1):
Step 1. Open the group object created in Display the spreadsheet view of a group of variables by double clicking the icon in the workfile window.
Step 2. Click View/Descriptive Stats/Individual Samples on the group window menu bar to view descriptive statistics for GROUP 01.2
1 You must name a group object if you want to keep its results. Unnamed objects are labeled “UNTITLED” and the
results are lost when the object window or the workfile is closed. To name a group, click Name on the group menu bar and enter the name in the Name to identify object: window. Once named, a 'group object' is saved with the workfile and can be viewed by double clicking its icon (i.e., ) in the workfile window.
2 The group view drop-down menu is divided into four blocks:
· The views in the first block provide various ways of looking at the actual data in the group. · The views in the second block display various basics statistics.
· The views in the third block are for specialized statistics for time series data.
The descriptive statistics printed in the table below are defined in footnote 3 at the bottom of this page.3
See Chapter 16 to gain a better understanding of these statistics.
Step 3. Select View/Spreadsheet on the group window menu bar to restore the spreadsheet view for
GROUP 01. Y N P I Mean 125634.6 4.393939 103887.5 20552.58 Median 122015.0 4.000000 95120.00 19200.00 Maximum 166755.0 9.000000 233844.0 33242.00 Minimum 91259.00 2.000000 37852.00 13240.00 Std. Dev. 22404.09 1.919300 55884.51 5141.865 Skewness 0.355246 0.555101 0.672915 0.933694 Kurtosis 1.920334 2.359612 2.280488 3.161758 Jarque-Bera 2.296908 2.258639 3.202315 4.830791 Probability 0.317127 0.323253 0.201663 0.089332 Observations 33 33 33 33
Displaying the simple correlation coefficients between all pairs of variables in a group (UE, Table 3.1):
Step 1. Open the group object created in Display the spreadsheet view of a group of variables by double clicking the icon in the workfile window.
Step 2. Click View/Correlations on the group window menu bar to display the simple correlation coefficients between all pairs of variables included in the group object (see the table below).4
Y N P I Y 1.000000 -0.144225 0.392568 0.537022 N -0.144225 1.000000 0.726251 -0.031534 P 0.392568 0.726251 1.000000 0.245198 I 0.537022 -0.031534 0.245198 1.000000 3
All of the statistics are calculated using observations in the current sample.
Mean is the average value of the series, obtained by adding up the series and dividing by the number of observations. Median is the middle value (or average of the two middle values) of the series when the values are ordered from the smallest to the largest. The median is a robust measure of the center of the distribution that is less sensitive to outliers than the mean. Max and Min are the maximum and minimum values of the series in the current sample. Std. Dev. (standard deviation) is a measure of dispersion or spread in the series. Skewness is a measure of asymmetry of the distribution of the series around its mean. Kurtosis measures the peakedness or flatness of the distribution of the series. Jarque-Bera is a test statistic for testing whether the series is normally distributed. The test statistic measures the difference of the skewness and kurtosis of the series with those from the normal distribution. Under the null hypothesis of a normal distribution, the Jarque-Bera statistic is distributed as with 2 degrees of freedom. The reported Probability is the probability that a Jarque-Bera statistic exceeds (in absolute value) the observed value under the null—a small probability value leads to the rejection of the null hypothesis of a normal distribution.
4
View/Correlations displays the correlation matrix of the series in the selected group. Observations for which any one of the series has missing data are excluded from the calculation.
Running a simple regression for Woody's Restaurants example (UE 3.2):
To regress the number of customers served (Y) on the Constant (C), the number of direct market competitors within a two-mile radius of the Woody's location (N), the number of people living within a three-mile radius of the Woody's location (P), and the average household income of people living within a three-mile radius of the Woody's location (I):
Step 1. Open the EViews workfile named Woody3.wf1.
Step 2. To estimate UE, Equation 3.6, p. 74, select Objects/New Object/Equation on the workfile menu bar.5 You can name the equation object now by deleting Untitled in the Name for Object: window and typing a name for the equation you are about to estimate, or you can skip this step and name the equation later (if you find that it is worth saving). Click OK to reveal the Equation Specification: window.
Step 3. Enter Y C N P I in the Equation Specification: window.
Step 4. Do not change the default settings for Method: and Sample:.
Step 5. Click OK to get the computer output printed in the top box of UE, Table 3.2, p. 76.
Step 6. To name the equation for later use, select Name on the equation window menu bar, enter
EQ01 in the Name to identify object: window, and click OK.6
Documenting the results:
All of the data necessary to write the results printed in (UE,Equation 3.7, p. 77) are printed in the EViews regression output. EViews provides a variety of views for regression results. For example, if you are documenting the results in a word processing file, you can facilitate the process by clicking View/Representations on the equation window menu bar to get the following: Estimation Command: ===================== LS Y C N P I Estimation Equation: ===================== Y = C(1) + C(2)*N + C(3)*P + C(4)*I Substituted Coefficients: ===================== Y = 102192.4277 - 9074.674399*N + 0.3546683674*P + 1.287923391*I
You can copy the last line and paste it into your word processing file to get the first line of UE, Equation 3.7.
5
Alternately, select Quick/Estimate Equation from the main menu. If this method is used, you must name the equation to save it. Click Name on the equation menu bar and enter the desired name in the Name for object:
window and click OK.
6 Restrictions on naming an object include, the name cannot exceed 16 characters and it cannot be a reserved name.
The following names are reserved and should not be used for series: ABS, ACOS, AR, ASIN, C, CON, CNORM, COEF, COS, D, DLOG, DNORM, ELSE, ENDIF, EXP, LOG, LOGIT, LPT1, LPT2, MA, NA, NRND, PDL, RESID, RND, SAR, SIN, SMA, SQR, and THEN.
Select View/Estimation Output on the group window menu bar to restore the estimation output view for EQ01.
Displaying the actual, fitted, residual, and a plot of the residuals for a regression (see UE, Table 3.2, p. 76):
Step 1. Open the EViews workfile named Woody3.wf1 and open the equation namedEQ01 by double clicking the equation icon in the workfile window.
Step 2a. Click View/Actual,Fitted,Residual/Actual,Fitted,Residual Table on the equation window menu bar (see figure below left). Click OK to reveal the figure below right.
Step 2b. Alternately, to display a graph of the actual, fitted, and residuals for a regression, click
View/Actual,Fitted,Residual/Actual,Fitted,Residual Graph (see figure below left). Click OK
to reveal the figure below right. Other views available in the equation window will be explained in future chapters of this guide.
Chapter 4: The Classical Model (
OPTIONAL
)
In this chapter:
Read this first: The procedures described in this chapter are not essential to your understanding of econometrics or to using EViews to reproduce the results published in UE. The purpose of describing the procedures in this chapter is to familiarize you with the Monte Carlo Simulation process described in (UE 4.3.2, p. 102).
Demonstrate that the estimated ββββs are drawn from a normal distribution (UE 4.3.2, pp. 101-102):
Follow these steps to complete the process described in (UE 4.3.2):
Step 1. Open EViews and type the following commands in the command window, hitting Enter after each command:
CREATE MONTECARLO U 1 15 MATRIX(20,1) BETA
SERIES X=10+NRND
What does this do? The first command creates an undated workfile named MONTECARLO
with 15 observations, the second command creates a matrix named BETA with 20 rows1 and one column to store the sample βs, and the third command creates a series named X equal to 10 plus a random number drawn from a normal distribution with zero mean and unit variance.
Step 2. Type the following commands in the command window, press Enter after each command: SERIES Y=X+0.25*@RNORM
EQUATION EQ1.LS Y X BETA(1)=@COEFS(1)
What this does: The first command generates a random number named y (UE, Equation 4.11, p. 101), the second command estimates the regression with y as the dependent variable and x as the independent variable (no constant), and the third command saves the β coefficient on x in the first row of the matrix named BETA. You have to repeat Step 2 for each new sample
β. However, you don’t have to re-type each line, each time. Just put the cursor on the command line and press Enter. Change the number (in parenthesis after betain the command
BETA(1)=@COEFS(1)) to the next higher number so you don’t overwrite the previous sample
β. The next iteration should look like this: SERIES Y=X+0.25*@RNORM
EQUATION EQ1.LS Y X BETA(2)=@COEFS(1)
1 Enter the number that equals the number of sample βs you plan to estimate. The number 20 was selected for this
Step 3. Type the following commands in the command window, press Enter after each command: BETA.WRITE(T=XLS) EXCEL
CREATE BETAWF U 1 20 READ(T=XLS) EXCEL 1 RENAME SER01 BETA BETA.HIST
SAVE
The first command writes the matrix named BETA as a series to an Excel file named EXCEL, the second command creates a new undated EViews workfile named BETAWF with 20
observations,2 the third command reads the series named excel into the EViews workfile and names it SER01, the fourth command renames SER01 to BETA, the fifth command creates a histogram of the sample βs, and the last command saves the EViews file.
The three figures below show how the probability distribution of the estimated sample β series more closely approximates the normal distribution as the number of observations increase from 20 to 2,000 and finally to 8,000. For an explanation of the histogram and descriptive statistics represented, see Chapter 16.
The graphic on the right shows the
View/Descriptive
Statistics/Histogram and Stats EViews for beta with 20 observations.
The graphic on the right shows the
View/Descriptive
Statistics/Histogram and Stats EViews for beta with 2,000 observations.
The graphic on the right shows the
View/Descriptive
Statistics/Histogram and Stats EViews for beta with 8,000 observations.
Chapter 5: Basic Statistics and Hypothesis Testing
In this chapter:
1. Viewing the t-value from an OLS regression(UE 5.2.1)
2. Calculating critical t-values and applying the decision rule(UE 5.2.2) 3. Calculating confidence intervals(UE 5.2.4)
4. Performing the t-test of the simple correlation coefficient(UE 5.3.3) 5. Performing the F-test of overall significance(UE 5.5)
6. Exercises
Viewing the t-value from an OLS regression (UE 5.2.1):
The Woody's Restaurants example is used to explain the use of t-values to test hypotheses concerning the coefficients on the independent variables in an OLS regression model. Follow these steps to open the Woody's Restaurant workfile in EViews and run the regression for the equation Yt = βˆ0 +βˆNNt +βˆpPt + βˆiIt + et .
Step 1. Open the EViews workfile named Woody3.wf1.
Step 2. Select Objects/New Object/Equation on the workfile menu bar, enter Y C N P I in the Equation Specification: window, and click OK. EViews generates the following output (also printed in UE, Table 3.2, p. 76):
Dependent Variable: Y Method: Least Squares Date: 05/23/00 Time: 05:55 Sample: 1 33
Included observations: 33
Variable Coefficient Std. Error t-Statistic1 Prob.
C 102192.4 12799.83 7.983891 0.0000
N -9074.674 2052.674 -4.420904 0.0001
P 0.354668 0.072681 4.879810 0.0000
I 1.287923 0.543294 2.370584 0.0246
R-squared 0.618154 Mean dependent var 125634.6
Adjusted R-squared 0.578653 S.D. dependent var 22404.09 S.E. of regression 14542.78 Akaike info criterion 22.12079 Sum squared resid 6.13E+09 Schwarz criterion 22.30218
Log likelihood -360.9930 F-statistic 15.64894
Durbin-Watson stat 1.758193 Prob(F-statistic) 0.000003
All information needed for hypothesis testing using the t-test is found in the middle of the
EViews equation output table (highlighted in yellow). The first column identifies the name of the variable. The second column reports the estimated coefficient (βˆk) for each variable, and the third column reports the standard error for the estimated coefficient (SEβˆk). The fourth column prints the calculated t-value given that the border value implied by the null hypothesis (βHo) is zero (i.e., the t-value in this case is (βˆk)/(SEβˆk)).
Calculating critical t-values and applying the decision rule (UE 5.2.2):
The critical t-value (tc) is the value that separates the "acceptance" region from the "rejection" region. Look up this value in UE, Statistical Table B-1, p.607. Its value depends on the degrees of freedom (printed in column one of Table B-1) and the level of Type I error specified (i.e., the number at the top of the column in Table B-1 for two-tailed tests or double the value for one-tailed tests). Alternately, you can follow these steps to have EViews calculate the one-one-tailed and two-tailed, 5% significance level critical t-values (tc):
Step 1. Open the EViews workfile named Woody3.wf1.
Step 2. Select Objects/New Object/Equation on the workfile menu bar, enter Y C N P I in the Equation Specification: window, and click OK.
Step 3. Select Name on the equation window menu bar, enter EQ01 in the Name to identify object: window, and click OK.
Step 4. To create a vector object named result with 10 rows (to store the results of the test statistics for Woody's Restaurants regression), type the following command in the command window:
vector(10) result and press Enter.2
Step 5. To compute the two-tailed critical t-value (tc) for the 5% significance level and save the value in the first row of the vector object named result, type the following equation in the command window and press Enter:3
result(1)=@qtdist(.975,(eq01.@regobs-eq01.@ncoef)).4
Step 6. To compute the one-tailed critical t-value (tc) for the 5% significance level and save the value in the second row of the vector object named result, type the following equation in the command window and press Enter:
result(2)=@qtdist(.95,(eq01.@regobs-eq01.@ncoef)).
Step 7. Double click on the Vector Object named result in the workfile window to view the two-tailed and one-tailed, 5% significance level critical t-value (tc) for the Woody's Restaurants regression. In this case, the value reported in row one of the result vector is 2.045230 and the value reported in row two is 1.69912702653.
Population was hypothesized to have a positive effect on the number of customers eating at Woody's Restaurants. This implies that the coefficient on P is expected to be positive and a one-tailed test is appropriate. Thus, the hypothesis that the coefficient is zero (βˆp = 0) is rejected at the 5% significance level because the calculated t-value (4.879810) is greater than the one-tailed critical t-value (5% level of significance), calculated in Step 6 to be 1.69912702653.
While it is important to be able to apply the decision rule by comparing the calculated t-value (reported in the EViews output) with the critical t-value just calculated, EViews makes it
2 Alternately, select Objects/New Object/Matrix-Vector-Coef from the main menu or the workfile menu. Write
result in the Name for Object: window, and click OK. Select Vecto in the Type window, enter 10 in the Rows
window, enter 1 in the Columns window, and click OK.
3 The command, @qtdist(p,v), calculates the value where the cumulative density function (CDF) of the t-distribution
with (v) degrees of freedom equals (p) probability, leaving 1-p% of the t-distribution in each tail. Note that you should enter 0.975 for "p" for the two-tailed 5% significance level calculation and 0.95 for "p" for the one-tailed 5% significance level. In this case, v equals (eq01.@regobs-eq01.@ncoef), which calculates the degrees of freedom for equation eq01. The {eq01.} Part can be omitted if the calculation relates to the last regression run.
possible to test the null hypothesis that a coefficient is zero (i.e., βHo = 0) without knowing the critical t-value. Instead, you can examine the probability (Prob.) value in the last column of the EViews OLS regression output (see the EQ01Estimation Output table). The Prob. value shows the probability of drawing a t-value as extreme as the one actually observed when, in fact, the coefficient value is actually zero5. This probability is also known as the p-value or the marginal significance level. In terms of UE, it represents the probability of making a Type I error if the null hypothesis, that the coefficient is zero, is rejected. Given a p-value, you can tell at a glance if the null hypothesis, that the true coefficient is zero against a two-sided alternative that it differs from zero, should be rejected or accepted. For example, a p-value lower than .05 suggests
rejection of the null hypothesis, for a two-tailed test at the 5% significance level. The appropriate probability is one-half that reported by EViews, for a one-sided test. This is comparable to reading the value at the top of the Critical t-Value table that is double the significance level that you are testing for a one-tailed test (i.e., using 0.10 instead of 0.05 for 5% significance level). Applying the Prob. value, one-tailed test to the population (P) variable in the Woody's
Restaurants regression, the hypothesis that the coefficient is zero (βˆp = 0) is rejected at the 5% significance level if one-half of the Prob. value in the last column is less than or equal to 0.05. Note that the null hypothesis is also rejected at the 1% significance level.
Calculating confidence intervals (UE 5.2.4):
Complete steps 1-4 of the section entitled Calculating critical t-values and applying the decision rule before attempting this section (i.e., an equation object named EQ01 and a vector object named result with 10 rows should already be present in the workfile). To calculate and record the 90% confidence interval for a coefficient using EViews:
Step 1. Open the EViews workfile named Woody3.wf1.
Step 2. To calculate the lower value for the 90% confidence interval for the population coefficient, enter the following formula in the command window, and press Enter:6
result(3)= eq01.@coefs(3)-(@qtdist(.95,(eq01.@regobs-eq01.@ncoef)))*eq01.@stderrs(3).
Step 3. To calculate the upper value for the 90% confidence interval for the population coefficient, enter the following formula in the command window, and press Enter:
result(4)= eq01.@coefs(3)+(@qtdist(.95,(eq01.@regobs-eq01.@ncoef)))*eq01.@stderrs(3).
Step 4. To view the lower and upper confidence interval values, double click the vector icon named
result. Note that the values 0.231175 and 0.478162 are printed in rows three and four respectively (the same values are reported in UE, p. 128).
5
Under the assumption that the errors are normally distributed, or that the estimated coefficients are asymptotically normally distributed.
6 eq01.@coefs(i) and eq01.@stderrs(i) are scalar values of the coefficient and standard error of the ith variable in
regression eq01,where i represents the coefficient number (including the constant) listed in the EViews OLS
Estimation Output. Since the population (P) variable is listed third in the Estimation Output, @coefs(3) and @stderrs(3), calculates the value for the population coefficient and its standard error respectively. As in section 5.2.2, (@qtdist(.95,(eq01.@regobs-eq01.@ncoef))) calculates the value where the cumulative density function (CDF) of the t-distribution equals 0.95 probability, leaving 5% of the t-distribution in each tail. The term (eq01.@regobs-eq01.@ncoef) calculates the degrees of freedom for EQ01, with eq01.@regobs calculating the number of observations used to estimate EQ01 and eq01.@ncoef calculating the number of coefficients estimated, including the constant.
Performing the t-test of the simple correlation coefficient (UE 5.3.3):
Complete steps 1-4 of the section entitled Calculating critical t-values and applying the decision rule before attempting this section (i.e., an equation object named EQ01 and a vector object named result with 10 rows should already be present in the workfile). To use the t-test to determine whether a particular simple correlation coefficient between Y and P is significant:
Step 1. Open the EViews workfile named Woody3.wf1.
Step 2. To calculate the simple correlation coefficient (r) and store it in the fifth row of the result vector, type the following command in the command window, and press Enter:
result(5)= @cor(y,p).
Step 3. To convert the simple correlation coefficient between Y and P into a t-value and store it in row six of the result vector, type the following command in the command window, and press
Enter: result(6) = (@cor(y,p)*((@obs(y)-2)^.5))/((1-@cor(y , p)^2)^.5).
Step 4. To calculate the critical t-value (tc) for the t-distribution with @obs(y)-2 degrees of freedom and store it in the seventh row of the result vector, type the following command in the command window, and press Enter: result(7) = @qtdist(.975,(@obs(y)-2)).
Step 5. Double click the icon for the result vector to view the results in rows 5, 6, and 7.
Performing the F-test of overall significance (UE 5.5):
Complete steps 1-4 of the section entitled Calculating critical t-values and applying the decision rule before attempting this section (i.e., an equation object named EQ01 and a vector object named result with 10 rows should already be present in the workfile). The F-statistic is reported as (15.64894) in the EQ01 estimation output table. Follow these steps to calculate the F-statistic from EQ01 and save it in row seven of a vector named result:
Step 1. Open the EViews workfile named Woody3.wf1.
Step 2. To store the F-statistic from EQ01 in row eight of the results vector, type the following command in the command window, and press Enter: result(8)=eq01.@f.
In this case, the F-statistic tests the hypothesis that all of the slope coefficients excluding the constant, in EQ01, are zero. Under the null hypothesis with normally distributed errors, this statistic has an F-distribution with k degrees of freedom in the numerator and n-k-1 degrees of freedom in the denominator, where n equals the number of observation and k equals the number of independent variables (k does not include the constant) in the model. The null hypothesis can be rejected if the calculated F-statistic exceeds the critical F-value at the chosen level of
significance. The critical F-value can be determined from UE, Appendix B, Statistical Tables B-2 or B-3, depending on the level of significance chosen. Alternately,
Step 3. To have EViews calculate the 5% critical F-value for EQ01 and store it in row nine of the results vector, type the following command in the command window, and press Enter:
result(9)=@qfdist(0.95,eq01.@ncoef-1,eq01.@regobs- eq01.@ncoef).
test statistic result row value t-critical for regression - 5% level of significance (two-tailed test) = R1 2.04523 t-critical for regression - 5% level of significance (one-tailed test) = R2 1.699127 lower confidence interval = R3 0.231175 upper confidence interval = R4 0.478162 The simple correlation coefficient (r) = R5 0.392568 t-calculated for correlation = R6 2.376503 t-critical for correlation = R7 2.039513 The F-statistic = R8 15.64894 Critical value of the F-statistic - 5% level of significance = R9 2.93403
R10 0
Since the 5% critical F-value for EQ01 (i.e., 2.934030) is significantly less than the calculated F-statistic (i.e., 15.64894), we can reject the null hypothesis that all of the slope coefficients in
EQ01 are zero.
The p-value printed just below the F-statistic in the EViews regression output, denoted Prob(F-statistic), represents the marginal significance level of the F-test. If the p-value is less than the significance level you are testing, say .05, you reject the null hypothesis that all slope
coefficients are equal to zero. For EQ01, the p-value is 0.000003, so we reject the null hypothesis that all of the regression coefficients are zero. Note that the F-test is a joint test so that even if all the t-values are insignificant, the F-statistic can be highly significant.
Exercises:
16. EViews can be used to complete parts 1, b, c & f of exercise 16.
a. Review the section Calculating critical t-values and applying the decision rule to learn how to use EViews to calculate the critical values for testing your hypothesis concerning the regression coefficients in this exercise.
b. Review the section Performing the F-test of overall significance to learn how to use EViews to calculate the critical value for the F-test of the overall significance of the estimated equation.
c. Review the section Calculating confidence intervals to learn how to use EViews to determine lower and upper confidence intervals for an estimated coefficient. d.
e.
f. Review the section Using EViews to estimate a multiple regression model of beef
demand in Chapter 2, if you have trouble estimating this multiple regression model using EViews.
Chapter 6: Specification: Choosing the Independent
Variables
In this chapter:
1. Adding or deleting variables to/from an OLS model in EViews(UE 6.1.2 - 6.3) 2. Lagging variables in an OLS model using EViews (UE 6.5)
3. Appendix: additional specification criteria (UE 6.8)
a. Ramsey's Regression Specification Error Test (RESET) (UE 6.8.1) b. Ramsey's Regression Specification Error Test (RESET) (EViews)
4. Akaike's Information Criterion (AIC) and the Schwartz Criterion (SC) (EViews) 5. Exercise
Adding or deleting variables to/from an OLS model in EViews (UE 6.1.2 - 6.3): EViews makes it easy to try alternative versions of an OLS model in order to determine whether omitting a variable is likely to result in specification bias or whether the variable is irrelevant. The four important specification criteria (UE, pp. 167-168) don't always agree. However, when the theory is not absolutely clear about the relevancy of including a specific variable in a model, the other three criteria (i.e., t-test, adjusted R2, and bias) should be considered. The only way to check these criteria is to run the regression with and without the variable and evaluate the results in terms of t-test, adjusted R2, and bias. The following steps outline a procedure to determine whether the price of beef (PB) is a relevant variable in the demand for chicken model (UE, Equation 6.8, p. 160):
Step 1. Open the EViews workfile named Chick6.wf1.
Step 2. Select Objects/New Object/Equation on the workfile menu bar, enter Y C PC PB YD in the Equation Specification: window, and click OK.
Step 3. To preserve this EViews Estimation Output view of UE, Equation 6.8, p. 160, for later comparison, select Name on the equation menu bar, enter EQ01 in the Name to identify
object: window, and click OK.1
Step 4. Create a duplicate copy of EQ01 by selecting Objects/Copy object… on the EQ01 menu bar. A new UNTITLED copy of EQ01 Estimation Output appears. In this new equation window, select Estimate on the equation menu bar, delete PB from the
Equation Specification: window, and click OK.
Step 5. To preserve this EViews Estimation Output of UE, Equation 6.9, p. 161, for later comparison, select Name on the equation menu bar, enter EQ02 in the Name to identify
object: window, and click OK.
Step 6. Compare and evaluate the two equations based on t-statistics, adjusted R2, and bias.
1 Alternately, the EViews Estimation Output could have been preserved by selecting Freeze on the equation menu bar. The Freeze button on the objects toolbar creates a duplicate of the current view of the original object. The primary feature of freezing an object is that the tables and graphs created by freeze may be edited for presentations or reports. Frozen views do not change when the workfile sample is changed or when the data change. The purpose for freezing the regression output table is to allow us to view it later by double clicking the objects icon in the workfile window. In order to do that, the frozen object must be named.
Lagging variables in an OLS model using EViews (UE 6.5):
EViews makes it easy to lag variables in an equation.2 Equations 6.22 & 6.23 refer to a hypothetical model and they are not actually estimated in UE. However, the demand for chicken model (UE, Equation 6.8, p. 160) will be used to show how to lag variables in EViews.
Step 1. Open the EViews workfile named Chick6.wf1.
Step 2. To run the regression for Yt on PCt-1, PBt and YDt, select Objects/New
Object/Equation on the workfile menu bar, enter Y C PC(-1) PB YD in the
Equation Specification:
window (see the graphic to the right), and click OK. Note that EViews reports that it has adjusted the sample (see the graphic to the right). The range and sample in the workfile window show 1951 1994 but the equation output reports Sample(adjusted): 1952 1994. You should be aware that if you include lagged variables in a regression, the degree of sample
adjustment will
differ depending on whether data for the pre-sample period are available or not. For example, suppose the workfile range is 1950 1994 and the workfile sample is 1950 1994. If you specify a regression with PC lagged one period, EViews will not adjust the sample because it can use the data for 1950 in the workfile.
2 In fact, nearly any transformation of the variables using EViews functions is allowed. See Help/Reference(Commands and Functions)/Function Reference for a list of EViews functions.