Echelon, L
ONW
ORKS, LonTalk, and the Echelon logo
are trademarks of Echelon Corporation registered
in the United States and other countries. LonMaker,
LNS, and
i
.LON are trademarks of Echelon
Corporation.
Other brand and product names are trademarks
or registered trademarks of their respective
holders.
Neuron
Chips and other OEM Products were not
designed for use in equipment or systems which
involve danger to human health or safety or a risk
of property damage and Echelon assumes no
responsibility or liability for use of the Neuron
Chips in such applications.
Parts manufactured by vendors other than
Echelon and referenced in this document have
been described for illustrative purposes only, and
may not have been tested by Echelon. It is the
responsibility of the customer to determine the
suitability of these parts for each application.
ECHELON MAKES AND YOU RECEIVE NO
WARRANTIES OR CONDITIONS, EXPRESS, IMPLIED,
STATUTORY OR IN ANY COMMUNICATION WITH
YOU, AND ECHELON SPECIFICALLY DISCLAIMS
ANY IMPLIED WARRANTY OF MERCHANTABILITY
OR FITNESS FOR A PARTICULAR PURPOSE.
No part of this publication may be reproduced,
stored in a retrieval system, or transmitted, in any
form or by any means, electronic, mechanical,
photocopying, recording, or otherwise, without the
prior written permission of Echelon Corporation.
Printed in the United States of America.
Copyright © 2002-2005 Echelon Corporation.
Echelon Corporation
Purpose
An IP-852 channel uses a shared IP network to connect devices, and is
defined by a group of IP addresses. These addresses form a “virtual” wire that the devices on the channel use in the same way they use traditional dedicated twisted pair wiring.
This document provides information you will need when creating an IP-852 channel with an i.LON™ 100 Internet Server, i.LON 600 LONWORKS®/IP
Server, an i.LON 1000 Internet Server or an LNS™ server. This includes
instructions you can follow when configuring the IP-852 channel with the Echelon LONWORKS/IP Configuration Server, and guidelines to follow when
using NAT, DNS or DHCP on the IP-852 channel.
Audience
This document is intended for Echelon customers, OEMs, and system designers and integrators with knowledge of control systems and IP networking.
Related Documentation
The i.LON 100 e3 User’s Guide and i.LON 100 e3 HardwareGuide documents describe how to install and use the i.LON 100 Internet Server. The i.LON 600 LONWORKS/IP Server User’s Guide describes how to use the i.LON 600
LONWORKS/IP Server. The LNS Programmer’s Guide describes how to create
LNS applications you could use to manage or monitor and control devices on an IP-852 channel.
You can download these documents from Echelon’s Web site at www.echelon.com.
Table of Contents
Purpose ...i
Audience ...i
Related Documentation ...i
Table of Contents ...ii
1
Introduction 1 Introduction to the IP-852 Channel... 2Document Roadmap... 5
2
Creating an IP-852 Channel 7 Creating an IP-852 Channel ... 8Designing a LonMaker Network Containing IP-852 Channels ... 15
Defining an IP-852 Device as a LONWORKS Router ... 15
Verifying Router Functionality... 17
3
IP-852 Channel Parameters 21 Channel Mode... 22Aggregation ... 23
MD5 Authentication ... 24
IP-852 Channel Timing Considerations ... 26
Channel Timeout ... 27
Channel Delay ... 27
Packet Reorder Timer ... 27
Using SNTP When Creating IP-852 Channels ... 28
Specifying System SNTP Servers... 28
Specifying SNTP Servers for a Channel or Device... 29
Using a Third-Party SNTP Client on the Configuration Server PC... 30
Choosing an SNTP Server... 30
4
Using NAT, DHCP & DNS on an IP-852 Channel 33 Network Address Translation (NAT)... 34Setting Up an IP-852 Channel With NAT ... 34
NAT Example: Simple Home Network ... 35
Ports and Port Mapping... 36
IP-852 Device Ports ... 37
Creating a Virtual Wire ... 38
DHCP ... 40
DHCP Servers... 41
ISP Address Allocation... 42
DNS... 42
DNS and the Echelon LONWORKS/IP Configuration Server... 43
Linking DNS and DHCP ... 44
Dynamic DNS... 45
How DDNS Works ... 45
Appendix A
Troubleshooting 47 Common Troubleshooting Problems ... 481
Introduction
This chapter provides an introduction to IP-852 channels, and describes the devices you can use to create and manage these channels.
Introduction to the IP-852 Channel
Traditionally, LONWORKS networks operate over dedicated network wiring
such as twisted pair. A given segment of wiring is referred to as a channel. With the introduction of LNS 3.01 and the i.LON 1000 Internet Server, as well as that of the i.LON 600LONWORKS/IP Server and the i.LON 100
Internet Server, a new kind of channel has been created: the IP-852 channel. Unlike traditional LONWORKS channels that use a dedicated physical wire to
create connections between the devices on the channel, an IP-852 channel uses a shared IP network to connect devices, and is defined by a group of IP addresses. These addresses form a “virtual wire” between the devices on the IP-852 channel.
This document describes how to use i.LON 600 LONWORKS/IP Servers, i.LON
100 Internet Servers, and i.LON 1000 Internet Servers as routers on IP-852 channels. These devices, as well as PCs running LNS 3.01 or higher, use the virtual wire created by an IP-852 channel in the same way they use
traditional dedicated twisted pair wiring. In this document, these devices are referred to collectively as IP-852 devices.
The concept of an IP-852 channel is similar to a Virtual Private Network (VPN). Each 852 device in the system is aware of its peers and each IP-852 device keeps peer information in its routing tables so it can forward LONWORKS packets to the correct IP address.
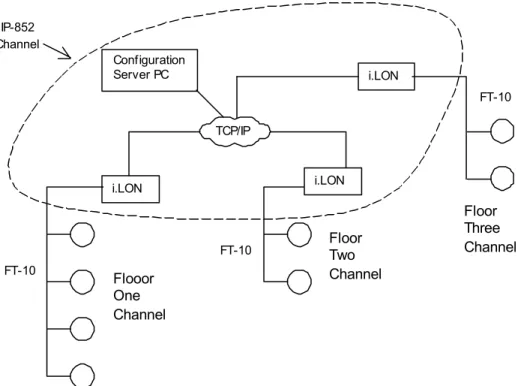
Figure 1.1 shows a typical channel configuration in which 3 i.LON 100 servers are used to create an IP-852 channel connecting three TP/FT-10 channels, each of which contains the devices installed on a different floor in a building. The circled portion of the diagram represents the IP-852 channel – the virtual, IP-based connection between the three i.LON 100 servers. As a result of this connection, a single application can connect to devices on all three of the TP/FT-10 channels in the building, and monitor and control the entire building.
i.LON
FT-10
FT-10 TCP/IP IP-852
Channel
i.LON
FT-10 Configuration
Server PC
i.LON
Flooor One Channel
Floor Two Channel
Floor Three Channel
Figure 1.1 An IP-852 Channel
You will notice that Figure 1.1 contains an icon representing the Echelon LONWORKS/IP Configuration Server inside the IP-852 channel. The
Configuration Server stores the configuration of the IP-852 channel, including the IP addresses of all the devices and routers installed on the channel. You will initially configure the IP-852 channel with the
Configuration Server, and the Configuration Server must be running anytime you modify the configuration of the devices on the IP-852 channel. You can run the Configuration Server on any PC with access to the IP network containing the IP-852 channel. Chapters 2 and 3 of this document describe how to use the Configuration Server.
Because a virtual wire is created by the devices on the IP-852 channel, the channel topology shown in Figure 1.1 is logically the same as Figure 1.2, which shows a traditional LONWORKS channel connecting the three floors.
FT-10 FT-10 TP/XF-1250
LonWorks FT-TP Router
LonWorks FT-TP Router
FT-10
LonWorks FT-TP Router
Figure 1.2 A LONWORKS Network with a Traditional TP-1250 High Speed
Backbone
The IP-852 device routing engine is designed to deal with the potentially large latencies introduced by large IP networks such as the Internet. Without this intelligent routing engine, certain LONWORKS network services, such as
the ability to detect duplicate packets, could be compromised.
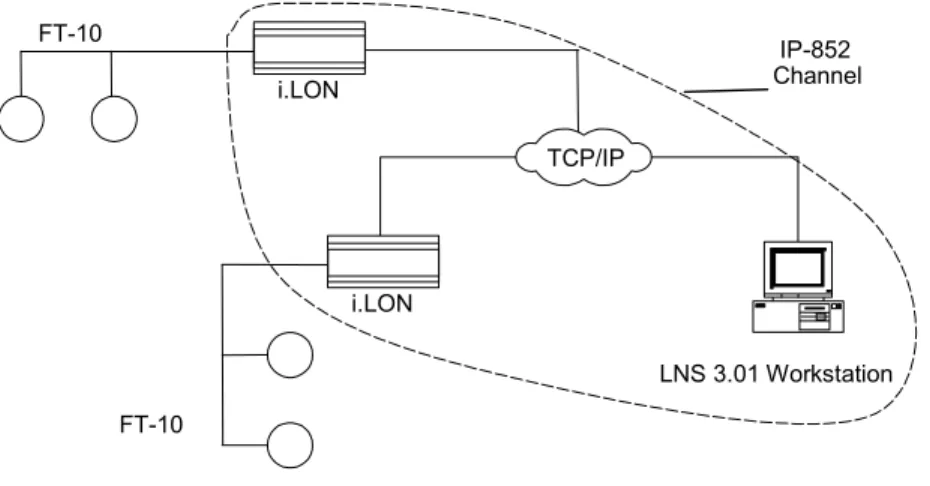
PCs running LNS 3.01 and higher incorporate the same routing intelligence as an i.LON 600 LONWORKS/IP Server or an i.LON 100 Internet Server.
Therefore, PCs running LNS version 3.01 or higher can be directly connected as a member of the IP-852 channel side of any i.LON 600 LONWORKS/IP
Server, i.LON 100 Internet Server or i.LON 1000 Internet Server. This allows topologies like the one shown in Figure 1.3.
i.LON
TCP/IP
LNS 3.01 Workstation IP-852 Channel
FT-10
i.LON FT-10
Figure 1.3 IP-852 Device and LNS 3.01 Workstation on an IP-852 Channel
A complete installation may contain many IP-852 devices and PCs – all sharing a single IP-852 channel. Because the IP-852 channel can exist on any IP network, a system may now span the entire globe as easily as it once spanned a single building, as shown in Figure 1.4.
i.LON FT-10
TCP/IP
LNS 3 Workstation
i.LON i.LON
TCP/IP T1
FT-10 TP/XF-1250
Building 1 (New York)
FT-10 i.LON
i.LON Building 2
(London)
LonWorks/IP Channel
FT-10
Figure 1.4 Large LONWORKS Network using an IP-852 Channel
NOTE: A single IP-852 channel may contain up to 256 devices. If your installation requires more than 256 devices, you must create multiple IP-852 channels.
Document Roadmap
The remainder of this document describes how to create an configure an IP-852 channel, as described below:
• Chapter 2, Creating an IP-852 Channel. This chapter
describes the steps to follow when creating an IP-852 channel with the Configuration Server.
• Chapter 3, IP-852 Channel Parameters. This chapter provides details on the settings you will choose from when configuring an IP-852 channel.
• Chapter 4, Using NAT, DHCP & DNS on an IP-852 Channel. This chapter describes considerations you should make when using NAT, DHCP or DNS on an IP-852 channel.
• Appendix A, Troubleshooting. This appendix describes how to resolve problems that may occur when creating and
2
Creating an IP-852 Channel
This chapter describes how to create an IP-852 channel with the Configuration Server.
Creating an IP-852 Channel
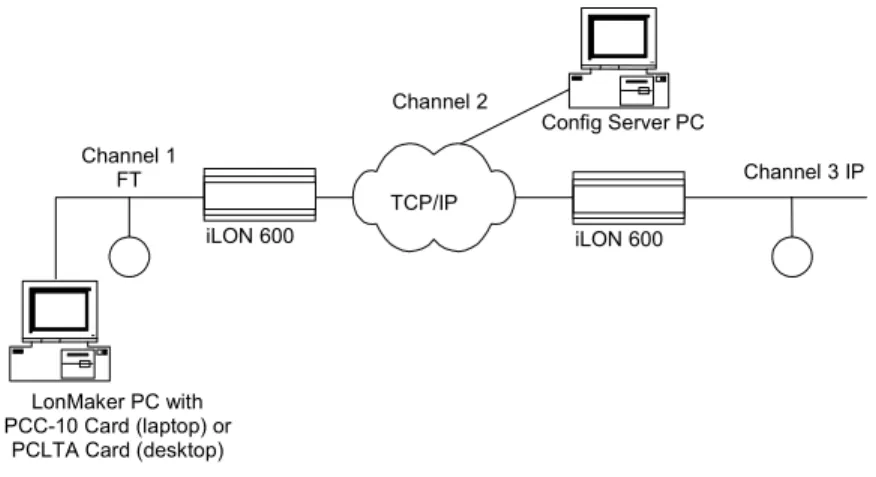
To create an IP-852 channel, you must configure the IP-852 devices that are to be installed on the channel, and enter information about each device in the Configuration Server. The Configuration Server is installed with the software for the IP-852 device you are using. Before proceeding, make sure that you have installed the software, and have access to the Configuration Server. This section describes how to do so, using an example network with two devices on an IP backbone to illustrate the process. In Figure 2.1, a
LONWORKS device on channel 1 is bound to a device on channel 3 across an IP
backbone. The PC running the Configuration Server resides on channel 2, and has access to both IP-852 devices through an IP connection. The PC running the LonMaker software is connected to channel 1. To simplify the network, you can run the LonMaker software and the Configuration Server software on a single PC.
Config Server PC Channel 1
FT
LonMaker PC with PCC-10 Card (laptop) or
PCLTA Card (desktop)
Channel 2
iLON 600 TCP/IP
Channel 3 IP iLON 600
Figure 2.1 Setting Up an IP-852 Channel To create a network like the one illustrated in Figure 2.1, follow the steps below:
1. Set the IP address, subnet mask, and default gateway for all the IP-852 devices you plan to use on the channel. In Figure 2.1, the two IP-852 devices are i.LON 600 LONWORKS/IP
Servers, although your network could contain any number of the IP-852 devices described in this document. Consult the documentation for your IP-852 device for instructions on how to perform this step.
2. Start the Configuration Server application. From the Windows desktop click on Start, choose Programs, select the Echelon LonWorks-IP Configuration Server program group for the device you are configuring, and then click on
LONWORKS/IP Configuration Server. The Configuration
Figure 2.2 Echelon LONWORKS/IP Configuration Server
3. Verify that the Configuration Server is attached to your IP network. The Network status box should indicate Enabled. If it does not, select Enabled from the Network menu. The Configuration Server should correctly detect and display the IP address of your PC in the Channel Description window. To verify the Configuration Server PC’s IP address, select Settings from the Network menu, and confirm that the Configuration Server’s IP address is shown in the Local IP Address or host name field.
Figure 2.3 Configuration Server Network Settings
4. If your PC has more than one IP address assigned to it, you can select which IP address should be used by the
Configuration Server with the Local IP button. On the main dialog shown in Figure 2.3, the New Channel’s Server Address is set to 10.5.250.17.
The defaults for the channel properties should work in cases where network delays are low. If you anticipate large delays in the IP segment (many routers / hops, or slow media segments), you may want to adjust the channel property settings and/or use SNTP time servers to synchronize LONWORKS/IP member devices. See Chapter 3, IP-852
Channel Parameters, for more information on this. Configure your channel mode by right clicking on the New Channel icon and selecting Properties from the menu. Select either
Backward Compatible, Standard EIA-852 or Extended Firewall Support mode. See the Channel Mode section in Chapter 3 for more detailed information on these settings. 6. From the Configuration Server main dialog, right-click on the
new channel, and select New Device from the shortcut menu. An icon representing a LONWORKS/IP device is added to the
channel. This device could be any of the IP-852 devices described in this document: an i.LON 100 Internet Server, an i.LON 600 LONWORKS/IP Server, an i.LON 1000 Internet
Server, a LONWORKS/IP interface on a PC running LNS 3.01
Each channel may contain up to 256 devices if you are only using devices that support the CEA-852 standard. Channels containing i.LON 1000 Internet Servers or LNS 3.01 PC’s operate in “backward compatibility” mode and are limited to 40 devices.
7. Right-click on the new device and select Rename Device from the shortcut menu to enter a name for the device. Then, right-click the device again and select Device Properties. The device properties dialog opens.
Figure 2.4 Configuration Server Device Properties: Address Tab 8. Enter the IP address of the IP-852 device (obtained from your
network administrator) and click Apply. This is the same address that you assigned to the IP-852 device using the setup Web pages.
If you use a host name, it must be registered in a DNS server that is available to the Configuration Server PC.
Figure 2.5 Configuration Server Device Properties: SNTP and Protocol Tabs
9. Click the SNTP tab, and then select the Use Channel Default checkbox.
10. Click the Protocol tab, and then select the Use Channel Default checkbox.
11. Click the i.LON Time Zone tab, and then set the time zone to correspond with the geographical area of the device.
12. Click Apply.
13. Repeat steps 6–12 for each device you want to add to the IP-852 channel. You may want to change the device’s settings (e.g. IP address, local port, etc.) later. When doing so, Echelon recommends that you update the device’s
configuration with the device software before modifying the device’s settings in the Configuration Server. The
Configuration Server must be running when you modify the device’s configuration with the device software. Echelon recommends that you keep the Configuration Server running at all times.
14. From the Configuration Server dialog, select Update
Members from the Channel menu, or Update Device from the Device menu. The Configuration Server automatically
attempts to set up the device's routing tables by updating all members of the channel with the current channel
Figure 2.6 Configuration Server: Update Members and Update Device When you select Update Members or Update Device, a communication
process starts between the Configuration Server and the devices that you added to the channel. For standard channels, this process conforms to the CEA-852 protocol standard. For backward compatible channels, the protocol used is not strictly compatible with the CEA-852 standard, although it is very similar. You can view this process by clicking the Show Log button.
Figure 2.7 Show Log Screen
If any information between channel members is outdated, the Configuration Server will send updated information to each channel member. Success or failure of this step is reflected in the Configuration Server log screen and the color of the devices in the tree view on the main dialog. The meaning of each color of the device status is listed in Table 2.1.
Table 2.1 Configuration Server Device Status Indicator Color Status Description
Green Normal. Configuration Server has communicated with the IP-852 device and configuration is up to date.
Yellow Normal, but the Time Check failed for device.
The IP-852 device’s time differs from the time on the PC running the Configuration Server by more than a few milliseconds. This usually means that either the
IP-852 device or the PC is not referencing an SNTP server to set the local time. The system may work with some yellow devices, but the probability of data loss is increased. You should provide an SNTP server to both the PC and the IP-852 device so that their time bases can be synchronized. When synchronized, the yellow icon should turn green.
Red Communication with the device has failed.
The Configuration Server cannot communicate with the IP-852 device. This usually occurs when no response is received from a device to which a request was made. This may happen if the IP-852 device is powered down, disconnected from the IP network, or has been configured improperly with the wrong IP address/subnet mask/gateway etc. It may also occur if an intervening NAT gateway has not been configured to statically map ports to the IP-852 device as described above.
Make sure that all security and IP settings are configured properly.
Orange The IP-852 device’s configuration is out of date or the IP address has not been specified (0.0.0.0).
This indicates work in progress. When the Configuration Server updates the IP-852 device, the icon will turn green. Note that in a large channel (> 40 devices) this can take several minutes. Also note that changing a bind in LonMaker can require that the routing tables in EVERY i.LON be updated. In this case, you may see many icons turn orange, and then one-by-one turn green again when their routing tables have been updated.
Red/White
Checkerboard Disabled. Typically, the user right clicked on the IP-852 device in the Configuration Server tree and selected Disable Device from the pop-up menu.
Cyan The Configuration Server has not yet attempted to communicate with the IP-852 device.
The Configuration Server may be busy communicating with other channel members (this is common on a large channel). If the Configuration Server appears not to be attempting
communication, click on the Show Log button and monitor the progress. Select Update Members from the Channel menu.
Designing a LonMaker Network Containing IP-852
Channels
IP-852 devices allow you to connect an FT-10, TP-1250, or PL-20 channel to an IP-852 channel for transporting LONWORKS packets over IP. Once the
IP-852 channel has been established as described in the previous section, you must define the IP-852 device using the LonMaker Integration Tool.
!
IMPORTANT:
The Configuration Server must be running when you configure IP-852 devices
using a LONWORKS network management tool such as LonMaker. Echelon
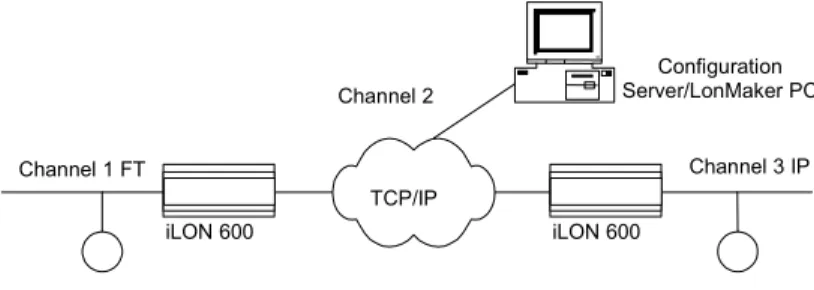
recommends that you keep the Configuration Server running at all times. Figure 2.8 shows an example of a LONWORKS network that contains a IP-852
channel. Note that if you are running LonMaker version 3.0 or higher, your LonMaker PC can be a part of the IP-852 channel by connecting it to the Ethernet rather than an FT-10 channel.
Configuration Server/LonMaker PC
Channel 1 FT
Channel 2
iLON 600 TCP/IP
Channel 3 IP iLON 600
Figure 2.8 Typical Network Containing an IP-852 Channel
Defining an IP-852 Device as a L
ON
W
ORKS
Router
The following procedure illustrates how to create the LONWORKS network
described in Figure 2.8 using the LonMaker Integration Tool. For more information on the LonMaker tool, see the LonMaker User's Guide.
1. With the Configuration Server running, create a new
LonMaker network. Change the name of Channel 1 to FT-10 Channel 1 and assign TP/FT-10 as the transceiver type in the Channel's properties.
Figure 2.9 Creating a New Channel Using LonMaker 2. Drop channel shapes onto the drawing representing the IP
Channel and FT-10 Channel 2. For the IP Channel, specify IP-10L (if using a local IP network) or IP-10W (if using a wide area IP network, such as the Internet) for the Transceiver Type in the Channel’s properties. For FT-10 Channel 2, assign TP/FT-10 as the Transceiver Type.
3. Drop two LONWORKS Router shapes onto the drawing, one
connecting FT-10 Channel 1 to IP Channel (iLONRTR_1) and one connecting FT-10 Channel 2 (iLONRTR_2) to the
IP channel. Follow the LonMaker convention: Channel A of a router is the side closest to the LNS Network Interface. Channel A of iLONRTR_1 is attached to FT-10 Channel 1 and Channel B is attached to IP Channel; Channel A of
iLONRTR_2 is attached to IP Channel, and Channel B is attached to FT-10 Channel 2.
4. Commission the IP-852 device RTR_1 and IP-852 device RTR_2 Routers, and leave them in the Online state. If your IP network contains large latencies, you may need to change the network timing properties as described in Chapter 8.
Be sure the Configuration Server is running when you commission the IP-852 device routers or make any other changes to your LONWORKS network, such
as adding or deleting devices or connections. Echelon recommends that you keep the Configuration Server running at all times.
Once the IP-852 devices have been installed and commissioned, you can add devices, functional blocks, and connections just as you would in any
LonMaker network. See the LonMaker User's Guide for more information. For example, Figure 2.10 shows the network described above with a DI-10 LonPoint device added to FT-10 Channel 1, and one of the digital output network variables from the DI-10 device bound to a DO device connected to channel 2 (switch band to lamp).
Figure 2.10 IP-852 Device Routers Configured on a LONWORKS
Network
Verifying Router Functionality
To verify that the IP-852 device in the network shown in Figure 2.10 are working correctly, right-click on the network variable connection between DI-10 (switch) functional block and DO-10 (LED) function block and select Monitor Input Value. Verify that the value displayed on the connection in LonMaker is tracking the value of the Digital Output network variable in DI-10 functional block. If you do not see network variable updates reported by LonMaker, there is a problem. Refer to Table 2.2 for troubleshooting information.
Table 2.2 Troubleshooting the IP-852 Device
Symptom Probable Cause Corrective Action There is a problem
with network connectivity, or the network interface in the PC may not be functioning properly.
Test connectivity between the network interface driver and the network interface card in the PC using the LONWORKS Plug and Play Control Panel
applet that came with the network interface. Test to make sure the applet can receive a service pin message from some other node on the same channel as the device.
The IP-852 device may not be physically connected to the
Check the network wiring between the PC and the IP-852 device.
No service pin message is received from the near router (iLONRTR_1 in Figure 2.10).
Symptom Probable Cause Corrective Action If you are using an
i.LON 600 LONWORKS/IP
Server as the near router, the router application has not yet been created on the IP-852 device.
Create the LONWORKS router application using the
Console Application, as described in Chapter 5 of the i.LON 600 LONWORKS/IP Server User’s Guide.
If you are using an i.LON 100 Internet Server as the near router, the i.LON 100 server may not be licensed or configured to operate as an IP-852 router.
License and configure the i.LON 100 Server to operate as an IP-852 router, as described in Chapter 2 of the i.LON 100 e3 User’s Guide.
The IP channel properties have not been properly set.
For a local Intranet, make sure the channel property/transceiver type in the LonMaker tool is IP-10L. For a WAN (Internet), choose IP-10W. The near router
(iLONRTR_1) commissions successfully, but no service pin message is received from the far router
(iLONRTR_2).
There is a problem with the IP-852 channel setup.
Be sure the Configuration Server is running in the background when you commission the devices on the IP-852 channel. Verify that the near router is online and that the Configuration Server reports connectivity among all members of the IP-852 channel (e.g. all icons are green).
Both IP-852 device routers
commission successfully, but the device on the far side of iLONRTR_2 (the DI-10 LonPoint device) does not install correctly.
There is a problem with the IP-852 channel or the device being installed.
Verify that the far router is online. Test devices on the far side channel (using the LonMaker Test command). If the test succeeds for any other device on the far channel, the IP-852 channel is working, and the improperly working device may not be installed correctly.
If no test succeeds, verify connectivity between the IP-852 devices in the main dialog status window of the Configuration Server.
Symptom Probable Cause Corrective Action An IP-852 device
added to an IP-852 channel using the Configuration Server remains red in the device tree.
IP connectivity problem: the Configuration Server is not able to communicate with the IP-852 device on the defined IP-852 channel.
Verify that the PC running the Configuration Server can ping the IP-852 device. To perform a ping, open the Windows Command Prompt (in the Accessories menu) and type “ping X.X.X.X” (the device’s IP address). You should receive a reply from your device.
Examine the Configuration Server trace window for clues as to what may be going wrong.
Verify that you can ping the Configuration Server PC or members of the IP-852 channel using the Windows Command Prompt.
The IP-852 device on the IP-852 channel pings successfully, but will not
commission.
Address translation may take place somewhere between the two devices.
The router
application does not exist.
Make sure that the IP address of the target IP-852 device matches the IP address defined for it in the Configuration Server.
If you are using an i.LON 600 server, determine if the router application exists by using the listapp command in the Console Application. Create the router app with the createapp Router command if it does not exist. If you are using an i.LON 100 server, make sure the device is licensed and configured to operate as an IP-852 router.
3
IP-852 Channel Parameters
This chapter provides details on the channel parameters you can set when creating an IP-852 channel with the
Channel Mode
You can set the IP-852 device channel mode using one of three radio buttons in the New Channel Properties dialog box. To access the New Channel Properties dialog box, start the Configuration Server, right-click the New Channel icon, and then select Channel Properties from the shortcut menu.
Figure 3.1 New Channel Properties Dialog Box Table 3.1 describes each channel mode.
Table 3.1 Channel Modes
Setting Description Backward
Compatible You must enable this option if your channel will contain any i.LON 1000 servers or LNS 3.0x LONWORKS /IP
network interfaces. This causes the IP-852 device to operate using a protocol that is compatible with these devices, but is not strictly CEA-852 compliant. In backward compatible mode, you can use a maximum of 40 devices. You can only have one device located behind each NAT firewall, the i.LON 1000 and LNS 3.0x devices cannot be located behind a NAT firewall, and you cannot have duplicate IP addresses or duplicate port
Setting Description Standard EIA-852 Select this option when using a standard LONWORKS
channel. You can use a maximum of 256 devices per channel in Standard EIA-852 mode. (Note: EIA-852 was the former name for the current CEA-852 standard.) When using this mode, you can only have one device located behind each NAT firewall. The IP address (including the port assignment) must be unique. Extended Firewall
Support Echelon recommends setting this option whenever your IP-852 channel crosses an IP firewall, regardless of whether or not the firewall is using Network Address Translation (NAT). Depending on the particular firewall and its configuration, this option may be required. In addition, this will allow you to place more than one LonWorks/IP device behind an NAT firewall, and to create multiple LNS LonWorks/IP interfaces in the same channel using the same IP address (but with different ports). Without this option, only one device may reside behind a NAT firewall, and all devices on the channel must have unique IP addresses. This option extends the CEA-852 protocol in a way that is not strictly compliant with that standard, though it should still be compatible with other CEA-852 devices. You can use up to 256 devices per channel in this mode.
Aggregation
Click the Protocol tab and then select the Aggregation check box to enable aggregation on the IP-852 channel. The IP-852 device router aggregates LONWORKS packets for transport over the IP channel. LONWORKS packets are
relatively small in size and often arrive at the IP-852 device router in bursts or at a high rate. Aggregating packets decreases the bandwidth necessary to send packets over IP, decreases IP network traffic, and increases the
performance of the IP-852 device router.
The IP-852 device router is set through the Configuration Server to use aggregation by default. The aggregation time parameter controls how long the router will wait for packets. The resolution of the timer depends on the particular IP-852 devices used, but for the i.LON 600 and i.LON 100 servers, it is in multiples of 10 milliseconds. The default aggregation time is 16 milliseconds, which is compatible with the i.LON 1000.
Figure 3.2 Aggregation Settings
If the network is idle and a single LONWORKS packet arrives at the
IP-852 device, the aggregation timer starts and the first packet is sent across the IP channel without delay. If the network remains idle, the timer resets. However, if another LONWORKS packet arrives within the aggregation time
period, the router waits the designated time for subsequent packets to arrive (anticipating a burst) so it can aggregate before sending them onto the IP channel.
MD5 Authentication
MD5 authentication is a channel-wide property that uses an authentication key to set security on an IP-852 channel. The authentication key is used to calculate the MD5 digest. When authentication is enabled and the IP-852 device prepares to send an IP packet, the IP-852 device uses the
authentication key and the public MD5 algorithm to compute a digest over each LONWORKS packet in the UDP payload.
For standard channels, the packet format is described in the CEA-852 protocol standard for sending LONWORKS packets over IP. The computed
digest is appended to the end of the packet and the packet is sent over the network. Authentication digests are appended to both LONWORKS data
packets and Configuration Server control packets. One or more IP-852 devices receive the packet and use their authentication key to compute a
digest over the same payload (not including the appended digest). The receiving IP-852 device compares the digest it computed to the one that was sent in the packet. If the digests match, the packet is authentic. If the digests do not match, the packet is considered to have been corrupted, tampered with, or otherwise unacceptable, and is discarded. The digest includes the entire packet, which contains a time stamp for preventing replay attacks when used in conjunction with a configured channel timeout value. For more information on the MD5 algorithm refer to RFC 1321.
NOTE: MD5 authentication should not be confused with authenticated LONWORKS messaging. MD5 authentication applies to IP packets,
authenticated LONWORKS messaging applies to LONWORKS packets.
The authentication key, consisting of 16 HEX pairs, is set for each IP-852 device using the device’s configuration interface (e.g. Web pages).
Authentication is enabled and the authentication key set for the IP-852 channel through the Configuration Server. To reset a lost authentication key, you must obtain physical access to the device and reset the key through the device’s configuration interface.
To enable authentication and set the authentication key on an IP-852 channel, follow these steps:
1. Select Channel Properties from the Configuration Server’s Channel menu or right-click on a channel and select Channel Properties. Click the Protocol tab.
2. Select the Authenticate checkbox to enable authentication, and then enter 16 HEX pairs that represent the MD5 authentication key into the entry field.
For example: ABF145E02B5CFF0019BEEFF145E02B5C All authentication keys within a single network must match. Be sure that you have previously entered the same authentication key on the IP-852 device defined on this channel using the Console Application or setup Web page. When you have selected an authentication key, click Apply.
To disable authentication on a channel that has
authentication enabled, clear the Authenticate check box and click Apply.
IP-852 Channel Timing Considerations
When designing an IP-852 channel over an IP network that might have a large latency, such as the Internet, it is important to be aware of the relationship between the three timing parameters that can be set when configuring the channel. Two of the timing parameters, Channel Timeout and Reorder Packets , are set for the IP-852 channel through the Configuration Server. Channel Delay is set through an LNS based tool such as the LonMaker tool.
On local area networks, Channel Timeout is required only if MD5
Authentication is used. Reorder Packets should be disabled on a LAN, and the LonMaker Channel Delay for the channel should be set to twice the aggregation timer.
On networks using the Internet, Channel Timeout and Reorder Packets must consider the value of the LonMaker Channel Delay parameter. Table 3.2 specifies how to approximate the timing values for network implementations using the Internet.
Table 3.2 Timing Parameter Calculations for Internet IP-852 Channels Timing Parameter Set to:
Channel Timeout (Average Ping Delay / 2) + 20%. A typical LAN based channel will require at least a 50 ms delay and a typical WAN based channel will require at least a 100 ms delay.
Packet Reorder Timer The lesser of:
¼ of Channel Timeout Value, or 64 MS LonMaker Channel
Delay Average Ping Delay + 10%
If you are using aggregation and the aggregation delay is a high percentage of the channel timeout or channel delay, add twice the aggregation delay to the Channel Delay and one times the aggregation delay to the Channel Timeout.
Use the ping command from a DOS window to obtain the average ping delay. Do not use the ping command in the IP-852 device Console Application.
Channel Timeout
The channel timeout property sets the delay for a packet to travel across a channel. The assigned delay is a time parameter set in milliseconds that indicates how old a packet can be before it is discarded. If you are sending packets across a virtual private network or any configuration that uses the Internet, set the Channel Timeout parameter to ½ the average ping delay. Synchronize the IP-852 device routers with an SNTP time server.
Set the channel timeout parameter to a value in relation with the ping delay specified in Table 3.2. In a LONWORKS network, each channel is assigned a
cost defined as the round trip delay for a packet traveling across that
channel. The channel delay is based on a combination of bit rate, packet size, and media access. Generally, you should set the channel timeout on your IP-852 channel to more than half the channel delay value.
Echelon recommends setting a channel timeout when using MD5 authentication. When using MD5 authentication, start with a
minimumchannel timeout of 100 ms and a channel delay of 200 ms. Factors in determining the Channel Timeout include:
• Variations on each leg of a round trip. Your timeout parameter should factor the maximum delay into one leg of the trip.
• Maximum difference between the times on the IP-852 devices. The IP-852 device stamps its time on a packet when it is sent on the IP network and the target IP-852 device compares the stamp to its own time. If the time has expired, (time of device – time stamp in packet is greater than channel timeout), the IP packet is discarded by the target device as stale. You can estimate the maximum difference between the times on the devices by comparing the offsets displayed in the Configuration Server log window log when you run the channel Time Check command.
Channel Delay
The channel delay specifies the value of the expected round trip time of a message (i.e. message and response). This allows expected traffic patterns to be input to the system so that the timer calculations can be affected
accordingly. This property can be set using an LNS-based tool such as LonMaker. See the LNS and LonMaker documentation for more information on the Channel Delay property.
Packet Reorder Timer
delays in packet processing if a packet is lost or corrupted. Whether enabled or disabled, out-of-order packets are never sent onto the LONWORKS network.
Using SNTP When Creating IP-852 Channels
In small IP networks where there is no appreciable latency, it is not
necessary to specify an SNTP server for your IP-852 channel. However, when creating IP-852 channels that span large IP networks where large network delays may be present, you must specify an SNTP time server. This allows each participant in the channel to synchronize to a common time base. Time synchronization is required to implement some of the LONWORKS protocol’s
messaging services. For example, the LONWORKS protocol’s stale packet
detection algorithm requires a common time base to function properly. You can specify SNTP servers at three levels: system, channel, and device. Each device and channel may be configured to synchronize to its own SNTP servers, or default to the next level up. For example, a device can default to its channel SNTP servers, and a channel can default to its system SNTP servers.
Specifying System SNTP Servers
To specify the system SNTP servers, follow these steps:
1. In the Configuration Server, select Settings from the Network menu and click on the SNTP tab.
Figure 3.4 Setting the System SNTP Server
2. Enter the IP address or host name of the primary and secondary SNTP servers. Note that the IP addresses must be static IP addresses. Leave the default port numbers of 123.
3. Ensure that the Use the SNTP Server on Device and the Run the SNTP Client in the Configuration Server check boxes are selected. The Use the SNTP Server on Device checkbox allows you to specify the default SNTP system server. The Run the SNTP Client in the Configuration Server check box allows you to run an SNTP client in the Configuration Server. The Maximum Time and Update Every properties only apply if the Run the SNTP client in the Configuration checkbox is checked. The IP-852 device SNTP options are self-adjusting and cannot be configured. If you are using a third-party SNTP server client on the Configuration Server PC, read the following section before setting these options. 4. Click OK to save and return to the main dialog.
Specifying SNTP Servers for a Channel or Device
All channels default to the SNTP server specified for the system as described above, and all devices default to the SNTP server specified for the channel (i.e. the System SNTP Server if the Channel SNTP server is not changed). Each channel and device in the network can be configured to synchronize to a different SNTP time server.
To specify SNTP servers for a channel or device, follow these steps: 1. Select the channel or device in the main dialog of the
Configuration Server, and then right-click the device and select Properties from the shortcut menu (or double-click the desired channel or device). Click on the SNTP tab.
2. Clear the Use System Default or Use Channel Default option and enter the IP addresses or host names of the SNTP servers as shown in Figure 3.5. Leave the default port numbers of 123.
Using a Third-Party SNTP Client on the Configuration
Server PC
When the Configuration Server PC is already setup to run a third-party SNTP client, the Configuration Server’s system SNTP settings must be set accordingly. The third-party SNTP client will synchronize the PC’s clock, and so the SNTP client should not be run in the Configuration Server. This would cause the PC’s clock to be synchronized to two SNTP servers—an undesired effect. The Configuration Server’s system SNTP setting is no longer tied with running an SNTP client in the Configuration Server.
Follow these steps to configure the Configuration Server to use a third-party SNTP client to update the PC’s clock.
1. Select Settings from the Network menu and click on the SNTP tab.
2. Clear the Run the SNTP Client in the Configuration Server check box. When this option is cleared, the Configuration Server will not poll a SNTP server to update the PC’s clock. The PC will use its third-party SNTP client to synchronize to whatever time server is specified by the third-party client.
Figure 3.6 SNTP Tab
3. Click OK to save and return to the main dialog.
Choosing an SNTP Server
You can obtain an IP address for an SNTP server for your IP-852 Channel in any of the following ways:
• Ask your network administrator for the IP address of an SNTP server in your corporate network.
• Connect to a time server on the Internet. There are many available public access servers; a comprehensive list may be found at
http://ntp.isc.org/bin/view/Servers/StratumTwoTimeServers.
• Install an SNTP server on any PC in your LAN. You can use the same PC on which the Configuration Server is installed. One option is Tardis2000 shareware available from http://www.kaska.demon.co.uk. You can configure the software to synchronize with any other SNTP server, or use local time on the PC by setting Tardis2000 to use the loop back address 127.0.0.1.
4
Using NAT, DHCP & DNS on
an IP-852 Channel
This chapter describes considerations you should make when using NAT, DHCP and DNS on an IP-852 channel.
Network Address Translation (NAT)
Network Address Translation (NAT) allows multiple computers (hosts) to share a single IP address. The address is normally set up at the gateway between a private network and the Internet, allowing the computers on the private network to share a global, ISP assigned address. This is achieved by modifying the headers of each packet traveling through the NAT gateway. At a minimum, an IP address in each packet header is replaced (translated). For outbound packets (to the Internet), source addresses are translated from private to public. For inbound packets, destination addresses are translated from public to private.
NAT Gateway iLON 600
iLON 600 NAT Gateway
Configuration Server PC
IP
Figure 4.1 IP-852 Devices Communicating Through Two NAT Gateways An IP-852 device may be placed behind an NAT gateway or firewall and can communicate with another IP-852 device placed behind another NAT gateway, as shown in Figure 4.1.
The port (by default 1628) that the IP-852 device uses to communicate with its peers and the Configuration Server must be opened, mapped, and properly forwarded. See your NAT gateway’s user manual for details on how to setup port forwarding (sometimes called static port mapping) on your particular NAT gateway.
Once the ports are mapped on the NAT gateway, setting up an IP-852
channel is much like the procedure described in Chapter 2 with the exception that additional entries are added to the Configuration Server’s device tree for each of the NAT gateways.
Setting Up an IP-852 Channel With NAT
To setup an IP-852 channel that spans NAT gateways, start the Configuration Server and perform the following steps:
1. Select New NAT Firewall from the Channel menu. 2. Enter a descriptive name for your NAT firewall and press
Enter.
3. Double-click on the new NAT firewall, or right-click and select NAT Firewall Properties, and enter the IP address of the NAT gateway/firewall.
4. Click on the new NAT firewall and select New Device from the Channel menu. Configure the device’s IP address and
other properties, as described in Section 2. Use the device’s local IP address (typically a private, non-routable address, such as 10.x.x.x or 192.168.x.x).
5. Repeat Steps 1 through 3 to add another NAT firewall and device. The Configuration Server should look like the one in Figure 4.2.
Figure 4.2 Setting Up Multiple Firewalls with Multiple IP-852 Devices 6. Right-click on the channel and select Update Members, or
right click on the device and select Update Device.
NAT Example: Simple Home Network
If you have a home network with DSL or cable Internet access, you can setup all of your computers to communicate on the same IP address (assigned by your ISP) with the help of an NAT gateway. Usually, addresses used in the private network (your home) are taken from the range of addresses
designated as “reserved” by the Internet Assigned Numbers Authority (IANA). The subnets reserved for private use are:
10.x.x.x or 10/8 (Class A)
172.16.x.x - 172.31.x.x or 172.16/12 (Class B) 192.168.x.x or 192.168/16 (Class C)
169.254.x.x or 169.254/16 – “Auto-configuration”
Home Network 192.168.1.100 192.168.1.101 192.168.1.1 NAT Gateway LAN Side WAN Side 131.28.203.17 ISP Internet WAN Side Address is
Assigned by ISP
Figure 4.3 NAT Gateway Structure
Ports and Port Mapping
A fully qualified URL consists of an IP address and a port. The URL www.echelon.com:80 is a fully qualified URL. Port 80 is recognized as the default port for Web servers worldwide. Internet Explorer automatically appends a URL with port 80 so you do not have to enter the full URL when accessing a Web site.
Ports allow a single computer to run multiple services. For example,
www.echelon.com can run both a web server and an FTP server. It could also run a time server and other applications as well. Each service may be
assigned different ports. For example, Internet Explorer uses port 80 as its default when it accesses http://www.echelon.com and maps the address as 205.229.51.8:80. When accessing an FTP client, Internet Explorer will use port 21 so ftp://www.echelon.com will map to 205.229.51.8:21. Both the browser and the FTP client may simultaneously access www.echelon.com because the requests are differentiated by port.
Most businesses use port 80 for their web site so customers have easy access to their Web sites. However, if you wanted to host a less public site, you could assign it a non-standard port number. For example, you could use
www.mycompany.com to attract a wide audience to your business, or you could assign your URL a non-standard port (www.mycompany.com:81) to “hide” your Web site from the general public. Note that changing ports does not provide security to your Web site, so other methods of security must be used for servers that contain sensitive information. Another reason to use non-standard ports is to allow access from the Internet to one of your home PCs.
The Internet Assigned Numbers Authority (IANA) lists common or “well known” ports as well as registered and dynamic ports.
See www.iana.org/assignments/port-numbers for more information. In one example situation, two PCs are connected to and communicate through an NAT gateway that accesses the Internet through a single IP address. The NAT gateway forwards the packets to the correct PC using different port settings. To ensure that packets are forwarded to the proper PC, you can setup your NAT gateway to perform static port mapping. Static port mapping lets your NAT gateway forward incoming Internet requests to different PCs in your home using the port settings you specified in your PCs.
IP-852 Device Ports
The IP-852 device uses IANA designated ports for LONWORKS traffic (ports
1628 and 1629). Continuing with the example described above, you could connect an IP-852 device to your network with an IP address of
192.168.1.102.
Home Network
192.168.1.100
192.168.1.101
192.168.1.1 NAT Gateway LAN Side
WAN Side 131.28.203.17
ISP Internet WAN Side Address is
Provided by ISP (assigned)
i.LON 600 192.168.1.102
Figure 4.4 Adding an IP-852 Device to an NAT Gateway
port 80 is already used by 192.168.1.100, so you must change the port on the IP-852 device and enter two static mappings into the NAT gateway:
Port 1628 Æ 192.168.1.102 Port 82 Æ 192.168.1.102
Consult your NAT gateway owner’s manual for details on how to setup static port mapping for your particular NAT gateway.
Creating a Virtual Wire
LONWORKS networks that do not connect to an IP network may be quite
large. A LONWORKS network may contain 255 subnets, with each subnet
containing as many as 127 devices. Subnets are linked together using LONWORKS routers. A common implementation is to have many FT subnets
connected to a single TP-1250 “high speed” backbone.
TP-1250 High Speed Backbone
FT-10 Channel
FT/TP-1250 Router
Figure 4.5 Connecting Devices on a Network
The high-speed backbone is a physical wire and, since all TP-1250 to FT routers are connected to the same physical wire, communication proceeds unimpeded.
IP-852 devices are logically identical to TP-1250 or FT routers, but use IP as their high-speed backbone instead of a TP-1250 backbone. They may not be connected to the same physical wire.
Two IP-852 devices located in different cities could use the Internet as a high-speed backbone to create a single LONWORKS network. Instead of connecting
the two IP-852 devices with one long wire, the Internet is used to create a “virtual wire”. The Configuration Server creates this virtual wire.
Home Network A i.LON 600 192.168.1.102
NAT Gateway 192.168.1.1
Home Network B
i.LON 600 10.1.1.8 NAT
Gateway 10.1.1.1 ISP A ISP B
Internet
29.1.7.65 131.23.203.17
FT Channel FT Channel
New York London
Figure 4.6 Creating a Virtual Wire
The Configuration Server is aware of NAT gateways, and you should enter each NAT gateway in your system as you create your IP-852 channel (virtual wire). In Figure 4.6, the Configuration Server could be configured as shown below.
Note that the diagnostic information provided about the IP-852 devices (indicated by the varying IP-852 device icon colors) is more complete than the diagnostics provided by the changing colors of the NAT gateways. The Configuration Server cannot acquire the same level of diagnostic information about an NAT gateway as it can about IP-852 devices. See
Table 2.1 for the descriptions of the different Configuration Server icon colors. The Configuration Server acts as a “relay station” for all information
pertaining to channel members, including which LonTalk subnets are on the far side of which IP address.
Whenever a LonTalk routing table changes (this can happen while making a network variable connection) or a new member is added to the IP-852
channel (virtual wire), the Configuration Server relays this information to all devices on the channel that need to know.
Once all channel devices have been inaugurated into the IP-852 channel, and all LonWorks device installations and connections have been made, you can shut down the Configuration Server software (though Echelon recommends leaving it running).
DHCP
For small networks, manually configuring the IP address of each device on the network is fairly simple. However, as the number of computers on your network grows, assigning each computer on the network its own IP address can be cumbersome. To solve this problem, a system called Dynamic Host Configuration Protocol (DHCP) was created to automatically assign network computers an IP address. Most computers use DHCP.
With DHCP, computers broadcast a message on the local network asking the DHCP server to assign them an address, instead of using a pre-defined address. The DHCP server stores a list of the assigned addresses and makes sure that no two requestors are given the same address. This greatly
simplifies the job of the network administrator, but in the case of web servers (or IP-852 devices), can create some difficulties.
The DHCP server resides on the network and assigns IP addresses. When you select Automatically Obtain IP Address in the configuration Web pages for an i.LON 100 or i.LON 600 server, you are asking Windows to get its IP address from a local DHCP server. DHCP is commonly used for workstations, but seldom used for servers. For example, your company’s web server likely has a static IP address instead of a DHCP assigned address.
DHCP addresses are assigned in the order computers are powered on. Computer 1 may be assigned address 100, computer 2 may be assigned address 101, computer 3 may be assigned address 102, and so on. If
computers are powered down and then later restarted, there is no guarantee that they will receive the same address. This is a problem if you want to setup a communication channel between a set of computers, as is done when creating an IP-852 channel. In an IP-852 channel, each device knows the addresses of other devices on the network. If those addresses change because a peer was power cycled, then all members of the group need to be updated with the new IP address. This is easily accomplished by updating an entry in the Configuration Server, but the process is manual, which makes it
impractical for larger networks. As a result of this, Echelon recommends that all members of an IP-852 channel be assigned static IP addresses. However, if you are in control of your DHCP server, you may be able to configure your DHCP server to always assign your i.LON 100 and i.LON 600 servers the same IP address. This is called making a static reservation, and is supported by most DHCP servers. Using DHCP with static reservations is acceptable and is similar to using static IP addresses. If you decide to use this technique, each i.LON 100 or i.LON 600 server should be instructed to acquire its IP address from the DHCP server by selecting Automatically Obtain IP Address on the TCP/IP Web page for your i.LON 600 server, or on the Network – LAN/WAN Web page for your i.LON 100 Server.
Figure 4.8 Automatically Obtain IP Address Setting
DHCP Servers
DHCP servers are configured to assign a range of valid Internet addresses. With a simple NAT gateway, like the one shown in Figure 4.4, the range is often 192.168.1.2 to 192.168.1.254. As an example, the Linksys Model BEFSR81 NAT gateway assigns the first PC to request an address
192.168.1.100, the second PC to request an address 192.168.1.101, the next gets 192.168.1.103, and so on. The address a PC is assigned is determined by the order in which the PCs are powered up on a network. PCs request an address each time they are powered. This means that by using DHCP you run the risk of losing a previously assigned address for a given PC (or IP-852 device). This usually is not an issue for a home PC that is used to browse the Internet because the PC is always the initiator of the web page request. However, if you want a PC to act as a web server, it must have a permanent address so other PCs can access it. The same is true for an IP-852 device participating in an IP-852 channel.
ISP Address Allocation
Cable or DSL service in the United States costs about $40 - $50 per month for a single dynamically allocated IP address. Depending on your telephone or cable provider, you may be able to purchase a business account that provides one or more static IP addresses at a higher cost.
In the example, if the address provided to your home by the ISP is static, you only need to setup static port mapping and inform outside users to go to 131.23.203.17:80 or 131.23.203.17:81 to view your web pages. Similarly, if you wanted to include your home IP-852 device in an IP-852 channel, you would enable static port mapping on the NAT gateway and enter
131.23.203.17:1628 in the Configuration Server. The packets on the channel would flow unimpeded.
You will run into problems with your network if your ISP does not offer static addresses. Even if static port mapping is enabled on your NAT gateway, you may not be able to access computers within your home because the house IP address (provided by the ISP) may change unpredictably. This is a common problem. As a result, Echelon recommends that you use a static IP address for both your NAT gateway and the i.LON in your home.
DNS
DNS is a mechanism that translates an IP host name like www.echelon.com into a numeric IP address like 205.229.51.8. For example, when you enter www.echelon.com in your web browser, your web browser queries a DNS server to find the IP address. It then requests the home page from the numeric IP address – not the IP host name. Because the process is transparent, many people are not aware of the existence of numeric IP addresses.
Note that IP host names are usually used to reference servers such as a Web server (www.echelon.com), a database server, or a file server. Because these servers are fixed assets, they are usually assigned a static IP address. That static IP address is also entered into a DNS server so that the mapping between the IP host name and the numeric IP address can be made.
If you are in control of your local DNS server, you should give all participants in your IP-852 channel static IP addresses and create DNS entries for each participant. This allows you to specify IP host names when setting up the IP-852 channel in the Configuration Server, instead of numeric IP addresses. The Configuration Server will translate the IP host name into a numeric IP address and pass that address to all members of the channel.
For example, if you had a static IP address at your home, you could register that IP address with one of the Internet registrars (such as register.com) and associate a name with that static IP address. The registrar will propagate the address/name pair throughout the Internet’s DNS servers for you, ultimately allowing you to tell people to go to www.myhouse.com instead of
131.23.203.17.
NOTE: When a browser tries to view a web site, it asks the DNS server to translate the name of a web site into an IP address. It then uses the IP address to contact the web site. The actual IP packets never contain the proper name of the Web site, only the hard IP address that was resolved by
the DNS server. In addition, the IP-852 devices themselves do not query DNS servers to resolve addresses, they only work with numeric IP addresses provided by the Configuration Server.
This only works for static IP addresses because each time you change the IP address, you need to contact the registrar to setup the new address/name pair across the Internet. This may take up to two days for an address/name pair to propagate through the entire Internet.
To set the Configuration Server automatic IP host name address translation, follow these steps:
1. Select Settings from the Network menu in the Configuration Server and click on the IP Host Names tab.
Figure 4.9 IP Host Names Tab
2. Check or uncheck the Enable Continuous IP Host Names Translation check box, and specify an update interval time (if applicable).
3. To issue and immediate IP word-based address translation, select Translate IP Host Names from the Network menu. This will perform a retranslation on all channels.
address, and then sends that address to all IP-852 devices on your IP-852 channel. This works until one of the IP addresses changes.
By default, the Configuration Server will periodically (once every five minutes) attempt to resolve any IP host name on all channels (including SNTP server) with a DNS server. If a translation is successful, and the resulting IP address is different than what was previously used, the channel members will be updated. This re-translation process also occurs when the Configuration Server is first started. Therefore, if you want to reference your IP-852 devices only by DNS name, you must leave the Configuration Server running on your network. The Configuration Server will periodically query the DNS server to verify that all hard IP addresses are still correct, as described previously.
If a device’s IP address changes, the Configuration Server will eventually become aware of the change and update its configuration. However, it is still possible that changing a device’s IP address could disrupt communication on your IP-852 channel before the Configuration Server becomes aware of the change. As a result, you should not rely on DNS to resolve i.LON IP addresses. Echelon recommends that you use static addresses that do not change.
Linking DNS and DHCP
DNS and DHCP are separate standards. A network can use DNS without using DHCP, and vice versa. You can, however, link DNS and DHCP servers in a single network so that all IP addresses on the network could be allocated dynamically, but still be referenced by name. While this can work for private networks, usually within corporations, it is not practical for the Internet. If your IP-852 channel implementation is under your control, and you have control of all DHCP and DNS servers referenced by the members of your IP-852 channel, you can assign each device an IP address using DHCP without static reservations, and resolve host names using DNS and the Configuration Server. This section describes how you can do so. Echelon does not recommend this method of configuring IP-852 channels.
NOTE: The Configuration Server requires a single static IP address for all PCs running LNS (version 3.01 or later) that are connected to an IP-852 channel.
If you leave the Configuration Server attached to the IP-852 channel, DNS resolvable addresses can be used. If the IP network links its DHCP server and DNS server (a Windows 2000 Server can do this), then IP-852 devices can be setup to use DHCP assigned addresses. However, the Configuration Server’s ability to resolve addresses through DNS is limited. See the following section, DNS and the Echelon LONWORKS/IP Configuration
Serverfor more information on this. Dynamic DNS (DDNS) can also be used with the same precautions. For more information on DDNS, see Dynamic DNS on page 45.
The CEA-852 specification requires that devices on an IP-852 channel share IP addresses instead of DNS resolvable names. If an IP-852 device in a channel is aware of a peer at 131.1.23.52, and that peer changes addresses, the IP-852 device will lose communication with the peer until it receives an updated peer list. The Configuration Server can solve this problem by
sending out an updated list (using DNS) to all members on the channel. The IP-852 device cannot resolve DNS address issues on its own.
When exchanging messages with the Configuration Server and other devices on the IP-852 channel, the IP-852 device protocol requires that each device’s IP address remain static so it can identify other members of the IP-852 channel.
If DHCP will be used to retrieve the IP information for the IP-852 device, the network administrator must ensure that a DHCP server is available to provide the IP address, subnet mask, and gateway address. In addition, the network administrator should create individual static address reservations for each IP-852 device.
Dynamic DNS
If your ISP does not offer a static IP address service, and you still want Internet access to an i.LON at your house, you can use a third party solution called dynamic DNS (DDNS). Providers include dns2go.com, dyndns.org and others. Perform a quick Internet search on “dynamic DNS”.
How DDNS Works
DDNS operators rely on the fact that your home’s IP address does not frequently change. Depending on your ISP, the home address may change only when you power cycle the NAT gateway. If the NAT gateway is on 24/7, it may be months before your home’s address changes. It is also possible that your ISP forces the address to change even if the gateway is not power cycled. The amount of time that a device may keep its address is called its “lease”. DHCP servers lease an address for a period of time after which the lessee is supposed to go back and acquire another lease.
When using DDNS, each time a new DHCP lease is given (e.g. each time the PC’s IP address changes) the DDNS server is notified. The DDNS server keeps track of each client’s current address. To let external users see the web server in your home, instead of telling the registrar that www.myhouse.com is linked to 131.23.203.17, you tell the registrar that www.myhouse.com is linked to myhouse.ddns.org (for example). When an Internet user types in www.myhouse.com, the Internet DNS server forwards the request to myhouse.ddns.org, which forwards the request to the current IP address of your home.
The DDNS provider tracks any changes in your home’s address and
maps/forwards any request for myhouse.ddns.org to your house’s current IP address.
Appendix A
Troubleshooting
This appendix can be used to diagnose common problems that could occur when you create an IP-852 channel with the Configuration Server.
Common Troubleshooting Problems
The following lists the most common problems encountered when creating and configuring an IP-852 channel with the Configuration Server.
Disabled IP-852 devices will not configure properly when the Configuration Server is taken off the network. If you reattached the Configuration Server and select Update Members, the IP-852 device is still not configured properly.
• To solve this problem, you must disable your IP-852 device while the Configuration Server is still attached to your network.
The device icons in the Configuration Server do not turn green.
• This is usually an indication that the Configuration Server cannot communicate with the device. Verify that the NAT gateways are properly setup to forward ports 1628 & 1629.
I cannot view an i.LON 100 or i.LON 600 server’s Setup Web page.
• IP-852 devices have a built-in web server used for setup that
communicates on port 80 by default. If you want to access the i.LON from outside your NAT gateway, be sure that the NAT gateway is configured to forward port 80 to your IP-852 device.
PCs using DHCP cannot communicate with an IP-852 device using Ethernet direct connect.
• Communication with the IP-852 device may be lost if you use DHCP and direct connect (using an Ethernet cable), and then unplug the IP-852 device. When you plug the Ethernet cable back into the IP-852 device, Windows communicates with the SNTP server and searches for an IP address. This action will fail. To solve this problem, assign your IP-852 device a static IP address and make any configuration changes. Enable DHCP before re-installing the IP-852 device onto your network.
I cannot access an IP-852 device with FTP.
• IP-852 devices have a built-in FTP server that communicates on port 21 by default. If you want to access the i.LON using FTP from outside your NAT gateway, be sure that the NAT gateway is configured to forward port 21 to your IP-852 device.
The Service LED on my i.LON 100 or i.LON 600 server is blinking, what does this mean?
• The Service LED blinks when the i.LON server is not commissioned. When an i.LON server is added to a network and commissioned, the Service LED will turn off.
How do I diagnose problems with the Configuration Server?
• Click on the Show Log button to display the Configuration Server log. Right-click on a device and select Diagnose Device. Watch for any error or warning messages that appear in the log window. To