Symantec™ Enterprise
Security Manager Installation
Guide
Enterprise Security Manager Installation Guide
The software described in this book is furnished under a license agreement and may be used only in accordance with the terms of the agreement.
Documentation version 9.0.1
Legal Notice
Copyright © 2009 Symantec Corporation. All rights reserved. Symantec, the Symantec Logo, ActiveAdmin, BindView, bv-Control, Enterprise Security Manager, and LiveUpdate are trademarks or registered trademarks of Symantec Corporation or its affiliates in the U.S. and other countries. Other names may be trademarks of their respective owners. The product described in this document is distributed under licenses restricting its use, copying, distribution, and decompilation/reverse engineering. No part of this document may be reproduced in any form by any means without prior written authorization of Symantec Corporation and its licensors, if any.
THE DOCUMENTATION IS PROVIDED “AS IS” AND ALL EXPRESS OR IMPLIED CONDITIONS, REPRESENTATIONS AND WARRANTIES, INCLUDING ANY IMPLIED WARRANTY OF MERCHANTABILITY, FITNESS FOR A PARTICULAR PURPOSE OR NON-INFRINGEMENT, ARE DISCLAIMED, EXCEPT TO THE EXTENT THAT SUCH DISCLAIMERS ARE HELD TO BE LEGALLY INVALID. SYMANTEC CORPORATION SHALL NOT BE LIABLE FOR INCIDENTAL OR CONSEQUENTIAL DAMAGES IN CONNECTION WITH THE FURNISHING,
PERFORMANCE, OR USE OF THIS DOCUMENTATION. THE INFORMATION CONTAINED IN THIS DOCUMENTATION IS SUBJECT TO CHANGE WITHOUT NOTICE.
The Licensed Software and Documentation are deemed to be commercial computer software as defined in FAR 12.212 and subject to restricted rights as defined in FAR Section 52.227-19 "Commercial Computer Software - Restricted Rights" and DFARS 227.7202, “Rights in Commercial Computer Software or Commercial Computer Software Documentation”, as applicable, and any successor regulations. Any use, modification, reproduction release, performance, display or disclosure of the Licensed Software and Documentation by the U.S. Government shall be solely in accordance with the terms of this Agreement.
Symantec Corporation 20330 Stevens Creek Blvd. Cupertino, CA 95014 http://www.symantec.com
Technical Support
Symantec Technical Support maintains support centers globally. Technical Support’s primary role is to respond to specific queries about product features and functionality. The Technical Support group also creates content for our online Knowledge Base. The Technical Support group works collaboratively with the other functional areas within Symantec to answer your questions in a timely fashion. For example, the Technical Support group works with Product Engineering and Symantec Security Response to provide alerting services and virus definition updates.
Symantec’s maintenance offerings include the following:
■ A range of support options that give you the flexibility to select the right amount of service for any size organization
■ Telephone and Web-based support that provides rapid response and up-to-the-minute information
■ Upgrade assurance that delivers automatic software upgrade protection ■ Global support that is available 24 hours a day, 7 days a week
■ Advanced features, including Account Management Services
For information about Symantec’s Maintenance Programs, you can visit our Web site at the following URL:
www.symantec.com/techsupp/
Contacting Technical Support
Customers with a current maintenance agreement may access Technical Support information at the following URL:
www.symantec.com/techsupp/
Before contacting Technical Support, make sure you have satisfied the system requirements that are listed in your product documentation. Also, you should be at the computer on which the problem occurred, in case it is necessary to replicate the problem.
When you contact Technical Support, please have the following information available:
■ Product release level ■ Hardware information
■ Available memory, disk space, and NIC information ■ Operating system
■ Version and patch level ■ Network topology
■ Router, gateway, and IP address information ■ Problem description:
■ Error messages and log files
■ Troubleshooting that was performed before contacting Symantec ■ Recent software configuration changes and network changes
Licensing and registration
If your Symantec product requires registration or a license key, access our technical support Web page at the following URL:
www.licensing.symantec.com
Customer service
Customer service information is available at the following URL: www.symantec.com/techsupp/
Customer Service is available to assist with the following types of issues: ■ Questions regarding product licensing or serialization
■ Product registration updates, such as address or name changes
■ General product information (features, language availability, local dealers) ■ Latest information about product updates and upgrades
■ Information about upgrade assurance and maintenance contracts ■ Information about the Symantec Buying Programs
■ Advice about Symantec's technical support options ■ Nontechnical presales questions
Maintenance agreement resources
If you want to contact Symantec regarding an existing maintenance agreement, please contact the maintenance agreement administration team for your region as follows:
Asia-Pacific and Japan
Europe, Middle-East, and Africa
North America and Latin America
Additional enterprise services
Symantec offers a comprehensive set of services that allow you to maximize your investment in Symantec products and to develop your knowledge, expertise, and global insight, which enable you to manage your business risks proactively. Enterprise services that are available include the following:
These solutions provide early warning of cyber attacks, comprehensive threat analysis, and countermeasures to prevent attacks before they occur. Symantec Early Warning Solutions
These services remove the burden of managing and monitoring security devices and events, ensuring rapid response to real threats.
Managed Security Services
Symantec Consulting Services provide on-site technical expertise from Symantec and its trusted partners. Symantec Consulting Services offer a variety of prepackaged and customizable options that include assessment, design, implementation, monitoring, and management capabilities. Each is focused on establishing and maintaining the integrity and availability of your IT resources. Consulting Services
Educational Services provide a full array of technical training, security education, security certification, and awareness communication programs. Educational Services
To access more information about Enterprise services, please visit our Web site at the following URL:
www.symantec.com
Technical Support
... 4Chapter 1
Planning for installation
... 11About planning for installation ... 11
About Symantec Enterprise Security Manager (ESM) ... 12
About Symantec ESM architecture ... 12
About policies ... 14
About scalability ... 16
About policy run disk space requirements ... 16
About CPU utilization ... 17
Virtualization support for ESM ... 17
Chapter 2
Upgrading the Symantec Enterprise Security
Manager
... 19Upgrading Symantec ESM ... 19
About backward compatibility ... 20
About preserving user data ... 21
Preserving the customized ".m" files ... 22
Silently upgrading the Symantec ESM console, the manager, and the agent ... 23
Upgrading Symantec ESM console ... 23
Upgrading the ESM manager and the agent ... 25
Silently upgrading the Symantec ESM manager and the agent ... 26
Upgrading Symantec ESM agent ... 26
Checking remote agent upgrade status ... 28
Silently upgrading the Symantec ESM agent ... 28
Upgrading Symantec ESM utilities ... 28
Chapter 3
Installing Symantec ESM managers and agents on
Windows
... 29About installing Symantec ESM components ... 29
Before you install Symantec ESM ... 30
About licensing managers ... 32
Contents
System requirements for Windows computers ... 32
Support for internationalization-compatible computers ... 34
Configuring and editing the disclaimer ... 35
Installing the ESM components by using the ESM Suite Installer ... 37
Silently installing the console, the manager, and the agent ... 38
Installing the Symantec ESM console by using the Suite Installer ... 41
Silently installing the ESM console ... 42
Installing the Symantec ESM console by using the Console Installer ... 45
Installing the ESM manager and the agent by using the Suite Installer ... 47
Silently installing the manager and the agent ... 48
Installing the Symantec ESM agent by using the Agent Installer ... 50
Silently installing and registering an ESM agent ... 52
Error codes for silent installation or registration failure of an ESM agent ... 55
Using the Encryption tool ... 58
Installing the Symantec ESM utilities ... 59
Post-installation tasks ... 60
Registering the Symantec ESM agents ... 60
Configuring the Symantec ESM console ... 64
About setting the Web browser ... 64
Changing LiveUpdate configuration for a Symantec ESM agent ... 64
Changing a Symantec ESM agent port ... 65
Uninstalling Symantec ESM from a local computer ... 66
Silently uninstalling the ESM console ... 66
Uninstalling Symantec ESM 9.0.1 from Windows Server 2008 Core ... 67
Uninstalling Symantec ESM utilities ... 67
Chapter 4
Installing Symantec ESM managers and agents on
UNIX
... 69About installing Symantec ESM components ... 69
About licensing managers ... 69
System requirements for UNIX computers ... 70
Supported UNIX operating systems ... 71
Support for internationalization-compatible computers ... 71
Installing Symantec ESM on UNIX computers ... 72
Silent installation of Symantec ESM on UNIX ... 74
Installing Symantec ESM utilities ... 77
Contents 8
Post-installation tasks ... 78
Appendix A
Symantec ESM communications
... 83About Symantec ESM communications security ... 83
About Symantec ESM communication ports ... 84
Appendix B
System assessment checklist
... 87About system assessment checklists ... 87
Console checklist ... 88
Manager checklist ... 88
Agent checklist ... 89
9 Contents
Contents 10
Planning for installation
This chapter includes the following topics:■ About planning for installation
■ About Symantec Enterprise Security Manager (ESM) ■ About scalability
■ Virtualization support for ESM
About planning for installation
Symantec ESM collects and evaluates security-related information from agent computers on the network. A large network with many agent computers generates a large volume of security-related information. Symantec ESM can process security information from multiple agents more efficiently in a large network environment when the agents are grouped into domains.
The domains group computers on the network into units with common rules and procedures. You can then manage computers by domain rather than manage an individual computer. Domains can be defined to reflect the geographical location of agent computers, or defined to correspond to the functional areas of the organization. Domains can also be defined to reflect the installation of specific security policies on computers.
Let us take a scenario that describes the grouped agents according to physical location.
A company site includes two buildings. The site supports 600 Symantec ESM agent computers that are located in both buildings. Each building houses different departments. For employees who are located in different areas, the company groups the employees according to their respective departments. Different company security policies cover the employees in each building. Different security
1
personnel are assigned in each building. This scenario has a clear delineation of staff, duties, and policies by physical location without any overlap.
Alternatively, there may be a scenario where the arrangement of security administration, company policies, and departments is not congruent. The physical location and management of each functional area is organized differently across geographical locations. Such a scenario is an example of grouping of agents into domains on the basis of the company security policy.
About Symantec Enterprise Security Manager (ESM)
Symantec ESM manages sensitive data and enforces security policies across a range of client-server platforms that includes the following:
■ Microsoft Windows ■ Sun Solaris ■ IBM AIX ■ HP-UX
■ SuSE and Red Hat Linux ■ Novell NetWare/NDS
Symantec ESM secures information while ensuring confidentiality, integrity, and availability.
Symantec ESM functions include the following: ■ Manage security policies.
■ Detect changes to security settings or files.
■ Evaluate and report computer conformity with security policies.
About Symantec ESM architecture
Symantec ESM uses a manager-agent architecture to scale the product over the enterprise. This architecture lets Symantec ESM adapt to changes in network structure by adding new Symantec ESM agents for additional operating systems and platforms.
Symantec ESM consists of three main components: agent, manager, and console (GUI).
Planning for installation
About Symantec Enterprise Security Manager (ESM)
About the ESM console
The console is one of the primary components of Symantec ESM. The console receives data and sends requests to the other Symantec ESM components. As the data returns, the console formats the information for display and creates spreadsheet reports, pie charts, bar charts, and other visual objects. The console can connect to any manager on the network across platforms.
About Symantec ESM managers
Symantec ESM managers perform the following functions:
■ Control and store policy data, and pass the data to agents or to consoles. ■ Gather and store security data from agents, and pass the data to consoles.
About Symantec ESM agents
The Symantec ESM agent gathers and interprets data about the security of a computer that a policy run request generates from a manager. Security modules in the policy analyze the configuration of the workstation, the server, or the computer node where the agent resides. The Security modules also analyze the configuration of the computer where the agent acts as a proxy. The agent server gathers the resulting data and returns the data to the manager that initiated the request. The manager responds by updating the appropriate files in its database. Modules are common to all agents. They contain the executables or security checks that do the actual checking at the server or the workstation level.
Symantec provides frequent updates to the modules to protect network environments from unauthorized access, data corruption, and denial-of-service attacks.
Symantec ESM groups its security checks into modules, and groups modules into policies. When a policy runs on an agent, the checks that are enabled in the modules examine the agent computer and report the detected vulnerabilities. Agents perform the following additional functions:
■ Store snapshot files of computer-specific and user-account information. ■ Make user-requested corrections to the files.
■ Update the snapshot files when corrections occur.
About Symantec ESM utilities
The Symantec ESM utilities copy policies between managers and transfer the security information from the managers to an external database.
13 Planning for installation
The following is a list of Symantec ESM utilities:
On large networks with several managers, the Policy tool provides an efficient way to standardize the settings of the enabled security checks, templates, and word lists. The Policy tool first exports policies from a selected manager, and then imports the policies to the other managers on the network. The policies that are imported to each new manager enable the same security checks as those of the source manager. The new managers and the source manager also share the same template and word list settings.
Policy tool
The Database Conversion tool lets you transfer security data from the databases of managers that are running on supported Operating Systems to an external database. For example, you can transfer data from the database of a manager that is installed on Windows or UNIX systems to any of the following:
■ Microsoft SQL server
■ Oracle
The transfer includes information about the following:
■ Agents
■ Domains
■ Managers
■ Policy run messages
■ Message suppressions
■ Message corrections
■ Policy run reports Database Conversion tool
About policies
Symantec ESM groups its security checks into modules and groups its modules into policies. When a policy runs on an agent, the checks that are enabled in the modules examine the agent computer and report the detected vulnerabilities. Symantec ESM contains the following types of policies:
■ Sample policies
Planning for installation
About Symantec Enterprise Security Manager (ESM)
■ Standards-based policies ■ Regulatory policies
About sample policies
Sample policies are included with Symantec ESM. These policies are already configured to assess a wide range of potential vulnerabilities. With a minimum amount of setup time, the sample policies let you prioritize security loopholes and fix them accordingly. You can discover and fix the most serious and the most easily corrected problems first, then move on to more complex problems and resolutions.
Sample policies are not intended for long-term use. Every time you download a security update, the sample policies are overwritten that include the template and snapshot data and settings.
About standards-based policies
Standards-based policies are based on ISO 17799 and other industry standards. The policies come with preconfigured values, name lists, templates, and the word files that directly apply to the targeted operating system or application.
Standards-based policies use the modules from Symantec ESM Security Updates to check OS patches and the various vulnerabilities on the targeted operating system or application. The standards-based policies may also introduce new templates and word lists to check the conditions that the supported standard requires.
About regulatory policies
Symantec ESM regulatory policies are based on governmental regulatory policies. You use them to assess compliance with the minimum requirements of each supported regulation.
Regulatory policies come with preconfigured values, name lists, templates, and the word files that directly apply to the targeted operating system or application. They use the modules and templates from Symantec ESM Security Updates to check OS patches and the various vulnerabilities on the targeted operating system. Regulatory policies may also introduce new templates and word lists to check the conditions that the regulation requires.
15 Planning for installation
About scalability
Symantec conducted scalability tests using 100baseT networks to establish the scalability parameters for Symantec ESM.
The Symantec ESM-base scalability tests determined the following: ■ Minimum computer configuration.
■ Maximum number of agents to register with a manager. ■ Maximum number of agents to include in a policy run.
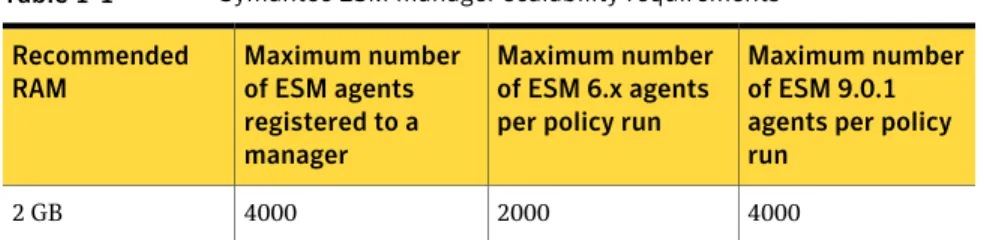
The following table lists the number of agents that a Symantec ESM manager can scale to. The host computer must have the RAM and free disk space as indicated in the table for the Symantec ESM manager to scale. The minimum RAM requirement for ESM manager is 1 GB.
Table 1-1 Symantec ESM manager scalability requirements
Maximum number of ESM 9.0.1 agents per policy run
Maximum number of ESM 6.x agents per policy run Maximum number of ESM agents registered to a manager Recommended RAM 4000 2000 4000 2 GB
Symantec ESM managers that register a large number of agents may require several gigabytes of disk space to store policy run data. You can estimate the additional free disk space that the Symantec ESM manager requires to store policy run data.
See“About policy run disk space requirements”on page 16.
You can register up to 4000 agents for each Symantec ESM manager. However, the ESM console may take longer to update if you have more than 500 agents registered to a manager.
About policy run disk space requirements
Disk space requirements for policy run data vary based on the following: ■ The number of agents in the policy runs
■ The number of reports that you retain on the computer
You can make the following calculations to estimate the additional disk space requirement for each policy run:
Per policy run disk space = A*M*Msg* MSize Kilobytes
Planning for installation
About scalability
Where:
■ A = the number of agents on which the policy is to be executed. ■ M = the number of modules per policy run.
■ Msg = the expected number of messages that each module returns. ■ MSize, a constant value = 13/100.
For example, a single policy run with 10 modules is executed on 4000 agents and it returns 300 messages per module. Hence, the required disk space is
(4000*10*300*13)/100 = 1560000 KB, which is 1.49 GB. This requirement is in addition to the disk space that you must provide to install Symantec ESM on the computer.
Note:Symantec ESM managers that register a large number of agents should have several gigabytes of free disk space to store the policy run data.
About CPU utilization
Symantec ESM processes do not take CPU resources from other processes. Higher priority processes can still obtain the CPU resources that they need.
The Symantec ESM agents and the modules run at idle priority. This means that the operating system gives them CPU time only when other threads and processes are not in queue for input and output (I/O).
When Symantec ESM processes run, the CPU can easily increase up to 100 percent utilization. This means that Symantec ESM processes use the available CPU cycles.
Virtualization support for ESM
The ESM components are currently supported on the following virtualized environments:
■ The ESM console, manager, and agent on VMWARE virtualized environment for Windows.
■ ESM manager and agent on Solaris 10 on both local and global zones. ■ ESM manager, agent, and console on virtualized environment for VMWARE
ESX servers.
Virtual environments use more system resources than the physical environments do. If significant performance degradation occurs in a virtualized environment, try to recreate the issue in a physical environment. Doing so provides a benchmark for the performance.
17 Planning for installation
If you face any issue while using ESM on VMWARE, recreate that issue on a physical computer. If the issue cannot be recreated on a physical computer, contact the VMWARE Technical Support.
For more information and help, contact Symantec Technical Support.
Planning for installation
Virtualization support for ESM
Upgrading the Symantec
Enterprise Security
Manager
This chapter includes the following topics: ■ Upgrading Symantec ESM
■ Upgrading Symantec ESM console
■ Upgrading the ESM manager and the agent ■ Upgrading Symantec ESM agent
■ Upgrading Symantec ESM utilities
Upgrading Symantec ESM
To use the new functions in this ESM 9.0.1 release, you must upgrade the Symantec ESM software. You can upgrade to ESM 9.0.1 only if you have ESM 9.0 installed on your computer.
The Symantec ESM upgrade depends on the currently installed version and configuration of the ESM. The upgrade includes the following tasks:
■ Install the 9.0 version of Symantec ESM on computers running Symantec ESM consoles.
■ Install the 9.0 version of Symantec ESM on computers running Symantec ESM managers.
■ Run LiveUpdate on a Symantec ESM console to ensure that the managers have the latest Symantec ESM security update or agent software.
2
■ Run Symantec ESM policies to ensure conformity with regulatory standards. Use the ESM console to edit the security checks, the templates, and the name lists in the latest security update to conform to company policy. You then run the ESM policy on a manager domain to update the updatable agents that are in the domain. If you run the policy on the All agents domain, the manager can update the updatable agents.
You must upgrade the ESM console first, followed by the ESM managers, and then the ESM agents. For an ESM manager 9.0.1, you must have an ESM console with version 9.0.1 or later. ESM agents with earlier versions are compatible with ESM manager 9.0.1.
Note:You cannot upgrade previous versions of ESM manager installation on AIX or HP-UX to ESM 9.0.1. ESM does not support AIX or HP-UX platforms for ESM manager installations. You can install only ESM agents on AIX or HP-UX platforms. See“Supported UNIX operating systems”on page 71.
If you have all the ESM components installed on one computer, then Symantec recommends that you maintain the same version for all the ESM components. During upgrade, the setup uninstalls the ESM components that you do not select for upgrade. For example, if you select the console and the manager for upgrade and do not select the utilities, the setup uninstalls the utilities during upgrade.
About backward compatibility
Symantec ESM 9.0.1 managers are backward-compatible with Symantec ESM agents with version 6.0 or later. Symantec ESM agents that you register to a manager before an upgrade continue to function with the manager after the upgrade. Symantec does not support any other backward compatibility. When you upgrade a manager-only installation to ESM 9.0.1, Symantec ESM installs the 9.0.1 agent on the same computer during the upgrade process. In such a scenario, you must register the new agent to the 9.0.1 manager.
Symantec ESM encrypts all internal communication between the managers and the agents. The Symantec ESM 9.0.1 manager has the ability to adjust its encryption level to support the encryption level of the agent. For example, communication between a Symantec ESM 9.0.1 manager and a Symantec ESM 6.0 agent uses the encryption level of the Symantec ESM 6.0 agent.
Upgrading the Symantec Enterprise Security Manager
Upgrading Symantec ESM
About preserving user data
Symantec ESM preserves customization when upgrading from an older version of Symantec ESM. Customization includes user modifications to policies, domains, templates, suppressions, and customized messages from the ".m" files.
Note:Symantec ESM does not preserve .fmt files because they are obsolete. During the upgrade process, Symantec ESM does the following:
■ Preserves any unexpired suppressions of security report items. ■ Stores the template data in the \esm\template directory.
During an upgrade, Symantec ESM preserves any modifications to the template files while it merges the new template information into the upgrade.
■ Saves any changes that customize the policy database.
These changes include the security checks that you enable in the security modules, as well as any changes to the name lists.
■ Preserves the changes to the message database that result from changes to the ".m" files.
Customized protection applies only to messages in the ".m" files. Security option information, such as the names of the security checks and the Help, have neither a customized flag nor the same protection.
■ Overwrites the ".m" files.
Overwriting of the ".m" files does not affect any customized messages, because the message database protects them. However, you lose the source of the customized messages.
■ Preserves any changes that customize the Domains database.
Preservation of the changes includes all agent registrations to the manager and the agent domains that you create on the manager.
Symantec ESM agents continue to belong to the following domains: ■ All agents domain
■ Domain of the agent operating system (OS)
For example, an ESM agent on a computer with Windows 2000 OS belongs to both the All agents domain and the Windows 2000 agents domain.
■ Ports existing summary database information to the new sumfinal database on the manager.
■ Converts the access records in the manager access database. You use the ESM console to do the following:
21 Upgrading the Symantec Enterprise Security Manager
■ Add the access rights of all Symantec ESM manager accounts. ■ Modify the access rights of all Symantec ESM manager accounts. ■ Delete the access rights of all Symantec ESM manager accounts. You cannot add, modify, or delete the Symantec ESM superuser account. ■ Replaces the registered manager information in a manager.dat file, which is
located at the agent's \esm\config\folder. Agents register only with the manager that initiates the upgrade. You must register each agent to any other managers. ■ Overwrites the other files in the \esm\config directory.
Users must customize the new files.
Preserving the customized ".m" files
When you upgrade ESM or apply a new Security Update, the new ".m" files overwrite the existing ".m" files on the agent. The overwrite may result in loss of the customized files. You can preserve the ".m" files on the manager by changing the customized value of the modified messages to a "1" in the ".m" files.
Note:You must restart the console to view the changes that you made in the ".m" file.
Perform the indicated steps to preserve the customized ".m" files on the ESM manager.
To preserve the customized ".m" files
1
If the Enterprise Security Manager version is 6.5.2 or later, then open the ".m" file from the agent's \ESM\register\<platform name>\i18n folder. If the Enterprise Security Manager version is earlier than 6.5.2, then the location of the ".m" is \ESM\register\<platform name>.2
Set the customized flag as 1 after you make the required changes in the message.3
Re-register the modules or the agent to the manager by using following command:register -fav -m <manager name> -U <ESM username> -P <ESM user password>
After you re-register the modules or the agent to the ESM manager, the customized ".m" file is stored in the manager with the changes that you have made. If you upgrade ESM or apply the latest SU, the ".m" files in the agents are overwritten. However, the ".m" file on the manager remains intact.
Upgrading the Symantec Enterprise Security Manager
Upgrading Symantec ESM
Silently upgrading the Symantec ESM console, the manager, and the
agent
You can use the Symantec ESM command-line options to silently upgrade the ESM components.
The procedure to silently upgrade the ESM components is same as the procedure for silent installation of the components.
See“Silently installing the console, the manager, and the agent ”on page 38.
Upgrading Symantec ESM console
When you upgrade to the new version of the console, the Symantec ESM installer does the following:
■ Takes a backup of the existing data.
■ Uninstalls the earlier version of the ESM console. ■ Installs the new version of the console.
■ Restores the data.
You can upgrade the ESM console by using any of the following: ■ The ESM Suite Installer
You must have the ESM 9.0 console installed if you want to upgrade to ESM 9.0.1 console.
■ The ESM Console Installer
The ESM 9.0.1 Console Installer supports upgrade from ESM console 6.5.x or later. The console installer aborts the installation process if you have a console with a version earlier than 6.5.x. In such a scenario, you can do one of the following to upgrade to ESM 9.0.1 console:
■ Use the ESM 9.0 Suite Installer and then select the ESM console component for upgrade.
■ Upgrade the console to ESM 6.5 or later console, and then upgrade to ESM console 9.0.1 by using the ESM 9.0.1 Console Installer.
23 Upgrading the Symantec Enterprise Security Manager
To upgrade the ESM console by using the Suite Installer
1
Log on as an administrator to the computer on which you want to upgrade the ESM console. Alternatively, use a role that is equivalent to anadministrator.
2
Insert the product disc into the drive.Note:If you want to configure the disclaimer for your console, then ensure that the Disclaimer.rtf file is present in the setup folder.
See“Configuring and editing the disclaimer”on page 35.
3
Navigate to ESMInstaller\ESMSetupSuite and run the setup.exe.4
On the prompt that informs you about the upgrade, click Yes.5
In the Resuming the Setup Wizard panel, click Next.6
In the License Agreement panel, click I accept the terms in the licenseagreement, and then click Next.
7
In the Superuser Account Credentials panel, enter the credentials for the ESM manager account, and then click Next.The superuser credentials that you provide for ESM 9.0.1 must be the same as the credentials of the ESM 9.0 superuser account.
8
In the Setup Wizard Completed panel, click Finish. To upgrade the ESM console by using the Console Installer1
Log on as an administrator to the computer on which you want to install the ESM console. Alternatively, use a role that is equivalent to an administrator.2
Navigate to the location where you have extracted the console installer. Note:If you want to configure the disclaimer for your console, then ensure that the Disclaimer.rtf file is present in the setup folder.See“Configuring and editing the disclaimer”on page 35.
3
Go to ESMInstaller\ESMConsole and run the setup.exe.4
On the message prompt that asks for the upgrade confirmation, click Yes.5
In the Welcome panel, click Next.6
In the License Agreement panel, click I accept the terms in the licenseagreement, and then click Next.
Upgrading the Symantec Enterprise Security Manager
Upgrading Symantec ESM console
7
In the Destination Folder panel, click Next to accept the default location for the ESM console setup. Alternatively, do the following in the given order and then click Next:■ In the Destination Folder panel, click Change.
■ In the Change Current Destination Folder panel, select the folder where you want to store the console installer binaries. You may also create a new folder to store the console installer binaries.
■ Click OK.
8
In the Disclaimer Options panel, enter the password for the Disclaimer.rtf file and then click Next.The Disclaimer Options panel appears if you have the Disclaimer.rtf file copied in the Symantec\ESMConsole folder to your local computer.
9
In the Ready to Install the Program panel, click Install.The Installing Symantec Enterprise Security Manager 9.0.1 Console panel displays the progress of the upgrade procedure.
10
On the message prompt that informs you about the deletion of the ESM files and the folders, click Yes.When you upgrade to ESM 9.0.1 console, the setup deletes the installation files of the previous version of the console. This operation is a part of the upgrade.
11
Check Launch ESM Console if you want to launch the ESM console immediately after the installation is complete.12
Check Show Release Notes if you want to view the Symantec™ Enterprise Security Manager 9.0.1 Release Notes after the installation is over. You must have Adobe® Reader to view the Symantec™ Enterprise Security Manager 9.0.1 Release Notes.13
In the Setup Wizard Completed panel, click Finish.Upgrading the ESM manager and the agent
You must have an ESM 9.0 manager installed on the computer before you upgrade to an ESM SP1 manager. An ESM 9.0.1 manager is compatible with 6.x or later agents. ESM manager and agent installations reside on the same computer in ESM 9.0.1. You cannot have separate installations of the manager and the agent in ESM 9.0.1.
25 Upgrading the Symantec Enterprise Security Manager
You locally upgrade a manager by installing the new version over the old version of ESM manager on the computer that runs the manager software.
To upgrade an ESM manager and agent
1
Log on as an administrator to the computer on which you want to install the ESM manager. Alternatively, use a role that is equivalent to an administrator.2
Insert the product disc into the drive.3
Go to ESMInstaller\ESMSetupSuite and run the setup.exe.4
On the prompt that informs you about the upgrade, click Yes.5
In the Resuming the Setup Wizard panel, click Next.6
In the License Agreement panel, click I accept the terms in the licenseagreement, and then click Next.
7
In the Superuser Password panel, enter the Superuser account password, and then click Next.8
The Installing Symantec Enterprise Security Manager 9.0.1 Suite panel displays the progress of the installation.9
In the Setup Wizard Completed panel, click Finish.Silently upgrading the Symantec ESM manager and the agent
You can use the Symantec ESM command-line options to silently upgrade the ESM manager and the agent.
The procedure to silently upgrade the manager and the agent is same as the procedure for silent installation of the manager and the agent.
See“Silently installing the manager and the agent”on page 48.
Upgrading Symantec ESM agent
You can upgrade Symantec ESM agents by using one of the following methods: Install the new version over the old version on the computer that runs the agent software.
Local upgrade
Use the Symantec ESM console. Remote upgrade
You should run LiveUpdate on the Symantec ESM console before you upgrade agents remotely. LiveUpdate ensures that the ESM manager has the most current Symantec security information.
Upgrading the Symantec Enterprise Security Manager
Upgrading Symantec ESM agent
If you do not register the agent during local upgrade, you need to register the agent manually to its manager after the upgrade is complete. Also, before you upgrade the agents to ESM 9.0.1, you must move the agents to an ESM 9.0.1 manager.
See“Installing the Symantec ESM agent by using the Agent Installer”on page 50. You must apply the Signature Fix before you remotely upgrade the agents that have a version earlier than ESM 6.5.3 to ESM 9.0.1.
Note:The Security Update level does not get updated if you remotely upgrade an ESM agent to ESM 9.0.1. Symantec recommends that you apply SU 35 after a remote upgrade, if SU 35 is not already applied on the agent.
To remotely upgrade a Symantec ESM agent
1
In the ESM console menu bar, click LiveUpdate.2
In the LiveUpdate Wizard, click Directory path and click Browse.3
In the Browse for Folder dialog box, navigate to the folder that contains the Agent folder in the product disk and then click OK.4
In the LiveUpdate Wizard, click Next.5
The LiveUpdate Wizard displays the managers that are connected to the console. Select the managers on which you want to copy the remote upgrade binaries and then click Next > OK.6
In the Symantec ESM console, in the Enterprise tree, right-click an agent or an agent in a domain, and then click Remote upgrade.7
In the Upgrade Staus panel, click Close after the upgrade is complete. To remotely upgrade agents in a domain1
In the ESM console menu bar, click LiveUpdate.2
In the LiveUpdate Wizard, click Directory path and click Browse.3
In the Browse for Folder dialog box, navigate to the folder that contains the Agent folder in the product disk and then click OK.4
In the LiveUpdate Wizard, click Next.5
The LiveUpdate Wizard displays the managers that are connected to the console. Select the managers on which you want to copy the remote upgrade binaries and then click Next > OK.27 Upgrading the Symantec Enterprise Security Manager
6
In the Symantec ESM console, in the Enterprise tree, right-click a domain and then click Remote upgrade.7
In the Upgrade Staus panel, click Close after the upgrade is complete. You can double-click an agent's name to display additional information about the agent's upgrade status.Checking remote agent upgrade status
You can disconnect the console from a manager during a remote agent upgrade without affecting the upgrade process. Like policy runs, the ESM manager controls the agent software upgrades. If you reconnect the console, you can monitor the progress of an agent upgrade.
Agents that have not started to upgrade are displayed with a white status. Agents that are running the upgrade are available. Agents that successfully upgrade change to a green status. Agents that fail to upgrade change to a red status. To check the status of an agent upgrade
1
Right-click a manager, and then click Check remote upgrade status.2
Double-click an agent's name to display additional information about the agent's upgrade status.Silently upgrading the Symantec ESM agent
You can use the Symantec ESM command-line options to silently upgrade the ESM agent.
The procedure to silently upgrade the ESM agent is same as the procedure for silent installation of the agent.
See“Silently installing and registering an ESM agent”on page 52.
Upgrading Symantec ESM utilities
To upgrade an older version of the Symantec ESM utilities, you must install the new version.
The procedure to upgrade the ESM utilities is same as the procedure for installation of the ESM utilities.
See“Installing the Symantec ESM utilities”on page 59.
Upgrading the Symantec Enterprise Security Manager
Upgrading Symantec ESM utilities
Installing Symantec ESM
managers and agents on
Windows
This chapter includes the following topics: ■ About installing Symantec ESM components ■ System requirements for Windows computers ■ Configuring and editing the disclaimer
■ Installing the ESM components by using the ESM Suite Installer ■ Installing the Symantec ESM console by using the Suite Installer ■ Installing the Symantec ESM console by using the Console Installer ■ Installing the ESM manager and the agent by using the Suite Installer ■ Installing the Symantec ESM agent by using the Agent Installer ■ Installing the Symantec ESM utilities
■ Post-installation tasks
About installing Symantec ESM components
You can install Symantec ESM managers, agents, consoles, and utilities on the computers that meet the system requirements.
See“System requirements for Windows computers”on page 32.
3
You must have the ESM 9.0 components installed on your computer to install the ESM 9.0.1 components.
Symantec distributes Symantec ESM software on a product disc. To access this software, at least one computer with a Windows operating system must have access to a disk drive.
Symantec locates the programs for each product on the disc according to the following directory structures:
■ Content_Updates ■ Documentation ■ UNIX_Package ■ Windows_Package ■ Reporting_DatabaseLink
The installation process includes the following tasks: ■ Start the Symantec ESM installer.
■ Install the ESM manager, agent, console, and utilities.
You can install the manager, the agent, the console, and the utilities by using the ESM Suite Installer. Use the ESM Agent Installer to install only the ESM agent.
Note:Remote installation of the agents is not supported from ESM 9.0 onwards. You must have the following rights on the computer on which you want to install Symantec ESM:
■ Administrative privileges to access system resources.
■ Write permissions on the path that you have selected to install Symantec ESM. ■ Permissions to read, modify, and update registry data.
Before you install Symantec ESM
You must have the ESM 9.0 console and the manager installed on the computer before you install the ESM 9.0.1 console and the manager. However, you can install the ESM 9.0.1 agents even if you do not have the ESM 9.0 agents installed on the computer.
The installation process of Symantec ESM on Windows consists of the following tasks:
■ Install the ESM console.
Installing Symantec ESM managers and agents on Windows
About installing Symantec ESM components
■ Install the ESM manager.
■ Install the ESM agents that report to the ESM manager. ■ Register the agents to the manager.
■ Install the Symantec ESM utilities.
Symantec ESM consoles are supported on Windows platforms only. Symantec ESM managers are supported on Windows and UNIX platforms.
Perform the following tasks before installing Symantec ESM components on Windows computers.
Symantec ESM console
■ Install Java runtime environment (JRE) 1.5.0_15 or later.
■ Prepare the Disclaimer.rtf if you want a disclaimer to be launched before you launch the ESM console.
See“Configuring and editing the disclaimer”on page 35. Symantec ESM managers and agents
■ Select the computers on which you want to install Symantec ESM manager and agent software.
■ Obtain access to an account with administrator privileges on each selected computer.
■ Select the Symantec ESM managers to which you want to register each Symantec ESM agent.
■ Ensure that the following ports are not in use by any other application: ■ 5600
■ 5601
■ List the following:
■ Name/IP/FQDN of the host computer
■ Name and password of a manager account that has privileges to register Symantec ESM agents
■ The port number for each Symantec ESM manager to which you plan to register a Symantec ESM agent
■ Select a password for the Symantec ESM superuser account on each manager. The superuser account has all of the privileges in Symantec ESM. You should choose a password with six or more characters including at least one non-alphabetical character. Manager account passwords can have up to 32 characters.
31 Installing Symantec ESM managers and agents on Windows
■ Install MDAC 2.7 on the computer on which you plan to install ESM by using the ESM Suite Installer. The MDAC version that you install must be version 2.70.9001 or later. You can verify the MDAC version from the file version of the msado15.dll, which resides at the following location:
\Program Files\Common Files\System\ado\msado15.dll Go to the following URL to download MDAC 2.70.9001: http://www.microsoft.com/downloads/details.aspx?
familyid=b41304ca-874f-421d-8820-182f179779a4&displaylang=en Symantec ESM utilities
■ Select the computers on which you want to install the Symantec ESM utilities. ■ Obtain access to accounts with administrator privileges on the computers that
have Windows operating systems.
■ Upgrade the Symantec ESM managers that are on the network to version 6.5 or later. The ESM Policy tool cannot run with earlier versions of Symantec ESM manager software.
■ Install Java 1.5.0_15 if you plan to use the Database Conversion tool with ORACLE 9i and the native ORACLE drivers.
You can choose to install Java 1.4.x as part of the default installation.
About licensing managers
Each Symantec ESM manager requires a permanent license to operate completely. Agents and consoles do not require licenses. Managers can register agents up to the number that is specified at the time of license distribution. To later register additional agents to the manager, you must change the manager’s allocation by using the Enterprise License feature from the ESM console.
You can install the ESM manager without a license. Without a license, the manager installs with limited functionality. For full functionality, you must assign a license using the Enterprise License feature from the ESM console.
The license of the ESM 9.0 manager is maintained in ESM 9.0.1 manager. You can continue with the same licenses that are allocated to the ESM 9.0 managers even after you upgrade to ESM 9.0.1 managers.
For information on how to assign a license to ESM Manager, see the Enterprise Security Manager User Guide.
System requirements for Windows computers
The Windows computers that have the ESM components installed must meet the minimum hardware requirements.
Installing Symantec ESM managers and agents on Windows
System requirements for Windows computers
Table 3-1lists the minimum hardware requirements for ESM consoles on Windows computers.
Table 3-1 Hardware requirements for ESM consoles on Windows
Minimum requirement Hardware
512 MB Physical memory
75 MB Hard disk space
1 GB Virtual memory 1.33 GHz CPU 10 Mbps Network speed
Table 3-2lists the minimum hardware requirements for ESM managers on Windows computers.
Table 3-2 Hardware requirements for ESM managers on Windows
Minimum requirement Hardware
2 GB Physical memory
25 GB Hard disk space
3.5 GB Virtual memory 2.8 GHz (Xeon/x86/Opteron/Itanium) CPU 100 Mbps Network speed
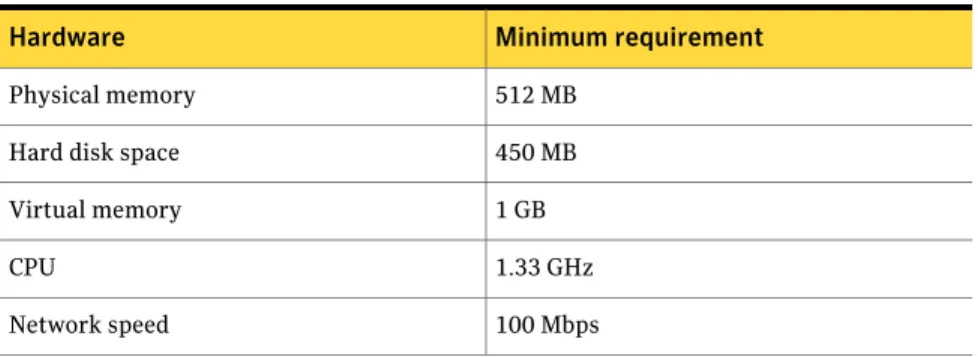
Table 3-3lists the minimum hardware requirements for ESM agents on Windows computers.
Table 3-3 Hardware requirements for ESM agents on Windows
Minimum requirement Hardware
512 MB Physical memory
450 MB Hard disk space
1 GB Virtual memory 1.33 GHz CPU 100 Mbps Network speed 33 Installing Symantec ESM managers and agents on Windows
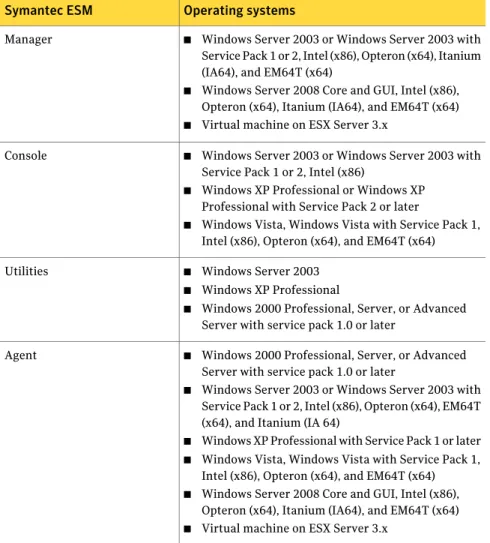
Table 3-4lists the required operating systems and service packs for ESM manager, agent, and console.
Table 3-4 Supported operating systems and service packs for ESM manager, agent, and console
Operating systems Symantec ESM
■ Windows Server 2003 or Windows Server 2003 with Service Pack 1 or 2, Intel (x86), Opteron (x64), Itanium (IA64), and EM64T (x64)
■ Windows Server 2008 Core and GUI, Intel (x86), Opteron (x64), Itanium (IA64), and EM64T (x64)
■ Virtual machine on ESX Server 3.x Manager
■ Windows Server 2003 or Windows Server 2003 with Service Pack 1 or 2, Intel (x86)
■ Windows XP Professional or Windows XP Professional with Service Pack 2 or later
■ Windows Vista, Windows Vista with Service Pack 1, Intel (x86), Opteron (x64), and EM64T (x64) Console
■ Windows Server 2003
■ Windows XP Professional
■ Windows 2000 Professional, Server, or Advanced Server with service pack 1.0 or later
Utilities
■ Windows 2000 Professional, Server, or Advanced Server with service pack 1.0 or later
■ Windows Server 2003 or Windows Server 2003 with Service Pack 1 or 2, Intel (x86), Opteron (x64), EM64T (x64), and Itanium (IA 64)
■ Windows XP Professional with Service Pack 1 or later
■ Windows Vista, Windows Vista with Service Pack 1, Intel (x86), Opteron (x64), and EM64T (x64)
■ Windows Server 2008 Core and GUI, Intel (x86), Opteron (x64), Itanium (IA64), and EM64T (x64)
■ Virtual machine on ESX Server 3.x Agent
Support for internationalization-compatible computers
Table 3-5contains the languages and the locales that ESM 9.0.1 supports in a heterogeneous environment.
Installing Symantec ESM managers and agents on Windows
System requirements for Windows computers
Table 3-5 Supported languages and locales Locale Language Germany German Spain Spanish France French Italy Italian US English
On an internationalization-compatible computer, you must have the same character set for all the ESM components on the supported Windows and UNIX operating systems.
For example, consider the following scenario:
You have the UTF-8 character set for an ESM manager, which is installed on a French Operating System. When you register agents to the ESM manager, the character set for the agents must also be UTF-8. If you have different character sets, the components fail to establish communication between each other.
Note:The ESM components that you install on the internationalization-compatible computers must have HI-ASCII character set.
Configuring and editing the disclaimer
You must create the Disclaimer.rtf file and use the file during upgrade if you want a disclaimer to be displayed before you launch the console. The Disclaimer.rtf is a configurable file and you can have customized information in the disclaimer as per the requirements of your organization. Before you upgrade the console to ESM 9.0.1, you must copy the ESMSetupSuite folder from the product disc and save it on your local computer. Alternatively, save the ESMSetupSuite folder in a shared folder in your network.
To configure the disclaimer, you must edit the "DISCLAIMER_PASSWORD=" parameter in any of the following files to enter a valid password:
■ ConsoleSilentInstallSample.bat
■ Manager&ConsoleSilentInstallSample.bat
35 Installing Symantec ESM managers and agents on Windows
Note:You have to provide the same password if you want to change the disclaimer.rtf file contents in the future.
You require the ConsoleSilentInstallSample.bat file to silently upgrade the console. The Manager&ConsoleSilentInstallSample.bat file silently upgrades the ESM manager and the console.
The .bat files are present at the ESMSetupSuite\example folder.
You can edit the disclaimer as per your need. However, to be able to modify the disclaimer, you must have an administrator's rights on the computer where you have the console installed.
Note:The disclaimer must be in the Rich Text File format.
If you do not want to configure a disclaimer, you have to delete the
"DISCLAIMER_PASSWORD=" parameter from the ConsoleSilentInstallSample.bat file or the Manager&ConsoleSilentInstallSample.bat file. You also have to delete the disclaimer.rtf file from the ESMSetupSuite folder before you proceed with the upgrade.
If the disclaimer file gets corrupted due to any reason, you must create a new Disclaimer.rtf. You have to use the Modify option in the setup wizard for an interactive upgrade of the console to use the newly created Disclaimer.rtf file. To configure the disclaimer during a silent upgrade of the ESM console
1
Open a WordPad and create a disclaimer.rtf file with the disclaimer information and save it in the ESMSetupSuite folder. The ESMSetupSuite folder must be present on your local computer or in a shared folder in your network.2
Go to ESMSetupSuite\example and copy the appropriate .bat file that you require to silently upgrade the console, or the console and the manager.3
Save the .bat file in the ESMSetupSuite folder.4
In the .bat file, type your password for the Disclaimer.rtf file in the "DISCLAIMER_PASSWORD=" field.5
Execute a silent upgrade of ESM console.See“Silently upgrading the Symantec ESM console, the manager, and the agent” on page 23.
Installing Symantec ESM managers and agents on Windows
Configuring and editing the disclaimer
To configure the disclaimer for an interactive upgrade of ESM console
1
Open a WordPad and create a disclaimer.rtf file with the disclaimer information and save it in the ESMSetupSuite folder. The ESMSetupSuite folder must be present on your local computer or in a shared folder in your network.2
Execute an interactive upgrade of the ESM console or all the ESM components. The installation wizard displays the Disclaimer Option panel if you save the Disclaimer.rtf file in the ESMSetupSuite folder on your local computer.3
In the Disclaimer Options panel, type the password for the Disclaimer.rtf file.4
Execute an upgrade of the ESM console. See“Upgrading Symantec ESM”on page 19. To edit the disclaimer1
Create a new .rtf file that contains the modified disclaimer information and save in your local computer.2
On the ESM console menu bar, click Edit > Configure Disclaimer.3
In the Configure Disclaimer dialog box, do the following:■ In the Password to change the file text box, enter your disclaimer password.
The password must be the same as the password that you enter in the
Disclaimer Option panel or in the DISCLAIMER_PASSWORD field of the
.bat file.
■ Click the browse option to navigate to the location where you have saved the .rtf file and then click OK.
An error message is displayed if you select the Disclaimer.rtf file that is currently in use.
Installing the ESM components by using the ESM Suite
Installer
You should begin the installation of Symantec ESM components by starting the Symantec ESM Suite Installer. The Suite Installer lets you install all the ESM components. However, you can select the components that you want to install from the Custom Setup panel of the install wizard. The Symantec ESM Suite Installer installs the components in the order in which they are listed on the Custom Setup panel.
37 Installing Symantec ESM managers and agents on Windows
You cannot install the ESM 9.0.1 console or the ESM 9.0.1 manager if you do not have ESM 9.0 installed on your computer.
You must be a built-in administrator on the computer to install ESM console on Windows Vista. You also have to have write access on the esm.mdb file to launch the console. If you do not have write permissions on the esm.mdb file, then an administrator must grant you the write permission.
Note:An ESM 9.0.1 manager is compatible only with an ESM 9.0.1 console. ESM 9.0.1 manager is compatible with ESM 6.0 or later agents.
To install the console, the manager, and the agent by using the ESM Suite Installer
1
Log on to the computer on which you want to install the Symantec ESM as an administrator. Alternatively, use a role that is equivalent to anadministrator.
2
Insert the product disc into the drive.3
Go to ESMInstaller\ESMSetupSuite and run the setup.exe.4
On the prompt that informs you about the upgrade, click Yes.5
In the Resuming the Setup Wizard panel, click Next.6
In the License Agreement panel, click I accept the terms in the licenseagreement, and then click Next.
7
In the Superuser Account Credentials panel, enter the credentials for the ESM manager account, and then click Next.The superuser credentials that you provide for ESM 9.0.1 must be the same as the credentials of the ESM 9.0 superuser account.
8
In the Disclaimer Option panel, enter a password for the Disclaimer.rtf file, and then click Next.The Disclaimer Option panel is displayed only if you have created and saved the Disclaimer.rt file in the console install directory.
9
In the Setup Wizard Completed panel, click Finish. See“Configuring and editing the disclaimer”on page 35.Silently installing the console, the manager, and the agent
You can use Symantec ESM command-line options to perform a silent installation of the ESM components. The command-line options let you install the ESM console, the manager, and the agent on local computers without any prompts for user inputs.
Installing Symantec ESM managers and agents on Windows
Installing the ESM components by using the ESM Suite Installer
To silently install the console, the manager, and the agent
1
Log on as administrator to the computer on which you want to install the console, the manager, and the agent. Alternatively, use a role that is equivalent to an administrator.2
Copy the ESMSetupSuite folder and the Documentation folder from the product disc to a network installation folder or to a local folder.3
Copy the Manager&ConsoleSilentInstallSample.bat file from the Examples folder in the product disc. Save the Manager&ConsoleSilentInstallSample.bat file in the local folder where you have saved the ESMSetupSuite folder.4
Right-click the Manager&ConsoleSilentInstallSample.bat file, and then clickEdit.
5
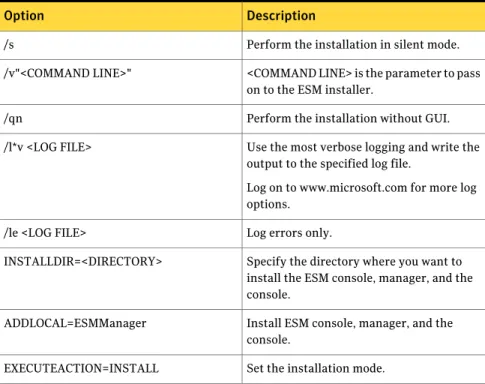
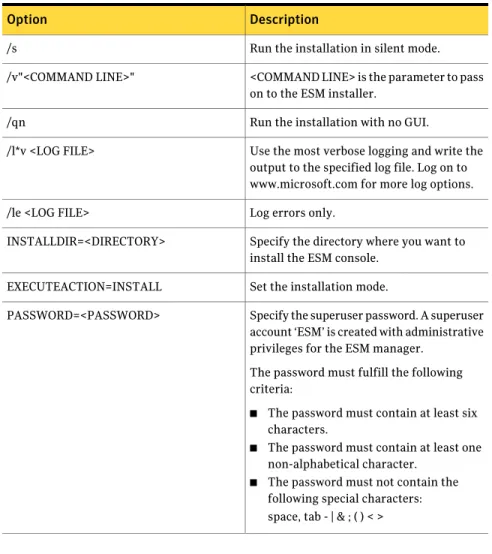
Specify the parameters of <COMMANDLINE>.Table 3-6lists the command-line options to silently install the ESM console, the manager, and the agent.
Table 3-6 Command-line options to silently install the ESM console, the manager, and the agent
Description Option
Perform the installation in silent mode. /s
<COMMAND LINE> is the parameter to pass on to the ESM installer.
/v"<COMMAND LINE>"
Perform the installation without GUI. /qn
Use the most verbose logging and write the output to the specified log file.
Log on to www.microsoft.com for more log options.
/l*v <LOG FILE>
Log errors only. /le <LOG FILE>
Specify the directory where you want to install the ESM console, manager, and the console.
INSTALLDIR=<DIRECTORY>
Install ESM console, manager, and the console.
ADDLOCAL=ESMManager
Set the installation mode. EXECUTEACTION=INSTALL
39 Installing Symantec ESM managers and agents on Windows
Table 3-6 Command-line options to silently install the ESM console, the manager, and the agent (continued)
Description Option
Specify the Superuser Password. A Superuser Account ‘ESM’ is created with administrative privileges for the ESM manager.
The password must fulfill the following criteria:
■ The password must contain at least six characters.
■ The password must contain at least one non-alphabetical character.
■ The password must not contain the following special characters: space, tab - | & ; ( ) < > PASSWORD=<PASSWORD>
List of managers to which you want to register the agent.
‘mgr spec’ has the following comma-delimited list of information:
■ Manager name
■ Logon name
■ Logon password REGAGENTLIST=[{mgr spec 1},{mgr spec
2},...{mgr spec n}]
Specify the type of LiveUpdate
(1 - disable, 2 - enable from all managers, 3 - enable from selected managers)
LURADIOGROUP=2
Comma-delimited list of managers to allow LiveUpdate for the agents.
This option is ignored unless LURADIOGROUP is 3. LUALLOWEDMGRS=mgr1,mgr2,...,mgrn
This property is ignored if you upgrade ESM console from a previous version.
EDITCONSOLEUSERNAME=ESM
Retain the ESM console user account credentials from the previous version. EDITCONSOLEPASSWORD=<password>
Installing Symantec ESM managers and agents on Windows
Installing the ESM components by using the ESM Suite Installer
Table 3-6 Command-line options to silently install the ESM console, the manager, and the agent (continued)
Description Option
Set the value to 1 if you want to install the Symantec LiveUpdate server and register ESM to the LiveUpdate server.
Set the value to 0 if you do not want to install the Symantec LiveUpdate server.
CHECKBOXINSTALLLIVEUPDATE=1
For example,
setup.exe /s /v"/qn /l*v
\"%TEMP%\SymantecESMManagerConsoleInstall.log\"
INSTALLDIR=\"C:\Program Files\Symantec\Enterprise Security Manager\" EXECUTEACTION=INSTALL EDITMANAGERUSERNAME=ESM PASSWORD=esm4now REGAGENTLIST=[{dev-imr50-2,esm,esm4now,1,default,5600}] LURADIOGROUP=2 LUALLOWEDMGRS=dev-imr50-2 EDITCONSOLEUSERNAME=ESM
EDITCONSOLEPASSWORD=esm4now CHECKBOXINSTALLLIVEUPDATE=1 REINSTALL=ALL"
Installing the Symantec ESM console by using the
Suite Installer
Symantec Enterprise Security Manager lets you install the console on Windows computers that meet the system requirements. If you intend to install the Report Viewer tool, you should install the Symantec ESM utilities before you install the console.
You can install the ESM console by using the Suite Installer on Windows computers that meet the system requirements.
See“System requirements for Windows computers”on page 32.
Note:You must have the ESM 9.0 console installed on your computer to upgrade to ESM 9.0.1 console.
You must be a built-in administrator on the computer to install ESM console. Alternatively, you can use a role that is equivalent to an administrator. You also have to have write access on the esm.mdb file to launch the console. If you do not have write permissions on the esm.mdb file, then an administrator must grant you the write permissions.
The installation process consists of the following:
41 Installing Symantec ESM managers and agents on Windows
■ Starting the Symantec ESM Suite Installer. ■ Installing the Symantec ESM console.
To install the Symantec ESM console by using the Suite Installer
1
Log on to the computer on which you want to install the Symantec ESM as an administrator. Alternatively, use a role that is equivalent to anadministrator.
2
Insert the product disc into the drive.Note:If you want to configure the disclaimer for your console, then ensure that the Disclaimer.rtf file is present in the setup folder.
See“Configuring and editing the disclaimer”on page 35.
3
Go to ESMInstaller\ESMSetupSuite and run the setup.exe.4
On the prompt that informs you about the upgrade, click Yes.5
In the Resuming the Setup Wizard panel, click Next.6
In the License Agreement panel, click I accept the terms in the licenseagreement, and then click Next.
7
In the Superuser Account Credentials panel, enter the credentials for the ESM manager account, and then click Next.The superuser credentials that you provide for ESM 9.0.1 must be the same as the credentials of the ESM 9.0 superuser account.
8
In the Setup Wizard Completed panel, click Finish.Silently installing the ESM console
You can use Symantec ESM command-line options to perform a silent installation of the ESM console. The command-line options let you install the console on local computers without any prompts for user inputs.
You can perform a silent installation of the ESM console by using the Suite Installer or by using the Console Installer.
Installing Symantec ESM managers and agents on Windows
Installing the Symantec ESM console by using the Suite Installer
To silently install the ESM console by using the Suite Installer
1
Log on as administrator to the computer on which you want to install the Symantec ESM console. Alternatively, use a role that is equivalent to an administrator.2
Copy the ESMSetupSuite folder and the Documentation folder from the product disc to a network installation folder or to a local folder.Symantec ESM provides you with a .bat file that you can use to perform a silent installation of only the ESM console. In f you want to perform a silent installation of the console, then copy the ESMConsole folder and the Documentation folder to a network installation folder or to a local folder.
3
Copy the ConsoleSilentInstallSample.bat file from the Examples folder to the folder where you have saved the setup.exe.4
Right-click the ConsoleSilentInstallSample.bat file and click Edit.5
Specify the parameters of COMMANDLINE.Table 3-7lists the command-line options for silent installation of the ESM console.
Table 3-7 Command-line options for silently installing the ESM console by using the Suite Installer
Description Option
Run the installation in silent mode. /s
<COMMAND LINE> is the parameter to pass on to the ESM installer.
/v"<COMMAND LINE>"
Run the installation with no GUI /qn
Use the most verbose logging and write the output to the specified log file.
Log on to www.microsoft.com for more log options.
/l*v <LOG FILE>
Log errors only. /le <LOG FILE>
Specify the directory where you want to install the ESM console.
INSTALLDIR=<DIRECTORY>
Install ESM console. ADDLOCAL=ESMConsole
Set the installation mode. EXECUTEACTION=INSTALL
43 Installing Symantec ESM managers and agents on Windows
Table 3-7 Command-line options for silently installing the ESM console by using the Suite Installer (continued)
Description Option
This property is ignored when you upgrade ESM Console from a previous version. EDITCONSOLEUSERNAME=ESM
Retains the ESM console User Account credentials.
EDITCONSOLEPASSWORD=<password>
Set the value to 1 if you want to install Symantec LiveUpdate Server and register Symantec ESM to the LiveUpdate Server. CHECKBOXINSTALLLIVEUPDATE=1
Specify the password that is required to modify the Disclaimer.rtf file after the Symantec ESM console installation. DISCLAIMER_PASSWORD=<password>
For example,
setup.exe /s /v"/qn /l*v \"%TEMP%\SymantecESMConsoleInstall.log\" INSTALLDIR=\"C:\Program Files\Symantec\Enterprise Security Manager\" ADDLOCAL=ESMConsole EXECUTEACTION=INSTALL EDITCONSOLEUSERNAME=ESM EDITCONSOLEPASSWORD=esm4now CHECKBOXINSTALLLIVEUPDATE=1"
To silently install the ESM console by using the Console Installer
1
Log on as administrator to the computer on which you want to install the console. Alternatively, use a role that is equivalent to an administrator.2
Copy the ESMConsole folder and the Documentation folder to a network installation folder or to a local folder.3
Copy the ConsoleSilentInstallSample.bat file from the Examples folder in the product disc. Save the ConsoleSilentInstallSample.bat file in the local folder where you have saved the Symantec ESM Enterprise Console folder.4
Right-click the ConsoleSilentInstallSample.bat file, and then click Edit.5
Specify the parameters of <COMMANDLINE> and then double-click the ConsoleSilentInstallSample.bat file.Table 3-8lists the command-line options for silent installation of the ESM console.
Installing Symantec ESM managers and agents on Windows
Installing the Symantec ESM console by using the Suite Installer