Medical Office Simulation Software (MOSS) 2.0
Case Studies
Workbook to Accompany Medical Assisting: Administrative and Clinical Competencies, Sixth Edition
This appendix presents six case studies designed to give you experience using medical office practice management software. Using Medical Office Simulation Software (MOSS) 2.0 Single User Version, you will enroll the patients and their family members using the information provided for each patient. To complete each case study, you will also need to create appointments, post procedure charges, bill insurance companies and individual patients, and post payments received by the office.
Step by step instructions will be given the first time a new procedure is
introduced. Users may wish to refer back to these instructions as they progress through the subsequent case studies.
MOSS 2.0 is generic practice management software, realistic in its look and functionality, which helps users prepare to work with any commercial software used in medical offices today. With a friendly, highly graphical interface, MOSS allows users to learn the fundamentals of medical office software packages in an educational
environment.
Installation and Setup Instructions
These are the installation instructions to install the MOSS 2.0 program: 1. Close all open programs and documents.
2. Place the Medical Office Simulation Software 2.0 CD into your CD-ROM drive. 3. Medical Office Simulation Software 2.0 should begin setup automatically. Follow
the on-screen prompts to install MOSS and Microsoft Access Runtime:
Click “Next”
Click “I Accept” the terms of the license agreement
Click “Next”
Click the button next to “TYPICAL” as the setup type
Click “Install”
4. If MOSS does not begin setup automatically, follow these instructions:
Double-click on My Computer.
Double-click the Control Panel icon.
Click the Install button, and follow the prompts as indicated in step 3. 5. When you finish installing MOSS, it will be accessible through the Start menu:
Start > Programs > MOSS v2.0
MOSS Support and Companion Site
Video tutorials, software documentation, FAQs, and additional resources can be found on the MOSS Information, Training, and Support Site: www.cengage.com/community/moss.
For technical support related to MOSS 2.0, please contact Delmar Technical Support, Monday-Friday, from 8:30 a.m. to 6:30 p.m. Eastern Standard Time:
Phone: 1-800-648-7450
Email: [email protected]
Getting Started with MOSS 2.0
Log on Instructions (Single User Version)
1. When MOSS is launched, it brings up a logon window.
2. The default user name and password are already loaded for you. (The default user name and password is “Student1”.)
3. Click OK.
4. You are now at the Main Menu screen of MOSS.
Navigating within the Program
The Main Menu screen orients you to the general functions of most practice management software programs and includes buttons that provide access to specific areas. Clicking on a specific button will allow you to work in that area of the program. Alternatively, there is an icon bar along the top left to quickly access the areas of the software, or the user may choose to navigate the software by using the pull-down menus below the software title bar.
Patient Registration: allows you to input information about each patient in the practice, including demographic, HIPAA, and medical insurance information. From the Main Menu screen, click on the Patient Registration button to search for a patient, or to add a new patient, using the command buttons along the bottom of the patient selection dialog box.
Appointment Scheduling: allows you to make appointments and also cancel,
reschedule, and search for appointments. MOSS allows for block scheduling, as well as several print features including appointment cards and daily schedules.
Procedure Posting: allows you to applypatient fees for services. When
procedures are input into the procedure posting system, the software assigns the fee to be charged according to the fee schedule for the patient’s insurance.
Insurance Billing: allows you toprepare claims to be sent to insurance
companies for the medical office to receive payment for services provided. You can generate and print a paper claim or simulate sending the claim electronically.
Claims Tracking: simulates receiving a Provider Payment Advice (electronic explanation of benefits [EOB] or remittance advice [RA]) from an insurance carrier.
Posting Payments: allows you to input payments received by the practice from patients or insurance companies, as well as enter adjustments to the account.
Patient Billing: allows you togenerate a bill to be sent directly to the patient to collect any outstanding balances.
File Maintenance: thisis a utility area of the program that contains common information used by various systems within the software. In this area, you can create and restore Backup Files, change your password, turn Feedback Mode and Balloon Help on and off, and more. In the Network Version, please note you will not have these options, as they are controlled by the Instructor’s Console.
Creating Backup Files
Backing up your MOSS database is just like saving a document or other file on your computer. Creating a backup file allows you to save all of the work you’ve completed up until that point. You may create a backup file of the work you’ve completed in the program at any time.
Backup files are very useful; for example, if you realize you have made a mistake and cannot correct it, you could restore a previous backup file and start the exercise over again. (Directions for restoring backup files are in the next section.)
We recommend creating backup files at regular intervals, while working through the Case Studies.
Follow these steps to create a backup file:
1. Click on File Maintenance, and then click the button next to 2. Backup Database.
2. Click Yes at the prompt.
3. Now, select a location to save your backup file. We recommend that you save the database on a flash drive (in most computers, this is your E:/ or F:/ computer drive). When saving your file, you may also choose to rename the file. You may rename the file to anything you choose, however, you must keep the file extension (.mde) in the file name.
4. Click Save when you are finished. You will receive a prompt telling you that your file was completed successfully. Click OK.
Restoring Backup Files
The restore function allows you to return to a previous point in the program. For instance, if you realize you have made a mistake and cannot correct it, you could restore a previous backup file and start the exercise over again. You may restore a backup file of previous work you’ve saved in the program at any time. Please note that restoring a backup file is permanent; all entries you have entered after creating that backup file will no longer appear in the program.
Follow these steps to restore a backup file:
1. Click on File Maintenance, and then click the button next to 3. Restore Database. Note that restoring a back up file is an irreversible process.
2. Click Yes at the prompt.
3. Click Restore MOSS from Database at the next prompt.
4. Click Yes at the following prompt. (Remember that restoring a back up file is an irreversible process.)
5. Find the back up file that you’ve created, click once to highlight it, and then click
OK.
6. Click Yes at the following prompt. 7. Click the button Return to MOSS.
8. You have successfully restored your back up database. You will need to log in to the new database to start working.
Case Study 1
David and Lois Fitzpatrick
The Fitzpatrick family recently moved to Douglasville from Albany, NY. Mr. Fitzpatrick has taken a promotion with his employer, the New York State Department of Corrections, which required him to relocate to the central facility.
1. Patient Registration
Enroll David and Lois Fitzpatrick with the Douglasville Medicine Associates practice using MOSS, using the information in Table 1.
Step by step instructions:
From the Main Menu, click Patient Registration.
Click Add on the patient selection screen, to add a new patient to the database.
Enter the appropriate information, being sure to Save on each screen. (Hint: Be sure Dr. Schwartz is selected as the physician. Use the magnifying glass next to the Physician field, on the top of the screen, to change the physician.)
Click Close until you return to the Main Menu.
Table 1 Patient Registration Information for David and Lois Fitzpatrick
David J. Fitzpatrick Lois J. Fitzpatrick
Physician Schwartz Schwartz
SSN 999-12-4567 999-21-3457 Gender M F Marital Status Married Married Date of Birth 1/25/1949 10/17/1950
Address 625 Renaud Ave
Douglasville, NY 01234
Same
Home Phone (123) 456-1318 Same
Employer/ School
NY Department of Corrections 452 Chain Link Fence Way Douglasville, NY 01234
Randall Craig Associates, LLC 29 Commerce Way
Douglasville, NY 01234
Referring Physician
Samantha Green, MD Same
Guarantor Self Spouse
Primary Insurance
ConsumerOne HRA Same
Information Group Number: NYDOC1000 Group Number: NYDOC1000 Secondary Insurance None None Additional Information
Your practice accepts assignment, signatures are on file, and this is an in-network/PAR.
Your practice accepts assignment, signatures are on file, and this is an in-network/PAR.
2. Insurance Verification
Whether new or established, it is essential to verify every patient’s medical insurance. Using the Online Eligibility feature in MOSS, verify the insurance eligibility for David and Lois Fitzpatrick. View and print the report.
Step by step instructions:
From the Main Menu, click Online Eligibility.
Search for each patient individually, on the patient selection screen. Click Select.
Review the information, and click Send to Payer.
Once complete, click View. Print the report for each patient.
Click Close until you return to the Main Menu.
3. Creating Appointments
a. Today is November 4, 2011. Mr. Fitzpatrick is not accustomed to the water in this area of the country and suffers from intestinal distress. He called this morning to see the doctor as soon as possible. Schedule an appointment for him for this afternoon at 2:00 p.m. He is a new patient and will need a comprehensive office visit for one hour.
b. Mrs. Fitzpatrick calls one week later and requests to see her doctor. She is not sure what is wrong with her; she just feels unusually tired. Mrs. Fitzpatrick is also a new patient and will need a comprehensive office visit for one hour. Schedule an appointment for Mrs. Fitzpatrick on November 11, 2011, at 9:00 a.m. Step by step instructions:
From the Main Menu, click Appointment Scheduling.
Navigate to the correct date, using the calendar on the upper right corner of the screen (use the M-/M+ and Y-/Y+ buttons).
Double click on the correct appointment time. (Hint: Be sure to select Dr. Schwartz’s column.)
Search for the patient in the patient selection window, and click Add, to add a new appointment to the calendar.
Fill out the Patient Appointment Form with the correct information.
Click Save Appointment. (Optional: Use the Print button to print an Appointment Reminder Slip.) Click Close until you return to the Main Menu.
4. Patient Check In
Be sure to check Mr. and Mrs. Fitzpatrick in on your appointment scheduler when they arrive for their scheduled office visits. At the time of check in, the administrative medical assistant gives the HIPAA Privacy Notice for each patient to sign. Indicate in each patient’s record that the HIPAA Privacy Notice has been given and signed.
Step by step instructions:
From the Main Menu, click Appointment Scheduling.
Navigate to today’s date and double click on the patient’s appointment time, bringing up the Patient Appointment Form.
Click the box next to Checked In and click Save Appointment. Click Close until you return to the Main Menu.
Click Patient Registration.
Search for the patient on the patient selection screen. Click Select, since the patient is already in the system and you are modifying information.
Select the HIPAA tab.
Click Yes in fields 1 and 2, and type the date of the appointments. Click Save.
Click Close until you return to the Main Menu.
5. Posting Procedures
a. Mr. Fitzpatrick was diagnosed with gastroenteritis and given a prescription. Post the charges for his office visit (the reference number on his superbill is 5001). Dr. Schwartz has indicated the following on the superbill:
o Procedure Code: New Patient – Level 4, comprehensive
o Diagnosis Code: Gastroenteritis NOS
o Mr. Fitzpatrick is to return for a follow-up appointment in about one week. Make a 15-minute follow-up appointment for Mr. Fitzpatrick on November 14, 2011, at 11 a.m.
o Since Mr. Fitzpatrick is in the office, print an appointment reminder slip for him to take home.
b. Mrs. Fitzpatrick’s visit required her physician to perform a comprehensive history and examination. The physician ordered a blood sugar test, a routine urinalysis (UA) with microscopy, a complete blood cell count (CBC) with differential, and a hematocrit. She was diagnosed with generalized weakness. Post the charges for her office visit (the superbill reference number is 5043):
o Procedure Code: New Patient – Level 4, comprehensive
o Procedure Code: Blood sugar
o Procedure Code: UA, Routine with microscopy
o Procedure Code: CBC w/Differential
o Procedure Code: Hematocrit
o Dr. Schwartz wants to see her again in three weeks for a follow-up
appointment. Make a 30-minute follow-up appointment for Mrs. Fitzpatrick on December 2, 2011, at 10:30 a.m.
o Since Mrs. Fitzpatrick is in the office, print an appointment reminder slip for her to take home.
Step by step instructions:
From the Main Menu, click Procedure Posting.
Search for the patient on the patient selection screen. Click Add, because you are adding procedures to the patient’s account. (Note: This is a critical step; Add must be selected in order to proceed correctly.)
Fill out the top of the procedure posting screen with the appropriate information:
o Reference Number
o POS (Hint: the patient was seen in the office)
o From (date) (Hint: only the “From” date is needed)
o CPT Code (Hint: use the magnifying glass to search for the description and select the correct code)
o Diagnostic Codes (Hint: use the magnifying glass to search for the description
and select the correct code)
When all fields are entered, click Post. The charges now appear in the center of the screen.
Repeat the process for additional charges. Click Close when all charges have been entered.
Review the “appointment scheduling” instructions for directions on printing an appointment slip.
6. Billing
Neither Mr. nor Mrs. Fitzpatrick made a payment at the time of their visit. Using the Insurance Billing feature in MOSS, generate a prebilling worksheet and submit the electronic claims to the insurance company for Mr. and Mrs. Fitzpatrick’s November 4 and 11 visits. Print the prebilling worksheet and the claims submission report.
Step by step instructions:
From the Main Menu, click Insurance Billing.
Fill out the Claim Preparation window with the appropriate information:
o Sort order: Patient Name
o Provider (Hint: choose the patients’ provider)
o Service dates (Hint: enter the date of Mr. Fitzpatrick’s claim in the from field, and the date of Mrs. Fitzpatrick’s claim in the through field)
o Patient name (Hint: select ALL, since you have narrowed the search using the service dates and provider)
o Transmit type: Electronic
o Payer (Hint: select the patients’ insurance company)
Click on Prebilling Worksheet. Print the Worksheet.
Close the Prebilling Worksheet to return to the Claim Preparation window.
Click on Generate Claims.
Review the claims for accuracy, and click Transmit EMC.
View the resulting Claims Submission Report, and Print it.
We recommend creating a backup file after this activity. 7. Claims Tracking
Use the Claims Tracking feature in MOSS to receive an electronic Provider Payment Advice, which describes insurance payments on the Fitzpatricks’ claims. Print the Provider Payment Advice.
Step by step instructions:
From the Main Menu, click Claims Tracking.
Select the correct insurance company.
Enter the start date (Hint: this is the date of the first claim).
Enter the end date (Hint: this is the date of the last claim).
Print the resulting Provider Payment Advice report.
8. Posting Insurance Payments
Review the Provider Payment Advice. Note that the insurance company has paid the entire Allowed Amount, and that the patient responsibility is zero. The difference
between the Charges amount and the Allowed Amount will be written off as an insurance adjustment. Use 11/30/2011 as the date of posting. The reference number will be the Claim ID number shown on the Provider Payment Advice for each charge.
Step by step instructions:
From the Main Menu, click Posting Payments.
Search for the patient in the patient selection window.
Highlight the procedure charge in the top part of the screen (in the Procedure Chart History area) and then click Select/Edit. If this is done correctly, the
Balance Due field will populate with the procedure charge. (Note: Do not proceed if the Balance Due field is not populated with a dollar amount.)
Enter the payment information for the charge:
o Date
o Payment Type (Hint: PAYINS)
o Reference # (Hint: this is the Claim ID number on the Provider Payment Advice)
o Amount Paid (Hint: this is the Allowed Amount)
o Adj Amount (Hint: this is the difference between the Charges and the Allowed Amount)
Click Post.
After all payments have been posted, click Close until you return to the Main Menu.
9. Print Patient Ledger
After all payments have been posted, view and print the Patient Ledger for Mr. and Mrs. Fitzpatrick.
Step by step instructions:
From the Main Menu, choose the Billing drop-down menu.
Select Patient Ledger.
Click on the magnifying glass next to the Patient Account field.
Search for the patient in the patient selection window, and click View.
Click on the Report button.
Print the Patient Ledger report.
Case Study 2
Diane, Robert, and Hannaley Mello
The Mello family was referred to your practice by Dr. Reed. The Mellos have recently switched insurance plans to receive more comprehensive medical coverage. Robert Mello is a construction worker and his wife, Diane, is a waitress at a local family restaurant. They have a daughter, Hannaley, who is asthmatic and requires a broad spectrum of health care needs.
1. Patient Registration
Enroll the Mellos with the Douglasville Medicine Associates practice using MOSS, using the information in Table 2.
Table 2 Patient Registration Information for the Mello family
Robert J. Mello Diane E. Mello Hannaley Mello
Physician Heath Heath Heath
SSN 999-27-4321 999-27-8002 999-32-9730
Gender M F F
Marital Status
Married Married Single
Date of Birth
09/23/1970 04/18/1971 06/17/2005
Address 28 Barbara Lane
Douglasville, NY 01234 Same Same Home Phone (123) 676-0332 Same Same Employer/ School Triple A Contractors 435 Rhode Island Ave Douglasville, NY 01234 (123) 676-4353 Grandma’s Family Restaurant 273 President Ave Douglasville, NY 01234 (123) 676-0223 Morton Elementary School 231 Main Street Douglasville, NY 01234 Referring Physician
Dr. Reed Same Same
Guarantor Self Spouse Parent (Robert Mello)
Primary Insurance
Signal HMO Same Same
Policy Information Copay: $10.00 ID Number: Copay: $10.00 ID Number: Copay: $10.00 ID Number:
999274321BB Policy Number: DE48329J
Group Number: n/a
999274321BB Policy Number: DE48329J
Group Number: n/a
999274321BB Policy Number: DE48329J
Group Number: n/a
Secondary Insurance
None None None
Additional Information
Your practice accepts assignment, signatures are on file, and this is an in-network/PAR.
Your practice accepts assignment, signatures are on file, and this is an in-network/PAR.
2. Insurance Verification
Whether new or established, it is essential to verify every patient’s medical insurance. Using the Online Eligibility feature in MOSS, verify the insurance eligibility for the patients. View and print the report.
3. Creating Appointments
Today is November 4, 2011. Mr. Mello called to make a same-day appointment. He has experienced persistent loose stools and vomiting. He has a temperature of 101.2°F. His wife and daughter are experiencing similar symptoms. Create 15 minute appointments for all three patients at 3:00 p.m., 3:15 p.m., and 3:30 p.m.
4. Patient Check In
Be sure to check the patients in on your appointment scheduler when they arrive for their scheduled office visits. At the time of check in, the administrative medical assistant gives the HIPAA Privacy Notice for each patient to sign. Indicate in each patient’s record that the HIPAA Privacy Notice has been given and signed.
5. Posting Procedures
All of the Mellos received a problem-focused history and examination. (Hint: Remember that the Mellos are new patients.) All were diagnosed with gastritis. Post the charges to each member’s account. (Hint: remember to select Add on the patient selection window, to add the charges to the patient account.) The superbill reference numbers are 5011, 5012, and 5013. Dr. Heath has indicated the following on the superbills:
o Procedure Code: New Patient – Level 1, problem-focused
o Diagnosis Code: Gastritis, acute w/o hemorrhage
o Because Mrs. Mello exhibited the most severe symptoms, the doctor asked that she return in two weeks for a follow-up examination. Make a 15 minute follow-up appointment for Mrs. Mello on November 18, 2011, at 2 p.m.
o Since Mrs. Mello is in the office, print an appointment reminder slip for her to take home.
6. Collecting Co-Payments
Collect the copayment of $10.00 for each patient. Mr. Mello writes check number 1088 for $30.00. Collecting copayments uses the same principles you learned in posting payments.
Step by step instructions:
From the Main Menu, click Posting Payments.
Search for the patient in the patient selection window.
Highlight the procedure charge in the top part of the screen (in the Procedure Chart History area) and then click Select/Edit. If this is done correctly, the
Balance Due field will populate with the procedure charge. (Note: Do not proceed if the Balance Due field is not populated with a dollar amount.)
Enter the payment information:
o Date
o Payment Type (Hint: PATCHECK)
o Reference # (Hint: this is the check number)
o Amount Paid (Hint: this is the copayment amount, $10)
Click Post.
Click Close to return to the patient selection window, and follow the same steps until you have posted all three copayments.
7. Billing
Using the Insurance Billing feature in MOSS, generate a prebilling worksheet and submit the electronic claims to the insurance company for the patients. Print the prebilling worksheet and the claims submission report.
Case Study 3
Sean and Manuella Gilbertson
There are occasions when your providers will see patients in outside facilities such as in the hospital or a skilled nursing facility. When this occurs for new patients, it is essential that as much information as possible is gathered by the provider and verified and
supplemented by the medical office staff. In the following case study, Dr. Heath made his weekly visit to the Retirement Inn Nursing Home, on November 1, 2011, where he met with all his patients. Today, he also saw the Gilbertsons, who recently were entered into care at that facility and are now under Dr. Heath’s care.
1. Patient Registration
Enroll the Gilbertsons with the Douglasville Medicine Associates practice using MOSS, using the information in Table 3. (Hint: on the Secondary Insurance tab, be sure to check “Bill Secondary Insurance after Primary.”)
Table 3 Patient Registration Information for Sean and Manuella Gilbertson
Sean G. Gilbertson Manuella A. Gilbertson
Physician Heath Heath
SSN 999-11-1114 999-99-0003 Gender M F Marital Status Married Married Date of Birth 03/11/1939 10/17/1939
Address 438 Courtship Ave
Douglasville, NY 01234 Same Home Phone (123) 678-6765 Same Employer/ School Retired Retired Referring Physician Dr. Reed Same
Guarantor Self Spouse
Primary Insurance
Medicare - Statewide Corporation Same
Policyholder Self Spouse
Policy Information ID Number: 999111114 ID Number: 999111114 Secondary Insurance Medicaid None
Policyholder Self Self Policy Information ID Number: 999-11-1114M ID Number: 999-99-0003M Additional Information
Your practice accepts assignment, signatures are on file, and Dr. Heath is a Medicare- and
Medicaid-participating provider.
Your practice accepts assignment, signatures are on file, and Dr. Heath is a Medicare- and
Medicaid-participating provider.
2. Insurance Verification
Whether new or established, it is essential to verify every patient’s medical insurance. Using the Online Eligibility feature in MOSS, verify the insurance eligibility for the patients. View and print the report.
3. Posting Procedures
Dr. Heath provided a comprehensive initial nursing home exam (Hint: use code 99306) for each patient. For Mr. Gilbertson, the examination focused on his cardiac pulmonary disease (Hint: cardiopulmonary disease, chronic, unspecified); for Mrs. Gilbertson, it focused on her insulin-dependent diabetes (Hint: diabetes mellitus, type II, controlled). Dr. Heath reported the procedures on an Outside Service log, as numbers 003 and 004. Retirement Inn Nursing Home is a skilled nursing facility.
4. Billing Primary Insurance
There is no copayment due at the time of service. Using the Insurance Billing feature in MOSS, generate a prebilling worksheet and submit the electronic claims to the primary insurance company for the patients. Print the prebilling worksheet and the claims submission report.
We recommend creating a backup file after this activity. 5. Claims Tracking
Use the Claims Tracking feature in MOSS to receive an electronic Provider Payment Advice, which describes insurance payments on the Gilbertsons’ claims. Print the Provider Payment Advice.
Step by step instructions:
From the Main Menu, click Claims Tracking.
Select the correct insurance company.
Enter the start date (Hint: this is the date of the first claim).
Enter the end date (Hint: this is the date of the last claim).
Print the resulting Provider Payment Advice report.
6. Posting Primary Insurance Payments
Review the Provider Payment Advice. Note that for each claim, the insurance company has paid $88.19, or 80% of the Allowed Amount. The remaining $22.05 (shown as the patient responsibility) will be billed to Medicaid. The difference between the Charges
amount and the Allowed Amount ($117.76) will be written off as an insurance adjustment, as Dr. Heath participates with Medicare. Use 11/30/2011 as the date of posting. The reference number will be the Claim ID number shown on the Provider Payment Advice for each charge.
Hints: You will enter the payment information for the charge:
o Date
o Payment Type (Hint: PAYINS)
o Reference # (Hint: the Claim ID number)
o Amount Paid (Hint: the amount in the Paid to Provider column)
o Adjust (Hint: select ADJINS from the drop-down menu)
o Adj Amount (Hint: this is the difference between the Charges and the Allowed Amount)
7. Billing Secondary Insurance
The Gilbertsons’ remaining charges will be billed to Medicaid. The secondary insurance claim will be billed as a paper claim.
Step by step instructions:
From the Main Menu, click Insurance Billing.
Enter the following information on the Claim Preparation window:
o Sort order: Patient Name
o Provider (Hint: choose the patients’ provider)
o Service dates (Hint: enter the date of the claim in both the from and through fields)
o Patient name (Hint: select ALL, since you have narrowed the search using the service dates and provider)
o Transmit type: Paper (1500)
o Billing options: Secondary
o Payer: Medicaid
Click on Prebilling Worksheet. Print the Worksheet.
Close the Prebilling Worksheet to return to the Claim Preparation window.
Click on Generate Claims.
Review the claims for accuracy, and click Print Forms.
Case Study 4
Stephanie Robertson
Stephanie Robertson is an emancipated minor who seeks free or reduced-fee care at your clinic. She has no insurance and little money in the bank. She has applied for state aid, but has not yet received it.
1. Patient Registration
Enroll Stephanie with the Douglasville Medicine Associates practice using MOSS, using the information in Table 4. (Hint: be sure to change Stephanie’s physician to Dr.
Schwartz.)
Table 4 Patient Registration Information for Stephanie Robertson Stephanie M. Robertson Physician Schwartz SSN 999-98-2020 Gender F Marital Status Single Date of Birth 12/11/1993
Address 1318 Renaud Street, Apt 12A
Douglasville, NY 01234 Home Phone (123) 677-2525 Employer/ School
Sloppy Joe’s Burgers 38 Main Road Douglasville, NY 01234 (123) 456-2708 Referring Physician None Guarantor Self Primary Insurance Self-Pay 2. Creating Appointments
Today is November 4, 2011. Stephanie Robertson makes a 45-minute appointment for November 11, 2011, at 10:30 a.m. She says that the reason is “personal.”
3. Patient Check In
Be sure to check the patients in on your appointment scheduler when they arrive for their scheduled office visits. At the time of check in, the administrative medical assistant gives the HIPAA Privacy Notice for each patient to sign. Indicate in each patient’s record that the HIPAA Privacy Notice has been given and signed.
4. Posting Procedures
Dr. Schwartz performs a Level 4 new patient examination. He also performs a routine breast and pelvic examination, draws blood (Hint: venipuncture) for a venereal disease research laboratory (VDRL) test, a mononucleosis screen, and a UA with microscopy. She was seen for abdominal pain. Post the charges to her account, using 6112 as the superbill reference number.
We recommend creating a backup file after this activity. 5. Posting Payments
You collect $20.00 in cash from the patient today and make arrangements to bill her $50.00 per month until the bill is paid. Post this payment to Ms. Robertson’s account and make a notation in her chart regarding the payment arrangement. (Hint: post the payment to the office visit charge, 99204).
Step by step instructions:
From the Main Menu, click Payment Posting.
Search for the patient in the patient selection window.
Highlight the procedure charge in the top part of the screen (in the Procedure Chart History area) and then click Select/Edit. If this is done correctly, the
Balance Due field will populate with the procedure charge. (Note: Do not proceed if the Balance Due field is not populated with a dollar amount.)
Enter the payment information for the charge:
o Date
o Payment Type (Hint: PATCASH)
o Amount Paid
Click Post.
Click View Ledger, to make the chart notation.
Click Notes.
Click Add, then click into the box next to the asterisk (*).
Type the appropriate notation, and click Close. Click Close until you return to the Main Menu.
6. Patient Billing
Prepare Ms. Robertson’s first billing statement on December 1, 2011. Be sure to include a message on her patient statement, per your agreement, to remit December’s payment of $50.00.
From the Main Menu, click Patient Billing.
Enter the following information on the Claim Preparation window:
o Statement type: Remainder Statement
o Provider: Choose the patient’s provider
o Service dates: Enter the date of service in both the from and through fields
o Report date: Type today’s date
o Patient name: Select the patient’s name
o Account number: leave blank
o Global dunning message: leave blank
o Account dunning message: type the appropriate message (Hint: “Per the agreement, please remit December’s payment of $50.00.”)
o Select accounts for message: Select the patient’s name
Click Process.
Print the resulting statement.
7. Posting Payments
On December 16, 2011, you receive check number 151 from Ms. Robertson for the amount of $50.00. Post the payment to her account. (Hint: post to the office visit charges.) Close and return to the Main Menu.
8. Print Patient Ledger
After all payments have been posted, view and print the Patient Ledger for Ms. Robertson.
Step by step instructions:
From the Main Menu, choose the Billing drop-down menu.
Select Patient Ledger.
Click on the magnifying glass next to the Patient Account field.
Search for the patient in the patient selection window, and click View.
Click on the Report button.
Print the Patient Ledger report.
Case Study 5
Mary and Henry Smith
Occasionally there will be accounts where the guarantor and the insured party are not one and the same. This is the case with Mr. and Mrs. Smith. Mr. Smith is the unemployed spouse of Mrs. Smith, who is a real estate broker of a very successful firm. Although Mrs. Smith is the insured party, her husband is the guarantor of the account.
1. Patient Registration
Enroll the Smiths with the Douglasville Medicine Associates practice using MOSS, using the information in Table 5.
Table 5 Patient Registration Information for the Smiths
Henry E. Smith Mary M. Smith
Physician Heath Heath
SSN 999-00-1110 999-10-3333 Gender M F Marital Status Married Married Date of Birth 02-14-1969 09-18-1970
Address 82 Hartwell Street
Douglasville, NY 01234 Same Home Phone (123) 678-2740 Same Employer/ School
Unemployed Homestead Realty, LLC
4832 Home Owner Way Douglasville, NY 01234 (123) 467-4983 ext. 21
Referring Physician
Dr. Samantha Green Same
Guarantor Self Spouse
Primary Insurance
Flexihealth PPO (In-Network) Flexihealth PPO (In-Network)
Policyholder Spouse Self
Policy Information ID Number: 999103333 $20.00 copayment ID Number: 999103333 $20.00 copayment Secondary Insurance None None
Additional Information
Your practice accepts assignment, signatures are on file, and Dr. Heath is a participating provider of Flexihealth PPO.
Your practice accepts assignment, signatures are on file, and Dr. Heath is a participating provider of
Flexihealth PPO.
2. Insurance Verification
Whether new or established, it is essential to verify every patient’s medical insurance. Using the Online Eligibility feature in MOSS, verify the insurance eligibility for the Smiths. View and print the report.
3. Creating Appointments
Today is November 15, 2011. The Smiths have registered with your practice and want to make appointments for a general checkup. However, Mr. Smith suspects he has an upper respiratory infection of some sort, and Mrs. Smith just simply feels overtired and run down. They request an appointment during their lunch time at about 1:00 p.m.
3. Patient Check In
Be sure to check the patients in on your appointment scheduler when they arrive for their scheduled office visits. At the time of check in, the administrative medical assistant gives the HIPAA Privacy Notice for each patient to sign. Indicate in each patient’s record that the HIPAA Privacy Notice has been given and signed.
4. Posting Procedures
Dr. Heath provided a Level 5 new patient comprehensive examination for each patient. Mr. Smith was diagnosed with acute bronchitis, and Mrs. Smith was diagnosed with generalized weakness, most likely due to stress. Post the charges to their accounts using 6225 and 6226 as the reference numbers.
We recommend creating a backup file after this activity. 5. Collecting Co-Payments
Collect the copayment of $20.00 for each patient. Mrs. Smith pays $40.00 in cash; post the copayments to each patient’s account.
6. Billing
Using the Insurance Billing feature in MOSS, generate a prebilling worksheet and submit the electronic claims to the insurance company for the patients. Print the prebilling worksheet and the claims submission report.
7. Claims Tracking
Use the Claims Tracking feature in MOSS to receive an electronic Provider Payment Advice, which describes insurance payments on the Smiths’ claims. Print the Provider Payment Advice.
8. Posting Insurance Payments
Review the Provider Payment Advice. Note that the insurance company has paid the entire Allowed Amount, less the patient responsibility (the co-payment, which has
already been paid). The difference between the Charges amount and the Allowed Amount will be written off as an insurance adjustment, since Dr. Heath is a participating provider. Use 12/15/2011 as the date of posting. The reference number will be the Claim ID
number shown on the Provider Payment Advice for each charge.
9. Print Patient Ledger
After all payments have been posted, view and print the Patient Ledger for Mr. and Mrs. Smith.
Case Study 6
Vito and Ermalinda Williams
It is always nice when things work the way in which they are designed. All too often, though, they do not. Patients will cancel appointments, change appointments, or ask if they can bring a dependent beneficiary to the appointment to be seen as well.
Occasionally medical office staff may fail to enter an appointment or even make an appointment for the wrong date, time, or provider. When these occurrences happen, they must be reflected and/or corrected in the medical office practice management software. Vito and Ermalinda Williams are an older adult couple who depend on family members for help. Of particular help is their daughter, who has been their most reliable source of support. In fact, they generally make their appointments based on their daughter’s availability.
1. Patient Registration
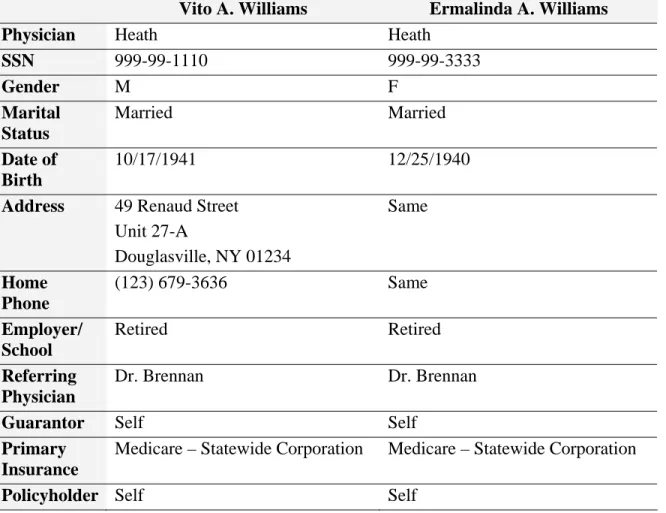
Enroll Mr. and Mrs. Williams with the Douglasville Medicine Associates practice using MOSS using the information in Table 6. Each patient has their individual Medicare and Medicaid medical coverage.
Table 6 Patient Registration Information for the Williams
Vito A. Williams Ermalinda A. Williams
Physician Heath Heath
SSN 999-99-1110 999-99-3333 Gender M F Marital Status Married Married Date of Birth 10/17/1941 12/25/1940
Address 49 Renaud Street
Unit 27-A Douglasville, NY 01234 Same Home Phone (123) 679-3636 Same Employer/ School Retired Retired Referring Physician Dr. Brennan Dr. Brennan
Guarantor Self Self
Primary Insurance
Medicare – Statewide Corporation Medicare – Statewide Corporation
Policy Information
ID Number: 999991110A 999993333A
Secondary Insurance Medicaid Medicaid Policy Information ID Number: 999991110B ID Number: 99999333B Additional Information
Your practice accepts assignment, signatures are on file, and Dr. Heath is a participating provider of both plans.
Your practice accepts assignment, signatures are on file, and Dr. Heath is a participating provider of both plans.
2. Insurance Verification
Whether new or established, it is essential to verify every patient’s medical insurance. Using the Online Eligibility feature in MOSS, verify the insurance eligibility for the Smiths. View and print the report.
3. Creating Appointments
Today is November 15, 2011. Mr. Williams calls to make an appointment for both himself and his wife for tomorrow, if possible. Both have similar symptoms of slight nausea, stomach pains, and chills. Make 30-minute appointments for each patient, at 1:00 p.m. and 1:30 p.m.
4. Rescheduling Appointments
Today is November 16, 2011. Mr. Williams calls to say his daughter will not be able to bring him and his wife to the office today. He also states the symptoms have not
worsened, and that they would like to be seen tomorrow, November 17, 2011 at the same time. Reschedule both patients’ appointments.
Step by step instructions:
From the Main Menu, click Appointment Scheduling.
Bring up today’s date.
Double click on the patient’s appointment. The Patient Appointment Form opens.
Click “Rescheduled,” and use the drop-down to select “Needs different date.”
Now, click on the calendar icon at the end of the Rescheduled row, on the right. A new calendar will appear. Note that it says Practice Reschedule on the top.
Navigate to the new date. Double click in the row of the new desired time. Note: It will appear that nothing has happened. Click Close on the Practice Reschedule calendar.
You are back on the Patient Appointment Form. The new date should be populated to the left of the calendar icon.
Click Save Appointment.
Click Close. You can navigate to the new appointment date and time to ensure the appointment was rescheduled. Click Close until you return to the Main Menu.
5. Patient Check In
Be sure to check the patients in on your appointment scheduler when they arrive for their scheduled office visits. At the time of check in, the administrative medical assistant gives the HIPAA Privacy Notice for each patient to sign. Indicate in each patient’s record that the HIPAA Privacy Notice has been given and signed.
6. Posting Procedures
Dr. Heath provided a Level 2 new patient comprehensive examination for each patient. Mr. and Mrs. Williams were diagnosed with gastritis and mild dehydration. Post the charges to their accounts using 6349 and 6350 as the reference numbers.
7. Billing Primary Insurance
There is no copayment due at the time of service. Using the Insurance Billing feature in MOSS, generate a prebilling worksheet and submit the electronic claims to the primary insurance company for the patients. Print the prebilling worksheet and the claims submission report.
We recommend creating a backup file after this activity. 8. Claims Tracking
Use the Claims Tracking feature in MOSS to receive an electronic Provider Payment Advice, which describes insurance payments on the Williams’ claims. Print the Provider Payment Advice.
9. Posting Primary Insurance Payments
Review the Provider Payment Advice. Note that for each claim, the insurance company has paid 80% of the Allowed Amount. The remaining patient responsibility will be billed to Medicaid. The difference between the Charges amount and the Allowed Amount will be written off as an insurance adjustment, as Dr. Heath participates with Medicare. Use 12/15/2011 as the date of posting. The reference number will be the Claim ID number shown on the Provider Payment Advice for each charge.
Hints: You will enter the payment information for the charge:
o Date
o Payment Type (Hint: PAYINS)
o Reference # (Hint: the Claim ID number)
o Amount Paid (Hint: the amount in the Paid to Provider column)
o Adjust (Hint: select ADJINS from the drop-down menu)
o Adj Amount (Hint: this is the difference between the Charges and the Allowed Amount)
10. Billing Secondary Insurance
The Williams’ remaining charges will be billed to Medicaid. The secondary insurance claim will be billed as a paper claim. Print the prebilling worksheet and paper claims.
Hints: You will enter the following information on the Claim Preparation window:
o Sort order: Patient Name
o Provider (choose the patients’ provider)
o Service dates (enter the date of the claim in both the from and through fields)
o Patient name (select ALL, since you have narrowed the search using the service dates and provider)
o Transmit type: Paper (1500)
o Billing options: Secondary