System 800xA Operations
Operator Workplace
Support for Mobile Devices
System 800xA Operations
Operator Workplace
Support for Mobile Devices
NOTICE
This document contains information about one or more ABB products and may include a description of or a reference to one or more standards that may be generally relevant to the ABB products. The presence of any such description of a standard or reference to a standard is not a representation that all of the ABB products referenced in this document support all of the features of the described or referenced standard. In order to determine the specific features supported by a particular ABB product, the reader should consult the product specifications for the particular ABB product.
ABB may have one or more patents or pending patent applications protecting the intel-lectual property in the ABB products described in this document.
The information in this document is subject to change without notice and should not be construed as a commitment by ABB. ABB assumes no responsibility for any errors that may appear in this document.
In no event shall ABB be liable for direct, indirect, special, incidental or consequential damages of any nature or kind arising from the use of this document, nor shall ABB be liable for incidental or consequential damages arising from use of any software or hard-ware described in this document.
This document and parts thereof must not be reproduced or copied without written per-mission from ABB, and the contents thereof must not be imparted to a third party nor used for any unauthorized purpose.
The software or hardware described in this document is furnished under a license and may be used, copied, or disclosed only in accordance with the terms of such license. This product meets the requirements specified in EMC Directive 2004/108/EC and in Low Volt-age Directive 2006/95/EC.
TRADEMARKS
All rights to copyrights, registered trademarks, and trademarks reside with their respec-tive owners.
Copyright © 2003-2014 by ABB. All rights reserved.
Release: August 2014 Document number: 2PAA110154-600
Table of Contents
About This User Manual
General ...9
User Manual Conventions ...9
Feature Pack ...9
Warning, Caution, Information, and Tip Icons ...10
Terminology...11
Released User Manuals and Release Notes...12
Section 1 - Introduction
Architecture ...14Server System Requirements...15
Section 2 - Concepts
Factory Coverage...17Access point placement best practices ...17
Service Set Identifier ...18
Security...19
Section 3 - Wireless Components
Wireless Components ...21Wireless Configuration ...23
Section 4 - Remote Desktop Sessions
RDS Host Server Licensing...25Installation...25
Table of Contents
RDS Host Server Role... 42
Adding the Remote Desktop Session Host Server Role ... 42
Adding Additional Remote Desktop Session Hosts ... 49
Setting up the License Server ... 52
Creating a Remote Desktop User Group ... 54
Creating a Remote User ... 56
Creating a New Collection... 57
Limiting loading of Remote Desktop Session - Load balancing ... 63
Testing Load Balancing ... 64
Enabling Audio ... 67
Section 5 - Certificate Authority
Installing the Certificate Authority ... 69Configuring the Certificate Authority ... 75
Section 6 - Creating Certificates
Creating a new certificate for the device ... 85Export Certificates... 91
Section 7 - Configuring NPS (RADIUS)
Adding NPS (RADIUS) ... 97Registering the server with Active Directory ... 102
Configuring NPS (RADIUS) ... 104
Starting and Stopping the NPS Service... 110
Section 8 - Remote Desktop Session Host Server Configuration
Adding the remote operator to 800xA ... 115Testing Remote Log on ... 115
Create a desktop shortcut to the iPad® Workplace... 115
Setting the remote operator startup application ... 117
Configuring the 800xA user profile for the remote... 119
Configure remote operator privileges for non-operation... 121
Table of Contents
Section 9 - 800xA Customization for iPad
®800xA iPad® Workplace ...125
Windows Configuration on Small Screens ...126
Changing the Title Bar Size...126
Section 10 - Configuring BAT54
Configuring BAT54 Wireless Access Points ...131Configuring Tool Installation ...131
Configuring BAT54 Wireless Access Points...134
Configuring BAT54-Rail Devices ...143
Entering the configuration mode of the device ...143
Specifying the Country ...144
Specifying Radio Channels ...145
Specifying Encryption...148
Authentication via RADIUS Configuration ...150
Setting the BAT54-Rail to router mode...151
Create WLAN1 Network Definition ...152
Creating DHCP Network ...154
Creating Firewall Service Object for RDP...156
Setting up the Firewall ...159
Applying Configuration Changes...161
Adding Access Points to RADIUS...161
Section 11 - Remote Desktop Session Host Server Routing
Section 12 - Certificates for Mobile Devices
Transferring the Certificate to the iPad®...167Section 13 - Remote Connection to 800xA
Installing the iPad® remote desktop application...173Connecting 800xA Remote Desktop Session Host Server ...174
About This User Manual
General
System 800xA is used for monitoring and controlling a process plant. This user manual describes the configuration of an Operator Workplace.
Information in this user manual is intended for the engineers of a process plant.
User Manual Conventions
Microsoft Windows conventions are normally used for the standard presentation of material when entering text, key sequences, prompts, messages, menu items, screen elements, etc.
Feature Pack
The Feature Pack content (including text, tables, and figures) included in this User Manual is distinguished from the existing content using the following two separators:
Any security measures described in this User Manual, for example, for user access, password security, network security, firewalls, virus protection, etc., represent possible steps that a user of an 800xA System may want to consider based on a risk assessment for a particular application and installation. This risk assessment, as well as the proper implementation, configuration, installation, operation, administration, and maintenance of all relevant security related equipment, software, and procedures, are the responsibility of the user of the 800xA System.
Warning, Caution, Information, and Tip Icons About This User Manual
Feature Pack Functionality
<Feature Pack Content>
Feature Pack functionality included in an existing table is indicated using a table footnote (*) :
*Feature Pack Functionality
Feature Pack functionality in an existing figure is indicated using callouts.
Unless noted, all other information in this User Manual applies to 800xA Systems with or without a Feature Pack installed.
Warning, Caution, Information, and Tip Icons
This User Manual includes Warning, Caution, and Information where appropriate to point out safety related or other important information. It also includes Tip to point out useful hints to the reader. The corresponding symbols should be interpreted as follows:
Although Warning hazards are related to personal injury, and Caution hazards are associated with equipment or property damage, it should be understood that operation of damaged equipment could, under certain operational conditions, result in degraded process performance leading to personal injury or death. Therefore, fully comply with all Warning and Caution notices.
Electrical warning icon indicates the presence of a hazard which could result in
electrical shock.
Warning icon indicates the presence of a hazard which could result in personal injury.
Caution icon indicates important information or warning related to the concept discussed in the text. It might indicate the presence of a hazard which could result in corruption of software or damage to equipment/property.
Information icon alerts the reader to pertinent facts and conditions.
Tip icon indicates advice on, for example, how to design your project or how to use a certain function
About This User Manual Terminology
Terminology
A complete and comprehensive list of terms is included in System 800xA System Guide Functional Description (3BSE038018*). The listing includes terms and definitions that apply to the 800xA System where the usage is different from commonly accepted industry standard definitions and definitions given in standard dictionaries such as Webster’s Dictionary of Computer Terms. Terms that uniquely apply to this User Manual are listed in the following table.
Term/Acronym Description
802.11 IEEE Standard to encourage inter operability among wireless networking equipment
802.1x IEEE Standard for an authentication framework for wireless LANs ACL Access Control List
AP Access Point
CA Certification Authority
EAP Extensible Authentication Protocol
FW Firewall
LAN Local Area Network MAC Media Access Control NPS Network Policy Server PKI Public Key Infrastructure
RADIUS Remote Authentication Dial-In User Service SSID Service Set Identifier
SSL Secure Socket Layer
TLS Transport Level Security (equivalent to SSL) WEP Wired Equivalent Privacy (802.11 basic encryption) Wi-Fi Wireless Fidelity
Released User Manuals and Release Notes About This User Manual
Released User Manuals and Release Notes
A complete list of all User Manuals and Release Notes applicable to System 800xA is provided in System 800xA Released User Manuals and Release Notes
(3BUA000263*).
System 800xA Released User Manuals and Release Notes (3BUA000263*) is updated each time a document is updated or a new document is released. It is in pdf format and is provided in the following ways:
• Included on the documentation media provided with the system and published to ABB SolutionsBank when released as part of a major or minor release, Service Pack, Feature Pack, or System Revision.
• Published to ABB SolutionsBank when a User Manual or Release Note is updated in between any of the release cycles listed in the first bullet.
WLAN Wireless Local Area Network WPA Wireless Protected Access
A product bulletin is published each time System 800xA Released User Manuals and Release Notes (3BUA000263*) is updated and published to ABB
SolutionsBank.
Section 1 Introduction
Integration of mobile technology in the automation and process control environment reduces cost, increases productivity of existing resources and improves operating efficiency. Utilizing standard technologies such as Microsoft's Remote Desktop Protocol (RDP), mobile devices can access the 800xA system over wireless networks. Application of Microsoft security patches should be applied to all nodes in the 800xA network.
It is highly recommended that ABB Qualified Security Updates are applied after they are available. Since the Remote Desktop Session servers will be exposed to the wireless networks, security patch updating is of higher importance.
In this guide, iPad® is used as the mobile device. This document provides a guideline that will assist in understanding the technologies used in WIFI deployment.
Mobile support for 800xA is not intended for remote over the internet operation of a production environment. It is intended for production environment mobility where operators and production staff can view the process. Any operation of the system without physical visual contact should be avoided. The iPad® should be dedicated to remote operation within the production environment and not be taken home or used in the office. There should also be no 3G/4G capabilities in the iPad®. Regulations should be in place which dictates that no usage of phone based hotspots is allowed in conjunction with the iPad®.
Due to the demanding requirements of industrial systems, it is highly
recommended that specialists in WIFI industrial deployments are consulted for planning and implementation of the wireless solution.
Architecture Section 1 Introduction
Architecture
An overview of the concepts involved in providing wireless access from a mobile device such as an iPad® to the 800xA system is shown in Figure 1. As an iPad® does not have a native remote desktop client, a third party application (Pocket Cloud Pro) is required. Wireless connectivity is provided by multiple wireless access points that also implements firewall and intrusion detection systems.
The technology described in this guide is part of the IEEE 802.1X standard. Protected Extensible Authentication Protocol (PEAP), which uses certificates, is used to establish connection between wireless devices and wireless networks. This requires a Certificate Authority (CA) server to be present in the network. To provide security authorization, at least one Network Policy Server (NPS) server is used. This provides Remote Authentication Dial-In User Service (RADIUS) authorization functionality. A separate network is used for the server side of the wireless network to minimize exposed Windows services.
The wireless access points are connected to one or more 800xA Remote Desktop Session Hosts (previously called Terminal Servers) which provide the login sessions for the remote desktop connection.
Due to the limited screen size, graphic displays will need to be engineered accordingly.
Section 1 Introduction Server System Requirements
Additional security measures must also be implemented to restrict who can log into the system, and that those users cannot operate equipment.
Server System Requirements
The expected functionality for the mobile access is that a user starts a remote session towards a Remote Desktop Session Host server. Only the 800xA workplace is to be presented with no desktop in the background when a remote desktop session has been established to a Remote Desktop Session Server through an iPad®. To achieve this, the system must be Windows Server 2012 R2 with Remote Desktop Services and be a system with a domain controller.
The requirements:
• Windows Server 2012 R2 • Active Directory based system
• Remote Desktop Session Host with Remote Desktop Services role • Remote Desktop Licensing
However, there are settings in the computer local user configuration which appears to provide the definition to run an application at logon, this does not work. The user settings must be defined in a domain.
The Remote Desktop Session Host (formally called Terminal Services) role must be installed before other applications could be installed. Addition and
Section 2 Concepts
This section describes the following: • Factory Coverage
• Service Set Identifier • Security
Factory Coverage
The coverage area is a major consideration for wireless implementation. Factory coverage is affected by structures, both moving and fixed, within the factory area. Interference from any machine that has electrostatic discharge may require additional routers to be located in the vicinity to provide access to strong signals.
Access point placement best practices
The following provides a list of basic best practices when planning the access point coverage.
• Consider the coverage areas required.
Manufacture specifications on range should be a guidance, but not the sole method for determining the layout of the wireless network. However, it is possible to place wireless routers at different locations to assess the coverage requirements. It is highly recommended to have a professional survey done for a comprehensive understanding of the coverage requirements. The survey should consider the changing conditions that may interfere with the wireless coverage in the factory. For example, when the production stock increases, during
Service Set Identifier Section 2 Concepts
• Consider the areas that should not have wireless access. For example, beyond the walls of the building
• Access points with overlapping signals should have different radio channels. • Potential overlapping region should be considered in all directions, not just the
current floor level.
• The physical potential signal blockages.
For example, pillars, walls, steel beams, ventilation ducts, metal cabinets. • Consider signals that has to go diagonally through a wall will experience a
higher attenuation due to the thicker signal path.
• How will the environment change over time. Stock build up may interfere with signal strength.
• What are the potential electrical sources of interference.
For example, arc welders, medical equipment, eclectic motors, wireless video cameras
Service Set Identifier
Service Set Identifier (SSID) is used to differentiate one wireless LAN (WLAN) from another. To enable a mobile device to connect to the same WLAN through different wireless routers, each wireless router is set up with the same SSID. The wireless routers are within the radio distance from each other. Each router should have a different channel configured.
Section 2 Concepts Security
Security
The security of a wireless system is dependent on the configuration of each of the components in the WLAN. This includes the physical configuration, the
configuration of the devices and access points, and the subsequent monitoring of the system.
Understand the range of the wireless network. Considering that the
wireless network is a potential attack point for hackers, it is important to understand where the wireless signals extend beyond the factory walls. These locations provide an opportunity for hackers to attempt to break into the network.
Use highest security available. The security level should be at least WPA2 or
higher. WEP security is easier to hack. When selecting a secure key, do not use dictionary words, and use a mixture of letters, numbers, and characters such as "#%&". Many hacking techniques make initial attempts using a dictionary of common passwords as an easy entry into the system.
Ensure that all default passwords are changed. Best practices are:
• Do not suppress SSID broadcast. This information can be obtained by more sophisticated hackers. Clients must probe for SSIDs which causes additional risks.
• Do not use MAC filtering. Hackers can easily modify the MAC address of their wireless devices to match allowed addresses.
Section 3 Wireless Components
This section describes the following: • Wireless Components
• Wireless Configuration
Wireless Components
Implementing a wireless solution should always have a strong focus on security. This guide describes a configuration that keeps the important nodes such as the domain controller from being on the physical network connected to the wireless access points. Hence, a separate server is used for the CA and NPS functionality. However, it is possible to have a primary and a backup NPS server, the initial support for mobile devices focuses on a single NPS server. There are many different methods for the implementation of security. The method described in this guide is based on a Certificate Authority and RADIUS server. These utilize existing Windows roles which reduces the requirements for additional third party systems.
Wireless Components Section 3 Wireless Components
Figure 3 presents these main components showing their communication dependency.
Establishing connection from the iPad® to the wireless access point is based WPA encryption and a certificate that has been generated in the Certificate Authority, and has previously been installed into the iPad®. Furthermore, RADIUS is used for the authentication where the user must provide domain credentials to establish
connection. This provides a central method to remove the access to a lost iPad® by revoking the certificate or removing a user who should no longer have access to the system.
Multiple layers of defense should be used where possible. A separate network is used for the connection from the access points to the Remote Desktop Session Host servers. Both the access point and the Remote Desktop Session Host server have firewalls active. In the case of the BAT54 access point, this requires that the internal connection between wireless and physical network is in router mode. This intern requires that the DHCP is active in the access point, and that routing is setup in the Remote Desktop Session Host server.
Section 3 Wireless Components Wireless Configuration
Whilst the Remote Desktop Session Host server firewall will be setup using the 800xA System Installer, the access point is setup to only allow remote desktop protocol communication. In addition to the firewall, the BAT54 also contains an intrusion detection system. An intrusion attempt is typically scanning ports to determine potential vectors of attack. The intrusion detection system can be configured to detect the port scan, block the source address, and send an alert. To provide remote authentication, a separate server is used for running the Certificate Authority (CA) and NPS (RADIUS - Remote Authentication Dial In Service). Whilst these functionalities could have been added to the domain
controller, this would have exposed the domain controller to the wireless networks. This provides the link between the mobile device and the domain controller authentication. Having the CA and the NPS on the same server reduces complexity in maintenance of the certificates. In the access point, the RADIUS server address is added to enable its usage. Encryption will be set to WPA and use the Extension Authentication Protocol (EAP) - Protected EAP (PEAP). This allows the use of certificates and login using usernames and passwords defined in the Active Directory on the Windows Server to authenticate the mobile device onto the wireless network.
Wireless Configuration
To assist in understanding the configuration of the components that need to be installed and configured, the following diagram provides an example of an
implementation that will be used for the subsequent descriptions in this user guide. Practical implementations may see the requirement for utilizing VLANs to perform logical separation of network functionality.
Wireless Configuration Section 3 Wireless Components
Section 4 Remote Desktop Sessions
This section describes the Remote Desktop Session (RDS) Server Licensing, RDS Server Licensing Configuration, RDS Server Role, and the RDS Server User Configuration.
RDS Host Server Licensing
By default, Windows Server allows to two administrative remote desktop session login. Beyond this, additional Remote Desktop CAL licenses are required. These are added to the Remote Desktop Session licensing server. In the example in this document, the Remote Desktop Licensing server is added to the domain controller.
Installation
Execute the following steps to add host server licensing role in the domain controller:
Installation Section 4 Remote Desktop Sessions
2. Select Roles > Add Roles and features.
3. Before You Begin window appears. Click Next.
4. Select Role-based or feature-based installation and click Next.
Figure 5. Accessing the Add Roles functionality
Section 4 Remote Desktop Sessions Installation
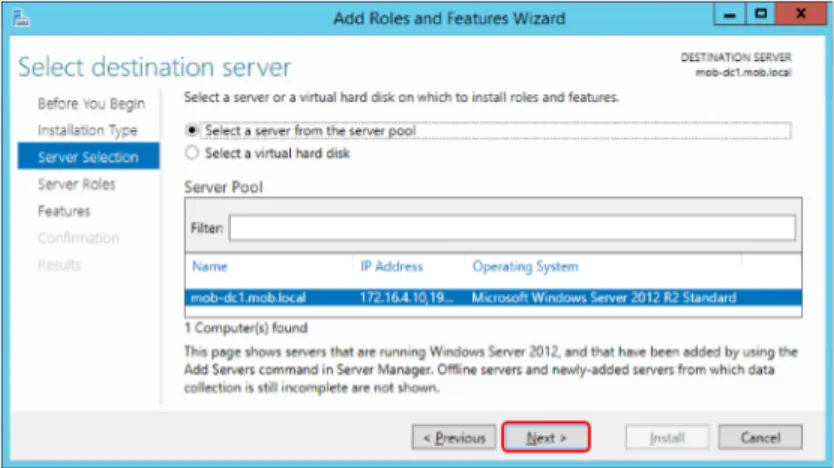
5. At the Select destination server, select the domain controller, and click Next.
Figure 7. Selecting Installation Type
Installation Section 4 Remote Desktop Sessions
6. Select Remote Desktop Services as the additional role and click Next.
7. Do not change the features. Click Next.
Figure 9. Adding the Remote Desktop Services role
Section 4 Remote Desktop Sessions Installation
8. Remote Desktop Services window appears. Click Next.
9. Select Remote Desktop Licensing role, then the Add Features at the suggested additional features. Click Next.
Figure 11. Introduction to Remote Desktop Services
Installation Section 4 Remote Desktop Sessions
10. Press Install in the Confirmation Window.
11. After the successful installation, click Close and restart the domain controller.
Figure 13. Confirmation to start adding additional roles and features
Section 4 Remote Desktop Sessions Activating the Licensing Server and Adding Licenses
Activating the Licensing Server and Adding Licenses
Perform the following tasks to configure the Terminal Server Licensing. 1. Activate the licensing server.
2. Add the purchased licenses.
The Remote Desktop Licensing Manager can be accessed through Control Panel > Administrative Tools > Remote Desktop Services.
Activating the License Server
Execute the following steps to activate the license server:
1. Initially, the Remote Desktop Session Host Server Licensing has the status Not activated. Right-click the server and select Activate Server.
Activating the Licensing Server and Adding Licenses Section 4 Remote Desktop Sessions
2. Welcome to the Activate Server Wizard window appears. Click Next.
Figure 16. Activating the RD license server
Section 4 Remote Desktop Sessions Activating the Licensing Server and Adding Licenses
3. The following example uses Automatic connection since internet connection was available. Where this is not practicable, there is an option for activation over the telephone. Click Next.
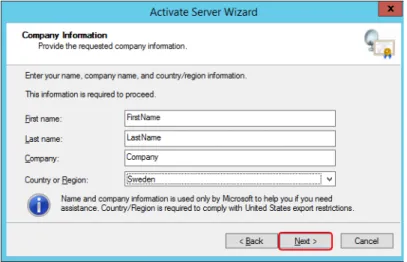
4. Enter name, company, and country details for the administrator of the system and click Next.
f
Figure 18. Selecting Automatic connection (usually via internet) to activate the server
Activating the Licensing Server and Adding Licenses Section 4 Remote Desktop Sessions
Figure 19. Providing identification details for the activation of the RD licensing server
Section 4 Remote Desktop Sessions Activating the Licensing Server and Adding Licenses
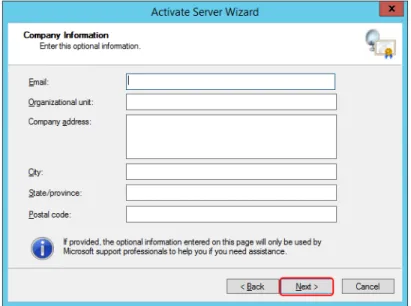
5. Enter optional information, if required, and click Next.
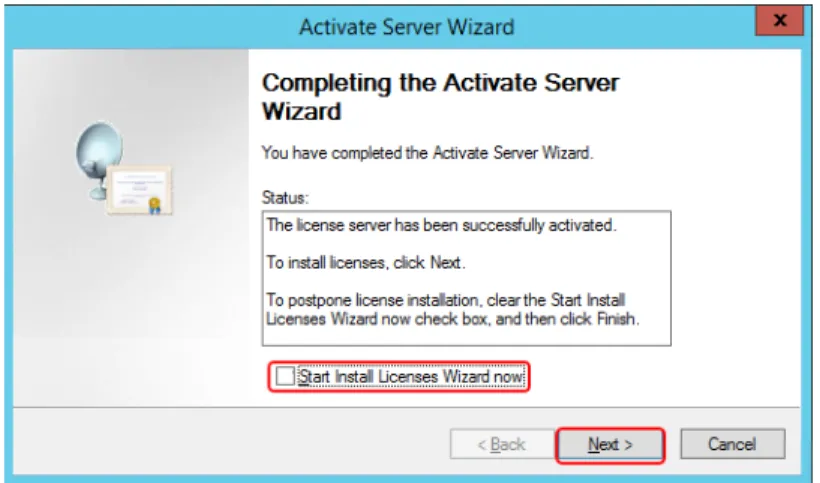
6. In the Completing the Activate Server Wizard window, remove the selection of Start Install Licenses Wizard now, and click Finish.
Figure 20. Providing optional information for the activation of the RD licensing server
Activating the Licensing Server and Adding Licenses Section 4 Remote Desktop Sessions
Reviewing Configuration
Execute the following steps:
1. After activating the licensing service, right-click the server and select Review Configuration to review the configuration.
Figure 21. Completion of the activation of the RD licensing server
Section 4 Remote Desktop Sessions Activating the Licensing Server and Adding Licenses
If there is any issue with membership of the license server, click Add to Group.
2. At the request to add the computer account for the license server, click Continue.
3. Click OK in the Confirmation window.
Figure 23. Reviewing issues with the RD license server
Figure 24. Adding the computer account to the Terminal Server License Server group
Activating the Licensing Server and Adding Licenses Section 4 Remote Desktop Sessions
4. Restart the RD Licensing Service to update the RD License Service status.
Adding RDS Server License
Execute the following steps to add the Remote Desktop Session Host Server license: 1. In the RD Licensing Manager,right-click the licensing server, and select
Install Licenses from the context menu.
Figure 25. Confirmation that the computer account is added to the Terminal Server License Server group
Section 4 Remote Desktop Sessions Activating the Licensing Server and Adding Licenses
2. Welcome to the Install Licenses Wizard window appears. Click Next.
Figure 27. Installing licenses into the RD licensing server
Activating the Licensing Server and Adding Licenses Section 4 Remote Desktop Sessions
3. Select the appropriate license program and click Next.
Section 4 Remote Desktop Sessions Activating the Licensing Server and Adding Licenses
4. Add the purchased licenses and click Next to install the licenses.
5. Competing the Install Licenses Wizard window appears. Click Finish.
Figure 30. Entering the purchased RD license keys
RDS Host Server Role Section 4 Remote Desktop Sessions
The additional licenses should now be present in the RD Licensing Manager.
RDS Host Server Role
The Remote Desktop Session role supports remote desktop sessions. Initially, it is installed in the first Remote Desktop Session Host. Additional Remote Desktop Session servers are then added to make a collection of Remote Desktop Session Hosts.
Adding the Remote Desktop Session Host Server Role
Execute the following steps to add the Remote Desktop Session Host Server Role:
Section 4 Remote Desktop Sessions Adding the Remote Desktop Session Host Server Role
1. Logon to the server that will be the Remote Desktop Session Host Server. Start the Server Manager and selectRoles - Add Rolesand features.
2. Before You Begin window appears. Click Next.
3. At the Select Installation Type, select Remote Desktop Services Installation and click Next.
Figure 33. Accessing the addition of roles to the server
Adding the Remote Desktop Session Host Server Role Section 4 Remote Desktop Sessions
4. At the Select Deployment Type, select Standard Deployment and click Next.
5. At the Select Deployment Scenario, select Session-based desktop deployment and click Next.
Figure 35. Selecting the Installation Type
Section 4 Remote Desktop Sessions Adding the Remote Desktop Session Host Server Role
6. Review the changes to be done and click Next.
7. At least one node must be the RD Connection Broker server. In this example, the first Remote Desktop Session host will be configured to be the RD
Figure 37. Selecting the Deployment Scenario
Adding the Remote Desktop Session Host Server Role Section 4 Remote Desktop Sessions
Connection Broker server. Add the server to be RD Connection Broker server and click Next.
8. At least one node needs to be the RD Web Access server. In this example, the first Remote Desktop Session host will be configured to be the RD Web Access server. Add the server to be RD Web Access server and click Next.
Section 4 Remote Desktop Sessions Adding the Remote Desktop Session Host Server Role
9. Add the server to be RD Session Host server and click Next.
10. Select the Restart the destination server automatically if required check box and click Deploy.
Figure 40. Specifying the RD Web Access Server
Adding the Remote Desktop Session Host Server Role Section 4 Remote Desktop Sessions
11. After restarting the computer, start the Server Manager to view the progress. Click Close.
Figure 42. Deploying the Configuration
Section 4 Remote Desktop Sessions Adding Additional Remote Desktop Session Hosts
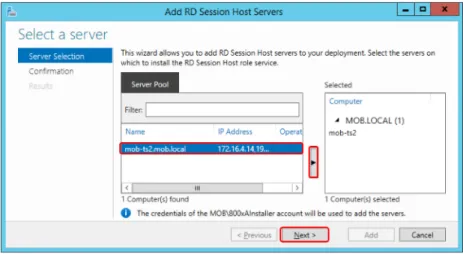
Adding Additional Remote Desktop Session Hosts
Additional Remote Desktop Session Hosts can be added from the first Remote Desktop Session Host. This is done in two stages:
1. The additional Remote Desktop Server is added to the servers to manage, 2. The additional Remote Desktop Server is added as an additional Remote
Desktop Session Host. Execute the following steps:
1. Add the additional server to be the additional Remote Desktop Session Host by starting the Server Manager, and selecting Add other servers to manage.
2. Add the computers that are to become additional Remote Desktop Session Hosts, and click OK.
Adding Additional Remote Desktop Session Hosts Section 4 Remote Desktop Sessions
3. Add the other server to the RD Session Host.
4. Select the additional servers that are to become Remote Desktop Session Host Servers, and click Next.
Figure 45. Adding additional servers to manage
Section 4 Remote Desktop Sessions Adding Additional Remote Desktop Session Hosts
Setting up the License Server Section 4 Remote Desktop Sessions
5. Click Add to confirm the addition of the server.
a
6. When the operation is succeeded, click Close.
a
Setting up the License Server
The RD License Server must be defined in the configuration to access licenses for remote desktop sessions.
Execute the following steps to setup the license server:
Figure 48. Confirmation to add additional server
Section 4 Remote Desktop Sessions Setting up the License Server
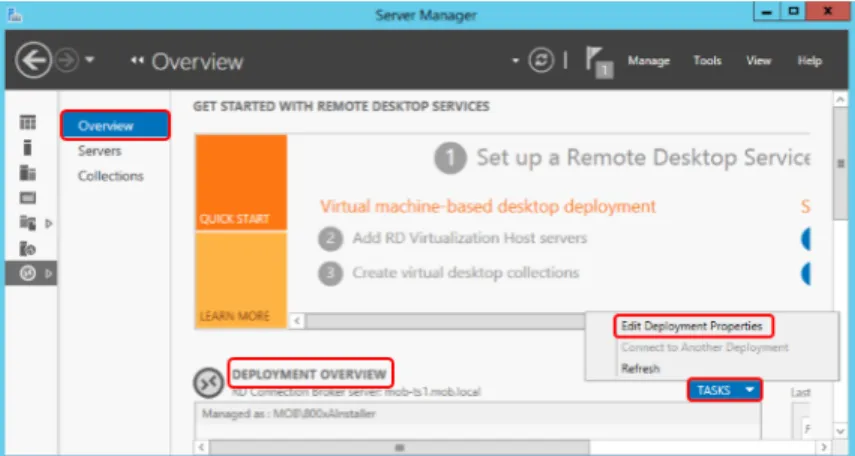
1. In the Server Manager - Remote Desktop Services, edit the deployment properties.
a
2. Select RD Licensing and specify the licensing according to the type of RD License CALs purchased. Type in the computer name of the RD license server, click Add and then click Apply and OK.
Creating a Remote Desktop User Group Section 4 Remote Desktop Sessions
a
Creating a Remote Desktop User Group
While there are Remote Desktop Users in the active directory configuration it may be preferred not to use this as it will grant remote logon to other servers.
In the domain controller, use the Active Directory Users and Computers interface to create a new security group for the purpose of assigning remote operator privileges. In the domain controller, create a new group for remote access.
Section 4 Remote Desktop Sessions Creating a Remote Desktop User Group
a
Creating a Remote User Section 4 Remote Desktop Sessions
Creating a Remote User
Execute the following steps to set up the first remote user:
1. In the domain controller, use the Active Directory Users and Computers interface to create a new user.
2. To provide security access for remote desktop login, make the user a member of the remote desktop security group. The user is also added to the
IndustrialITUser group for access to 800xA and to the Users group to allow local login.
Section 4 Remote Desktop Sessions Creating a New Collection
Creating a New Collection
A collection is one or more Remote Desktop Session Hosts and provides control over the remote desktop sessions such as user group access control and load balancing.
To create a new collection:
1. Select the Collections in the Server Manager and select Create Session Collection from the Tasks.
Creating a New Collection Section 4 Remote Desktop Sessions
2. At the Before you beginwindow, click Next.
3. Provide a name and description for the new collection and click Next.
Figure 55. Creating a new Remote Desktop Session Collection
Section 4 Remote Desktop Sessions Creating a New Collection
Creating a New Collection Section 4 Remote Desktop Sessions
4. Add the Remote Desktop Session Hosts to the new collection and click Next.
5. Specify the user groups which are allowed to connect to the collection. In the Default Wizard configuration, Domain Users is added. To have a tighter limit on user access, use the group created specifically for remote access. In this example, the IndustrialITRemote user group.
Section 4 Remote Desktop Sessions Creating a New Collection
6. Remove the selection of Enable user profile disks check box and click Next.
7. At the Confirm Selections window, review the configuration and click Create.
Figure 59. Specifying the user groups to have access to the remote desktop session collection
Creating a New Collection Section 4 Remote Desktop Sessions
8. Click Close after the changes are successfully completed.
Figure 61. Confirmation of changes to be done
Section 4 Remote Desktop Sessions Limiting loading of Remote Desktop Session - Load balancing
Limiting loading of Remote Desktop Session - Load balancing
Load balancing is a function of the Remote Desktop Session Collection that enables the control of the maximum number of sessions that can be running on a Remote Desktop Session Host.To access the Remote Desktop Session load balancing:
1. Select the collection and select Edit Properties from Tasks.
2. Select the Load Balancing option and specify the Session Limit. In the example below, each Remote Desktop Session Host has been limited to 2 sessions. If a user is logged into the server (that is, not in a remote session), this is still counted as a session. This value should be set to the corresponding maximum users for each RD Session Host Server.
Testing Load Balancing Section 4 Remote Desktop Sessions
Any of the Remote Desktop Session Host server IP addresses can be used to make a connection. If the designated server session limit is reached, another available server in the collection will be used. If there are no more sessions available, an error message will be presented.
Testing Load Balancing
It is essential to confirm that the load balancing is working as intended. This is done by setting an initial low maximum user count on the Remote Desktop Session Servers and attempting to connect more users than the maximum. This can be done by making multiple remote desktop sessions from a client to the Remote Desktop Session servers using different users for each session.
Figure 64. Configuring load balancing for the Remote Desktop Session Collection
The user logged into the console is counted as one user. In the following example, the maximum user count is set to 2, there is a user logged into the console (800xAInstaller) and a remote desktop session has been started using the rduser1 user.
Section 4 Remote Desktop Sessions Testing Load Balancing
When an additional user is logged in (rduser2), this user is redirected to another remote desktop session host in the same collection. In the example below, mob-ts2.
Figure 65. One remote desktop session user in addition to the locally logged in user in Remote Desktop Session Host Server 1
Testing Load Balancing Section 4 Remote Desktop Sessions
If there are no available Remote Desktop Session Host Servers, that is, all the session limits are reached, an error box will be presented indicating that was a problem connecting to the remote computer:
Figure 66. A second remote desktop session user is redirected to an available remote desktop session host server
Figure 67. Attempting to establish a remote desktop session where session limits have been reached
Section 4 Remote Desktop Sessions Enabling Audio
Enabling Audio
The default installation of Windows Server 2012 R2 does not enable audio. Audio is required for Remote Desktop Sessions for audible alarms. The system tray in the Remote Desktop Session server shows the current state of the audio support. In
Figure 68, audio has not been enabled yet:
To enable audio, select Services from the Computer Manager. Right-click the Windows Audio service and select Properties.
Set the Startup type to Automatic, click Start and then click OK.
Figure 68. Audio not enabled in Window Server 2012R2
Enabling Audio Section 4 Remote Desktop Sessions
Now, the speaker in the system tray indicates that the audio is enabled.
Figure 70. Setting the Windows Audio service to Automatic and starting the service
Section 5 Certificate Authority
The certificate authority is responsible for providing certificates which are used in the authentication of the wireless device to the wireless access point. As it is expected to have limited number of mobile devices used in conjunction with the 800xA system, it is preferable to have one certificate per device. This provides a more concise control over device access to the wireless networks.
Installing the Certificate Authority
Execute the following steps:
1. To add the certificate authority role, login to the radius server and start the Server Manager. Select Add Roles and Features. .
Installing the Certificate Authority Section 5 Certificate Authority
2. Before You Begin window appears. Click Next.
3. Select Role-based or feature-based installation and click Next.
Figure 73. Before you begin information message
Section 5 Certificate Authority Installing the Certificate Authority
4. Select the radius server and click Next.
5. At the Select Server Roles window, select the Active Directory Certificate Services role. This will call a prompt to add additional features. Select the Include management tools check box and click Add Features.
Installing the Certificate Authority Section 5 Certificate Authority
6. In the Select Features window, click Next.
7. Click Next at the information window.
Figure 76. Selecting to add the Active Directory Certificate Services role and required features
Section 5 Certificate Authority Installing the Certificate Authority
8. At the Select role services window, select the Certification Authority role and click Next.
9. Review the configuration changes to be done and click Install.
Figure 78. Information window on Active Directory Certificate Services
Installing the Certificate Authority Section 5 Certificate Authority
10. Click Close after completing the installation.
Figure 80. Reviewing configuration changes before installation
Section 5 Certificate Authority Configuring the Certificate Authority
Configuring the Certificate Authority
After installing the Certificate Authority, it must be configured to setup the base mode of operation. This requirement will be highlighted in the alert in the Server Manage.
Click the alert in the Server Manager, and select the Configure Active Directory Certificate Services on this node.
11. Provide the required administrative credentials to configure the node and click Next.
Configuring the Certificate Authority Section 5 Certificate Authority
12. Select Certification Authority role to configure and click Next.
Section 5 Certificate Authority Configuring the Certificate Authority
13. At the Setup Type window, keep the setting as Enterprise CA and click Next.
Figure 84. Selecting the Certification Authority to configure
Configuring the Certificate Authority Section 5 Certificate Authority
14. Specify CA Type window appears. Leave the setting as Root CA and click Next.
Section 5 Certificate Authority Configuring the Certificate Authority
15. Select Create a new private key when requested to set up a private key and click Next.
Configuring the Certificate Authority Section 5 Certificate Authority
16. Leave the defaults when configuring the cryptography for CA, and click Next.
Section 5 Certificate Authority Configuring the Certificate Authority
17. Leave the default suggestion for the common name for the CA and click Next.
18. Enter a validity period for the certificate generated by the CA and click Next.
Figure 89. Providing a common name for the CA
Configuring the Certificate Authority Section 5 Certificate Authority
19. Leave the certificate database settings as default and click Next.
Section 5 Certificate Authority Configuring the Certificate Authority
20. At the confirmation window, click Configure.
21. After successful completion of configuration changes, click Close.
Configuring the Certificate Authority Section 5 Certificate Authority
Section 6 Creating Certificates
Each device should have its own certificate. When the NPS server configuration is created, one certificate is used for the first client access.
Creating a new certificate for the device
Execute the following to create a certificate for a device:
1. Logon to the node where the Certificate Authority has been installed and run the mmc command.
Creating a new certificate for the device Section 6 Creating Certificates
2. Handling certificates is done through a Snap-in. Select File > Add/Remove Snap-in.
3. From the available snap-ins, select the Certificates snap-in and then click Add.
Figure 95. Adding the Certificates snap-in
Section 6 Creating Certificates Creating a new certificate for the device
4. Select to manage certificates for the computer and click Next.
5. Select to manage certificates for the local computer and click Finish.
Figure 97. Selecting to manage certificates for the Computer Account
Creating a new certificate for the device Section 6 Creating Certificates
6. Click OK.
7. To create a new certificate, navigate to the Console Root > Certificates > Personal > Certificates, right-click the Certificates item and select All Tasks > Request New Certificate.
Figure 99. Certificates snap-in added to mcc
Section 6 Creating Certificates Creating a new certificate for the device
8. At the Before you begin window, click Next.
9. At the Select Certificate Enrollment Policy window, click Next.
Figure 101. Before you create a certificate window
Creating a new certificate for the device Section 6 Creating Certificates
10. Select Computer at the Request Certificates window and click Enroll.
11. At the confirmation that the new certificate has been produced, click Finish.
Figure 103. Enroll the new certificate
Section 6 Creating Certificates Export Certificates
12. Use the Properties on the new certificate to change the friendly name to identify the intended device.
Export Certificates
To export the certificate:
1. Login to the authorization server and access the certificates through the mmc. Navigate to the Console Root > Certificates > Personal > Certificates, and right-click the device. Note that the previously defined friendly name assists in selecting the correct device. From the context menu, select All Tasks > Export.
Export Certificates Section 6 Creating Certificates
2. In the Certificate Export Wizard, click Next.
3. Click Next at the Export Private Key window.
Figure 106. Exporting the Certificate for a device
Section 6 Creating Certificates Export Certificates
Export Certificates Section 6 Creating Certificates
4. Use the default export file format and click Next.
5. Provide a file name for the certificate and click Next.
Figure 109. Setting the export file format
Section 6 Creating Certificates Export Certificates
6. Click Finish to complete the export operation.
7. Click OK to acknowledge the successful completion.
Figure 111. Completing the certificate export wizard
Section 7 Configuring NPS (RADIUS)
This section describes the procedure to add and configure the NPS (RADIUS).
Adding NPS (RADIUS)
In Windows Server 2012 R2, the RADIUS functionality is included in the Network Policy and Access Services role. This must be added to the authorization servers. Execute the following steps to add the NPS (RADIUS):
1. Logon to the authorization server and start the Server Manager. Select Add roles and features.
Adding NPS (RADIUS) Section 7 Configuring NPS (RADIUS)
2. In Before You Begin wizard, click Next.
3. Select Role-based or feature-based installation and click Next.
Figure 114. Before you add the roles information
Section 7 Configuring NPS (RADIUS) Adding NPS (RADIUS)
4. Select the authorization server and click Next.
5. In Select Server Roles wizard, select the Network Policy and Access Services check box and click Next.
Figure 116. Selecting authorization server for the NPS (RADIUS) role
Adding NPS (RADIUS) Section 7 Configuring NPS (RADIUS)
6. In the Select Features window, click Next.
7. In Network Policy and Access Services wizard, review the information on the policy and click Next.
Figure 118. Selecting features
Section 7 Configuring NPS (RADIUS) Adding NPS (RADIUS)
8. In Select Role Services wizard, select the Network Policy Server check box to access the Remote Desktop Session Host servers. Click Next.
9. In Confirm Installation Selections wizard, click Install to begin the installation of the NPS role.
Figure 120. Required option for the Network Policy Server
Registering the server with Active Directory Section 7 Configuring NPS (RADIUS)
10. In the Installation Results wizard, click Close.
Registering the server with Active Directory
Initially the NPS server has to be registered with the Active Directory. Execute the following steps to register the NPS Server.
1. In Server Manager > NAP, right-click the NPS Server and select Network Policy Server.
Section 7 Configuring NPS (RADIUS) Registering the server with Active Directory
2. Right-click the NPS object and select Register server in Active Directory from the context menu.
3. Click OK to confirm that the changes to read users dial-in properties are to be done.
Figure 123. Accessing the Network Policy Server interface
Configuring NPS (RADIUS) Section 7 Configuring NPS (RADIUS)
This prompts for a confirmation. Click OK to proceed.
Configuring NPS (RADIUS)
After the installation of the NPS, the NPS server must be configured as a RADIUS server.
This will, for example specify the type of encryption to use. The initial
configuration is in the form of a getting started guide. Once completed, the resulting configuration can be reviewed and modified as required.
Execute the following steps to configure the NPS (RADIUS):
Figure 125. Request to authorize the computer to read users' dial-in properties
Figure 126. Confirmation that the computer is authorized to read users' dial-in properties
Section 7 Configuring NPS (RADIUS) Configuring NPS (RADIUS)
1. Access the NPS configuration (see Step 1). The Getting Started dialog appears where the Standard Configuration should be set to RADIUS server for 802.1X Wireless or Wired Connection. Then select Configure 802.1X.
2. In the Configure 802.1X dialog, select Secure Wireless Connections. Enter the name of the policy and click Next.
Configuring NPS (RADIUS) Section 7 Configuring NPS (RADIUS)
Section 7 Configuring NPS (RADIUS) Configuring NPS (RADIUS)
3. The next window provides the ability to add wireless access points. In this guide, the clients will be added at a later stage. Click Next to continue.
4. In Type, select Microsoft Protected EAP (PEAP) and click Configure. It helps to confirm the authentication method. The certificates will be setup at a later stage.
Figure 129. Configuration window for adding clients such as wireless access points
Configuring NPS (RADIUS) Section 7 Configuring NPS (RADIUS)
5. With the certificate in place, the Edit Protected EAP Properties dialog appears.
Click OK to return to Configure an Authentication Methodwindow (see
Figure 130)
.
Click Next.6. The Specify User Groups wizard is used to restrict the authentication to specific User Groups. It is recommended to restrict the users to
non-administrative user groups. In the following example, the Groups will be left blank. Click Next.
If a warning appears with a message that there is no available certificate, either a CA Authority has been installed on another node or it has not been installed on the Domain Controller. Multi-node CA, NPS, DC are not in the scope of this user guide.
Section 7 Configuring NPS (RADIUS) Configuring NPS (RADIUS)
7. The Configure Traffic Controls wizard appears. This is used to configure the traffic control attributes. In this example, no adjustments are made. Click Next.
Figure 132. Restriction of access based on User Groups
Starting and Stopping the NPS Service Section 7 Configuring NPS (RADIUS)
8. Click Finish to complete the configuration.
Starting and Stopping the NPS Service
After completing the configuration, stop and start the NPS Service to ensure that the configuration is applied to the NPS Server.
To stop the NPS Service, right-click the NPS object and select Stop NPS Service from the context menu.
Section 7 Configuring NPS (RADIUS) Starting and Stopping the NPS Service
To start the NPS Service, right-click the NPS object and select Start NPS Service from the context menu.
Starting and Stopping the NPS Service Section 7 Configuring NPS (RADIUS)
Section 8 Remote Desktop Session Host
Server Configuration
The goal for the Remote User Configuration is to provide a configuration where the remote operator logs on to the 800xA system and is presented only with an 800xA workplace. When the workplace is closed, the remote desktop session is
automatically closed.
If the remote operator disconnects from the session, reconnecting to the system presents the same remote desktop session.
Note that automatic closing of remote desktop session can be configured in the Remote Desktop Session Host server. It may be desirable to set this to a time that allows movement between production areas without closing the session.
Whilst remote desktop log on may be granted to an existing user, the configuration described here assumes that a separate user is created for remote logon to enable the remote user privileges to be more restrictive, that is, monitor the process, but not to operate it.
Following is the procedure to set up the first remote user: 1. Create a remote user.
2. Create a Remote Operators security group.
3. Add the remote operator to the Remote Operators and IndustrialITUser group. 4. Add the remote operator to the 800xA system.
5. Add the Remote Operators group to the Remote Desktop Session Host Server Remote Desktop Host Configuration security.
6. Add the Remote Operators group to the local policy of the Remote Desktop Session Host Server for the Allow log on locally, and Allow log on through Remote Desktop Services.
Section 8 Remote Desktop Session Host Server Configuration
7. Restart the Remote Desktop Session Host server.
8. Test log on to the remote operator through the Windows remote desktop client. 9. Create a desktop shortcut to the iPad® Workplace.
10. Use the startup program definition from the shortcut to setup the environment startup program for the remote user.
11. Configure the 800xA User profile for the remote user to use the iPad® Operator workplace in Operator workplace mode.
12. Configure remote operator privileges for non-operation.
13. Test that remote desktop log on of the remote operator provides a full screen operator workplace with no desktop.
Section 8 Remote Desktop Session Host Server Configuration Adding the remote operator to
Adding the remote operator to 800xA
Log on to the Aspect Server, and use the 800xA Configuration Wizard to add the remote operator account to the 800xA system. Make this account a member of Everyone, and Operators.
Testing Remote Log on
At this stage it should be possible to use a Windows workstation or server to start a remote desktop session to the Remote Desktop Session Host server using the remote operator account.
Create a desktop shortcut to the iPad
®
Workplace
After opening the remote desktop session, it is beneficial for the user configuration to place a shortcut to the iPad® Workplace (assuming that this is required workplace for the remote operator) in the desktop.
Create a desktop shortcut to the iPad® Workplace Section 8 Remote Desktop Session Host Server
Start the 800xA Workplace application, select the workplace required, and click Create Desktop Shortcut.
Section 8 Remote Desktop Session Host Server Configuration Setting the remote operator startup
This creates a shortcut on the desktop.
Setting the remote operator startup application
To ensure that the remote operator has access only to the workplace, the workplace should be defined in the environment settings of the remote user.
To determine the command line for the workplace, right-click the workplace desktop icon and select Properties.
Figure 139. The 800xA iPad® Operator Workplace desktop icon
Setting the remote operator startup application Section 8 Remote Desktop Session Host Server
Copy the Application Target line. As this must be entered in the Domain Controller, the target definition can be copied into a text file that will then be copied to the Domain Controller.
Log on to the domain controller, start the Active Directory Users and Computers program, double-click the remote operator account, select the Environment tab, select the Start the following program at logon check box, and paste in the target obtained through the desktop shortcut as in Figure 141.
Section 8 Remote Desktop Session Host Server Configuration Configuring the 800xA user profile
Configuring the 800xA user profile for the remote
The remote user should be configured in 800xA for the correct workplace, and that the workplace should be in Operator mode.
Log on to the aspect server, start the engineering, and access the Workplace Profile Values for the remote operator. Set the Default Workplace to the iPad® Operator Workplace.
Figure 142. Updating the remote operator user to only start the iPad® Operator Workplace at log on
Configuring the 800xA user profile for the remote Section 8 Remote Desktop Session Host Server
Configure the Workplace Mode to be in Operator Workplace Mode.
Figure 143. Setting the remote operator Default Workplace
Section 8 Remote Desktop Session Host Server ConfigurationConfigure remote operator privileges
Configure remote operator privileges for non-operation
While mobile access to the production system provides many benefits, the risk to accidental operation of the system must be minimized. Mobile devices such as iPads, are easy to pick up in one hand and perform unintended actions. To minimize this risk, the security definitions in 800xA should be defined to prevent operation of the system by the remote operator.
One example of security restriction, is to place a Security Definition aspect on the Control Network base and configure it to deny access to the remote operator:
While this allows the remote operator to view graphic displays and faceplates, the buttons on the faceplate will be disabled.
Figure 145. Placing a Security Definition on the Control Network to restrict operations
Test the remote desktop log on of the remote operator Section 8 Remote Desktop Session Host
Test the remote desktop log on of the remote operator
To test the configuration, use a Windows workstation or server and the remote desktop client to open a session to the Remote Desktop Session Host Server. When logged on, only the 800xA workplace should be present:
Section 8 Remote Desktop Session Host Server Configuration Test the remote desktop log on of
Closing the workplace should end the remote desktop session.