SSH for OpenVMS
Administration and User’s Guide
April 2007This manual provides the system manager with the procedures for installing, managing, and using the SSH for OpenVMS family of software products.
Revision/Update: This is a revised manual.
Operating System/Version: VAX/VMS V5.5-2, OpenVMS VAX V6.2 and higher OpenVMS Alpha V6.2 and higher
OpenVMS I64 8.2 and higher
UCX Version: V4.0 ECO 5 and later
TCP/IP Services Version: V5.0 and later
Software Version: 2.3
Process Software
Framingham, Massachusetts USA
any errors that may appear in this document.
Use, duplication, or disclosure by the U.S. Government is subject to restrictions as set forth in subparagraph (c)(1)(ii) of the Rights in Technical Data and Computer Software clause at DFARS 252.227-7013.
The following third-party software may be included with your product and will be subject to the software license agreement.
RES_RANDOM.C. Copyright © 1997 by Niels Provos <[email protected]> All rights reserved. Redistribution and use in source and binary forms, with or without modification, are permitted provided that the following conditions are met:
1. Redistributions of source code must retain the above copyright notice, this list of conditions and the following disclaimer.
2. Redistributions in binary form must reproduce the above copyright notice, this list of conditions and the following disclaimer in the documentation and/or other materials provided with the distribution.
3. All advertising materials mentioning features or use of this software must display the following acknowledgement: This product includes software developed by Niels Provos.
4. The name of the author may not be used to endorse or promote products derived from this software without specific prior written permission.
Copyright © 1990 by John Robert LoVerso. All rights reserved. Redistribution and use in source and binary forms are permitted provided that the above copyright notice and this paragraph are duplicated in all such forms and that any documentation, advertising materials, and other materials related to such distribution and use acknowledge that the software was developed by John Robert LoVerso.
Kerberos. Copyright © 1989, DES.C and PCBC_ENCRYPT.C Copyright © 1985, 1986, 1987, 1988 by Massachusetts Institute of Technology. Export of this software from the United States of America is assumed to require a specific license from the United States Government. It is the responsibility of any person or
organization contemplating export to obtain such a license before exporting. WITHIN THAT CONSTRAINT, permission to use, copy, modify, and distribute this software and its documentation for any purpose and without fee is hereby granted, provided that the above copyright notice appear in all copies and that both that copyright notice and this permission notice appear in supporting documentation, and that the name of M.I.T. not be used in advertising or publicity pertaining to distribution of the software without specific, written prior permission. M.I.T. makes no representations about the suitability of this software for any purpose. It is provided "as is" without express or implied warranty.
ERRWARN.C. Copyright © 1995 by RadioMail Corporation. All rights reserved. Redistribution and use in source and binary forms, with or without modification, are permitted provided that the following conditions are met:
1. Redistributions of source code must retain the above copyright notice, this list of conditions and the following disclaimer.
2. Redistributions in binary form must reproduce the above copyright notice, this list of conditions and the following disclaimer in the documentation and/or other materials provided with the distribution.
3. Neither the name of RadioMail Corporation, the Internet Software Consortium nor the names of its contributors may be used to endorse or promote products derived from this software without specific prior written permission. THIS SOFTWARE IS PROVIDED BY RADIOMAIL CORPORATION, THE INTERNET SOFTWARE CONSORTIUM AND CONTRIBUTORS ``AS IS’’ AND ANY EXPRESS OR IMPLIED WARRANTIES, INCLUDING, BUT NOT LIMITED TO, THE IMPLIED WARRANTIES OF
MERCHANTABILITY AND FITNESS FOR A PARTICULAR PURPOSE ARE DISCLAIMED. IN NO EVENT SHALL RADIOMAIL CORPORATION OR CONTRIBUTORS BE LIABLE FOR ANY DIRECT, INDIRECT, INCIDENTAL, SPECIAL, EXEMPLARY, OR CONSEQUENTIAL DAMAGES (INCLUDING, BUT NOT LIMITED TO, PROCUREMENT OF SUBSTITUTE GOODS OR SERVICES; LOSS OF USE, DATA, OR PROFITS; OR BUSINESS INTERRUPTION) HOWEVER CAUSED AND ON ANY THEORY OF LIABILITY, WHETHER IN CONTRACT, STRICT LIABILITY, OR TORT (INCLUDING NEGLIGENCE OR
under a contract with Vixie Enterprises. Further modifications have been made for the Internet Software Consortium under a contract with Vixie Laboratories.
ASCII_ADDR.C Copyright © 1994 Bell Communications Research, Inc. (Bellcore) DEBUG.C Copyright © 1998 by Lou Bergandi. All Rights Reserved.
RANNY.C Copyright © 1988 by Rayan S. Zachariassen. All Rights Reserved. MD5.C Copyright © 1990 by RSA Data Security, Inc. All Rights Reserved.
Portions Copyright © 1981, 1982, 1983, 1984, 1985, 1986, 1987, 1988, 1989 by SRI International Portions Copyright © 1993 by Hewlett-Packard Corporation.
Permission to use, copy, modify, and distribute this software for any purpose with or without fee is hereby granted, provided that the above copyright notice and this permission notice appear in all copies, and that the name of Hewlett-Packard Corporation not be used in advertising or publicity pertaining to distribution of the document or software without specific, written prior permission. THE SOFTWARE IS PROVIDED "AS IS" AND HEWLETT-PACKARD CORPORATION DISCLAIMS ALL WARRANTIES WITH REGARD TO THIS SOFTWARE, INCLUDING ALL IMPLIED WARRANTIES OF MERCHANTABILITY AND FITNESS. IN NO EVENT SHALL HEWLETT-PACKARD CORPORATION BE LIABLE FOR ANY SPECIAL, DIRECT, INDIRECT, OR CONSEQUENTIAL DAMAGES OR ANY DAMAGES WHATSOEVER RESULTING FROM LOSS OF USE, DATA OR PROFITS, WHETHER IN AN ACTION OF CONTRACT, NEGLIGENCE OR OTHER TORTIOUS ACTION, ARISING OUT OF OR IN CONNECTION WITH THE USE OR PERFORMANCE OF THIS SOFTWARE.
Secure Shell (SSH). Copyright © 2000. This License agreement, including the Exhibits (“Agreement”), effective as of the latter date of execution (“Effective Date”), is hereby made by and between Data Fellows, Inc., a California corporation, having principal offices at 675 N. First Street, 8th floor, San Jose, CA 95112170 (“Data Fellows”) and Process Software, Inc., a Massachusetts corporation, having a place of business at 959 Concord Street, Framingham, MA 01701 (“OEM”).
All other trademarks, service marks, registered trademarks, or registered service marks mentioned in this document are the property of their respective holders.
Copyright ©1997, 1998, 1999, 2000 Process Software Corporation. All rights reserved. Printed in USA. Copyright ©2004, 2005, 2007 Process Software, LLC. All rights reserved. Printed in USA.
Copyright 1999-2001 The OpenLDAP Foundation, Redwood City, California, USA. All Rights Reserved. Permission to copy and distribute verbatim copies of this document is granted.
ACE/Agent, ACE/Server, Because Knowledge is Security, BSAFE, ClearTrust, Confidence Inspired, e-Titlement, Intelli-Access, Keon, RC2, RC4, RC5, RSA, the RSA logo, RSA Secured, the RSA Secured logo, RSA Security, SecurCare, SecurID, SecurWorld, Smart Rules, The Most Trusted Name in e-Security, Transaction Authority , and Virtual Business Units are either registered trademarks or trademarks of RSA Security Inc. in the United States and/or other countries.
If the examples of URLs, domain names, internet addresses, and web sites we use in this documentation reflect any that actually exist, it is not intentional and should not to be considered an endorsement, approval, or recommendation of the actual site, or any products or services located at any such site by Process Software. Any resemblance or duplication is strictly coincidental.
Preface
Introducing This Guide... xi
What You Need to Know Beforehand ... xi
How This Guide Is Organized ... xi
Online Help...xii
Accessing the SSH for OpenVMS Public Mailing List...xii
Obtaining Customer Support ...xiii
License Information...xiii
Maintenance Services ...xiii
Reader's Comments Page... xiv
Documentation Set... xiv
Conventions Used... xv
Chapter 1
Before You Begin
Introduction...1-1 Steps to Get SSH Up and Running ...1-1 Prepare for Installation ...1-2 Hardware Requirements ...1-2 Software Requirements...1-2 Disk Space and Global Pages ...1-2 General Requirements ...1-3 Where to Install SSH for OpenVMS ...1-3 Release Notes and Online Documentation ...1-3
Chapter 2
Installing SSH for OpenVMS
Introduction...2-1 Load the Software...2-1 Start VMSINSTAL ...2-2 Sample Installation ...2-3 Installing SSH for OpenVMS for the First Time on a Common VMScluster System Disk ...2-9 Installing SSH for OpenVMS on Mixed Platform Clusters ...2-10 ...2-10
Chapter 3
Configuring SSH for OpenVMS
Introduction ... 3-1 The SSH Configuration Utility... 3-1
Chapter 4
Configuring the Secure Shell (SSH) V1 Server
SSH1 and SSH2 Differences ... 4-1 Restrictions:... 4-1 Understanding the SSH for OpenVMS Secure Shell Server... 4-2 Servers and Clients ... 4-2 Security... 4-2 Break-in and Intrusion Detection ... 4-3 Configuration File ... 4-6 Starting the SSH Server for the First Time... 4-8 Changing SSH1 Configuration File After Enabling SSH1 ... 4-9 Connection and Login Process ... 4-9 FILES ... 4-10 AUTHORIZED_KEYS File Format ... 4-12 RSA Key File Examples ... 4-14 SSH_KNOWN_HOSTS File Format ... 4-15 Example ... 4-15 SSH Logicals ... 4-15
Chapter 5
SSH1 and SSH2 Differences ... 5-1 Restrictions:... 5-1 Understanding the SSH for OpenVMS Secure Shell Server... 5-2 Servers and Clients ... 5-2 Expired Password Handling ... 5-3 Break-In and Intrusion Detection ... 5-4 Configuring SSHD Master ... 5-6 SSH2 Configuration File ... 5-6 HostSpecificConfig Notes: ... 5-22 UserSpecificConfig Notes: ... 5-23 KEYBOARD-INTERACTIVE Notes: ... 5-24 ForwardACL Notes ... 5-24 MappingFileFormat ... 5-25
Changing SSH2 Configuration File After Enabling SSH2...5-27 Connection and Login Process ...5-28 FILES ...5-28 SSH2 AUTHORIZATION File Format...5-30 SSH2 Logicals ...5-30 SSH daemon Files...5-33
Chapter 6
Accessing Remote Systems with the Secure Shell (SSH) Utilities
SSH Protocol Support...6-1 Secure Shell Client (remote login program)...6-2 Initial Server System Authentication...6-2 Hostbased Authentication ...6-2 Publickey Authentication ...6-3 Password Authentication ...6-4 Using Publickey Authentication with SSH ...6-4 Break-in and Intrusion Detection...6-5 Session Termination...6-5 X11 Forwarding ...6-5 Configuring the SSH Client...6-6 Notes Regarding SSH2_CONFIG ...6-12 Authorization File Options ...6-13 Options that can be specified: ...6-14 SSH Client/Server Authentication Configuration Examples...6-15 Hostbased Authentication Example...6-15 Publickey Authentication Example ...6-16 SSH1 Example ...6-17 SSH2 User Authentication Using Certificates: ...6-19 SSH2 Hostkey Authentication Using Certificates ...6-20 Port Forwarding ...6-21 Other Files...6-23 SSHKEYGEN...6-27 SSHAGENT (authentication agent) ...6-31 DESCRIPTION...6-31 FILES ...6-32 SSHADD ...6-32 DESCRIPTION...6-32 OPTIONS ...6-32
FILES ... 6-33 CERTTOOL ... 6-33 Description ... 6-33 Valid Options ... 6-34 Example:... 6-36 CERTVIEW... 6-36 Description ... 6-36 Valid Options ... 6-36 Example:... 6-37 CMPCLIENT ... 6-37 Description ... 6-37 Command Parameters... 6-37 Valid Options ... 6-37 Examples: ... 6-39 Public-key Subsystem ... 6-39 Publickey Assistant Commands ... 6-39 Publickey Assistant Qualifiers ... 6-40 Other Implementations ... 6-41
Chapter 7
Secure File Transfer
SCP-SERVER1... 7-2 SCP2... 7-2 Usage ... 7-2 Qualifiers ... 7-3 File Specifications ... 7-4 SFTP2... 7-11 File Specifications ... 7-11 SFTP2 Command Syntax and Qualifiers ... 7-11 Usage ... 7-11 Qualifiers ... 7-12 SFTP2 Logical Names... 7-21 Configuration File Parameters... 7-21 FTP over SSH... 7-22
Chapter 8
Monitoring and Controlling SSH
Starting the SSHD Master Process ...8-2 Shutting down the SSHD Master Process ...8-2 Restarting the SSHD Master Process ...8-3 Changing the Server Debug Level...8-3 Displaying SSH Server Utilization...8-3
Introducing This Guide
This guide describes the SSH for OpenVMS software. It covers the following topics: software installation, server and client configuration, server startup and shutdown, using the SSH clients, utilities, and server monitoring and control.
What You Need to Know Beforehand
Before using SSH for OpenVMS, you should be familiar with:•
Computer networks in general•
OpenVMS operating system and file system•
HP’s OpenVMS TCP/IP softwareHow This Guide Is Organized
This guide has the following contents:•
Chapter 1, Before You Begin, explains what you need to prepare for an installation.•
Chapter 2, Installing SSH for OpenVMS, provides a step-by-step procedure for executing the software installation.•
Chapter 3, Configuring SSH for OpenVMS, explains how to configure SSH for OpenVMS.•
Chapter 4, Configuring the Secure Shell (SSH) V1 Server, describes how to configure and maintain the SSH for OpenVMS SSH V1 server.•
Chapter 5, Configuring the Secure Shell (SSH) V2 Server, describes how to configure and maintain the SSH for OpenVMS SSH V2 server.•
Chapter 6, Accessing Remote Systems with the Secure Shell (SSH) Utilities, explains how to configure and maintain the SSH for OpenVMS Secure Shell (SSH) client.•
Chapter 7, Secure File Transfer, describes using SCP, SFTP2, and FTP over SSH for transferring files in a secure manner.•
Chapter 8, Monitoring and Controlling SSH, describes the utilities used for monitoring and controlling the SSH server environment.Online Help
You can use help at the DCL prompt to find the following:
•
Topical help — Access SSH help topics only as follows:$ HELP SSH [topic]
The topic entry is optional. You can also enter topics and subtopics at the following prompt and its subprompts:
SSH Subtopic?
Accessing the SSH for OpenVMS Public Mailing List
Process Software maintains two public mailing lists for SSH for OpenVMS customers:•
[email protected]•
[email protected]The [email protected] mailing list is a forum for discussion among SSH for OpenVMS system managers and programmers. Questions and problems regarding SSH for OpenVMS can be posted for a response by any of the subscribers. To subscribe to Info-SSH, send a mail message with the word “SUBSCRIBE” in the body to [email protected].
You can retrieve the Info-SSH archives by anonymous FTP to ftp.multinet.process.com. The archives are located in the directory [.MAIL_ARCHIVES.INFO-SSH].
You can also find the Info-SSH archives on the SSH for OpenVMS CD in the [INFO-SSH] directory.
The [email protected] mailing list is a one-way communication (from Process Software to you) used for the posting of announcements relating to SSH for OpenVMS (patch releases, product releases, etc.). To subscribe to SSH-Announce, send a mail message with the word “SUBSCRIBE” in the body to [email protected].
Obtaining Customer Support
You can use the following customer support services for information and help about SSH for OpenVMS and other Process Software products if you subscribe to our Product Support Services. (If you bought SSH for OpenVMS products through an authorized Process Software reseller, contact your reseller for technical support.) Contact Technical Support directly using the following methods:
•
Electronic MailE-mail relays your question to us quickly and allows us to respond, as soon as we have information for you. Send e-mail to [email protected]. Be sure to include your: – Name
– Telephone number – Company name
– Process Software product name and version number – Operating system name and version number
Describe the problem in as much detail as possible. You should receive an immediate automated response telling you that your call was logged.
•
TelephoneIf calling within the continental United States or Canada, call Process Software Technical Support toll-free at 1-800-394-8700. If calling from outside the continental United States or Canada, dial +1-508-628-5074. Please be ready to provide your name, company name, and telephone number.
•
World Wide WebThere is a variety of useful technical information available on our World Wide Web home page, http://www.process.com (select Support).
License Information
SSH for OpenVMS includes a software license that entitles you to install and use it on one machine. Please read and understand the Software License Agreement before installing the product. If you want to use SSH for OpenVMS on more than one machine, you need to purchase additional licenses. Contact Process Software or your distributor for details.
Maintenance Services
Process Software offers a variety of software maintenance and support services. Contact us or your distributor for details about these services.
Reader's Comments Page
The SSH for OpenVMS Administration and User’s Guide includes Reader's Comments as the last page. If you find an error in this guide or have any other comments about it, please let us know. Return a completed copy of the Reader's Comments page, or send e-mail to
Please make your comments specific, including page references whenever possible. We would appreciate your comments about our documentation.
Documentation Set
The documentation set for SSH for OpenVMS consists of the following:
•
Administration and User’s Guide — For system managers, general users, and those installingthe software. The guide provides installation and configuration instructions for the SSH for OpenVMS products.
•
Online help — Topical help, using HELP SSH [topic]•
Release Notes for the current version of SSH for OpenVMS — For all users, system managers,and application programmers. The Release Notes are available online on your SSH for OpenVMS media and are accessible before or after software installation.
Conventions Used
Convention Meaning
host Any computer system on the network. The local host is your computer. A remote host is any other computer.
monospaced type System output or user input. User input is in bold type. Example: Is this configuration correct? YES
Monospaced type also indicates user input where the case of the entry should be preserved.
italic type Variable value in commands and examples. For example, username indicates that you must substitute your actual username. Italic text also identifies documentation references.
[directory] Directory name in an OpenVMS file specification. Include the brackets in the specification.
[optional-text] (Italicized text and square brackets) Enclosed information is optional. Do not include the brackets when entering the information.
Example: START/IP line address [info]
This command indicates that the info parameter is optional. {value | value} Denotes that you should use only one of the given values. Do not
include the braces or vertical bars when entering the value.
Note! Information that follows is particularly noteworthy.
CAUTION! Information that follows is critical in preventing a system interruption or security breach.
key Press the specified key on your keyboard.
Ctrl/key Press the control key and the other specified key simultaneously. Return Press the Return or Enter key on your keyboard.
Before You Begin
Introduction
This chapter introduces you to and prepares you for SSH product installation, configuration, startup, and testing. It is for the OpenVMS system manager or technician responsible for product installation and configuration.
Steps to Get SSH Up and Running
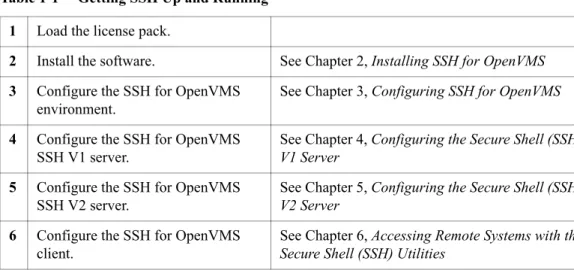
To get SSH up and working, you must perform the following steps: Table 1-1 Getting SSH Up and Running
1 Load the license pack.
2 Install the software. See Chapter 2, Installing SSH for OpenVMS
3 Configure the SSH for OpenVMS environment.
See Chapter 3, Configuring SSH for OpenVMS
4 Configure the SSH for OpenVMS SSH V1 server.
See Chapter 4, Configuring the Secure Shell (SSH) V1 Server
5 Configure the SSH for OpenVMS SSH V2 server.
See Chapter 5, Configuring the Secure Shell (SSH) V2 Server
6 Configure the SSH for OpenVMS client.
See Chapter 6, Accessing Remote Systems with the Secure Shell (SSH) Utilities
Prepare for Installation
SSH for OpenVMS installation involves using the VMSINSTAL procedure. Preparing for installation involves:
•
Understanding the hardware and software requirements•
Determining if you have sufficient disk space and global pages for the installation•
Determining where to install the softwareHardware Requirements
SSH for OpenVMS has no special hardware requirements beyond those stated in the Software Product Description for HP’s TCP/IP Services.
Software Requirements
SSH for OpenVMS supports OpenVMS/VAX version 5.5-2 and 6.2 and later; OpenVMS Alpha version 6.2and higher; OpenVMS I64 version 8.2 and later; UCX version 4.0 ECO 5 and later, and TCP/IP Services version 5.0 and later.
Disk Space and Global Pages
The destination device for your SSH for OpenVMS software must have enough disk space so that you can install and run the software. Your system must meet the following approximate
parameters:.
The runtime values for disk space are slightly higher once you configure and start SSH for OpenVMS.
Note! Insufficient GBLPAGES can abort the installation and leave your system command tables disconnected. The only way to recover is through a system reboot.
System Number of Blocks Needed to Install Number of Blocks Needed After Installation Free GBLPAGES Needed to Run
VAX 150,000 about 42,000 35,000
Alpha 250,000 about 88,000 45,000
General Requirements
Check at this point that you:•
Have OPER, SYSPRV, or BYPASS privileges•
Can log in to the system manager's account•
Are the only user logged in (recommended)•
Backed up your system disk on a known, good, current, full backup (recommended)•
Need to reinstall SSH for OpenVMS after performing a major VMS upgrade•
If SSH for OpenVMS is currently running, shut it down using the “$ SSHCTRL SHUTDOWN” command. This is mandatory.•
Ensure TCP/IP Services (or UCX) is currently running.Where to Install SSH for OpenVMS
Install SSH for OpenVMS in a location depending on the following:
•
Generally, on your system disk, but you can install SSH for OpenVMS anywhere, just answer the question when it appears. This is also where you would keep your "common" files. Node-specific files should always be on your system disk.•
If the machine is in a single platform cluster, on a common disk.•
If the machine is in a mixed platform cluster, once on the Alpha system disk (or disks), once on the I64 system disk (or disks), and once on the VAX common system disk.Release Notes and Online Documentation
The SSH for OpenVMS Release Notes provide important information on the current release. If you are installing from CD-ROM, you can access the Release Notes and the full SSH for OpenVMS documentation as PDF files. They are in the [DOCUMENTATION] directory. The Release Notes
for this product are in the file SSH023.RELEASE_NOTES. The other file MULTINET052.RELEASE_NOTES may be ignored.
•
The Release Notes is a text file which can be obtained in one of three ways: – By performing a partial installation– During the full installation – After the installation
They can also be found in the top-level directory on the CD. To perform a partial installation (see Example 1-1):
1 Invoke VMSINSTAL at the system prompt:
$ @SYS$UPDATE:VMSINSTAL MULTINET052 device OPTIONS N
The device is the mount location of the distribution volumes. 2 Press Return at the prompt
Are you satisfied with the backup of your system disk [YES]?.
3 Select the option by number as to whether you want to display or print the Release Notes, or both.
4 If you requested a printout, enter the queue name for the printer. The default is SYS$PRINT. 5 Press Return at the prompt
Do you want to continue the installation [NO]?:.
This will print both the MultiNet V5.2 and SSH for OpenVMS V2.3 Release Notes. (Note that if you enter YES at the prompt, you proceed with the full installation.)
6 You see the message
Product's release notes have been moved to SYS$HELP.
7 If you want to read or print the Release Notes after you exit the installation, you can access the SSH023.RELEASE_NOTES files in the SYS$HELP directory, as in:
$ TYPE SYS$HELP:SSH023.RELEASE_NOTES
Note! For this command to work as desired, do not redefine the SYS$HELP directory logical. Example 1-1 Performing a Partial Installation to Obtain theRelease Notes
$ @SYS$UPDATE:VMSINSTAL MULTINET052 DKA300: OPTIONS N [1]
OpenVMS AXP Software Product Installation Procedure V7.1 It is 3-MARCH-2007 at 11:01.
Enter a question mark (?) at any time for help.
* Are you satisfied with the backup of your system disk [YES]? Return [2] The following products will be processed:
MULTINET V5.2
Beginning installation of MULTINET V5.2 at 11:01 %VMSINSTAL-I-RESTORE, Restoring product save set A ...
Release notes included with this kit are always copied to SYS$HELP. Additional Release Notes Options:
1. Display release notes 2. Print release notes 3. Both 1 and 2
4. None of the above
* Select option [2]: Return [3] * Queue name [SYS$PRINT]: Return [4]
* Do you want to continue the installation [NO]? Return [5] %VMSINSTAL-I-RELMOVED, Product's release notes have been moved to SYS$HELP.[6]
VMSINSTAL procedure done at 11:02
.
Installing SSH for OpenVMS
Introduction
This chapter takes you through the SSH for OpenVMS product installation procedure and certain post-installation tasks. It is for the OpenVMS system manager, administrator, or technician responsible for product installation.
To prepare for installation, see Chapter 1, Before You Begin.
Note! Once you have installed SSH for OpenVMS, you need to reinstall it after you have done a major OpenVMS upgrade.
To install SSH for OpenVMS: 1 Load the software.
2 Run the VMSINSTAL procedure.
3 Install other products, if needed, and perform post-installation tasks.
Load the Software
SSH for OpenVMS is shipped to you on CD-ROM media. There are three steps to loading the SSH for OpenVMS software: 1 Log in to the system manager's account.
2 If SSH for OpenVMS is currently running, shut it down:
$ SSHCTRL SHUTDOWN
If you are installing on a VMScluster, shut down SSH for OpenVMS on each node in the cluster. 3 Physically load the distribution media onto the appropriate device.
•
In a VMScluster environment, if you want to access the media from more than one node, enter the following:$ MOUNT/CLUSTER/SYSTEM device SSH023
•
On a standalone system, or if you want to prevent multiple users from accessing the software, enter the following:$ MOUNT device SSH023
Note! If you install SSH for OpenVMS on a VMS cluster that has a common system disk, install the software on only one node in the cluster. If reinstalling or upgrading SSH for OpenVMS, first shut down SSH for OpenVMS on all nodes in the cluster.
Be sure to configure SSH for OpenVMS on all systems in a VMS cluster that has a common system disk, even though it only needs to be installed once.
Start VMSINSTAL
VMSINSTAL is the OpenVMS installation program for layered products. VMSINSTAL prompts you for any information it needs. Table 2-1 shows the steps to follow.
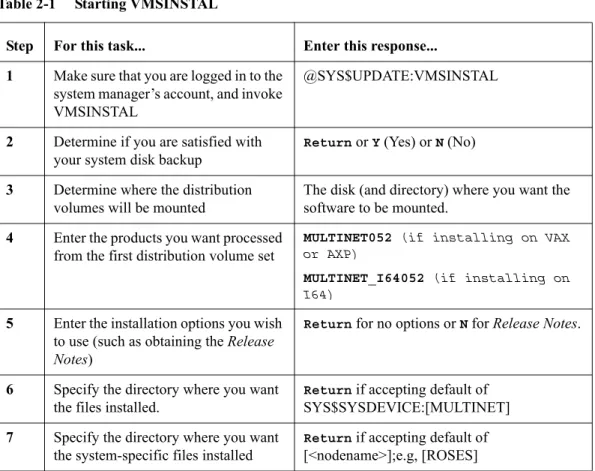
Table 2-1 Starting VMSINSTAL
Step For this task... Enter this response...
1 Make sure that you are logged in to the system manager’s account, and invoke VMSINSTAL
@SYS$UPDATE:VMSINSTAL
2 Determine if you are satisfied with your system disk backup
Return or Y (Yes) or N (No)
3 Determine where the distribution volumes will be mounted
The disk (and directory) where you want the software to be mounted.
4 Enter the products you want processed from the first distribution volume set
MULTINET052 (if installing on VAX or AXP)
MULTINET_I64052 (if installing on I64)
5 Enter the installation options you wish to use (such as obtaining the Release Notes)
Return for no options or N for Release Notes.
6 Specify the directory where you want the files installed.
Return if accepting default of SYS$SYSDEVICE:[MULTINET] 7 Specify the directory where you want
the system-specific files installed
Return if accepting default of [<nodename>];e.g, [ROSES]
Sample Installation
$ @sys$update:vmsinstal multinet052 dka600:[multinet052]
OpenVMS AXP Software Product Installation Procedure V7.3-2
It is 7-MAY-2007 at 13:24.
Enter a question mark (?) at any time for help.
%%VMSINSTAL-W-ACTIVE, The following processes are still active: TCPIP$NTP_1
* Do you want to continue anyway [NO]? y
* Are you satisfied with the backup of your system disk [YES]?
The following products will be processed:
MULTINET V5.2
Beginning installation of MULTINET V5.2 at 13:24
%VMSINSTAL-I-RESTORE, Restoring product save set A ...
%VMSINSTAL-I-RELMOVED, Product's release notes have been moved to SYS$HELP.
* Where do you want to install SSH for OpenVMS [SYS$SYSDEVICE:[MULTINET]]:
* What do you want to call the system-specific directory [MYSYS]: %VMSINSTAL-I-SYSDIR, This product creates system disk directory _MYSYS$DKA0:[MULTINET.MYSYS].
%VMSINSTAL-I-SYSDIR, This product creates system disk directory _MYSYS$DKA0:[MULTINET.AXP_COMMON].
%VMSINSTAL-I-RESTORE, Restoring product save set Y ...
SSH for OpenVMS MultiNet (R)
ALL RIGHTS RESERVED UNDER THE COPYRIGHT LAWS OF THE UNITED STATES
This licensed material is the valuable property of Process Software. Its use, duplication, or disclosure is subject to the restrictions set forth in the License Agreement.
Other use, duplication or disclosure, unless expressly provided for in the license agreement, is unlawful.
Installing SSH for OpenVMS V2.3 Rev A
* Do you want to install the online documentation [YES]?
The HTML documentation requires 950 blocks.
* Do you want to install the HTML documentation [YES]?
* Do you want to install the PDF documentation [YES]?
The SSH for OpenVMS software will be installed with these selected components:
* Online documentation - HTML Documentation - PDF Documentation
* Would you like to change your selections [NO]?
* Do you want to purge files replaced by this installation [YES]? * Configure SSH for OpenVMS after installation [NO]? y
%VMSINSTAL-I-SYSDIR, This product creates system disk directory MU$SPECIFIC_ROOT:[MULTINET].
%VMSINSTAL-I-SYSDIR, This product creates system disk directory MU$COMMON_ROOT:[MULTINET].
The installation will now proceed with no further questions.
%VMSINSTAL-I-RESTORE, Restoring product save set 27 ... %MULTINET-I-INSTALLING, Installing SSH for OpenVMS files
%VMSINSTAL-I-SYSDIR, This product creates system disk directory MU$COMMON_ROOT:[MULTINET.PSCSSH].
%VMSINSTAL-I-SYSDIR, This product creates system disk directory MU$SPECIFIC_ROOT:[MULTINET.PSCSSH].
%VMSINSTAL-I-SYSDIR, This product creates system disk directory MU$SPECIFIC_ROOT:[MULTINET.PSCSSH.LOG].
%VMSINSTAL-I-SYSDIR, This product creates system disk directory MU$SPECIFIC_ROOT:[MULTINET.PSCSSH.SSH].
%VMSINSTAL-I-SYSDIR, This product creates system disk directory MU$SPECIFIC_ROOT:[MULTINET.PSCSSH.SSH2].
%VMSINSTAL-I-SYSDIR, This product creates system disk directory MU$SPECIFIC_ROOT:[MULTINET.PSCSSH.SSH2.HOSTKEYS].
%VMSINSTAL-I-SYSDIR, This product creates system disk directory MU$SPECIFIC_ROOT:[MULTINET.PSCSSH.SSH2.KNOWNHOSTS].
%MULTINET-I-CREATING, Creating SSH for OpenVMS startup file
***************************************************************** * * * * * * * To start SSH for OpenVMS, add the following line to your * * * * SYSTARTUP_VMS.COM file after you have configured SSH for * * * * OpenVMS: * * * * * * $ @SYS$STARTUP:PSCSSH$STARTUP * * * * * *****************************************************************
*%MULTINET-I-INSTALLING, Installing the online documentation files %VMSINSTAL-I-SYSDIR, This product creates system disk directory MU$SPECIFIC_ROOT:[MULTINET.PSCSSH.DOCUMENTS].
%VMSINSTAL-I-SYSDIR, This product creates system disk directory MU$COMMON_ROOT:[MULTINET.PSCSSH.DOCUMENTS].
%MULTINET-I-INSTALLING, Installing SSH for OpenVMS HELP library %MULTINET-I-DELETING, Deleting obsolete MultiNet files
%VMSINSTAL-I-MOVEFILES, Files will now be moved to their target directories...
SSH for OpenVMS Version V2.3A SSH Configuration procedure
This procedure helps you define the parameters needed to get SSH for OpenVMS running on this system.
This procedure creates the configuration data file, MULTINET_SPECIFIC_ROOT:[MULTINET.PSCSSH]SSH_CONFIGURE.COM, to reflect your system's configuration.
For detailed information on the following parameters, refer to the SSH for OpenVMS Administration and User Guide.
SSH for OpenVMS supports both SSH1 and SSH2 servers. You may configure SSH for OpenVMS to support either SSH1 servers or SSH2 servers, or both. Note that the choice of either or both servers has no impact on the SSH for OpenVMS client, which supports both SSH1 and SSH2 remote servers.
Do you want to enable the SSH1 server [NO]? y
Do you want to enable the SSH2 server [NO]? y
For SSH1, you must specify the number of bits in the RSA key. The range is 512 to 32768 bits, but keys longer than 1024 are generally not much safer,and they significantly increase the amount of CPU time consumed by keygeneration when the SSHD_MASTER process is starting.
Enter the number of bits in the RSA key [768]:
You may specify an alternate configuration file for the SSH1 server. If you have already specified an alternate configuration file, enter a single space and hit RETURN at the prompt to reset it to the default file name.
Enter an alternate SSH1 configuration filename []:
You may specify an alternate configuration file for the SSH2 server. If you have already specified an alternate configuration file, enter a single space and hit RETURN at the prompt to reset it to the default file name.
Specify the level of debug for the SSH1 and SSH2 servers.
For SSH1, any non-zero value will turn on debug, but there is no "degree of debug".
For SSH2, this is a value from 0 to 50, where zero is no debug and 50 is the maximum level of debug. Note that at levels exceeding debug level 8,there may be a substantial impact on SSH2 server (and possibly, the system,too) performance due to the amount of information logged.
Enter the debug level [0 - 50, 0]: 2
For SSH1, you may enter the name of an alternate RSA host key file. If you have already specified an alternate host key file, enter a single space and hit RETURN at the prompt to reset it to the default file name.
Enter an alternate SSH1 public server host key file []:
Specify the time in seconds after which the server private key is generated. This is only done for SSH1 sessions.
Enter the key regeneration time [3600]:
You may specify the number of seconds a user has to enter a password during user authentication (default = 600). In addition, you may allow thisto default to the value used by OpenVMS when a user is logging into a non-SSH session. To specify an infinite wait time, enter 0 for the timeout value.
Do you want to change the default login grace time [NO]?
Specify the address for the SSH server to listen on, if you wish to use an address other than the default listen_address of ANY (0.0.0.0). Any valid IPV4 or IPV6 address may be specified, or ANY to listen on all addresses.
Enter address to listen on [ANY]:
Specify the port for the SSH server to listen on, if you wish to use a port other than the default port of 22.
Enter port to use [22]:
Do you want any messages logged by the SSH server at all [YES]? Do you want verbose logging by the SSH server [NO]? y
You may specify the maximum number of concurrent SSH sessions to be allowed on the server. This is the total of both SSH1 and SSH2 sessions. The default is 1000 sessions.
You may permit the server to log a brief informational message when a user is allowed or denied access to a system.
- For SSH1 connections, an ACCEPT or REJECT event will be simply
dependent upon if a user could connect based on the ALLOWGROUP/DENYGROUP settings in the configuration file SSH_DIR:SSHD_CONFIG. The message will be of the form:
<date><time> SSH1 (accepted) from [192.168.0.1,111] (my.server.com)
- For SSH2 sessions, an ACCEPT or REJECT event will be logged when the user is either successfully authenticated or fails authentication. The message will be of the form:
<date><time> SSH2 (accepted) from user "foo" at [192.168.0.1,111] (my.server.com)
You may specify the name and location of the log file to record accepted and/or rejected connections. If you simply hit RETURN, this information will be logged to OPCOM as opposed to a disk file.
By default, this file will be in the SSH_DIR: directory. You may override this by specifying a complete filename, including the directory specification; or by specifying a logical name that translates to a full filename specification.
Do you want to log accepted sessions [NO] y
Do you want to log rejected sessions [NO] y
You are currently logging to OPCOM.
Do you want to change the log file [NO]?
In OpenVMS, users with passwords that have expired because the SYSUAF PWDLIFETIME value has been exceeded are allowed to log into the system, and are then forced to change their password. The SSH1 protocol does not allow for that condition. Answer "YES" to the following question if you wish to allow users with expired passwords to still log into the system. They WILL NOT be forced to change their password.
Note that the SSH2 protocol is not restricted as the SSH1 protocol is; changing of expired passwords, save for pre-generated passwords, is performed by many SSH2 clients (including the SSH for OpenVMS client).
Do you want to allow users with expired passwords to log in [NO]? y
In OpenVMS, users with passwords that have been pre-expired by the system manager are allowed to log into the system, and are then forced to change their password. The SSH1 protocol does not allow for that condition. Answer"YES" to the following question if you wish to allow users with pre-expired passwords to still log into the system. They WILL NOT be forced to change their password.
Note that the SSH2 protocol is not restricted as the SSH1 protocol is; changing of expired passwords, save for pre-generated passwords, is performed by many SSH2 clients (including the SSH for OpenVMS client).
Do you want to allow users with preexpired passwords to log in [NO]? y
The SSH1 protocol does not permit the display of the contents of the SYS$ANNOUNCE logical or file prior to a user logging in. Answering "Y" to the next question will cause the SSH for OpenVMS client to display the contents of SYS$ANNOUNCE after user authentication is completed but before the contents of SYS$WELCOME are displayed.
Do you want to display SYS$ANNOUNCE [NO]? y
When generating user keys, a passphrase may be used to further protect the key. No limit is normally enforced for the length of the
passphrase. However, you may specify a minimum length the passphrase may be.
What you want the minimum passphrase length to be for SSH1 [0-1024, 0]? What you want the minimum passphrase length to be for SSH2 [0-1024, 0]?
The SSH1 host key has not yet been generated. Answer YES to the following question to generate the key now. Answer NO to generate the key manually later by issuing the command:
$ MULTINET SSHKEYGEN /SSH1/HOST
Generating a host key can take a few minutes on slow systems.
Do you want to generate the SSH1 host key now [YES]? Initializing random number generator...
Generating p: ...++ (distance 154) Generating q: ..++ (distance 34)
Generating q: ...++ (distance 246) Computing the keys...
Testing the keys... Key generation complete.
Key file will be MULTINET_ROOT:[MULTINET.PSCSSH.SSH]SSH_HOST_KEY.
Your identification has been saved in
MULTINET_ROOT:[MULTINET.PSCSSH.SSH]SSH_HOST_KEY..
Your public key is:
1024 35 13346338328257309153665734167613815548072936373049679049091856411472190 78774177098168255638760640870869381947672719067515263000411693969314340 50918215289619621122643808964596520618116400737268345415856269060126298 74599147047690547027366195251687737905227203091199516456022993413976084 484441625719193392968523 [email protected]
Your public key has been saved in
MULTINET_ROOT:[MULTINET.PSCSSH.SSH]SSH_HOST_KEY.pub
The SSH2 host key has not yet been generated. Answer YES to the following question to generate the key now. Answer NO to generate the key manually later by issuing the command:
$ MULTINET SSHKEYGEN /SSH2/HOST
Generating a host key can take a few minutes on slow systems.
Do you want to generate the SSH2 host key now [YES]? Generating 1024-bit dsa key pair
6 OOo.oOo.oOo. Key generated.
1024-bit dsa, [email protected], Fri May 07 2005 13:44:18 Private key saved to multinet_ssh2_hostkey_dir:hostkey Public key saved to multinet_ssh2_hostkey_dir:hostkey.pub
SSH Configuration completed.
Review the additional steps you may need to perform as described in the configuration chapters of the SSH for OpenVMS Administration and User Guide before starting SSH.
Refer to the "Monitoring and Controlling SSH" chapter of the SSH for OpenVMS Administration and User Guide for information on starting SSH.
Installation of MULTINET V5.2 completed at 13:45
Adding history entry in VMI$ROOT:[SYSUPD]VMSINSTAL.HISTORY
Creating installation data file: VMI$ROOT:[SYSUPD]MULTINET052.VMI_DATA
VMSINSTAL procedure done at 13:45
$
Installing SSH for OpenVMS for the First Time on a
Common VMScluster System Disk
After installing SSH for OpenVMS on one node of a VMScluster with a common system disk, you must perform the following steps on each additional cluster node that shares the common system disk:
1 Log in (telnet/set host/etc.) to the next node of the cluster. 2 Create the MULTINET logicals by using the following command:
$ @SYS$STARTUP:PSCSSH$STARTUP LOGICALS
3 Make the node-specific SSH root and configure SSH for this node: $ @MULTINET:SSH_MAKE_ROOT
4 Start SSH for OpenVMS:
$ @SYS$STARTUP:PSCSSH$STARTUP
5 Repeat steps 1-4 for each remaining node of the cluster except for the one where SSH was originally installed.
Installing SSH for OpenVMS on Mixed Platform
Clusters
SSH for OpenVMS has no files which can be shared between cluster systems of different architectures.
Configuring SSH for OpenVMS
Introduction
This chapter describes how to configure the SSHD Master process, which controls access to the SSH servers for the SSH for OpenVMS software.
For a basic configuration, accept the default values for each component, which appear after a prompt. This also helps you step through the process more quickly.
After performing the basic configuration, you must perform the advanced configuration for the SSH1 and SSH2 servers, and for the SSH clients as desired. Chapters 4 through 7 describe the configuration and use of these components.
The SSH Configuration Utility
SSH is the Secure Shell protocol. SSH for OpenVMS provides support for both SSH Version 1 protocol and SSH Version 2 protocol.
Please note that in addition to the configuration performed via CNFSSH as described below, there are configuration files for both the SSH1/SSH2 servers and SSH client which must be modified as appropriate to meet the security requirements of your organization. Refer to chapters 4 and 5 of this manual for details on the configuration files.
You can use the CNFSSH utility to configure the SSH server as shown in Example 3-1. Example 3-1 Using the CNFSSH Utility
$ @MULTINET:CNFSSH CONFIGURE
SSH for OpenVMS Version V2.3A SSH Configuration procedure
This procedure helps you define the parameters needed to get SSH for OpenVMS running on this system.
This procedure creates the configuration data file,
MULTINET_SPECIFIC_ROOT:[MULTINET.PSCSSH]SSH_CONFIGURE.COM,to reflect your system's configuration.
For detailed information on the following parameters, refer to the SSH for OpenVMS Administration and User’s Guide.
SSH for OpenVMS supports both SSH1 and SSH2 servers. You may configure SSH for OpenVMS to support either SSH1 servers or SSH2 servers, or both. Note that the choice of either or both servers has no impact on the SSH for OpenVMS client, which supports both SSH1 and SSH2 remote servers.
Do you want to enable the SSH1 server [NO]?YES
Do you want to enable the SSH2 server [NO]?YES
For SSH1, you must specify the number of bits in the RSA key. The range is 512 to 32768 bits, but keys longer than 1024 are generally not much safer, and they significantly increase the amount of CPU time consumed by key generation when the SSHD_MASTER process is starting.
Enter the number of bits in the RSA key [768]:
You may specify an alternate configuration file for the SSH1 server. If you have already specified an alternate config file, enter a single space and hit RETURN at the prompt to reset it to the default file name.
Enter an alternate SSH1 configuration filename []:
You may specify an alternate configuration file for the SSH2 server. If you have already specified an alternate config file, enter a single space and hit RETURN at the prompt to reset it to the default file name.
Enter an alternate SSH2 configuration filename []:
Specify the level of debug for the SSH1 and SSH2 servers.
For SSH1, any non-zero value will turn on debug, but there is no "degree of debug".
For SSH2, this is a value from 0 to 50, where zero is no debug and 50 is the maximum level of debug. Note that at levels exceeding debug level 8,there may be a substantial impact on SSH2 server (and possibly, the system,too) performance due to the amount of information logged.
Enter the debug level [0 - 50]:
For SSH1, you may enter the name of an alternate RSA host key file. If you have already specified an alternate host key file, enter a single space and hit RETURN at the prompt to reset it to the default file name.
Enter an alternate SSH1 public server host key file []:
Specify the time in seconds after which the server private key is generated. This is only done for SSH1 sessions.
Enter the key regeneration time [3600]:
You may specify the number of seconds a user has to enter a password during user authentication (default = 0). In addition, you may allow this to default to the value used by OpenVMS when a user is logging into a non-SSH session. To specify an infinite wait time, enter 0 for the timeout value.
Do you want to change the default login grace time [NO]?
Specify the address for the SSH server to listen on, if you wish to use an address other than the default listen_address of ANY (0.0.0.0). Any valid IPV4 or IPV6 address may be specified, or ANY to listen on all addresses.
Enter address to listen on [ANY]:
Specify the port for the SSH server to listen on, if you wish to use a port other than the default port of 22.
Enter port to use [22]:
Do you want any messages logged by the SSH server at all [YES]? Do you want verbose logging by the SSH server [NO]?
You may specify the maximum number of concurrent SSH sessions to be allowed on the server. This is the total of both SSH1 and SSH2 sessions. The default is 1000 sessions.
Enter maximum number of concurrent SSH sessions [1-1000, 1000]:
In OpenVMS, users with passwords that have expired because the SYSUAF PWDLIFETIME value has been exceeded are allowed to log into the system, and are then forced to change their password. The SSH1 protocol does not allow for that condition. Answer "YES" to the following question if you wish to allow users with expired passwords to still log into the system. They WILL NOT be forced to change their password.
Note that the SSH2 protocol is not restricted as the SSH1 protocol is; changing of expired passwords, save for pre-generated passwords, is performed by many SSH2 clients (including the SSH for OpenVMS client).
Do you want to allow users with expired passwords to log in [NO]?
In OpenVMS, users with passwords that have been pre-expired by the system manager are allowed to log into the system, and are then forced
to change their password. The SSH1 protocol does not allow for that condition. Answer "YES" to the following question if you wish to allow users with pre-expired passwords to still log into the system. They WILL NOT be forced to change their password.
Note that the SSH2 protocol is not restricted as the SSH1 protocol is;
changing of expired passwords, save for pre-generated passwords, is performed by many SSH2 clients (including the SSH for OpenVMS client).
Do you want to allow users with preexpired passwords to log in [NO]?
The SSH1 protocol does not permit the display of the contents of the SYS$ANNOUNCE logical or file prior to a user logging in. Answering "Y" to the next question will cause the SSH for OpenVMS client to display the contents of SYS$ANNOUNCE after user authentication is completed but before the contents of SYS$WELCOME are displayed.
Do you want to display SYS$ANNOUNCE [NO]?
When generating user keys, a passphrase may be used to further protect the key. No limit is normally enforced for the length of the
passphrase. However, you may specify a minimum length the passphrase may be.
What you want the minimum passphrase length to be for SSH1 [0-1024, 0]? What you want the minimum passphrase length to be for SSH2 [0-1024, 0]?
You may permit the server to log a brief informational message when a user is allowed or denied access to a system.
-For SSH1 connections, an ACCEPT or REJECT event will be simply
dependent upon if a user could connect based on the ALLOWGROUP/DENYGROUP settings in the configuration file SSH_DIR:SSHD_CONFIG. The message should be of the form:
<date><time>SSH1(accepted)from [192.168.0.1,111)(my.server.com)
-For SSH2 sessions, an ACCEPT or REJECT event will be logged when the user is either successfully authenticated or fails authentication. The message will be of the form:
<date><time>SSH2(accepted)from user "foo" at [192.168.0.1,111] (my.server.com)
You may specify the name and location of the log file to log accepted and/or rejected connections. If you simply hit RETURN, this information will be logged to OPCOM as opposed to a disk file.
By default, this file will be in the SSH_DIR: directory. You may
override this by specifying a complete filename, including the directory specification; or by specifying a logical name that translates to a full filename specification.
Do you want to log accepted sessions [NO]? YES Do you want to log rejected sessions [NO]? YES
You are currently logging to OPCOM.
Do you want to change the log file? NO
Enter the name of the log file (RETURN = log to OPCOM):
The SSH1 host key has not yet been generated. Answer YES to the following question to generate the key now. Answer NO to generate the key manually later by issuing the command:
$ MULTINET SSHKEYGEN /SSH1/HOST
Generating a host key can take a few minutes on slow systems.
Do you want to generate the SSH1 host key now [Y]? Initializing random number generator...
Generating p: ...++ (distance 238)
Generating q: ...++ (distance 842)
Computing the keys... Testing the keys... Key generation complete.
Key file will be MULTINET_ROOT:[MULTINET.PSCSSH.SSH]SSH_HOST_KEY. Your identification has been saved in
MULTINET_ROOT:[MULTINET.PSCSSH.SSH]SSH_HOST_KEY.. Your public key is:
1024 33 15821952685470837322327354967189853848401938205654075618074325189600826 8 48367224919257232067933619163719764793125246848492474238176919275217552 999742062 80407940365239518329686395794571444672063001691034673198381673202473106 563769428 30338428649813169988704931451943380484496221966866623577435879842456222 157799 [email protected]
Your public key has been saved in
MULTINET_ROOT:[MULTINET.PSCSSH.SSH]SSH_HOST_KEY.pub
The SSH2 host key has not yet been generated. Answer YES to the following question to generate the key now. Answer NO to generate the key manually later by issuing the command:
$ MULTINET SSHKEYGEN /SSH2/HOST
Generating a host key can take a few minutes on slow systems.
Do you want to generate the SSH2 host key now [Y]? Generating 1024-bit dsa key pair
3 o.oOo.oOo.oo Key generated.
Private key saved to multinet_ssh2_hostkey_dir:hostkey. Public key saved to multinet_ssh2_hostkey_dir:hostkey.pub
SSH Configuration completed.
Review the additional steps you may need to perform as described in the configuration chapters of the SSH for OpenVMS Administration and User’s Guide before starting SSH.
Refer to the "Monitoring and Controlling SSH" chapter of the SSH for OpenVMS Administration and User’s Guide for information on starting SSH.
Configuring the Secure Shell (SSH) V1 Server
This chapter describes how to configure and maintain the SSH for OpenVMS Secure Shell (SSH) v1 server.This is the server side of the software that allows secure interactive connections to other computers in the manner of rlogin/rshell/telnet. The SSH server has been developed to discriminate between SSH v1 and SSH v2 protocols, so the two protocols can coexist simultaneously on the same system.
SSH1 and SSH2 Differences
SSH1 and SSH2 are different, and incompatible, protocols. The SSH1 implementation is based on the V1.5 protocol, and F-Secure 1.3.7 code base, and the SSH2 implementation is based on the V2 protocol and the WRQ RSIT 6.1.0 code base. While SSH2 is generally regarded to be more secure than SSH1, both protocols are offered by SSH for OpenVMS, and although they are incompatible, they may exist simultaneously on an OpenVMS system. The SSH for OpenVMS server front-end identifies what protocol a client desires to use, and will create an appropriate server for that client.
Note! You must install the DEC C 6.0 backport library on all OpenVMS VAX v5.5-2 systems prior to using SSH. This is the AACRT060.A file. You can find the ECO on the SSH for OpenVMS CD the following directory: VAX55_DECC_RTL.DIR.
Restrictions:
When using SSH1 to connect to a VMS server, if the VMS account is set up with a secondary password, SSH1 does not prompt the user for the secondary password. If the VMS primary password entered is valid, the user is logged in, bypassing the secondary password.
When using SSH1 to execute single commands (in the same manner as RSHELL), some keystrokes like CTRL/Y are ignored. In addition, some interactive programs such as HELP may not function
as expected. This is a restriction of SSH1. If this behavior poses a problem, log into the remote system using SSH1 in interactive mode to execute the program.
Understanding the SSH for OpenVMS Secure Shell Server
Secure Shell daemon (SSHD) is the daemon program for SSH that listens for connections from clients. The server program replaces rshell and telnet programs. The server/client programs provide secure encrypted communications between two untrusted hosts over an insecure network. A new daemon is created for each incoming connection. These daemons handle key exchange, encryption, authentication, command execution, and data exchange.
Servers and Clients
The SSH for OpenVMS server is an OpenVMS system server that acts as a host for executing interactive commands or for conducting an interactive session. The server software consists of two processes (for future reference, “SSHD” will refer to both SSHD_MASTER and SSHD, unless otherwise specified):
•
SSHD_MASTER, recognizes the differences between SSH v1 and SSH v2 and starts the appropriate server. If the request is for SSH v1, then a new SSH v1 server is run; if the request is for SSH v2, then a new SSH v2 server is run.•
SSHD, a copy of which is spawned for each time a new connection attempt is made from a client. SSHD handles all the interaction with the SSH client.A client is any system that accesses the server. A client program (SSH) is provided with SSH for OpenVMS, but any SSH client that uses SSH version 1 protocol may be used to access the server. Examples of such programs are FISSH, SSH for OpenVMS, and TCPware SSH on OpenVMS systems; TTSSH, SecureCRT®, F-Secure SSH Client, and PuTTY on Windows®-based systems; and other SSH programs on UNIX-based systems.
Security
Each host has a host-specific RSA key (normally 1024 bits) that identifies the host. Additionally, when the SSHD daemon starts, it generates a server RSA key (normally 768 bits). This key is regenerated every hour (the time may be changed in the configuration file) if it has been used, and is never stored on disk. Whenever a client connects to the SSHD daemon,
•
SSHD sends its host and server public keys to the client.•
The client compares the host key against its own database to verify that it has not changed.•
The client generates a 256 bit random number. It encrypts this random number using both the host key and the server key, and sends the encrypted number to the server.•
The client and the server start to use this random number as a session key which is used to encrypt all further communications in the session.The rest of the session is encrypted using a conventional cipher. Currently, IDEA (the default), DES, 3DES, Blowfish, and ARCFOUR are supported.
•
The client selects the encryption algorithm to use from those offered by the server.•
The server and the client enter an authentication dialog.•
The client tries to authenticate itself using any of the following methods: – .rhosts authentication
– .rhosts authentication combined with RSA host authentication – RSA challenge-response authentication
– password-based authentication – Kerberos 5 authentication
Note! Rhosts authentication is normally disabled because it is fundamentally insecure, but can be enabled in the server configuration file, if desired.
System security is not improved unless the RLOGIN and RSHELL services are disabled. When the client authenticates itself successfully, a dialog is entered for preparing the session. At this time the client may request things such as:
•
forwarding X11 connections•
forwarding TCP/IP connections•
forwarding the authentication agent connection over the secure channelFinally, the client either requests an interactive session or execution of a command. The client and the server enter session mode. In this mode, either the client or the server may send data at any time, and such data is forwarded to/from the virtual terminal or command on the server side, and the user terminal in the client side. When the user program terminates and all forwarded X11 and other connections have been closed, the server sends command exit status to the client, and both sides exit.
Break-in and Intrusion Detection
Care must be exercised when configuring the SSH clients and server to minimize problems due to intrusion records created by OpenVMS security auditing. The SSH user should consult the system manager to determine the authentication methods offered by the SSH server. The client should then be configured to not attempt any authentication method that is not offered by the server.
If a client attempts authentication methods not offered by the server, the OpenVMS security auditing system may log several intrusion records for each attempt to create a session to that server. The result being that the user could be locked out and prevented from accessing the server system without intervention from the server's system manager.
The authentication methods to be offered by the server are determined by the configuration keywords RhostsAuthentication, RhostsRSAAuthentication, RSAAuthentication, and
PasswordAuthentication. The number of intrusion records to be logged for any attempted SSH session is determined by the StrictIntrusionLogging configuration keyword.
When StrictIntrusionLogging is set to YES (the default), each method that is tried and fails causes an intrusion record to be logged:
•
When Rhosts, RhostsRSA or RSA authentications are attempted and fail, one intrusion record will be logged for each failed method.Note! RSA ACE/Agent for OpenVMS is no longer supported by RSA Security. Therefore, Process Software can no longer assist with RSA ACE/Agent for OpenVMS-related problems. Process Software recommends using SSH instead.
•
When password authentication is attempted, one intrusion record will be logged for each failed password.Example 1:
The server is set up to allow Rhosts, RSA, and password authentication; also, up to three password attempts are allowed. If all methods fail, five intrusion records are logged:
1 for the failed Rhosts 1 for the failed RSA
3 for the failed password attempts, one per attempt
When StrictIntrusionLogging is set to NO, it has the effect of relaxing the number of intrusions logged. Overall failure of all authentication methods simply counts as a single failure, except for password authentication. The following rules apply:
•
When password authentication is attempted, one intrusion record is logged for each failed password.•
When any of Rhosts, RhostsRSA, or RSA authentication fails, and password authentication is not attempted, exactly one intrusion record is logged, as opposed to one for each failed method.•
When any of Rhosts, RhostsRSA, or RSA authentication fails, but password authentication is attempted and succeeds, the only intrusion record(s) logged is one for each failed password attempt.Example 2:
The server is set up to allow Rhosts, RSA, and password authentication; also, up to three password attempts are allowed. If all methods fail, three intrusion records are logged:
0 for the failed Rhosts 0 for the failed RSA
3 for the failed password attempts, one per attempt Example 3:
The server is set up to allow Rhosts, RSA, and password authentication; also, up to three password attempts are allowed. Rhosts and RSA fail, but password authentication is successful after 1 failed password. Therefore, one intrusion record is logged:
0 for the failed Rhosts 0 for the failed RSA
1 for the failed password attempt Example 4:
The server is set up to allow Rhosts, RhostsRSA, and RSA authentication, but not password authentication. If all methods fail, one intrusion record is logged.
Example 5:
The server is set up to allow Rhosts, RhostsRSA, and RSA authentication, but not password authentication. Rhosts and RSA authentication both fail, but RhostsRSA succeeds. No intrusion records are logged.
Expired Passwords
The SSH v1 protocol does not provide a method for changing an expired VMS password. When an expired password is encountered by the SSH1 server, it will do one of two things.
1 If the logical name MULTINET_SSH_ALLOW_EXPIRED_PW is defined for allowing access for passwords that have exceeded the UAF value for PWDLIFETIME, or if the logical name MULTINET_SSH_ALLOW_PREEXPIRED_PW is defined for allowing access for users that have a pre-expired password, the server will allow the user to log in. In the logical name table LNM$SSH_LOGICALS, the logical name MULTINET_SSH_pid_PWDEXP (where pid is the process ID for the user process) will be defined. The system manager can look for this logical to be defined, and if so, take action such as executing the DCL SET PASSWORD command. 2 If the appropriate logical is not set as described above, the user will be denied access to the
system. In that case, the user must log in interactively via another mechanism such as telnet and change the password, or the system manager must reset the password.
When a user is allowed access to the system with an expired password, the LOGIN_FLAGS for the process will reflect this. The values of the LOGIN_FLAGS will be as follows:
•
new mail has been received (JPI$M_NEW_MAIL_AT_LOGIN)•
the password is about to expire (JPI$M_PASSWORD_WARNING)•
the password has expired (JPI$M_PASSWORD_EXPIRED)The DCL lexical function F$GETJPI may be used to examine these flags, as can the $GETJPI(W) system service or LIB$GETJPI RTL function. When an expired password value is detected, the user may then execute a SET PASSWORD command in the command procedure run for the account.
For example:
$!
$! Login_flags:
$! 1 = new mail messages waiting (JPI$M_NEW_MAIL_AT_LOGIN) $! 4 = password expired during login (JPI$M_PASSWORD_EXPIRED) $! 5 = password expires within 5 days (JPI$M_PASSWORD_WARNING) $!
$ flags = f$getjpi("", "LOGIN_FLAGS") $ new_flags = (flags/2)*2
$ if new_flags .ne. flags then write sys$output "New mail waiting" $!
$!Note - new_flags is used below because it has the NEW_MAIL_AT_LOGIN$ $! bit stripped. The rest of the possible values are all
$! discrete; i.e., you can't have combinations of them at the $! same time.
$!
$ if new_flags .eq. 4 then write sys$output "Password expired during login" $ if new_flags .eq. 5 then write sys$output "Password expires within 5 days" $!
![Table 4-1 SSH1 Configuration File Keywords [SSHD_CONFIG]](https://thumb-us.123doks.com/thumbv2/123dok_us/8701499.2355084/44.756.53.652.153.899/table-ssh-configuration-file-keywords-sshd-config.webp)
![Table 4-1 SSH1 Configuration File Keywords [SSHD_CONFIG] (Continued)](https://thumb-us.123doks.com/thumbv2/123dok_us/8701499.2355084/45.756.135.722.95.910/table-ssh-configuration-file-keywords-sshd-config-continued.webp)
![Table 5-1 SSH2 Configuration File Keywords [SSHD2_CONFIG] (Continued)](https://thumb-us.123doks.com/thumbv2/123dok_us/8701499.2355084/64.756.54.643.77.509/table-ssh-configuration-file-keywords-sshd-config-continued.webp)
![Table 5-1 SSH2 Configuration File Keywords [SSHD2_CONFIG] (Continued)](https://thumb-us.123doks.com/thumbv2/123dok_us/8701499.2355084/66.756.58.639.72.822/table-ssh-configuration-file-keywords-sshd-config-continued.webp)
![Table 5-1 SSH2 Configuration File Keywords [SSHD2_CONFIG] (Continued)](https://thumb-us.123doks.com/thumbv2/123dok_us/8701499.2355084/70.756.58.639.83.819/table-ssh-configuration-file-keywords-sshd-config-continued.webp)
![Table 5-1 SSH2 Configuration File Keywords [SSHD2_CONFIG] (Continued)](https://thumb-us.123doks.com/thumbv2/123dok_us/8701499.2355084/72.756.55.640.77.437/table-ssh-configuration-file-keywords-sshd-config-continued.webp)
![Table 5-1 SSH2 Configuration File Keywords [SSHD2_CONFIG] (Continued)](https://thumb-us.123doks.com/thumbv2/123dok_us/8701499.2355084/76.756.54.643.74.563/table-ssh-configuration-file-keywords-sshd-config-continued.webp)
