13
Reading Device/PLC from
Database
13.1 Try to Read Device/PLC Data from Database ...13-2 13.2 Setting Guide ...13-26
Pro-Server EX Reference Manual
13-2
13.1
Try to Read Device/PLC Data from Database
[Action Example]
Detect the rising of the trigger device (bit device: "M01") of Device/PLC, read data from the field (F2) set for the trigger device in a relational database, and write the data into a specified device address.
This section describes the setting procedures for executing the above action (ACTION) as an example. PC (Node Name: PC1) Device/PLC (Device Name: PLC1) D51 25 GP3000
(Node Name: AGP1)
Device Data Bit device "M01" ON! SQL Server table1 10 20 30 40 50 F4 F5 F3 F2 F1 15 25 35 45 55 20 30 40 50 60 seqno 1 2 3
[Setting Procedure]
10
9
Setting ACTION Node/Process Completion NotificationThis step sets the name of an ACTION node and the alert setting whether it should be tuned on or off when the ACTION is completed.
8
Setting Data Received by ACTION This step sets a constant value to be the sequence No. (seqno) of a database.7
Setting Trigger Conditions This step sets conditions (trigger) for executing data write.6
Parameter Setting for Feature (ACTION) This step sets the following items: • Database informaiton• Database access method • File specification
5
Registering Symbols This step registers as a symbol the device of Device/ PLC which serves as a trigger condition (trigger) and a data write destination.3
Starting 'Pro-Studio EX' This step starts 'Pro-Studio EX'.1
Creating a Table This step creates a table to specify the database to read data from or the device to write data in.2
Creating a Database This step creates a database table containing data to write in the device of Device/PLC.4
Registering Entry Nodes This step registers the PC and the GPs as entry nodes.Pro-Server EX Reference Manual
13-4
13.1.1
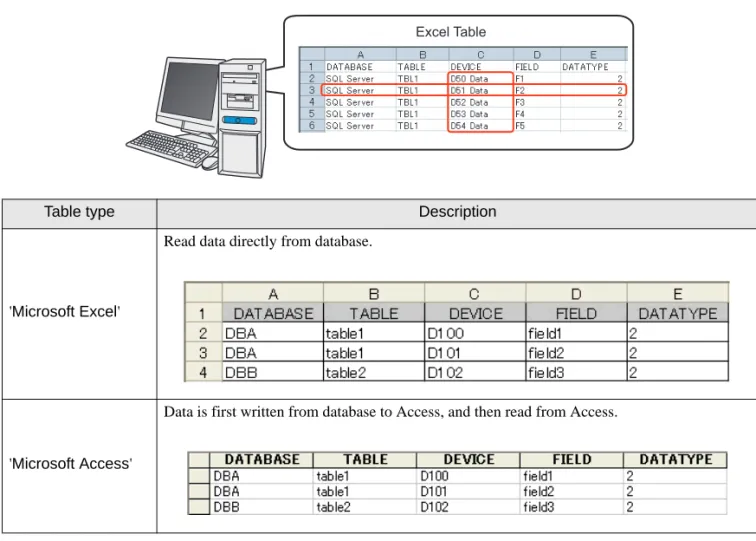
Creating a Table
This step creates a table to specify the database to read data from or the device to write data in.
'Pro-Server EX' obtains database information, referring to data to transfer (which is "Fixed vale" of the transfer source set in "13.1.8 Setting Data Received by ACTION") and Excel table rows.
Table type Description
'Microsoft Excel'
Read data directly from database.
'Microsoft Access'
Data is first written from database to Access, and then read from Access. Excel Table
1
Start 'Microsoft Excel' and create the table below.Below are the contents of each item of this table. [DATABASE]
Set the name of the database from which data is read. [TABLE]
Set the name of the database table from which data is read. [DEVICE]
Set the device or symbol name of the device to which data is written. [FIELD]
Set the field of the database table from which data is read. [DATATYPE]
Set the type of data to write.
Specify the data type as the following table shows.
DATABASE TABLE DEVICE FIELD DATATYPE
SQL Server TBL1 D50 data F1 2
SQL Server TBL1 D51 data F2 2
SQL Server TBL1 D52 data F3 2
SQL Server TBL1 D53 data F4 2
SQL Server TBL1 D54 data F5 2
Value Data Type Value Data Type
1 Bit 7 32 bits without decimal code 2 16 bits with decimal code 8 Hexadecimal 32 bits 3 16 bits without decimal code 9 BCD 32 bits
Pro-Server EX Reference Manual
13-6
13.1.2
Creating a Data Table
This step creates a database table to store data to read out (recipe data).
'Pro-Server EX' obtains data in the [FIELD] row specified on an Excel table , referring to data to transfer (which is "Fixed vale" of the transfer source set in "13.1.8 Setting Data Received by ACTION") and "seqno" data on a database table.
Create the table below on a database.
seqno F1 F2 F3 F4 F5
1 10 20 30 40 50
2 15 25 35 45 55
3 20 30 40 50 60
• Do not use "0" for "seqno" value. If data to transfer is not a character string, the lowest row of the table is searched when the data is "0".
• Do not use any character string containing " ' " (apostrophe) for "seqno" value.
• If you use "DSN", there is a sample file (DataBase.mdb) of a data table available in the "PRO-SDK" folder where Pro-Server EX has been installed. Use this as a template when creating a table.
Database 10 20 30 40 50 F4 F5 F3 F2 F1 20 30 40 50 60 seqno 1 3 15 25 35 45 55 2
13.1.3
Starting 'Pro-Studio EX'
This step starts 'Pro-Studio EX'.
Refer to "3 Trial of Pro-Server EX" for details about starting method.
13.1.4
Registering Entry Nodes
This step registers the PC and the GP connected with network as nodes. Refer to "30 Node Registration" for details about entry nodes.
Entry node Setting item Setting example
PC Node Name PC1
IP Address 192.168.0.1 GP
Type GP3000 series
Node Name AGP1
IP Address 192.168.0.100
Node Name
:PC1
IP Address
:192.168.0.1
Node Name
:AGP1
IP Address
:192.168.0.100
Device/PLC Information
Pro-Server EX Reference Manual
13-8
13.1.5
Registering Symbols
This step registers as a symbol the device address of Device/PLC which serves as a trigger condition (trigger) and the device of Device/PLC to write data in.
Refer to "31 Symbol Registration" for details about entry nodes.
Setting item Trigger (trigger condition) Writing device
Symbol Name Start writing D51 data
Data Type Bit 16Bit (Signed)
Device address for symbol
registration "M01" of Device/PLC (PLC1) "D51" of Device/PLC (PLC1)
No. of Devices 1 1
Writing Device
Device Address M01Start writing
SymbolTrigger (Trigger Condition)
Device Address D51 Symbol
D51 data
'Z
13.1.6
Parameter Setting for Feature (ACTION)
This step makes settings to write database data in a device. (parameter settings) Refer to "13.2 Setting Guide" for more details about ACTION parameter.
Setting item Setting content
Login Name login
Password abcde
Server Name server Database Type SQL Server Database Access
Method Access directly to database (EXCEL)
File Specification C:\Documents and Settings\Administrator\Desktop\exceltable.xls exceltable.xls
exceltable
Desktop
Specify the file
Database Type
Read
SQL Server 10 20 30 40 50 F4 F5 F3 F2 F1 seqno 1'Z
Pro-Server EX Reference Manual
13-10
1
Click the [Feature] icon on the status bar.3
Click the [ACTION Type] list button, and select "Download from the database".Then, enter the name of ACTION to set in the [ACTION Name] field. In this example, enter "Database Download".
4
Click the [Click here to set the ACTION parameter] button. • [ACTION Name] can be an arbitrary name.Pro-Server EX Reference Manual
13-12
5
Make settings regarding a database.1) Set "login" in [Login name] and "abcde" in [Password] to access the database server with, and "server" in [Server name] for the database server PC name.
2) Set "SQL Server" in [Database Type].
3) Set "SQL Server" in [Driver name].
6
Select "It accesses a database directly (EXCEL)" as an access method.7
Make settings regarding a file (a table).Pro-Server EX Reference Manual
13-14
2) Select the Excel table file name "exceltable.xls".8
Click the [OK] button.13.1.7
Setting Trigger Conditions
This step sets a trigger condition (trigger bit ON) to read out device data. Refer to "32 Trigger Conditions" for details about trigger conditions.
• Trigger Condition Name: Turn on write start bit • Trigger Condition : When "Start writing" (M01) is ON
1
On the "Set ACTION Name/Parameter" screen, click the [Next] button.2
Click the [New Trigger Condition] button.Pro-Server EX Reference Manual
13-16
3
Enter the trigger condition name "TurnOnWriteStartBit" in [Trigger Condition Name], and select "AGP1" in [Node Name] which has the device to serve as the trigger condition (trigger).4
Click the [When Device ON] button in the [Condition 1] tab and select "PLC1" for the device name. • Here, you are to specify the node having the device to be the trigger condition or having data totransfer.
5
Click the [Device Address] list button and select "WriteStart" for the symbol name of the device which serves as the trigger.[Data Type] automatically appears after selection, too.
6
Click the [OK] button.• You can also set trigger conditions by combining 2 different types of conditions ("And" condition or "Or" condition).
Pro-Server EX Reference Manual
13-18
13.1.8
Setting Data Received by ACTION
This step sets a constant value (seqno) to be the sequence No. of a data table in ACTION .
• Constant value to transfer : 2
1
On the "Set ACTION Trigger Condition" screen, click the [Next] button.2
After clicking [Constant Value], enter "2" in the text box for the constant value to transfer and "1" in [No.].Pro-Server EX Reference Manual
13-20
13.1.9
Setting ACTION Node/Process Completion Notification
This step sets the name of an ACTION node and the alert setting whether it should be tuned on or off when the ACTION is completed.
• ACTION Node : PC1 • Receive Notification: OFF
1
On the "Data settings to be received by ACTION" screen, click the [Next] button.2
Click the list button of [ACTION Node] and select "PC1" as a node where ACTION operates. Also, clear the check if [Receive Notification Exists] has been checked.• When "Receive Notification Exists" is turned on, the specified bit device will be turned on when the ACTION is completed. This can be used as the trigger condition (trigger) of the subsequent ACTION when you want to execute two or more ACTIONs sequentially.
)
"32 Trigger Conditions"3
Click the [Complete] button.The "SetACTION Node/Process Completion Notification" screen will disappear. On the left of the screen, the ACTION and trigger condition names you set will appear.
Pro-Server EX Reference Manual
13-22
13.1.10
Verifying Setting Result
This step verifies setting results on the setting content list screen.
1
Select the ACTION name "Database Download" from the tree display on the left of the screen.2
Select the trigger condition name "TurnOnWriteStartBit" from the tree display on the left of the screen.Confirm that the setting content appears on the right of the screen.
Pro-Server EX Reference Manual
13-24
13.1.11
Saving a Network Project File
This step saves the current settings as a network project file and reloads to 'Pro-Server EX'. Refer to "24 Saving" for details about saving a network project file.
• Path of network project file : Desktop\Database_download.npx • Title : Database download action
13.1.12
Transferring a Network Project File
This step transfers a saved network project file to entry nodes.
Refer to "25 Transferring" for details about transferring a network project file.
• 'Pro-Server EX' reads a created network project file, and then executes ACTION according to the settings in the file. The settings therefore need be saved in the network project file.
• Be sure to reload the network project file to 'Pro-Server EX'. If not, ACTION will not work.
• Be sure to transfer a network project file. If not, ACTION will not work.
13.1.13
Executing ACTION
This step verifies that database data is written in the device of Device/PLC when the preset trigger condition has become effective.
This is the end of the explanation of this ACTION.
Pro-Server EX Reference Manual
13-26
13.2
Setting Guide
This section explains how to set the parameters of ACTION.
Setting item Setting content
Database Information
Login name Sets a login name to access the database server with. Password Sets a password to access the database server with.
Server name
Enters "PC Name" or "IP Address" of the database server.
• If you select "DSN" in [Database Type], you do not have to enter this.
Database Type Selects a database type between [SQL Server], [Oracle], and [DSN].
Driver name
Selects a driver depending on the selected database type.
• If you select "DSN" in [Database Type], you do not have to enter this.
"A setup of details" Screen
DatabaseInformation
Normally connected to server
Connects with the server at all times.
• If you connect with the server frequently, an always-on connection is useful to reduce the time to open your database.
If connection request is not received within standard time period, connection is terminated.
Disconnects when no connection is requested in a certain period in case of always-on connection to the server.
Database Access Method
Selects how to access databases.
• It accesses a database directly (EXCEL)
If you use Excel, database data is directly written into a device. • Indirect accesses a database (ACCESS)
If you use Access, database data is once written into an Access file and then into a device.
File designation
Specify the save folder of the file including a table. C drive (C:) folder is to appear for initial setting.
To change the drive to display, click the list button to select new one. After you specify the folder, select the file name from the list and the sheet name including a table.
[Details] Button Clicking this button displays the "A setup of details" screen. Refer to ""A setup of details" Screen" Screen" for more details.