Unit 1
Graphic design using Adobe
Fireworks CS4
Timing: 12–18 hours
Unit overview
To produce quality images for the web, students need to understand how digital images are created and then learn and apply essential graphic design principles. Adobe Fireworks CS4 is an image-editing program designed to create images, effects, and optimization especially for web pages. This unit is project-based, so students plan and evaluate the images they produce.
In the unit, students learn to create, modify, and optimize a variety of digital images. They compare image file size and quality during phases of production. The unit balances instruction of specific techniques with encouraging students to research technical aspects of the program on their own. Students are introduced to project evaluation and reflection to incorporate solutions into subsequent projects.
Unit objectives
At the completion of the unit, students will have developed the following skills:
Project management skills
• Planning a scan
• Creating a storyboard
• Following standard copyright practices for text
• Reviewing and redesigning images
• Planning graphics based on needs and audience
Design skills
• Optimizing JPEGs and GIFs
• Editing images
• Using composition, contrast, and balance
• Applying the rule of thirds
• Creating emphasis
• Applying proximity and patterns
• Using line
• Using shape
• Using unity and color
• Using typography
• Design and create original page banner
Research and communication skills
• Understanding graphics types
• Understanding copyright issues
• Collecting and analyzing audience needs and purpose to inform design
• Communicating with peers to review and redesign images
• Present and communicate design principles to peers
Technical skills
General
• Scanning photographs, objects, and drawings
• Using a digital camera
Fireworks
• Using panel elements and structure
• Creating text
• Setting export window options
• Creating effects
Activity summary
The unit contains the following activities, with handouts and other materials.
Activity Activity materials
Activity 1.1: Introduction to graphics and copyright Guide: Principles and rules of copyright Guide: Internet citations
Guide: Sample student document Activity 1.2: Introduction to scanning Scanner
Objects to scan
Drawing materials (colored pencils, paper, tape, scissors, and so on)
File folders for each student Guide: Scanning
Guide: How to scan images without image-editing software
Presentation: Introduction to scanning Activity 1.3: Using a digital camera One or more digital cameras
Floppy disks or other storage devices, if the camera model requires them
Cables to connect the camera to a computer, if needed
Software, usually bundled with the camera, that allows for transfer of images from camera to computer
Activity 1.4: Optimizing graphics for the web Worksheet: Fireworks Optimize panel Guide: Fireworks Optimize panel Guide: How to optimize GIF images Guide: How to optimize JPEG images Activity 1.5: Making a nameplate Worksheet: Fireworks tools
Guide: Fireworks panels
Guide: How to build a nameplate Guide: How to create effects Worksheet: Nameplate interview
Activity 1.6: Planning a logo Grid paper
Drawing materials (pencils, pens, paper, colored pencils, and so on)
Presentation: Introduction to graphic design Presentation: Storyboards
Activity Activity materials
Activity 1.8: Logo review and redesign Worksheet: Logo review and redesign Activity 1.9: Planning a page banner Examples of page banners of varying designs
Grid paper (optional)
Drawing materials (pencils, pens, paper, colored pencils, and so on)
Activity 1.10: Building a page banner Students’ page banner storyboards from Activity 1.9
Guide: How to create a page banner
Activity 1.11: Page banner review and redesign Worksheet: Page banner review and redesign Guide: Review and redesign presentation topics
Activity 1.1
Introduction to graphics and copyright
Objectives
• Identify and distinguish between GIF, JPEG, and PNG formats. • Understand how graphics are viewed.
• Create graphics.
• Copy and save images and graphics from the Internet, using appropriate citations for copyright. • Use copyright terms correctly.
Materials
• Guide: Principles and rules of copyright • Guide: Internet citations
• Guide: Sample student document
Time
45–60 minutes
Overview
The instructor introduces web graphic formats (GIF, JPEG, and PNG). After a brief class discussion about copyright, students locate, select, save, and annotate a collection of image files, representing the three main file types (GIF, JPEG, and PNG) used to publish on the web.
Student product: Text document with images, as well as individual image files
Activity steps
1. Introduce the file types available for graphics: GIF, JPEG, and PNG. Discuss how the file types differ and when it is appropriate to use each type of file. You might also distinguish between a Fireworks native PNG and a PNG image.
2. Use a sample website to discuss the types of materials that are copyrighted and explain whether they fall under intellectual property, fair use doctrine, derivative works, or academic standards. Discuss methods students can use to copyright their own work.
Guide: Principles and rules of copyright
3. Have students search the Internet to find and save at least one sample of each type of graphic: GIF, JPEG, and PNG. Ask students to consider whether they would need to seek permission should they choose to use the graphic in any work they might create.
4. Have students save all their work in two ways: as a set of individual graphic files (for later use) and in a text document that includes notes about the graphics.
Guide: Sample student document
5. Have students identify copyright-protected graphics on each site and write a citation for each graphic they download.
6. For each object or piece of information that is copyrighted, have students explain the rationale for copyright, using key vocabulary terms, and indicate what type of permission would need to be obtained for using this work.
Preparation
• Find a website to use as an example for showing students copyrighted materials.
• If you choose to use the Principles and rules of copyright, Internet citations, or Sample student document guides, make photocopies.
• If you don’t want students to do an open-ended graphics search, create a list of websites they can investigate and use later for their logo and page banner projects.
• Students will use a text document to save images with notes. You might want to try this yourself to see how a document will look. Review the Sample student document guide.
Rationale
Visual images and graphics are an important part of digital design. Selecting the appropriate graphic file types is an important part of the technical aspects of constructing web-ready materials.
Background resources
• Conduct a search (perhapsimage, image type,
GIF images, JPEG images, or PNG images.
Assessment
Does not meet expectations Meets expectations Exceeds expectations Images Absent or incomplete. Documents include
identification of each image file type, but students cannot clearly articulate the differences between file types or when to use a particular file type.
Documents include identification of each image file type and students can clearly articulate the differences between file types as well as clearly explain when to use each file type.
Copyright citations
Absent or incomplete. Students practice good use of copyright citations for each image, but student rationales do not include clear rationale on why the image is
copyrighted. However, students have not
synthesized their research to be able to identify the type of permission needed to use the images in other work.
Students practice good use of copyright citations for each image, and student rationales include clear rationale on why the image is copyrighted. Students have
synthesized their research to be able to identify the type of permission needed to use images in other work.
ISTE NETS*S Standards for Students
This activity is aligned to the ISTE NETS*S Technology Standards. Depending on the subject and
content area the student selects you may research your own state content standards to see how this activity aligns to your state requirements.
ISTE NETS*S: Curriculum and Content Area Standards – NETS for Students II. Communication and Collaboration
Students use digital media and environments to communicate and work collaboratively, including at a distance, to support individual learning and contribute to the learning of others. Students:
A. interact, collaborate, and publish with peers, experts, or others employing a variety of digital media and formats.
B. communicate information and ideas effectively to multiple audiences using a variety of media and formats.
III. Research and Information Fluency
Students apply digital tools to gather, evaluate, and use information. Students:
B. locate, organize, analyze, evaluate, synthesize, and ethically use information from a variety of sources and media.
C. evaluate and select information sources and digital tools based on appropriateness to specific tasks.
Adobe Certified Associate, Web Communication objectives
1.3 Demonstrate knowledge of standard copyright rules (related terms, obtaining permission, and citing copyrighted material).
4.4 Insert images and apply alternative text on a web page.
Key terms
• GIF • JPEG • PNG • copyright • intellectual property • fair-use doctrine • derivative works • academic standards • bibliographyActivity 1.2
Introduction to scanning
Objectives
• Create scanned black-and-white images and color images. • Modify file type, resolution, and image size of images.
Materials
• Scanner
• Graphics, photographs, or objects to scan
• Instructor workstation connected to a projector, or an overhead projector, for presentation slides • Guide: Scanning
• Guide: How to scan images without image-editing software • Presentation: Introduction to Scanning
• Drawing materials (colored pencils, paper, tape, scissors, and so on) • File folders for each student
Time
90–135 minutes
Overview
Students gather images from magazines, newspapers, or books, artwork, or other objects they find (leaves, flowers, and so on) to practice scanning and to create graphical content to include in future projects. In class, the instructor starts with a demonstration of scanning. Students produce an individual body of work (electronic files and folders with original materials).
Student product: A file folder with original images (or photocopies of images), a set of electronic image files, and an annotated document with all image files
Activity steps
1. Briefly demonstrate the four steps in using a scanner: Plan, Scan, Edit, Save.
Guide: Scanning
Guide: How to Scan Images without Image-Editing Software
2. Explain the importance of planning. Have students answer the planning questions found in the
Scanning guide for each of the objects or images they will scan.
3. Demonstrate the first scan pass. Talk about the orientation and placement of objects or images on the scanner, cleanliness of the glass, and so on. Be sure to mention not to lift the cover while the scan is in process.
Note: Sometimes the lamp takes several minutes to warm up; remind students to be patient.
4. Explain scan mode, resolution, and image size (crop) and how these affect file size. Have students write down the scan mode and resolution they will use for their objects and images.
5. Demonstrate how to set the scan mode, resolution, and image size (crop). If you’re using the
Scanning guide, you might have students add specific directions for the class scanner to the handout.
6. Explain the file types. If you are using a stand-alone scanner, have students save the files in TIF or BMP format. Have students write down where they saved the document, the name of the document, the size of the document, and the scan mode and resolution they used. Ask students to save the scanned images in one specified folder (directory).
Note: Make sure students save files in the native format file type and the web-ready file type.
7. Have students practice scanning. They should create at least one black-and-white image and one color image.
8. Have students scan their images and objects and then save their work in two ways: as individual image files and in a text document that includes all images with notes about each image. (For ideas, look at the Sample student document guide in Activity 1.1: Introduction to graphics and copyright.)
Preparation
• Ask students to bring in images to scan that represent themselves or their interests. These could be magazine pictures, photos, hand drawings, or objects they find (leaves, flowers, and so on). • Determine how students will store files on workstations or the school server. Find out how much
space is available for each student.
• Optional: Review the presentation, Introduction to scanning.
• Modify the How to scan images without image-editing software guide instructions to be scanner specific, as desired.
• Have drawing materials (colored paper, pencils, glue, scissors, and so on) available for students wishing to create original artwork.
Note: If your classroom has limited resources, you might complete this activity in conjunction with
Activity 1.3: Using a digital camera. Half the class can complete scanning while the other half works with the digital camera. Switch groups during the next class period so all students have a chance to learn both types of equipment.
Rationale
Scanning is part of the designer’s toolbox. It is one of the many ways of capturing and creating assets to include in electronic documents such as web pages. Images—whether they are photographs, original art, charts, diagrams, or objects—become part of the overall message and tone of a presentation (such as a web page or PowerPoint document).
Background resources
• Introduction to scanning presentation • Scanning guide
• A comprehensive look at scanners and graphics:
• You can also search, using keywords such as scanning, scanned image, or scanning tips.
Assessment
Does not meet expectations Meets expectations Exceeds expectations Scanning Absent or incomplete. Students research and
gather images and objects from multiple sources. Students plan their scans, taking into account minimum scanning considerations when planning a scan.
Students research and gather images or objects from multiple sources. Students create a new image by scanning a combination of objects and/or images at once. Students plan their scans, well and can clearly articulate the reasons for their decisions.
Scan document and images
Absent or incomplete. Students have one black-and-white scanned mage and one color image. Students have saved their graphic files and saved a text file that includes their images with notes that state filename, file size, resolution, images dimensions, and file type.
Students have more than one black-and-white scanned mage and more than one color image. Students have saved their graphic files and saved a text file that includes their images with notes that state filename, file size, resolution, images dimensions, and file type.
ISTE NETS*S Standards for Students
This activity is aligned to the ISTE NETS*S Technology Standards. Depending on the subject and
content area the student selects you may research your own state content standards to see how this activity aligns to your state requirements.
ISTE NETS*S: Curriculum and Content Area Standards – NETS for Students I. Creativity and Innovation
Students demonstrate creative thinking, construct knowledge, and develop innovative products and processes using technology. Students:
A. apply existing knowledge to generate new ideas and products and processes. B. create original works as a means of personal and group expression
III. Research and Information Fluency
Students apply digital tools to gather, evaluate, and use information. Students: A. plan strategies to guide inquiry.
B. locate, organize, analyze, evaluate, synthesize, and ethically use information from a variety of sources and media.
C. evaluate and select information sources and digital tools based on the appropriateness to specific tasks.
VI. Technology Operations and Concepts
Students demonstrate a sound understanding of technology concepts, systems and operations. Students:
A. understand and use technology systems.
B. select and use applications effectively and productively. C. troubleshoot systems and applications.
D. transfer current knowledge to learning of new technologies.
Key terms
Typical scanning modes:
Line art: Pen-and-ink drawings, black-and-white logos, and so on.
Halftones: Pictures from books, newspapers, and magazines.
Color: Color photos.
True Color: Use when the destination is a color printer or a monitor set to display millions of colors and the selection area contains:
• Color photograph.
• Color drawing or illustration.
• Picture with shades of gray that you want to tint with a color.
Grayscale: Use when displaying or printing the image in black and white and the selection area contains:
• Black-and-white photograph.
• Color drawing or illustration.
• Color photograph.
• Halftone picture.
• Picture with shades of gray.
Spot color: Output type eliminates small variations on a solid color block.
Black & white: Use when the image will not need to be scaled in another program, the destination is a printer, and the selection area contains a black-and-white drawing.
Web palette: Use only when the destination is a web page being viewed in a browser and the selection area contains:
• Color photograph.
• Color drawing or illustration.
• Picture with shades of gray.
System palette: The best general-purpose output type for displaying an image on a monitor set to display 256 colors. Use when the destination is for a desktop presentation on a monitor and the selection area contains:
• Color photograph.
• Color drawing or illustration.
• Picture with shades of gray.
Optimized palette: Use when the destination is a color printer or e-mail or when you want a small file size and the selection area contains:
• Color photograph that is mostly one color.
• Color drawing or illustration that is mostly one color.
Activity 1.3
Using a digital camera
Objectives
• Use a digital camera to capture and save images.
• Construct a document that demonstrates the ability to differentiate among file types and to minimize file size by using optimization strategies.
Materials
• One or more digital cameras
• Floppy disks or other storage devices, if the camera model requires them • Cables to connect the camera to a computer, if needed
• Software, usually bundled with the camera, that enables the transfer of images from camera to computer
Time
45–60 minutesOverview
The instructor demonstrates the use of the digital camera. Students practice using the camera and then save their images to the computer.
Student product: Digital photograph files and a document with annotations and images
Activity steps
1. Briefly demonstrate how to use a digital camera. Focus on selecting resolution and framing the picture. Here are some general tips for digital cameras:
• Fully charge the camera (varies with model, but usually about six hours).
• When the battery dies, all photographs in the camera are erased unless the camera comes with a storage card such as a compact flash card.
• Blurry pictures are more common when using digital cameras because you can take a picture while looking at the LCD. This can cause you to hold the camera unsteadily. If the camera has an optical viewfinder, use it instead of the LCD, or hold the camera tightly with both hands and keep your elbows tucked to your body.
• Close-up pictures tend to be more successful. Digital photographs do not enlarge as well as traditional film unless the resolution of the camera is set at a higher setting. You might want to review the setting options on the camera.
3. Discuss the concept of the rule of thirds. (You may want to have students research the rule of thirds on the web.)
4. Have students take at least four photographs. Photographs can be of the same subject with different resolution settings.
5. Discuss how students used framing and the rule of thirds as design principles when creating their images.
6. Have students save their work in two ways: as separate image files and in a text document with images and notes about each image.
Preparation
• Because there are so many different types of cameras, this activity does not include step-by-step instructions. You may want to create a short student handout that outlines the basic steps for your cameras.
• Check the file formats and resolution available on the camera so you know the acceptable range. • You may want to try downloading files to workstations.
Rationale
Digital cameras are part of the arsenal of tools designers need to use to produce original images. Although many types of cameras are available, there are common elements in their use that are important for developing a sound foundation in design.
Background resources
• A site that offers a variety of information about digital cameras (see Digital photography for tips on taking photographs)
• A site with links to tips for taking great pictures
Assessment
Does not meet expectations Meets expectations Exceeds expectations Digital camera No photographs taken. Students can take photos
that also exhibit design principles such as the rule of thirds.
Students take photos that exhibit design principles such as the rule of thirds. articulate the reasons for their decisions. Students take into consideration audience and purpose when taking their photos.
Does not meet expectations Meets expectations Exceeds expectations Images Absent or incomplete. Students have four
images with annotations including file type and resolution.
Students have four images with annotations including file type, resolution, audience, and purpose.
ISTE NETS*S Standards for Students
This activity is aligned to the ISTE NETS*S Technology Standards. Depending on the subject and
content area the student selects you may research your own state content standards to see how this activity aligns to your state requirements.
ISTE NETS*S: Curriculum and Content Area Standards – NETS for Students VI. Technology Operations and Concepts
Students demonstrate a sound understanding of technology concepts, systems and operations. Students:
A. understand and use technology systems.
B. select and use applications effectively and productively. C. troubleshoot systems and applications.
D. transfer current knowledge to learning of new technologies.
Key terms
• resolution • frame (framing)Activity 1.4
Optimizing graphics for the web
Objectives
• Optimize images as GIF and JPEG files.
• Create the smallest possible image file size while maintaining desired image quality. • Save and export image files.
Materials
• Adobe Fireworks CS4 installed on student and instructor workstations
• Projection system for instructor workstation or overhead slides with screenshots • Worksheet: Fireworks Optimize panel
• Guide: Fireworks Optimize panel • Guide: How to optimize GIF images • Guide: How to optimize JPEG images
Time
90–135 minutes
Overview
The instructor demonstrates image optimization. Then students use Adobe Fireworks CS4 to optimize their scanned and photo images.
Student product: Optimized GIF and JPEG images
Activity steps
1. To test the difference in download times, have students visit sites with GIF and JPEG images to see examples of large and small files. Discuss the differences between the images in each category.
2. Using large GIF and JPEG sample images, introduce the Optimize panel in Fireworks.
3. Demonstrate to students the methods available for optimizing an image.
Worksheet: Fireworks Optimize panel
Guide: Fireworks Optimize panel
4. As an experiment, divide the class into small groups and assign half of the groups to optimize one of the JPEGs they scanned previously; assign the other half of the groups to optimize a GIF they
scanned previously. All JPEG groups should have the same image, and all GIF groups should have the same image.
Guide: How to optimize GIF images
Guide: How to optimize JPEG images
5. Groups should optimize and save their graphics in two ways: Make the graphic file size as small as possible.
Make the graphic file as small as possible while keeping as much image quality as possible.
6. At the end of the experiment, have each group show their two images and report the mechanisms they used to optimize the images.
7. Use each sample image to discuss the benefits of optimization and the balance that must be reached to preserve quality.
8. Have students optimize their images from Activity 1.2 and Activity 1.3 to prepare for creating a nameplate, logo, or page banner.
Preparation
• Locate sample images by searching the web. For example, at
and Advanced Image Search. On the Advanced Image Search page, alternately choose large and small from the Size pop-up menu and alternately choose JPG files and GIF files from the File Types pop-up menu. Enter topic words of your choice in the Find results section.
• Install sample images for the optimization demonstration on student and instructor workstations. • Review the elements of the Fireworks Optimize panel.
• Practice optimizing with the How to optimize GIF images and How to optimize JPEG images guides. You can practice on the large sample images to prepare for the class demonstration.
• If you plan to give students the guides or worksheet, make photocopies.
Extensions
Individual Work and Building Group Dynamics: A method to help students learn a new technical skill while building group dynamics is to require all group members to complete the technical task. Following task completion, the group members negotiate one product to represent the group. This negotiation might lead to choosing one member’s work or integrating the work of all the individuals into a common
product.
Technical Help in the Classroom: To encourage students to develop self-sufficiency when seeking help, you can assign a small group or pair of students to research challenging skills and present their findings to the class. Ask them to define key terms (such as optimization) and to explain the relevance of these terms to the task at hand. Then ask students to give a three- to five-minute oral report at the beginning of class, demonstrating the skill and reporting their findings.
Rationale
Optimization is important for web graphics. Successful websites enable visitors to download web pages quickly. Website success also depends on image quality. Although small file size is important, designers balance file size with image quality.
Background resources
• Resource for information on GIF versus JPEG image types and reduction.
• Possible search keywords for finding more information on the web: optimize, optimize graphics, image compression
• Review the Fireworks Optimize panel guide. • Review the How to optimize GIF images guide. • Review the How to optimize JPEG images guide.
Assessment
Does not meet expectations Meets expectations Exceeds expectations Optimization Absent or incomplete. Students can optimize
GIF and JPEG images.
Students can optimize GIF and JPEG images as well as balance quality with file size and articulate benefits of optimization.
ISTE NETS*S Standards for Students
This activity is aligned to the ISTE NETS*S Technology Standards. Depending on the subject and
content area the student selects you may research your own state content standards to see how this activity aligns to your state requirements.
ISTE NETS*S: Curriculum and Content Area Standards – NETS for Students I. Creativity and Innovation
Students demonstrate creative thinking, construct knowledge, and develop innovative products and processes using technology. Students:
A. apply existing knowledge to generate new ideas and products and processes. IV. Critical Thinking, Problem-Solving & Decision-Making
Students use critical thinking skills to plan and conduct research, manage projects, solve problems and make informed decisions using appropriate digital tools and resources. Students:
A. identify and define authentic problems and significant questions for investigation. B. plan and manage activities to develop a solution or complete a project.
VI. Technology Operations and Concepts
Students demonstrate a sound understanding of technology concepts, systems and operations. Students:
A. understand and use technology systems.
B. select and use applications effectively and productively. C. troubleshoot systems and applications.
D. transfer current knowledge to learning of new technologies.
Key terms
• JPEG • GIF • palette • optimize • crop • image sizeActivity 1.5
Making a nameplate
Objectives
• Use graphics tools and effects in Adobe Fireworks CS4. • Explain and document a process.
Materials
• Adobe Fireworks CS4 installed on student and instructor workstations
• Projection system for instructor workstation or overhead slides with screenshots of the Fireworks interface
• Worksheet: Fireworks tools • Guide: Fireworks panels
• Guide: How to build a nameplate • Guide: How to create effects • Worksheet: Nameplate interview
Time
45–90 minutes
Overview
The instructor briefly demonstrates Fireworks tools and effects by building a sample nameplate. Students explore Fireworks by designing and constructing a personal nameplate. Students explain their process and choices through peer interviews.
Student product: Online nameplate
Activity steps
1. Demonstrate building a nameplate, highlighting the tools necessary for creating various effects in Fireworks drawing and color panels. Identify the main panels: the Tools panel and the Property inspector.
Worksheet: Fireworks tools
Guide: Fireworks panels
2. Have students start Fireworks at individual workstations and open a new document.
Note: To prepare for effects they might use later, have students draw their rectangles small enough to allow about 30 pixels of blank area around all sides.
3. Have them choose the size of their nameplates (a typical rectangular nameplate canvas is 500 × 250).
Guide: How to build a nameplate
4. Allow students time to create and save their nameplates. Encourage them to explore the variety of effects in Fireworks they can use in building their nameplates.
Guide: How to create effects
5. Have students optimize their nameplates by exporting them as GIFs or JPEGs.
6. Have student partners interview each other about their completed nameplates. Some topics to cover are:
• Fireworks functions used to create your nameplate • Effects used on your nameplate
• Step-by-step description of how you created your nameplate
Worksheet: Nameplate interview
Preparation
• You might want to practice using the tools in Fireworks to see how the activity works, following the guidelines in the How to build a nameplate guide.
• Review the Fireworks panels guide.
• Make photocopies of the Nameplate interview worksheet for students.
Extensions
Integrating Images: Suggest that students integrate scanned images with the effects they are creating in Fireworks.
More Nameplates: If some students finish quickly, have them design nameplates for their pets, family, or friends.
Optional Wrap-up: Discuss how professional web developers document the design process. Documenting shares expertise and provides designers with a written record for themselves and others to replicate the work.
Rationale
Success in online graphic design stems from understanding graphic design tools and how to apply their capabilities, and by studying and understanding design principles. Designers often explore new graphics tools before using them within a formal design. Communicating about tool use and design process strengthens knowledge of the tool.
Background resources
• Fireworks Help• Online material available for Fireworks
Assessment
Does not meet expectations Meets expectations Exceeds expectations Nameplate Absent or incomplete. Students use the drawing
tools, filters, and effects to create a nameplate.
Students use the drawing tools, filters, and effects to create a nameplate. Students take into account design elements when creating their nameplates.
Interviews Absent or incomplete. Students provide a
description of their process and the tools they used. Students conducting the interviews take notes on the answers from their interviewee.
Students provide a description of their process and the tools they used, including reasons they choose the specific effects and how they are a means of personal
expression. Students conducting the interviews take detailed notes on the answers from their interviewee.
ISTE NETS*S Standards for Students
This activity is aligned to the ISTE NETS*S Technology Standards. Depending on the subject and
content area the student selects you may research your own state content standards to see how this activity aligns to your state requirements.
ISTE NETS*S: Curriculum and Content Area Standards – NETS for Students I. Creativity and Innovation
Students demonstrate creative thinking, construct knowledge, and develop innovative products and processes using technology. Students:
A. apply existing knowledge to generate new ideas and products and processes. B. create original works as a means of personal and group expression
II. Communication and Collaboration
Students use digital media and environments to communicate and work collaboratively, including at a distance, to support individual learning and contribute to the learning of others. Students:
A. interact, collaborate, and publish with peers, experts or others employing a variety of digital environments and media.
B. communicate information and ideas effectively to multiple audiences using a variety of media and formats.
V. Digital Citizenship
Students understand human, cultural, and societal issues related to technology and practice legal and ethical behavior. Students:
B. exhibit positive attitudes toward technology uses that support collaboration, learning, and productivity.
VI. Technology Operations and Concepts
Students demonstrate a sound understanding of technology concepts, systems and operations. Students:
A. understand and use technology systems.
B. select and use applications effectively and productively. C. troubleshoot systems and applications.
D. transfer current knowledge to learning of new technologies.
Key terms
• Tools panel • stroke • effect • object • emboss • bevel • drop shadow • panelActivity 1.6
Planning a logo
Objectives
• Create a storyboard using graphic design principles.
Materials
• Presentation: Introduction to graphic design • Presentation: Storyboards
• Projector for presentations • Grid paper (optional)
• Drawing materials (pencils, pens, paper, colored pencils, and so on)
Time
45–60 minutes
Overview
The instructor presents sample logos and leads a discussion about graphic design elements and principles used in creating logos and other graphical elements. Then the instructor describes the use of storyboards in design. Students produce storyboards for their logos.
Student product: A paper storyboard for a logo
Activity steps
1. Introduce the overall project: creating a logo students can use as an identifying element for themselves, for a fictional organization such as a design firm or a nonprofit, or for a school group.
2. Show students sample logos and ask them to identify visual cues that help the logo stick in their minds. Discuss how these logos are appropriate branding for the organizations they represent. Discuss how these designs reach the organization’s target audience and meet the company goals.
3. Introduce graphical design topics. If you use the presentation Introduction to graphic design, have students identify the design elements on the sample logos on each slide.
Presentation: Introduction to graphic design
4. After introducing design principles, ask students how they might change the sample logos to depict a different design principle. For example, how might they make a symmetrical logo into an
5. Introduce the storyboard concept as follows:
• The typical use of a storyboard is in designing movies or animated cartoons, to depict what happens in the story. A storyboard contains scene-by-scene drawings of the sequence of action, camera angles, background, and so on. As the name implies, the storyboard is meant to tell the story visually with sufficient detail to enable the production crew to understand what they will create.
• A graphic storyboard shows all the elements of the graphic, indicating size, location, color, and font.
• A website storyboard might go through several iterations before going into production. First create rough sketches to convey the big picture and the basic site structure so all team members understand the scope of the project. Convert these rough sketches to finished sketches that can be shared with other parts of an organization or an outside client.
Presentation: Storyboards
6. Have students create a storyboard for a logo that represents them as an individual or a logo that represents a nonprofit organization or a fictional digital design company. You might use grid paper and suggest the following guidelines:
• Indicate the intended focus, purpose, and audience of your design.
• The storyboard can be in black and white, with colors labeled. If you create your storyboard with colored pens or pencils, use colors that match the design.
• Indicate whether your design illustrates horizontal symmetry, vertical symmetry, diagonal symmetry, radial symmetry, or asymmetry. On the back of your storyboard, explain why you selected one style over another.
• Indicate the scale you are using. In other words, if your paper design is larger or smaller than the final product, say what size the finished product will be. Professional designers usually illustrate logos larger than the finished product so details are easy to see.
• On the back of the storyboard, indicate any other design decisions you made and state why.
Preparation
• Review the Introduction to graphic design and Storyboards presentations. (Some slides have notes.) • Review the background resources listed in the following section.
• You might want to download and prepare sample logos such as those on the following websites:
•
•
•
Extensions
More design investigation: Add more graphic design exploration to this activity by having students use the Internet to find examples of each design principle.
Rationale
A storyboard is a fundamental tool for planning and thinking visually in digital design. Creating
storyboards with sufficient detail ensures that many problems are worked out on paper prior to investing in production. It is a crucial step that leads to the development of other planning tools: asset production, cost estimation, hardware requirements, and software requirements.
Background resources
Graphic design
• A short introduction to graphic design theory, explaining the aspects of design to consider when composing a piece of fine art or producing a graphic layout
• A brief discussion of the main principles of design
Logos
• Logo design articles and tips
• Types of logos and their construction
Storyboards
• Definition of the storyboard concept, plus sample storyboards
• A theoretical approach to storyboards
Assessment
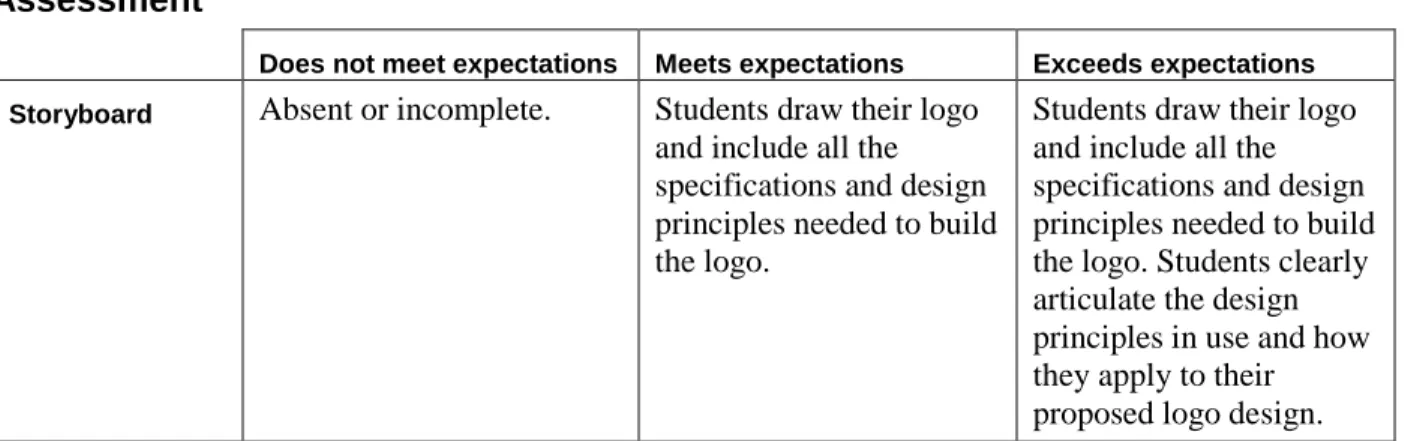
Does not meet expectations Meets expectations Exceeds expectations Storyboard Absent or incomplete. Students draw their logo
and include all the specifications and design principles needed to build the logo.
Students draw their logo and include all the specifications and design principles needed to build the logo. Students clearly articulate the design principles in use and how they apply to their proposed logo design.
Does not meet expectations Meets expectations Exceeds expectations Design
principles
Absent or incomplete. Students can name design principles and describe what they are.
Students can name design principles and describe what they are. Students can apply this knowledge to predicting how design principle changes can alter the visual and meaningful impact of a graphic.
ISTE NETS*S Standards for Students
This activity is aligned to the ISTE NETS*S Technology Standards. Depending on the subject and
content area the student selects you may research your own state content standards to see how this activity aligns to your state requirements.
ISTE NETS*S: Curriculum and Content Area Standards – NETS for Students II. Communication and Collaboration
Students use digital media and environments to communicate and work collaboratively, including at a distance, to support individual learning and contribute to the learning of others. Students:
A. interact, collaborate, and publish with peers, experts or others employing a variety of digital environments and media.
B. communicate information and ideas effectively to multiple audiences using a variety of media and formats.
IV. Critical Thinking, Problem-Solving & Decision-Making
Students use critical thinking skills to plan and conduct research, manage projects, solve problems and make informed decisions using appropriate digital tools and resources. Students:
A. identify and define authentic problems and significant questions for investigation. B. plan and manage activities to develop a solution or complete a project.
C. collect and analyze data to identify solutions and/or make informed decisions.
Adobe Certified Associate, Web Communication objectives
1.1 Identify the purpose, audience, and audience needs for a website. 2.3 Demonstrate knowledge of page layout design concepts and principles.2.5 Demonstrate knowledge of flowcharts, storyboards, and wireframes to create web pages and a site map (site index) that maintain the planned website hierarchy.
Key terms
• audience • purpose • asymmetry (asymmetrical) • axis of symmetry • balance • chroma • complementary color • composition • contrast • emphasis hue • radial symmetry • shade • storyboard • symmetry (symmetrical) • tint • tone • unity • white spaceActivity 1.7
Building a logo
Objectives
• Develop a digital logo based on a storyboard.
Materials
• Adobe Fireworks CS4 installed on all student workstations • Students’ logo storyboards from Activity 1.6
Time
45–60 minutesOverview
Students produce their logo, based on their storyboard.
Student product: Digital logo
Activity steps
1. Have students look through their storyboards as you discuss production.
2. Discuss possible canvas sizes for logos. Typical sizes are 79 × 51 pixels (very small), 150 × 25 pixels, 125 × 144 pixels, and 243 × 203 pixels (fairly large for web purposes).
3. Introduce drawing and image-editing tools such as the Line, Rectangle, Pen, and Eraser tools.
4. Allow students time to build their logos.
5. Allow students time to present their logos to each other or the class.
Preparation
• Review the drawing tools in Fireworks. As needed, go to the Help menu in Fireworks to access step-by-step procedures.
Extension
Using Local Experts: Assign students as resource specialists. Extra hands and heads will enable you to manage the classroom without students expecting you to be the sole software expert. For example, have
some of your top students act as local experts to help others use a software product. As students become more familiar with the software, more students will be able to share the responsibility of being the local experts.
Rationale
Using a storyboard as a guide, professionals use the authoring software required to meet their design needs. Often a design requires designers to learn new techniques or aspects of the authoring software.
Background resources
• A tour of the features of Fireworks
• Check the Fireworks technical support area for a variety of resources, most notably technical notes (TechNotes) and tutorials.
Assessment
Does not meet expectations Meets expectations Exceeds expectations Logo Absent or incomplete. Logo reflects the basic
elements identified on the storyboard. Techniques used to build the logo reflect a basic knowledge of Fireworks.
Logo reflects all concepts (both sketches and design principles) from the storyboard. Techniques used to build the logo reflect effective and productive uses of Fireworks.
ISTE NETS*S Standards for Students
This activity is aligned to the ISTE NETS*S Technology Standards. Depending on the subject and
content area the student selects you may research your own state content standards to see how this activity aligns to your state requirements.
ISTE NETS*S: Curriculum and Content Area Standards – NETS for Students VI. Technology Operations and Concepts
Students demonstrate a sound understanding of technology concepts, systems and operations. Students:
A. understand and use technology systems.
B. select and use applications effectively and productively. C. troubleshoot systems and applications.
Adobe Certified Associate, Web Communication objectives
4.3 Follow a flowchart, storyboards, and wireframes to create web pages and a site map (site index) that maintain the planned website hierarchy.
Activity 1.8
Logo review and redesign
Objectives
• Identify aspects of redesign and its importance in web design. • Reflect on a digital image and identify what could be improved. • Create a storyboard for the redesign of an image.
• Modify an existing image
Materials
• Adobe Fireworks CS4 installed on all student workstations • Worksheet: Logo review and redesign
Time
90–135 minutes
Overview
The instructor introduces the concepts of review and redesign. Students review their own work in reference to their goals, intentions, and design constraints.
Student product: Redesign write-up and new logo
Activity steps
1. Through a class discussion, define review and redesign. Explore what redesign means for student work in the context of web design and why it might be useful as a step of the overall project process. Develop class definitions and discuss possible steps or questions that will help in redesigning a product. Some possible categories for review include the following:
• Meeting initial focus, purpose, and audience • Changing focus, purpose, or audience • Applying good design principles
Worksheet: Logo review and redesign
2. Have students individually review their own logos to redesign them.
3. After the review, have students create storyboards of their proposed redesign changes to create new logos.
5. Have students build their redesigned logos.
Preparation
• Before teaching this activity, it might be helpful to compile your own steps for redesign to help you guide the student discussion.
• Students complete the logo project in this activity. If you want to do a full project assessment, use the sample project rubric in the Course overview and setup.
Extensions
Defining redesign: Have students use various resources, such as books and the Internet, in addition to brainstorming definitions for the word “redesign.” This gives students an opportunity to practice web research skills.
Presentations: Have students present their redesigns to the class, outlining the changes they made and why they made them.
Rationale
Designers reflect on their work and subsequently redesign to improve their work. One method of revision is to evaluate your own work in reference to your previously stated goals and ideas.
Background resources
These resources discuss the design process, including redesign:
• Koberg, Don and Jim Bagnall. The Universal Traveler: A Soft-Systems Guide to Creativity, Problem-Solving and the Process of Reaching Goals. Los Altos, CA: Crisp Publications, Inc., 1991.
• The graphic design process:
• To find more Internet information on redesign and the design process, some helpful search keywords are redesign cycle and design process.
Assessment
Does not meet expectations Meets expectations Exceeds expectations Logo review and
redesign worksheet
Absent or incomplete. Students can define, communicate, and document the idea of redesign. Students can evaluate their logos and explain the design principles employed. Students can think critically about audience and purpose to forecast changes and a plan to improve logo.
Students can define, communicate, and document the idea of redesign and its place in the development process. Students can evaluate and analyze their logos, then clearly explain the design principles employed. Students can think critically about audience and purpose to forecast changes and a plan to improve logo. Students provide clear, strong reasons for redesign recommendations clearly tied to design principles and better meeting goals.
Logo Absent or incomplete. Students implement
redesign plan into creating a new logo.
Students implement redesign plan into creating a new logo with clear articulation of design principles and how they address audience and purpose.
ISTE NETS*S Standards for Students
This activity is aligned to the ISTE NETS*S Technology Standards. Depending on the subject and
content area the student selects you may research your own state content standards to see how this activity aligns to your state requirements.
ISTE NETS*S: Curriculum and Content Area Standards – NETS for Students I. Creativity and Innovation
Students demonstrate creative thinking, construct knowledge, and develop innovative products and processes using technology. Students:
A. apply existing knowledge to generate new ideas and products and processes. B. create original works as a means of personal and group expression
II. Communication and Collaboration
Students use digital media and environments to communicate and work collaboratively, including at a distance, to support individual learning and contribute to the learning of others. Students:
A. interact, collaborate, and publish with peers, experts or others employing a variety of digital environments and media.
B. communicate information and ideas effectively to multiple audiences using a variety of media and formats.
IV. Critical Thinking, Problem-Solving & Decision-Making
Students use critical thinking skills to plan and conduct research, manage projects, solve problems and make informed decisions using appropriate digital tools and resources. Students:
A. identify and define authentic problems and significant questions for investigation. B. plan and manage activities to develop a solution or complete a project.
C. collect and analyze data to identify solutions and/or make informed decisions.
Adobe Certified Associate, Web Communication objectives
1.1 Identify the purpose, audience, and audience needs for a website. 2.3 Demonstrate knowledge of page layout design concepts and principles.2.6 Communicate with others (such as peers and clients) about design and content plans.
Key terms
• review • redesignActivity 1.9
Planning a page banner
Objectives
• Analyze the uses of graphic design principles, including the rule of thirds, proximity, pattern, background color, shape, and typography.
• Create a storyboard of a page banner.
Materials
• Examples of page banners of varying designs • Grid paper (optional)
• Drawing materials (pens, pencils, paper, colored pencils, and so on)
Time
45–90 minutes
Overview
Students examine design principles used on different page banners and then plan their own page banners they would include on a portfolio or personal website.
Student product: Page banner storyboard
Activity steps
1. Introduce the idea of page banners as part of an overall personal and business presence. Discuss how they have a focus, purpose, and audience.
2. Introduce the idea of a page banner as a way to add an identity to a website.
• The design reflects the broader purpose of the person or organization’s website. • The banner fits within the basic layout of the screen.
• A different shape can act as a banner across the page.
3. Introduce additional design principles, including the rule of thirds, proximity, pattern, background color, shape, and typography (including serif and sans serif font faces).
4. Form small groups of students and ask students in each group to look at different page banners on the web, either by searching their favorite sites or by viewing a list you’ve previously compiled. Be sure to include a variety of business, entertainment, and personal websites in each group’s review.
5. Ask students to identify the use of design principles in each banner:
• Previously covered principles: composition, balance, unity, contrast, emphasis, line, and color in logos
• New in this activity: rule of thirds, proximity, pattern, background color, shape, and typography
6. Have student groups report to the class the design features they found and explain how these features portray the industry, company, or organization in terms of its focus, purpose, and audience.
7. Ask students to design a storyboard of a page banner, perhaps using the logos they created. Have them consider their audience and goals, as well as the mood they want to convey (for example: fun, serious, formal, or cool).
Preparation
• If you plan to provide students with a list of websites to view during this activity, prepare a list of websites with page banners that represent different groups, such as personal websites, restaurant websites, corporation websites, entertainment websites, or education websites.
• Review the websites on graphic design principles. See the following background resources section. • Prepare a list of websites students can research to generate discussion on design principles.
Extensions
Researching design principles: Divide the class into groups, assigning each group a research topic such as the rule of thirds, proximity, pattern, background color, shape, or typography. Have students present their research findings through a paper summary or an oral report. You might want to monitor students’ progress in their groups. You might also want to assess the group process or oral presentations. Some possible expectations to discuss include the following:
• A paper summary of their findings (include URLs of sites researched)
• A brief (5 minutes) oral report that includes the main idea behind the principle • Vocabulary definitions
• How their design principle can be applied to the page banner examples or other projects
Multiple meanings: Many of the design topics have alternate meanings when you use them as keywords for searching the web. Guide students in refining their searches to include the following keywords: graphic design, art, layout, and visual design. For examples of page banners and logos, search for design services.
Rationale
A page banner appears on most websites as the first identifier that is seen for the organization or person who sponsored the website. The design of a page banner conveys information about the sponsor—how it wants to be perceived. These identifiers are consistent with the overall design of the site and help visitors recognize that they remain in the site as they move from page to page. Designers identify goals and the audience of a design before they create it.
Background resources
Graphic design principles
• Dimitry’s Design Lab has many design topics, including texture.
• A short article on consistency in design
Rule of thirds • Proximity
• An article that discusses proximity and alignment. Has some nice interactive examples that require the Adobe Shockwave plug-in to view.
Patterns
• Although the focus of this article is about patterns in rugs, it has very useful general information applicable to graphic design.
• An article about design principles, including repetition.
Typography
• A general introduction to typography on the web.
Background color
• A fairly comprehensive article on backgrounds and textures, with examples.
Assessment
Does not meet expectations Meets expectations Exceeds expectations Page banner
research
Absent or incomplete. Student use strong search strategies to find page banners. Students collect, evaluate, and analyze page banners for design principles reflected and how these principles impact audience, purpose, and organization goals. Students report research results.
Student use strong search strategies to find a range of page banners that reflect distinct types of organizations. Students collect, evaluate, and analyze page banners for design principles
reflected and how these principles impact audience, purpose, and organization goals. Students clearly and concisely report research results.
Page banner storyboard
Absent or incomplete. Students create a
storyboard for their page banner and identify the design principles chosen to meet their goals.
Students create a
storyboard for their page banner and identify the design principles chosen to meet their goals. Students can convey design principles and their role in message and tone of the banner plans.
ISTE NETS*S Standards for Students
This activity is aligned to the ISTE NETS*S Technology Standards. Depending on the subject and
content area the student selects you may research your own state content standards to see how this activity aligns to your state requirements.
ISTE NETS*S: Curriculum and Content Area Standards – NETS for Students I. Creativity and Innovation
Students demonstrate creative thinking, construct knowledge, and develop innovative products and processes using technology. Students:
A. apply existing knowledge to generate new ideas and products and processes. B. create original works as a means of personal and group expression
D. identify trends and forecast possibilities. II. Communication and Collaboration
Students use digital media and environments to communicate and work collaboratively, including at a distance, to support individual learning and contribute to the learning of others. Students:
A. interact, collaborate, and publish with peers, experts or others employing a variety of digital environments and media.
D. contribute to project teams to produce original works and solve problems. III. Research and Information Fluency
Students apply digital tools to gather, evaluate, and use information. Students: A. plan strategies to guide inquiry.
B. locate, organize, analyze, evaluate, synthesize, and ethically use information from a variety of sources and media.
C. evaluate and select information sources and digital tools based on the appropriateness to specific tasks.
D. process data and report results.
IV. Critical Thinking, Problem-Solving & Decision-Making
Students use critical thinking skills to plan and conduct research, manage projects, solve problems and make informed decisions using appropriate digital tools and resources. Students:
A. identify and define authentic problems and significant questions for investigation. B. plan and manage activities to develop a solution or complete a project.
C. collect and analyze data to identify solutions and/or make informed decisions.
Adobe Certified Associate, Web Communication objectives
1.1 Identify the purpose, audience, and audience needs for a website. 2.3 Demonstrate knowledge of page layout design concepts and principles.2.5 Demonstrate knowledge of flowcharts, storyboards, and wireframes to create web pages and a site map (site index) that maintain the planned website hierarchy.
Key terms
• rule of thirds • proximity • shape • typography • serif • sans serifActivity 1.10
Building a page banner
Objectives
• Use a design storyboard to build an online graphic.
Materials
• Adobe Fireworks CS4 installed on all student workstations • Students’ page banner storyboards from Activity 1.9 • Guide: How to create a page banner
Time
45–60 minutesOverview
Students use Adobe Fireworks CS4 to build a page banner based on the design in their storyboards.
Student product: Page banner
Activity steps
1. Have students decide on the appropriate canvas size for a page banner.
Note: Because most monitors now display at least 800 × 600 pixels, a horizontal banner that spans the screen can be up to 750 pixels wide. A vertical banner sitting on the right or left side of the screen can be up to 500 pixels high.
2. Allow students time to build their page banners in Fireworks.
Guide: How to create a page banner
Preparation
• Review the drawing tools in Fireworks. Use the Help menu within Fireworks to access step-by-step procedures.
Extensions
Fast finishers: Ask students to design and build a page banner for a classmate or family member.
Using local experts: Assign students as resource specialists. For example, have four students act as local experts to help others use a software product. Extra hands and heads will enable you to manage the classroom without students expecting you to be the sole software expert. As students become more familiar with the software, more students will be able to share the responsibility of being the local experts.
Rationale
Using the storyboard as a guide, professionals identify the type of authoring software required to meet the needs of the planned design. Many times the planned design requires the designer to learn new techniques or aspects of the authoring software.
Background resources
• A tour of the features of Fireworks
• Check the Fireworks technical support area for a variety of resources, most notably technical notes (TechNotes) and tutorials.
Assessment
Does not meet expectations Meets expectations Exceeds expectations Page banner Absent or incomplete. Page banner accurately
reflects storyboard plans and incorporates design principles.
Page banner accurately reflects storyboard plans and incorporates design principles effectively, including design justifications to address audience and purpose.
ISTE NETS*S Standards for Students
This activity is aligned to the ISTE NETS*S Technology Standards. Depending on the subject and
content area the student selects you may research your own state content standards to see how this activity aligns to your state requirements.
ISTE NETS*S: Curriculum and Content Area Standards – NETS for Students VI. Technology Operations and Concepts
Students demonstrate a sound understanding of technology concepts, systems and operations. Students:
B. select and use applications effectively and productively. C. troubleshoot systems and applications.
D. transfer current knowledge to learning of new technologies.
Adobe Certified Associate, Web Communication objectives
2.3 Demonstrate knowledge of page layout design concepts and principles.4.3 Follow a flowchart, storyboards, and wireframes to create web pages and a site map (site index) that maintain the planned website hierarchy.