H Y P E R I O N ® E S S B A S E ® – S Y S T E M 9
E S S B A S E ® I N T E G R A T I O N S E R V I C E SR E L E A S E 9 . 3 . 1
Integration Services System Administrator’s Guide, 9.3.1
Copyright © 1998, 2007, Oracle and/or its affiliates. All rights reserved. Authors: David Lang
The Programs (which include both the software and documentation) contain proprietary information; they are provided under a license agreement containing restrictions on use and disclosure and are also protected by copyright, patent, and other intellectual and industrial property laws. Reverse engineering, disassembly, or decompilation of the Programs, except to the extent required to obtain interoperability with other independently created software or as specified by law, is prohibited.
The information contained in this document is subject to change without notice. If you find any problems in the documentation, please report them to us in writing. This document is not warranted to be error-free. Except as may be expressly permitted in your license agreement for these Programs, no part of these Programs may be reproduced or transmitted in any form or by any means, electronic or mechanical, for any purpose.
If the Programs are delivered to the United States Government or anyone licensing or using the Programs on behalf of the United States Government, the following notice is applicable:
U.S. GOVERNMENT RIGHTS Programs, software, databases, and related documentation and technical data delivered to U.S. Government customers are "commercial computer software" or "commercial technical data" pursuant to the applicable Federal Acquisition Regulation and agency-specific supplemental regulations. As such, use, duplication, disclosure, modification, and adaptation of the Programs, including documentation and technical data, shall be subject to the licensing restrictions set forth in the applicable Oracle license agreement, and, to the extent applicable, the additional rights set forth in FAR 52.227-19, Commercial Computer Software--Restricted Rights (June 1987). Oracle USA, Inc., 500 Oracle Parkway, Redwood City, CA 94065.
The Programs are not intended for use in any nuclear, aviation, mass transit, medical, or other inherently dangerous applications. It shall be the licensee's responsibility to take all appropriate fail-safe, backup, redundancy and other measures to ensure the safe use of such applications if the Programs are used for such purposes, and we disclaim liability for any damages caused by such use of the Programs.
Oracle is a registered trademark of Oracle Corporation and/or its affiliates. Other names may be trademarks of their respective owners.
The Programs may provide links to Web sites and access to content, products, and services from third parties. Oracle is not responsible for the availability of, or any content provided on, third-party Web sites. You bear all risks associated with the use of such content. If you choose to purchase any products or services from a third party, the relationship is directly between you and the third party. Oracle is not responsible for: (a) the quality of third-party products or services; or (b) fulfilling any of the terms of the agreement with the third party, including delivery of products or services and warranty obligations related to purchased products or services. Oracle is not responsible for any loss or damage of any sort that you may incur from dealing with any third party.
Contents
Chapter 1. Using Essbase Integration Server . . . 7
Integration Server . . . 7
Starting Integration Server . . . 7
Integration Server Startup Switches . . . 10
Storing Startup Information in the Configuration File . . . 20
Storing Startup Information in the Startup File (Windows Only) . . . 21
Additional Configuration Parameters . . . 22
Reconnecting . . . 23
Shutting Down Integration Server . . . 24
Integration Server Log File . . . 25
Items Logged in Integration Server File . . . 25
Integration Server Log File Size . . . 26
Data Load Error File . . . 26
Unicode . . . 27
Unicode and Non-Unicode Application Modes . . . 27
When to Use Unicode-Mode Applications . . . 28
Unicode-Enabled Administration Tools . . . 29
Analytic Integration Connector for SAP BW . . . 29
Chapter 2. Working with Users, Locks, and Permissions . . . 31
Working with Users . . . 31
Working with Locks . . . 32
Using Standard Access Mode . . . 32
Using Exclusive Access Mode . . . 32
Correcting Problems with Locks . . . 33
Viewing Integration Services Users with Locks . . . 33
Deleting Locks for Integration Services Users . . . 34
Working with Permissions . . . 35
Viewing Permissions for OLAP Models . . . 35
Viewing Permissions for Metaoutlines . . . 36
Chapter 3. Troubleshooting ODBC and Connections . . . 39
Common Connection Problems . . . 39
Database-Specific Problems . . . 41
ODBC and Connection Problems . . . 41
Isolating Connection Problems . . . 42
Testing the Database Client Connection to the Data Source . . . 44
Testing the ODBC Connection to the Data Source . . . 45
Testing the Integration Server Connection to the Data Source . . . 49
Testing the Integration Services Console Connection to the Data Source . . . 51
Testing the Integration Server Connection to Essbase Server . . . 52
Testing the Integration Services Console Connection to Essbase Server . . . 53
Correcting Connection Problems . . . 54
User Name and Password Problems . . . 55
Correcting Data Source Problems . . . 56
Correcting Database Client Problems . . . 56
Correcting ODBC Problems . . . 58
Correcting Integration Server Problems . . . 59
Correcting Integration Services Console Problems . . . 60
Using ODBC Tracing . . . 61
Using ODBC Tracing on Windows Systems . . . 61
Using ODBC Tracing on UNIX Systems . . . 61
Chapter 4. Tables in OLAP Metadata Catalog . . . 63
OLAP Metadata Catalog . . . 63
Tables Relating to the OLAP Model . . . 64
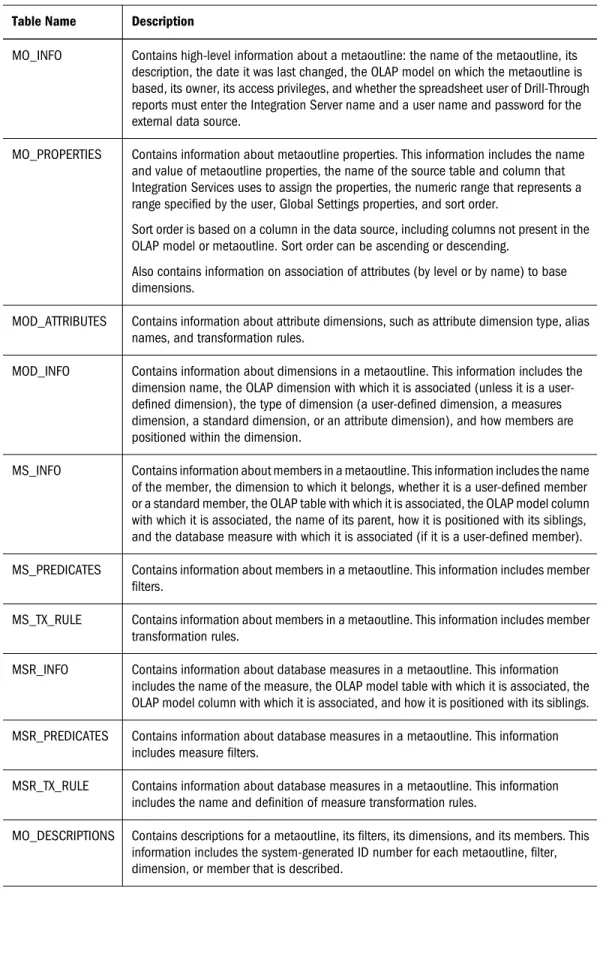
Tables Relating to the Metaoutline . . . 65
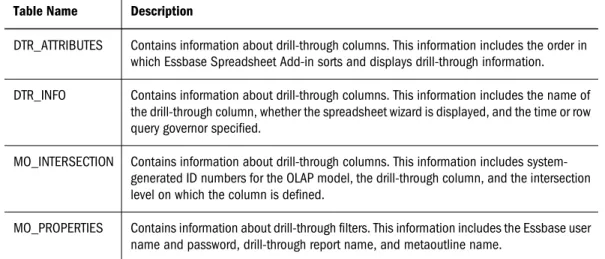
Tables Relating to Drill-Through . . . 67
Tables Relating to Hybrid Analysis . . . 67
Miscellaneous Tables . . . 68
Chapter 5. Using Integration Services Shell . . . 69
Starting Integration Services Shell . . . 69
Integration Services Shell . . . 70
SET and LOAD Commands . . . 71
Informational Commands . . . 72
Command Syntax and Execution . . . 72
Recording Member and Data Load Scripts . . . 73
Running Integration Services Shell Script and Batch Files . . . 73
Running OLAP Command Script Files . . . 74
LOGIN . . . 75
STATUS . . . 76
VERSION . . . 76
SETLOCALE . . . 76
SETSOURCE . . . 77
SETTARGET . . . 78
SETCATALOG . . . 78
LOADMEMBER . . . 78
LOADDATA . . . 81
LOADALL . . . 83
LOGOUT . . . 87
SHUTDOWN . . . 87
EXIT . . . 88
Peforming Member Loads Using Integration Services Shell . . . 88
Loading Data Using Integration Services Shell . . . 88
Chapter 6. Naming Restrictions for Essbase Applications, Databases, and Members . . . 91
Naming Restrictions for Applications and Databases . . . 91
Naming Restrictions for Dimensions, Members, and Aliases . . . 92
Using Dimension and Member Names in Calculation Scripts, Report Scripts, Formulas, and Filters . . . 94
Appendix A. Return Codes and Error Messages . . . 95
OLAPICMD Session Return Codes . . . 95
Member Load Error Messages . . . 96
Data Load Error Messages . . . 99
Drill-Through Report Error Messages . . . 100
Miscellaneous Error Messages . . . 101
Essbase Error Messages Generated During Data Loads . . . 103
Appendix B. Integration Services Limits and Guidelines . . . 105
Artifact Limits . . . 105
Source Database Artifact Naming Limits . . . 108
Setting the Compression Dimension . . . 109
Guidelines . . . 109
Hybrid Analysis Guidelines . . . 110
Data Source Guidelines . . . 110
Dimensions Guidelines . . . 110
Members Guidelines . . . 110
Spreadsheet Guidelines . . . 111
Operations Guidelines . . . 111
Limitations on Transformation Rules with Hybrid Analysis . . . 111
Transformations Not Supported by Hybrid Analysis . . . 112
Limitations on Using Formulas with Hybrid Analysis . . . 112
Using Advanced Relational Access . . . 114
Advanced Relational Access Guidelines . . . 114
Essbase Databases and Advanced Relational Access . . . 116
Drill-through Report Guidelines . . . 117
Unicode Guidelines . . . 118
Duplicate Member Names Guidelines . . . 118
Dimensions in Duplicate Outlines . . . 118
Members in Duplicate Outlines . . . 119
Other Guidelines for Duplicate Outlines . . . 119
DB2 Cube Views Restrictions . . . 119
Unsupported Aggregate Functions in SAP BW . . . 120
Glossary . . . 121
1
Using Essbase Integration Server
In This ChapterIntegration Server ... 7
Starting Integration Server ... 7
Reconnecting ...23
Shutting Down Integration Server ...24
Integration Server Log File...25
Data Load Error File...26
Unicode ...27
Analytic Integration Connector for SAP BW ...29
This chapter describes starting and stopping Essbase Integration Server and how to view its log file.
Integration Server
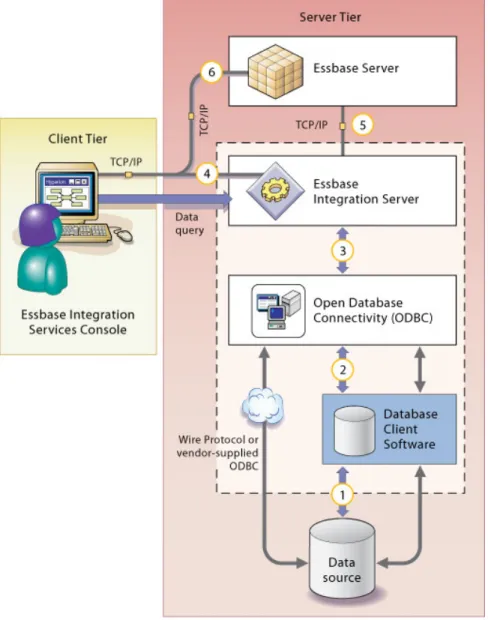
Integration Server is multithreaded server software that is the bridge between the data source, OLAP Metadata Catalog, and Essbase Server. Oracle's Essbase® Integration Services performs several tasks:
● Retrieves OLAP model and metaoutline information from OLAP Metadata Catalog ● Generates SQL statements
● Retrieves data from external sources
● Loads members and data into the Oracle's Hyperion® Essbase® – System 9 database Integration Server must be running if you want to use Integration Services Console (the graphical user interface) or Integration Services Shell (the command line interface).
Starting Integration Server
Before starting Integration Server, verify all required components are running. These components need not be on your local computer.
● If you are accessing relational data sources, verify these components are running:
❍ The relational database management system (RDBMS) with the relational data source containing the OLAP Metadata Catalog where the metadata is stored
❍ One or more RDBMSs containing the relational data sources you want to use to create or modify an OLAP model or metaoutline
● If you are accessing an SAP Business Information Warehouse (BW) data warehouse, verify Hyperion® System™ 9 BI+™ Analytic Integration Connector for SAP BW™ is running. Essbase Server must be running if you create, change, or load data into an Essbase database or if you want to preview an Essbase database outline.
You can start Integration Server using several methods: ● From a DOS command prompt
● From a UNIX command prompt ● From the Windows Desktop Start menu ● As a Windows service
Note:
To start Integration Server as a Windows service, you must first enable the Windows service for Integration Server. See the Essbase Integration Services Installation Guide.
➤ To start Integration Server from DOS:
1 At the command line, type the startup.bat command.
The startup.bat command ensures the environment is set correctly and that proper PATH and CLASSPATH settings are used when starting Integration Server.
2 If you want to change a default startup switch, add the switch to the ais.cfg file or the
startup.bat file.
3 If you want to change a default configuration parameter, add the parameter to the ais.cfg file.
See “Storing Startup Information in the Configuration File” on page 20 and “Storing Startup Information in the Startup File (Windows Only)” on page 21 for information on adding startup switches and configuration parameters to files.
➤ To start Integration Server from UNIX: 1 Type is.sh .
2 Type the executable name on the command line, for example, type
olapisvr
Note:
If Integration Server does not start when olapisvr is executed from the command line, the operating system path may not be updated correctly. See the Essbase Integration Services Installation Guide.
3 If you want to change a default startup switch, type the command syntax after the olapisvr command or add the switches to the ais.cfg file.
See “Storing Startup Information in the Configuration File” on page 20 and “Storing Startup Information in the Startup File (Windows Only)” on page 21 for information on adding startup switches to these files.
Values for startup switches entered at the command line override startup switch values stored in the ais.cfg file.
When entering parameters for startup switches at the command line, enclose path names that contain spaces in quotation marks (" "). The following example illustrates the syntax for passing the -E and -M options:
olapisvr -E"c:\my logs\aislog" -M"c:\ess\bin\essbase.mdb"
➤ To start Integration Server from the Windows Desktop Start menu: 1 Click Start.
2 Select Programs > Hyperion > Integration Services > Integration Server.
If startup switch settings are stored in startup.bat or ais.cfg, the settings in
startup.bat override the settings in ais.cfg when Integration Server is started from the Windows Desktop Start menu.
➤ To start Integration Server as a Windows service: 1 Access the Services dialog box.
● On Windows 2000 and Windows 2003, select Start > Settings > Control Panel, double-click
Administrative Tools, and then double-click Services.
● On Windows XP, select Start > Control Panel. In the Control Panel, select Performance & Maintenance, and then Administrative Tools. In the Administrative Tools window, double-click Services.
The Services dialog box is displayed with EssbaseIntegration Server in the list of services. 2 Select, but do not double-click, Essbase Integration Server.
3 If you want to change any default startup switches or configuration parameters, add the switches to the
ais.cfg file or the startup.bat file.
4 Start the service for Integration Server.
● On Windows 2000 and 2003, select Action > Start. ● On Windows XP, click Start.
The Service Control message box is displayed. After a few seconds it is removed, and the
Status field entry for Integration Server is changed to Started.
Integration Server Startup Switches
Table 1 lists the switches and configuration parameters used to change default settings when starting Integration Server from the command line, to add startup switch information to the startup.bat file, or to store startup switch information in the ais.cfg file.
Table 1 Essbase Integration Server Switches
-? -F -N -U -A -I -P [V] -C [K] -R -D -L -S -E -M -T
For information on storing startup switches in startup.bat or ais.cfg, see “Storing Startup Information in the Configuration File” on page 20 and “Storing Startup Information in the Startup File (Windows Only)” on page 21.
The following topics describe the default switches.
-?
To view a list of available switches for starting Integration Server.
-A
To ignore the parent of a given member when updating OLAP intersections during a drill-through operation.
To ignore parents when updating OLAP intersections, do one of the following: ● In Windows, add -AY to the startup.bat file.
● In UNIX, type -AY when you start Integration Server. ● In Windows or UNIX, add [A]=Y to the ais.cfg file.
By default, Integration Server sets the value at N so that parents are not ignored when updating OLAP intersections. If a parent is ignored during an update of OLAP intersections, subsequent drill-through operations cannot be performed on any shared members related to that parent.
In Windows:
In the startup.bat file, to ignore the parent of a given member when updating OLAP intersections during a drill-through operation, add -IY after "C:\Hyperion\AIS\bin\ olapisvr.exe". For example:
"C:\Hyperion\AIS\bin\olapisvr.exe" -AY
To ignore the parent of a given member when updating OLAP intersections during a drill-through operation, type:
olapisvr -AY
In Windows or UNIX:
In the ais.cfg file, this parameter is specified in the following format:
[A]=Y
-B
Note:
-B is no longer available.
-C
To set the number of records that Integration Server commits to Essbase: ● In Windows, add -Cnumberofrecords to the startup.bat file. ● In UNIX, type -Cnumberofrecords when you start Integration Server. ● In Windows or UNIX, add -Cnumberofrecords to the ais.cfg file. The default setting is all records.
-C can be used with the -N switch.
Note:
-C should not be used in operations involving aggregate storage.
-C is often used in testing environments. The recommended setting for testing purposes is 5,000 to 10,000 records. After you have completed testing, shut down Integration Server to revert to the default setting, or reset to the limit allowed by DATAERRORLIMIT.
When -C is used with the DATAERRORLIMIT setting in the essbase.cfg file, you can maximize the number of records written to dataload.txt, the data load error file. For example, if you set DATAERRORLIMIT to 65,000, the maximum number of error records allowed in the Essbaselog, and then set -C to 65,000 or less, you will be able to view all error records allowed by Essbase.
Note:
If you have included a setting for testing purposes for -C in ais.cfg, be sure to edit the file to clear the ais.cfg file so that it will change the setting back to “all records.”
Setting a smaller number of records during testing enables you to see data load errors
incrementally, providing you an opportunity to correct problems before continuing. Resetting the number of records to the default of all records results in faster performance.
There is no limit to the number of records that Integration Server can transfer to Essbase during a data load. If, however, you experience memory problems during a data load, set -C to a smaller value.
Note:
The setting of -C does not apply to member loads.
In Windows:
For example, in the startup.bat file, to set the number of records that Integration Server incrementally transfers to Essbase during a data load to 5,000, add -C5000 after "C: \Hyperion\ AIS\bin\olapisvr.exe". For example:
"C:\Hyperion\AIS\bin\olapisvr.exe" -C5000
In UNIX:
For example, to set the number of records that Integration Server incrementally transfers to Essbase during a data load to 5,000, type:
olapisvr -C5000
In Windows or UNIX:
For example, to set the number of records that Integration Services incrementally transfers to Essbase during a data load to 5,000, in the ais.cfg file, type:
[C]=5000
-D
To specify whether or not to add the DISTINCT clause to the SELECT statement of drill-through SQL.
The default behavior adds the DISTINCT clause. To not add the DISTINCT clause: ● In Windows, add -DN to the startup.bat file.
● In UNIX, type -DN when you start Integration Server. ● In Windows or UNIX, add [D]=N to the ais.cfg file.
In Windows:
In the startup.bat file, to specify that the DISTINCT clause should not be added to drill-through queries, add -DN after "C:\Hyperion\AIS\bin\olapisvr.exe". For example:
"C:\Hyperion\AIS\bin\olapisvr.exe" -DN
Any value other than -DN or no value specifies that the DISTINCT clause should always be added to drill-through SQL.
In UNIX:
To specify that the DISTINCT clause should not be added to drill-through queries, type:
olapisvr -DN
In Windows or UNIX:
In the ais.cfg file, this parameter is specified in the following format:
[D]=N
-E
To give the log file a different name:
● In Windows, add -Elog_file_name to the startup.bat file. ● In UNIX, type -Elog_file_name when you start Integration Server. ● In Windows or UNIX, add [E]=log_file_name to the ais.cfg file.
The .log extension is added automatically. The default name and location is ISHOME\log\ olapisvr.log.
In Windows:
In the startup.bat file, to name the log file myserver.log and put it in the temp directory on Windows, add -Ec:\temp\myserver after "C:\Hyperion\AIS\bin\
olapisvr.exe". For example:
"C:\Hyperion\AIS\bin\olapisvr.exe -E"c:\temp\myserver
Do not type the .log file extension. The .log extension is automatically appended to the name you type for the log.
Always enclose path names that contain spaces with quotation marks (" "); for example, type:
"C:\Hyperion\AIS\bin\olapisvr.exe" -I -E"c:\program files\ais\myserver"
In UNIX:
To name the log file myserver.log and put it in the temp directory on Windows, type
olapisvr -Ec:\temp\myserver
Enclose path names that contain spaces in quotation marks (" "); for example, type:
olapisvr -E"c:\program files\ais\myserver"
In Windows or UNIX:
In the ais.cfg file, this parameter is specified in the following format:
[E]=c:\temp\myserver
or
[E]=c:\program files\ais\myserver
Note:
In the ais.cfg file, you do not need to type quotation marks around path names that contain spaces.
-F
To specify whether to add parentheses around user-defined drill-through filters. See Essbase Spreadsheet Add-in help.
The default is not to add parentheses around user-defined drill-through filters. To add parentheses:
● In Windows, add -FY to the startup.bat file. ● In UNIX, type -FY when you start Integration Server. ● In Windows or UNIX, add [F]=Y to the ais.cfg file.
In Windows:
In the startup.bat file, to specify that parentheses should be added around user-defined drill-through filters, add -FY after "C:\Hyperion\AIS\bin\olapisvr.exe". For example:
"C:\Hyperion\AIS\bin\olapisvr.exe" -FY
Any other value or no value specifies that parentheses should not be added around user-defined drill-through filters.
In UNIX:
To specify that parentheses should be added around user-defined drill-through filters, type:
olapisvr -FY
In Windows or UNIX:
In the ais.cfg file, this parameter is specified in the following format:
[F]=Y
-I
To prevent Integration Server from shutting down as a service on Windows after you log off, add -I to the startup.bat file.
When you run Integration Server as a service on Windows, we recommended you use -I.
Note:
This configuration parameter is applicable only in Windows environments.
Note:
In Windows:
In the startup.bat file, to prevent Integration Server from shutting down as a service, add -I after "C:\Hyperion\AIS\bin\olapisvr.exe". For example:
"C:\Hyperion\AIS\bin\olapisvr.exe" -I
-L
To set the level of detail of the messages that Integration Server logs: ● In Windows, add -Llevel to the startup.bat file.
● In UNIX, type -Llevel when you start Integration Server. ● In Windows or UNIX, add -Llevel to the ais.cfg file. The default level is 2. You can specify the following levels:
0 To log all debug messages and the ODBC SQL generated by Integration Server; generate the
dataloadrecord.txt file, listing the first 1,000 records, which may include successfully loaded records and rejected records; and create the hisdld.rul file consisting of the names of the dimensions loaded followed by the leaf node number of each dimension or member
2 To log all informational messages and some of the ODBC SQL generated by Integration Server
3 To log all warnings
4 To log all noncritical errors
7 To log all critical errors where Integration Server terminates the command
8 To log all critical server errors
The recommended level setting is 2 or 3.
In Windows:
In the startup.bat file, to use the highest level of logging, add -L0 after "C:\Hyperion\ AIS\bin\olapisvr.exe". For example:
"C:\Hyperion\AIS\bin\olapisvr.exe" -L0
In UNIX:
To use the highest level of logging, type:
olapisvr -L0
In Windows or UNIX:
In the ais.cfg file, this switch is specified in the following format:
[L]=0
-M
To specify the location of the Essbase message database file if the file is moved to a new location:
● In Windows, add -Mpath\essbase.mdb to the startup.bat file. ● In UNIX, type -Mpath\essbase.mdb when you start Integration Server. ● In Windows, add -Mpath\essbase.mdb to the ais.cfg file.
The default location is ISHOME\bin\essbase.mdb.
In Windows:
In the startup.bat file, to specify the new location of the Essbase message database file as essbasemsg\bin, add -Mc:\essbasemsg\bin\essbase.mdb after "C:\Hyperion\ AIS \bin\olapisvr.exe". For example:
"C:\Hyperion\AIS\bin\olapisvr.exe" -Mc:\essbasemsg\bin\essbase.mdb
Always enclose path names that contain spaces with quotation marks (" "); for example, type:
"C:\Hyperion\AIS\bin\olapisvr.exe" -M"c:\ess\bin\essbase.mdb"
In UNIX:
To specify the new location of essbase.mdb as essbasemsg\bin, type:
olapisvr -Mc:\essbasemsg\bin\essbase.mdb
Enclose path names that contain spaces with quotation marks (" "); for example:
olapisvr -M"c:\ess\bin\essbase.mdb"
In Windows or UNIX:
In the ais.cfg file, this parameter is specified in the following format:
[M]=c:\essbase\bin\essbase.mdb
or
[M]=c:\ess\bin\essbase.mdb
Note:
In the ais.cfg file, you do not need to add quotation marks around path names that contain spaces.
-N
To specify the number of threads Integration Server uses when sending data to Essbase during a data load, do one of the following:
● In Windows, add -Nnumber_of_threads to the startup.bat file. ● In UNIX, type -Nnumber_of_threads when you start Integration Server. ● In Windows or UNIX, add -Nnumber_of_threads to the ais.cfg file. The default setting is 1 thread.
—N controls the number of threads allocated to data load optimization. Usually, users start with 2 threads and adjust according to the environment.
In Windows:
In the startup.bat file, to set the number of threads to 2, add -N2 after "C:\Hyperion\ AIS\bin\olapisvr.exe". For example:
"C:\Hyperion\AIS\bin\olapisvr.exe" -N2
In UNIX:
To set the number of threads to 2, type:
olapisvr -N2
In Windows or UNIX:
In the ais.cfg file, this parameter is specified in the following format:
[N]=2
-P
To set the TCP port number with which Integration Server communicates with its clients to a port different from the default 3388:
● In Windows, add -Pportnumber to the startup.bat file ● In UNIX, type -Pportnumber when you start Integration Server ● In Windows or UNIX, add -Pportnumber to the ais.cfg file
In Windows:
In the startup.bat file, add -Pportnumberafter "C:\Hyperion\AIS\bin \olapisvr.exe". For example:
"C:\Hyperion\AIS\bin\olapisvr.exe" -P8850
If you change the default port number, in Integration Services Console you must log in to the Integration Server by typing the server name or IP address and the non-standard port number, separated by a colon; for example:
aspen:8850
When starting Integration Services Shell, to change the TCP port number, at the command line, type -Pportnumber. For example:
olapicmd -P8850
In UNIX:
When starting Integration Server or Integration Services Shell, to change the TCP port number, type:
olapisvr -P8850
or
olapicmd -P8850
In Windows or UNIX:
In the ais.cfg file, this parameter is specified in the following format:
[P]=8850
-Q
Note:
-Q is no longer available.
-R
To specify that users are restricted from browsing table records when customizing a drill-through report.
● When -R is not set, users have unrestricted access to all table records. ● When -R is set to Y, users have no access to any table records.
● When -R is set to F, users have no access to fact table records but have unrestricted access to all other table records.
To restrict users from browsing fact table records:
● In Windows, add -Raccess_parameter to the startup.bat file. ● In UNIX, type -Raccess_parameter when you start Integration Server. ● In Windows or UNIX, add [R]=access_parameter to the ais.cfg file. By default, -R is not set, giving users unrestricted access to all table records.
In Windows:
In the startup.bat file, to prevent users from accessing any table records, add -RY after "C: \Hyperion\AIS\bin\olapisvr.exe". For example:
"C:\Hyperion\AIS\bin\olapisvr.exe" -RY
In the startup.bat file, to prevent users from accessing fact table records, add -RF after "C: \Hyperion\AIS\bin\olapisvr.exe"-R. For example:
"C:\Hyperion\AIS\bin\olapisvr.exe" -RF
In UNIX:
To prevent users from having any access to any table records, type:
olapisvr -RY
To prevent users from having any access to fact table records, type:
olapisvr -RF
In Windows or UNIX:
[R]=Y
or
[R]=F
-S
To specify the stack size in megabytes of each thread that Integration Server creates:: ● In Windows, add -Snumber_of_threads_created to the startup.bat file. ● In UNIX, type -Snumber_of_threads_created when you start Integration Server. ● In Windows or UNIX, add [S]=number_of_threads_created to the ais.cfg file. For Windows and Solaris, no stack size setting is required. For AIX, the default stack size setting is 3 MB; for HP-UX, the default stack size setting is 8 MB.
In Windows:
In the startup.bat file, to set the number of threads that Integration Server creates to 1, add -S1 after "C:\Hyperion\AIS\bin\olapisvr.exe". For example:
"C:\Hyperion\AIS\bin\olapisvr.exe" -S1
In UNIX:
To set the number of threads that Integration Server creates to 1, type:
olapisvr -S1
In Windows or UNIX:
In the ais.cfg file, this parameter is specified in the following format:
[S]=1
-T
To set the number of network listeners that Integration Server starts: ● In Windows, add -Tnumber to the startup.bat file
● In UNIX, type -Tnumber when you start Integration Server ● In Windows or UNIX, add [T]=number to the ais.cfg file The default (and recommended) number is 10.
Network listeners receive requests from Integration Services Console. Integration Server automatically adds and subtracts listeners as needed, so the number of listeners set at startup does not limit the number of users that can connect to an Integration Server.
In Windows:
In the startup.bat file, to set the number of network listeners that Integration Server starts to 17, add -T17 after "C:\Hyperion\ais\bin\olapisvr.exe". For example:
"C:\Hyperion\AIS\bin\olapisvr.exe" -T17
In UNIX:
To set the number of network listeners Integration Server starts to 17, type:
olapisvr -T17
In Windows or UNIX:
In the ais.cfg file, -T is specified in the following format:
[T]=17
-U
To specify whether the Essbase database and application should be unloaded from memory after a load is completed.
Integration Server can successfully unload the Essbase database from memory only if there are no users accessing it.
To specify whether the Essbase database and application should be unloaded from memory after a load is completed, do one of the following:
● In Windows, add -UY to the startup.bat file. ● In UNIX, type -UY when you start Integration Server. ● In Windows or UNIX, add [U]=Y to the ais.cfg file.
By default, Integration Server does not unload the Essbase database from memory after a load is completed.
In Windows:
In the startup.bat file, to specify whether the Essbase database and application should be unloaded from memory after a load is completed, add -UY after "C:\Hyperion\ AIS\bin \olapisvr.exe". For example:
"C:\Hyperion\AIS\bin\olapisvr.exe" -UY
In UNIX:
To specify whether the Essbase database and application should be unloaded from memory after a load is completed, type
olapisvr -UY
In Windows or UNIX:
In the ais.cfg file, -U is specified in the following format:
[U]=Y
Storing Startup Information in the Configuration File
The ais.cfg file has two purposes:● To configure the required JDBC drivers for Teradata and Oracle users. See the Essbase Integration Services Installation Guide
● To pass startup switches and configuration parameters, other than the defaults, when launching Integration Server
The ais.cfg file is a text file residing in the \bin directory on Windows, UNIX, and Linux platforms. When you start Integration Server from the command line using the
startup.bat command (in DOS or UNIX), the startup routine checks the contents of ais.cfg for any startup switch or parameter information. Then one of the following applies: ● Startup switch or configuration parameter syntax added to the ais.cfg file override default
settings (see “Integration Server Startup Switches” on page 10 and “Storing Startup Information in the Configuration File” on page 20).
● If you did not add startup switch or parameter information to ais.cfg, the default settings are used to start Integration Server.
● If ais.cfg contains startup switch syntax and you enter startup switch overrides in the startup.bat file (Windows only) any startup switches in startup.bat override both the startup switch settings contained in the ais.cfg file and the default settings.
➤ To store startup switch and parameter settings in the ais.cfg file: 1 Open the ais.cfg file in any text editor.
2 Add the startup switch you want to store by typing the startup switch letter in brackets; for example:
[B]
3 Add the new information for startup switches in the following format:
[L]=0
[E]=c:\temp\myserver [N]=40
[M]=c:\ess\bin\essbase.mdb
To enter the above overrides in the startup.bat file, type:
"C:\Hyperion\AIS\bin\olapisvr.exe" -I -L0 -Ec:\temp\myserver -N40 -M"c: \ess\bin\essbase.mdb"
4 Save and close ais.cfg.
Storing Startup Information in the Startup File (Windows
Only)
The startup.bat file has two purposes:
● To configure the common Hyperion components, such as Java, ODBC, and JDBC drivers, for Teradata and Oracle users. See the Essbase Integration Services Installation Guide ● To pass startup switches and configuration parameters, other than the defaults, when
launching Integration Server
The startup.bat file is a text file residing in the \bin directory. When you start Integration Server as a Windows service, the startup routine checks the contents of startup.bat for any startup switch information. Then the startup routine checks ais.cfg for any startup switch and configuration parameter information. Then one of the following applies:
● Startup switch syntax added to the startup.bat file (Windows only), override default settings (see “Integration Server Startup Switches” on page 10).
● If you added startup switch or configuration parameter syntax only to the ais.cfg file, those settings that you added override the default settings for those switches and parameters (see “Integration Server Startup Switches” on page 10 and “Storing Startup Information in the Configuration File” on page 20).
● If you did not add startup switch or parameter information to startup.bat or ais.cfg, the default settings (see “Integration Server Startup Switches” on page 10 and “Storing Startup Information in the Configuration File” on page 20) are used to start Integration Server.
➤ To store startup switch settings in the startup.bat file: 1 Open the startup.bat file in any text editor.
2 If you want to change a default startup switch, type the command syntax in the line that calls the Integration Server.
The values for startup switches that you enter into startup.bat override any startup switch values you have stored in the ais.cfg file.
When entering parameters for startup switches in startup.bat, enclose path names that contain spaces in quotation marks (" "). The following example illustrates the syntax for passing the -L, -E, -M, -N options:
"C:\Hyperion\aisserv\bin\olapisvr.exe" -I -L0 -Ec:\temp\myserver -N40 -M"c:\ess\bin\essbase.mdb"
Note:
In the startup.bat file, the above syntax should be entered all on one line.
You can only enter startup switch information into startup.bat. Configuration parameters must be entered in ais.cfg.
3 Save and close startup.bat.
Additional Configuration Parameters
Add the configuration parameters specified in this topic to the ais.cfg file to change the default configuration settings described in “Storing Startup Information in the Configuration File” on page 20.
Windows Configuration Parameters
The configuration parameters described in this section can only be specified in the ais.cfg file that is installed on Windows. These parameters cannot be specified in the startup.bat file, at the command line, or in the ais.cfg file that is installed with the UNIX version of Integration Server.
[K]
To specify whether to display the primary keys in an OLAP model. The default behavior is not to display the primary keys in an OLAP model.
If you want to display the primary keys in an OLAP model, add [K]=Y to the ais.cfg file.
In Windows:
In the ais.cfg file, this parameter is specified in the following format:
[K]=Y
[V]
To specify whether Integration Server automatically validates an OLAP model or metaoutline when a Save or Save As operation is performed. The default behavior is for Integration Server to validate an OLAP model or metaoutline before saving it.
If you want to disable automatic OLAP model and metaoutline validation, add [V]=0 to the ais.cfg file.
In Windows:
In the ais.cfg file, this parameter is specified in the following format:
[V]=0
Windows and UNIX Configuration Parameter for Aggregate Storage
The configuration parameter described in this section can be specified in the ais.cfg file that is installed on Windows and UNIX. This parameter cannot be specified in the startup.bat file at the command line.
[ADDDUPLICATESFORASO]
To allow addition of duplicate data records when using an aggregate storage database. The default behavior is to set the data load option in aggregate storage to not allow duplicate records. If you want to allow duplicate data records when using an aggregate storage database, add [ADDDUPLICATESFORASO]=Y to the ais.cfg file.
In Windows and UNIX:
In the ais.cfg file, this parameter is specified in the following format:
[ADDDUPLICATESFORASO]=Y
Reconnecting
If you lose the connection to Integration Server and OLAP Metadata Catalog, you can reconnect directly from Integration Services Console without losing unsaved work.
➤ To reconnect to Integration Server::
1 Start Integration Server using any method described in “Starting Integration Server” on page 7.
2 In the Integration Services Console, select Connections > OLAP Metadata Catalog > Reconnect.
Note:
The connection is made implicitly; no messages are displayed.
Shutting Down Integration Server
After using Integration Server, shut it down using any of several methods.
Note:
Always close Integration Services Console before shutting down Integration Server.
➤ To shut down Integration Server from the command line, either close the Integration Server window, or use Integration Services Shell.:
● On Windows platforms, close the Integration Server window. ● Issue the SHUTDOWN command in the Integration Services Shell. See “Integration Services Shell Commands” on page 75.
➤ To shut down Integration Server from the Windows desktop:
1 Right-click the button representing Integration Server in the Windows task bar.
2 Select Close.
➤ To shut down Integration Server as a Windows service: 1 Select Start > Settings > Control Panel.
2 Open the Services dialog box.
● On Windows 2000 and 2003, double-click Administrative Tools, and then double-click
Services.
● On Windows XP, select Performance & Maintenance, and then Administrative Tools. In the Administrative Tools window, double-click Services.
3 Locate Essbase Integration Server in the list of services.
4 Stop the service.
● On Windows 2000 and 2003, select Action > Stop.
Integration Server Log File
By default, the Integration Server log file is named olapisvr.log and is located in the ISHOME\log directory. View it from Integration Services Console by selecting Tools > View Log File to launch the Server Log file dialog box, or open olapisvr.log in any text editor. To create the log file with a different location or name, use -E. See “Integration Server Startup Switches” on page 10.
Items Logged in Integration Server File
Items are logged in the Integration Server log file, depending on the logging level you set when you start Integration Server:
● Processing messages
● Member load error messages
● Settings for switches used to start Integration Server from the command line or as a Windows service
● Two copies of each SQL statement generated to access the data source as follows:
❍ The first statement is in the SQL dialect understood by the ODBC driver and is generated by Integration Server.
❍ The second statement is generated by the ODBC driver and is translated by the driver into the dialect of SQL understood by the data source being accessed.
● Integration Services Shell commands used to perform an action ● Connection information
● Load status
● Names of any metaoutline running ● Other informational messages
When a user accesses a drill-through report using Essbase Spreadsheet Add-in, items related to the drill-through report are also logged:
● Drill-through report name
● Metaoutline with which this drill-through report is associated ● Essbase Server computer being accessed
● Essbase application and database ● User accessing drill-through report
See “Integration Server Startup Switches” on page 10.
Integration Server error message text is located in ISHOME\bin\error.txt on Windows systems; $ISHOME/bin/error.txt on UNIX.
Essbase error message text is located in ISHOME\bin\message.txt on Windows systems; $ISHOME/bin/message.txt on UNIX.
Integration Server Log File Size
Your server log file will grow to a maximum of 50 megabytes in size. Then it will be truncated to 10 megabytes with the most recent 10 megabytes of entries being retained. The log file will again grow to 50 megabytes before it is truncated.
Change the default settings by specifying LOGFILEMIN and LOGFILEMAX in the ais.cfg file, for example:
[LOGFILEMIN] = 20 [LOGFILEMAX]= 60
Data Load Error File
If data loads generate errors, the file dataload.txt is placed in a folder Integration Server creates for the load under the ISHOME/loadinfo directory. The dataload.txt file lists rejected dimensions and members and error message codes to identify data load problems. The folder Integration Server creates in the loadinfo directory is in the following format:
<application_database_timestamp_sessionnumber>
If you performed a data load for the MyTBC application and MyTBC_DB database at 10 P.M. on May 1, 2003, the folder is named:
MyTBC_MyTBC_DB_2003_May_1_10_00_pm_<sessionnumber>
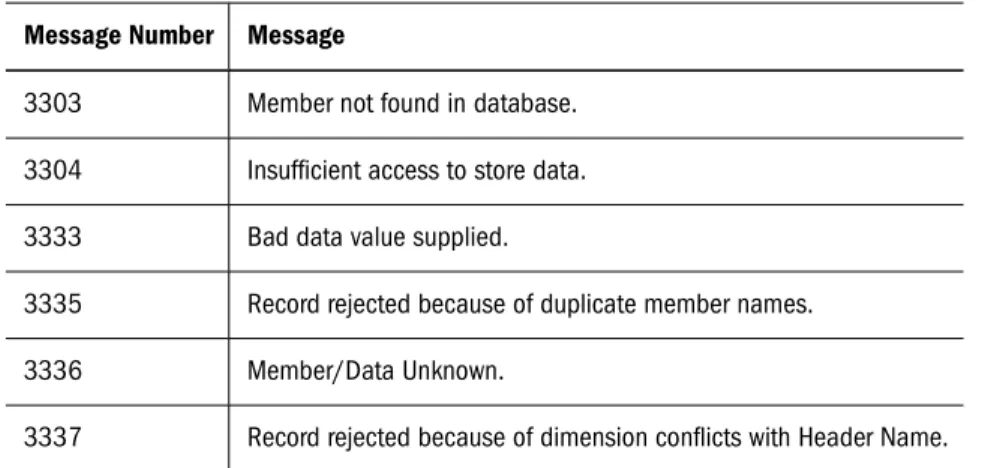
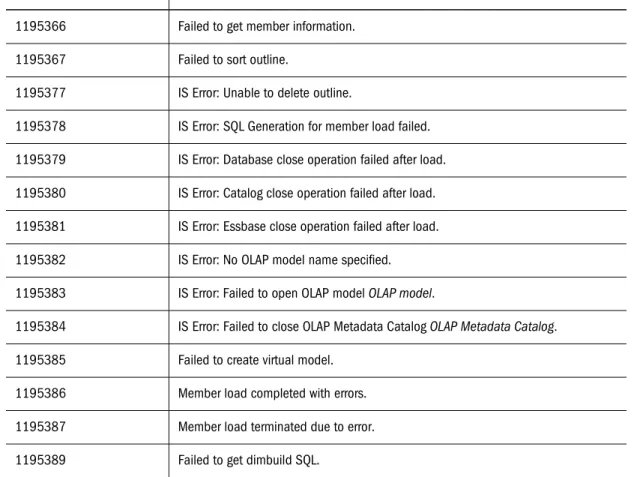
In the case of data load failure, open the dataload.txt file located in the folder described previously and review the error codes.
These are the most common error codes:
Message Number Message
3303 Member not found in database.
3304 Insufficient access to store data.
3333 Bad data value supplied.
3335 Record rejected because of duplicate member names.
3336 Member/Data Unknown.
3337 Record rejected because of dimension conflicts with Header Name.
Figure 1 Example from dataload.txt File
Unicode
Sharing data across national and language boundaries is a challenge for multi-national
businesses. Traditionally, each computer stores and renders text based on its locale specification. A locale identifies the local language and cultural conventions such as the formatting of currency and dates, sort order of the data, and the character set encoding to be used on the computer. The encoding of a character set refers to the specific set of bit combinations used to store the character text as data, as defined by a code page or an encoding format. In Essbase, code pages map characters to bit combinations for non-Unicode encodings.
Because different encodings can map the same bit combination to different characters, a file created on one computer can be misinterpreted by another computer that has a different locale. The Unicode Standard was developed to enable computers with different locales to share character data. Unicode provides encoding forms with thousands of bit combinations, enough to support the character sets of multiple languages simultaneously. By combining all character mappings into a single encoding form, Unicode enables users to correctly view character data created on computers with different locale settings.
Users whose computers are set up in different languages can work with the same database. For example, using alias tables in their respective languages, users in Taiwan can view database reports displaying Chinese characters while users in France can view the same reports in French characters.
User-defined character sets (UDC) are not supported and the Chinese National Standard GB 18030-2000 is not supported.
Note:
For information on using Unicode in Essbase, see the Essbase Services Database AdministratorÕs Guide.
Unicode and Non-Unicode Application Modes
Applications are designated as Unicode-mode applications or non-Unicode-mode applications. Unicode-mode applications support multiple character sets. Integration Services uses the UTF-8 encoding form to interpret and store character text. Character-based artifacts in Unicode-mode applications, such as member and alias names, can include characters from different languages. Clients working with Unicode-mode applications can have different locales than Essbase Server. For example, client computers with Japanese locales and client computers with German locales
can work with the same Unicode-mode application on an Essbase Server that has a Spanish locale.
Non-Unicode-mode applications support one character set that is defined by a locale value, which must be the same for Essbase Server and all Unicode clients that work with the non-Unicode-mode applications. Both non-Unicode-mode and non-non-Unicode-mode applications can reside on the same Essbase Server.
Note:
You cannot convert a Unicode-mode application to non-Unicode mode.
When to Use Unicode-Mode Applications
Consider working with Unicode-mode applications only if you have any of the following situations:
● You need to enable users with different languages to view, in their own languages and character sets, information from a common database. For example, using alias tables in Japanese and German, users in Japan and Germany could view, in their own languages, information about a common product set.
● You need to handle artifact names longer than non-Unicode-mode applications support. For example, application and database names need to be larger than eight characters or, if you are working with a multi-byte character set, you need to handle more characters in artifact names.
● You have experienced what is called the “round-trip” problem. The round-trip problem can occur in communications between multi-byte operating systems and application programs where two different bit values can map to the same character. As Java applications, Oracle's Essbase® Administration Services and Oracle's Hyperion® Provider Services always work in Unicode. No encoding conversions occur when these clients work with Unicode-mode applications and UTF-8-encoded text files; hence no round-trip conversion errors. When deciding on using Unicode-mode applications, you should also consider the following points:
● Using non-Unicode text files with Unicode-mode applications requires an understanding of locales and care in managing to them. To prevent errors that could cause database corruption, using UTF-8-encoded files is recommended. For details, see the Essbase Services Database AdministratorÕs Guide.
● To work with Unicode-mode applications, custom client applications that were written to support non-Unicode-mode applications must be built to use the longer string lengths used by Unicode-mode applications. This may be a simple build or may involve
re-programming, depending on the design of the applications. Also, depending on how they are coded, the new client applications may require more memory.
Unicode-Enabled Administration Tools
Hyperion provides Oracle's Essbase® Administration Services and MaxL to administer Unicode-mode applications. The main administration activities include, in addition to the normal Essbase administration activities, changing the Unicode-related mode of the Essbase Server to enable or disable creation of Unicode-mode applications, creation of Unicode-mode applications, migration of non-mode applications to Unicode mode, and viewing the Unicode-related status of servers and applications.
Analytic Integration Connector for SAP BW
Integration Services supports SAP Business Information Warehouse (BW) data collection. This separately purchased and licensed option is known as “Analytic Integration Connector for SAP BWHyperion.”
Integration Services functions with Analytic Integration Connector for SAP BW through BAPI Protocol for online analytic processing (OLAP). The open database connectivity (ODBC) driver used for this process is manufactured by Simba Technologies. (See the Hyperion Analytic Integration Connector Installation Guide.)
2
Working with Users, Locks, and
Permissions
In This ChapterWorking with Users...31 Working with Locks ...32 Working with Permissions ...35
This chapter describes how to view information about users, OLAP models, and metaoutlines in OLAP Metadata Catalog. It also describes how to clear locks and change permissions on OLAP models and metaoutlines.
See Chapter 4, “Tables in OLAP Metadata Catalog.”
Working with Users
When working with Integration Services, you must manage access for three types of users: ● Integration Services users who can access OLAP models and metaoutlines stored in OLAP
Metadata Catalogs. (Integration Services users are the database users defined in the data source that contains the OLAP Metadata Catalog that you are using.)
● Essbase users who can access the Essbase database that you create from a metaoutline ● Source database and data warehouse users who can access the tables and views in the specified
source database or data warehouse
Use the tools provided with each data source to manage each set of users. Consult the data source documentation if you are not sure how to perform any of the following tasks:
● Create new users
● View a list of available users ● Change the permissions for users ● Delete current users
● Disconnect users
Working with Locks
You can use either of two methods for opening an OLAP model or metaoutline in Integration Services Console: standard access mode (the default mode) and exclusive access mode. The locks that are established by these different modes are specific to Integration Services and are completely separate from the locking performed by the data source database.
Tip:
If you plan only to view an OLAP model or metaoutline, use standard access mode. If you plan to edit an OLAP model or metaoutline, use exclusive access mode.
Using Standard Access Mode
When you open an OLAP model in standard access mode, Integration Services gives you a read lock on that OLAP model. When you open a metaoutline in standard access mode, Integration Services gives you a read lock on that metaoutline and a read lock on the OLAP model on which the metaoutline is based. Multiple users can have read locks on the same OLAP model or metaoutline at the same time.
When you save an OLAP model or metaoutline in standard access mode, Integration Services upgrades the read lock to a write lock for the duration of the save. After Integration Services saves the changes to the OLAP model or metaoutline, the lock reverts back to a read lock. However, if other users have the OLAP model or metaoutline open, your changes are not updated for the other users until they reopen the document.
In addition, if other users have the OLAP model or metaoutline open at the same time as you do, they can edit and save it, thereby overwriting your changes. Using exclusive access mode prevents users from overwriting your changes. See “Using Exclusive Access Mode” on page 32.
➤ If you opened and edited an OLAP model or metaoutline in standard access mode, and are concerned that other users may overwrite your changes, perform one of the following actions: ● Save the OLAP model or metaoutline using a different name. See Integration Services
Console Help.
● If you have not yet started editing the document or have entered only a few changes, close the OLAP model or metaoutline and then reopen it using exclusive access mode and reapply the changes.
● Contact the users with read locks and ask them to close the OLAP model or metaoutline. To view a list of users with read locks, see “Viewing Integration Services Users with Locks” on page 33.
Using Exclusive Access Mode
Opening an OLAP model or metaoutline in exclusive access mode eliminates the risk of other users overwriting your changes. When you open an OLAP model in exclusive access mode,
Integration Services gives you a write lock on that OLAP model that remains in effect until you close the model. When you open a metaoutline in exclusive access mode, Integration Services gives you a write lock on that metaoutline and a read lock on the OLAP model on which the metaoutline is based that remains in effect until you close the metaoutline. While you have an OLAP model or metaoutline open in exclusive access mode, other users can open and view the documents, but they cannot save them.
Correcting Problems with Locks
Due to the complex nature of Integration Services and the other software components with which it interacts, you may experience problems that result in locks not being released from OLAP models or metaoutlines. Unreleased locks can result in an inability to save, even if no other users are on the system. Unreleased locks can also prevent you from opening an OLAP model or metaoutline.
If you suspect that unreleased locks remain from previous sessions, delete the locks by selecting Servers > OLAP Metadata Catalog > Delete Locks. Deleting locks from the menu removes only your locks; it does not delete locks held by other users.
If you suspect that unreleased locks remain from other user sessions, check to see which users have locks. See “Viewing Integration Services Users with Locks” on page 33. If you are convinced that some or all of the locks are from terminated user sessions, delete them. See
“Deleting Locks for Integration Services Users” on page 34.
Viewing Integration Services Users with Locks
The CB_CONCURRENCY table in OLAP Metadata Catalog contains information about the users who access OLAP models and metaoutlines. This table contains the following columns: ● CB_USER_NAME: the name of the user accessing the OLAP model or metaoutline; for
example, sa.
● CB_USER_SESSION_ID: a system-generated reference number that uniquely identifies an editing session
● CB_OBJECT_ID: an OLAP model or metaoutline number
● CB_OBJECT_TYPE: a type reference that indicates whether the user is accessing an OLAP model or a metaoutline
❍ The number 1 represents an OLAP model. ❍ The number 2 represents a metaoutline.
● CB_OBJECT_LOCK: a lock reference number that indicates whether the user has a read or write lock
❍ The number 1 represents a read lock. ❍ The number 2 represents a write lock.
● CB_LOCK_TIMESTAMP: the date and time that the user acquired the lock
➤ To determine which users are accessing a specific OLAP model or metaoutline:
1 Enter the following SELECT statement in the OLAP Metadata Catalog database, using the tools for the data source you are using:
SELECT CB_USER_NAME, CB_OBJECT_ID, CB_OBJECT_TYPE, CB_OBJECT_LOCK, CB_LOCK_TIMESTAMP
FROM CB_CONCURRENCY
2 View the results.
In the following example, the sa user is the only user currently accessing an OLAP model or metaoutline. The sa user has two read locks on one OLAP model and one read lock each on two different metaoutlines.
CB_USER_NAME CB_OBJECT_ID CB_OBJECT_TYPE CB_OBJECT_LOCK CB_LOCK_TIMESTAMP --- --- --- --- ---sa 889844639 1 1 Apr 9 2004 4:43PM sa 889845263 2 1 Apr 9 2004 4:43PM sa 889844639 1 1 Apr 9 2004 5:20PM sa 892167813 2 1 Apr 9 2004 5:20PM (4 row(s) affected)
You can determine the following information from the sample CB_CONCURRENCY table shown in the preceding list:
● The first row of the results tells you that the sa user (CB_USER_NAME = sa) has a read lock (CB_OBJECT_LOCK = 1) on an OLAP model (CB_OBJECT_TYPE = 1) with an ID of 889844639.
● The second row of the results tells you that the sa user (CB_USER_NAME = sa) has a read lock (CB_OBJECT_LOCK = 1) on a metaoutline (CB_OBJECT_TYPE = 2) with an ID of 889845263.
● The third row of the results tells you that the sa user (CB_USER_NAME = sa) has a read lock (CB_OBJECT_LOCK = 1) on an OLAP model (CB_OBJECT_TYPE = 1) with an ID of 889844639.
● The fourth row of the results tells you that the sa user (CB_USER_NAME = sa) has a read lock (CB_OBJECT_LOCK = 1) on a metaoutline (CB_OBJECT_TYPE = 2) with an ID of 892167813.
When you open a metaoutline, you receive a read lock on the metaoutline and on the OLAP model on which it is based; therefore, you can assume that the sa user is working on two different metaoutlines based on the same OLAP model.
Deleting Locks for Integration Services Users
If you are certain that the other users who have read or write locks on an OLAP model or a metaoutline that you want to save do not need their locks, delete their locks from the CB_CONCURRENCY table.
Caution!
➤ To delete read and write locks on OLAP models or metaoutlines: 1 Determine which users have locks.
See “Viewing Integration Services Users with Locks” on page 33. 2 Delete the rows containing the unwanted locks.
For example, to delete all locks held by the sa user, issue the following DELETE statement in the OLAP Metadata Catalog database, using the tools for the data source:
DELETE FROM CB_CONCURRENCY WHERE CB_USER_NAME = 'sa'
Working with Permissions
When you save an OLAP model or metaoutline for the first time, you determine what read or write permissions other users have. Integration Services supports the following kinds of permissions:
● Allow read/write access for other users. This setting permits all other users to read and write to the OLAP model or metaoutline. This setting is the default.
● Allow read access for other users. This setting permits all other users to read but not write to the OLAP model or metaoutline; that is, other users cannot save changes to the OLAP model or metaoutline.
● Disallow all access for other users. This setting denies all other users read or write permission to the OLAP model or metaoutline. You are the only user who can read or write to it.
➤ To change the permissions of an OLAP model or metaoutline, take one of the following actions: ● Change the OLAP model properties in Integration Services Console. See the Integration
Services Console Help.
● Save the metaoutline with a different name by selecting File > Save As. See the Integration Services Console Help.
● To edit tables containing the permissions for the OLAP model or metaoutline, use the tools provided with the data source that contains OLAP Metadata Catalog. See “Viewing Permissions for OLAP Models” on page 35 or “Viewing Permissions for Metaoutlines” on page 36.
Viewing Permissions for OLAP Models
Information about the permissions that are set for OLAP models and metaoutlines is stored in OLAP Metadata Catalog. View this information by selecting the appropriate columns from tables in OLAP Metadata Catalog.
The OM_INFO table in OLAP Metadata Catalog contains information about OLAP models, including the following columns which are relevant to permissions:
● MODEL_ID: a system-generated reference number.
● MODEL_NAME: the name of the OLAP model; for example, TBC Model.
● MODEL_DESCRIPTION: a description of the OLAP model. If you do not enter a description when you save the model, this column is blank.
● MODEL_DATA_SOURCE: the name of the Open Database Connectivity (ODBC) data source on which the OLAP model is based; for example, TBC.
● MODEL_OWNER: the login name of the OLAP model owner; for example, sa. The login name is specified in the data source that contains the OLAP Metadata Catalog.
● MODEL_ACCESS_CODE: a reference number that indicates what level of access users, other than the owner, have to the OLAP model.
❍ The number 0 represents no permissions—other users can neither read nor write to the OLAP model.
❍ The number 1 represents read access—other users can read the OLAP model but cannot write to it.
❍ The number 2 represents read and write access—other users can both read and write to the OLAP model; this is the default.
➤ To view access permissions for all OLAP models in OLAP Metadata Catalog:
1 Issue the following SELECT statement in the OLAP Metadata Catalog database, using the tools for the data source.
SELECT MODEL_NAME,MODEL_OWNER,MODEL_ACCESS_CODE FROM OM_INFO
2 View the results.
In the following example, TBC Model gives read and write permissions to other users (MODEL_ACCESS_CODE = 2). TBC_Mod_Archive gives read permissions to other users (MODEL_ACCESS_CODE = 1). TBC_Mod_Mine gives neither read nor write permissions to other users (MODEL_ACCESS_CODE = 0).
MODEL_NAME MODEL_OWNER MODEL_ACCESS_CODE --- --- ---TBC Model sa 2
TBC_Mod_Archive sa 1 TBC_Mod_Mine sa 0 (3 row(s) affected)
Viewing Permissions for Metaoutlines
OLAP Metadata Catalog stores information about the permissions set for OLAP models and metaoutlines. View this information by selecting the appropriate columns from tables in OLAP Metadata Catalog.
The MO_INFO table in OLAP Metadata Catalog contains information about metaoutlines, including the following columns which are relevant to permissions:
● MODEL_ID: a system-generated reference number for the OLAP model on which the metaoutline is based.
● MO_NAME: the name of the metaoutline; for example, TBC Metaoutline.
● MO_DESC: a description of the metaoutline. If you do not enter a description when you save the metaoutline, this column is blank.
● MO_CHANGE_DATE: the date on which changes were last made to the metaoutline. ● MO_OWNER: the login name of the metaoutline owner; for example, sa. The login name
is specified in the database that contains the associated OLAP Metadata Catalog.
● MO_ACCESS_CODE: a reference number that indicates what level of access users, other than the owner, have to the metaoutline.
❍ The number 0 represents no permissions—other users can neither read nor write to the metaoutline.
❍ The number 1 represents read access—other users can read the metaoutline but cannot write to it.
❍ The number 2 represents read and write access—other users can both read and write to the metaoutline; this setting is the default.
➤ To determine the access permissions for all metaoutlines in OLAP Metadata Catalog:
1 Issue the following SELECT statement in the OLAP Metadata Catalog database, using the tools for the data source.
SELECT MO_NAME,MO_OWNER,MO_ACCESS_CODE FROM MO_INFO
2 View the results.
In the following example, TBC Metaoutline gives read and write permissions to other users (MO_ACCESS_CODE = 2). TBC_Archive gives read permissions to other users
(MO_ACCESS_CODE = 1). TBC_Mine gives neither read nor write permissions to other users (MO_ACCESS_CODE = 0).
MO_NAME MO_OWNER MO_ACCESS_CODE --- --- ---TBC Metaoutline sa 2
TBC_Archive sa 1 TBC_Mine sa 0 (3 row(s) affected)
3
Troubleshooting ODBC and
Connections
In This ChapterCommon Connection Problems...39 Database-Specific Problems...41 ODBC and Connection Problems ...41 Isolating Connection Problems ...42 Correcting Connection Problems ...54 Using ODBC Tracing...61
Integration Services requires several layers of software components to connect to data sources and load data into Essbase databases. Each of the components must be configured properly to run and communicate with each other. Consequently, diagnosing and correcting connection problems in the system can be challenging.
This chapter assists you in isolating and correcting connection problems that can occur during the operation of Integration Services. The first topic of this chapter lists common causes for connection problems. The subsequent topics outline a strategy for isolating and correcting connection problems not addressed by the common problems list.
This chapter assumes that you know how to perform basic database administration tasks, such as using a database client utility program to connect to a database server, navigating directories using a command prompt, and editing configuration files.
Note:
If you are accessing SAP BW data sources, the latest troubleshooting information can be found in the Hyperion® System™ 9 BI+™ Analytic Integration Connector for SAP BW™ readme file.
Common Connection Problems
If you have problems connecting to OLAP Metadata Catalog or to the external data source with Essbase Integration Services Console, review the following list of common problems:
● Are you using the correct user name and password?
❍ Does the user name you used have the correct privileges to access both OLAP Metadata Catalog and the data source at the database level?
❍ If you are trying to connect to OLAP Metadata Catalog, did you use the same user name and password as the user who created the tables in OLAP Metadata Catalog?
If you create an OLAP Metadata Catalog when logged in as one user name, you cannot access the tables in OLAP Metadata Catalog using a different user name unless you create an alias for the user name (for Microsoft SQL Server) or synonyms for the tables (for DB2 and Oracle). See the Essbase Integration Services Installation Guide.
● Are all required components up and running? ❍ Essbase Integration Server
❍ The database servers that manage OLAP Metadata Catalog and the data source databases ❍ The data source database listener for OLAP Metadata Catalog and the data source ● Is the database client software installed and configured on the computer where Integration
Server is installed?
❍ Do the database client software utility programs, such as the command-line SQL utility, run? Can you connect to databases with them?
❍ Does the user who starts Integration Server have the correct environment variables set and the necessary access privileges to run the database client software?
❍ Are the required environment variables for the database client software, such as the path (and the library path on UNIX), configured on the computer where Integration Server is installed?
On UNIX, use ivtestlib located in the ISHOME/bin directory to confirm that the library path contains all files required by the open database connectivity (ODBC) driver.
● If necessary, is the bin directory for each database in the operating system path of the user who is running Integration Server?
● Does the ODBC data source name (DSN) configuration identify the name of the data source client?
On UNIX, use the odbcconfig utility to check the path and environment variable, and to test connectivity to ODBC.
● Are OLAP Metadata Catalog and the data source configured as ODBC data sources on the Integration Server computer? For information on configuring ODBC data sources, see the Essbase Integration Services Installation Guide.
● Are you using the ODBC data source names for OLAP Metadata Catalog and the data source databases as configured on the Integration Server computer? Do not assume that the data source database name is the same as the ODBC data source name for that database. ● Are you experiencing time-out problems when connecting to the external data source? Wait and retry the action when the data source is less busy. To avoid the problem, increase the ODBC driver time-out limit using ODBC Administrator on Windows systems. See the ODBC documentation.
● Did you create tables in OLAP Metadata Catalog? For information on creating tables for the catalog, see the Essbase Integration Services Installation Guide.