www.bmc.com
BMC Atrium Single Sign-On 7.6.04
Administration Guide
If you have comments or suggestions about this documentation, contact Information Design and Development by email at
about the company, its products, corporate offices, special events, and career opportunities. United States and Canada
Address BMC SOFTWARE INC 2101 CITYWEST BLVD HOUSTON TX 77042-2827 USA
Telephone 713 918 8800 or 800 841 2031
Fax 713 918 8000
Outside United States and Canada
Telephone (01) 713 918 8800 Fax (01) 713 918 8000
© Copyright 2006, 2007, 2009-2011 BMC Software, Inc.
BMC, BMC Software, and the BMC Software logo are the exclusive properties of BMC Software, Inc., are registered with the U.S. Patent and Trademark Office, and may be registered or pending registration in other countries. All other BMC trademarks, service marks, and logos may be registered or pending registration in the U.S. or in other countries. All other trademarks or registered trademarks are the property of their respective owners.
Linux is the registered trademark of Linus Torvalds.
UNIX is the registered trademark of The Open Group in the US and other countries.
Oracle and Java are registered trademarks of Oracle and/or its affiliates. Other names may be trademarks of their respective owners. BMC Software considers information included in this documentation to be proprietary and confidential. Your use of this information is subject to the terms and conditions of the applicable End User License Agreement for the product and the proprietary and restricted rights notices included in this documentation.
Restricted rights legend
U.S. Government Restricted Rights to Computer Software. UNPUBLISHED -- RIGHTS RESERVED UNDER THE COPYRIGHT LAWS OF THE UNITED STATES. Use, duplication, or disclosure of any data and computer software by the U.S. Government is subject to
restrictions, as applicable, set forth in FAR Section 52.227-14, DFARS 252.227-7013, DFARS 252.227-7014, DFARS 252.227-7015, and DFARS 252.227-7025, as amended from time to time. Contractor/Manufacturer is BMC Software, Inc., 2101 CityWest Blvd., Houston, TX 77042-2827, USA. Any contract notices should be sent to this address.
Customer Support
You can obtain technical support by using the Support page on the BMC Software website or by contacting Customer Support by telephone or email. To expedite your inquiry, please see “Before Contacting BMC Software.”
Support website
You can obtain technical support from BMC Software 24 hours a day, 7 days a week at
http://www.bmc.com/support_home. From this website, you can:
■ Read overviews about support services and programs that BMC Software offers. ■ Find the most current information about BMC Software products.
■ Search a database for problems similar to yours and possible solutions. ■ Order or download product documentation.
■ Report a problem or ask a question.
■ Subscribe to receive email notices when new product versions are released.
■ Find worldwide BMC Software support center locations and contact information, including email addresses, fax numbers, and telephone numbers.
Support by telephone or email
In the United States and Canada, if you need technical support and do not have access to the Web, call 800 537 1813 or send an email message to [email protected]. (In the Subject line, enter
SupID:<yourSupportContractID>, such as SupID:12345.) Outside the United States and Canada, contact your local support center for assistance.
Before contacting BMC Software
Have the following information available so that Customer Support can begin working on your issue immediately: ■ Product information
— Product name
— Product version (release number)
— License number and password (trial or permanent) ■ Operating system and environment information
— Machine type
— Operating system type, version, and service pack — System hardware configuration
— Serial numbers
— Related software (database, application, and communication) including type, version, and service pack or maintenance level
■ Sequence of events leading to the problem ■ Commands and options that you used
■ Messages received (and the time and date that you received them) — Product error messages
— Messages from the operating system, such as file system full — Messages from related software
methods:
■ E-mail [email protected]. (In the Subject line, enter SupID:<yourSupportContractID>, such as SupID:12345.)
■ In the United States and Canada, call 800 537 1813. Outside the United States and Canada, contact your local support center for assistance.
Contents 5
Contents
Chapter 1 BMC Atrium Single Sign-On overview 11
BMC Atrium SSO overview . . . 12
Log on and log off behavior . . . 13
BMC Atrium SSO and OpenSSO . . . 14
OpenSSO Administrator console access . . . 14
Atrium SSO user console access . . . 15
Realms . . . 15
Authentication . . . 15
JEE filter-based agents. . . 16
Certificates. . . 18
Generating a CSR. . . 18
Adding a new CA certificate . . . 19
Integrating with BMC Remedy AR System . . . 19
Chapter 2 Installing and configuring BMC Atrium SSO 21 Prerequisites . . . 22
Disk space requirements. . . 22
Log file memory requirements . . . 22
Configuring Terminal Services parameters . . . 22
Installing BMC Atrium SSO as a standalone . . . 23
Before you begin . . . 23
Default cookie domain . . . 24
Administrator password . . . 25
Where to go from here . . . 25
Installing BMC Atrium SSO on an external Tomcat server . . . 25
Configuring an external Tomcat instance for FIPS-140 . . . 27
Installing and uninstalling in silent mode . . . 28
Installing in silent mode . . . 28
Uninstalling in silent mode . . . 29
Silent installation example . . . 29
Upgrading BMC Atrium SSO. . . 29
Stopping and restarting BMC Atrium SSO . . . 30
Stopping and restarting on Windows . . . 30
Stopping and restarting on UNIX or Linux . . . 30
Uninstalling BMC Atrium SSO . . . 31
Running the uninstaller on Windows . . . 31
Certificates overview . . . 34
Using the keytool utility . . . 34
Obtaining and importing CA certificates . . . 35
Generating CSRs in Windows . . . 35
Importing CA certificates in Windows . . . 36
Generating CSRs in UNIX. . . 37
Importing CA certificates in UNIX . . . 37
Adding another CA certificate . . . 38
Creating new keystores . . . 38
Locating the keystore and truststores . . . 38
Creating a keystore example . . . 38
Chapter 4 Authentication chaining 41 Authentication chaining overview. . . 42
Authentication chaining example . . . 42
Chapter 5 Using LDAP for authentication 45 Setting up LDAP to use for authentication. . . 46
Configuring the LDAP module . . . 46
LDAP configuration parameters . . . 46
Enabling LDAP authentication. . . 49
Chapter 6 Using AR Server for authentication 51 Setting up AR to use for authentication . . . 52
Configuring the AR module . . . 52
AR configuration parameters . . . 52
Enabling AR authentication . . . 53
Enabling the AR data store . . . 54
Accessing the AR data store configuration page. . . 54
Configuring the AR data store . . . 55
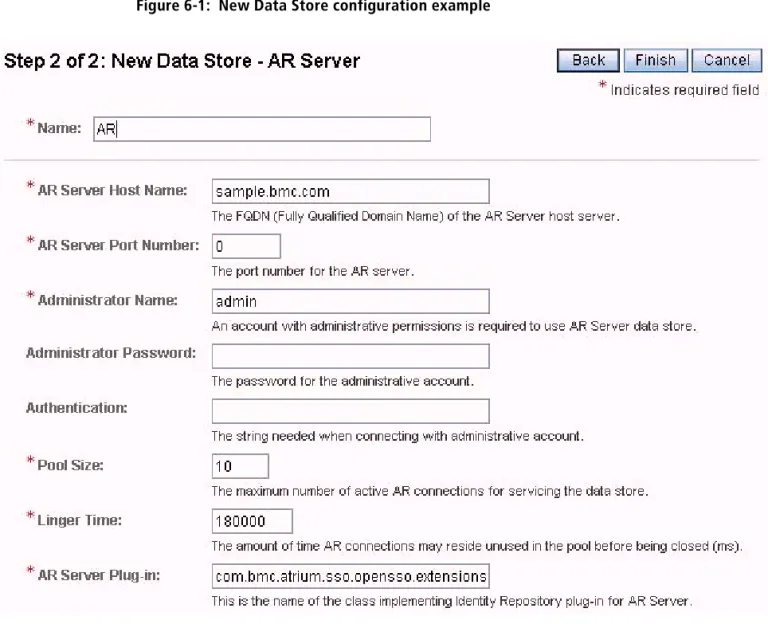
New data store configuration example. . . 56
Troubleshooting AR System module. . . 56
User has no profile in this organization . . . 57
Error saving user or group edits . . . 57
Contents 7
Specifying the sdconf.rec location . . . 66
Configuring to rely on an RSA SecurID server . . . 66
Reconfiguring the SecurID module . . . 67
Enabling RSA SecurID authentication . . . 67
Modifying the rsa_api.properties file . . . 68
Chapter 9 Using CAC for authentication 71 CAC configuration overview . . . 72
Modifying the Tomcat server . . . 72
Importing DoD CA certificates . . . 73
Validating CAC certificates . . . 74
Using OCSP responder to validate certificates . . . 74
Using CRL to validate certificates . . . 75
Specifying CAC users . . . 76
Allowing any user access with a valid CAC card. . . 76
Allowing a subset of users access through the internal data store . . . 76
Allowing a subset of user access through an external LDAP server . . . 77
Enabling CAC Chain . . . 78
Troubleshooting CAC authentication . . . 78
URL certificate authentication not enabled . . . 79
OCSP verify failed . . . 79
Chapter 10 Using an external LDAP data store 81 External LDAP server overview . . . 82
Creating a new data store . . . 82
Modifying an existing data store . . . 85
Troubleshooting an external LDAP data store . . . 85
No users in User tab . . . 86
No groups in Group tab . . . 86
Chapter 11 Configuring FIPS-140 mode 87 FIPS-140 overview . . . . 88
Prerequisites for converting to FIPS-140 mode . . . 88
Before converting to FIPS-140 mode . . . 89
Converting to FIPS-140 mode. . . 89
Installing unlimited strength policy files . . . 89
Installing the cryptography library. . . 90
Enabling FIPS-140 mode. . . 92
Monitoring FIPS-140 mode conversion . . . 93
Reconfiguring integrated products. . . 93
Troubleshooting FIPS-140 conversion . . . 93
Converting back to normal mode . . . 94
Enabling normal mode . . . 94
Restoring the original encryption files and non-FIPS-140 library . . . 95
Reconfiguring integrated products. . . 95
Monitoring normal mode conversion. . . 95
Changing the FIPS-140 network ciphers . . . 96
Chapter 12 Logging 99
Logging overview. . . 100
Support utility . . . 100
Support utility location . . . 100
Running the support utility . . . 100
Log file locations . . . 101
Log directory. . . 101
Debug directory . . . 102
Managing BMC Atrium SSO logging . . . 102
Modifying logging attributes . . . 102
Adjusting logging levels . . . 103
Logging with RSA SecurID. . . 103
Using JEE agents for logging . . . 103
Adjusting logging levels . . . 104
Agent audit logging . . . 104
Log file rotation . . . 105
Manually removing JEE agents . . . 106
Removing JEE agents from BMC Atrium SSO. . . 106
Removing JEE agents from WebSphere . . . 107
Removing JEE agents from Tomcat. . . 107
Removing JEE agents from JBoss or WebLogic . . . 108
Using Java agents . . . 108
Chapter 13 Managing users and groups 109 Managing users. . . 110
Adding users. . . 110
Searching for users. . . 111
Deleting users . . . 111
Modifying user accounts. . . 111
Viewing user sessions . . . 113
Terminating user sessions. . . 113
Managing groups . . . 114
Predefined groups . . . 114
Creating groups . . . 114
Deleting groups . . . 114
Adding users to groups. . . 115
Contents 9
Deleting modules. . . 120
Managing authentication chains . . . 120
Creating chains . . . 121
Editing chains. . . 121
Deleting chains. . . 121
Adding modules to chains . . . 122
Deleting modules from chains. . . 123
Editing a module instance in a chain . . . 123
Reordering modules in chains . . . 123
Appendix A Policy file additions for external Tomcat installations 125 Adding to the policy file . . . 126
Appendix B Error messages 129 Error Messages . . . . 130
Chapter 1 BMC Atrium Single Sign-On overview 11
Chapter
1
BMC Atrium Single Sign-On
overview
The following topics are provided: ! BMC Atrium SSO overview (page 12) ! Log on and log off behavior (page 13) ! BMC Atrium SSO and OpenSSO (page 14) ! Realms (page 15)
! Authentication (page 15)
! JEE filter-based agents (page 16) ! Certificates (page 18)
BMC Atrium SSO overview
BMC Atrium Single Sign-On (BMC Atrium SSO) is an authentication system that supports many authentication protocols and provides single sign-on and single sign-off for users of BMC products. BMC Atrium SSO allows users to present credentials only once for authentication and subsequently be automatically authenticated by every BMC product that is integrated into the system.
Not only does BMC Atrium SSO support authentication with traditional systems such as LDAP or Active Directory, it also supports integration into existing SSO systems.
BMC Atrium SSO is the central integration point that performs integration with the local enterprise systems. BMC Atrium SSO can be configured:
! As a standalone system
! To rely upon an existing enterprise system, such as an LDAP server
In addition to functioning as the central server, BMC Atrium SSO uses agents which are integrated into each of the BMC products. These agents perform the following functions:
! Accessing authentication services
! Coordinating with the server to authenticate users ! Validating existing authentications
Chapter 1 BMC Atrium Single Sign-On overview 13 Log on and log off behavior
When initially installed, BMC Atrium SSO is configured for immediate use. This default configuration uses the internal data store as an authentication source. This configuration is suitable for demonstrations, proof-of-concept deployments, testing, and other small deployment scenarios. However, for a large-scale system, you should configure the use of an external user repository for authentication, such as an LDAP server.
To help with the configuration of BMC Atrium SSO, predefined authentication chains are provided using LDAP, RSA SecurID, and other methods.
These predefined authentication chains allow you to:
! Configure an authentication module specifically for your deployment environment.
! Quickly configure your system.
! Create more complex chains by modifying the predefined chains
In addition, new chains can be created if a complex authentication chain is needed. To use authentication chains, see the Authentication Configuration section.
Log on and log off behavior
When using an SSO system, the normal authentication behavior is altered. The practice of logging on when you start a product is automatically performed when the second product is started. This change happens without any user involvement. When you log off, you are logged off of all BMC Atrium SSO-integrated products. If you want to continue working with other BMC products:
! Quit the product instead of logging out of BMC Atrium SSO.
! If the product supports application-only log off, log off the application and close the browser.
IMPORTANT
When quitting an product, the normal behavior is to log off and then quit. This process results in termination of all the product connections.
If you want to continue working with other BMC products, quit the product that you are finished with, but only log off the last product.
With web applications, the BMC Atrium SSO authentication status is maintained through sessions within the web browsers. When web applications share the same browser session, the authentication state with BMC Atrium SSO is shared by these applications.
To use a different login ID without logging off BMC Atrium SSO, you must start a new session in the web browser. The following table summarizes how to share current sessions and how to create new sessions with the browsers supported by BMC Atrium SSO.
Table 1-1: Session behavior in supported browsers
When BMC products launch a new application, the applications use the process needed to ensure a shared session and a seamless experience.
BMC Atrium SSO and OpenSSO
BMC Atrium SSO is built on the open source project OpenSSO. This project has a long history of providing authentication and authorization across many different platforms by using many authentication techniques. The OpenSSO platform is built using a pluggable architecture which allows the system to expand as new authentication technologies evolve.
The goal of BMC Atrium SSO is to provide a simplified, turnkey system that applies OpenSSO technology to BMC products. Configuration of the servers and agents is automated as much as possible, allowing for easy adoption.
OpenSSO Administrator console access
The OpenSSO Administrator console is accessed through this URL: https://host:port/atriumsso?service=adminconsoleservice ! In this syntax, host is the FQDN of the server host.
Browser Share Session New Session
Firefox 3 New tab, Ctrl-N for new window, or launch from Start menu or shortcut
Use Private Browsing
Internet Explorer 6 Ctrl-N to create a new window Launch new browser using Start menu or shortcut Internet Explorer 7 New tab or Ctrl-N to create a new
window
Launch new browser using Start menu or shortcut Internet Explorer 8 New tab, Ctrl-N to create a new
window, or launch new browser from Start menu or short-cut
Chapter 1 BMC Atrium Single Sign-On overview 15 Realms
Atrium SSO user console access
The user console access is through the following URL: https://host:port/atriumsso?realm=BmcRealm
This URL can be used to verify the authentication module configuration. You do not need to rely on an installed and configured BMC application to initiate login in order to test configuration of authentication modules.
Realms
The BMC Atrium SSO system makes use of the following realms within OpenSSO: ! The Top Level Realm is the root realm that is used for administrative purposes. Specifically, the root realm is used during BMC product integration for remote Administrator access and as a repository for the J2EE agent configurations. To maintain this function, the root realm authentication must use an authentication scheme involving user name and password, such as the internal LDAP server. ! The BmcRealmis used by BMC products for user authentication. As such, this
realm does not have the constraints that the root realm does, and can be modified to use any authentication scheme needed.
Authentication
BMC Atrium SSO uses a subset of the technologies within the OpenSSO project that are required by BMC products. The current technologies of OpenSSO that are certified by BMC Atrium SSO include:
! Authentication chaining ! Authentication schemes
! Internal ! LDAP
! BMC Remedy Action Request (AR) System ! Active Directory
! RSA SecurID
! Common Access Cards (CAC), ActivIdentity-based ! Groups
IMPORTANT
BMC Atrium SSO certifies a subset of platforms and technologies supported by OpenSSO 8.0. BMC Atrium SSO is certified on the configurations explicitly stated in this document.
Reported defects either found to be unique to an unconfirmed configuration or not reproducible within a supported environment are addressed at the discretion of BMC. Visit the Customization Policy under the Support Contacts & Policies link on the BMC support website.
JEE filter-based agents
In this release of BMC Atrium SSO, a new JEE filter-based agent replaces the OpenSSO J2EE agent from BMC Atrium SSO 1.0. You can continue to manage these newer agents by using the J2EE Administrator console.
With this release of BMC Atrium SSO, a new, lighter-weight agent is available for use by BMC applications. This new agent uses OpenSSO J2EE agent configuration features for its configuration. This section describes how configuration items apply to this newer agent.
When using the JEE filter-based agent, some of the OpenSSO J2EE agent configurations are not used or do not apply.
Chapter 1 BMC Atrium Single Sign-On overview 17 JEE filter-based agents
The following table lists the functions that are enabled. Table 1-2: Administrator console functions with JEE
Tab Notes
Global All functions are enabled except: Profile
!Location of Agent Configuration Repository
!Configuration Reload Interval
!Agent Root URL for CDSSO General
!Agent Filter Mode (always SSO only) User Mapping
!User Mapping Mode (always uses USER_ID) Audit
!Audit Log Location (always LOCAL)
!Remote Log File Name Application Logout Processing
!Application Logout Handler is unused All parameters are used in:
!Not Enforced URI Processing
!Not Enforced IP Processing
!Profile Attributes Processing
!Response Attributes Processing
!Common Attributes Fetching Processing
!Privilege Attributes Processing No parameters are used in:
!Login Processing
!Access Denied URI Processing
!Custom Authentication Processing SSO All parameters are used except:
Certificates
The default Tomcat server used by BMC Atrium SSO uses a keystore and a truststore for secure (HTTPS/TLS) communications. These files are stored in the following directory:
installationDirectory/BMC Software/AtriumSSO/tomcat/conf
The initial keystore created during the installation uses a self-signed certificate. This certificate causes browsers and other programs to warn users about the insecure nature of the certificate each time the user authenticates. This certificate warning can be prevented by doing one of the following:
! Permanently importing the self-signed certificate into the user’s truststore. ! Obtaining and importing a signed identity certificate from a trusted Certificate
Authority (CA). The CA vouches for the authenticity of the server’s identity when the user visits the BMC Atrium SSO for authentication. In this case, the
Open SSO Services All parameters are used in:
!Login URL
!Authentication Service No parameters are used in:
!Policy Client Service
!Session Client Service
No parameters are used in User Data Cache Service except:
!Enable Notification of User Data Cache
!User Data Cache Polling Time Miscellaneous All parameters are used in:
!Locale
No parameters are used in:
!Port Check Processing
!Deprecated Agent Properties
Advanced No parameters are used in the Advanced section.
Chapter 1 BMC Atrium Single Sign-On overview 19 Integrating with BMC Remedy AR System
The output from the command must be sent to the CA for a digital signature. After the signed identity certificate is returned, the next step is to import the signed identity certificate into the keystore where it replaces the current self-signed certificate.
NOTE
The keytool utility is used to obtain a CSR, to obtain a signed certificate, and to import the signed certificate in order to replace the self-signed certificate. This tool is available with Oracle JDKs and BMC Atrium SSO.
Adding a new CA certificate
Adding another certificate is necessary when CAC authentication is used, when the Department of Defense (DoD) issues new CA certificates, or the CA certificates used to create a signed certificate for the BMC Atrium SSO server is not already within the truststore. The keytool utility is used to import a new CA certificate into the BMC Atrium SSO truststore.
Integrating with BMC Remedy AR System
The typical method for BMC Atrium SSO with BMC Remedy AR System is to install BMC Atrium SSO, install BMC Remedy AR System, and then integrate with BMC Remedy AR System.
For information on integrating with BMC Remedy AR System, see the BMC Remedy AR System Installation Guide and Integration Guide.
Chapter 2 Installing and configuring BMC Atrium SSO 21
Chapter
2
Installing and configuring
BMC Atrium SSO
The following topics are provided: ! Prerequisites (page 22)
! Configuring Terminal Services parameters (page 22) ! Installing BMC Atrium SSO as a standalone (page 23)
! Installing BMC Atrium SSO on an external Tomcat server (page 25) ! Configuring an external Tomcat instance for FIPS-140 (page 27) ! Installing and uninstalling in silent mode (page 28)
! Upgrading BMC Atrium SSO (page 29)
! Stopping and restarting BMC Atrium SSO (page 30) ! Uninstalling BMC Atrium SSO (page 31)
Prerequisites
Before installing BMC Atrium SSO, make sure you have met the following prerequisites:
! Do not deploy BMC Atrium SSO on an NFS-mounted file system.
! If the runtime user of the BMC Atrium SSO web container instance is a non-root user, this user must be able to write to his own home directory.
! (Windows) You must have administrator privileges.
! (UNIX) You can be any user. However, root privileges are required to set up auto-startup of the services.
Disk space requirements
This section contains information about prerequisite storage space requirements for installation and log files.
Before installing BMC Atrium SSO, you must have at least the following available disk space:
! (Windows) 650 MB ! (Linux) 750 MB ! (Solaris) 850 MB
Log file memory requirements
An additional 7-10 GB of space is recommended for log file growth, depending on the volume of users and products integrating with the BMC Atrium SSO server. To manage log file storage space effectively, perform the following tasks: ! Delete the debug log files periodically, especially if the debug level is set to
message.
! Check the .access and .error log files periodically in the logs directory. ! Consider configuring the log rotation to delete the oldest log files.
Chapter 2 Installing and configuring BMC Atrium SSO 23 Installing BMC Atrium SSO as a standalone 3 In the Delete temporary folders on exit field, click No (disabled).
To configure Terminal Services on Windows Server 2008 (64-bit)
1 In Group Policy Editor, select:
Computer Configuration > Windows Components > Terminal Services > Terminal Server > Temporary folders
2 In the Do not delete temp folder upon exit field, click Enabled.
3 In the Do not use temporary folders per session field, click Enabled.
Installing BMC Atrium SSO as a standalone
This section describes how to perform a BMC Atrium SSO standalone installation. In this installation, a Tomcat server and JVM are installed and properly configured for use by the BMC Atrium SSO server. This installation method is the simplest and easiest to perform since all of the administrative and configuration details are performed by the installation program.
Before you begin
! Obtain the zipped BMC Atrium SSO files from the BMC product package via Electronic Product Download (EPD) or the BMC Atrium SSO DVD.
! If there is already an installation of BMC Atrium SSO the target computer, the installer will not allow another installation. Uninstall the existing version. Perform the following steps to install BMC Atrium SSO as a standalone system:
To install BMC Atrium SSO
standalone
1 Run the installation program.
The installation program, autorun, automatically detects the appropriate
subscript to run. However, if theappropriate file is not launched, manually run the setup executable. The setup executable is located in the Disk1 directory of the extracted files.
(Windows) Run setup.cmd.
(UNIX) Run setup.sh (which automatically detects the appropriate subscript to execute).
2 Accept the default destination directory or browse to select a different directory and click Next.
3 Verify that the hostname presented is the Fully Qualified Domain Name (FQDN) for the host, correct the value as needed, and click Next.
4 Verify that Install New Tomcat is selected and click Next. The Tomcat server options are:
! Install New Tomcat (default)
! Use External Tomcat. See “Installing BMC Atrium SSO on an external Tomcat server” to install with this option.
NOTE
The BMC Atrium SSO Tomcat server cannot be shared with any product that integrates with BMC Atrium SSO. BMC recommends that BMC Atrium SSO be the only application in the Tomcat server.
5 Accept the default Tomcat HTTP port number, HTTPS port number, and Shutdown port number or enter different port numbers and click Next. If any of the port numbers are incorrect, a panel identifies the incorrect port number and requires you to return to the previous page to correct the values before proceeding with the installation.
NOTE
When installing on Linux servers, port selections below 1000 require the server to run as root, or use a port forwarding mechanism.
6 Enter a cookie domain and click Next.
The domain value of the cookie should be the network domain of BMC Atrium SSO or one of its parent domains. See “Default cookie domain” on page 24 for more information.
IMPORTANT
The higher the level of the selected parent domain, the higher the risk of user impersonation. Top-level domains are not supported (for example, "com" or "com.ca").
7 Enter a strong administrator password, confirm the password, and click Next. The default administrator name is amAdmin. See “Administrator password” on page 25 for more information.
8 Review the installation summary and click Install.
9 Verify that your BMC Atrium SSO installation was successful by accessing the BMC Atrium SSO URL.
a Launch the Administrator console.
Chapter 2 Installing and configuring BMC Atrium SSO 25 Installing BMC Atrium SSO on an external Tomcat server
For example, changing the domain adprod.bmc.comto bmc.com gives all of the servers within the bmc.com domain access to the cookies stored by the server in a user’s browser. The danger of increasing the cookie visibility is illustrated when the value is changed to com, giving all servers in the internet com domain access to the cookie.
Administrator password
The administrator password is used to access BMC Atrium SSO through a browser. This access allows user accounts to be created and enables other authentication algorithms. Also, the administrator password is used to integrate application servers that have deployed the BMC Atrium SSO Web agent to integrate with BMC Atrium SSO.
Where to go from here
! To secure certificates with an external CA, see “Using CA certificates” on page 33.
! To configure authentication, such as LDAP or Active Directory, see “Using LDAP for authentication” on page 45 or “Using Active Directory for authentication” on page 59.
! To create users, see “Managing users and groups” on page 109.
Installing BMC Atrium SSO on an external
Tomcat server
This section explains how to install BMC Atrium SSO on an external Tomcat server. This installation option allows the BMC Atrium SSO server to be installed using versions of Tomcat and Java VM that are different from those provided by the standalone installation option.
Using this option allows greater flexibility in choosing the Tomcat and JVM, but at the expense of adding administration of the Tomcat server and JVM. In addition, correct version selection must also be performed to avoid incompatibilities. Due to these added responsibilities, BMC recommends that this option be performed only when the default selections are not sufficient.
Before installation
! Before installation, make sure you have performed the tasks in “Prerequisites” on page 22.
NOTE
The BMC Atrium SSO Tomcat server cannot be shared with any product that integrates with BMC Atrium SSO. BMC recommends that BMC Atrium SSO be the only application in the Tomcat server.
! If you plan to enable FIPS, perform the tasks in “Configuring an external Tomcat instance for FIPS-140” on page 27.
To install BMC Atrium SSO on an external Tomcat server
1 If autorun does not automatically launch the appropriate file, launch the setup
executable, located in the Disk1 directory of the extracted files. ! (Windows) Run setup.cmd.
! (UNIX) Run setup.sh (which automatically detects the appropriate subscript to execute).
2 Accept the default destination directory or browse to select a different directory and click Next.
3 Verify that the hostname presented is the Fully Qualified Domain Name (FQDN) for the host, correct the value as needed, and click Next.
4 Click Use External Tomcat. The Tomcat server options are: ! Install New Tomcat (default)
! Use External Tomcat
5 At the prompt, enter the Tomcat directory (or use the browse button to specify the Tomcat directory) and click Next.
6 At the Tomcat Application Server Selection panel, enter the path to the Tomcat server.
After clicking Next, the installer verifies that:
! The directory has a webapps directory that can be written to. ! The main program,tomcat6.exe, is present (even on UNIX).
! The server.xml file contains a connector with port and secure defined and with scheme set to https. The installer parses important information from this Connector entry and stores it.
As the installer deploys the BMC Atrium SSO web application to the Tomcat server, it will ask that you start or stop it when necessary.
Chapter 2 Installing and configuring BMC Atrium SSO 27 Configuring an external Tomcat instance for FIPS-140
! Tomcat keystore password, alias, and certificate ! Tomcat cookie domain
! Tomcat administrator name and password
9 Stop the Tomcat server.
10 During installation, follow the installer directions to restart the Tomcat server.
11 Verify that your BMC Atrium SSO installation was successful: a Launch the Administrator console.
b Confirm that you can view the OpenSSO login panel.
The Tomcat server can now be used as the BMC Atrium SSO application server. If you make modifications to the server configuration, be sure to test each change to insure that the BMC Atrium SSO application functions correctly.
Configuring an external Tomcat instance for
FIPS-140
The Federal Information Processing Standard (FIPS-140) are standards for use in computer systems by all non-military government agencies and government contractors. For example, data encoding and encryption standards. See Configuring FIPS-140 mode (page 87)for more information.
If you plan to enable FIPS-140 and are installing to an external Tomcat server, perform these steps:
1 Configure the Tomcat server for auto-deployment of .war files.
2 Use the same keystore for both non-FIPS and FIPS versions of your server.xml file.
3 Perform these modifications to the following files for non-FIPS and FIPS versions: ! server.xml
a Duplicate the original file to create a FIPS version (named server.xml.fips).
b In the new FIPS version of the file, use the following ciphers attributes to force
a higher level of encryption (using your own values):
ciphers="SSL_RSA_WITH_RC4_128_MD5,SSL_RSA_WITH_RC4_128_SHA,TLS_R SA_WITH_AES_128_CBC_SHA,TLS_DHE_RSA_WITH_AES_128
CBC_SHA,TLS_DHE_DSS_WITH_AES_128_CBC_SHA,SSL_RSA_WITH_3DES_EDE_C BC_SHA,SSL_DHE_RSA_WITH_3DES_EDE_CBC_SHA, SSL_DHE_DSS_WITH_ DES_EDE_CBC_SHA"
c Add the XML comment to tag the file as FIPS-140: <!-- FIPS140 -->
d Also duplicate the server.xml file to the conf folder (named server.xml.nofip).
e Duplicate the original file, creating java.security.nofips and java.security.fips versions.
f In java.security.nofips, make sure that the provider is the first one in the security providers list, with the remaining providers renumbered.
For example, the following list places the JsafeJCE provider at the top of the list with a key suffix of 1, while the providers after JsafeJCE are renumbered to follow the first.
The com.rsa.cryptoj.jce.kat.strategy and
com.rsa.cryptoj.jce.fips140initialmode properties are placed after the security providers list. For those properties, use the exact values shown in the following example:
security.provider.1=com.rsa.jsafe.provider.JsafeJCE security.provider.2=sun.security.provider.Sun
security.provider.3=sun.security.rsa.SunRsaSign security.provider.10=sun.security.mscapi.SunMSCAPI com.rsa.cryptoj.jce.kat.strategy=on.load
com.rsa.cryptoj.jce.fips140initialmode=FIPS140_SSL_MODE
Installing and uninstalling in silent mode
The installer and uninstaller program can be run from a script in addition to the GUI interface. This functionality is accessible by running the setup program from the command line and specifying certain parameters.
This section provides examples for installing and uninstalling BMC Atrium SSO in silent mode with the setup script.
The following represents the general command line syntax: {setup.sh|setup.cmd} -i silent -DOPTIONS_FILE=<file>
Installing in silent mode
To install in silent mode
1 Open a command line window.
Chapter 2 Installing and configuring BMC Atrium SSO 29 Upgrading BMC Atrium SSO a Launch the Administrator console.
b Confirm that you can view the OpenSSO login panel.
Uninstalling in silent mode
To uninstall in silent mode
1 Open a command-line window.
2 Run UninstallAtrium.exe by using the following syntax: C:\SSO\AtriumSSO\UninstallAtriumSSO.exe i silent -DOPTIONS_FILE=SSOSilentUninstallOptions.txt
where SSOSilentUninstallOptions.txt contains: -silent
-U productAtriumSSO -U featureAtriumSSO
Silent installation example
The following example invokes a silent installation where the administrator password is admin123.
setup.cmd -i silent -DOPTIONS_FILE=SSOSilentInstallOptions.txt The SSOSilentInstallOptions.txt file contains:
-P installLocation=C:\SSO\AtriumSSO -A featureAtriumSSO
-J ATRIUMSSO_TOMCAT_SHUTDOWN_PORT=8005 -J ATRIUMSSO_TOMCAT_HTTP_PORT=8080 -J ATRIUMSSO_INSTALL_TOMCAT=true -J ATRIUMSSO_TOMCAT_HTTPS_PORT=8443 -J
ATRIUMSSO_SERVER_PASSWORD=DES\:3996ba109b2b3f035fb4200116c2339a78e cec52023308de
-J
ATRIUMSSO_SERVER_PASSWORD_2=DES\:3996ba109b2b3f035fb4200116c2339a7 8ecec52023308de
-J ATRIUMSSO_COOKIE_DOMAIN=bmc.com
-J ATRIUMSSO_HOST_NAME=atrium-sso-vm4.bmc.com
Upgrading BMC Atrium SSO
You can upgrade a previous installation of BMC Atrium SSO by using the installer provided with BMC Atrium SSO.
NOTE
BMC recommends that you backup BMC Atrium SSO before proceeding with an upgrade.
The procedure for upgrading BMC Atrium SSO is the same for both Windows and UNIX.
To upgrade BMC Atrium SSO
1 On the target computer, start the BMC Atrium SSO installation utility.
2 When prompted, choose to upgrade BMC Atrium SSO and agree to the license agreement.
3 When the upgrade is complete, review the summary information.
4 To view the upgrade logs, click View Log.
5 To close the dialog, click Done.
Stopping and restarting BMC Atrium SSO
This section describes how to stop and restart BMC Atrium SSO on Windows and UNIX.
Stopping and restarting on Windows
To stop and restart BMC Atrium SSO on Windows
1 From the desktop of the application server host, use the Control Panel to go to the
Administrator Tools' Component Services dialog box.
2 Expand the Services folder.
3 Select BMC Atrium SSO.
4 Click Stop.
5 To restart BMC Atrium SSO, click Start.
Chapter 2 Installing and configuring BMC Atrium SSO 31 Uninstalling BMC Atrium SSO 3 To start the services, type the following command:
startup-servers.sh
Uninstalling BMC Atrium SSO
During installation, the uninstaller is installed with BMC Atrium SSO. Running the uninstaller removes BMC Atrium SSO from the system.
Running the uninstaller on Windows
To uninstall BMC Atrium SSO from a Windows platform, use the Add or Remove Programs control panel.
To run the uninstaller program
1 From the control panel, select Add or Remove Programs.
2 Select BMC Atrium Single Sign-On in the list.
3 Click Change or Remove Programs once it is displayed. This last action launches the uninstaller program.
NOTE
Because of varying Windows system dependencies, a reboot might be required to completely the uninstall BMC Atrium SSO.
Running the uninstaller on Solaris or Linux
To run the uninstaller on Oracle Solaris or Linux, the uninstaller must be launched from within a graphical environment, for example, from the console or through an X-Windows server.
To run the uninstaller program
1 Change the working directory to the installation directory. The following is the default directory:
$ cd /opt/SSO
2 Run the UninstallAtriumSSO script. $ ./UninstallAtriumAsso
If the GUI environment is properly setup, the uninstaller program launches and walks the user through the steps to remove BMC Atrium SSO.
IMPORTANT
Be sure to select the BMC Atrium SSO component, otherwise the uninstaller will remove the server.
3 Manually delete the BMC Atrium SSO log file artifacts. These log files are left in the file system regardless of the reboot.
Uninstaller invocation error
If the GUI environment is incorrectly set up, an invocation error similar to the following occurs when you run the installer.:
Invocation of this Java Application has caused an
InvocationTargetException. This application will now exit. (LAX) Stack Trace:
java.awt.HeadlessException:
No X11 DISPLAY variable was set, but this program performed an operation which requires it.
at java.awt.GraphicsEnvironment.checkHeadless(Unknown Source)
at java.awt.Window.<init>(Unknown Source) at java.awt.Frame.<init>(Unknown Source) at java.awt.Frame.<init>(Unknown Source) at javax.swing.JFrame.<init>(Unknown Source)
at com.zerog.ia.installer.LifeCycleManager.g(DashoA8113) at com.zerog.ia.installer.LifeCycleManager.h(DashoA8113) at com.zerog.ia.installer.LifeCycleManager.a(DashoA8113) at com.zerog.ia.installer.Main.main(DashoA8113)
at sun.reflect.NativeMethodAccessorImpl.invoke0(Native Method)
at sun.reflect.NativeMethodAccessorImpl.invoke(Unknown Source)
at sun.reflect.DelegatingMethodAccessorImpl.invoke(Unknown Source)
at java.lang.reflect.Method.invoke(Unknown Source) at com.zerog.lax.LAX.launch(DashoA8113)
at com.zerog.lax.LAX.main(DashoA8113)
This Application has Unexpectedly Quit: Invocation of this Java Application has caused an InvocationTargetException. This
Chapter 3 Using CA certificates 33
Chapter
3
Using CA certificates
The following topics are provided: ! Certificates overview (page 34) ! Using the keytool utility (page 34)
! Obtaining and importing CA certificates (page 35) ! Adding another CA certificate (page 38)
Certificates overview
The default Tomcat server used by BMC Atrium SSO uses a keystore and a truststore for secure (HTTPS/TLS) communications. These files are stored in the following directory:
installDir/BMC Software/AtriumSSO/tomcat/conf
The initial keystore created during the installation uses a self-signed certificate. This certificate causes browsers and other programs to warn users about the insecure nature of the certificate each time the user authenticates. The certificate warning can be prevented by doing one of the following:
! Permanently importing the self-signed certificate into the user’s truststore. ! Obtaining and importing a signed identity certificate from a trusted Certificate
Authority (CA). The CA vouches for the authenticity of the server’s identity when the user visits the BMC Atrium SSO for authentication.
In this case, the user has an established trust relationship with the CA and this relationship is extended to BMC Atrium SSO after a digitally signed identity certificate is imported.
By default, BMC Atrium SSO is installed with a self-signed certificate. Although valid, this certificate causes warning messages when users access the server to perform authentication. The warning messages occur because the certificate is not signed by a CA.
Using the keytool utility
The keytool utility is used to obtain a digitally signed identity certificate to replace the self-signed certificate. This utility is available with Oracle JDKs and BMC Atrium SSO. The keytool utility must be available within the shell command environment to generate a CSR or to import a CA signed certificate.
To verify that the keytool utility is available
1 Open a shell command window.
2 At the command prompt, type keytool, and press Enter.
NOTE
Chapter 3 Using CA certificates 35 Obtaining and importing CA certificates
[-keystore <keystore>] [-storepass <storepass>] [-storetype <storetype>] [-providername <name>]
[-providerclass <provider_class_name> [-providerarg <arg>]] ...
[-providerpath <pathlist>]
3 If the tool is available, proceed with the instructions for generating a CSR and importing signed certificates.
If the tool is not available, update the command shell environment to include the following path:
installationDirectory/BMC Software/AtriumSSO/jdk/bin
Obtaining and importing CA certificates
By default, BMC Atrium SSO is installed with a self-signed certificate. Although valid, this certificate causes warning messages when users access the server to perform authentication. The warning messages occur because the certificate is not signed by a CA.
To obtain and import a CA signed identity certificate
1 Generate a Certificate Signing Request (CSR).
The CSR must be sent to a CA to be digitally signed and returned. The CA signs the CSR using a private key which validates the server’s identity and returns a signed identity certificate.
2 Import the CA certificate into BMC Atrium SSO Tomcat keystore.
3 Stop and restart the Tomcat server.
4 Update all integrated application truststores with the new public key.
NOTE
The new CA certificate will not take effect until the restart occurs.
Generating CSRs in Windows
To generate a Certificate Signing Request (CSR)
1 On the command line, change the working directory to:
installationDirectory/BMC Software/AtriumSSO/tomcat/conf
2 From the conf directory, issue the following command:
keytool -certreq -alias tomcat -keystore keystore.p12 -storepass internal4bmc -storetype PKCS12 -providername JsafeJCE
The supplied password is the default for BMC Atrium SSO Tomcat. Another password might need to be supplied if the keystore has been replaced with a locally-generated file.
The command generates and displays the CSR on the shell window screen:
---BEGIN NEW CERTIFICATE
REQUEST---MIIBmDCCAQECAQAwWDEZMBcGA1UECxMQQXRyaXVtU1NPIFNlcnZlcjEVMBMGA1UECh MMQk1DIFNv
ZnR3YXJlMSQwIgYDVQQDExtpQk1DLUpCSEJCSzEuYWRwcm9kLmJtYy5jb20wgZ8wDQ YJKoZIhvcN
AQEBBQADgY0AMIGJAoGBAJABuagV7e12Yu3m0LmNWEmVE4HXrdaB+uOyZFyKLZxO2e +WX3r9vc9q
al5VQSE1yME6ml53B9sWS2RWA5d8xDPW8ppQe3dqQdf3QDDzfXQ18MmZAfraSbv6Y2 Tj0Oad10Uf
c8NUXYCvKNcmdHzkabaHuTOXuhfyGyzyCgFdd/ jTAgMBAAGgADANBgkqhkiG9w0BAQUFAAOBgQAx
oNCBNvnbYNHD02QOIXEP4eMd9HlfJjvJHtAS6SyibMEd00mq/ BD5iV1TewwkmvJRn1BjmzGXNO1c
xbasQaHN9l0+HP4X6aWfRIJtq9GOj4d9Y2wb5L6SEsgnCtnvbHDsMR0AEBLPCR7nVJ 4vgQsZ9xLj
EfQB8idnyyimIfoqqQ==
---END NEW CERTIFICATE
REQUEST---The toolkit command output must be sent to the CA for a digital signature. After the signed identity certificate is returned, the next step is to import the signed identity certificate into the keystore where it replaces the current self-signed certificate.
NOTE
The Common Name (CN) of the certificate cannot be modified because the CN must match the host name of the server. If the names do not match, the browser issues a warning that the server is trying to impersonate another site.
Importing CA certificates in Windows
To import a CA certificate, use the keytool -importcert option. -importcert [-v] [-noprompt] [-trustcacerts] [-protected]
[-alias <alias>]
[-file <cert_file>] [-keypass <keypass>]
Chapter 3 Using CA certificates 37 Obtaining and importing CA certificates
installationDirectory/BMC Software/AtriumSSO/tomcat/conf
2 Run the keytool utility with the following parameters:
keytool -importcert -alias tomcat -storepass internal4bmc -file signed.cert -keystore keystore.p12 -storetype PKCS12 -providername JsafeJCE
3 If the keystore has been altered from the default password created during installation, update the password.
4 Change the name of the CA certificate file to the actual value.
5 After successfully importing the signed certificate file into the keystore, restart the server.
NOTE
The new CA certificate will not take effect until the restart occurs.
Generating CSRs in UNIX
To obtain CA signed certificate for BMC Atrium SSO, you generate a CSR.
To generate a CSR
1 Run the following keytool command:
keytool certreq keyalg RSA alias tomcat file certreq.csr -keystore -keystore.p12 -storetype PKCS12 -providername JsafeJCE
2 The CSR is automatically sent to the CA. The CA returns the signed certificate which is a verification of the server’s identity.
3 Import the returned CA signed certificate into the BMC Atrium SSO Tomcat keystore.
This must be done to provide secure communications.
Importing CA certificates in UNIX
To import the certificate
1 Run the following keytool command:
keytool -import -alias tomcat -keystore keystore.p12 -file cert.txt -storetype PKCS12 -providername JsafeJCE
Adding another CA certificate
Adding another certificate is necessary when CAC authentication is used, the Department of Defense (DoD) issues new CA certificates, or you are using SSL with LDAP for authentication. By default, the BMC Atrium SSO truststore already contains the current certificates for CAC.
The procedures for adding another CA certificate are the same as for importing a CA certificate.
IMPORTANT
Replacing the self-signed certificate on the BMC Atrium SSO server invalidates the certificates that have already been accepted by users. In addition, you will be required to install the new certificate into the truststore of all integrated BMC applications.
Creating new keystores
To create a new keystore
1 Create a new keystore by using a new password to secure the certificate as follows: keytool -genkey -alias tomcat -keyalg RSA -keystore
tomcatInstallationDirectory/keystore
2 After the keystore has been created, update the server.xml file with the new password for the keystore.
For details, see the Tomcat documentation at http://tomcat.apache.org/tomcat-6.0-doc/ ssl-howto.html# SSL and Tomcat).
Locating the keystore and truststores
With the BMC Atrium SSO default installation, the keystore and truststores are in the following locations:
! Keystore:
<installdir>/tomcat/conf/keystore.p12 ! Tomcat truststore:
Chapter 3 Using CA certificates 39 Creating new keystores
C:\apache-tomcat-6.0.20>keytool -genkey -alias tomcat -keyalg RSA -keystore C:/apache-tomcat-6.0.20/keystore
Enter keystore password:
What is your first and last name? [Unknown]: sample.bmc.com
What is the name of your organizational unit? [Unknown]: BMC Atrium SSO
What is the name of your organization? [Unknown]: BMC Software, Inc.
What is the name of your City or Locality? [Unknown]: Austin
What is the name of your State or Province? [Unknown]: TX
What is the two-letter country code for this unit? [Unknown]: US
Is CN=sample.bmc.com, OU=BMC Atrium SSO, O="BMC Software, Inc.", L=Austin, ST=TX, C=US correct?
[no]: yes
Enter key password for <tomcat>
Chapter 4 Authentication chaining 41
Chapter
4
Authentication chaining
The following topics are provided:
! Authentication chaining overview (page 42) ! Authentication chaining example (page 42)
Authentication chaining overview
An Authentication Chain is the object used by BMC Atrium SSO for specifying how authentication is to be performed. A chain can be a single authentication module or a combination of multiple authentication modules. Chaining allows different modules to act as a single authority.
At its simplest form, an authentication chain consists of only a single
authentication module. A chain can also be a complex combination of multiple authentication modules joined to validate the credentials that are used to
authenticate a user. Through chaining, different modules can be merged to appear as a single authority.
For example, if two organizations merge to form a new, single organization, then the authentication system from each organization could be used as a module within a single chain.
! The effect of combining these modules into this single chain is that the users only provide credentials to a single authority.
! The chain can be configured to check each of the modules until the user is authenticated.
! This chaining creates the perception of a merged authority despite the reality of multiple, disparate systems that are actually employed.
Authentication chains allow the combination of authentication modules to process authentication requests. One of the best uses for combining modules is to merge different authentication schemes to appear as a single authentication scheme. For example, when two departments have their own LDAP servers, these two servers could be put into a single chain and users would appear to validate against a single authority.
Authentication chaining example
The processing of the chain to determine the overall status of authentication is controlled by the criteria specified for each of modules in the chain. The following figure illustrates authentication chaining where authentication modules are tried in an ordered sequence.
Chapter 4 Authentication chaining 43 Authentication chaining example
The overall status is successful if all of the Required and Requisite modules pass before either the end of the chain or the first successful Sufficient module. When there are no Required or Requisite modules, then at least one Sufficient or Optional module must authenticate the user. See “Adding modules to chains” on page 122. In the chaining process for the above example illustration, three LDAP servers combined into a single authority, would be:
1 Check with LDAP A
! Pass: Stop processing and accept user ! Fail: Proceed to next
2 Check with LDAP B
! Pass: Stop processing and accept user ! Fail: Proceed to next
3 Check with LDAP C
! Pass: Stop processing and accept user ! Fail: Stop processing and reject user
With this configuration, the first LDAP server is presented the user credentials for authentication. If the authentication succeeds, then processing stops with the user being authenticated. If the user is not within the first LDAP server, then the credentials are passed to the second LDAP server. Each server is checked in the sequence specified until either the user passes and is considered successfully authenticated, or the user fails to authenticate and is rejected.
Chapter 5 Using LDAP for authentication 45
Chapter
5
Using LDAP for authentication
The following topics are provided:
! Setting up LDAP to use for authentication (page 46) ! Configuring the LDAP module (page 46)
Setting up LDAP to use for authentication
BMC Atrium SSO provides support for using external Lightweight Directory Access Protocol (LDAP) servers for authentication.
To set up LDAP to use for authentication
1 Configure the LDAP module.
2 If you enabled SSL Access to LDAP Server on the LDAP configuration page, import the certificates and restart the Tomcat server before enabling LDAP authentication. See “Using CA certificates” for more information.
3 Enable LDAP authentication.
Configuring the LDAP module
The configuration and use of the LDAP module is described for a single BMC Atrium SSO server. By default, a single LDAP module is created and configured as part of the LDAP chain. The LDAP module must be configured for the enterprise environment.
To configure the LDAP module
1 Navigate to the Authentication tab:
Access Control > BmcRealm link > Authentication
2 Click the Module Instances link
3 Click the LDAPlink.
4 Enter your LDAP configuration parameters and click Save.
LDAP configuration parameters
LDAP configuration parameters are entered on the LDAP Realm Attributes page. The LDAP page has the following options:
! Save to save your modifications
! Reset to remove your modifications and stay on the LDAP page. ! Back to Authentication to navigate back to the Authentication tab.
Chapter 5 Using LDAP for authentication 47 Configuring the LDAP module
Table 5-1: LDAP module parameters
Parameters Description
Primary LDAP Server (Required) Enter the host’s Full Qualified Domain Name (FQDN) for the primary LDAP server is required.
If the LDAP server is not listening on the default port (389), suffix the host name value with a colon (:) and port number that the LDAP server is using: <host name value (FQDN)>:<port>
Secondary LDAP Server The secondary LDAP server is only used when the primary server is not available. It is not used in parallel or when a user fails to authenticate with the primary server.
If the secondary server is not listening on the default LDAP port, suffix the host name with a colon (:) and the port that is being used.
<host name value (FQDN)>:<port>
The amount of time that the server uses the secondary server before attempting to re-connect with the primary server can be configured. DN to Start User Search The search DNs should be as specific as possible for performance
reasons. The depth of the search that is performed can be
configured. If an Object search is specified, then the DN should be the DN of the node containing the users.
Enter the starting locations within the LDAP directory for
performing user searches. For each starting point, enter the login name (DN).
DN for Root User Bind (Required) The DN is the login name that is used to connect to the LDAP server.
A root user must have privileges to perform searches on the primary and secondary LDAP servers.
Enter the DN for the root user, the password, and the password confirmation.
Attributes Used to Retrieve User Profile
Attributes can be specified to retrieve user profiles. Attributes Used to Search for a
User to be Authenticated
(Required) Attributes are used to identify the DN to be used for
authentication within the LDAP servers. The attributes specified are used to search for the DN for the user to be authenticated.
Enter an attribute to identify user names in the LDAP servers. The default attribute is uid, but if a different value is used (such as
givenname), then update this value to the environment-specific attribute.
More than one attribute can be used to uniquely identify a user. For example, along with a unique user ID, the user's phone number or e-mail address could also be used. In this way, users could use their phone numbers or email accounts when authenticating, instead of relying solely upon a user ID.
User Search Filter The attribute-value pairs further refines the user search for authentication. This field can be left blank (default).
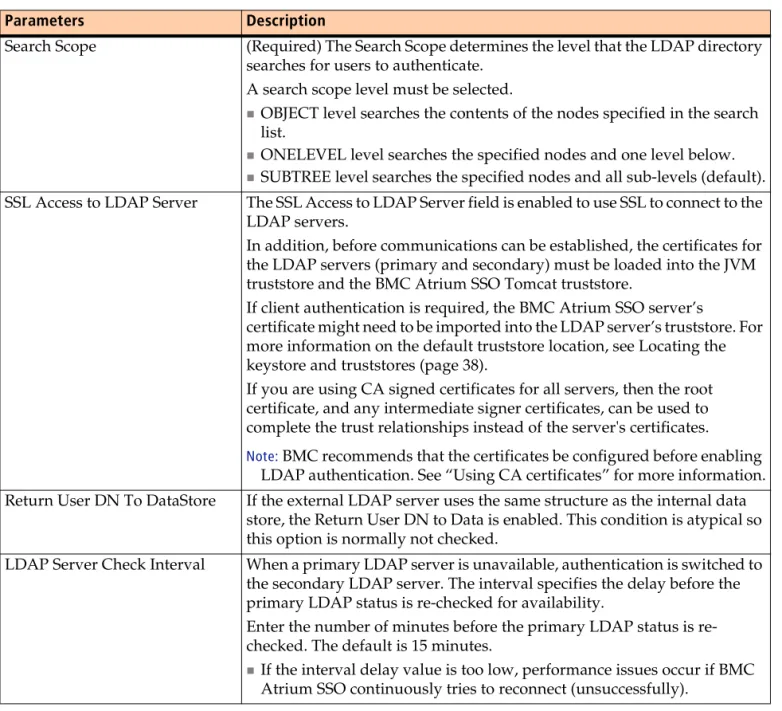
Search Scope (Required) The Search Scope determines the level that the LDAP directory searches for users to authenticate.
A search scope level must be selected.
! OBJECT level searches the contents of the nodes specified in the search list.
! ONELEVEL level searches the specified nodes and one level below.
! SUBTREE level searches the specified nodes and all sub-levels (default). SSL Access to LDAP Server The SSL Access to LDAP Server field is enabled to use SSL to connect to the
LDAP servers.
In addition, before communications can be established, the certificates for the LDAP servers (primary and secondary) must be loaded into the JVM truststore and the BMC Atrium SSO Tomcat truststore.
If client authentication is required, the BMC Atrium SSO server’s
certificate might need to be imported into the LDAP server’s truststore. For more information on the default truststore location, see Locating the keystore and truststores (page 38).
If you are using CA signed certificates for all servers, then the root certificate, and any intermediate signer certificates, can be used to complete the trust relationships instead of the server's certificates.
Note:BMC recommends that the certificates be configured before enabling LDAP authentication. See “Using CA certificates” for more information. Return User DN To DataStore If the external LDAP server uses the same structure as the internal data
store, the Return User DN to Data is enabled. This condition is atypical so this option is normally not checked.
LDAP Server Check Interval When a primary LDAP server is unavailable, authentication is switched to the secondary LDAP server. The interval specifies the delay before the primary LDAP status is re-checked for availability.
Enter the number of minutes before the primary LDAP status is re-checked. The default is 15 minutes.
! If the interval delay value is too low, performance issues occur if BMC Atrium SSO continuously tries to reconnect (unsuccessfully).
Table 5-1: LDAP module parameters
Chapter 5 Using LDAP for authentication 49 Enabling LDAP authentication
Enabling LDAP authentication
After the LDAP module is configured, specify that the LDAP module is to be used for authentication. This task involves specifying LDAP Chain as the organizational choice for authentication.
NOTE
Configure only the BmcRealm to use external LDAP servers.
IMPORTANT
If you enabled SSL Access to LDAP Server on the LDAP module configuration page, import the certificates and restart the Tomcat server. See “Using CA certificates” for more information.
To configure LDAP realm authentication
1 On the Authentication tab for the BmcRealm, click All Core Settings.
A new page is displayed. At the top of this new page is a series of radio buttons. The buttons are used to select how the user profile is handled when a user is authenticated.
2 In the User Profile field, click either Dynamic or Ignored.
! Dynamic specifies that a local SSO user profile is created after a successful authentication, if it does not already exist.
! Dynamic with User Alias specifies that a local SSO user profile and user alias is created for each successful authentication.
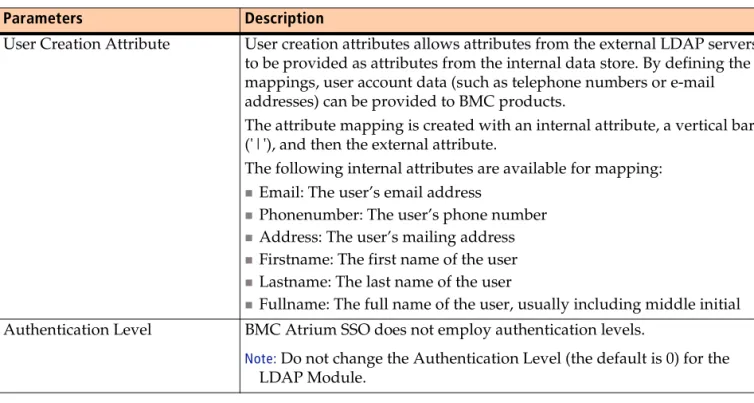
User Creation Attribute User creation attributes allows attributes from the external LDAP servers to be provided as attributes from the internal data store. By defining the mappings, user account data (such as telephone numbers or e-mail addresses) can be provided to BMC products.
The attribute mapping is created with an internal attribute, a vertical bar ('|'), and then the external attribute.
The following internal attributes are available for mapping:
! Email: The user’s email address
! Phonenumber: The user’s phone number
! Address: The user’s mailing address
! Firstname: The first name of the user
! Lastname: The last name of the user
! Fullname: The full name of the user, usually including middle initial Authentication Level BMC Atrium SSO does not employ authentication levels.
Note:Do not change the Authentication Level (the default is 0) for the LDAP Module.
Table 5-1: LDAP module parameters
! Ignored specifies that no local SSO user profile is created or required for authentication.
! Required specifies that a local SSO user profile with the same user ID is required for authentication to be successful.
3 Click Save.
4 Click Back to Authentication.
5 On the BmcRealm Authentication page, select LDAP Chain from the Organization Authentication Configuration drop down menu.
6 On the BmcRealm Authentication page, select LDAP Chain from the Administrator Authentication Configuration drop down menu.
Chapter 6 Using AR Server for authentication 51
Chapter
6
Using AR Server for
authentication
The following topics are provided:
! Setting up AR to use for authentication (page 52) ! Configuring the AR module (page 52)
! Enabling AR authentication (page 53) ! Enabling the AR data store (page 54)
Setting up AR to use for authentication
The Action Request (AR) authentication module allows BMC Atrium SSO to use the user accounts within an BMC Remedy AR System server for authentication. This module is normally used in conjunction with the AR data store to retrieve group information and other user attributes from the AR server.
To use AR for authentication
1 Configure the AR module.
2 Enable AR authentication. 3 Enable AR data store.
Configuring the AR module
The AR authentication module allows BMC Atrium SSO to use user accounts within an BMCAR Server for authentication purposes. This module should be used in conjunction with the AR data store.
To configure the AR module
1 Navigate to the Authentication tab:
Access Control > BmcRealm link > Authentication
2 Click the Module Instances link.
3 Click the ARlink.
4 Enter the AR configuration information and Save.
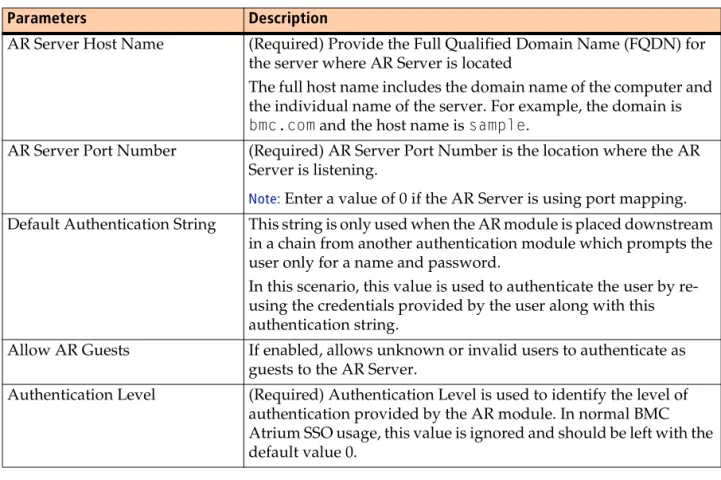
AR configuration parameters
AR configuration information is entered on the AR Server Realm Attributes page. The AR page has the following options:
! Save to save your modifications
! Reset to remove your modifications and stay on the AR page. ! Back to Authentication to navigate back to the Authentication tab.