single spermatozoa in a microfluidic system
Jorien Berendsen
Report number: 2014-3 April 22, 2014
Committee:
Prof.dr.ir. A. van den Berg Dr. L.I. Segerink
This research describes the entrapment of spermatozoa in a microfluidic device and the analysis of single spermatozoa by fluorescence and impedance spectroscopy.
This microfluidic device is made from PDMS and consists of two main channels, which are con-nected by small side channels. These side channels act as small traps when a pressure difference is obtained over the main channels. This pressure diffence was caused by a difference in flow rate. Three different trap heights of 1, 1.5 and 2 μm were tested, of which the 1 μm traps showed a single cell trapping capacity of 43%. This chip showed the least tendency to trap multiple sper-matozoa, which is an advantage since multiple trapping is undesirable for impedance measurements.
Spermatozoa were analysed with fluorescent stainings. Viability staining was performed on and off chip. With viability staining on chip, the viability of a specific cell could be determined. FISH staining of X and Y chromosomes was performed, after which several FISH staining experiments were performed on spermatozoa on chip. The staining results were not influenced by the presence of microelectrodes in the chip.
The presence of a spermatozoon in the trap could also be detected through impedance spectroscopy. It was seen that spermatozoa caused a drop in impedance at the resistive plateau. This drop in impedance indicates that the interior of the cell was measured. Because the interior of spermatozoa mainly consists of DNA, it might be possible to measure the amount of DNA.
1 Introduction 7
1.1 Project background . . . 7
1.2 Assignment description . . . 7
1.3 Sex sorting background . . . 7
1.4 Ethical concerns . . . 8
1.5 Structure of the report . . . 8
2 Theory 9 2.1 Sex determination . . . 9
2.2 Anatomy of the spermatozoon . . . 10
2.3 DNA . . . 10
2.4 Fluorescent staining . . . 13
2.4.1 Viability staining . . . 14
2.4.2 FISH staining . . . 15
2.5 Current methods for sex sorting . . . 16
2.5.1 Centrifugation . . . 16
2.5.2 Fluorescence Activated Cell Sorting (FACS) . . . 16
2.6 Cell trapping techniques . . . 17
2.6.1 Hydrodynamical trapping . . . 17
2.6.2 Electrical trapping . . . 18
2.6.3 Other trapping techniques . . . 19
2.7 FISH staining on chip . . . 20
2.8 Impedance spectroscopy . . . 21
2.8.1 Dielectric properties of cells . . . 22
2.8.2 The equivalent circuit model . . . 22
2.9 Previous projects . . . 23
2.9.1 Results from project 1 . . . 23
2.9.2 Results from project 2 . . . 24
3 Experimental set-up 25 3.1 Chip fabrication . . . 25
3.2 Electrode design and set-up . . . 26
3.3 Sample preparation . . . 27
3.4 Single cell trapping . . . 27
3.5 Viability staining on and off chip . . . 28
3.6 FISH staining . . . 28
3.6.2 FISH staining on chip . . . 29
3.7 Impedance analysis . . . 29
4 Results and Discussion 31 4.1 Chip fabrication and set-up . . . 31
4.2 Cell trapping . . . 32
4.3 Viability staining . . . 34
4.3.1 Viability staining off chip . . . 34
4.3.2 Viability staining on chip . . . 35
4.4 FISH staining . . . 35
4.4.1 FISH staining off chip . . . 35
4.4.2 FISH staining on chip . . . 36
4.5 Impedance analysis . . . 39
4.5.1 Electrode orientation . . . 39
4.5.2 Simulations . . . 40
4.5.3 Characterization . . . 41
4.5.4 Beads and cells . . . 43
4.5.5 The influence of the trap . . . 45
5 Conclusions 47 5.1 Recommendations . . . 48
A Protocols 53 A.1 Viability staining . . . 53
A.2 FISH Staining . . . 53
A.3 PDMS chip fabrication . . . 55
A.4 FISH Staining on Chip . . . 56
B Used fluorescent dyes and probes 59 B.1 Viability staining . . . 59
B.2 FISH staining . . . 60
Introduction
1.1
Project background
In the livestock industry, artificial insemination is a well-established method for expanding herds. Naturally speaking, the ratio of male to female offspring is around 50%. However, for some animal industries one specific sex is desired, e.g. female offspring for the milk and the pig industry. Per-forming artificial insemination with sex-sorted semen can provide a big economic benefit compared to insemination with normal semen.
This work is part of ongoing research to develop a microfluidic system, which is able to elec-trically detect whether a spermatozoon contains an X or Y chromosome and to subsequently sort them into two fractions. Currently, the most reliable method of sorting is fluorescence-activated cell sorting (FACS), a specialized flow cytometry sorting. A microfluidic system could provide two potential advantages: an increase in sorting efficiency and a decrease in inflicted cell damage.
1.2
Assignment description
This project focuses on fluorescent in situ hybridization (FISH) staining of the X and Y chromo-somes of hydronamically trapped spermatozoa, which will serve as a verification tool for electrical measurements. The main goal is to perform FISH staining on trapped spermatozoa inside a mi-crochannel. Firstly, viability staining will be performed in batch, and secondly in a mimi-crochannel. Subsequently, FISH staining will also be carried out in batch and in a microchannel. If FISH staining on chip is performed succesfully, electrical measurements will be integrated on chip.
1.3
Sex sorting background
At the moment, preselection of semen based on the sex chromosome is the most used in the animal livestock industry. In the beef industry, male offspring is preferred. Steers (castrated bulls) provide the most meat, so sperm sexing is used to select for males. In the dairy industry, only female offspring is desired for milk production. To ensure a genetic optimum, male calves are obtained from the best cows in the herd to use as breeding bulls.[1]
5% of uncastrated male pigs. due to this odor, the meat is preferably not used for consumption.[2]
1.4
Ethical concerns
When it is possible to do sex sorting in the veterinary industry, the same methods can be used for human spermatozoa. At the moment, sex selection on humans is only done in the case of heriditary diseases which are linked to the sex chromosomes. IVF is used, where the embryos are tested and selected on their sex chromosomes. Sex sorting before conception is also used, but current methods are less reliable and seen as too risky in the case of severe hereditary diseases. Also, this way of sorting damages the DNA. Reliable preconception sex sorting can make it easier to perform gender selection on humans without the need for a medical reason. This form selection might prevent the discarding of embryos of the wrong gender or cases of gender driven abortion. At the moment this is possible, as the gender can be discovered at the 20-week-ultrasound and in some countries (including the Netherlands) getting an abortion without giving any reasons is legal up to 24 weeks into the pergnancy.[3] There are however some concerns about the ethics of gender selection without a medical reason.
One concern is the potential of gender selection to increase or reinforce gender discrimination, either by allowing more males to be born as first children or by encouraging parents to prefer a gender.
A second concern is the welfare of children born as a result of gender selection, who may be expected to act in a gender specific way when the technique succeeds. The born children may also disappoint parents when they are born the ”wrong” gender, as sex sorting is not (yet) 100% accurate.
The third concern is more of a societal concern. When widely practiced, gender selection could lead to imbalances in the sex ratio, as is already the case in some parts of China because of a one-child family policy. Another societal concern is the emphasis that gender selection could place on a child’s genetic characteristics, rather than their inherent worth.
Before allowing the general public access to gender selection, a careful debate on the ethics of gender selection before conception is neccesary. [4]
1.5
Structure of the report
Theory
2.1
Sex determination
Most species on earth reproduce sexually, which means that for the formation of a new organism, a male and a female reproductive cell/gamete is necessary. These cells are formed from somatic cells in the body through meiosis. The male gamete is called a spermatozoon. A gamete is hap-loid, which means that only one of each chromosome is present in the nucleus. The fusion of two gametes produces an omnipotent stem cell, also called zygote. This zygote is diploid and has a pair of each chromosome, like normal cells in the body.[5] A human spermatozoon has 22 autosomal chromosomes and one sex chromosome. Bovine and porcine spermatozoa have 29 and 15 autosomal chromosomes respectively, with both containing one sex chromosome.[6]
In most mammals, the presence of a Y chromosome determines the sex of the offspring, as can be seen in Figure 2.1. This is the case even if there are more (or less) than 2 sex chromosomes through a mistake in the meiosis. This is possible through X inactivation (only one X chromosome is left activated, the rest is silenced) and the fact that the Y chromosome is gene poor (78 genes vs. about 2000 genes for the X chromosome). This means that for example individuals with 47,XXY and 47,XYY karyotypes are males, while individuals with 45,X and 47,XXX karyotypes are females. On the Y chromosome there is one gene, the sex-determining region of the Y, or SRY, that is the regulator of sex determination. This gene is located on the short arm of the chromosome.[5]
2.2
Anatomy of the spermatozoon
Spermatozoa have evolved to most efficiently fertilize an egg cell, or ovum. They are equipped with a strong tail, which propels them through an aqueous medium. Compared to other cells present within the body, the only organelle present in the sperm cell is the mitochondrium. Other cell organelles are unnecessary for the task of delivering the DNA to the ovum.[7]
[image:10.612.93.514.475.549.2]Spermatozoa usually consist of three regions enveloped by a plasma membrane: the tail, the mid-piece and the head (Figure 2.2). The DNA inside the head is very condensed, which minimizes the cells volume to have a faster transport. In the front of the head, the acrosomal vesicle is located. This vesicle contains enzymes that help the sperm to penetrate an ovum’s outer coat.[7] The tail of a sperm is a long flagellum. The flagellar movement of the tail is driven by motor proteins, which use the energy created by ATP hydrolysis. The mitochondria are located in the midpiece and produce the ATP to power the flagellum.[7] Typical dimensions of a spermatozoon of different species are given in Table 2.1
Figure 2.2: A spermatozoon consists of three distinct regions; the head, the midpiece and the tail. The head contains a nucleus and an acrosome and the midpiece contains mitochondria.[7]
Table 2.1: The dimensions of human, porcine and bovine spermatozoa.
Species
Total Head Midpiece Tail
Length Length Width Length Width Length Width Human [8] 55 μm 4.5μm 3μm 4.2 μm 0.6μm 45 μm 0.5μm Domestic Pig [9] 45 μm 7 μm 4μm 9 μm 0.7μm 28 μm 0.4μm Cattle [10] 57 μm 7 μm 4μm 10 μm 0.6μm 37 μm 0.4μm
2.3
DNA
DNA is composed of four different nucleobases, sugars and phosphates. Adenine (A) and Thymine (T) each form two hydrogen bonds and Guanine (G) and Cytosine (C) form three hydrogen bonds. Thermodynamics dictate that the only pairs that will exist will be A-T and G-C, because formed hydrogen bonds are energetically very favorable (Figure 2.3a).
dyes (such as DAPI, see Appendix B.2). DNA is normally also methylated, where a methyl group is added to the cytosine or adenine nucleotides.[11]
(a) DNA base pairs
[image:11.612.138.451.128.517.2](b) DNA Stacking
To achieve a tight packing in the nucleus, the DNA is coiled around nucleosomes, which are complexes of positively-charged histones (proteins) that strongly bind to the negatively-charged phosphate-spine of the DNA helix. These nucleosomes, together with histones, help the DNA to fold up into a chromosome. This process is illustrated in Figure 2.4.[12]
Figure 2.4: The DNA condensation process from double helix to chromosome.[12]
Figure 2.5: The DNA condensation process in spermatozoa, where most of the histones are replaced by protamines, causing a tighter packing than in somatic cells.[13]
2.4
Fluorescent staining
Fluorescence is the emission of photons due to the relaxation of photon exited electrons. The energy difference between the energy states determines the wavelength of the emitted light. On average, this emitted light will be lower in energy than the light absorbed by the molecule, due to vibrational relaxation (both after absorption and after emission). The change in photon energy causes a shift of the fluorescence spectrum to longer wavelengths than the absorption spectrum. This phenomenon is known as the Stokes Shift.[14] Figure 2.6 shows the mechanism of fluorescence.
Fluorescence microscopy is the most common technique to visualize biological structures and pro-cesses. The goal in fluorescence microscopy is to choose an appropriate excitation wavelength to excite the dye molecule. Using a white-light-source, a band-pass filter (excitation filter) is selected, which transmits only a small bandwidth of wavelengths suitable for the fluorophore. Exciting a dye molecule at a nonoptimal wavelength will decrease the amount of emitted fluorescence light, but not the characteristics of the emission spectrum.[15]
Figure 2.6: Jablonski diagram, which shows the mecha-nism of fluorescence.[17]
Table 2.2: Excitation and emission maxima for the used dyes in this work. For more information on the dyes, see Appendix B.
Dye Excitation max (nm)
Emission max (nm)
SYBR 14 488 516
Propidium Iodide
536 617
IDetect Red
548 573
IDetect Green
493 521
DAPI 360 460
2.4.1 Viability staining
[image:14.612.233.383.500.660.2]Viability staining is used to determine if a cell is dead or alive. This can be done by staining the cells with two fluorescent dyes. These dyes bind to the DNA helix. The dyes are chosen such that one of the dyes will be able to permeate the cell membrane and color the DNA of all cells. The other dye is not able to go through an uncompromised cell membrane and will only color the dead cells. In this work, the dyes SYBR 14 and propidium iodide (PI) are used. SYBR 14 is able to permeate the cell membrane and color all cells. PI can only stain the DNA of cells with compromised cell membranes, which are dead cells, as it is a nonpervasive dye. Because the binding to DNA is more favourable for PI, this dye expels the SYBR 14 from dead cells. Possible binding sites for fluorescent dyes used in viability staining are shown in Figure 2.7. SYBR 14 and PI are both intercalators.[18]
2.4.2 FISH staining
FISH staining is used to detect specific genes/sequences on the DNA of a cell. To detect such a specific DNA sequence, fluorescent probes can be used. These probes consist of a strand of com-plementary DNA, whose nucleotides bind to the chromosomal DNA that has to be detected. This mechanism for detection is called Fluorescence In Situ Hybridization, or FISH.
Because of the hydrogen bonds between the bases, a DNA helix is remarkably stable. When breaking down the hydrogen bonds of the helix with heat or chemicals, the helix is able to reform when conditions become more favorable. This ability of the DNA helix to reform, or renature, provides the basis for molecular hybridization.
[image:15.612.192.420.429.642.2]The first step in the FISH process is to make a copy of the chromosomal DNA sequence that is of interest, and label this strand directy or indirectly by a fluorescent marker (Figure 2.8b, mid-dle or left column). This copy serves a the fluorescent probe and will be bound to the target DNA. Because DNA inside a spermatozoon is tightly packed, it must first be decondensed. This step is necessary for the accessibility of hybridization sites. Next, both the target and the probe sequences must be denatured, which is done by exposing the DNA to heat or chemicals (Figure 2.8c). This denaturation step is necessary to break down the hydrogen bonds. The sequences are then mixed (Figure 2.8d) and during the hybridization step, the probe will hybridize to its complementary sequence on the chromosome. The DNA is renatured in the double helix after the hybridization, with the labeled probes on the specific target sequences. If the probe is already fluorescent (middle column), the site of hybridization can be directly detected, otherwise an additional step is neces-sary. The hybrids formed between the probes and their targets can be detected with the usage of a fluorescent microscope.[19] The more technical processing steps can be found in the protocols in Appendix A.2.
Various probes can be used for FISH staining, with each their own application. In this work, locus specific probes are used. This probe is very useful if the research needs information on a specific chromosome sequence. A chromosome with a locus specific probe is visible in Figure 2.9.[19]
Figure 2.9: The locus specific probe binds to its target sequence, showing two fluorescent spots on the chromo-some.[20]
2.5
Current methods for sex sorting
The two currently used techniques for sex sorting of semen are centrifugation and FACS. These tech-niques are based on the fact that an X spermatozoon has 3.8% more DNA than a Y spermatozoon, resulting in a difference in sperm mass.[21]
2.5.1 Centrifugation
When a semen sample is centrifuged, the induced forces cause the spermatozoa (and other particles) in the sample to become sorted into layers according to their density. Sorting separates the more dense X spermatozoa from the lighter Y spermatozoa. By separating the layers, sperm populations with a skewed ratio of X to Y chromosome content can be obtained.[22]
The accuracy of this method is influenced by confounders such as the natural spreading of the spermatozoa size in every individual and between individuals. The threshold for the best separa-tion is thus different for every sorting.[23] This method has been tested and has both been reported as succesful, with an enrichment of aproximately 70%,[24] and unsuccesful to alter the X/Y ratio in sperm enough for clinical use.[25]
2.5.2 Fluorescence Activated Cell Sorting (FACS)
groups; X bearing spermatozoa, Y bearing spermatozoa and a waste category. The advantage of it is the increased accuracy, with a purity of the sexed samples of 80% and up to more than 90%. The disadvantages of this technique compared to the centrifugation are the higher costs and the induced damage to the sperm cells.[26]
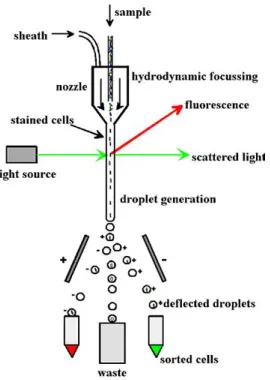
[image:17.612.241.376.243.433.2]FACS is the most used method for sex sorting. Spermatozoa can be sexed at a rate of 3000 live spermatozoa per second. The theoretical maximum rate is estimated to be at 10,000 sperma-tozoa per second. About a quarter of the spermasperma-tozoa processed are efficiently sex-sorted; the rest is discarded in the process or lost due to logistical constraints. The fertility is somewhat lower with sexed than control spermatozoa.[27]
Figure 2.10: Before going into the cell sorter, the DNA of the cells in the semen sample is stained with a fluorescent dye. The sample is forced out of a nozzle in a small stream. When the stream of cell containing fluid is passed through a UV laser beam, the fluorescent stained DNA starts to emit. The intensity of the fluorescence is measured. The stream is then broken into micro-droplets that optimally hold one spermatozoon. If the measured amount of fluorescence is in the range designated for the Y spermatozoa, that micro-drop is given an electric charge by passing through a charged ring. If the intensity is within the range for X spermatozoa, the micro-drop is given an opposite electric charge. The charged micro-drops fall between two charged plates, resulting in two groups of droplets to be separated into different pools. Droplets that fall outside of the fluorescence range for X or Y, for example when there are two spermatozoa in one droplet, are collected into a third group.[28]
2.6
Cell trapping techniques
There are several techniques available to trap cells within microfluidic systems. Well described methods include hydrodynamical trapping and electrical trapping, which by electrophoresis and the use of an optical tweezer. Lastly there are some other methods, such as acoustic and magnetic trapping.
2.6.1 Hydrodynamical trapping
sufficiently small to trap cells when a fraction of the total flow is sucked through these channels by a pressure difference (see Figure 2.12).[29, 30, 31] This method has been used to trap different cells, but not yet for spermatozoa.
Figure 2.11: For this particular set-up, two-layer (40 and 2μm) cup-shaped PDMS trapping sites allow a fraction
of the fluid streamlines to enter the traps. After a cell is trapped and partially blocks the 2μm open region, the
amount of streamlines through the trap decreases, discouraging other cells to enter the traps and leading to single-cell trappings.[30]
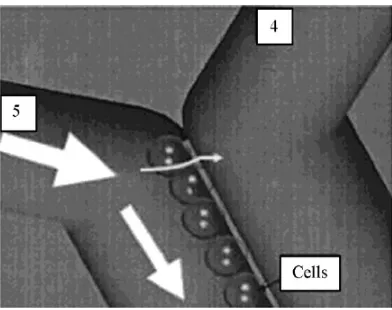
Figure 2.12: When the liquid pressure in channel 5 is higher than in channel 4, a fraction of the fluid flows over the dam structure to channel 4. The hydrodynamic pressure difference will cause the cells in channel 5 to be trapped at the trapping channels of the dam. After the cells are trapped, they (partially) block the flow, diverting other cells and leading to single-cell trapping.[31]
2.6.2 Electrical trapping
(a) There is a higher conductivity around the sper-matozoa at larger frequencies (in the MHz range). Because of this, negative dielectrophoresis can be used to focus the spermatozoa towards a lower elec-tric field strength. The electrodes are focused in such a way that the field minumin is located in the center of the trap. Only slowly moving spermatozoa can be forced to a stop (I). Faster swimming spermatozoa can only be deflected (II), as the forces involved are not that large.[32]
[image:19.612.345.518.96.325.2](b) This method makes use of electrodes and a hy-drodynamical flow. Depending on its motility, a sper-matozoon finds a stable position in front of the break-electrodes (2). This is the equilibrium point between the sperm forces, the repelling electric field force and the hydrodynamic force. Rapidly swimming sper-matozoa stop close to the break-electrode, whereas slower swimming cells come to rest further away.[32]
Figure 2.13: Spermatozoa can be captured by different dielectrophoretic methods. The field distributions of a quadrupole/octopole cage (a) and stripwise arranged electrodes (b) are visible. Darker colors indicate larger fieldstrengths.[32]
The optical tweezer technique uses the electromagnetic fields of light. Here, a force is generated by a single beam gradient laser to trap a spermatozoon. If the particle is pulled sideways from the focus center, the trap beam will pass through the edge of the particle. Just like with a lens, the rays will be refracted towards the optical axis. If the particle moves up, it focuses the outgoing beam into a narrower bundle. There are then sideways and upward forces on the laser beam, caused by the direction and thus momentum change of the electromagnetic field. Such a force results in an opposite force on the particle. This keeps the particle at the center of the trap, where the light rays will pass through symmetrically.[33] With this technique spermatozoa can also be trapped, as shown in the work of Nascimento et al.[34]
2.6.3 Other trapping techniques
Magnetic trapping techniques make use of magnetic fields and magnetic particles of different kinds and sizes. Magnetic methods can also be used to trap non-magnetic objects if a suitable magnetic buffer is chosen. In a homogeneous field, where there is no magnetic gradient, there isno force acting on a particle. It is thus necessary to create an inhomogeneous magnetic field to manipulate a particle. The set-up to create such a field is generally called a magnetic tweezer. The force on a particle that can be generated by this method is typically between a few pN to tens of pN.[36]
2.7
FISH staining on chip
In the following examples, FISH has been performed on chip to reduce time steps and the amount of reagents, especially the amount of expensive probes. Although it is shown for different cells on chip, FISH staining on chip has not been performed on spermatozoa.
In the first example, Matsunaga et al. made a microfluidic device (shown in Figure 2.14) with a black PET micromesh for the entrapment of cells. Cell adsorption on other sites was prevented by treating the PDMS surface of the microchannel with air plasma and Pluronic F-127. The FISH staining could then be directly performed against cells that have been trapped onto the black PET micromesh.[37]
Figure 2.14: A: A schematic diagram of the PDMS microfluidic device integrated with a micromesh for entrapment of mammalian cells. Top; the PDMS microfluidic device integrated with micromesh for entrapment of mammalian cells. Bottom; the black PET micromesh. B: A fluorescence microphotograph of the FISH stainedβ-actin mRNA in
Raji cells that were trapped on the black PET micromesh.[37]
Figure 2.15: A: The microchip contains a reagent multiplexer, a cell chamber with an integrated thin-film heater and a pump. The reagent multiplexer was made of bus valves with minimal dead volume, to avoid the mixing of reagents. During the process, vacuum is constantly applied to the waste well (W). Next to the device, two fluorescence images are shown, which were made after the automated FISH protocol was performed on the integrated microchip. B: Two X chromosomes were detected, C: An X and Y chromosome were detected.[38]
A third example is a device (Figure 2.16) that is used for preparing metaphase spreads on a microscope glass slide, followed by a adhesive tape-based bonding protocol for the fabrication of the microFISH device. Vedarethinam et al. claim that the microFISH device allows for an optimized metaphase FISH protocol on a chip with a 20-fold reduction in the reagent volume, although the amount of the expensive probe was only halved.[39]
Figure 2.16: A: The pre-FISH process is visible. (a) Placing the double-sided adhesive tape stencil on the slide; (b) Spreading of the metaphase spreads in the splashing device; (c) Removing the top cover of the double-sided tap; (d)/(e) Aligning and placing the PDMS onto the tape; (f) Connecting the syringes. B: The fluorescence image of normal FISH staining. C: The results from the on-chip staining. A slight decrease in intensity is visible when the on-chip staining is compared with the normal staining process.[39]
2.8
Impedance spectroscopy
The conductivity and permittivity are combined into the complex permittivity ε∗, where ε∗ =
ε+ jσ(ωω). Hereωis the radial frequency (rads ) and j =
√
–1. The real part of this value is generally called the resistance, while the imaginary part is called the reactance. Together they form the electrical impedance. The electrical impedance is the measure of the opposition that is presented to an anternating current of a certain frequency. It is defined as VI, where V and I are the com-plex voltage and current. The comcom-plex permittivity (or impedance) can be measured by dielectric spectroscopy (or impedance spectroscopy).[40]
2.8.1 Dielectric properties of cells
A cell consists of a cell membrane and the cytoplasm. The cell membrane is a lipid bilayer, while the cytoplasm is composed of the cytosol and organelles. The cell membrane generally has a small reactance and a large resistance. The reactance of the cytoplasm is very large when compared to its resistance. [41]
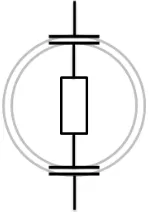
2.8.2 The equivalent circuit model
To gain insight in the electrical properties of a cell, an equivalent circuit model (ECM) can be con-structed. There are three main linear components in such a circuit. There are capacitors, inductors and resistors, of which the impedances are given by j1
ωC, jωL and R respectively. As inductors do not appear in our ECM, these are not further discussed.
The phaseshift of a capacitor is -90◦, while a resistor does not change the phase, because they do not store charge. The magnitude of the impedance of a capacitor will decrease as the frequency goes up, as it is inversely proportional to the frequency. At higher frequencies, the capacitor has less time to charge, until it becomes a short. The impedance of a resistor is independent of the frequency, and will thus stay the same over the complete frequency range.
[image:22.612.270.345.542.648.2]In Foster and Schwan’s simplified circuit model for a single cell, the following approximations are made. The lipid bilayer membrane can be approximated by a capacitor, as it has a large resistance, but a small reactance. Cells themselves are able to contain a voltage drop over the membrane, indicating the capacitive properties of the lipid bilayer. The cytoplasm can be modeled by a resistor, as its reactance can be ignored when compared to its resistance. The cytoplasm of a spermatozoon generally does not contain any significant bilayers, which are mainly responsible for any reactance in biological systems.[41] Figure 2.17 shows the simple ECM for a cell.
2.9
Previous projects
This work is a follow-up on the research done by two other students. The first student, Camille Denoeud, researched a way to trap spermatozoa in a microchip. The second student, Inge van de Ven, worked on (the protocol for) FISH staining of spermatozoa.
2.9.1 Results from project 1
This work focused on designing a microfluidic chip for the single cell entrapment of spermatozoa. For the entrapment of spermatozoa, five trapping techniques were considered: dielectrophoresic, optic, acoustic, magnetic and hydrodynamic entrapment. These trapping techniques are described shortly in section 2.6.
This dielectric trapping method was not suited due to the cost and complexity of the electrode microfabrication. Furthermore, it would complicate electrical measurements. The optical tweezer technique has a small trapping time and a large and expensive set-up, which makes it unattractive. Acoustic trapping can be accomplished with an easy set-up, but it has a tendency to form clusters, making it very hard to trap a single spermatozoon. With magnetic entrapment, it is almost impos-sible to provide enough force to trap a spermatozoon, as only forces tens of pN instead of 200 pN (the force generated by a spermatozoon) are achieved. Therefore, hydrodynamic entrapment was chosen, which fit all of the requirements in Table 2.3. It has an easy set-up, a long trapping time, and the integration of a large possible amount of traps.
Because spermatozoa are motile cells, the side channel trapping method was chosen. This method makes it harder for the cells to escape and easier to be caught than an obstacle method, as the tail is very large in comparison to the head (giving problems with smaller obstacles). Electrical measurements are also more easily carried out with a side channel set-up than an obstacle set-up, where the obstacles might influence the measurements.[42]
Table 2.3: Comparison of the different methods with the requirements.[42]
Criteria
Trapping method Easy set-up Trapping time t>40s F>200pN PDMS Multiple traps
Dielectrophoretic - + + + +
Optical - - + -
-Acoustic - - + - +
Magnetic - + - -
-Hydrodynamic + + + + +
2.9.2 Results from project 2
Experimental set-up
3.1
Chip fabrication
PDMS chips were used for this project. These chips contain two main channels, interconnected by 20 side channels. These side channels act as cell traps when there is a pressure difference between the main channels. Three PDMS chips were used, where the traps have channel heights of 1, 1.5 and 2 μm respectively. The PDMS chips were made from a mold, which is a reusable SU-8 (an epoxy based negative photoresist) patterned silicon wafer. In Figure 3.1 an overview of the chip design is shown.
In the fabrication of such a mold, negative photoresist layers were patterned on a 4-inch sili-con wafer. First, the wafer was cleaned and a 30 nm aluminum layer was deposited by sputtering on the wafer. After this layer had been etched away, the alignment mark, that is included in all mask layers, was clearly visible for alignment. The molds used in this project contain two different layers of SU-8. The layers have heights of 1, 20 μm, 1.5, 20 μm and 2, 20 μm respectively. The other dimensions of the chip can be seen in Figure 3.1. Alignment was performed very precisely, because the margin is less than 1μm. To prevent a bad coverage, the process was started with the thinnest layer. When exposed to UV light, the long molecular chains in SU-8 cross-link, causing the solidification of the material. After exposure through the mask, the unexposed part of the wafer was etched away. To strengthen the mold, a dummy wafer was glued on the backside.[42]
After the mold was ready, PDMS chips were by pouring PDMS on the mold and curing it at 60◦C. The PDMS was made by mixing two components, the polymer base and the cross linker together in a ratio of 10:1. This mixture was first degassed, to remove air bubbles that where created during mixing. The PDMS was then poured on the mold, after which a second degassing took place. This second degassing ensured the removal of any possible air bubbles on the micro pattern. The PDMS was then cured overnight at 60◦C for complete crosslink formation (for the complete protocol, see Appendix A.3).
properly. Next, the slides were placed in an oven at 60◦C for 30 minutes. This permanently seals the substrates together. The protocol for the PDMS chip fabrication can be found in Appendix A.3.
Figure 3.1: The PDMS chip.
3.2
Electrode design and set-up
For the impedance measurements, two planar electrode designs were fabricated. A planar set-up was chosen for its ease of fabrication. The electrodes in design 1 have a width of 20 μm with an overlap of 25 μm. The electrodes in design 2 were made with three different widths; 10, 20 and 40μm. The electrodes are present on a glass chip, which is embedded in a custom-made printed circuit board (PCB) (see Figure 3.3). The alignment of the chip on the micro electrodes was done with a special alignment tool under a stereomicroscope (Appendix C). The two design are show in Figure 3.2.
(a)Planar electrode design 1. (b)Planar electrode design 2.
Figure 3.2: The two electrode designs. The electrode width is 20μm and the overlap of the electrodes in the first
Figure 3.3: The PCB-glass set-up.
3.3
Sample preparation
Spermatozoa were obtained from KI Twente at a concentration of 20·106 cells per ml. For cell trapping experiments, a lower concentration of spermatozoa is desired. First the semen was vor-texed, to get an even distribution of cells in the liquid. 50 μl semen was then mixed with 950 μl sperm medium. This gives a concentration of 1·106spermatozoa per ml. Before using the prepared sample, it was be vortexed again, to reduce the amount of clustered cells. The semen and sperm medium were stored at 17◦C. The sample was prepared before each experiment.
3.4
Single cell trapping
In all experiments on chip a Nemesys low pressure standard edition pump (Model NEM-B002-02 D) equipped with two Hamilton 100 μl syringes ( Model 1710 N SYR, Cemented NDL, 22s ga, 2 in, point style 3) was used to draw the liquid through the channels. For the visualization of cells during the trapping and staining experiments on chip, a Nikon TE2000U Inverted Fluorescence Microscope was used. In Figure 3.4 the chip on the stage of a microscope is shown.
Figure 3.4: Chip on the microscope stage.
3.5
Viability staining on and off chip
For viability staining, SYBR 14 was diluted 2000x and PI 40x in the prepared semen sample (sec-tion 3.3). This solu(sec-tion was incubated for 10 minutes at room temperature and was then observed through a fluorescence microscope (EVOS FL Cell Imaging System).
For the viability staining on chip, the cells are first captured in the chip described in section 3.4. The SYBR/PI solution is then flowed through the channel, while the flow rates are kept at 0.5 μl/min and 1μl/min. After the channels are completely filled with the dye mixture, the flow in the channels is stopped. After 10 minutes of incubation, the tubing is cut and the chip is visualized by the EVOS fluorescence microscope. The dye mixture is kept in the channel to observe the effect of PI on the cell viability.
3.6
FISH staining
3.6.1 FISH staining off chip
FISH staining was performed on four slides containing fixated spermatozoa. The semen sample was prepared as described in section 3.3 and was first exposed to a 37◦C KCl solution. This solution is hypotonic, which inflates the cells. The cells were then fixated by adding Carnoy’s fixate (Methanol:Acetic Acid, 3/1). For convenience, the location of the cells was marked with a diamond-tipped pen.
The slides were washed, dehydrated and further decondensated by a 37◦C DTT solution. This solution breaks down the cell membrane and extracts the DNA from its protective proteins. After-wards, the slides were washed and again dehydrated in the same manner.
The probe mixture was then added to the sample on the glass slide, followed by the denatura-tion (at 74◦C) and hybridization (at 37◦C) of the DNA and probe. The slide was then washed, where it was placed in a jar with 74◦C 0.4X solution for 2 or 3 minutes. After washing the non-specific probe away, the slide was rinsed and air-dried.
cells were visualized with an EVOS FL Cell Imaging System. The detailed protocol can be found in Appendix A.2.
3.6.2 FISH staining on chip
FISH staining was performed several times on trapped cells in a chip. After the cells were trapped according to section 3.4, FISH staining on chip was peformed. As long as the cells were not fix-ated, the flow rates were kept at 0.5 μl/min and 1 μl/min. The cells were decondensated in 37◦C KCl (0.075M) and fixated in Carnoy’s fixate. The cells were then washed, dehydrated and further decondensated by a 37◦C DTT solution. The DTT was flowed through with a pulsating flowrate, to ensure that the liquid reaches the desired temperature. Afterwards, the cells were washed and again dehydrated. Before the 74◦C denaturation step, the wells of the chip were covered with parafilm. During the denaturing step, the parafilm melted to the glass/plastic substrate, sealing the wells. After the addition of the probe and the denaturation step, the complete mobile part of the set-up (which includes the tubing and syringes) was put into a 37◦C hybridization chamber and left overnight (for shorter incubation periods, a 37◦C hot plate was used). The set-up was then re-installed, the parafilm was removed and the washing steps were performed. For the 74◦C washing step, the chip was moved onto a 74◦C hot plate, while no flow was present. Finally, Vectashield was flowed through the channel, the tubing was removed and the inlets were sealed with a coverslip.
For the 37◦C DTT step of the FISH protocol, a the microscope hot plate was used. This plate could be placed inside the microscope while the chip could still be seen. The hot plate is made by Tokai Hit (model MATS-U505R30), which is made for the Nikon TE2000U Microscope. The maximum temperature that the plate can reach, is 50◦C. For the 74◦C denaturation and washing steps, an external Ika RET hot plate was used. The hot plate (IKA Works L005201 Ret Basic Hot Plate Stirrers Stainless Steel Plate Kit) has a maximum temperature of 340◦C. For fluorescence imaging, an EVOS FL Cell Imaging System was used.
3.7
Impedance analysis
Results and Discussion
4.1
Chip fabrication and set-up
Three different chip set-ups were designed to find an efficient method for single trapping of sper-matozoa.
In PDMS chip set-up 1 (Figure 4.1a), liquid was inserted through inlets 1 and 2. Inlets 3 and 4 were connected to a small waste container to catch the liquid. All inlets were made with a 1 mm pen, which forms a tight connection with the inserted tubing. To gain precise control over the pressure and flow rates, small volumes syringes were used. Due to the fact that liquid was pushed inside the channels, small pieces of PDMS where introduced inside the channels. Therefore, this debris was formed by the insertion of the tubing, which damaged the PDMS inlets. This method and set-up was therefore discarded.
With the PDMS chip set-up 2 (Figure 4.1b), the liquid was not pushed in, but drawn through the channel by suction. Inlet A was made using a 3 mm pen; this large diameter was chosen to prevent the formation of air bubbles when pipetting the liquid in the inlet. Inlet 3 was closed, while inlets 1 and 2 were both connected to a syringe to provide suction. Exchange of liquids in inlet A was performed by using a fiberless tissue to suck up the remaining liquid and a pipette, to add the new liquid to the inlet. Because the second chip set-up used suction, introduction of PDMS debris was prevented. Furthermore, closing inlet 3 was not necessary, because a large flowrate from the syringe connected to inlet 2 was enough to provide a sufficient pressure difference and to create a fluid flow between the main channels. A disadvantage of the second design is the fact that a droplet, which was placed on inlet 3, would flow over the PDMS into inlet A. The connection of the droplets caused mixing of the liquids, introducing cells in the other channel.
(a) 1st PDMS chip set-up. All inlets are made with a 1 mm pen.
(b) 2nd PDMS chip set-up. Inlets 1, 2 and 3 are made with a 1 mm pen, inlet A is made with a 3 mm pen.
(c) 3rd and final PDMS chip set-up. Inlets 1 and 2 are made with a 1 mm pen, inlets A and B with a 3 mm pen.
Figure 4.1: Three PDMS chip designs. Liquids are pushed through the channel in set-up 1 (a) and drawn through the channels by suction in set-ups 2 amd 3 (b and c). The flow directions are indicated with an arrow.
Because set-up 2 and 3 make use of suction, the amount of dead volume in inlets 1 and 2 is not important. The wells however had to be punctured such that they are connected to the channels, to reduce the dead volume. Exchanging fluids using a fiberless tissue and a pipette is a simple procedure, which provides complete control over the fluid composition within the channels.
4.2
Cell trapping
Hydrodynamic cell trapping experiments were performed using PDMS chips with three different cell trap heights (1, 1.5 and 2 μm) to find the optimal trap dimensions for single cell entrapment. Per trap height, three experiments were performed to investigate the trapping capacity (Table 4.1).
The percentage of cell trapping achieved with the 1, 1.5 and 2 μm trap heights were 43%, 47% and 27%. For increasing trap heights, more multiple trappings ocurred. In some cases, more than four spermatozoa could be caught in a 2μm trap (Figure 4.2). When the trap height was increased, an increased number of cells was also able to be caught head-first instead of tail-first (Figure 4.3). The yield of single cell trappings was around 50%. Chip to chip differences were caused by fabri-cation artifacts. The chip with 1 μm channels was chosen for further experiments, because it gave the smallest chance of multiple cell trapping, which is undesirable for single cell analysis.
Table 4.1: Trapping rates for chips with trapping heights of 1, 1.5 and 2 μm respectively. Larger trap heights
captured more spermatozoa, but had less single trappings.
Channel height Single cells Multiple cells Empty channels
1 μm 9 0 11
10 1 9
43% 7 2% 0 55% 13
1.5 μm 11 2 7
9 2 9
47% 8 12% 3 42% 9
2 μm 7 9 4
3 14 3
27% 6 60% 13 13% 1
Figure 4.2: Multiple cell trapping in 2μm traps. The two traps on the right have two cells each, while the one on
the left has trapped at least four spermatozoa. (15x, scale bar is 100μm)
Figure 4.3: Sideways trapping (left) and trapping by tail (right) in 1.5μm traps. (15x, scale bar is 50μm)
[image:33.612.215.397.476.568.2]Figure 4.4: Dead cells sticking to the glass of the chip. (10x, scale bar is 100μm)
4.3
Viability staining
Viability staining was performed on and off chip as described in section 3.5, to investigate the viability of spermatozoa.
4.3.1 Viability staining off chip
Viability staining was performed at the start of the project using of the dyes SYBR 14 and Propid-ium Iodide. SYBR 14 is able to permeate the cell membrane and bind to the DNA of a viable cell, wheras PI accumulates in the nucleus when the membrane is permeated. PI has a larger binding affinity to DNA. SYBR 14 thus stained viable spermatozoa, while PI stained dead spermatozoa, as it excludes the SYBR 14. SYBR 14 and PI emitted a green and red fluorescence respectively (see also Appendix B.1). The results of the staining are clearly seen in Figure 4.5. After 15 minutes incubation in the staining solution, almost all spermatozoa were viable and showed a green fluores-cence. As the incubation time increased, the cells died one by one due to the toxic concentration of PI, showing a red fluorescence. After 30 minutes of incubation, all cells were red.
(a) Viable spermatozoa (b) Approximately half of the cells have died
(c) Dead spermatozoa
4.3.2 Viability staining on chip
[image:35.612.238.373.178.365.2]Viability staining was performed on chip after capturing the cells on chip as described in section 3.4. This method allowed controlled trapping of the spermatozoa, keeping most of the spermatozoa alive. Figure 4.6 shows the death of a cell due to exposure to a toxic concentration of propidium iodide. The PI replaced the SYBR 14 when the cell dies (for the dyes, see Appendix B.1). Conditions and microscope settings during imaging were kept constant.
(a)Trapped cell after 15 minutes of exposure to the SYBR 14, PI mix.
(b) Trapped cell during cell death, after approximately 20 minutes of exposure. Both red and green fluorescence are visible, the PI is replacing the SYBR 14.
[image:35.612.405.540.182.348.2](c)Trapped cell after 25 minutes of exposure to the SYBR 14, PI mix. The PI has completely re-placed the SYBR 14.
Figure 4.6: The exposure to a large concentration of PI caused the cell death of a trapped cell within 30 minutes. (40x, scale bars are 20μm)
4.4
FISH staining
FISH staining was performed on and off chip as described in section 3.6. Several time steps were varied to obtain results with specific staining of the X and Y chromosomes.
4.4.1 FISH staining off chip
FISH staining was performed on four slides to get familiar with the protocol. The DTT step and the post-hybridization washing step are critical according to previous reports. Experiments were carried out using DTT steps of 15 and 25 minutes and washing steps of 2 and 3 minutes. The time steps are shown in Table 4.2. After the FISH staining, 3 slides were also stained with DAPI.
Table 4.2: Time steps for the FISH experiments.
Slide DTT time step (min) Washing time step at 74◦C (min) DAPI
1 15 3 yes
2 15 2 yes
3 25 3 yes
[image:35.612.73.207.183.347.2]The slides that were exposed to a 3 minute washing step, only showed the red Y probe. On the slides with the 2 minute washing step, both probes were visible. It appears that a washing step of 3 minutes washed away the X probe. A washing step of 2 minutes seems to have cleaned the cells from nonspecific staining, but did not wash away the specific staining on both the X and Y chromosome. This difference is visible in Figures 4.7a and 4.7b. One slide was not stained with DAPI. These cells were visualized using phase contrast (Figure 4.8). As an advantage, the X chromosome staining in these cells was clearer compared to DAPI stained cells, in which the fluorescent response of the specific staining is negatively influenced by spectral overlap with the DAPI fluorophore.
(a) A 15 min DTT and a 3 min washing step. The Y probe is visible, but the X probe seems to have been washed away.
(b) A 15 min DTT and a 2 min washing step. Both the X and Y probe are visible, the X probe is more decondensed because of its larger size and also less clear due to the additional staining with DAPI.
Figure 4.7: FISH staining with DAPI (40x, scale bars are 20μm)
Figure 4.8: FISH staining (25 min DTT, 2 min wash). The cells were not stained with DAPI, because the cells were visualized by phase contrast. Both the X and Y chromosome are visible. (40x, scale bar is 20μm)
4.4.2 FISH staining on chip
Table 4.3: Time steps for the FISH on chip experiments.
Experiment Hybridization time (h) DTT time step (min) Washing time step at 74◦C (min)
1 2 15 0.5
2 16 25 1.5
3 16 17 2
4 16 20 2
5 16 20 2.5
6 4 20 2.5
DTT
The spermatozoa were exposed to a DTT solution, which dissolves the cell membrane and breaks the disulfide bonds between protamines to unravel the tightly packed DNA. To investigate the effect of the exposure time to DTT, the cell nuclei, and specifically the DNA within the nuclei, were visualized with DAPI. This dye shows the edges of the cell, indicating how much it has fallen apart. The cells were not decondensated enough after 15 minutes of exposure to DTT. A time step of 25 minutes led to too much condensation, resulting in cells invisible by phase contrast. A DTT step of 20 minutes left the cell structure intact, but opened the membrane enough to allow hybridization of the probe and DNA. The results of the exposure times are shown in Figure 4.9.
(a) Trapped spermatozoon after a DTT step of 15 minutes (exp 1)
(b) Trapped spermatozoon after a DTT step of 20 minutes (exp 2)
(c) Trapped spermatozoa after a DTT step of 25 minutes (exp 4)
Figure 4.9: Visualization of FISH staining after three DTT time steps (15, 20 and 25 min). (40x, scale bars are 20
μm)
Washing step at 74◦C
(a) Cells after a washing step of 2 minutes (exp 4).
[image:38.612.338.540.78.261.2](b) Cell after a washing step of 2.5 minutes (exp 5).
Figure 4.10: Visualization of FISH stained spermatozoa after two washing steps (2 and 2.5 min). (40x, scale bars are 20μm)
DAPI
As already mentioned in section 4.4.1, DAPI binds to the DNA in the spermatozoa, increasing the visibility of the nucleus. However, the visibility of the green probe is negatively affected. Due to spectral overlap, both the DAPI and the X chromosome fluorophore emitted a green signal. In Figure 4.11 two spermatozoa with and without DAPI are shown.
Figure 4.11: Cells in the first part of the channel from 3rd attempt at FISH on chip. The DAPI was added as it makes it easier to find and identify the cells, but the spectral overlap of DAPI and the green probe reduces the visibility of the green probe. (40x, scale bars are 20μm)
[image:38.612.90.523.410.577.2]Final results
Figure 4.12 shows the final results of the fifth experiment. FISH staining was performed on a chip with microelectrodes, to investigate the effect of the microelectrodes on the FISH staining results. In Figure 4.12, it can be seen that the electrodes did not influence the results. FISH staining can therfore be performed on spermatozoa after they have been analysed with impedance spectroscopy. The results from experiment 6 are not shown, because there was no staining of the cells or PDMS. A possible explanation is the short hybridization time of the probe. The hybridization is a slow diffusion based process, which may need more than four hours. Therefore, the optimal conditions for a succesful FISH staining one spermaztozoa are a DTT step of 20 minutes, a washing step of 2.5 minutes and an overnight hybridization.
(a) (b)
Figure 4.12: Results from experiment 5. After staining, the platinum electrodes are unchanged and the FISH staining results were succesful. No nonspecific staining was observed. (40x, scale bars are 20μm)
4.5
Impedance analysis
Several impedance measurements were performed on empty traps and on traps which were filled with 11μm beads and spermatozoa. The behaviour of the system was also modelled and simulated to predict its dielectric response.
4.5.1 Electrode orientation
4.5.2 Simulations
To gain insight in the electrical properties of the microfluidic set-up, an ECM was constructed. Bjorn de Wagenaar simulated the dielectric behavior of an empty trap and a trap with a sperma-tozoon in both Milli-Q and sperm diluent.
Foster and Schwan’s model was used for the construction of the ECM. A spermatozoon differs from normal cells in several ways. It has a stronger membrane and inside the head a large amount of the cytoplasm is DNA. A sperm cell also has a tail that is 5 to 10 times the size of the head. The head of a spermatozoon consists of a cell membrane and cytoplasm (the tail is not considered in this work). The cell membrane is composed of a lipid bilayer. Within this cell membrane, the cytoplasm is contained, which consists of a large amount of negativily charged DNA. A spermato-zoon can therefore also be modelled by a capacitor and a resistor.
Figure 4.13 shows the ECM’s for an empty trap and a trap with a spermatozoon. In the model for the empty trap, the medium in which the cell was suspended, was modelled as a parallel resistor and capacitor. The double layer of the electrodes and medium was modelled as two capacitors. These two capacitors are placed in series with the parallel resistor and capacitor of the medium. A parasitic capacitor is placed in parallel to this (Figure 4.13a).
In the model for the trap with a cell, two capacitors and a resistor in series were placed paral-lel to the medium resistor and capacitor (Figure 4.13b).
Figure 4.14 shows the impedance and phase plots for the simulations of these models. At low frequencies the double layer capacitance is completely charged. As the frequency increases, the capacitors have less time to be charged, allowing more current through. This causes the first drop in impedance in the impedance spectrum of the empty trap. When the impedance of the double layer capacitance is lower than the impedance of the medium resistance, the medium resistance becomes the limiting factor. Therefore, a resistive plateau is visible in the impedance plot. At even higher frequencies, the capacitance of the medium and the parasitic capacitance become dominant. The impedance of these capacitors decreases until it is lower than that of the medium resistance. As the current takes the path of the least resistance, the current then goes through the medium and parasitic capacitors. Therefore, a second drop in impedance is visible at larger frequencies.
When a cell is measured, the impedances of the double layer and membrane go down until the resistances of the medium and the cell become dominant. The cell however has a lower impedance than the medium due to the charged interior. The electric field always goes the path of the least resistance, so when a cell is measured at high frequencies, the current goes (partly) through the cell. Therefore, a drop in impedance is seen at the frequency range of the resistive plateau.
(a) ECM for an empty trap (b)ECM for a filled trap
Figure 4.13: Equivalent circuit models for a trap with (b) and without (a) a spermatozoon (constructed by Bjorn de Wagenaar).
(a)Impedance (b) Phase
Figure 4.14: Spectra of the ECM with sperm diluent and Milli-Q, with and without a trapped spermatozoon (constructed by Bjorn de Wagenaar).
4.5.3 Characterization
For the characterization of the chip, impedance measurements were performed for liquids with dif-ferent conductivities and for difdif-ferent measurement areas.
[image:41.612.79.527.332.519.2](a)Impedance (b)Phase
Figure 4.15: Impedance and phase spectra for liquids of increasing conductivity.
In Figure 4.16, it can be seen that the impedance goes down for a larger measurement area. A larger area gives a larger measurement volume, which contains more conductive electrolyte. A larger amount of electrolyte causes a lower impedance. The impedance also goes down for a larger trap height, although this effect is smaller. A difference of 1μm in the measurement area with the same trap height (blue solid and dashed lines) has a much larger effect than a different trap height for the same measurement area (green and blue dashed lines).
(a) Measurement area (b)Impedance
Figure 4.16: Measurements in sperm diluent for different measurement areas. The green, red and blue lines are for the chips with 1, 1.5 and 2μm trap heights respectively.
[image:42.612.81.538.409.617.2]4.5.4 Beads and cells
Impedance measurements were performed on cells and 11 μm beads in sperm diluent and Milli-Q. During the experiments, a control measurement was done by sweeping the traps while they were still empty. After cell/bead trapping, the traps were again sweeped. If the cells/beads could be expelled, a second control measurement was done. This was done to take into account the differences in ion concentration due to the drift of the medium.
Beads
Plastic beads are insulators, and do not allow current to pass over the entire frequency range. The beads showed a larger impedance over the complete frequency range, with some irregularities at frequencies under 1 kHz. The impedance difference caused by the beads increased with a factor 10 for measurements in Milli-Q compared to measurements in sperm diluent. The beads did not have a large influence on the phase spectrum (Figure 4.17).
Cells
For the sperm cell measurements, an increase in impedance was seen at low frequencies, while a decrease was visible at higher frequencies (Figure 4.18). At lower frequencies, the current is forced around the cell by the cell membrane, while at higher frequencies, it is possible measure through the cell membrane and see the more conductive interior of the cell.
The cells displayed similar behavior for the real measurements and the simulations. The phase became more negative, although it was not as extreme as in the simulations, and there was also a small frequency shift to the right. In the plots, the earlier occurence of the parasitic capacitance is also visible.
In Milli-Q the cells had a much larger effect than in sperm diluent. The drop in impedance was larger, which was caused by the large difference in impedance between the low conductive Milli-Q and the high conductive interior of the cell.
The frequency of the impedance crossover was fairly consistent for the diluent measurements, but no relation between the amount of cells and the crossover frequency was found. The presence but not the amount of membranes determined the crossover frequency. The integrity of the membrane is suspected to influence the crossover frequency.
The impedance difference was measured at the resistive plateau, where no relation was found between the amount of cells and the impedance drop. No differences in the impedance spectra were seen for cells that lay flat and those that lay on their sides. There were not enough measurements done in Milli-Q to compare the crossover frequency or the impedance drop in this medium. It was however seen that the crossover frequency lies at around 200 Hz and that the impedance drop was approximately 1.5 MΩ.
(a)Impedance (b)Phase
Figure 4.17: Spectra of an empty trap and a trap filled wit an 11μm bead in sperm diluent and Milli-Q.
[image:44.612.89.522.78.266.2](a)Impedance (b)Phase
Figure 4.18: Spectra of an empty trap and a trap with a spermatozoon in sperm diluent and Milli-Q.
Table 4.4: Crossover frequencies and impedance differences at the resistive plateau for different cells in diluent (all measured in the same trap)
Number of cells Crossover frequencies (Hz) Impedance difference at 8·105 Hz (Ω)
1 4.8·104 2164
1 2.4·105 174
2 4.6·104 1824
3 5.1·104 1479
Comparison
[image:44.612.87.520.319.505.2]The beads showed an increase in impedance over the complete frequency range. Conversely, the cells increased the impedance at lower frequencies, but caused a decrease at the resistive plateau. This drop in impedance suggests that the interior of the cell can be measured. Because the interior of spermatozoa mainly consists of DNA, the presence and probably the amount of DNA can be measured.
4.5.5 The influence of the trap
In the impedance spectra, a resistive behavior was visible at lower frequencies (Figure 4.19). This resistive behavior did not occur in the simulations, indicating that there was another factor that had an effect on the impedance. We suspect that part of the current goes through the trap to the other electrode. This can be seen as a leak resistance. This was investigated by looking at the phase plots of the impedance measurements for several measurement areas and trap heights.
In Table 4.5, the phase shift of this resistive plateau can be seen for different trap sizes and mea-surement areas. The last result of the 1μm chip was disregarded, as it deviated substantially from the other results. There appeared to be more resistive behavior for smaller measurement volumes. The 1.5μm channels showed more resistive behavior than the 2μm channels, but that of the 1μm channels was less resisitive than both. The two equal 1μm measurement volumes had equal phase shifts (-58θ).
For larger traps, it might be that it is easier for the current to go through the traps, leading to a lower resistance and a larger contribution to the impedance. The 1 and 2μm traps seemed to confirm this suspicion, the resistive behavior increased for a larger trap height and the frequency shift that accompanies a drop in impedance confirmed the lower resistance of a larger trap. The 1.5μm trap however showed different behavior, more research is needed to investigate this.
The influence of the trap occurs at low frequencies. It does not appear at the frequencies where the resistive plateau occurs, which are our frequencies of interest.
[image:45.612.82.523.483.683.2](a) Impedance (b) Phase
Table 4.5: Magnitude and frequency of the phase shift of the unexpected resistive behaviour for various trap heights and measurement areas (measured in sperm diluent). The measurement marked with * deviated substantially form other measurements.
Trap height (μm) Measurement area (μm2) Phase shift (θ) Frequency (Hz)
1 340 -58 460
1 340 -58 798
1 360 -59 540
1* 400* -45* <100*
1.5 240 -51 1378
1.5 300 -53 1240
2 380 -54 1912
Conclusions
In this project, we investigated single cell trapping, viability and FISH staining and the impedance behaviour on chip to create a platform for single cell analysis of spermatozoa.
Several PDMS chip designs where tested for optimal fluid throughput. A design that contained two large inlets and that made use of suction was chosen. The fact that suction was used, prevented the introduction of PDMS debris. The large inlets of the design prevented the formation of air bubbles and the mixing of fluids.
Three different trap heights were tested on their single cell trappig capacity. The 1 μm traps showed the largest amount of single cell trappings compared to multiple trappings with an average trapping yield of 43% vs. 2%. These traps tended to catch single cells with their tails in the traps. Conversely, the 1.5 and 2μm traps caught spermatozoa head-first as well as tail-first. These larger traps sometimes caught more than four spermatozoa.
The viability staining on and off chip both turned out succesful. Prolonged exposure to the toxic concentration of PI caused cell death in both experiments. During the viability staining on chip, the death of a single cell could be monitored.
The FISH staining protocol was tested and adjusted. The results of the FISH staining showed that the 3 minute washing step of the original protocol was too long, resulting in washed away probe. The duration of the washing step was adjusted to 2 minutes.
The development of a protocol for FISH staining of spermatozoa on chip was succesful. Appropriate flow rates were chosen in such a way that cells could be caught and stained. Several untrapped spermatozoa were also fixated inside the channels to have a large population for the experiments. After several experiments, a DTT step of 20 minutes and a washing step of 2.5 minutes resulted in specific staining without too much dispersion of the fluorescent signal. The drying steps were also removed from the protocol.
be measured. Because the interior of spermatozoa mainly consists of DNA, the quantity of DNA can probably be measured. The impedance difference caused by a cell increased with a factor 1000 when a Milli-Q instead of sperm diluent was used.
5.1
Recommendations
Several recommendations are proposed to increase the trapping efficiency and throughput and to improve the fluorescent stainings and electrical measurements.
• The yield of single cell trapping could still be improved. Chips without fabrication artifact could be made, as clean chips probably trap more spermatozoa.
• The viability experiments on chip could be repeated with a lower concentration of PI. A lower (non-toxic) concentration of PI would keep the cells viable for a longer time, while still allowing to monitor cell death.
• The FISH on chip protocol could be repeated for different hybridization times, to research if a shorter hybridization time is possible.
• An isotonic low conductive solution could be used for the impedance measurements of sper-matozoa. This way, there is no difference in osmolarity, preventing cell death by inflation.
• More impedance measurements could be done for a better characterization of the chip and cells, as no conclusion could be drawn apart from their existence in the trap.
• Electrodes with a smaller measurement volume could also be designed, which would increase the influence of the spermatozoa on the field. The cell would occupy a larger fraction of the measurment volume, leading to relatively more electric field through the cell.
[1] Sudhir Roy. Sperm sexing techniques and their applications. 2010. url: http : //ahd.maharashtra.gov.in/pdf/mldb/sperm%20sexing.pdf.
[2] Vincent ter Beek. “Sex sorting technology could save time and money”. In:Pig Progress23.10 (2007), pp. 22–23.url: http://www.pigprogress.net/PageFiles/27740/001_boerderij-download-PP5803D01.pdf.
[3] Overheid.nl. Wet afbreking zwangerschap. 2014. url: http : //wetten.overheid.nl/BWBR0003396/geldigheidsdatum_10-03-2014.
[4] “Preconception gender selection for nonmedical reasons”. In:Fertility and Sterility 82, Sup-plement 1 (2004), pp. 232–235.issn: 0015-0282.doi:10.1016/j.fertnstert.2004.05.013. url:http://www.sciencedirect.com/science/article/pii/S0015028204008921.
[5] C. O’Connor. “Genetic mechanisms of sex determination.” In: Nature Education (2008), 1(1):25.
[6] Peter Chen. Biology genetics. 2007.
[7] N.A. Campbell et al. Biology. Global Edition. Benjamin Cummings / Pearson Education. isbn: 9780321739759.
[8] Loes Irene Segerink. “Fertility chip : a point-of-care semen analyser”. PhD thesis. Enschede, the Netherlands, Nov. 2011.url:http://doc.utwente.nl/78340/.
[9] S. Bonet et al.Boar Reproduction: Fundamentals and New Biotechnological Trends. Springer, 2013. isbn: 9783642350498.
[10] J. M. Cummins and P. F. Woodall. “On mammalian sperm dimensions”. In: Journal of Reproduction and Fertility 75.1 (1985), pp. 153–175.doi:10.1530/jrf.0.0750153.
[11] V. Ingram. Biology Hypertextbook. 2006.
[12] A. Annunziato. “DNA packaging: Nucleosomes and chromatin.” In:Nature Education (2008), 1(1):26.
[13] Undraga Schagdarsurengin. “Analysing the sperm epigenome: roles in early embryogene-sis and asembryogene-sisted reproduction”. In: Nature Reviews Urology 9 (2012), pp. 609–619. doi: 10.1038/nrurol.2012.183.
[14] P. Atkins and J. de Paula. Atkins’ Physical Chemistry. OUP Oxford, 2010. isbn: 9780199543373.
[15] Winfried Wiegraebe. Fluorescence. 2014. url: http : //research.stowers -institute.org/microscopy/external/Technology/index.htm.
[17] “Fluorescence microscopy”. In: Nature Methods 2 (2005), pp. 910–919. doi: 10.1038/nmeth817.
[18] Life Technologies. Nucleic Acid Stains—Section 8.1. 2014. url: http : //www.lifetechnologies.com/nl/en/home/references/molecular probes the handbook/nucleic acid detection and genomics technology/nucleic acid -stains.html.
[19] C. O’Connor. “Fluorescence in situ hybridization (FISH).” In: Nature Education (2008), 1(1):171.
[20] Nation Master. Fluorescent in situ hybridization. 2007.
[21] Erik B. van Munster et al. “Difference in volume of X- and Y-chromosome-bearing bovine sperm heads matches difference in DNA content”. In: Cytometry 35.2 (1999), pp. 125–128.
issn: 1097-0320. doi: 10.1002/(SICI ) 1097 - 0320(19990201 ) 35 : 2<125 :: AID - CYTO3 >
3.0.CO ; 2 - H. url: http : //dx.doi.org/10.1002/(SICI ) 1097 - 0320(19990201 ) 35 : 2 % 3C125::AID-CYTO3%3E3.0.CO;2-H.
[22] Ilaria Natali. “Sperm Preparation Techniques for Artificial Insemination - Comparison of Sperm Washing, Swim Up, and Density Gradient Centrifugation Methods”. In: Artificial Insemination in Farm Animals. Springer, 2011. doi:10.5772/713.
[23] K H Cui. “Size differences between human X and Y spermatozoa and prefertilization diagno-sis.” In:Molecular Human Reproduction3.1 (1997), pp. 61–67.doi:10.1093/molehr/3.1.61.
[24] S Kaneko et al. “Separation of human X- and Y-bearing sperm using percoll density gradient centrifugation.” In:Fertil Steril.40.5 (1983), pp. 661–665.
[25] Shau-Ping Lin et al. “Separating X-Bearing Human Spermatozoa Through a Discontinuous Percoll Density Gradient Proved to Be Inefficient by Double-Label Fluorescent In Situ Hy-bridization”. In: Journal of Assisted Reproduction and Genetics 15.9 (1998), pp. 565–569. issn: 1058-0468. doi:10.1023/A:1022590321986.
[26] B Alexander, G Mastromonaco, and WA King. “Recent Advances in Reproductive Biotech-nologies in Sheep and Goat”. In: J Veterinar Sci Technol 1.101 (2010).doi: 10.4172/2157-7579.1000101.
[27] GE Seidel and DL Garner. “Current status of sexing mammalian spermatozoa”. In: Reproduction 124.6 (2002), pp. 733–743. doi: 10.1530/rep.0.1240733. url: http : //www.reproduction-online.org/content/124/6/733.abstract.
[28] UCSF School of Medicine.Flow Cytometry and Flourescence-Activated Cell Sorting (FACS). 2014. url:http://missinglink.ucsf.edu/lm/molecularmethods/flow.htm.
[29] Johan Nilsson et al. “Review of cell and particle trapping in microfluidic systems.” In: Ana-lytica chimica acta 649.2 (2009), pp. 141–157. doi:10.1016/j.aca.2009.07.017.
[30] Dino Di Carlo, Nima Aghdam, and Luke P. Lee. “Single-Cell Enzyme Concentrations, Ki-netics, and Inhibition Analysis Using High-Density Hydrodynamic Cell Isolation Arrays”. In: Analytical Chemistry 78.14 (2006), pp. 4925–4930.doi:10.1021/ac060541s.
[31] Mengsu Yang, Cheuk-Wing Li, and Jun Yang. “Cell Docking and On-Chip Monitoring of Cellular Reactions with a Controlled Concentration Gradient on a Microfluidic Device”. In: Analytical Chemistry 74.16 (2002), pp. 3991–4001.doi:10.1021/ac025536c.
![Figure 2.2:A spermatozoon consists of three distinct regions; the head, the midpiece and the tail.The headcontains a nucleus and an acrosome and the midpiece contains mitochondria.[7]](https://thumb-us.123doks.com/thumbv2/123dok_us/9854855.486671/10.612.93.514.475.549/spermatozoon-consists-distinct-midpiece-headcontains-acrosome-midpiece-mitochondria.webp)

![Figure 2.4: The DNA condensation process from double helix to chromosome.[12]](https://thumb-us.123doks.com/thumbv2/123dok_us/9854855.486671/12.612.121.494.144.508/figure-dna-condensation-process-double-helix-chromosome.webp)
![Figure 2.5: The DNA condensation process in spermatozoa, where most of the histones are replaced by protamines,causing a tighter packing than in somatic cells.[13]](https://thumb-us.123doks.com/thumbv2/123dok_us/9854855.486671/13.612.216.415.74.309/figure-condensation-process-spermatozoa-histones-replaced-protamines-causing.webp)
![Figure 2.7: There are several binding sites on the DNA. The two largest classes of dyes are intercalators and minorgroove binders.[18]](https://thumb-us.123doks.com/thumbv2/123dok_us/9854855.486671/14.612.233.383.500.660/figure-binding-sites-largest-classes-intercalators-minorgroove-binders.webp)

![Figure 2.13:Spermatozoa can be captured by different dielectrophoretic methods.a quadrupole/octopole cage (a) and stripwise arranged electrodes (b) are visible.The field distributions ofDarker colors indicate largerfieldstrengths.[32]](https://thumb-us.123doks.com/thumbv2/123dok_us/9854855.486671/19.612.345.518.96.325/spermatozoa-dierent-dielectrophoretic-quadrupole-stripwise-electrodes-distributions-largereldstrengths.webp)