About Your USING Book
USING is more than just a book: it’s the fastest, easiest way to
gain the technology skills you’re looking for!
Don’t just read about it: see it, hear it, with step-by-step video tutorials and valuable audio sidebars delivered through theFree Web Editionthat comes with everyUSINGbook. For the price of the book you get online access anywhere with a web connection—no books to carry, updated content, and the benefi t of video and audio learning.
How Do You Get Access to the Free Web Edition?
Simply visitquepublishing.com/using for information about how to register your USING book or eBook.
About the USING Web Edition
The Web Edition of every USING book is powered by Safari
allowing you to access the video tutorials and valuable audio sidebars. Plus, you can search the contents of the book, highlight text and attach a note to that text, print your notes and highlights in a custom summary, and cut and paste directly from Safari Books Online.
Yvonne Johnson
Editor-in-Chief Greg Wiegand Acquisitions Editor Laura Norman Development Editor The Wordsmithery LLC Managing Editor Sandra Schroeder Senior Project Editor Tonya Simpson Copy Editor Chuck Hutchinson Proofreader Water Crest Publishing Technical Editor Jennifer Ackerman-Kettell Publishing Coordinator Cindy Teeters Book Designer Anne Jones Cover Designer Anna Stingley Multimedia Developer John Herrin
Using Microsoft
®Office for Mac 2011
Copyright © 2011 by Pearson Education, Inc.All rights reserved. No part of this book shall be reproduced, stored in a retrieval system, or transmitted by any means, electronic, mechanical, photocopying, re-cording, or otherwise, without written permission from the publisher. No patent liabil-ity is assumed with respect to the use of the information contained herein. Although every precaution has been taken in the preparation of this book, the publisher and author assume no responsibility for errors or omissions. Nor is any liability assumed for damages resulting from the use of the information contained herein.
ISBN-13: 978-0-7897-4558-3 ISBN-10: 0-7897-4558-5
Trademarks
All terms mentioned in this book that are known to be trademarks or service marks have been appropriately capitalized. Que Publishing cannot attest to the accuracy of this information. Use of a term in this book should not be regarded as affecting the validity of any trademark or service mark.
Microsoft is a registered trademark of Microsoft Corporation.
Warning and Disclaimer
Every effort has been made to make this book as complete and as accurate as pos-sible, but no warranty or fitness is implied. The information provided is on an “as is” basis. The author and the publisher shall have neither liability nor responsibility to any person or entity with respect to any loss or damages arising from the information contained in this book.
Bulk Sales
Que Publishing offers excellent discounts on this book when ordered in quantity for bulk purchases or special sales. For more information, please contact
U.S. Corporate and Government Sales 1-800-382-3419
For sales outside the United States, please contact
Contents at a Glance
Introduction1 Getting Started with Word 2 Editing Documents 3 Formatting Documents 4 Exploring Other Features 5 Using the Notebook
6 Creating Documents for Publication 7 Using E-mail
8 Using Contacts 9 Using the Calendar 10 Using Tasks and Notes
11 Getting Started with PowerPoint 12 Creating Sophisticated Presentations 13 Getting Started with Excel
14 Enhancing Worksheets
15 Working with Databases and Multiple Worksheets 16 Using Review Features
Media Table of Contents
To register this product and gain access to the Free Web Edition and the au-dio and video files, go to quepublishing.com/using.
Chapter 1: Getting Started with Word
Tell Me More Media 1.1—Creating Automator Workflows
Show Me Media 1.2—Printing a Document with the Print Command Show Me Media 1.3—E-mailing a Document
Show Me Media 1.4—Creating a Calendar from a Template
Chapter 2: Editing Documents
Show Me Media 2.1—Using Browse Objects to Navigate
Show Me Media 2.2—Using the Advanced Find and Replace Command Show Me Media 2.3—Using the Scrapbook
Tell Me More Media 2.4—Setting Grammar Preferences
Chapter 3: Formatting Documents
Show Me Media 3.1—Setting Paragraph Alignment, Indents, and Spacing
Show Me Media 3.2—Setting Tabs in the Tabs Dialog Box Show Me Media 3.3—Setting Tabs on the Ruler
Tell Me More Media 3.4—Using Quick Styles Show Me Media 3.5—Drawing a Table
Chapter 4: Exploring Other Features
Show Me Media 4.1—Creating an AutoText Entry Show Me Media 4.2—Using the Thesaurus Show Me Media 4.3—Recording a Macro
Tell Me More Media 4.4—Macros and Security Issues Show Me Media 4.5—Removing the Background of a Photo
Chapter 5: Using the Notebook
Show Me Media 5.1—Numbering Text in a Notebook Show Me Media 5.2—Recording Audio Notes in a Notebook Tell Me More Media 5.3—Setting Audio Preferences Show Me Media 5.4—Using the Scribble Tools
Chapter 6: Creating Documents for Publication
Show Me Media 6.1—Using a Template to Create a Publication Tell Me More Media 6.2—Exploring Lorem Ipsum Text
Show Me Media 6.3—Creating Linked Text Boxes and Filling Them with a Story
Show Me Media 6.4—Inserting a SmartArt Graphic
Chapter 7: Using E-mail
Show Me Media 7.3—Creating Signatures Show Me Media 7.4—Deleting E-mail Messages
Chapter 8: Using Contacts
Tell Me More Media 8.1—Performing Advanced Searches
Show Me Media 8.2—Adding and Deleting Fields on a Contact Form Show Me Media 8.3—Creating a Contact Group
Show Me Media 8.4—Adding and Deleting Categories
Chapter 9: Using the Calendar
Show Me Media 9.1—Customizing the Work View
Show Me Media 9.2—Creating a Nonrecurring Appointment Show Me Media 9.3—Setting a Recurring Appointment Tell Me More Media 9.4—Setting Preferences for My Day
Chapter 10: Using Tasks and Notes
Show Me Media 10.1—Creating a Task
Show Me Media 10.2—Creating a Recurring Task Show Me Media 10.3—Making Changes to a Task
Tell Me More Media 10.4—Creating Separate To-Do Lists with Categories
Show Me Media 10.5—Creating Notes
Chapter 11: Getting Started with PowerPoint
Show Me Media 11.1—Adding a Slide
Show Me Media 11.2—Adding Text to a Placeholder Show Me Media 11.3—Adding a Photo to a Placeholder Show Me Media 11.4—Working with Layers
Show Me Media 11.5—Typing the Outline for a Presentation Show Me Media 11.6—Creating a Presentation with Both
Methods
Tell Me More Media 11.7—Editing the Master Slide Layouts
Chapter 12: Creating Sophisticated Presentations
Show Me Media 12.1—Assigning an Action Show Me Media 12.2—Animating Slide Elements Show Me Media 12.3—Applying a Transition Tell Me More Media 12.4—Annotating Slides
Chapter 13: Getting Started with Excel
Show Me Media 13.1—Taking a Tour of the Excel Window
Show Me Media 13.2—Entering a Formula with the Pointing Method Show Me Media 13.3—Copying Formulas with Relative Cell
References
Tell Me More Media 13.4—Using Absolute Cell References
Chapter 14: Enhancing Worksheets
Show Me Media 14.1—Inserting Cells
Tell Me More Media 14.3—Using Conditional Formatting Show Me Media 14.4—Modifying and Enhancing Charts
Chapter 15: Working with Databases and Multiple Worksheets
Show Me Media 15.1—Sorting a Database on Multiple Fields Tell Me More Media 15.2—Sorting on Conditional Formatting Show Me Media 15.3—Filtering Data
Show Me Media 15.4—Using the Pointing Method for 3D Formulas
Chapter 16: Using Review Features
Show Me Media 16.1—Reviewing Each Edit and Comment in Word Show Me Media 16.2—Turning On and Protecting Track Changes in
Excel
Show Me Media 16.3—Accepting and Rejecting Changes in Excel
Show Me Media 16.4—Comparing and Reviewing Presentations
Chapter 17: Collaborating
Show Me Media 17.1—Touring the Document Connection Window
Show Me Media 17.2—Uploading Files to a SkyDrive Folder Tell Me More Media 17.3—Working with Documents on SharePoint Show Me Media 17.4—Presenting a PowerPoint Presentation on the
Table of Contents
1 Getting Started with Word
Selecting a Document Template Exploring the Word Window
Touring the Menus
Getting Familiar with the Toolbars Getting Familiar with the Ribbon Changing the View
Deciphering the Status Bar Viewing Other Screen Features Working with Documents
Creating a New Document Saving a Document Printing a Document E-mailing a Document
Creating Special Documents from Templates Setting Preferences for Word
Exploring the Preferences Dialog Box Setting a Few Preferences
2 Editing Documents
Navigating
Using Scroll Bars
Using Keystrokes to Navigate Using Browse Objects Using Window Techniques Finding and Replacing Text Deleting, Copying, and Moving
Deleting Text
Copying and Pasting Text Moving Text
Checking Spelling and Grammar
3 Formatting Documents
Formatting the Page
Setting Margins and Headers and Footers Setting Layout Options
Using Themes Formatting Characters Formatting Paragraphs Using Styles
Applying Styles Modifying Styles
Creating a User-Defined Style Inserting Graphics
Using Columns Working with Tables
Creating a Table Setting Table Properties
Moving Around and Entering Text in a Table Fine-Tuning the Structure of a Table Formatting Tables
Creating Envelopes and Labels
4 Exploring Other Features
Using the AutoCorrect Components Using AutoCorrect
Using AutoFormat As You Type Using AutoText
Using the Thesaurus Creating a Macro Flagging for Follow-Up Working with Photos
Adding a Photograph to a Document Resizing and Cropping Photographs Adding Borders and Styles
Adjusting Photos Using Filters
Removing the Background of a Photograph Adding Effects to Photos
Resetting a Photograph Working with Layers
5 Using the Notebook
Renaming Tabs Adding Tabs Deleting Tabs
Specifying Colors for Tabs Using Page Numbers Storing Information
Typing and Organizing Information Inserting Outlook Information Recording Audio
Scribbling
Inserting Media from the Media Browser Managing Your Information
Flagging Text Sorting Text
Creating an Outlook Task Searching for Text
6 Creating Documents for Publication
Examining the Publishing Layout View Creating a New Publication
Using a Blank Template Using a Designed Template Saving a Publication
Setting Up the Graphic Environment Setting Options for Nonprinting Guides Getting Acquainted with the Publishing Tools Laying Out a Publication
Creating Master Pages Creating Content Pages
Inserting and Working with Text Boxes Adding the Story to the Linked Text Boxes Breaking a Story into Two Stories
Deleting a Text Box in a Linked Set Formatting Text Boxes
Inserting and Working with Shapes Changing the Style of a Shape Changing to a Different Shape Changing the Fill and Outline Inserting and Working with SmartArt
Changing the Style of a SmartArt Graphic Changing the Color of a SmartArt Graphic Resetting a SmartArt Graphic
Inserting Media from the Media Browser Getting Acquainted with the Photos Tab Getting Acquainted with the Audio Tab Getting Acquainted with the Movies Tab Getting Acquainted with the Clip Art Tab Getting Acquainted with the Symbols Tab Getting Acquainted with the Shapes Tab Manipulating the Objects in a Publication
Changing the Stacking Order of Objects Resizing Objects
Aligning Objects Distributing Objects
Rotating and Flipping Objects Grouping Objects
7 Using E-mail
Exploring the Mail Interface
Understanding the Client/Server Relationship Viewing and Reading E-mail
Opening and Saving Attachments Sending Messages: The Basics
Composing a New Message Sending Replies to Messages Forwarding a Message Changing Your Mind
Sending Messages with Bells and Whistles Attaching Files and Inserting Pictures Selecting the Message's Format Formatting the Text
Using a Background Color
Using a Background Photo or Picture Assigning a Priority
Using Signatures Finding Messages
Sorting Messages
Searching for Messages with the Spotlight Deleting Messages
Handling Junk Mail Working with Folders
8 Using Contacts
Exploring the Contacts Interface Adding Contacts to the Address Book Finding Contacts
Sorting Contacts Using a Spotlight Search Using Contacts Search Communicating with Contacts Editing and Deleting Contacts Editing the Contact Form
Sending an Electronic Business Card Sending Mass E-mails
Categorizing Contacts Editing Categories
Assigning and Removing Categories Viewing Contacts by Category Printing the Address Book Using Folders
9 Using the Calendar
Exploring the Calendar Window Viewing and Navigating the Calendar
Changing the View Navigating
Creating Appointments and Meetings Creating a Recurring Appointment Creating an Event
Scheduling a Meeting Searching for Appointments Editing and Deleting Appointments Printing the Calendar
10 Using Tasks and Notes
Exploring the Tasks and Notes Windows Using Tasks
Creating Tasks
Editing and Deleting Tasks Viewing Tasks
Marking a Task as Complete Using Notes
Editing and Deleting Notes Viewing Notes
E-mailing Notes
11 Getting Started with PowerPoint
Using Themes and Templates Exploring the PowerPoint Window Building the Presentation
Creating a Presentation One Slide at a Time Creating a Presentation from an Outline Creating a Presentation with Both Methods Saving a Presentation
Modifying the Presentation Editing a Slide
Deleting a Slide Duplicating a Slide Changing the Slide Order Hiding a Slide
Adding Notes to a Slide Changing the Theme Presenting the Show
12 Creating Sophisticated Presentations
Grouping Slides in Sections
Adding Tables, Charts, and SmartArt Inserting a Table
Inserting a Chart Inserting SmartArt Using Actions
Adding Audio and Video
Adding Audio to a Presentation Adding Video to a Presentation
Creating and Presenting Custom Slide Shows Polishing Your Presentation Skills
Presenting with Presenter View My Top Five Tips
13 Getting Started with Excel
Exploring the Window
Entering and Editing Data in Cells Editing Data
Deleting Data
Copying, Cutting, and Pasting Cells Enlisting Excel's Help Entering Data Entering Comments
Working with Formulas Constructing a Formula
Understanding the Order of Precedence Using a Function
Entering a Formula or Function Copying Formulas
Correcting Formula Errors Printing a Worksheet
Setting the Page Layout and Print Options Previewing the Sheet Before Printing Sending the Sheet to Print
14 Enhancing Worksheets
Configuring the Worksheet for Your Data Changing the Column Width
Changing the Row Height Merging and Centering Cells
Inserting and Deleting Columns and Rows Inserting and Deleting Cells
Hiding and Unhiding Columns and Rows Formatting
Using Number Formats Using Styles
Using Conditional Formatting Working with Large Worksheets
Freezing and Unfreezing Panes Splitting the Pane
Working with Charts and Graphic Elements Working with Charts
Inserting and Deleting Sparklines Inserting and Deleting SmartArt Adding Media
15 Working with Databases and Multiple Worksheets
Creating a Database Sorting Data Filtering a Database Working with Additional Sheets
Adding and Renaming Sheets Deleting a Sheet
Copying a Sheet Moving a Sheet
Hiding and Unhiding a Sheet Working with Grouped Sheets
Grouping Sheets Ungrouping Sheets Using 3D Formulas
Using the Proper Syntax for 3D Formulas Entering 3D Formulas by Pointing
16 Using Review Features
Examining the Editorial Process Reviewing Word Documents
Author: Getting a Document Ready for an Editor Editor: Making Changes to the Document Author: Reviewing the Edits
Reviewing Excel Workbooks
17 Collaborating
Surveying the Collaboration Landscape Using Microsoft Document Connection
Exploring the Document Connection Window Putting Files on SkyDrive
About the Author
Yvonne Johnson has been writing computer books and teaching computer classes since 1982. She has delivered classroom training on computer appli-cations to thousands of employees of large and small businesses, military and government personnel, teachers, attorneys, secretaries, and, yes, even Micro-soft Micro-software support engineers. She has written more than 65 computer books for well-known publishers, including Que and Pearson Education. Her latest book in this series is Using Mac OS X Snow Leopard.
She started the first proprietary computer training school in the state of Ken-tucky and operated it for 12 years. During that time, she wrote all the curricula for all the software programs taught at the school. After selling the school, she worked as a freelance computer curriculum developer and developed a large percentage of the curricula offered by the national training company Productiv-ity Point International, headquartered in Chicago. She also wrote and trained extensively for the national consulting firm of PerfectAccess-Speer, headquar-tered in New York City, a subsidiary of the Washington Post. Ultimately, she took the position of Vice President with PerfectAccess-Speer, where she be-came the head of the Curriculum Development Department.
Dedication
To Cooper, Logan, William, Lilly, Eleanor, and Josie
Acknowledgments
My thanks go out to everyone who made this book possible. The Pearson staff and all the editors who worked on this book did a first rate job. In particular, it's always a pleasure working with my acquisition editor, Laura Norman, and Jenn Kettell is the best tech editor I've ever had! Additionally, I'd like to thank Brit-tany Gidican, on the public relations team for the Microsoft Macintosh Busi-ness Unit, who supplied my every beta need!
We Want to Hear from You!
As the reader of this book, you are our most important critic and commentator. We value your opinion and want to know what we’re doing right, what we could do better, what areas you’d like to see us publish in, and any other words of wisdom you’re willing to pass our way.
As an editor-in-chief for Que Publishing, I welcome your comments. You can e-mail or write me directly to let me know what you did or didn’t like about this book—as well as what we can do to make our books better.
Please note that I cannot help you with technical problems related to the topic of this book. We do have a User Services group, however, where I will forward specific technical questions related to the book.
When you write, please be sure to include this book’s title and author as well as your name, e-mail address, and phone number. I will carefully review your comments and share them with the author and editors who worked on the book.
E-mail: [email protected] Mail: Greg Wiegand
Editor-in-Chief Que Publishing 800 East 96th Street Indianapolis, IN 46240 USA
Reader Services
Introduction
Microsoft was committed to making Office for Mac 2011 a significant improvement over previous versions. To that end, the company focused on collaboration, com-patibility, and ease of use, and laid out a four-pronged approach:
• Incorporate features from Office 2007 that were not added to Office 2008 for Mac.
• Incorporate Office 2007 features that did not get added, as well as the lat-est updates to those features that were made in Office 2010.
• Incorporate the new features introduced in Office 2010 for maximum com-patibility.
• Add new features to Office for Mac 2011 that are unique to it.
Additionally, Microsoft had the goal of making Office for Mac truly Mac-like. Mac BU (Mac Business Unit), the Microsoft team responsible for developing Office for Mac, consists of team members who are really Mac users. They personally know and understand what Mac users want and consistently seek out and use customer feedback to identify, prioritize, and improve Office specifically for Mac users. In my opinion, Microsoft met and exceeded its goals with this release. It achieved a high degree of parity between the PC and Mac versions while integrating uniquely Mac functions, such as the Spotlight. Users who must switch between platforms will find the majority of the tasks they need to perform on a daily basis to be nearly identical.
If I had to point to the most outstanding achievements in this release of Office, I would name Outlook and the return of Visual Basic for Applications (VBA). Although the Mac version of Outlook doesn't have every single feature as the PC version, at least Mac users are fully integrated into systems that use Exchange Server now. Programmers who use VBA to design full-blown applications that sit on top of Office are ecstatic about VBA's return. Office 2008 for Mac dropped VBA completely, making all previously designed VBA applications useless.
a large number of users. If reviewed on merit alone, the collaboration features are wonderfully easy to use and fill a great need in the editorial process. Now using col-laboration on SharePoint or SkyDrive, there is only one version of a file—no more Proposal-Final.docx, Proposal-Final-2.docx, or Proposal-Really-the Final-One.docx.
How This Book Is Organized
This book introduces you to the Office for Mac 2011 applications, including Word, Outlook, PowerPoint, and Excel, and shows you how to use the most prominent features of each. It's a lot to cover in so few pages, but I cover the functions in each application that will make you productive the fastest.
Using MicrosoftOffice for Mac 2011 is broken into five sections: one section for each of the four applications and a fifth section that teaches you how to use the col-laboration features of Office. For Word, PowerPoint, and Excel, each section in-cludes an introductory chapter to make you comfortable with the basics and
subsequent chapters that teach you how to enhance your work and use productivity tools. The Exchange section covers E-mail, Contacts, Calendar, Tasks, and Notes. In the book, I provide you with the following:
• Basic concepts for novice users
• More advanced information for experienced users • My personal recommendations for how to do things
• Real-life examples to help you understand the usefulness of features • Explanations of why you do something and not just how to do it
Using This Book
This book enables you to customize your own learning experience. The step-by-step instructions in the book give you a solid foundation in using Office for Mac 2011, while rich and varied online content, including video tutorials and audio side-bars, provide the following:
• Demonstrations of step-by-step tasks covered in the book • Additional tips or information on a topic
• Practical advice and suggestions
• Direction for more advanced tasks not covered in the book
Here's a quick look at a few structural features designed to help you get the most out of this book:
• Notes: Notes provide additional commentary or explanation that doesn't fit neatly into the surrounding text. Notes give detailed explanations of how something works, alternative ways of performing a task, shortcuts, work-arounds, ways to avoid pitfalls, and cautions.
• Cross-references: Many topics are connected to other topics in various ways. Cross-references help you link related information together, no mat-ter where that information appears in the book. When another section is re-lated to one you are reading, a cross-reference directs you to a specific page in the book on which you can find the related information.
LET ME TRY IT
Tasks are presented in a step-by-step sequence so you can easily follow along.
SHOW ME Media—This Is a Show Me
Video walks through tasks you've just got to see, including bonus ad-vanced techniques.
TELL ME MORE Media—This Is a Tell Me More Audio delivers practical insights straight from the experts.
Special Features
More than just a book, your Using product integrates step-by-step video tutorials and valuable audio sidebars delivered through the Free Web Edition that comes with every Using book. For the price of the book, you get online access anywhere with a web connection—there are no books to carry, content is updated as the tech-nology changes, and you receive the benefit of video and audio learning.
About the
Using
Web Edition
The Web Edition of every Using book is powered by Safari Books Online, ena-bling you to access the video tutorials and valuable audio sidebars. Plus, you can search the contents of the book, highlight text and attach a note to that text, print your notes and highlights in a custom summary, and cut and paste directly from Sa-fari Books Online.
1
In this chapter, you take a tour of Word's window,
learn how to create and e-mail a document, and set
the preferences for Word.
Getting Started with Word
Word! There it is. For good or ill, it's the undisputed king of the word processing world. Now the Mac version is no longer the pretender to the throne of its Microsoft brother, but a full-fledged joint ruler. Let's examine the royal pedigree. This chapter covers the application window; basics tasks of creating, saving, e-mailing, and printing a document; and some of the Word preferences I recom-mend you set right away.
Selecting a Document Template
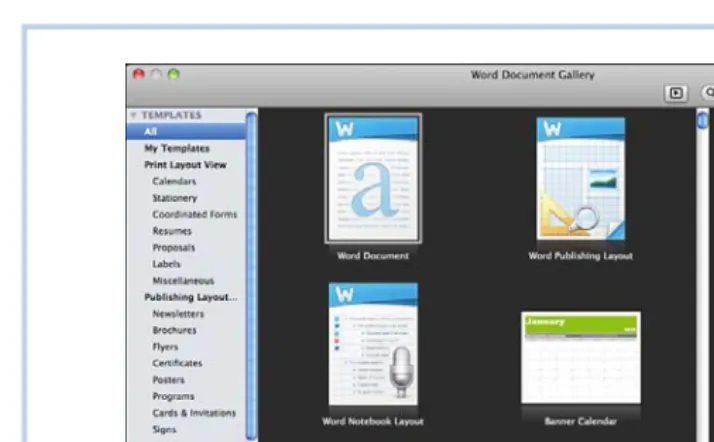
When you start Word, the Word Document Gallery, shown in Figure 1.1, opens by default. This window enables you to select a template for the document you want to create. Word has templates for all types of documents, such as calen-dars, invitations, posters, flyers, catalogs, newsletters, brochures, fax cover sheets, and so on.
To select a template, first select the category in the Templates pane on the far left, click the template you want to use in the middle pane, and click the Choose button. Word names the new document Document1 for you, but you can give it a more appropriate name when you save the document.
If you don't think you want to be bothered with the Document Gallery, you could click the Don't Show This When Opening Word check box at the bottom of the screen. The next time you start Word, the Word Document Gallery will not open, and Word will create a document for you automatically.
[image:25.612.40.397.37.258.2]
Figure 1.1 The plain, vanilla Word document template is called, surprisingly enough, Word Document.
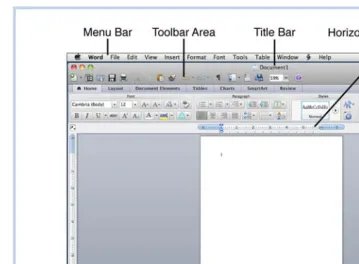
Exploring the Word Window
Before you start using Word to type a document, you might need to take a short tour of the Word window. It's designed to give you information about your docu-ment and make commands available to you. Word does this with a number of dif-ferent screen elements, most of which can be turned on or off.
Before starting the tour, if you want your screen to match Figure 1.2, click the Print Layout View button in the lower-left corner. Then you can refer to the figure as the tour takes you from the top of the screen and moves down. If your screen doesn't display all the elements described, don't worry; the element just hasn't been turned on in the View Preferences. (You learn how to set these preferences later in this chapter.)
At the top of the window, you can see the Word menu bar. It displays in the Mac menu bar, as all good little Mac applications do. (On a Mac, you never have more than one menu bar displaying at a time. Only the current application's menu is displayed.)
[image:26.612.38.397.43.306.2]
Figure 1.2 The print layout view shows more screen elements than any other view.
The title bar, which displays the name of the current document, is below the menu bar. This bar also contains the red, yellow, and green buttons that close, minimize, and zoom the Word window.
The toolbar area is just under the title bar. It can expand to display two toolbars, each on a separate line.
An element called the ribbon is located just below the toolbar area. Of all the screen elements, it's definitely the dominant one. You learn more about the rib-bon later in this chapter.
Below the ribbon is the horizontal ruler that displays the indents and tabs. The vertical ruler appears on the left side of the screen, but it displays only in the print layout view.
The vertical scroll bar appears on the right side of the screen. At the bottom of the bar are two navigation buttons for scrolling up and down in the document and the Browse Object control.
Across the bottom of the screen is the horizontal scroll bar, which appears only when necessary and, therefore, is not shown in Figure 1.2. Below that is the status bar, which contains the view buttons on the far left, followed by various document information and status indicators (discussed later in this chapter), and the zoom control on the far right.
Touring the Menus
I'm going to spare you a long discussion of the menu bar because I assume you didn't just fall off the turnip truck. (Bless your heart, as we say in the South.) I will say that the menu bar changes slightly when you use different templates. For example, if you use the Calendar template, a new menu option called Calendar appears on the menu bar.
The only specific menu I'm going to call your attention to is the Script menu. That's the one represented by the three-dimensional "S" just to the left of the Help menu, as shown in Figure 1.3.
Figure 1.3 The Script menu contains Automator workflows.
If you're upgrading from a version of Word or Office for Mac that predates the 2008 version, you've never seen this menu before. It contains Automator work-flows. Office comes with a library of Automator workflows, which, similar to macros, perform repetitive tasks. The Word workflows are preloaded for you on the Scripts menu, and you can create your own workflow to add to the menu. If you'd like to learn more about Automator workflows, listen to the audio file I've recorded for you.
TELL ME MORE Media 1.1—Creating Automator Workflows Access this audio recording through your registered Web edition at my.safaribooksonline.com/9780132174718/media.
Getting Familiar with the Toolbars
By default, Word displays only the Standard toolbar. This toolbar contains tools for commands you use in the general course of creating and editing a document: Save, Copy, Cut, Paste, Undo, Redo, and so on. The only other toolbar that exists in Word 2011 is the Formatting toolbar. If you turn it on, it displays on a second line under the Standard toolbar.
Getting Familiar with the Ribbon
The ribbon is like a toolbar on steroids, containing all the tools that previously appeared on individual toolbars in earlier versions of Office. If you are upgrading from Office for Mac 2008, you'll notice the similarity between the Elements Gallery (now passé) and the ribbon.
The ribbon contains tabs that have tools for specific uses. To access the tools, you click the appropriate tab at the top of the ribbon. For example, if you click the Layout tab, the ribbon displays tools to set the page orientation, page size, mar-gins, background colors, and so on. The Home tab on the ribbon displays all the tools found on the Formatting toolbar and then some, effectively rendering the Formatting toolbar useless, unless you don't want to use the ribbon at all. (If that's the case, you can turn it off completely by choosing View, Ribbon.) If you want to use the ribbon, but it takes up too much room on the screen, you can easily minimize it to just the tabs and expand it again when you want to use it. To minimize the ribbon, click the current tab. To expand the ribbon, click any tab. Alternatively, you can click the caret icon on the far right side of the ribbon bar to minimize it. When the ribbon is minimized, the icon changes to a "V." If you click the V, the ribbon expands.
Changing the View
Word 2011 has six buttons on the status bar that change the view of the docu-ment and one option available only on the View menu. Each view has features that are useful in different situations. Table 1.1 describes the views and when to use them.
Table 1.1 Using Views
View Description
Draft This view does not display unused whitespace on the page such as the margins at the top, bottom, and sides of the page. Addition-ally, it does not display the header or footer, or floating graphics. Use this view when you need to see the maximum amount of text possible.
Outline In this view, you can create an outline using tools that help you assign levels to your outline headings, collapse and expand tions, promote or demote headings, as well as move entire sec-tions with the least amount of effort. The outline view is also useful for viewing documents created with heading styles (Heading 1, Heading 2, and so on), which, by default, have hierarchical levels assigned. Using this view, you can quickly review the structure of a document that uses headings and subheadings. For example, you could check a document in the Outline view to be sure that you have at least two subheadings for each heading.
Publishing Layout Use this view for documents that you format with a publishing tem-plate such as a brochure or newsletter. If you click this view button in a document that is not a publishing type document, Word asks if you want to create a new publishing document or edit the current document in publishing layout view. This view contains desktop publishing tools on the ribbon's Layout tab that are not included in other views.
Print Layout The print layout view shows the document as it will look when it prints. It displays the margins, unused space on a page, graphics, headers, and footers, as well as a visual page break between pages.
Notebook Layout This view is available only for documents that you format with the notebook template. If you click the NotebookLayout View button in a document that is not a notebook, Word asks if you want to con-vert the current document to a notebook or create a new document formatted as a notebook. If you convert the current document, some existing formatting may be lost. This view presents your document on the screen visually as a bound notebook with sec-tions. In this view, you can take notes, flag items, and record audio notes.
en-ables you to work in Write or Read mode. You can press the Esc key to exit this view.
Web Layout This view is sort of a leftover from the old days when you could use Word as a web browser. It's the one that is accessible only from the View menu. You can use it to view or create HTML documents, but here's a tip: Don't even think about creating HTML documents in Word!
.
[image:30.612.37.399.195.402.2]
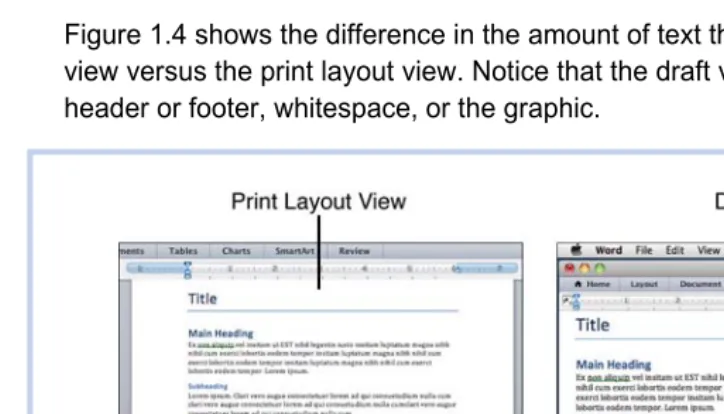
Figure 1.4 shows the difference in the amount of text that you can see in the draft view versus the print layout view. Notice that the draft view doesn't show the header or footer, whitespace, or the graphic.
Figure 1.4 Use the draft view to see more text, but use the print layout view when you want to see how the document will look when printed.
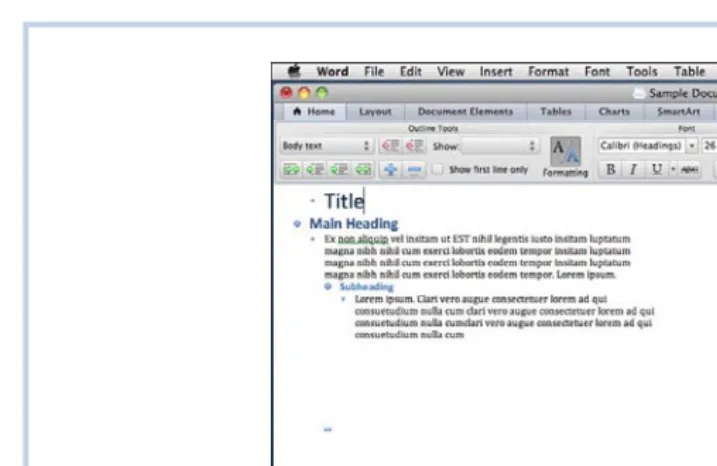
Figure 1.5 shows the same document in the outline view. Notice that the head-ings are indented like an outline, and the graphic doesn't show in this view either. Figure 1.6 shows the publishing layout and notebook views. They look similar because both views have a workspace that the document or notebook sits on. You can easily recognize the notebook view, however, because the document actually looks like a notebook.
[image:31.612.39.398.40.273.2]
Figure 1.5 Use the outline view to create an outline or quickly review the structure of a document created with heading styles.
[image:31.612.39.399.289.543.2]
Deciphering the Status Bar
The appearance of the status bar changes depending on the view you are using; however, all views display the view buttons on the far left. The name of the view you are currently using also displays as the first piece of information on the sta-tus bar.
In the draft, outline, and print layout views, the status bar contains the following document information:
▪ The current section number of the document
▪ The current page number and total number of pages
▪ The number of the current word (where the insertion point is) and the total number of words in the document
▪ The status of spelling errors
▪ The zoom percentage
In the publishing layout and notebook views, a small subset of the preceding in-formation displays in the status bar in addition to special buttons that apply only to the specific views.
In the full screen view, there is no status bar displayed at all!
Viewing Other Screen Features
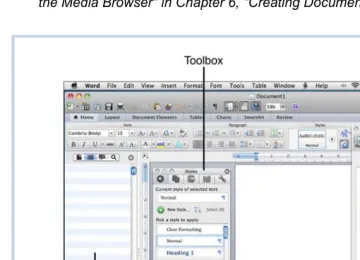
Three more screen features deserving mention are the Toolbox, the Sidebar, and the Media Browser. Figure 1.7 shows all three of these features.
▪ Toolbox—The Toolbox has five tabs: Styles (shown in Figure 1.7), Cita-tions, Scrapbook, Reference Tools, and Compatibility Report. To open the Toolbox, click View and click the name of the tab you want. Each tab has a different function; most are explained in later chapters as needed.
▪ Sidebar—The Sidebar can display the Document Map pane, the Thumb-nail pane (shown in Figure 1.7), the Reviewing pane, or the Search pane. To open the Sidebar, click View, Sidebar, and then click the pane you want to view. Each pane has a different purpose, and most of them are ex-plained in later chapters as needed.
To learn more about using the Media Browser, see "Inserting Media from the Media Browser" in Chapter 6, "Creating Documents for Publication."
[image:33.612.39.399.92.352.2]
Figure 1.7 It is doubtful you would display the Sidebar, Toolbox, and Media Browser at the same time because they take up so much screen real estate.
Working with Documents
Now that you've had the tour, you're ready to work with documents. This section looks at the most rudimentary tasks that deal with documents: creating, saving, printing, and e-mailing.
Creating a New Document
If you don't have the Word Document Gallery activated, Word creates a "normal" document (that is, it uses the Word Document template). If you don't want to use a normal document, you can create a different kind of document from within Word and then close the normal document. This is a little more trouble than sim-ply selecting the exact type of document you want to begin with, which is why I recommend you continue to use the Word Document Gallery if you regularly cre-ate documents from different templcre-ates.
LET ME TRY IT
Creating a Different Type of Document from Within Word
To select a different type of document to create, follow these steps:
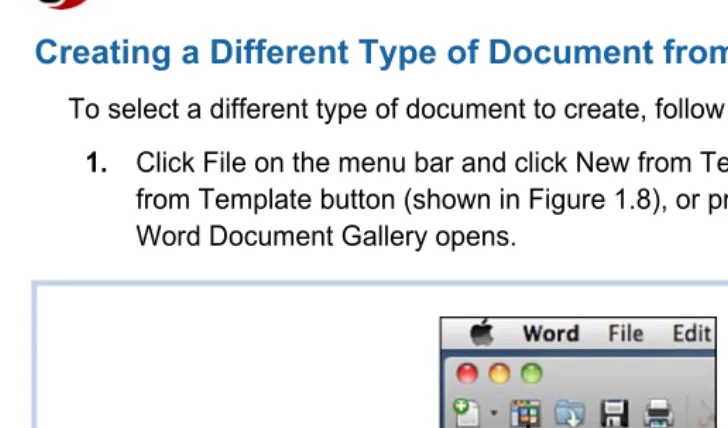
1. Click File on the menu bar and click New from Template, click the New from Template button (shown in Figure 1.8), or press Shift-Cmd-P. The Word Document Gallery opens.
[image:34.612.35.399.226.440.2]
Figure 1.8 The New from Template button is on the Standard toolbar.
2. Select the category in the left pane, and in the middle pane, click the tem-plate that you want.
3. Click the Choose button.
Word keeps each document that you create in its own window, and you can have multiple windows open at the same time.
Saving a Document
I recommend saving a new document very soon after you create it. I like to type the title of the document first, if it has one, and then save it because Word auto-matically uses the first few words in a document as the suggested name for the document when you save it.
LET ME TRY IT
Saving a Document for the First Time
To save a document for the first time, follow these steps:
1. Click File, Save, click the Save button in the Standard toolbar, or press Cmd-S to open the Save dialog box shown in Figure 1.9.
Figure 1.9 You can expand the Save dialog box to show the Finder.
2. Type a name for the document in the Save As text box or accept the sug-gested name.
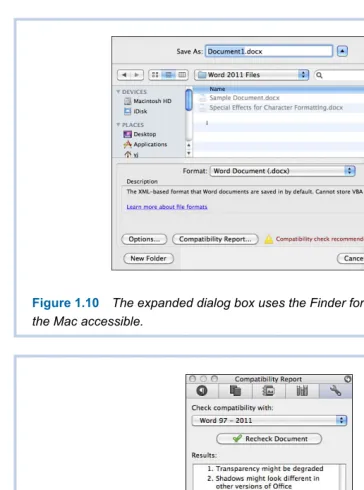
3. If your dialog box looks like Figure 1.9, click the button to the right of the Save As text box so the "mini-Finder" replaces the Where text box, as shown in Figure 1.10.
4. Navigate to the location where you want to save the file or click the New Folder button, type a name for the new folder, and click Create.
5. Click the Format pop-up button if you need to select a format that makes the document compatible with older software, or if you just need to save the document in a special format, such as an earlier version of Word.
6. Click Save.
Figure 1.10 The expanded dialog box uses the Finder format to make all locations on the Mac accessible.
Figure 1.11 The Compatibility Report window lists issues that you can fix or ignore.
[image:36.612.37.401.33.523.2] [image:36.612.35.398.39.247.2]The AutoRecovery file is not the actual file you are working on. It's a temporary file that Word uses to recover the file you're working on if Word shuts down un-expectedly or gets hung up and causes you to have to force quit. To save a file that has been saved before, just click the Save button in the Standard toolbar or press Cmd-S.
Printing a Document
You might think that printing a document is a simple topic, but Word offers quite a few print features that you should know about. First, consider the fact that you can quickly print one copy of the current document by clicking the Print button in the Standard toolbar. If you have several printers attached to your Mac, Word sends the document to the one you have specified as the default printer. If you don't remember which one that is, you can point to the button to see a ScreenTip telling you which printer Word is going to send the document to before you click the button (see Figure 1.12).
Figure 1.12 The ScreenTip tells you which printer Word is going to use.
If you want to print a document using a different printer, or you want to print more than one copy, you should use the Print command. The Print command displays the Print dialog box, which has many different options in it.
SHOW ME Media 1.2—Printing a Document with the Print Command
Access this video file through your registered Web Edition at my.safaribooksonline.com/9780132174718/media.
LET ME TRY IT
Printing a Document with the Print Command
To print a document using the Print dialog box, follow these steps:
2. Click File on the menu bar, and then click Print or press Cmd-P to open the Print dialog box, as shown in Figure 1.13.
Figure 1.13 This Print dialog box is "collapsed." Figure 1.14 shows the expanded dialog box.
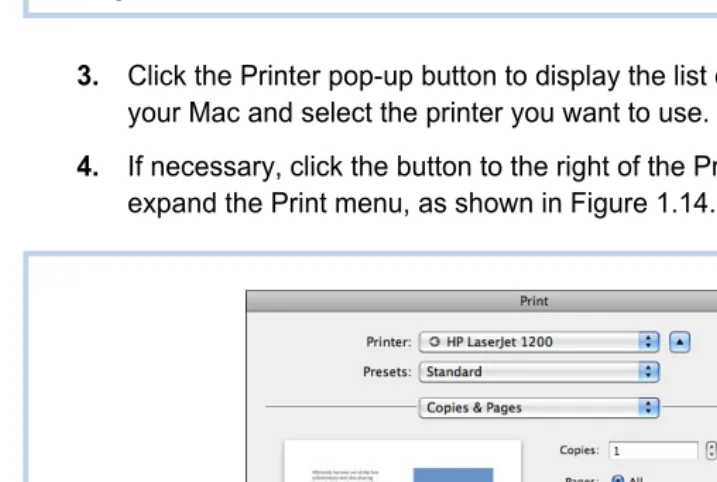
3. Click the Printer pop-up button to display the list of printers installed on your Mac and select the printer you want to use.
4. If necessary, click the button to the right of the Printer drop-down menu to expand the Print menu, as shown in Figure 1.14.
[image:38.612.39.398.272.513.2]
5. In the Copies & Pages section, enter the number of copies that you want to print. Notice that the Collated check box is checked by default. If the docu-ment has several pages and you print more than one copy, Word prints one complete copy of the document at a time. In other words, it does not print multiple copies of the first page, followed by multiple copies of the second page, and so on.
6. In the Pages section:
▪ Print the entire document by selecting All.
▪ Print the page that the insertion point is on by selecting Current Page.
▪ Print a range of pages by entering a starting and ending page in the From and To fields.
▪ Print nonconsecutive pages or more than one range by entering the page numbers or ranges separated by commas. (For example, to print pages 1 through 3 as well as 6 and 9 and pages 12 through 15, you would enter 1–3, 6, 9, 12–15. Although entering the pages in order might be most logical, it is not necessary.)
7. Scroll through the Quick Preview if you want to see the document one last time before you print it.
8. Click Page Setup to set the options shown in Figure 1.15, including the pa-per size, orientation, and scale. Click OK when finished.
9. Click Print to send the document to the printer.
Taking a Closer Look at the Incredible Print Dialog Box
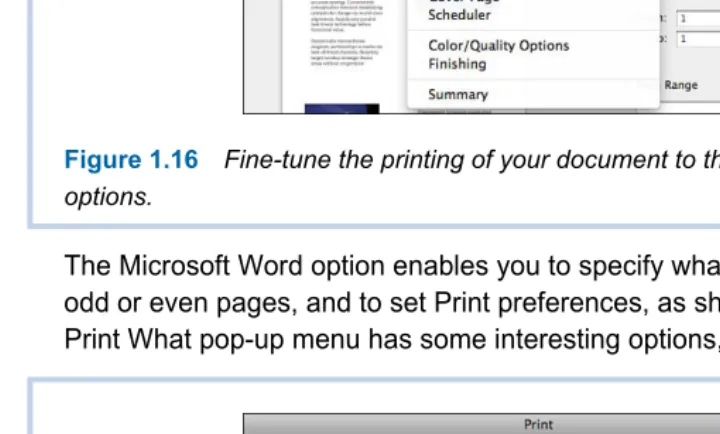
Even though the previous task had nine steps, this description has only scratched the surface of what the print dialog box can do for you. Much of the functionality of the dialog box is buried in the third menu control, which defaults to Copies & Pages. If you click the pop-up button on this control, you see some-thing similar to the options displayed in Figure 1.16. (Different printers may dis-play different options.)
Figure 1.16 Fine-tune the printing of your document to the nth degree with these options.
The Microsoft Word option enables you to specify what you want to print, to print odd or even pages, and to set Print preferences, as shown in Figure 1.17. The Print What pop-up menu has some interesting options, explained in Table 1.2.
[image:40.612.37.397.340.557.2]
Table 1.2 Print What Pop-Up Menu Options
Option Description
Document Prints the current document.
Document Properties Prints the information in the Properties dialog box, includ-ing the document type, location, size, creation date, last modification date, attributes, number of revisions, total editing time, number of words, number of pages, and so on.
Document Showing Markup Prints the document with all comments that have been added and all revisions that have been made with Track Changes activated. If a document has revision marks, this is the default option for printing the entire document. For more information about the Track Changes feature, see Chapter 16, "Using Review Features."
List of Markup Prints a list of all revisions that have been made with Track Changes activated. Word also prints the name of the person who made the revision or comment. Styles Prints a list of all styles used in the document and the
attributes of each style. For more information about using styles, see Chapter 3, "Formatting Documents."
AutoText Entries Prints all the AutoText entries that have been saved in the file. See "Using AutoText" in Chapter 4, "Exploring Other Features," to learn more about AutoText entries. For more information about the AutoText feature, see Chapter 4.
Key Assignments Prints a list of all key assignments you assign to macros that have been saved in the file. See Chapter 4 to learn more about macros.
The Layout option, among other things, enables you to specify the number of pages per sheet to print and the order in which the pages should print on the page. In Figure 1.18, the settings are four pages per sheet and the direction is up and down, left to right.
Additional options may include the following (depending on the printer):
▪ Color Matching—Enables you to select the color profile that your printer should use.
▪ Paper Handling—Includes options for the order in which pages should print and the option to scale the page to fit the paper size.
Figure 1.18 The Two-Sided option is not available unless your printer has duplexing capability.
▪ Cover Page—Enables you to print a cover page (before or after a docu-ment) and include billing information. The title at the top of the cover page is determined by the type of cover page you select (standard, classified, confidential, secret, top secret, and unclassified), and the other information on the cover page includes the print job ID, the title of the document, your initials, the print from location, and billing information (if you have specified any).
▪ Scheduler—Enables you to specify a time that the document will print and to set a priority (which is important if other users are also sending docu-ments to the same printer).
▪ Color/Quality or PaperType/Quality—Includes options for paper type, resolution, and printing in color or black and white.
▪ Finishing—Enables you to specify the paper path.
▪ Supply Levels—Shows the level of ink or toner remaining in the printer.
▪ Summary—Lists all the options you have selected for Color Matching, Pa-per Handling, PaPa-per Feed, and so on, as shown in Figure 1.19.
Figure 1.19 Clicking the arrow for a Setting shows the choices that you have made in the Value column.
E-mailing a Document
One of the features that I have always liked about Word is the ability to e-mail the currently open document right from within Word. You can send it as an attach-ment or as HTML.
SHOW ME Media 1.3—E-mailing a Document
Access this video file through your registered Web edition at my.safaribooksonline.com/9780132174718/media.
LET ME TRY IT
E-mailing a Document
To send the current document in an e-mail message, follow these steps:
1. Click File on the menu bar, and then click Share.
2. Select E-mail (as Attachment) or E-mail (as HTML).
Creating Special Documents from Templates
Templates are preformatted documents that you can use to create a specific kind of document that may be more complicated than you would ordinarily want to tackle on your own. Chapter 6, "Creating Documents for Publication," covers many of the publishing templates, but in this chapter, just as an introduction, you look at creating a calendar from a template.
SHOW ME Media 1.4—Creating a Calendar from a Template Access this video file through your registered Web edition at my.safaribooksonline.com/9780132174718/media.
LET ME TRY IT
Creating a Calendar from a Template
I can't remember birthdays to save my life, so creating a monthly calendar is a must for me. To create a calendar from a template, follow these steps:
1. Click File, New from Template. The Word Document Gallery opens.
2. Click Calendars in the Templates sidebar, and then click the style you want to use in the middle pane.
3. Click the Colors pop-up in the right sidebar and click a color palette, such as Breeze. The thumbnail in the right sidebar updates to show the color combination that you selected.
4. Click the Fonts pop-up in the right sidebar and select the font you want to use. The thumbnail of the calendar in the right sidebar updates to show the font you selected.
5. Click the Choose button. The Select Calendar Date dialog box opens.
6. Select the Month and Year and click OK. An information box opens, telling you how to select new dates. Click OK.
7. If the calendar template that you selected has a photo in it, click the Media Browser button in the Standard toolbar to access your photos. Click the Photo tab, if necessary, and drag a photo to a photo placeholder.
8. If the calendar template has a text placeholder, click it and enter your own text.
9. On the calendar grid, click in a box for a specific date and type a birthday, appointment, event, and so on.
10. Save and print the file.
Setting Preferences for Word
Preferences are very important on a Mac. They determine how an application works and how it looks. When you install Office 2011 for Mac, predetermined preferences are loaded, but you can change them so the applications behave the way you want them to.
Exploring the Preferences Dialog Box
The Word preferences in the Preferences dialog box, shown in Figure 1.20, are divided into three categories: Authoring and Proofing Tools, Output and Sharing, and Personal Settings. Each category has several options. When you have some time, you should look at each one of the options in each category just to familiar-ize yourself with what's available for your customization.
To select an option in any category, click the icon. To go back to viewing all the options, click the Show All button in the toolbar.
When you need to set a preference but you're not sure where it is, just type a search word in the Spotlight text box in the upper-right corner. Word highlights all the options that relate to the search phrase and even shows you a list of possible preferences that you might want to select.
Figure 1.20 The Preferences dialog box can be a little overwhelming, but the Spot-light can help you find things quickly.
Setting a Few Preferences
Before you start exploring all the preferences, let me recommend a few that you should look at first. The particular preferences that I want to call your attention to are in the General, View, and Save categories.
LET ME TRY IT
Setting the Word Document Gallery Preference
If you want to take my advice about using the Word Document Gallery, and you have already turned it off, you can turn it on again by following these steps:
1. Click Word on the menu bar and click Preferences to open the Preferences dialog box.
2. Click General in the Authoring and Proofing Tools row.
3. Click the Open Word Document Gallery When Application Opens check box to enable this option. (The check box should be blank if you have dis-abled the Gallery previously.)
4. Click OK or click the Show All button to go back to the Word Preferences dialog box.
so on. Often it is helpful to have some of these nonprinting characters visible on the screen while you are working. The Window preferences display or hide screen elements, such as the status bar, live word count, and the vertical ruler.
LET ME TRY IT
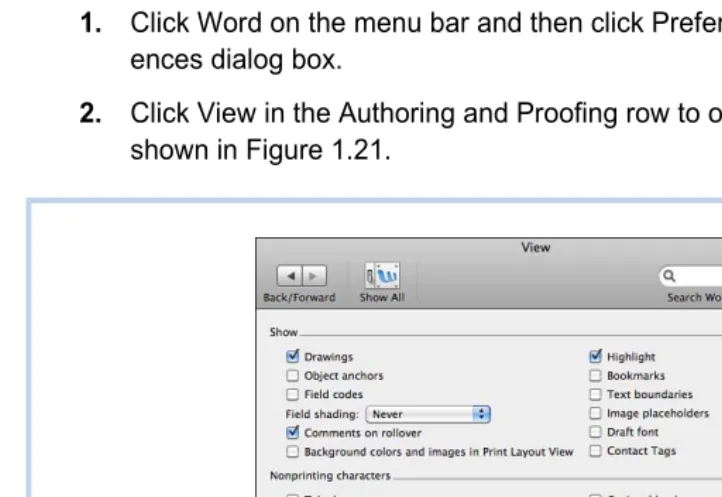
Setting the View Preferences
To set View preferences, follow these steps:
1. Click Word on the menu bar and then click Preferences to open the Prefer-ences dialog box.
2. Click View in the Authoring and Proofing row to open the preferences shown in Figure 1.21.
Figure 1.21 By default, none of the nonprinting characters display.
3. Click the check boxes for the nonprinting characters that you want to see on the screen while you are working. I personally like to see the paragraph marks, but I don't like seeing the spaces.
[image:47.612.38.399.223.471.2]4. Click the check boxes for the Window options you want to display. I like to display all the screen elements, but I don't select Wrap to Window or spec-ify a width for the Style Area.
To learn more about the Style Area, see "Applying Styles" in Chapter 3.
5. Click OK or click the Show All button to go back to the Word Preferences dialog box.
The AutoRecover preference is preset for you at an interval of 10 minutes. If you do a lot of typing in 10 minutes (as I do) and your electricity goes out a lot (as mine does), you might want to set the AutoRecover to an interval of 5 minutes (as I have).
LET ME TRY IT
Setting the Save AutoRecover Frequency
There is really no advantage that I can see to increasing the interval of the Auto-Recover, but if you want to decrease the interval, which I think is a very good idea, follow these steps:
1. Click Word on the menu bar and then click Preferences to open the Prefer-ences dialog box.
2. Click Save in the Output and Sharing row.
3. Decrease the number of minutes in the Save AutoRecover Info text box.
2
Learn the techniques to navigate and preview
a document, as well as delete, copy, move,
find/replace text, and check your spelling.
Editing Documents
If you've ever typed even one document in Word, you know that part of the crea-tion process is editing. This chapter tells you how to navigate a document using several different methods, select text, find and replace text, copy and move text, and check the spelling and grammar in the document.
Navigating
Moving around in a document quickly is a key factor in being able to edit a doc-ument efficiently. Sometimes you simply want to scroll the docdoc-ument itself to see different locations, but other times you actually want to move the insertion point so that you can make an edit at a specific location.
Before I continue, I probably need to clarify three terms used frequently in this chapter. The insertion point is the vertical bar that always follows your typing. Some people also refer to this symbol as the cursor, but I always refer to it as the
insertion point.
The term cursor is also used interchangeably with the term pointer, which refers not to the insertion point, but to the symbol that floats over your document and is controlled by the mouse. For clarity, I always refer to this as the pointer.
Sometimes, the pointer takes the shape of an I-beam, a single-headed arrow, a double-headed arrow, or an icon such as a pencil or eraser, depending on the circumstance. When you hover the pointer over text, it takes the shape of an I-beam, indicating that you can click in the text and the insertion point will move to that location.
Word provides several techniques for navigating, including
▪ Scroll bars
▪ Keystrokes ▪ Browse objects
▪ Window techniques
▪ The Find command
No matter what the situation, Word has a useful method or combination of meth-ods that you can use to navigate the document.
Using Scroll Bars
You probably already know how to use scroll bars. Just to review: In the vertical scroll bar, you can scroll through large portions of the document by dragging the bubble in the bar, click the up or down arrows to move a line at a time, or click in the whitespace above or below the bubble in the bar to move a screen at a time. Remember that the scroll bars cause the pages in a document to move, not the insertion point. Generally, you scroll to a location in the document, point to the desired location, and click the mouse to position the insertion point. Also, I want to remind you that you can turn both the vertical and horizontal scroll bars on and off in the View Preferences.
Using Keystrokes to Navigate
Table 2.1 lists some of the most commonly used keystrokes to move around in a document. When you use keystrokes to navigate, the insertion point moves to a specific location.
Table 2.1 Navigation Keystrokes
To Move To Press
End of the document Cmd-End
Beginning of the document Cmd-Home Beginning of a line Cmd-Left Arrow
End of a line Cmd-Right Arrow
Next word Opt-Right Arrow
Previous word Opt-Left Arrow
Next screen PgDn
Previous screen PgUp
Bottom of the current page Cmd-Opt-PgDn Top of the current page Cmd-Opt-PgUp .
Using Browse Objects
At the bottom of the vertical scroll bar is a very handy browsing tool that often is underused. The tool consists of a double-arrow pointing up, a Select Browse Object button, and a double-arrow pointing down. If you click the Select Browse Object button, you see a selection of objects, as shown in Figure 2.1. By default, the Page object is selected, so the up and down double-arrow buttons move the insertion point backward and forward to the top of the previous or next page. If you point to the double-arrow buttons, a ScreenTip that says Previous Page or Next Pageappears. This indicates what object is currently selected for browsing.
Figure 2.1 The browse objects include (from left to right) Go To, Find, Edits, Heading, Graphic, and Table, and on the second line, Field, Endnote, Footnote, Comment, Section, and Page.
After you select an object, clicking the double-arrow buttons moves the insertion point to the previous or next object in the document. If, for example, you select Table as the object, the ScreenTips change to Previous Table and Next Table, and clicking those buttons takes you to the previous or next table in the
document. This would be helpful if you have a document that has 10 tables in it and you need to change the background color of the first row in each.
SHOW ME Media 2.1—Using Browse Objects to Navigate Access this video file through your registered Web edition at my.safaribooksonline.com/9780132174718/media.
LET ME TRY IT
Using Browse Objects to Navigate
To browse for a particular type of object in a document, follow these steps:
1. Click the Select Browse Object button.
2. Scroll across the objects in the palette to see the name of the object at the top of the palette. When you find the object you want, click it to select it.
3. Click the up or down double-arrow button in the Browse Objects tool to move to the previous or next object.
Using Window Techniques
Now suppose you have a long document that you are editing, and you need to refer to the first paragraph while you are editing the last paragraph. What do you do? Well, you can scroll back and forth, but splitting the window is a more effi-cient way to work. To split the window into two windows, double-click the blue
If you click the Find object in the browse control palette, the Spot-light field on the right side of the Standard toolbar becomes active, and you can type the text you want to find. If you click the Go To object, the Go To tab of the Find and Replace dialog box opens. In this dialog box, you can specify what you want to go to, such as a page, and then specify the exact page number.
button at the top of the vertical scroll bar. (Figure 2.2 shows the button.) After you split the window, the button moves to the bottom of the scroll bar in the upper window. To remove the split, double-click the button again.
Figure 2.2 When the pointer actually touches the button that splits the window, the pointer changes to a double-headed arrow.
Now suppose that you actually need to see three different locations in the docu-ment at the same time. You can't split the window into more than two windows, but there is another technique you can use. You can open several windows on the same document by choosing Window, New Window. The title bar for each window shows the document name followed by a colon and a number to indicate which window is which. After opening several windows on the same document, you might want to tile them on the screen by manually sizing them and moving them, or you can let Word arrange them for you—choose Window, Arrange All.
Finding and Replacing Text
When you are editing or formatting a document, often you know the exact text that you want to go to in the document. Think of a printed copy of a document that has been edited by hand in red ink. To enter the edits in the electronic document, you can use the Find command to search for the specific text that has been edited in red ink.
LET ME TRY IT
Searching for Text with the Find Command
To find a specific string of text in a document, follow these steps:
1. Click in the Spotlight field on the right side of the Standard toolbar and type the text string. Word highlights all occurrences of the string in the document simultaneously.
2. Go to the next or previous occurrence by clicking the right or left arrow in the Spotlight tool.
3. To eliminate the highlighting of all the strings of text and exit the search mode, click the X in the Spotlight field.
Sometimes you need to be a little more precise about the text you are searching for in a document. Perhaps you want to find only the capitalized instances of a word. For that kind of precision, you need to use the Advanced Find and Replace Command.
SHOW ME Media 2.2—Using the Advanced Find and Replace Command
Access this video file through your registered Web edition at my.safaribooksonline.com/9780132174718/media.
LET ME TRY IT
Using the Advanced Find and Replace Command
To define a more specific search, follow these steps:
1. Take note of the position of your insertion point and move it if you need to.
2. Click Edit, Find, Advanced Find and Replace to open the dialog box shown in Figure 2.3.
[image:55.612.39.396.45.274.2]
Figure 2.3 If your dialog box does not look like this one, click the arrow that expands the dialog box.
3. Type the text string in the Find What text box. Note that if you select text before you open the Find and Replace dialog box, the text appears auto-matically in the Find What text box.
4. Remove the check in the Highlight All Items Found In check box (if neces-sary) and select an option from the Search pop-up menu to specify what direction to search. Your options are Current Document Down, Current Document Up, and Current Document All.
[image:56.612.36.399.242.456.2]
Figure 2.4 In this search, Find looks for all highlighted occurrences of the word rental.
6. Click the Find Next button to go to the first occurrence. At this point, I prefer to close the dialog box and use the double-arrow buttons in the Browse Ob-jects tool to go to the next or previous occurrence.
The Replace feature works with the Find feature to find a specified string of text and replace it with another specified string of text. It's very useful if you need to make the same correction several times in the same document. For example,
say you are working on a brochure for an organization called the Veterans of Toddler Wars (an organization for parents who have survived the "terrible twos"). Throughout the brochure, you have referred to the organization as th