Teach Yourself VISUALLY™
Office 2013
Table of Contents
Part I: Office Features
Chapter 1: Office Basics
Start and Exit Office Applications Navigate the Program Windows Work with Backstage View Work with the Ribbon
Customize the Quick Access Toolbar Using an Office Program on a Tablet PC
Chapter 2: Working with Files
Create a New File Save a File Open a File Print a File
Check Your File for Hidden or Personal Data E-Mail a File
Select Data
Cut, Copy, and Paste Data Arrange Windows
Chapter 3: Office Graphics Tools
Insert a Picture
Insert an Online Picture
Understanding Graphic Object Modification Techniques
Chapter 4: Working with Office Files Online
Office and the Cloud Sign In to Office Online Share a Document from Office
Download Apps from the Office Store Sign In to SkyDrive
Using a Web App in SkyDrive
Using an Office Program from SkyDrive Upload a Document to SkyDrive
Share a Document Using SkyDrive
Part II: Word
Chapter 5: Adding Text
Change Word’s Views Type and Edit Text Insert Quick Parts Insert Symbols Create a Blog Post
Chapter 6: Formatting Text
Change the Font, Size, and Color Align Text
Apply a Template
Chapter 7: Adding Extra Touches
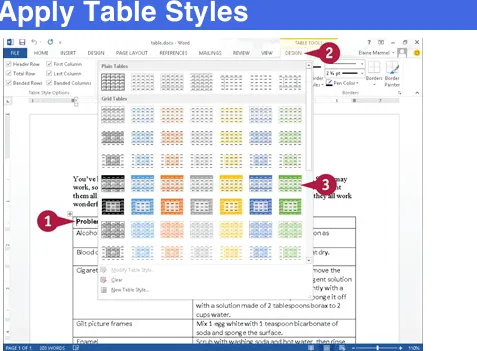
Insert an Online Video Assign a Theme Add Borders Create Columns Insert a Table Apply Table Styles
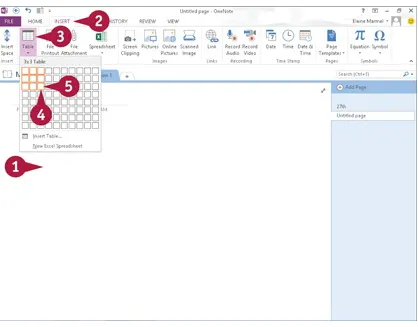
Insert an Excel Spreadsheet Add Headers and Footers Insert Footnotes and Endnotes
Insert Page Numbers and Page Breaks Mark Index Entries
Generate an Index
Generate a Table of Contents Create a Bibliography
Chapter 8: Reviewing Documents
Work in Read Mode View Find and Replace Text Scan Document Content Check Spelling and Grammar
Check Spelling and Grammar Work with AutoCorrect
Using Word’s Thesaurus and Dictionary Translate Text
Track and Review Document Changes Lock and Unlock Tracking
Part III: Excel
Chapter 9: Building Spreadsheets
Enter Cell Data Select Cells
Faster Data Entry with AutoFill Turn On Text Wrapping
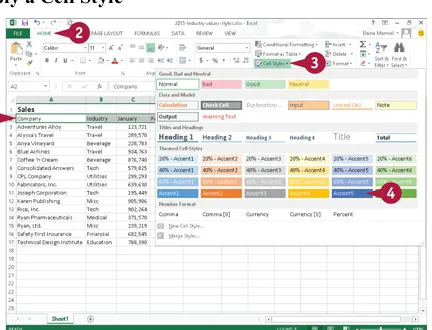
Center Data across Columns Adjust Cell Alignment Change the Font and Size Change Number Formats Increase or Decrease Decimals Add Cell Borders and Shading Format Data with Styles Apply Conditional Formatting Add Columns and Rows Resize Columns and Rows
Freeze Column and Row Titles On-Screen Name a Range
Clear or Delete Cells
Split and Format a Column of Data
Chapter 10: Worksheet Basics
Add a Worksheet Name a Worksheet
Change Page Setup Options Move and Copy Worksheets Delete a Worksheet
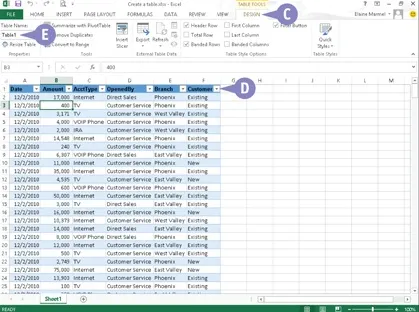
Find and Replace Data Create a Table
Analyze Data Quickly
Understanding Data Analysis Choices Track and Review Worksheet Changes Insert a Comment
Chapter 11: Working with Formulas and Functions
Understanding Formulas Create a Formula
Apply Absolute and Relative Cell References Understanding Functions
Apply a Function
Total Cells with AutoSum Audit a Worksheet for Errors Add a Watch Window
Chapter 12: Working with Charts
Create a Chart
Move and Resize Charts Change the Chart Type Change the Chart Style Change the Chart Layout Add Chart Elements Format Chart Objects Change the Chart Data
Using Sparklines to View Data Trends
Part IV: PowerPoint
Chapter 13: Creating a Presentation
Build a Blank Presentation
Insert Slides
Change the Slide Layout Change the Slide Size
Chapter 14: Populating Presentation Slides
Add and Edit Slide Text
Change the Font, Size, and Color Apply a Theme
Set Line Spacing Align Text
Add a Text Box to a Slide Add a Table to a Slide Add a Chart to a Slide Add a Video Clip to a Slide Move a Slide Object
Resize a Slide Object
Chapter 15: Assembling and Presenting a Slide Show
Reorganize Slides Reuse a Slide
Organize Slides into Sections Define Slide Transitions Add Animation Effects Create a Custom Animation Record Narration
Insert a Background Song Create Speaker Notes Rehearse a Slide Show Run a Slide Show Review a Presentation
Part V: Access
Chapter 16: Database Basics
Understanding Database Basics
Create a Database Based on a Template Create a Blank Database
Create a New Table Change Table Views Add a Field to a Table Delete a Field from a Table Hide a Field in a Table Move a Field in a Table Create a Form
Change Form Views Move a Field in a Form Delete a Field in a Form Apply a Database Theme Format Form Fields Add a Background Image
Chapter 17: Adding, Finding, and Querying Data
Add a Record to a Table Add a Record to a Form Navigate Records in a Form Search for a Record in a Form Delete a Record from a Table Delete a Record from a Form Sort Records
Filter Records
Create a Report
Part VI: Outlook
Chapter 18: Organizing with Outlook
Navigate in Outlook Schedule an Appointment Create a New Contact Create a New Task Add a Note
Customize the Navigation Bar Peek at Appointments and Tasks Search for Outlook Items
Work with the To-Do Bar Link Contacts
Chapter 19: E-Mailing with Outlook
Compose and Send a Message Send a File Attachment
Read an Incoming Message Reply To or Forward a Message
Add a Sender to Your Outlook Contacts Delete a Message
Work with Conversations Screen Junk E-Mail Create a Message Rule
Part VII: Publisher
Chapter 20: Publisher Basics
Add Text
Add a New Text Box Swap Pictures
Save a Publication for Photo Center Printing
Chapter 21: Fine-Tuning a Publication
Change the Font, Size, and Color Apply a Text Effect
Change Text Alignment Add a Border
Control Text Wrap Link Text Boxes
Move and Resize Publication Objects Edit the Background
Add a Building Block Object Create a Building Block Object
Part VIII: OneNote
Chapter 22: Taking Notes with OneNote
Navigate OneNote Type and Draw Notes Insert and Format a Table Attach Files to Notes
Send Information to OneNote Insert a Screen Clipping Create a Quick Note Record an Audio Note
Chapter 23: Organizing and Sharing Notes
Rename a Section or Page Group Sections
Search Notes
Search for Recent Edits Set Synchronization Options
Teach Yourself VISUALLY™ Office 2013
Published by John Wiley & Sons, Inc. 10475 Crosspoint Boulevard
Indianapolis, IN 46256
www.wiley.com
Published simultaneously in Canada
Copyright © 2013 by John Wiley & Sons, Inc., Indianapolis, Indiana
No part of this publication may be reproduced, stored in a retrieval system or transmitted in any form or by any means, electronic,
mechanical, photocopying, recording, scanning or otherwise, except as permitted under Sections 107 or 108 of the 1976 United States
Copyright Act, without either the prior written permission of the Publisher, or authorization through payment of the appropriate per-copy fee to the Copyright Clearance Center, 222 Rosewood Drive,
Danvers, MA 01923, 978-750-8400, fax 978-646-8600. Requests to the Publisher for permission should be addressed to the Permissions
Department, John Wiley & Sons, Inc., 111 River Street, Hoboken, NJ 07030, 201-748-6011, fax 201-748-6008, or online at
www.wiley.com/go/permissions.
Wiley publishes in a variety of print and electronic formats and by print-on-demand. Some material included with standard print versions of this book may not be included in e-books or in print-on-demand. If this book refers to media such as a CD or DVD that is not included in the version you purchased, you may download this material at
Library of Congress Control Number: 2012956423
ISBN: 978-1-118-51768-0
Manufactured in the United States of America
10 9 8 7 6 5 4 3 2 1
Trademark Acknowledgments
Wiley, the Wiley logo, Visual, the Visual logo, Teach Yourself VISUALLY, Read Less - Learn More and related trade dress are trademarks or registered trademarks of John Wiley & Sons, Inc.
and/or its affiliates. Microsoft is a registered trademark of Microsoft Corporation. All other trademarks are the property of their respective owners. John Wiley & Sons, Inc. is not associated with any product or vendor mentioned in this book.
LIMIT OF LIABILITY/DISCLAIMER OF WARRANTY: THE
PUBLISHER AND THE AUTHOR MAKE NO REPRESENTATIONS OR WARRANTIES WITH RESPECT TO THE ACCURACY OR
COMPLETENESS OF THE CONTENTS OF THIS WORK AND SPECIFICALLY DISCLAIM ALL WARRANTIES, INCLUDING WITHOUT LIMITATION WARRANTIES OF FITNESS FOR A PARTICULAR PURPOSE. NO WARRANTY MAY BE CREATED OR EXTENDED BY SALES OR PROMOTIONAL MATERIALS. THE ADVICE AND STRATEGIES CONTAINED HEREIN MAY NOT BE SUITABLE FOR EVERY SITUATION. THIS WORK IS SOLD WITH THE UNDERSTANDING THAT THE PUBLISHER IS NOT ENGAGED IN RENDERING LEGAL, ACCOUNTING, OR OTHER PROFESSIONAL SERVICES. IF PROFESSIONAL
PROFESSIONAL PERSON SHOULD BE SOUGHT. NEITHER THE PUBLISHER NOR THE AUTHOR SHALL BE LIABLE FOR
DAMAGES ARISING HEREFROM. THE FACT THAT AN ORGANIZATION OR WEBSITE IS REFERRED TO IN THIS WORK AS A CITATION AND/OR A POTENTIAL SOURCE OF FURTHER INFORMATION DOES NOT MEAN THAT THE
AUTHOR OR THE PUBLISHER ENDORSES THE INFORMATION THE ORGANIZATION OR WEBSITE MAY PROVIDE OR
RECOMMENDATIONS IT MAY MAKE. FURTHER, READERS SHOULD BE AWARE THAT INTERNET WEBSITES LISTED IN THIS WORK MAY HAVE CHANGED OR DISAPPEARED
BETWEEN WHEN THIS WORK WAS WRITTEN AND WHEN IT IS READ.
FOR PURPOSES OF ILLUSTRATING THE CONCEPTS AND
TECHNIQUES DESCRIBED IN THIS BOOK, THE AUTHOR HAS CREATED VARIOUS NAMES, COMPANY NAMES, MAILING, E-MAIL AND INTERNET ADDRESSES, PHONE AND FAX
NUMBERS AND SIMILAR INFORMATION, ALL OF WHICH ARE FICTITIOUS. ANY RESEMBLANCE OF THESE FICTITIOUS
NAMES, ADDRESSES, PHONE AND FAX NUMBERS AND SIMILAR INFORMATION TO ANY ACTUAL PERSON,
COMPANY AND/OR ORGANIZATION IS UNINTENTIONAL AND PURELY COINCIDENTAL.
Contact Us
For general information on our other products and services please contact our Customer Care Department within the U.S. at 877-762-2974, outside the U.S. at 317-572-3993 or fax 317-572-4002.
Sales | Contact Wiley at (877) 762-2974 or fax (317) 572-4002.
Credits
Executive Editor
Jody Lefevere
Sr. Project Editor
Sarah Hellert
Technical Editor
Vince Averello
Copy Editor
Marylouise Wiack
Editorial Director
Robyn Siesky
Business Manager
Sr. Marketing Manager
Sandy Smith
Vice President and Executive Group Publisher
Richard Swadley
Vice President and Executive Publisher
Barry Pruett
Project Coordinator
Sheree Montgomery
Graphics and Production Specialists
Noah Hart
Joyce Haughey Jennifer Henry
Andrea Hornberger Jennifer Mayberry
Quality Control Technician
Lauren Mandelbaum
Proofreader
BIM Indexing and Proofreading Services
Indexer
About the Author
Elaine Marmel is President of Marmel Enterprises, LLC, an organization that specializes in technical writing and software
training. Elaine has an MBA from Cornell University and worked on projects to build financial management systems for New York City and Washington, D.C. This prior experience provided the foundation for Marmel Enterprises, LLC to help small businesses manage the project of implementing a computerized accounting system.
Elaine spends most of her time writing; she has authored and
co-authored more than 65 books about Microsoft Excel, Microsoft Word, Microsoft Project, QuickBooks, Peachtree, Quicken for Windows, Quicken for DOS, Microsoft Word for the Mac, Microsoft Windows, 1-2-3 for Windows, and Lotus Notes. From 1994 to 2006, she also was the contributing editor to monthly publications Inside Peachtree,
Inside Timeslips, and Inside QuickBooks.
Elaine left her native Chicago for the warmer climes of Arizona (by way of Cincinnati, OH; Jerusalem, Israel; Ithaca, NY; Washington, D.C., and Tampa, FL) where she basks in the sun with her PC, her cross stitch projects, and her dog, Jack.
Author’s Acknowledgments
Because a book is not just the work of the author, I’d like to
understandable. And, thank you, Sarah Hellert; your top-notch
management of all the players and manuscript elements involved in this book made my life easy and writing the book a pleasure.
Dedication
To Buddy (1995-2012), my constant companion for 17 ½ years. You brought me nothing but joy and I will sorely miss you.
How to Use This Book
Who This Book Is For
This book is for the reader who has never used this particular
technology or software application. It is also for readers who
want to expand their knowledge.
The Conventions in This Book
Steps
This book uses a step-by-step format to guide you easily
through each task.
Numbered steps
are actions you must do;
bulleted steps
clarify a point, step, or optional feature; and
indented steps
give you the result.
Notes give additional information — special conditions that
may occur during an operation, a situation that you want to
avoid, or a cross-reference to a related area of the book.
Icons and Buttons
Icons and buttons show you exactly what you need to click to
perform a step.
Tips
Tips offer additional information, including warnings and
shortcuts.
Bold
Bold
type shows command names or options that you must
click or text or numbers you must type.
Italics
Part I: Office Features
The Office 2013 applications share a common look and feel.
You can find many of the same features in each program, such
as the Ribbon, Quick Access Toolbar, program window
controls, and File tab. Many of the tasks you perform, such as
creating and working with files, share the same processes and
features throughout the Office suite. In this part, you learn how
to navigate the common Office features and basic tasks.
Chapter 2: Working with Files
Chapter 3: Office Graphics Tools
Chapter 1: Office Basics
Start and Exit Office Applications
Office 2013 runs on a 1-gigahertz (GHz) or faster x86- or x64-bit
processor with 1 or 2 gigabytes of RAM, based on your processor speed. Your system must be running Windows 7, Windows 8, Windows Server 2008 R2, or Windows Server 2012. For additional requirements, visit
http://technet.microsoft.com/en-us/library/ee624351%28v=office.15%29.aspx.
This section uses Access to demonstrate how to open a program from the Windows 8 Start screen. Once an Office program opens, its Start screen appears, helping you to find a document on which you recently worked or to start a new document. For other ways to open or start a new document, see Chapter 2.
On the Windows Start screen, click to zoom.
Note: You can start typing the name of the program and then skip to Step 3.
Click any program tile on the right side of the Start screen. Windows zooms in and enlarges all tiles to their regular size.
Click the tile of the program you want to open.
Note: This example uses Access 2013.
Windows switches to the Desktop and opens the program, displaying the program’s Start screen, which helps you open new or existing
A
You can use this panel to open an existing document.B
You can use this area to start a new document.C
This area indicates whether you have signed in to Office Online.D
To exit from the program, click the Close button ( ) after closing all documents.TIP
Can I create a shortcut to open an Office application?
program to the Windows taskbar. To open the program, display the Desktop and click the program’s tile on the taskbar.
Navigate the Program Windows
All Office programs share a common appearance and many of the same features, and when you learn your way around one Office program, you can easily use the same skills to navigate the others. These common features include scroll bars, a Ribbon, and a Quick Access Toolbar (QAT). The Ribbon contains commands that Microsoft Office
determines that users use most often, and the QAT contains frequently used commands; you can customize both of these elements.
A
Title Bar
Displays the name of the open file and the Office program.
B
Quick Access Toolbar
Displays quick access buttons to the Save, Undo, and Redo commands.
C
Ribbon
Displays groups of related commands in tabs. Each tab offers buttons for performing common tasks.
D
Program Window Controls
These buttons enable you to view the program in a full screen, with only scroll bars but no other controls. They also allow you to
including program controls, or to close the window.
E
Office Online Indicator
If you see your name, you are signed in to Office Online. You can click to display a menu that enables you to change your photo, manage your Microsoft account, or switch to a different Microsoft account. If you are not signed in, this area shows a Sign In link. See Chapter 4 for details.
F
Scroll Bars
The vertical and, if available, horizontal scroll bars let you scroll through the item shown in the work area, such as a document or worksheet.
G
Status Bar
Displays information about the current Office document.
H
View Shortcuts
These shortcuts switch to a different view of your document.
I
Zoom Controls
This feature changes the magnification of a document.
Work with Backstage View
You can click the File tab to display Backstage view, which resembles a menu. Backstage is the place to go when you need to manage documents or change program behavior. In Backstage view, you find a list of
actions — you can think of them as commands — that you can use to, for example, open, save, print, remove sensitive information, and
distribute documents as well as set Word program behavior options.
drive or in your network that you use to store documents and to manage your Office Online account.
Work with Backstage View
A
Commonly used file and program management commands appear here.B
Buttons you can click appear here.C
Information related to the button you click appears here. Each time you click a button, the information shown to the right changes.Note: The New, Close, and Options commands do not display buttons or information, but take other actions. See Chapter 2 for details.
Click here to return to the open document.
Work with the Ribbon
In Office 2013, you use the Ribbon to select commands. On each Ribbon tab, you find groups of related command buttons. Each button performs a common task. Some tabs appear only when needed. For example, if you select a picture, the Ribbon displays the Picture Tools tab.
In all Office programs, you can customize the Ribbon. You can create your own Ribbon tab that contains the buttons you use most often; that way, you do not need to switch tabs to use a particular command.
Work with the Ribbon
Click the tab containing the command you want to use. Click the command.
A
Buttons with arrows ( ) display additional commands.B
You can click the dialog box launcher ( ) to display a dialog box of additional settings.Create a Ribbon Tab
Click the File tab.
Click Customize Ribbon.
Click the tab you want to appear to the left of the new tab. Click New Tab.
C
Word creates a new tab and a new group on that tab. To reposition the tab, click it and click the arrows.Click New Tab (Custom).
Click Rename to display the Rename dialog box. Type a name for your tab and click OK.
Click New Group (Custom) and repeat Steps 7 and 8 to rename the group.
Click the group on the tab you created. Click a command.
D
If the command you want does not appear in the list, click the list box arrow ( ) and select All Commands.Click Add.
E
The command appears below the group you created.F
The new tab appears on the Ribbon. If you positioned your tab as the first tab, it will appear each time you open the program.TIPS
How do I assign keyboard shortcuts to the buttons I add to my group?
You do not need to assign keyboard shortcuts; the program assigns them for you, based on the keys already assigned to commands
appearing on the tab where you placed your group. Be aware that you can place the same button on two different tabs, and if you do, the
program assigns different keyboard shortcuts to that button on each tab.
What can I do if I decide that I do not want a custom tab on the Ribbon?
program redisplays the Ribbon, your tab will not appear.
Customize the Quick Access Toolbar
The Quick Access Toolbar, or QAT, is located in the top-left corner of the program window above the File and Home tabs. It offers quick access to the frequently used Save, Undo, and Redo commands. If you want, you can customize this toolbar to include other commands you use often, such as the Quick Print command or the Print Preview command, or any other command you want.
You can also reposition the QAT so that it appears below the Ribbon instead of above it; and, if you change your mind, you can put the QAT back above the Ribbon.
Customize the Quick Access Toolbar
A
You can click any of the common commands to add them to the toolbar.B
You can click Show Below the Ribbon if you want to display the toolbar below the Ribbon.Click More Commands.
The Options dialog box appears.
Click the command that you want to add to the toolbar. Click Add.
C
Office adds the command.D
The new command appears on the Quick Access Toolbar.TIPS
How do I remove a button from the Quick Access Toolbar?
To remove a command, reopen the program’s Options dialog box by following the steps in this section, click the command name in the list on the right, click the Remove button, and click OK. The button no longer appears on the toolbar.
Are there other ways to customize the Quick Access Toolbar?
Yes. You can add commands to the toolbar directly from the Ribbon. Simply click the tab containing the command that you want to add,
Using an Office Program on a Tablet
PC
If you are using Office 2013 with Windows 8 on a tablet PC, you need to know some basic touch gestures. Using a tablet PC is a different
experience than using a computer with a keyboard and mouse, but
Windows 8 was built with the tablet PC in mind, so the touch gestures are intuitive and easy to learn.
On a tablet PC, you use your fingers (or sometimes a stylus, if your
tablet comes with one) to run applications, select items, and manipulate screen objects. This might seem awkward at first, but just a little
practice of the gestures in this section will make your experience natural and easy.
Using an Office Program on a Tablet PC
Start a Program
Position your finger or the stylus over a blank spot toward the bottom of the Windows 8 Start screen.
Tap the Word tile to switch to the Desktop and open Word to the Word Start screen.
Swipe the Screen
Click to switch to Word’s Read Mode view.
Note: See Chapter 8 for details.
Swipe left from the right edge of the tablet to read the next page.
Swipe right from the left edge of the tablet to read the previous page.
Move an Object
A
The object moves along with your finger or the stylus, and an alignment guide helps you find a position for the object.When the object appears where you want it, lift your finger or the
stylus off the screen to complete the move and hide the alignment guide.
TIPS
How do I close a program using gestures?
Position your finger or the stylus at the top edge of the tablet and then slide it down the screen. At first you see the Windows 8 application bar for the program, so keep sliding. When you get about halfway, the
application becomes a small window. Keep dragging that small window to the very bottom of the screen, and then lift your finger or the stylus. Windows 8 shuts down the application.
After I tap the Desktop tile, how do I return to the Start screen?
application, you can close it using the technique described in the
Chapter 2: Working with Files
Create a New File
When you open an Office program (except Outlook), the program’s Start screen greets you; see Chapter 1 for details. If Word, Excel, PowerPoint, Access, or Publisher are already open and you want to create a new document, workbook, presentation, database, or
publication, you create a new file using Backstage view. When you do, you have the option of creating a blank file or basing the file on a
template. Outlook opens by default to the Inbox, and, to create a new item in Outlook, whether it is an e-mail message, a calendar
appointment, a contact, or a task item, you use the Ribbon.
Create a New File
Click the File tab. Backstage view appears.
Click New.
Click the type of file that you want to create.
If you click a template, a preview appears; if you like what you see, click Create and the new file opens.
If you click a blank document, no preview appears; instead, a new blank document appears.
Create a New Outlook Item
Click the appropriate New button. For example, if you are creating a Mail item, the button is labeled New Email. If you are creating a
Calendar item, the button is labeled New Appointment, New Meeting, and so on.
A
The new item opens.TIPS
What is a template?
A template is a file containing predefined settings that serve as the foundation for your document, saving you the effort of manually
creating the settings. Word, Excel, PowerPoint, Access, and Publisher 2013 display a variety of templates on the program Start screen and also when you start a new document while working in the program.
At Office Online. At the top of the program Start screen or on the New screen, click in the Search online templates box, describe the type of template you want, and click .
Save a File
You save files so that you can use them at another time in Office
programs. When you save a file, you can give it a unique filename and store it in the folder or drive of your choice.
After you save a document for the first time, you can click the Save button on the Quick Access Toolbar (QAT) to save it again. The first time you save a document, the program prompts you for a document name. Subsequent times, when you use the Save button on the QAT, the program saves the document using its original name without prompting you.
A
Before you save a document, the program displays a generic name in the title bar.Click the File tab. Backstage view appears.
Click Save As. Click Computer.
B
If the folder in which you want to save the document appears here, click it and skip to Step 5.Click Browse.
Type a name for the document here.
C
You can click here to select a location on your computer in which to save the document.D
You can click the New Folder button to create a new folder in which to store the document.E
Word saves the document and displays the name you supplied in the title bar.F
For subsequent saves, you can click the Save button ( ) on the Quick Access Toolbar to quickly save the file.TIP
Can I save a file using a different file type?
Open a File
You can open documents that you have created and saved previously in order to continue adding data or to edit existing data, regardless of
where you store the files. If you are not sure where you saved a file, you can use the Open dialog box’s Search function to locate it.
New to Word 2013, you can open and edit PDF files. However, editing a PDF file in Word works best if you used Word to create the original
PDF file. If you used a different program to create the PDF file, you will find that Word has difficulty maintaining the file’s formatting.
Open a File
Click the File tab. Backstage view appears.
Click Open.
to open, you can click it to open it and skip the rest of these steps.
Click the place where you believe the document is stored. This example uses Computer.
Note: If you choose the wrong place, you can search for the file.
B
If the folder containing the document appears here, click it and skip to Step 5.Click Browse.
Click here to navigate to the folder containing the document you want to open.
The file opens in the program window.
Note: To close a file, click in the upper-right corner. If you have not saved the file, the program prompts you to save it.
TIP
What if I cannot find my file?
Print a File
If a printer is connected to your computer, you can print your Office
files. For example, you might distribute printouts of a file as handouts in a meeting.
When you print a file, you have two options: You can send a file directly to the printer using the default settings or you can open the Office
application’s Print screen to change these settings. For example, you might opt to print just a portion of the file, print using a different
printer, print multiple copies of a file, collate the printouts, and so on. (Printer settings vary slightly among Office programs.)
Print a File
Click Print.
A
You can specify the number of copies to print using the Copies spin box.B
You can choose a printer from the Printer drop-down list.D
You can select additional print options under Settings. For example, you can click here to choose from various paper sizes and to print in landscape or portrait orientation.Click Print.
The Office program sends the file to the printer for printing.
TIP
How do I print using default settings?
If you do not need to change any of your default print settings, you can simply click the Quick Print button ( ) on the Quick Access Toolbar. If the Quick Print button does not appear on your QAT, you can add it. To do so, click to the right of the QAT and click Quick Print in the list of commands that appears. You can also add a Print Preview and Print button ( ) to the QAT; clicking that button opens the Print screen.
Check Your File for Hidden or
Personal Data
You can remove any personal information that an Office program stores in a document. For issues of privacy, you may want to remove this
information before you share a document with anyone.
Depending on the Office program, the Document Inspector searches your document for comments, revision marks, versions, and ink
annotations. It searches document properties for hidden metadata and personal information. It inspects for task pane apps saved in the
document as well as information like hidden rows, columns, or worksheets. If your document contains custom XML data, headers,
footers, watermarks, or invisible content, the Document Inspector alerts you.
Data
In the document you want to check for sensitive information, click the File tab.
Click Info.
Click Check for Issues. Click Inspect Document.
Note: If you have unsaved changes, Word prompts you to save the document, which you do by clicking Yes.
The Document Inspector window appears.
A
You can deselect check marks ( changes to ) to avoid inspecting for these elements.Click Inspect.
B
You can remove any identified information by clicking Remove Allbeside that element.
C
You can click Reinspect after removing identifying information. Click Close.TIPS
Can I review the information that the Document Inspector displays before I remove it?
No. The only way to review the information before you remove it is to close the Document Inspector without removing information, use the appropriate Word features to review the information, and then rerun the Document Inspector as described in this section.
You cannot undo the effects of removing the information using the
Document Inspector. However, to restore removed information, you can close the document without saving changes and then reopen it.
E-Mail a File
You can share a file with others via e-mail. For example, suppose that you have a colleague who must present a project for approval at an
upcoming meeting. Your colleague approaches you, asking for guidance concerning what to discuss. You put together a skeleton PowerPoint
presentation and you want to e-mail it to your colleague.
You could create a new e-mail message in Outlook and add the file as an attachment, as discussed in Chapter 19. Or, you can send a file from the program you used to create the file, as described here. Note that, to open the file, recipients must have the appropriate software on their
computer.
With the document you want to share via e-mail open, click the File
tab.
Backstage view appears.
Click Email.
A
Options for e-mailing the file appear here. Click Send as Attachment.Note: If you are sending a file that you do not want anyone to edit, click
Send as PDF or Send as XPS.
Office launches an Outlook New Message window.
B
The name of your file appears in the New Message window’s Subject line.Type the message recipient’s e-mail address in the To field. Type your text in the body of the message.
Click Send.
Office places the message in your e-mail program’s outbox.
TIP
What if my recipient does not have the necessary software to open the file?
You can send the file in PDF or XPS format, which maintains the appearance of your file, but the file cannot easily be changed — meaning your recipient cannot edit the file. Alternatively, you can suggest that the recipient download an Office program viewer from
Select Data
You can select data in your file to perform different tasks, such as
deleting it, changing its font or alignment, applying a border around it, or copying and pasting it. Selected data appears highlighted.
Depending on the program you are using, Office offers several different techniques for selecting data. For example, in Word, PowerPoint,
Outlook, and Publisher, you can select a single character, a word, a sentence, a paragraph, or all the data in the file. In Excel and Access tables, you typically select cells. In One Note, use the technique
appropriate to the type of data you want to select.
Select Data
Select Data in Word, PowerPoint, or Publisher
Click to one side of the word or character that you want to select.
Drag the mouse pointer across the text that you want to select.
A
The program highlights the characters to indicate that they are selected.To cancel a selection, click anywhere outside the text or press any arrow key on your keyboard.
Click the cell representing the upper-left corner of the cells you want to select.
Drag the cell pointer across the cells you want to select.
To cancel a selection, click anywhere outside the text or press any arrow key on your keyboard.
TIP
How can I use my keyboard to select text?
To select text or cells to the left or right of the insertion point or cell pointer, press + + or + + . To select a paragraph or cells
above or below the insertion point or cell pointer, press + + or + + . To select all text or cells from the insertion point or cell pointer location onward, press + + . To select all of the text or cells above the insertion point or cell pointer location, press + + . To select all the text or cells containing data in the file, press + .
Cut, Copy, and Paste Data
You can use the Cut, Copy, and Paste commands to move or copy data. For example, you might cut or copy text or a picture from a Word
document and paste it elsewhere in the same Word document, in another Word document, or in a PowerPoint slide or a Publisher file.
When you cut data, it is removed from its original location; when you copy data, the selected data is duplicated, leaving it in its original
location. You can move or copy data using two methods: drag-and-drop or buttons on the Ribbon. This section uses Word to drag-and-drop, and Excel to demonstrate Ribbon buttons.
Cut, Copy, and Paste Data
Select the data that you want to cut or copy. This example cuts text. Click and drag the data to a new location.
A
As you drag, changes to .To copy the data, you can press and hold as you drag, and changes to .
C
The data appears in the new location.Cut or Copy in Excel or Access
Click the Home tab.
Click the Cut button ( ) to move data or the Copy button ( ) to copy data.
Note: You can also press + to cut data or + to copy data.
The outline around the selected cell(s) changes to an animated dashed box and the data is stored in the Office Clipboard.
Select the cells where you want the cut or copied data to appear.
Note: You can also open another file into which you can paste the data. On the Home tab, click the Paste button. Alternatively, to preview how the text will look before you paste it, click the down arrow below the Paste button and position your mouse pointer over each button that appears.
Note: You can also press + to paste data.
D
The data appears in the new location.When I paste cut or copied data, an icon appears. What is it?
This is the Paste Options button ( ). You can use it to view Paste-formatting choices; the options that appear depend on the program you are using and the location where you want to paste. You can click one of these options or ignore ; eventually, it disappears.
Can I cut or copy multiple selections?
Yes, you can, using the Office Clipboard, which holds up to 24 items that you can paste in any order you choose. To display the Office
Clipboard, click the dialog box launcher ( ) in the Clipboard group on the Ribbon’s Home tab. Then select and cut or copy.
Arrange Windows
You can simultaneously view multiple files. For example, you might view two versions of a Word document side by side to compare their contents or view two Excel workbooks to compare data. If the files you want to compare are particularly long, you can enable the Synchronous Scrolling option to scroll both files at the same time.
In addition to viewing multiple files simultaneously, you can split the window of one long file into scrollable panes to view different portions of it. For example, you might split a document to compare how portions of it are formatted.
Arrange Windows
Open two or more files. Click the View tab.
Click the View Side by Side button.
B
To scroll both files at the same time, click the Window button and then click the Synchronous Scrolling button.C
You can click the Maximize button ( ) to restore a window to its full size.D
You can click the Close button ( ) to close a file.To split the window displaying a single file into scrollable panes, click the View tab.
Click the Split button.
E
Horizontal and vertical bars appear.Drag the bar up, down, right, or left to resize the panes, and click to set the bar in place when the panes are the desired size.
To return the page to a full document, click the Split button again.
TIPS
What does the Switch Windows button do?
If you have two or more files open, click the Switch Windows button to view a list of all open files in the current Office program. You can then choose a file in the list to view it.
Chapter 3: Office Graphics
Tools
Insert a Picture
You can illustrate your Office files with images that you store on your computer. For example, if you have a photo or graphic file that relates to your Excel data, you can insert it onto the worksheet. If you have a
photo or graphic file that relates to the subject matter in your document, you can insert it into the document to help the reader understand your subject. After you insert a picture, you can resize, move, or modify the graphic in a variety of ways, as described in the section “Understanding Graphic Object Modification Techniques” later in this chapter.
Click in your document where you want to add a picture.
Note: You can move the image to a different location after inserting it onto the page. See the section “Resize and Move Graphic Objects.”
Click the Insert tab. Click Pictures.
The Insert Picture dialog box appears.
A
The folder you are viewing appears here.Note: Image files come in a variety of formats, including GIF, JPEG, and PNG.
B
To browse for a particular file type, you can click and choose a file format.Navigate to the folder containing the picture you want to add to your document.
Click the picture you want to add. Click Insert.
D
The picture appears in your document, selected and surrounded by handles ( and ).F
On the Home tab, click Wrap Text to control text flow around the picture.G
Picture Tools appear on the Ribbon; you can use these tools to format pictures.To remove a picture that you no longer want, you can click the picture and press .
TIPS
If I am sharing my file with others, can I compress the pictures to save space?
Yes. You can compress image files that you add to any file. To do so, click the image, click the Format tab on the Ribbon, and click the
Compress Pictures button ( ) in the Adjust group. In the Compress Pictures dialog box, fine-tune settings as needed and click OK to compress the pictures.
I made changes to my picture, but I do not like the effect. How do I return the picture to the original settings?
You can click the Reset Picture button ( ), located in the Adjust group on the Format tab, to restore a picture to its original state. This command removes any edits that you applied to the image. Activating this command does not restore the original size of the image.
Insert an Online Picture
Outlook, or OneNote document. Be careful when choosing online
pictures and make sure that they fall into the public domain or that you have written permission to use the picture.
The pictures and clip art found at Office.com are all public domain art and you can freely use any of these images. None of the Office 2013 applications come with any preinstalled clip art as previous versions did.
Insert an Online Picture
Note: If you are working in Word or Excel, switch to Print Layout view.
Click in your document where you want to add a picture.
Note: You can move the graphic to a different location after you insert it. See the next section, “Resize and Move Graphic Objects.”
Click the Insert tab. Click Online Pictures.
on the Insert tab. In this case, click Illustrations. The Insert Pictures window appears.
Click here and type a description of the kind of image you want. Click the Search button ( ).
The results of your search appear.
A
You can click here ( and ) to navigate through the search results.B
You can click here to return to the Insert Picture window and search for a different image.Click Insert.
C
The picture appears in your document, selected and surrounded by handles ( ).D
Drag to rotate the picture.E
You can click Wrap Text or to control text flow around the picture.F
Picture Tools appear on the Ribbon; you can use these tools to format the picture.When you finish working with your online picture, click anywhere else in the work area.
TIPS
Why must I make sure that the image I choose falls into the public domain?
agree to pay a fee and/or give credit to the owner of the image. To use a public domain image, you do not need to pay a royalty and you do not need permission from an image owner to use the image.
What happens when I search for images using Bing?
Like the results of a search of Office.com, the search results appear in a window. A message states that search results are licensed under
Creative Commons and that you need to review the specific license for any image you want to use to ensure that you can comply with the
license. Bing searches do not exclude pictures outside the public domain.
Resize and Move Graphic Objects
Pictures and other types of images are also called graphic objects. If a graphic object is not positioned where you want it or if it is too large or too small, you can move or resize it. When you select a graphic object, handles appear on each side of the graphic object; you can use these handles to resize it. Alignment guides — green lines — appear as you move a graphic object to help you determine where to place it. Once you have picked the spot for the graphic, the alignment guides disappear.
Resize and Move Graphic Objects
Click a graphic object.
A
Handles ( ) surround the graphic.Note: In Publisher, and surround the graphic.
Drag the graphic object to a new location.
B
In Word, green alignment guides help you position the graphic object. Release the mouse button.The graphic object appears in the new location and, in Word, the alignment guides disappear.
Click outside the graphic object to cancel its selection.
Click a graphic object.
C
Handles ( ) surround the graphic.Note: In Publisher, and surround the graphic.
Drag the handle inward or outward until the graphic object is the appropriate size ( , , , or changes to ).
Release the mouse button.
The graphic object appears in the new size.
Click outside the graphic object to cancel its selection.
TIPS
Can I control how text wraps around an object?
Yes, if you insert the object into a Word or Publisher file. Click the object, click the Wrap Text button on the Format tab, and choose a wrap style. In Word, you also can click .
Does it matter which handle I use to resize a graphic?
graphic, so using one of them can make your graphic look distorted, especially if you resize a picture, video, or screenshot using any handle except a corner handle.
Understanding Graphic Object
Modification Techniques
In addition to inserting, moving, and resizing pictures as described in this chapter, you can insert and modify other types of graphic objects — shapes, screenshots, SmartArt, WordArt, and charts — in all Office
programs except Access. The available graphic objects vary from program to program; the specific types of available graphic objects appear on the Insert tab of the program. You insert these objects using basically the same techniques you use to insert pictures.
You can modify an object’s appearance using a variety of Ribbon
buttons that appear on a Tools tab specific to the type of graphic object you select.
Crop a Picture
You can crop a picture, screenshot, or clip art image. When you crop an object, you remove vertical and/or horizontal edges from the
object. The Crop tool is located on the Format tab on the Ribbon, which appears when you click the object you want to crop.
Rotate or Flip a Graphic
After you insert an object such as a piece of clip art or a photo from your hard drive into a Word document, you may find that the object appears upside down or inverted. Fortunately, Word makes it easy to flip or rotate an object. For example, you might flip a clip art image to face another direction, or rotate an arrow object to point elsewhere on the page. Or, for dramatic effect, you can rotate or flip pictures, clip art images, and some shapes. Keep in mind that you cannot rotate text boxes.
You can change the brightness and contrast of a picture, clip art, or a screenshot to improve its appearance, and you can sharpen or soften an image. Suppose, for example, the image object you have inserted in your Word, Excel, or PowerPoint file is slightly blurry, or lacks contrast. You find the image-correction tools on the Picture Tools Format tab on the Ribbon, which appears when you click to select the object to which you want to apply the effect.
Make Color Adjustments
You can adjust the color of a picture, screenshot, or clip art image by increasing or decreasing color saturation or color tone. You can also recolor a picture, screenshot, or clip art image to create an interesting effect.
Color saturation controls the amount of red and green in a photo, while color tone controls the amount of blue and yellow.
Remove the Background of an Image
image. For example, suppose that you inserted a screenshot of an Excel chart in a Word document; the screenshot would, by default, include the Excel Ribbon. You can use the Remove Background tool in the Adjust group on the Picture Tools Format tab to remove the Excel Ribbon and focus the reader’s attention on the chart.
Add an Effect
You can use tools to assign unique and interesting special effects to objects. For example, you can apply a shadow effect, create a
mirrored reflection, apply a glow effect, soften the object’s edges, make a bevel effect, or generate a 3D rotation effect. You can find these tools on the Format tab of the Ribbon, which appears when you click to select the object to which you want to apply the effect. (Note that the Picture Effects tool is not available in Publisher.)
Apply a Style to a Graphic
style removes other effects you may have applied, such as shadow or bevel effects. Sample styles appear on the Picture Tools Format or Drawing Tools Format tab when you click in the Picture Styles or Shape Styles group.
Add a Picture Border or Drawing Outline
You can add a border to a picture, shape, text box, WordArt graphic, clip art image, or screenshot. Using the Picture Border or Shape
Outline tool, which appears on the Picture Tools Format or Drawing Tools Format tab, you can control the thickness of the border, set a style for the border — a solid or dashed line — and change the color of the border.
Apply Artistic Effects
You can apply artistic effects to pictures, screenshots, and clip art in order to liven them up. For example, you can make an image appear as though it was rendered in marker, pencil, chalk, or paint. Other
Chapter 4: Working with Office
Files Online
Office and the Cloud
Office 2013 offers a completely new experience when it comes to
working in a mobile environment. Today, people are on the go but often want to take work with them to do while sitting in the waiting room of their doctor’s office, at the airport, or in a hotel room. Office 2013 was designed to help you work from anywhere using almost any device
available because, among other reasons, it works with SharePoint and SkyDrive, Microsoft’s cloud space. From SkyDrive, you can log into cloud space and, using Office Web Apps — essentially, tools with which you are already familiar — get to work.
Sign In to Office Online
SkyDrive and Office 2013
The SkyDrive app is a cloud storage service from Microsoft that comes with Office 2013; 7GB are free, and you can rent additional space. Office 2013 saves all documents by default to your SkyDrive so that your documents are always available to you.
Using Office Web Apps
You can open and edit Word, Excel, OneNote, and PowerPoint
documents from your SkyDrive using Office Web Apps, which are scaled-down editions of Office programs that you can use to easily review documents and make minor changes.
Take Your Personal Settings with You Everywhere
slide you were viewing when you close a document, and they display that location when you open the document on another machine,
making it easy for you to get back to work when you move from one work location to another.
Your Documents Are Always Up to Date
Office 2013 saves your Office documents by default in the SkyDrive folder that installs along with Office. As you work, Office
synchronizes files with changes to your SkyDrive in the background. And, the technology does not slow down your work environment, because Office only uploads changes, not entire documents, saving bandwidth and battery life as you work from wireless devices.
Share Your Documents from Anywhere
document to recipients you choose, post a document at a social media site, or create a link to a document that you can provide to users so that they can view the document in a browser. You can also use Microsoft’s free online presentation service to present Word and PowerPoint documents online.
Take Advantage of the Office Store
The Office Store contains add-in applications that work with Office programs. For example, the dictionary you use to look up words in Microsoft Word or Excel 2013 does not automatically install when you install the program. But, when you need an add-on for Word or Excel, you can download it from the Office Store. Click the Office Store button to open your browser to the Office Store web page.
Office 2013 on Demand
Office 2013 comes in three “traditional” editions, where you buy the program; you can install any traditional edition on one machine.
Office 2013 also comes in two “subscription” editions; essentially, you pay an annual rental fee to use the software on five PCs or Macs. Subscription editions include the Office on Demand feature;
subscribers can run temporary instances of Word, Excel, PowerPoint, Access, Publisher, Visio, and Project on computers where they
Subscribers must be online and logged in to validate their right to use Office on Demand.
Sign In to Office Online
You can use Office Online to work from anywhere. Sign in to Office Online using any of your devices and then, using one of the Office Web Apps, go to work. Office remembers some of your personal settings such as your Recent Documents list so that you always have access to them.
When you work offline, Office creates, saves, and opens your files from the local SkyDrive folder. Notifications appear periodically, reminding you that you are working offline. Occasionally, Office alerts you if
changed files are pending upload to the cloud. Whenever you reconnect, Office automatically uploads your changes to the cloud.
Sign In to Office Online
Open an Office program.
Click the Sign In link.
Note: If you are viewing a document, click the Sign In link in the upper-right corner of the screen.
The Sign In to Office window appears.
Click Microsoft Account or Organizational Account, depending on the user ID you use with Office.
Type your Microsoft account e-mail address. Type your Microsoft account password.
A
If you do not have a Microsoft account, you can click here to sign up for one. You can establish any existing e-mail address as your Microsoft account address.B
This area indicates that you have signed in to Office Online.TIP
How do I sign out of Office Online?
Sign in to Windows 8 using a local account and follow these steps:
Click Account.
Note: In Outlook, click Office Account. Click Sign Out.
A
The Remove Account dialog box appears to warn you that continuing removes all customizations and synchronization might stop.Note: In most cases, it is perfectly safe to click Yes. If you are unsure, check with your system administrator.
Click Yes.
Share a Document from Office
You can easily share documents using Office Online. You can share an Office document by posting it using a social network or to a blog or sending a document as an e-mail attachment. You can also take
cloud space at SkyDrive — where the recipient can view and even work on only the shared document. When you finish, you can stop sharing the document.
Share a Document from Office
Share a Document
Note: The document you want to share must be stored in the cloud. See the tip at the end of this section for details.
Click Share.
Click Invite People.
Type e-mail addresses of people with whom you want to share here.
Note: If you type multiple addresses, Office separates them with a semicolon (;).
Specify whether these people can edit or simply view the document.
A
You can type a personal message to include with the invitation. Click Share.B
Recipients with whom you shared the document appear here.Stop Sharing
Open the document you want to stop sharing and click the File tab.
Click Invite People.
Right-click the recipient with whom you no longer want to share. Click Remove User.
The program updates document permissions and removes the user from the screen.
TIP
Why do I see a screen indicating I must save my document before sharing it?
If you have not previously saved your document to your SkyDrive, the Office program prompts you to do so before starting the Share process. By default, Office saves all your documents to your SkyDrive, but, if you changed that option, click the Save to Cloud button that appears. The program displays the Save As pane in Backstage view; click your SkyDrive and then click a folder in the Recent Folders list or click
Browse to navigate to the SkyDrive folder where you want to place the document.
Download Apps from the Office Store
You can use the Office Store to download add-on applications, or apps, for Word, Outlook, or Excel. For example, the dictionary you use to look up words in Word 2013 does not automatically install when you install the program. But, when you need an add-on, you can download it from the Office Store.
Download Apps from the Office Store
Install an App
Click the Insert tab. Click Apps for Office.
The Insert App dialog box appears, displaying the My Apps tab of currently installed apps.
A
You can click Featured Apps to view apps you may find interesting. If you browse through featured apps and do not find what you need,click More apps.
Click Office Store.
The Office Store web page appears.
Search for apps using the search box at the top of the page or simply scroll down to find and click the app you want to add.
The web page describing the app appears.
(and Excel) as an example.
B
You can read the information about the app.C
The price of the app appears here. Click Add.Fill in the login information. Click Sign in.
A web page appears, asking you to confirm that you want to add the app.
TIP
What should I do for add-ins for other Office 2013 programs?
OneNote, PowerPoint, and Publisher use the Add-Ins pane of the
Options dialog box, as they did in earlier editions of Office, to manage add-ins. For dictionary look-ups, these programs and Outlook use the same Research pane that appears in earlier editions of Office. To
display the Research pane, click the Review tab (in Outlook, pop out a reply or a forward message window and the Review tab becomes
visible), and then click Research. Available research sources appear in a list in the pane. Access manages its add-ins using the Add-In
Manager, available from the Database Tools tab.
When you need an app for Microsoft Word or Excel, you go to the Office Store. You visit the Office Store from within the program to
review available apps. You then choose, buy if necessary, download, and install apps that interest you.
After you finish installing an app that you download from the Office Store, you must, in most cases, activate the app so that you can use it in Microsoft Word or Excel. This section describes how to activate the Merriam-Webster Dictionary app and then use it in Word to look up definitions of words.
Another web page appears, providing directions to activate the app.
In Word or Excel, click the Insert tab. Click Apps for Office.
Note: If you click on the bottom of the Apps for Office button, click
See All.
The app loads. For the Merriam-Webster Dictionary app, a pane opens on the right side of the Word screen, enabling you to type a word to look up.
TIPS
Do I need to keep the Merriam-Webster Dictionary pane open all the time to use the dictionary?
No. Click in the pane to close it. See Chapter 8 to learn how to use the thesaurus and dictionary.
Yes. Click the Insert tab and then click Apps for Office. In the dialog box that appears, click the Manage My Apps link in the upper-right corner. A web page opens, showing your installed apps; you can click
Hide beside any app to remove it.
Sign In to SkyDrive
You can use your SkyDrive and Office 2013 programs to work from any location in the world on any trusted device. SkyDrive offers you online storage from Microsoft. With Office 2013, you automatically receive a small amount of storage space for free and you can rent additional
storage space for a nominal fee.
You use a browser and a Microsoft Account to sign into SkyDrive. Once you have signed in to SkyDrive, you can use Office Web Apps to open and edit documents. Office 2013 technology synchronizes documents stored in your SkyDrive with documents stored on trusted devices.
Open your browser.
Type the e-mail address associated with your Microsoft Account. Type your Microsoft Account password.
Your SkyDrive appears.
TIP
How do I sign out of SkyDrive?
Using a Web App in SkyDrive
From SkyDrive, you can use Office Web Apps to open and edit Office documents with the same basic editing tools you use in the Office
program.
While you cannot create or use macros, you can use these editing tools to perform basic functions in each Office program. For example, in the Word Web App, you can apply character and paragraph formatting, such as bold or italics, and you can align text. You can change margins, insert a table or a picture stored on the local drive, and add clip art available from Microsoft’s Clip Art collection.
Using a Web App in SkyDrive
Open the Document
Sign in to SkyDrive at https://skydrive.live.com.