Apples Maci ntosh ™
Computer
Davong,
Mac
DiskTM
User's Guide
Copyright notJc;e
Manual Copyright C 1984, 1985 Davong Systems, Inc. All Rights Reserved.
Program Copyright C 1984. 1985 Oavong. Systems, Inc. All Rights Reserved.
Printed in U.S.A.
Macintosh Ttl is a trademark licensed to Apple Computer, Inc. Apple ~,
the Macint08h logo, and the Finderr
.. are registered trademarks of
Apple Computer, Inc.
Macintosh Finder, System, and ImagewMter are copyrighted programs of Apple Computer, Inc. licensed to Davong Systems, Inc. to distribute for use only in combination with the Davong Mac Disk program. Apple Software shall not be copied onto another diskette (except for archive purposes) or into memory unless as part of the execution of the Mac Disk program. When the Mac Disk has completed execution Apple Software shall not be used by any other program.
Oavong Systems, Inc. reserves the right to make changes or improvements to the equipment. software, and documentation described herein at any time and without notice.
Every possible effort was made to ensure accw-acy in this manual. However. Davong cannot accept responsibility for any manual et'TOr5 or consequences resulting from such elTars. Unless you· receive written pennission from Davong Systems, Inc .• you may not reproduce or transmit any part of this document in any fonn by any eiectronic or mechanical means including photocopying and recording, or by any information storage and retrieval system. Apple Computer, IDe. raakea 00 w81"l"8.Dde8, eithe .. erpre88 or
implied, regardiug tile eDcloeed compute .. 80itware package, itS lDerclaaatability 01" ita Dmesa for auy particular purpoee. The excluaioa of implied waJT8Ddes is not peMDitted by some states.
The a~ exciusioll8 lDay Dot apply to you. This warranty
provides you with specific legal righta. There may be other ripta
This equipment generates and uses radio frequency energy. If it is not installed and used properly; i.e., in strict accordance with the oper-ating instructions and reference manuals, it may cause interference to radio or tel~vision reception. It has been tested and found to comply with the limits for a Class B computing device pursuant to Subpart J
of Part 15 of FCC Rules, which are designed to provide reasonable protection against such interference when operated in a residential installation. Operation with non-certified equipment is likely to result in interference to radio and TV reception.
If this equipment does cause interference to radio or television recep-tion, which can be determined by turning the equipment off and on, the user is encouraged to try to correct the in terference by one or more of the following measures.
• Reorient the receiving antenna.
• Move .the equipment away from the receiver.
• Plug the equipment into'a different outlet so that equipment and receiver are on different branch circuits.
• Ensure that card mounting screws, attachmertt connector screws. and ground wires are tightly secured.
• Ensun:: that card slot covers are in place when no card is installed. The manufacturer is not responsible for any radio or 1V interference caused by unauthorized modifications to this equipment. It is the responsibility of the user to correct such interference.
If necessary, consult your dealer or an experienced technician for· additional suggestions, or refer to the following booklet prepared
by
the Federal Communications Commission:1
2
3
4
Contents
About This Users Guide
Reading Guidelines Getting Started
About Your Mac Disk Saving Packing Materials Equipment Required to Install
Mac Disk Hardware Software
Precautions to Follow
Setting Up Your Hardware
Voltage Setting
. .
Connecting the Interface Cable Connecting the Power Cord
Turning Your System On And Off Indicator Lights . . . .
Parking . . . .
1\1rning Off Yo~ System
Installing the Software .
Section 1 Davong JWac Disk Software Section .2 Software Installation
vii ix 1-1 1-2 1-2 1-3 1-3 1 .. 3 1-4
2·1 2 .. 1
2-2 2-5
3-1 3-1 3 .. 2. 3-2
4-1 4-2
Procedures '*-3
Initial Installation . . . 4-4
Starting Up . . . 4-4
Copying System Software
to Mac Disk . . . 4-5
Transferring Control to Mac Disk 4-5
Copying Documents and
Applications to Volumes 4-6
5
iv
Upgrade Installation . . . . BaCkingUp . . . .
Initializing Mac Disk Starting Up . . .
Creating Volwnes . . . . Copying System Software
to Mac Disk . . . 1ransfeITing Control to Mac Disk Installation on Special Diskette
Copying Your Special Diskette . Copying Mac Disk Applications
Running Install Drivers
Volume Manager . . . . .
Opening Volume Manager . Reading the Volume Directory
Active/Inactive Status Buttons . . Automatic/Manual Startup Buttons Using Volwne Manager Menus .
Apple Menu . . . . . . . . File'Menu . . .
Edit Menu . . .
Mac Disk Menu .. . . . Help Menu
Adding Volumes
Determining tl;le Number of Volumes . . . Determining Volume Name and Size . . . . Adding Volume Explanation Entering Name and Size Making Volumes Active . . Making Volumes Inactive Making Volumes Auto-Active
Customing Diskettes vvith Auto-Active'
Deleting Volumes . . .
Gathering Free Space . Opening File Windows
4-7
4-8 4-8 4-10 4-11 .
A
B
c
"
Appendixes
Voltage Settings and Fuse Changes
Changing the Voltage Setting, Changing the Fuse for 230 VAC
Trouble?' . . . .
Section·1 Symptoms
and'~0S3ible-Solutions
Hardware Symptoms , .
Software Symptoms . • . . .
Advanced Communication
Checks . . . .
Section
.2Error
Messages .Contents
. A .. l A-2 A-3
B-1
B-2 B-2 B-3 B-6 B-7Section 3 Mac Disk Indicator Lights B-l1
Indicator Lights During Powerup B .. 12 Indicator Lights During Normal
Operation . . . B-12
Section 4 'Mac Disk Diagnostic B-13 Version NtUIlber and Drivers Status B .. 14
Diagnostic Tests . . . B-1S
Disk Verification , . B"18
Confirmation Status B-19
Diagnostic Summary B-19
Technical Notes
Software Interface to rvlac Disk
Applications . . , . . . .
Mac Disk Characteristics . . . . How to Recognize a Mac Disk
Volume . . . . Attempting lVlac Disk Volume
Eject . . . , . Serial Port Usage . . . Disk Driver and Volume
Characteristics , . , Davong Use of System
Resource File
Specifications . . .
C-l
C-l
C-Z C .. ,
C-3
C-4 C-4
tJse~s
Guide
'Ibis user's guide provides simple and comprehensive infonnation about installing and using your Davong
Mac Disk TN with your Apple~ Macintosh 1M computer. Before continuing, you should feel comfortable with
your ability to:
• . Use the Macintosh operating system (Finder 1M version 1.1 or later)
• Control the Macintosh desktop I including opening and copying documents
• Use the mouse
No Macintosh operating instructions are included in this guide, since we assume that you are familiar with
basic Macintosh terms and techniques. If you need help operating your Macintosh, see your t'vfacintosh operator's manual.
Chapter 1, Getting Started I provides important
infonnation about your Mac Disk. It tells you what equipment you need to install your Mac Disk and what precautions you should observe to protect your warranty and take good care of your Mac Disk.
Chapter 2, Setting Up Your Hard"vare , shows you how to connect Mac Disk to your Macintosh computer.
About This Guide
Chapter 3, Turning Your System On and Off,
contains the system on/off procedures and discusses the
AutO-Park
feature.. Chapter 4, Installing the
Software,
describes· the Mac Disk system software and tells you how to iristall -it usingyour
Mac Disk System Diskette. Separate installationprocedures are given for users installing their software for the first time, users who are upgrading their software, and users who want to copy the Mac Disk system
software to a special system diskette.
Chapter 5, Volume Manager, describes the Volwne
Manager application and tells you how to use it to add, delete, and activate volumes and gather free space on
yo~ Mac Disk.
Appendix A, Voltage Setting and Fuse Changes I shows
you how to change the switch setting and fuse in Mac Disk if your power requirements are not standard.
Appendix B, Trouble? I explains the eITar messages
you may receive when operating your Mac Disk. Diagnostic solutions are offered where appropriate.
Appendix C, Technical NOles I contains technical information about the applications software interface to Mac Disk via the Macintosh operating system. Electrical, performance, and environmental specifications are included.
See the Glossary for definitions of many important Mac Disk and Macintosh terms.
Please pay special attention to the precautions and warnings throughout this guide. Davong includes them to
protect your equipment and the valuable information you store on your Mac Disk volumes.
Reading Guidelines
This chart·spows you the chapters of special interest to you, depending upon what you have to do with the
Mac Disk.
U you are: Read Chapter.
1 ~ 3
"
5 A B C the Mac Disk hardware ~ ~ ~ ~ ~v
~and software installer
a new Mac Dfak user ~
,., ,.,
v
,.,
an experienced Mac Disk user
v
v
~v
a troubleshooter ~ ~ ~
an applications programmer ~ ~
,.,
,.,
Chapter
1
Getting
Started
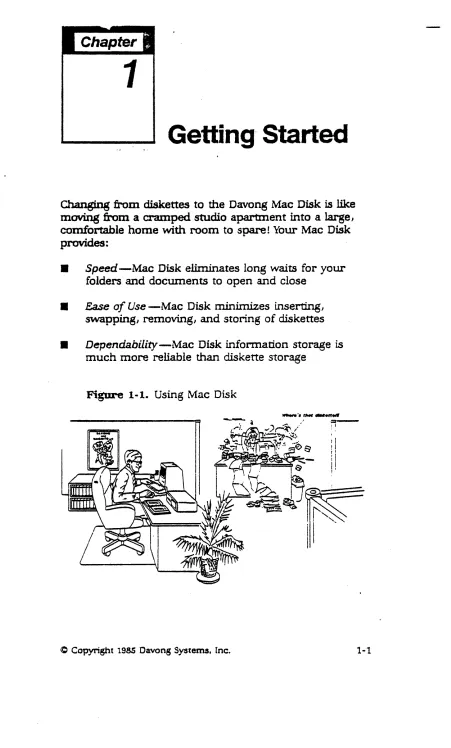
Changing from diskettes to the Davong Mac Disk is like moving from a cramped studio apartment into a large, comfortable home with room to spare! Your Mac Disk provides:
• Speed -Mac Disk eliminates long waits for your folders and documents to open and close
• Ease of Use-Mac Disk minimizes inserting,
swapping, removing I and stonng of diskettes
• Dependability -Mac Disk information storage is
[image:10.612.80.531.26.774.2]much more reliable than diskette storage
Figure
1-1. Using Mac DiskAbout Your Mac Disk
Your Mac Disk has two volumes for storage of your documents and applications. A'volwne is a designated storage area with a name and size. The volumes on your Mac Disk are a l-megabyte volwne named System and
a 2 .. megabyte volume named User. When you have
connected your Mac Disk to yo~ Macintosh and started up with the Mac Disk System Diskette, the icons for these volwnes will appear on the desktop.
The System volume is intended for storage of your Mac Disk system software and the User volume for storage of your applications and documents. If you want
separate volumes for your documents and applications, you can add them using the Volume Manager application
that Davong provides on your Mac Disk System
Diskette.
Once you have copied your folders, applications, and documents to your Mac Disk volumes, you can operate directly from your Mac Disk. You will probably need diskettes only to start up your system, back up (copy) important infonnation, or run copy-protected software (applications that cannot be copied to the hard disk),
Saving Packing Materials
-When you unpack your Mac Disk, be sure you save the packing material. If you ever change locations or need to send your Mac Disk for repair, you will need this
packing material.
Equipment .Required
to- Install'.Mac Disk
Getting Started
Make sure you have the following equipment before
starting to install your Mac Disk.
Hardware
• Macintosh computer
• Davong Mac Disk unit and power cable
• Davong interface cable
• Small flat-blade screwdriver
Software
• Standard Macintosh System Disk with Finder version
1.1 or later
• Blank diskette for copying the system diskette • Davong Mac Disk System Diskette, version 1.1 or
later
Precautions to Follow
. Some .of these precautions. keep you from vOiding
your warranty. Others help your Mac Disk operate more effectively or protect you against injury.
1-4
Dropping voids your
waITanty!
Opening the disk drive assembly voids your
warranty!
Using an UD.8hielded interlace cable violates FCC-Class B
requirements and voids the warranty.
Getting Sta.rted
Moisture, dust, or direct
8UD can harm Mac Disk.
Blocking ventilation may
damage Mac Disk.
Frayed cords, broken plugs, and overloaded circuits can hurt you.
Turning off power
before clean.ing protects both you and your Mac
Disk.
2
Setting Up
---', , Your
Hardware
Attaching your Mac Disk to your Macintosh computer is a very simple task. You only need to connect one cable and
plug in the power cord.
Voltage Setting
If you have 115 VAC voltage at your wall outlet, go on
to Connecting the Interface Cable in this chapter.
If you have 230 VAC voltage, see Appendix A for
instructions on changing the Mac Disk voltage setting and fuse. If you do not know what the voltage is in your geographical area, your Davong dealer can tell you which setting to use.
Jl'ABNING:
Using the wrong voltage setting will damage your equipment and void the warranty.
Setting Up
Connecting the Interface Cable
The interface cable in your adapter ldt can be connected to either the modem or printer port on the back of your Macintosh. If it is connected to the printer
port, printer outpUt will be· redirected to the modem port. 'Secertain that your
appli'Canoit"'\Vf.ll
redirectprlnter··'· ,.
output before you connect to the printer port. If it
will
not, you could lose. data or your Mac Disk data could
become corrupted.. .
If you are not certain about your application,
connect
Mac
Diskto the modem
port. Ifyou have to use
a modem that will only connect to the modem port, you
can
connect Mac Diskto the
printer portlong enough to
use the modem, then switch back to the modem port. Power off before you disconnect your Mac Disk. After you switch ports, power on and start up your system again.
WARNING:
2-2
Use the shielded interface cable you r-eceived
with your Mac Disk. Use of an unshielded cable violates the FCC:-Class B r-equirements and voids your warranty.
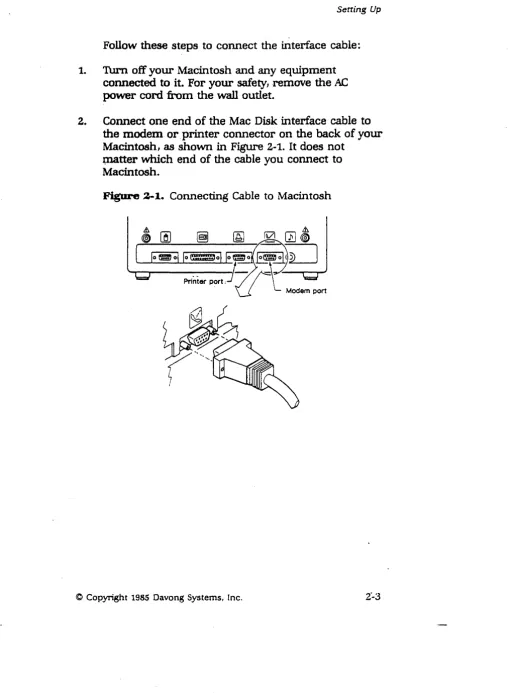
Follow these steps to connect the interface cable:
1. Turn off your Macintosh and any equipment
connected to it. For your safety, remove the AC power cord from the wall outlet.
2. Connect one end of the Mac Disk interface cable to the modem or. printer connector on the back of your
Macintosh, as shown in Figure 2·1. It does not ~tter which end of the cable you connect to
[image:17.615.61.574.76.769.2]Macintosh.
Figure 2-1. Connecting Cable to Macintosh
Setting Up
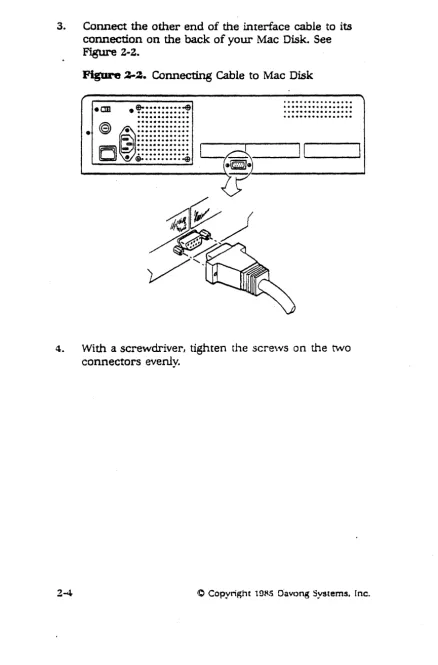
3. Connect the other end of the interface cable to its
[image:18.621.83.522.91.757.2]connection on the back of your Mac Disk. See Figure 2·2.
Figure ~2. Connecting Cable to Mac Disk
-em •
!::::::::::='
~ ~:::::::::::::.
~ ~. C8:::::::::::::
• • • • • • • • • • • • •C
..
.
c:a •••••••••••••.
.
.•...•.•....
...••...
• ···4
. e • • o • • • • • • • • • • · • •
..•...
...•...•...
...
\ _ _ _ _ _ _ _ 1 ... 1 _ _ _____
4. With a screwdriver, tighten the screvvs on the t"iVO connectors evenly.
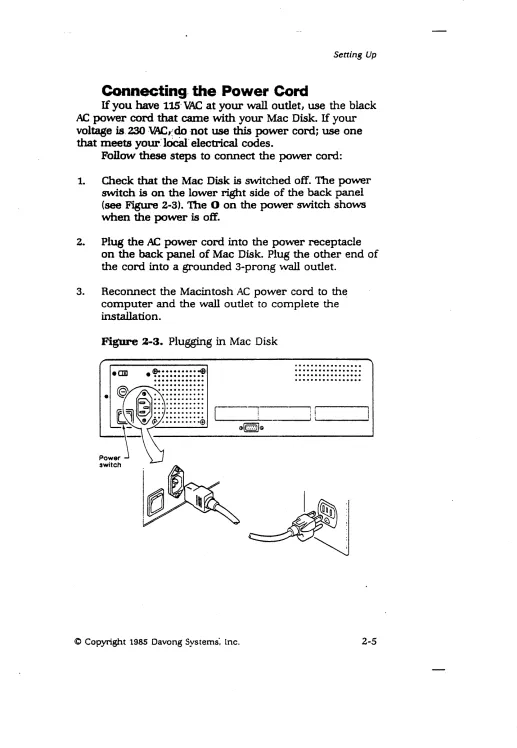
Connecting, the Power
Cord
If you have 115' VAC at your wall outlet, use the black
AC power cord that came with your Mac Disk. If your voltage is. 230 ·VAC,:'d.o not use this power cord; use one that meets your.-Iocal electrical codes.
Follow these steps to connect the power cord:
1. Check that the Mac Disk is switched off. The power switch is on the lower right side of the back panel
(see Figure 2 .. 3). The 0 on the power switch shows when the power is off.
2. Plug the AC power cord into the power receptacle on the back panel of Mac Disk. Plug the other end of the cord into a grounded 3 .. prong wall outlet.
3. Reconnect the Macintosh AC power cord to the computer and the wall outlet to complete the
[image:19.612.63.580.31.779.2]installation.
Figure
2-3. Plugging in Mac Disk• em .'=:::::::::~ .•...
...
...
...•••...•.. ...[ - - " l - - - -
1i~
_____ ~:~ :i~ ____ ~
(J~G
3
Turning
Your System
On And: Off
When turning on your system, tum on the Mac Disk first and then the Macintosh. The Mac Disk power switch is
on the lower right side of the back panel, as shown in
Figure 2-3.
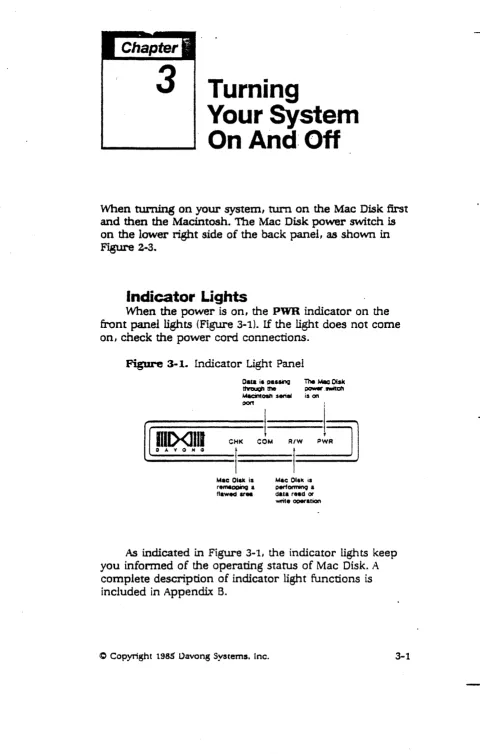
Indicator Lights
[image:20.613.48.528.22.776.2]When the power is on, the PWR indicator on the front panel lights (Figure 3-1). If the light does not come on, check the power cord connections.
Figure 3-1. Indicator Light Panel
Oata ia "aaai'IQ The Mac OfSK
ttwcugh the POW« .l'Mtc:h Mac:intoah sen.. is on
l.:=P!=~=JI'
=c
f
:
1
r
.L
11
Mac 01_ is
remeooinQ a
flawed ar . .
Mac Olak is Qerl0rmin9 a
data r.ad or
writ. OQ8tation
As indicated in Figure 3-1, the indicator lights keep
you infonned of the operating status of Mac Disk. A
complete description of indicator light functions is included in Appendix B.
Parking
The heads on a hard disk utIoat" just above the
surface of the disk when the hard disk is in operation and
rest on the surface when the hard disk is turned off. '1b
prevent damage· to the data when the heads are resting on the disk, the· heads are usually parked before the hard disk is turned off; that is, they are moved to an W1used
area of the disk.
Parking is often initiated by the user, but Mac Disk
does it automatically with the Auto-Park feature. Auto-Park parks the heads after 7 seconds of inactivity. It is important to wait about 10 seconds after your last access to Mac Disk to give Auto-Park a chance to park the heads before you turn off your system.
WARNING:
You can damage Mac Disk and lose your information if you turn the Macintosh or Mac Disk off while Mac Disk is perfonning read or
vvrite operations.
Tuming Off Your System
Give Auto-Park about 10 seconds to park the heads. Turn off the Macintosh, then turn off the iYIac Disk.
4
Installing
the Software
Now that your Mac Disk and yo~ Macintosh are physically cormected, you are ready to introduce them fonnally with the Davong Mac Disk System Diskette.
The
system
diskette contains all the software you need(including the Finder) to start up your system and store infonnation on your Mac Disk.
Section 1 of this chapter describes the Davong Mac Disk software. Section 2 tells you how to install it using the Mac Disk System Diskette. There are three
installation procedures: one for first-time users, one for users who are upgrading their Mac Disk software I and one for users who want to install the Mac Disk software on a special diskette, for example ,one with a new release of the Finder.
1
Mac Disk
_________
~
·,.Software
The Davong Mac' Disk System Di8kette contains the following folders and applications:
• System Folder
• Davong Initialize Disk Contents application • Davong Install Drivers application
• Davong Volwne Manager application • Davong Mac Disk Diagnostic application
System Folder contains the System and Finder files for operation of your Macintosh; the Note Pad, Scrapbook, and Clipboard files for the desk accessories; and the Imagewriter file for the printer (if installed).
Initialize Disk Contents prepares your Mac Disk to store information. Use this application only when you are upgrading your Mac Disk software.
Install Drivers is required for pennanen t
installation of the Davong Mac Disk software on a special Macin tosh system diskette.
Volume Manager, described in Chapter 5, allows you to add, delete, and activate volumes and gather free space on the Mac Disk. This application helps you make the most efficient use of your Mac Disk.
Mac DiBk Diagnostic, described in Appendix B, checks out your Mac Disk and gives you a report.
2
Software
Instalolation
Procedures~
Before you do anything else you should copy your original Mac Disk System Diskette. Use your copy to start up your system. If for any reason the copy becomes defective, you will have your original diskette as a backup and source from which to make other copies. See
Chapter 3 of your Macintosh manual if you need help
in copying.
We recommend that you lock your original Mac Disk System Diskette to keep it from being altered by mistake (see Chapter 3 of your lWacintosh manual for locking instructions) .
When you have copied your system diskette I you are
ready to install the Mac Disk software. Use the installation procedure that applies to you. If you are installing Mac Disk software for the first time, use the Initial Installation procedure; if you are upgrading, see Upgrade Installation;
and if you are installing the Mac Disk software on a special diskette, skip to Installation on Special Diskette.
Initial Installation
These are the basic steps in the initial installation of yo~ Mac 'Disk' software:
1. Start up with your copy of the Mac Disk System Di8kette.
2. Copy yo~ Mac Disk software to the System volume on yo~ Mac Disk.
3. 1hmBfer control from the Mac Disk System
Diskette to your Mac Disk (optional).
4. Copy yo~ applications and documents to the User
volume, or to voltunes you create using Volume Manager (Chapter 5).
Starting Up
Follow these instructions to start up your system:
1. 'fum on your Mac Disk, if it is not already on.
2. Insert your copy of the l\'lac Disk System Diskette
in the Macintosh disk drive and turn on your Macintosh.
3. The 'following icons will appear on the desktop:
Mac Disk System I System, and User. Mac Disk System
is the icon for your Mac Disk System Diskette; System and User are the icons for the volumes on your Mac Disk.
lnstailing
Copying System
Software.
to Mac Disk
Open the Mac Disk System icon and copy your Mac Disk system software to the System volmne on your !Wac Disk. Copying from a diskette to a volwne is
essentially the same process as copying from one diskette
to another. The only difference is that you do not use the
Disk Copy- application and you do not have to switch
diskettes. See Chapter 3 you Macintosh manual for help with copying.
Transferring Control to Mac Disk
Your next step is to tell the Finder that the system files are on the Mac Disk.. The Finder will then bypass the system diskette and go directly to the Mac Disk. You can transfer control by opening Volume Manager from your System volwne. Follow these steps:
1. Select the System volume icon and open the window. 2. Open the Volwne Manager application.
3. Quit Volume Manager and return to the desktop. The System icon should now be first on the desktop, as
in Figure 4-1. This indicates that you are operating
from the Mac Disk.
4. Ejec~ the Mac Disk SY8tem Diskette.
<0 Copyright 1985 Oavong Systems. Inc. 4-5
Figure 4-1. Mac Disk Icons
r '. file Edit Ulew Special
~
TrHtl
You will find that your Mac Disk operates faster without a diskette in the Macintosh disk drive. For maximum efficiency and benefit from your Mac Disk, make it a practice to transfer control to your Mac Disk and eject your system diskette as soon as possible after starting up.
Copying
Documents
and Applications to Volumes
You can now go ahead and copy your applications and documents to the User volume on your Mac Disk or to volumes you create using the Volume Mailager
application described in Chapter 5. Use the standard copying techniques given in Chapter 3 of your Macintosh
manual.
lnscsiling
Upgrade Installation
These are the basic steps in upgrading your Mac
Disk software:
1. Back up your Mac Disk documents to diskettes.
2. Reinitialize your Mac Disk using the' Davong Initialize Disk Contents application.
3. Start up with your copy of the new Mac Di8k
System Di8kette.
4. Using the Volume Manager application, create Mac
Disk volumes for your Mac Disk system software and
your applications and documents.
5. Copy the Mac Disk system sofuvare to your system volume.
6. 'Transfer control from the Mac Disk System
Diskette to the Mac Disk (optional),
7. Copy your applications and dOCUInents to the
volumes you created for them.
WARNING:
Initialization erases all documents and applications on the rvrac Disk. Back up your Mac Disk before you begin.
Backing Up
Back up the documents and applications on your Mac Disk by copying them to diskettes. Use stancIard copying techniques given in Chapter 3 of your Macintosh
manual.
Initializing Mac Disk
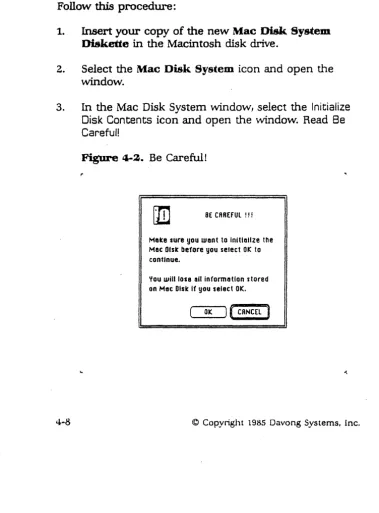
lnitiali.zing takes about one minute per megabyte, or about as many minutes as the size of your Mac Disk. Follow this procedw-e:
1. Insert your copy of the new Mac Disk System Diskette in the Macintosh disk drive.
2. Select the Mac Disk System icon and open the window.
3. In the Mac Disk System window, select the Initialize Disk Contents icon and open the window. Read Be Careful!
[image:29.618.90.470.251.764.2]4-8
Figure 4-2. Be Careful!
[1D
BE CRREfUl !!!Meke sure you want to Initialize the
Mac: Disk before you select OK to
continue.
You will lose 011 in(ormatlon stored on Mac Dlsle If you select OK.
OK ) (CRNCEL :1
....
1 nstall ing
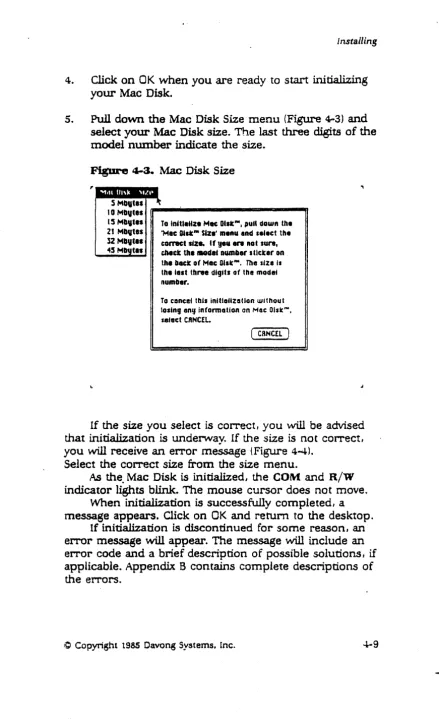
4. Click on OK when you are ready to start initializing your Mac Disk.
[image:30.617.66.505.38.761.2]5. Pull down the Mac Disk Size menu (Figure 4-3) and select your Mac Disk size. The last three digits of the model number indicate the size.
Figure 4-3. Mac Disk Size
S Mbutll 10 MlIv,e.
15 Mllltil To InUS.llze Mec OI.tN
, putl down the 21 Mllvtas 'Mec OtItN Size' menu and "teet the
12 MIIUtll comet sjz .. If yeu .... Rot sun,
<45 M tal
eM"
Utenaode. numlaer stlcter onthe beet of Mac Ollt"". The S'ZI II
the I ••• three digiti of the mode.
number.
To eonce. this initlollzatlon without los.ng eng jnformation on Mac Olsx .... select C"NCEL.
( C8NC!1. J
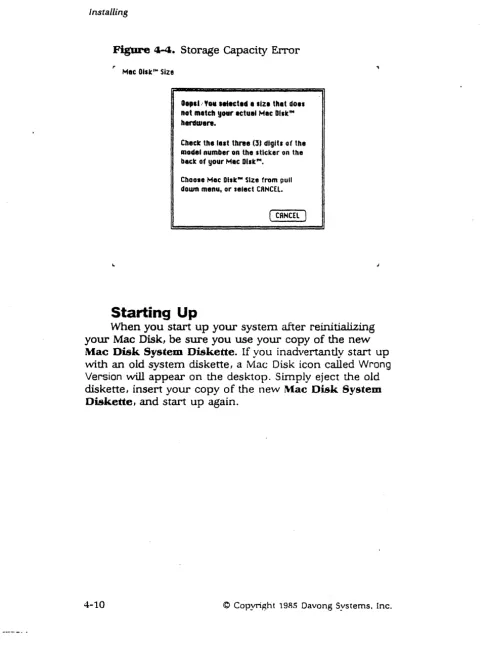
If the size you select is correct, you will be advised that initialization is underway. If the size is not correct, you will receive an error message (Figure 4-4).
Select the correct size from the size menu.
As the. Mac Disk is initialized, the COM and R/W
indicator lights blink. The mouse cursor does not move. When initialization is successfully completed, a message appears. Click on OK and retum to the desktop.
If initialization is discontinued for some reason, an error message will appear. The message will include an error code and a brief description of possible solutions, if applicable. Appendix B contains complete descriptions of
the errors.
Figure 4-4. Storage Capacity Error
MIC O'slc'" Size
0,,11 .. You •• ectod , slZl that dO'1
not mltch your actual Mae DIIIeIN hardware.
Check the lalt three (3) digits of the
lOodel number on tho sticker on the
blck of your Mlc DIIIeIN• Choose Moe DiskIN Size from pull
down menu, or select CRNCEl.
( CANCEL)
Starting Up
When you start up your system after reinitializing your Mac Disk, be sure you use your copy of the new Mac Disk System Diskette. If you inadvertantly start up
with an old system diskette, a t\![ac Disk icon called Wrong Version will appear on the desktop. Simply eject the old diskette, insert your copy of the new Mac Disk System Diskette, and start up again.
installing
Creating Volumes
Open the Volume Manager application from your
Mac Disk system icon and go on to Chapter 5, Volume Manager. Follow the instructions ·given in the section
Adcling Volumes. Add a volume for your Mac Disk system software and as many volwnes as you need for your applications ·and documents. Make the volumes active, as
instructed in Chapter 5; then quit Volume Manager and re~ to the desktop_
Copying
System
Software·
to Mac Disk
Now you are ready to copy your Mac Disk system software to your system volume. When the system files are on the Mac Disk, you can transfer control to the disk and eject the system diskette.
Transferring Control
to
Mac Disk
To transfer control, open the Volume Manager application from your system volume. This will instruct the Finder to bypass the system diskette and go directly to your Mac Disk. Quit Volume ~lanager and eject the system diskette.
The icon for your system volume will appear at the top of the desktop, indicating that you are operating from your Mac Disk. You will find that your Mac Disk operates faster without a diskette in the Macintosh disk drive.
Go ahead and copy your documents and applications to the Mac Disk volumes you created for them.
Installation' on Special Diskette
If you want to access your Mac Disk using a special Macintosh system diskette (for example J one with C/. new
release of the Finder),You must copy the Davong Irf§tall
Drivers and Volume Manager applications to your diskette. Then run Install Drivers to add the Mac Disk software pemumently to your special diskette.
The installation takes fo~ steps:
1. Copy your special diskette' and rename the copy.
2. Copy Mac Disk applications to your copy of the special diskette to create an alternate Mac Disk system diskette.
3. Run the Davong Install Drivers application from your alternate Mac Disk system diskette.
4. Start up your system. again using your alternate Mac Disk system diskette.
Copying
Your Special Diskette
Use the standard copying techniques given in Chapter 3 of yoW" Macin tosh manual. Rename the copy and store the original diskette. From now on we will refer to the copy as the "alternate Mac Disk system diskette" or lIalternate system diskette".
Copying
Mac Disk Applications
Copy Install Drivers, Volume Manager. Mac Disk
Diagnostic (optionalL and Initialize Disk Contents (optional) from your Mac Disk System Diskette to your alternate Mac Disk system diskette.
If there is not enough room on your alternate
diskette for both Install Drivers and Volume Manager, you can copy and run Install Drivers, delete Install Drivers, and then copy Volume Manager.
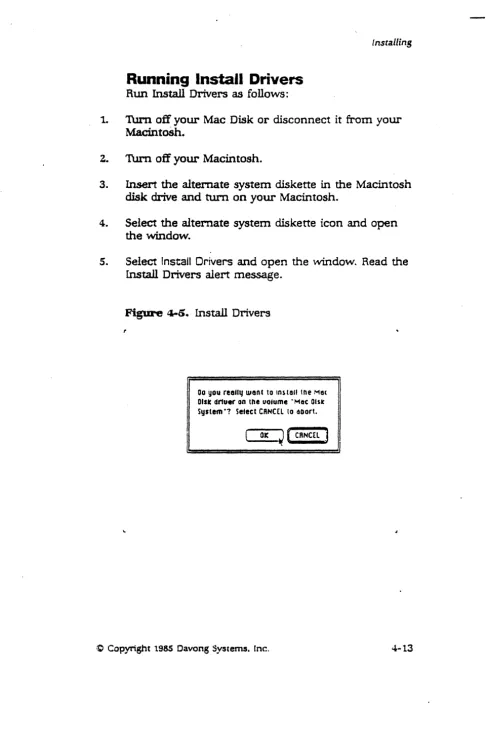
Running Install Drivers
Run Install Drivers as follows:
Installing
1. 'I\.un off your Mac Disk or disconnect it from your MacintoSh.
2. 'I\.un off your Macintosh.
3. Insert the alternate system diskette in the Macintosh disk drive and turn on your Macintosh.
4. Select the alternate system diskette icon and open
the window.
[image:34.620.49.537.39.774.2]5. Select Install Drivers and open the window. Read the Install Drivers alert message.
Figure
4-5. Install Drivers00 you reauq want to InUall Ihe MIS(
Dlst drtuet' on the uo.ume "Mac Gist
System'7 Seteel CANCEL 10 400rt.
OK ~
I
C8NC£l ]7. When a dialog box tells you the drivers are installed, click on OK.
8. If you get an error message, follow the instructions.
9. Turn on or reconnect your Mac Disk, as applicable.
10. Turn your Macintosh off, then on again. The Mac Disk system icon should appear on the desktop.
Using the Volume Manager application, you can add volumes to your Mac Disk and copy your applications and docwnents to them. See Chapter 5 for instructions.
You are strongly advised to have at least two alternate system diskettes for each special system, as well as
multiple copies of your original special system diskette.
5
Volume
Manager
The Mac Disk Volume Manager application on your Mac Disk System Diskette lets you partition your Mac Disk so you can use it more efficiently and economically. With Volwne Manager you can:
• Add volumes
• Delete volumes
• Gather free space
• Make volumes active or inactive • Make volumes auto-active
Volume Manager has two \-vindo\-"s and five menus:
• Davong Mac Disk window with volume directory
• File window with file directory
• Apple menu
• File menu
• Edit menu
• Mac Disk menu
• Help menu
Opening Volume Manager .
[image:37.613.67.560.36.792.2]On the desktop, select your Mac Disk system icon (preferably the icon for your system volume if you have one) and open the window. Select and open Volume Manager. The Oavong Mac Disk window with the volume directory will appear.
Figure 5-1. Volume Directory ,. .. file fdl1 Mac Dlst- Help
Oouong Moe Disk '"
.. S1u Ito. FII.. F,.... ScHlee 10
Volume I\,fanaser
Reading the Volume Directory
The volume directory supplies eight items of infonnation about each volume on the Mac Disk. 1b see
all the infonnation, scroll the window horizontally. Reading from right to left, the items ~:
• Volume name (listed alphabetically)
• Volume status (active/inactive)
• Volume startup status (auto/manual)
Note:
Volume startup status buttons appear only when there is an unlocked Mac Disk system diskette in the Macintosh disk drive.
• Amount of' free space in the volume, in kbytes • Number of files in the volume
• Size of volume, in kbytes • Date and time last modified
• Date and tillle crealed
Active/Inactive Status Buttons
The active/inactive status buttons show the cUITent status of the volwnes on the Mac Disk. When a volume's status button reads ACTIVE, the volume icon will appear on the desktop when you quit Volume Manager. If the status button reads inactive, the volume is not currently available to Macintosh. No icon will appear on the desktop.
'Ib change the active/inactive status of a volwne, click once on the status button.
You cannot change the statUs of the system volume and the volume with Volwne Manager.
Automatic/Manual Startup Buttons
The buttons to the left of the active/inactive status buttons show the startup status of the volumes. They only appear when an unlocked wlac Disk system diskette is in the Macintosh disk drive.
If a volume's startup status button is highlighted and reads AUTO, the volume becon1es active automatically on startup. If the button reads manual, you have to use Volume Manager to make the volume active.
You can change startup status by clicking once on the button. The change will not be effective until you save
it to your Mac Disk system diskette, as explained in
IWaking Volumes Auto-Active in this chapter.
Volume ' .... tanager
Using Volume Manager Menus
Volume Manager has five menus: Apple, File, Edit, Mac Disk, and Help.
Apple Menu
The Apple menu offers desk accessories and information about Volwne Manager. All the desk
accessories function when you are in Volume Manager, but you cannot cut, copy, or
paste
between a desk accessory and Volwne Manager. See your Macintoshmanual for descriptions of the desk accessories.
About Volume Manager is a dialog box that tells you how many volumes are currently on' the Mac Disk, how many kilobytes of disk space have been used, and how
[image:40.617.55.552.41.742.2]many kilobytes remain in the largest free block of space.
Figure
5-2. About Volume i\I[anager.. File: Edit ""1111: Ohtc··· rt~ttJ
Oauong Mac OlslC'" Uo'ume Meneger Utility,
UenJan 1.1 0 198'" Dy Oftuong Systems Inc.
All RICJhts Reserued.
There are 2 uo.umes on this Mec (l'st' ...
31 .. 7 KblJtes used. on It 5202 Kbqte Mac Oist"·.
Thl largest frel block is 20SS ~1:U4res.
I
OKJ
File Menu
From the File menu you can open and close
,
windows, eject the diskette, open another application, and quit Volwne Manager.Open Another Application is a great time-saver. It allows you to transfer to another application without going through the Finder. You pick the application from a dialog box like the one in Figure 5-3.
[image:41.612.59.547.40.762.2]5-6
Figure 5- 3. Open Another Application
,. • file Edit Moc Oi~k'" Hplp
Finder ~
Initialize Disk ••• InstaU Oriuers Mee Dlsle Dlag ••• Uo.ume Mene •••
Mee Disle Sy •••
[ Eject
ClIncel . [ Driue
Volume Manager
Edit Menu
Except for Undo, the items on the Edit menu are for use with the desk accessories. They do not function in Volume Manager.
Undo functions oilly when you make an auto/manual starti.lp change. It allows you to Hundo" all your
auto-manual choices and restore the default selections from your Mac Disk Sy.em. Diskette.
Auto/manual startup changes do not become
effective Wltil you save them ~o your system diskette (see Making Volumes Auto-Active in this chapter).
Mac Disk Menu
From the Mac. Disk menu you can select Add Volume, Delete Volume, or Gather Free Space. These functions are described in the following sections of this chapter.
Help Menu
Help displays a series of handy references on
volumes 'and tips on adding volumes, making volumes active and inactive, and changing auto/m41nual startup
status.
It is a good idea to review the information in the
Help menu before you go on to the next section.
Adding Volumes
Adding a volume to Mac Disk allocates space for the volume on the disk and creates the volume statistics that appear in the volume directory.
If your Mac Disk is not already partitioned into volumes, you should add a system volume for yoW" Mac Disk System software and additional volumes for your documents and applications.
Detennining the Number of Volumes
The number of additional volumes you need depends on the number of applications, folders, and documents you have to store and the way you want to store them.
You can think of Mac Disk as a filing cabinet that can be partitioned in a nUlnber of ways. It can have one or two very large drawers with a large number of
documents per drawer, or it can have many small drawers and a few documents per dravver. Obviously, it
will take less time to find what you want if you can go to a small drawer and search through a few documents.
The more applications I folders, and documents you have on a !'vIae Disk volunle I the longer it \vill take the Finder to retrieve what you wan t. You will get the best
performance if you partition the wlac Disk into many small volumes, each containing about 40 documents.
WARNING:
5-8
It is dangerous to have nl0['e than 200
documents on a volume, especially if you have a 128K Macintosh. Under eer'win circun1stances. the Finder can lock yOll out of your data.
Volume Manager
Detennining Volume Name and Size
[image:44.612.71.553.24.775.2]Select Add Volume from the Mac Disk menu to get the Add a Mac Disk Volume dialog box.
Figure 5-4. Add a Mac Disk Volume r • fU, Edit l'oictC Di~k'" Hrtp
lIdd. Mec Ollt'" uo.ume
N ... Uotum. Heme
Iwm
1m . . . .SiZI In Klyt.. 1800
OK ( Cancl' )
The volume nan1e and size you see in the dialog box are the defa.ult nume and size. You CUll accept these
defaults by clicking on OK, or you C<ln enter another
name and/or size.
Renaming
If you want to rename the volume, pick a name you have not used before. You can ha~e two volumes with the same name, but it might be confusing.
The name you choose should identify the contents of the volume. TIle volwne that contains your Mac Disk system software, for example, should be called "System" or have "System" in its name.
Although volumes are listed alphabetically in the volwne directory, you can force a volume like "System" to the top of the list by enteriilg a blank space before the name. Hold down the <Option> key as you press the space bar, then type the name. For additional tips on naming, pull down the Help menu and click on About Volumes.
Names can be changed any time a volume is active. See Renaming in Chapter 3 of your l'vlacintosh Manual.
Resizing
A volume can be as small as 100 kbytes or as large 16
megabytes. To find out how much space is available, pull down the Apple menu and click on About Volume Manager.
The default size, 800 kbytes, is more than adequate for your system volume and most volumes. A volume of
800 kybtes will accommodate two single-sided diskettes. Once the volume is added, the size cannot be
changed. If a volume proves to be too small, you can add a larger volume and delete the old one. For instructions. pull down the Help menu and click on About Volumes.
Volume l'vlanager
Adding Volume Explanation
Before you enter anything in the dialog box, click on
[image:46.618.59.536.38.764.2]Help in the dialog box and read Adding Volume Explanation.
Figure 5~S. Adding Volume Explanation
,. • rt.e fdlt "'1ftC 01\-':'" "l"fp
=
...
-
..
lidding a Uotume - EMpa.nation
lis. the '1Idd Uotum.- function to creete new (empty) uo'umel, to your specfflcatlon, on your
lIeuon, Mec Dlli". .
" uafld name Is I to 27 cnaracters. with no calons (:) InCluded.
RuaUd stze is gr •• ter than I aa ICbytes, end cont.in. onag the digUI 0 to 9.
II
If the name or size you enter does not meet the specifications sho\'VI1 in Figure 5-5, you 'tvill get an error message. Figure 5-6 will appear if you attempt to add a
volume larger than the largest free block of space .
Figw-e 5-6. Gather Free Space -Advice
,. • File Edit .Mac [)I~k'" Krlp
=
ft . . .
...
~ There Isn't enough free space in one
li.U p'ace to create II uo.ume of 2050 ICbytel. Run "Sather free Space" It you need II uolume of more than 2048
IJj-O-K ---.)
~ t(
II
Gathering free space is discussed later on in this
chapter.
When you are ready to en ter a new name and size I
click on OK in Adding Volume Explanation and return to
Add a Mac Disk Volume.
Entering Name and Size
Press the <Backspace> key to delete the default name. Enter a new name as instructed in your i'vlacintosh
manual.
To erase the default size, press the <Tab> key. Enter a new size with numerals only, no commas.
When you are ready to add theW vollune, click on OK. The volume statistics will appear in the volume directory.
The next step is to make the volume active so you can use it.
Volume Ivfanager
, Making Volumes Active
1b make a volume active, click once on the volume's status button and turn on ACTIVE. The volume icon will
appear on the desktop when you quit Volwne Manager. There is no fixed limit to the number of volumes you can activate at one time; however, you cannot activate a v.olume if it would leave too little memory for Volume Manager to operate. If there is insufficient memory, you
will be infonned when you attempt to activate the volume.
Some applications may not run if you activate too many volum.es. Others, like the Finder, may allow you to activate some but not all of the volumes. In any event, if you need more memory to activate volumes, you can obtain it by making volumes you are not currently using inactive.
Making'Volumes Inactive
To make a volume inactive. click once on the ACTIVE
button and change it to inactive. The voLume icon \lvUl be removed from the desktop when you quit VoLume
Manager.
You cannot make the system volume or the volume containing Volume Manager inactive.
Making Volumes Auto-Active
An active volume will become inactive when you start up again, unless the volmne has AUTO startup status. In that case, the volume becomes active automatically. Its icon appears on the desktop when you start up your system with your system diskette; you do not have to use Volwne Manager to activate it.
1b give a volume AUTO startup status, click once on
its startup status button and change. manual to AUTO. Auto/manual startup changes are 'not effective until you save them to your startup diskette. When you select Eject Internal Diskette, Open Another Application, or Quit from the File menu, you will be asked:
Save Auto/manual changes to diskette?
Click on Yes if you want to make the change; click on No if you change your mind.
You can request AUTO status for any number of volumes; however, the number that vvill actually become active when you start up will depend on the amount of memory available to activate the volumes. If there is insufficient nlenlory, you will be informed during startup.
Customing Diskettes
with Auto-Active
The auto-active feature can be used to customize
l\t1ac Disk System diskettes. For example, if you are in
charge of a shared Macintosh, you can configure a startup diskette for each user, making the user's System, application, and data volumes automatically active.
This technique not only saves time, it also offers a measure of data security. If the users' volumes are automatically active, you can eliminate Volume Manager fronl their startup diskettes and volumes. Users \vould then have no access to each other's volumes.
Volume Mane
Deleting Volumes
Deleting a volwne deallocates the space for it on the Mac Disk; in effect, it erases the volume from the space. Deleting does not compact or gather the deallocated space.
JR.RNlNG:
Deleting a volume destroys all documents on the volume.
You can delete up to 20 volumes at a time. If you try
to delete more, you will receive an error message. Before you delete a volume, remember to back up (copy) onto diskettes or onto another volume any documents you want to save.
When the backup is completed, delete the volumes as follows:
1. In the Davong Mac Disk window, check that every volume you vvant to delete is inactive. If you attempt to delete an active volume, you vvill get an error message.
..
2. Select the volumes to be deleted by clicking on the volume names. You can shift-click or drag the mouse
to select more than one volume.
3. Pull down the Mac Disk lnenu, select Delete Volume, and read the Delete Volume alert box.
Figure 5-7. Delete Volume Alert
r • FUe Edit Mac Dl~k'" Help
An you sur. you went to r,moue the
M.c Disk'" Uolume 'User #2"7
( OK
J (
Cllncel 14. Click on OK to delete the volume. The volume will
disappear from the directory. unless it has AUTO statvs .
A deleted volume with AUTO status vvill remain in the directory in dimmed type. On startup, the Finder \vill
look for the volume and then display a "volume not found" message. When the volun1c is no longer
auto-active, it is dropped from the volume directory.
Volume Ma
Gathering Free Space
Gathering free space is the process of moving
volumes closer together in order to consolidate free space between the volumes. There is no reason to gather free space unless you receive a Gather Free Space Advice
message.
Figures- 8. Gather Free Space Advice
,. • File Edit Mile: DI~4c'" "pip
WA.BNING:
f t j . . . . 'L
~ There isn't enaug" free space in one
l.i..!J
plac:a to create a ..,olume of 2050Kbytes. Run "Gather free Space" It you need a uo.ume of more thlln 20<48
,.I .... OK .... J~
If a power failure oCCW-S \'vhilc cl voLume is
being moved, the volume and all the data on
it will be lost. Be sure you back up all your
applications and documents on to diskettes
before you begin.
When you have backed up all your documents and applications, proceed as follows:
1. Insert your copy of the Mac Disk System Diskette
in the Macintosh disk drive.
z.
Open Volume Manager from the system diskette.3. Make every volume in the volume directory inactive. An error message will appear if any volume remains
active.
4. Pull down the Mac Disk menu, click on Gather Free Space, and read the alert message (Figure 5-9).
5. Click on OK to start the operation.
5-18
Figure 5-9. Gathering Free Space
5 rile Edit MISI: l/i~k Ih~l()
Gather free Spoce
Gothering free Spece Is 0 long operationl
Also, if there i$ 0 power failure. the entire contents o( the Mac Disk'" will be lost. MaKe sure you haue curren ( back:up a ( all dato on the Mac Disk'" before continuing.
OK ~ Concel l4elp I'
To abort the operation, pre~~ the <.: ~ >
<.>
keys simultaneously.
[image:53.613.65.527.61.762.2]Volume Mar
Note:
It may take a minute to actually stop the operation. This delay ensures that no data
is lost.
6. When a Free Space Collected dialog box appears, click on OK and return to the Davong Mac Disk window.
7. Select Add Volume from the Mac Disk menu and add your volume.
Opening File Windows
Each volume contains a file directory, which gives
information
on
the files in the volume. The directoryprovides information only; you cannot access your tiles from it.
To open the file directory wi n do,,,,, double-click on a volume name in the volume directory. Select only one volume; you cannot open more than one file directory window at a time.
.
Figure 5-10. File Directory
r • file EdU Mac DI~Ic'" HeCp
':'I':.t¥i~ (t!-:'!":. H1 10:"0 ~IO:: D.c1cf~
"'1021&4 08:07 lit ~ Ra. Finder
"'1021&4 08: 09 lit 17-408 mrs 1~lt.o
01128185 02:38 fin 291M ffI'I'\. Initialize 01_ eo..
0112818:5 02:40 fin 20002 ~ l_t.11 11.-1_ 0112'185 03:30 fin 13312 I'IPPl nee Disk Olevnestlc
041221&4 03:" ,." 2048 ZSVS lICIt . . . .., File
041201&4 10: '" fin 9312 ZSVS ScI pili I> File
0112118:5 04:30 "" 143013 zsys
s.,.t-01/28185 0:5:47 "" 43217 If'f'l.
Uo'_
"--Jw'The file directory window displays five columns of information about each file on the volume. Reading from right to left, the colwnns are:
•
File name (listed alphabetically!•
'TYPe of file (text, application, etc.)•
Size in kbytes•
Date and time last modified•
Date and time of creationFolders are not listed, only individual files. Listings in dimmed type are invisible files that your applications use to perform certain functions. The Desktop file on your system volume, for example, keeps track of icons, folders, and documents for the Finder. You have no access to invisible files.
Appendix
A
Voltage
Settings and
Fuse Changes
You may need to change the voltage setting and fuse on your Mac Disk if your power requirements are not standard. Both of these tasks are quick and easy to accomplish.
Davong shipped your Mac Disk with the 115 VAC setting, for the standard United States outlet voltage. If your voltage is 115 VAe, you may discard the additional 1.5
Amp fuse shipped with your Mac Disk and begin setting up your hardware as instructed in Chapter 2.
Installations outside of the United States sometimes require the 230 VAC setting. If your voltage is 230 VAC, you must change the voltage switch setting and the fuse. Discard the fuse shipped in your Nlac Disk, and remove
the 115 VAC sticker from the back of your Mac Disk Wlit.
Do not use the power cord shipped with your Mac Disk. Use a power cord that meets your electrical codes.
Contact your Davong dealer if you have any
questions about the COITect setting in your area.
Changing
the Voltage
Setting
Table A-l shows the settings you should use for the voltage ranges given.
Table A-I. Voltage Settings
8etdDg Voltage BaDge
115 90-132 VA[;
230 198-264 VAC
1b change the voltage setting:
1. 'fum off your Mac Disk and remove all cords from it. 2. Slide the voltage switch, on the right side of the back
panel, to the 230 VAC setting (see Figure A-l).
Figure
A-I. Setting the Switch·
... .
~<?:::::::::::~· ... .
· ... .
· ... .
• ®
~n ~~~~~~~~~~~~~
. ~ \"'J :::::::::: : : :
I
I !I
ly==ill ( : : : : : : : : : : : : : L-J <t) ••••••••••• 0 --.-.... . ... _. __ . - . I
'1>Igc:l
jj,
',"-,-'.
II
0
I
~
I
orI
~
I
0
I
I
Voltage ~election switch
[image:57.618.63.533.66.764.2]\/(Jil •• ~. . ..
Changing the ·Fuse for 230 VAC
. 1. Turn off Mac Disk. Disconnect all cords and cables from the back panel of Mac Disk and from the wall
outlet.
2. Locate the fuse holder on the back of the Mac Disk unit. Use a screwdriver to turn the holder
[image:58.612.49.539.63.779.2]counterclockwise and remove it from the back of the unit. Refer to Figure' A-2'.
Figure A·2. Changing the Fuse
-CD
.'=:::.::::::='
..•.•••....•.
...
...•.•...
...
....••...•...
L ___
! , ______11.-1 _ _ _ --'
,,(QJ<J
3. Remove the existing fuse and discard it.
4. Place the 1.5 Amp fuse in the holder. It does not matter which end goes first.
5. Reinsert the fuse holder into the unit and turn it clockwise.
B
Trouble?
If you have trouble with your Macintosh or Mac Disk, the infonnation in this appendix should help you identify your problem and may show you how to fix it. If you cannot
find a solution, call your. Davong dealer for assistance. 1roubleshooting suggestions are included in these four major sections:
• SYmptoms and Possible Solutions
• Error Messages
• Mac Disk Indicator Lights
• Mac Disk Diagnostic
The error messages and the ivlae Disk Diagnostic application are your primary troubleshooting tools. The diagnostic allows you to test Nfac Disk operations \vithout destroying the volunles and files on your ;'vIae Disk.
1
Symptoms
and Possible
Solutions
If something goes wrong, the first thing you should do is
check theo
, following list of symptoms. These explanations
suggest possible solutions or direct you to further information in this appendix.
Hardware Symptoms
Nothing works.
Check that the interface cable is securely connected to the Macintosh and Mac Disk. Start up again.
The Mac Disk PWR light is Dot aD.
Check the following and remedy if necessary:
1. Mac Disk power switch is in the on position.
2. Voltage selection is correct for your \oval! outlet.
3. Power cord is securely connected.
4. Power is supplied to the wall outlet. Test the outlet
using another p.lectricaJ appliance.
5. Fuse is good.
Perform the following checks:
1. 'fum the Macintosh off, then turn the Mac Disk off and on again.
2. Watch the indicator lights during powerup and check that they light up in the correct sequence. See
Indicator Lights During. Powerup in this appendix.
If a powerup error occurs, take the Mac Disk to your dealer.
3. If the lights indicate that the disk has not been initialized, run the Initialize Disk Contents
application. If the problem recurs, take the Mac Disk to your dealer.
Software Symptoms
Error me88age appears during Mac Disk installation or when rllDning Volume Manager.
Note the code number of the message I the application you are using, and the operation in progress when the
message appeared. 'furn to Error A1.essages in this appendix and find the error message in the appropriate table. If the tables do not help, try the Advanced
Communications Checks in this appendix or contact your Davong dealer for assistance.
BlTor occurs when running an application.
The problem may be due to the application, not the Mac Disk. 'Try using a different application to do a similar task. If the error repeats, restart and run the application again to nlie out transient error. If the eITor recurs, replace the original application from its backup and retest. If the problem persists, try the Advanced Communications Checks in this appendix or contact your Davong dealer for assistance.
[image:61.615.96.549.81.776.2]Trouble
Error occurs when running various applicaiioD8. The Mac Disk system file you are using is corrupted. Replace it. If the bad file is on a Mac Disk volume, UB~ your copy of the Mac Disk System Diskette or alternate system diskette to replace it. If the file is on a copy of the Mac Di8k System Diskette, use your original Mac Disk System DiakeUe to replace it. Replace the system file as follows:
1. Start up with your good Mac Disk System Diskette
(copy or original).
2. Open the icon for the volwne or diskette with the corrupted system file. Open the System Folder, drag
System to the trash, and empty the trash. 3. Replace System from the System Folder on the
diskette you used in step 1.
If the problem persists, try the ,-i.dvanced
Communications' Checks or can tact your Davong dealer for assistance.
Application will not MID irom the Mac Disk.
Refer to the manual for the application for the
requirements to make the application run from a hard disk. Or ask your dealer. If the application is supposed to run from a hard disk but you are unable to run it from Mac Disk, try recopying the application from the original diskette. If the problem persists, try the Advanced
Communications Checks in this appendix or contact your Davong dealer for assistance.
Fatal system elTOr ("bomb") me8sage is displayed
while rlJDging system software.
Record the eITOr ID code, your applicatibn, and the operation in progress when the error occurred. Isolate the eITOr as '.follows:
1. Restart the system and try the operation again, using the sa:me diskette, to rule out a transient error.
2. Restart the system and try a similar operation using another application. If the error does not occur, then your first application diskette has become corrupted. Replace it from a backup copy and try the operation
again. If it still does not work, check \l\lith the application dealer.
3. Restart the system and repeat the original operation \l\lithout Using the Mac Disk. If this works, then your Mac Disk system file may be corrupted. Throw the old system file in the trash and replace it with the
System file from the System Folder on your original
Mac Disk System Diskette (see Error occurs when
running various applications above). It may be a good
idea to replace the applications from backup too.
4. If none of the above remedies work I check the error
codes listed in Table B-3. If this does not help, try the
Advanced Communication Checks in this appendix or
contact your Davong dealer for assistance.
Trouble
Advanced Communication Checks
One or more of these guidelines may isolate
communications reliabili~problems. You need additional equipment to run these tests. If you do not have it,
contact your dealer. .
• Run the Mac Disk Diagnostic application. See Mac
Disk Diagnostic in this appendix.
• 1ry a different Macintosh with your Mac Disk. • 'Iry a different Mac Disk with your Macintosh.
• 'try a different interface cable between your Macintosh and your Mac Disk.
• Reinstall your Mac Disk Install Drivers application on your copy of your Mac Disk System Disk~tte,
using the instructions in Chapter 4.
2
Error Messages
When you receive an error message, write down the code number, your current application, and the operation in
progress when the message appeared. Use the following tables to explain the error. Steps to isolate and remedy problems are included in the tables where applicable.
Conununication messages (Table B-1) are ideritified by a COM number. They appear when Macintosh and Mac Disk are not communicating properly. Mac Disk error messages (Table B-2) are identified by a MAC code and appear when the lViac Disk cannot carry out a Macintosh instruction. Fatal system error messages (Table B-3) are identified by a bomb and an ID code.