585-300-507
Comcode 108356114
Issue 7
Notice
Every effort was made to ensure that the information in this book was complete and accurate at the time of printing. However, information is subject to change.
Your Responsibility for Your System’s Security
Toll fraud is the unauthorized use of your telecommunications system by an unauthorized party, for example, persons other than your com-pany’s employees, agents, subcontractors, or persons working on your company’s behalf. Note that there may be a risk of toll fraud associated with your telecommunications system and, if toll fraud occurs, it can result in substantial additional charges for your telecommunications services.
You and your system manager are responsible for the security of your system, such as programming and configuring your equipment to pre-vent unauthorized use. The system manager is also responsible for reading all installation, instruction, and system administration docu-ments provided with this product in order to fully understand the fea-tures that can introduce risk of toll fraud and the steps that can be taken to reduce that risk. Lucent Technologies does not warrant that this product is immune from or will prevent unauthorized use of com-mon-carrier telecommunication services or facilities accessed through or connected to it. Lucent Technologies will not be responsible for any charges that result from such unauthorized use.
Lucent Technologies Fraud Intervention
If you suspect you are being victimized by toll fraud and you need technical support or assistance, call the appropriate BCS National Cus-tomer Care Center telephone number. Users of the MERLIN®, PART-NER®, and System 25 products should call 1 800 628 2888. Users of the System 75, System 85, DEFINITY® Generic 1, 2 and 3, and DEFINITY® ECS products should call 1 800 643 2353. Customers outside the continental United States should contact their local Lucent representative, or call one of the above numbers in the following man-ner:
• Dial the International Access Code; for example, 011. • Dial the country code for the U.S., that is, 01.
• Lastly, dial either of the telephone numbers provided above.
Lucent Technologies Web Page
The world wide web home page for Lucent Technologies is: http://www.lucent.com
Federal Communications Commission Statement
Part 15: Class A Statement. This equipment has been tested and
found to comply with the limits for a Class A digital device, pursuant to Part 15 of the FCC Rules. These limits are designed to provide rea-sonable protection against harmful interference when the equipment is operated in a commercial environment. This equipment generates, uses, and can radiate radio-frequency energy and, if not installed and used in accordance with the instructions, may cause harmful interfer-ence to radio communications. Operation of this equipment in a resi-dential area is likely to cause harmful interference, in which case the user will be required to correct the interference at his own expense.
noise emissions set out in the radio interference regulations of Industry Canada.
Le Présent Appareil Nomérique n’émet pas de bruits radioélectriques dépassant les limites applicables aux appareils numériques de la class A préscrites dans le reglement sur le brouillage radioélectrique édicté par le Industrie Canada.
Trademarks
See the preface of this document.
Ordering Information
Call: Lucent Technologies BCS Publications Center
Voice 1 800 457-1235 International Voice 317 322-6791 Fax 1 800 457-1764 International Fax 317 322-6699
Write: Lucent Technologies BCS Publications Center 2855 N. Franklin Road
Indianapolis, IN 46219
Order: Document No. 585-300-507 Comcode 108356114 Issue 7, May 1999
For additional documents, refer to the section in “About This Docu-ment” entitled “Related Resources.”
You can be placed on a standing order list for this and other documents you may need. For more information on standing orders, or to be put on a list to receive future issues of this document, contact the Lucent Tech-nologies Publications Center.
Obtaining Products
To learn more about Lucent Technologies products and to order prod-ucts, contact Lucent Direct, the direct-market organization of Lucent Technologies Business Communications Systems. Access their web site at www.lucentdirect.com. Or call the following numbers: custom-ers 1 800 451 2100, account executives 1 888 778 1880 (voice) or 1 888 778 1881 (fax).
Warranty
Lucent Technologies provides a limited warranty on this product. Refer to the “Limited Use Software License Agreement” card provided with your package.
European Union Declaration of Conformity
The “CE” mark affixed to the equipment means that it conforms to the following directives. Lucent Technologies Business Communications Systems declares that DEFINITY AUDIX System equipment specified in this document conforms to the referenced European Union (EU) Directives and Harmonized Standards listed below:
EMC Directive 89/336/EEC Low-Voltage Directive73/23/EEC
Acknowledgment
Contents
iii
Contents
Contents iii
About This Document xi
■ Intended Audiences xi
■ Prerequisite Skills or Knowledge xi ■ How This Document Is Organized xii ■ How to Use This Document xiii ■ Conventions Used in This Document xiii
■ Related Resources xiv
■ Customer Care Center Information xv Who Should Call the Customer Care Center xv
What to Do Before You Call xv
What Does the Center Cost xvi
■ How to Make Comments About This Document xvi
1
Introduction 1-1■ Overview 1-1
■ Administrative Interface 1-2
■ Types of Administration 1-3
■ Administrative Phases 1-4
■ System Management Tools 1-5
■ DEFINITY AUDIX Administrator Responsibilities 1-6
2
Preparing for DEFINITY AUDIXSystem Operation 2-1
■ Overview 2-1
■ Initial Administration Prerequisites 2-2
Switch Administration 2-2
Using the Administration Terminal
and Administrative Forms 2-3
Contents
iv
■ Customer Initial Administration Tasks 2-4 Task 1: Logging into the DEFINITY AUDIX System 2-4
Task 2: Changing Your Passwords 2-5
Task 3: Customizing System Announcements 2-6
Task 4: Customizing Automated Attendants 2-6
Task 5: Distributing Documentation to Subscribers 2-7
■ What to Do After Initial Administration 2-8
3
Feature Administration 3-1■ Overview 3-1
■ AMIS Analog Networking 3-2
■ Alarm Origination 3-3
■ Announcements and Announcement Sets 3-3
■ ADAP 3-3
■ Automated Attendant 3-4
■ Broadcast Messages 3-5
Setting Up the Broadcast Mailbox 3-6
Login ID and Password 3-6
Message Storage and Deletion 3-6
Administration 3-7
■ Bulletin Board 3-9
■ Call Answer 3-9
■ Call Screening 3-10
■ Changing the DEFINITY AUDIX Extension Length 3-11
■ Class of Service 3-13
■ Digital Networking 3-14
■ End of Message Warning 3-14
■ Enhanced Disconnect Detection 3-15
■ Escape to Attendant 3-16
■ Exit AUDIX 3-16
■ Guest Password 3-16
■ Lucent INTUITY Message Manager 3-17 ■ Leave Word Calling (LWC) 3-17
■ Login Announcement 3-17
■ Mailing List 3-20
Contents
v
■ Message Sending Restrictions 3-21
■ Multilingual 3-21
■ Multiple Personal Greetings 3-23 ■ Name Record by Subscriber 3-25
■ Online Help 3-25
■ Outcalling 3-26
■ Priority Messages 3-27
■ Priority Outcalling 3-27
■ Security Password 3-28
■ System Clock 3-28
■ TDD 3-28
■ TTY Automated Attendant 3-30
■ Traffic Reports 3-32
■ Transfer into AUDIX 3-32
■ Transfer Out of AUDIX 3-32
Call Transfer Dialplan 3-33
Basic Call Transfer 3-34
Enhanced Call Transfer 3-34
■ Voice Mail 3-35
■ Voice Mailbox 3-36
4
Ongoing Preventive Maintenance 4-1■ Overview 4-1
■ Your Responsibility as an Administrator 4-2 ■ Daily Preventive Maintenance Tasks 4-2 ■ Weekly Preventive Maintenance Tasks 4-3 ■ Monthly Preventive Maintenance Tasks 4-4
5
Ongoing Subscriber Administration 5-1■ Overview 5-1
■ Adding New Subscribers 5-2
■ Creating and Changing Subscriber Name Recordings 5-4
■ Removing Subscribers 5-5
Contents
vi
■ Evaluating Subscriber Classes of Service 5-8 ■ Changing the DEFINITY AUDIX Extension Length 5-10
■ Subscriber Features 5-11
Automatic Message Scan 5-11
Delivery Scheduling 5-11
Dial-By-Name 5-11
Directory 5-11
Full Mailbox Answer Mode 5-12
Personal Directory 5-12
Playback and Recording Control 5-12
Private Messages 5-12
Security Password 5-13
Untouched Message 5-13
■ Responding to Subscriber Issues 5-13 ■ Remote Subscriber Administration 5-14
6
Ongoing Data Administration 6-1■ Overview 6-1
■ How DEFINITY AUDIX Data Are Organized 6-1
Volumes 6-2
Filesystems 6-3
Filesystem Interactions 6-4
■ Maintaining Filesystem Sizes 6-4 Checking for Threshold Exceptions 6-5
■ Backing Up Filesystems and Subdirectories 6-6 ■ Adding an Additional
Announcement Set 6-8
■ Replacing an MO disk 6-8
■ Replacing a Removable Tape 6-8
■ Cleaning a Tape 6-8
■ Recovering Backed-up
Contents
vii
■ Customizing Announcements 6-9 What Are Fragments and Announcements 6-9
System and Administrative Announcement Sets 6-12
DEFINITY AUDIX Announcement Sets 6-12
Custom Announcement Sets 6-12
Creating a New Announcement Set 6-13
Variables in Announcements 6-18
Changing the Default Call Answer Greeting 6-20
Changing the Default Voice Mail Greeting 6-21
7
Alarms, Logs, and Audits 7-1■ Overview 7-1
■ Error and Alarm Handling 7-1
■ Error and Alarm Logs 7-2
■ Administration Log 7-3
■ Activity Log 7-3
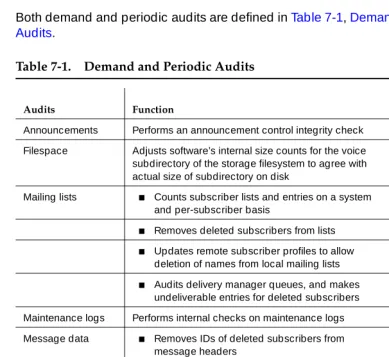
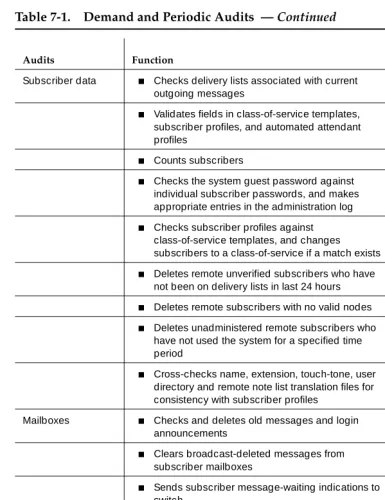
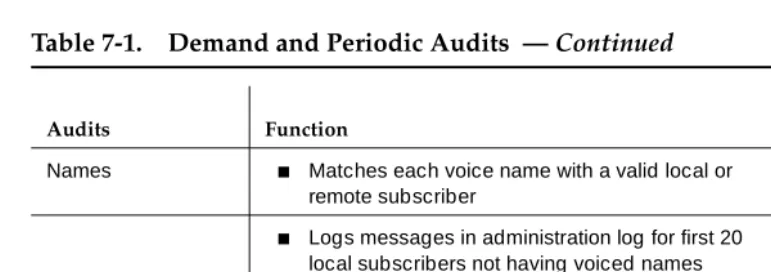
■ Demand and Periodic Audits 7-6
8
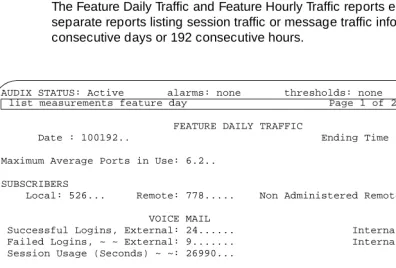
Traffic Reports 8-1■ Overview 8-1
■ Traffic Report Summary 8-2
■ AUDIX Administration and Data Acquisition Package 8-5 ■ Activating Traffic Collection 8-5 ■ Data Retention Requirements 8-6 ■ Using DEFINITY AUDIX Traffic Reports 8-7 ■ Interpreting the Community Reports 8-7 ■ Interpreting the Feature Reports 8-8 ■ Interpreting the Load Reports 8-12 ■ Interpreting the Special Features Reports 8-14 ■ Interpreting the Subscriber Reports 8-15
9
Automated Attendant 9-1■ Overview 9-1
■ Multilingual Automated Attendants 9-3 ■ How Automated Attendants Work 9-5
■ Prerequisite Conditions 9-6
Contents
viii
■ Setting Up an Automated Attendant 9-7 Step 1: Defining the Attendant 9-7
Step 2: Administering the Attendant Menu 9-8
Step 3: Recording the Attendant Menu 9-10
Step 4: Listing Automated Attendants 9-11
■ Setting Up a Call Routing Table 9-12
Overview 9-12
Setting up a Business Schedule 9-12
Setting up a Holiday Schedule 9-14
Filling in the Routing Table 9-15
■ Testing Your Menu Tree 9-16
■ Automated Attendant Examples 9-17 Setting Up a Main Attendant 9-17
Setting Up Nested Attendants 9-19
Setting Up Shared Extensions 9-20
Setting Up Non-Resident Subscriber Extensions 9-21
Setting Up Bulletin Board Directories 9-23
Using Multiple Greetings for Automated
Attendants 9-24
10
Ongoing System Security 10-1■ Minimizing Toll Fraud 10-4
11
Lucent INTUITY Message Manager and LANConsiderations 11-1
■ Lucent INTUITY Message Manager Client Software 11-2
■ Number of Subscribers and IMM Sessions 11-2 ■ Administering the DEFINITY AUDIX
System as a LAN Server 11-3
Activating the IMM Feature 11-3
Completing the System-Parameters
IMAPI-Options Screen 11-3
Enabling Subscribers to Use IMM 11-6
Contents
ix
■ Handling Problems with Service 11-8 Verifying the Server Communicates with the LAN 11-9
Verifying IMM Client Administration 11-9
Testing the LAN Connection 11-9
Resetting the DEFINITY AUDIX Server 11-9
■ Rebooting the Client PC 11-10 ■ Rebooting the DEFINITY AUDIX Server 11-10 ■ Verifying Server Communications
with Another LAN Address 11-10
■ Handling LAN Problems 11-11
■ Handling Problems with the IMM Client 11-11 ■ Monitoring Traffic and Regulating Performance 11-11 Balancing Server Login Sessions with Voice Ports 11-11
Employing Other Performance Controls 11-12
A
Communicating with Subscribers A-1■ Subscriber Change-Request Form A-1
■ Subscriber Survey A-3
■ Welcome to the DEFINITY AUDIX System A-7 ■ Template Letter for the Multilingual Feature A-10 ■ Template Letter for AMIS Analog Networking A-11
ABB Abbreviations
ABB-1GL
Glossary GL-1Contents
About This Document
xi Intended Audiences
About This Document
This document describes how to administer the Lucent DEFINITY® AUDIX® System. Since the DEFINITY AUDIX System provides one of two types of switch integration methods — either the display set (DS) type or the control link (CL) type — this document also discusses the differences in the features between the two modes as well as the differences in administration procedures. It covers ongoing administration strategies considering both DS and CL integration and also provides background and conceptual information, special considerations, and ramifications of administrative functions for each integration type.
This document is designed to allow the DEFINITY AUDIX system administrator to quickly find information about performing specific administrative tasks. Its focus is on how, when, and why to perform these tasks. Use this document with its companion reference, DEFINITY AUDIX System R3.2 — Screens Reference,
585-300-211 or DEFINITY AUDIX System Release 4.0 Screens Reference,
585-300-213, which contains detailed information about each administration screen that is used to perform DEFINITY AUDIX system administration.
Intended Audiences
This document is intended for the person(s) who administers the DEFINITY AUDIX system.
Prerequisite Skills or Knowledge
About This Document
xii How This Document Is Organized
How This Document Is Organized
■ Chapter 1, ‘‘Introduction’’, provides an overview of the DEFINITY AUDIX system administration process and outlines the responsibilities of the DEFINITY AUDIX system administrator.
■ Chapter 2, ‘‘Preparing for DEFINITY AUDIX System Operation’’, describes initial administration prerequisites and your initial administration tasks. Special considerations for DS and CL integration are addressed.
■ Chapter 3, ‘‘Feature Administration’’, describes procedures for activating and using DEFINITY AUDIX features, including outcalling, bulletin board, broadcast messages, sending restrictions, and priority messaging. It also describes which features are available for each type of switch integration. ■ Chapter 4, ‘‘Ongoing Preventive Maintenance’’, describes the
responsibilities of the DEFINITY AUDIX system administrator and lists preventive maintenance procedures that should be performed on a daily, weekly, or monthly basis.
■ Chapter 5, ‘‘Ongoing Subscriber Administration’’, describes how to add, change, and remove subscribers.
■ Chapter 6, ‘‘Ongoing Data Administration’’, describes how DEFINITY AUDIX data are organized, how to backup filesystems, and how to customize the default call answer and voice mail greetings.
■ Chapter 7, ‘‘Alarms, Logs, and Audits’’, describes how alarm and error logs are generated by DEFINITY AUDIX background tests and also describes the various audits that are performed automatically or manually to update filesystems and correct problems in the system.
■ Chapter 8, ‘‘Traffic Reports’’, describes DEFINITY AUDIX traffic reports, how to interpret them, and how to make appropriate corrections. It also compares traffic and performance (per port) for DS and CL integration. ■ Chapter 9, ‘‘Automated Attendant’’, describes how to set up and maintain
DEFINITY AUDIX automated attendants.
■ Chapter 10, ‘‘Ongoing System Security’’, provides suggestions for both modes of switch integration about making your DEFINITY AUDIX system secure and minimizing toll fraud.
■ Chapter 11, ‘‘Lucent Intuity Message Manager and LAN Considerations’’, provides information for handling DEFINITY AUDIX system administration and other issues associated with the Lucent INTUITY Message Manager. ■ Appendix A, ‘‘Communicating with Subscribers’’, contains sample
change-request, user information, and user feedback survey forms to customize and distribute to subscribers.
About This Document
xiii How to Use This Document
How to Use This Document
This document describes administrative strategies and procedures for the DEFINITY AUDIX System. Use this document in conjunction with DEFINITY AUDIX System R3.2 — Screens Reference, 585-300-211 or DEFINITY AUDIX System Release 4.0 Screens Reference, 585-300-213. The screens reference documents contain specific instructions for using each screen.
Conventions Used in This Document
The following typographic conventions are used in this document:
■ Information that appears on your terminal screen — including displays, field names, prompts, and error messages — is shown in constant-width type. Information that you are to type just as it appears in the document is shown in constant-width bold type. Here is an example:
At the when? prompt, type no
If the system is not yet ready to receive your input, you receive the following error message:
#1: System is not ready; try again in five minutes. ■ Terminal keys that you are to press are shown in boxes. For example, an
instruction to press the return, carriage return, or equivalent key might appear in this document as:
Press .
■ Two or three keys that you are to press at the same time (that is, you are to hold down the first key while pressing the second key and, if appropriate, the third key as well) are enclosed together, separated by hyphens, in a curved-edge box. For example, an instruction to press and hold while typing the letter “d” appears in this document as:
Press .
■ Variables for which you or the system substitute a word specific to your own application are shown in italic type. For example, an error message that appears on the screen with the name of your own specific filename might appear generically in this document as:
Your filefilenameis formatted incorrectly. RETURN
ALT
About This Document
xiv Related Resources
Related Resources
The DEFINITY AUDIX System Screens Reference is the companion document for this book. It contains a description of all DEFINITY AUDIX screens and an explanation of each field on each screen. Refer to the DEFINITY AUDIX System Screens Reference that is appropriate for your version of the DEFINITY AUDIX system:
■ DEFINITY AUDIX System Release 3.2 Screens Reference, 585-300-211 ■ DEFINITY AUDIX System Release 4.0 Screens Reference, 585-300-213 For a list of all documents related to the DEFINITY AUDIX System see the Lucent Technologies Product Publications Catalog website at
About This Document
xv Customer Care Center Information
Customer Care Center Information
The Lucent National Customer Care Center is a centralized telephone information service that provides a fast and convenient way for DEFINITY AUDIX
administrators and technicians to report problems and get information about DEFINITY AUDIX capabilities and administration procedures.
Calls to the customer care center are handled by Lucent personnel using an automated tracking system. You only need to identify yourself, the name of your company, and the IL or main listed number of your DEFINITY AUDIX system to the support representative who answers your call. (Of course, if your company has multiple locations of DEFINITY AUDIX systems, you may need to provide more identifying details to the support representative, such as your location or the name of your system.)
Once you have established your identity, your pertinent information (name, location, configuration, maintenance contract information, recent system trouble history) is displayed on the support representative’s screen. The support representative can then answer your questions or help you isolate and solve your problem either by talking you through a particular troubleshooting procedure or by remotely accessing your system and performing the troubleshooting
procedure.
Non-U.S. customers contact your Remote Service Center or Center of Excellence for assistance.
Who Should Call the Customer Care Center
The customer care center is intended to provide support for DEFINITY AUDIX administrators and technicians. DEFINITY AUDIX subscribers should not call the center directly. Instead, subscribers should direct their questions or problems to their DEFINITY AUDIX administrator, who can solve most routine subscriber issues or call the center for assistance.
What to Do Before You Call
Gather all relevant facts prior to calling the customer care center. Alarm reporting should include the resource type, location, and fault code found on the Display Alarms screen. You should also display the Activity Log when reporting a subscriber’s problem with his/her mailbox.
National Customer Care Center
1-800-242-2121
About This Document
xvi How to Make Comments About This Document
What Does the Center Cost
Basic service is provided at no extra cost to customers who have warranty or maintenance contracts. The customer care center is available to other DEFINITY AUDIX users on a fee-per-call basis.
How to Make Comments About This
Document
We are interested in your suggestions for improving this document. Please send your comments and suggestions to:
Lucent Technologies OMD Technical Publications Room 22-2X57
11900 North Pecos Street Denver, Colorado 80234
Send email comments to:
Introduction
1-1 Overview
1
1
Introduction
This chapter provides an overview of the DEFINITY AUDIX system administration process and outlines the responsibilities of the DEFINITY AUDIX system
administrator.
Overview
The DEFINITY AUDIX system is a voice mail system — a computerized method of using a touch-tone telephone to send and receive verbal messages (voice mail). The DEFINITY AUDIX system allows subscribers (individuals who have DEFINITY AUDIX service) to use keypad commands on a touch-tone telephone to create, edit, send, receive, save, and delete voice mail messages. The DEFINITY AUDIX system also can answer calls for subscribers and record verbal messages from callers. Lucent INTUITY Message Manager (IMM) offers a visual interface for the DEFINITY AUDIX system at a personal computer that has IMM client software and local area network access to the DEFINITY AUDIX server.
DEFINITY AUDIX system administration is the ongoing process of making the DEFINITY AUDIX system work to the satisfaction of each subscriber. The administrator is responsible for making the system work efficiently from both the system side and the user side. This requires both technical and interpersonal skills and is an ongoing responsibility that can take many forms, including the following:
■ Setting up subscribers and customizing their service options
■ Recording voice fragments, including subscriber names and customized system announcements
Introduction
1-2 Administrative Interface
1
■ Analyzing audits and traffic reports and taking corrective action when appropriate
■ Establishing and maintaining communication with the subscriber community, responding to problems, and correcting misconceptions ■ Troubleshooting and correcting problems as they occur
As the administrator, you must also be acquainted with the two possible types of switch integration used by your DEFINITY AUDIX System.
Display Set (DS) integration provides voice mail integration with the switch through use of display and other messages sent from the switch to the port board.
The control link (CL) mode connects to the switch using the BX.25 control link.
Some of the features and capabilities available to you will vary slightly depending on which mode of integration is used by your company. Differences between the two modes will be discussed as relevant throughout this document.
Administrative Interface
The DEFINITY AUDIX system administrative interface is made up of a series of interactive screens you display on your system administration terminal. Each screen consists of fields that display information or require information to be entered.
Introduction
1-3 Types of Administration
1
Types of Administration
The DEFINITY AUDIX system administration process includes four distinct types of administration:
■ Switch administration — Establishes communications between the DEFINITY AUDIX system and the switch and specifies Call Answer (CA) coverage paths and Leave Word Calling (LWC) translations for individual subscribers. As the DEFINITY AUDIX system administrator, it is your responsibility to ensure that all required switch administration is completed at the appropriate time before DEFINITY AUDIX initial
administration and on an ongoing basis as new subscribers are added to your DEFINITY AUDIX system. Switch administration requirements and ramifications are described in Chapter 2, ‘‘Preparing for DEFINITY AUDIX System Operation’’.
■ System administration — Includes tasks you perform to establish system parameters and activate or deactivate DEFINITY AUDIX features. Some tasks are performed during initial administration by Lucent technical personnel, and some are performed by you as required as part of your DEFINITY AUDIX system administration. DEFINITY AUDIX system
administration requirements and ramifications are described in Chapter 2, ‘‘Preparing for DEFINITY AUDIX System Operation’’, and Chapter 3, ‘‘Feature Administration’’.
■ Subscriber administration — Includes tasks you perform to add new subscribers to your DEFINITY AUDIX system and to change or remove existing subscribers as their DEFINITY AUDIX system requirements change. These tasks are performed during initial administration by Lucent technical personnel and later by you as required as part of your DEFINITY AUDIX system administration. Subscriber administration requirements and ramifications are described in Chapter 3, ‘‘Feature Administration’’, and
Chapter 5, ‘‘Ongoing Subscriber Administration’’.
■ Data administration — Includes monitoring filesystem space, backing up data, recovering backed-up data, and creating customized system voice announcements. These tasks are performed as required as part of your DEFINITY AUDIX system administration. Data administration and
ramifications are described in Chapter 6, ‘‘Ongoing Data Administration’’.
Introduction
1-4 Administrative Phases
1
Administrative Phases
DEFINITY AUDIX system administration occurs in three sequential phases that are addressed in this document:
■ Planning administration — Includes checking prerequisite switch administration and organizing information for input during initial administration. It is important for you to be involved in the system
configuration process to learn as much as possible about system features and equipment and about how the DEFINITY AUDIX system interconnects with the switch. Refer to Planning for the DEFINITY AUDIX System,
585-300-904, or Planning for the DEFINITY AUDIX System Release 4.0, 585-300-602 for a description of this phase of DEFINITY AUDIX
administration.
■ Initial administration — Includes initial system, data, and subscriber administration that must be completed before the DEFINITY AUDIX system can be used by the general user population. Much of this phase is described in DEFINITY AUDIX System — Installation and Upgrade,
585-300-111, or Installation and Switch Administration for the DEFINITY AUDIX System Release 4.0, 585-300-122. It is generally performed by Lucent technical personnel. It is during this phase that Lucent sets up the switch integration method selected by your company.
■ Ongoing administration — Includes all administrative activities that are performed during normal DEFINITY AUDIX system operation after initial administration, including:
— Subscriber administration — Feature administration — Preventive maintenance — Data administration
— Monitoring alarms, logs, and audits — Traffic reports
— Setting up automated attendants — System security
This ongoing phase of DEFINITY AUDIX system administration is described in this document.
Each phase in the administration process may include one or more of the administration types (switch, system, subscriber, data) that were
Introduction
1-5 System Management Tools
1
System Management Tools
DEFINITY AUDIX system management involves evaluating information about your system’s performance and taking appropriate actions. This task is part of your ongoing administrative responsibilities. System management information is generated from the following sources:
■ Alarms, logs, and audits — DEFINITY AUDIX system diagnostic programs recognize and/or resolve problems that may occur within system files. The Activity Log is a unique type of log that does not generate error or alarm notifications but tracks and displays a history of activities involving subscriber mailboxes. Other diagnostic programs that monitor the system while running in the background find errors as they occur and run internal tests or audits that attempt to correct problems. If problems cannot be corrected internally, they are logged as faults that generate alarms. System audits run automatically each night or as administered using the DEFINITY AUDIX system administration screens. Audits also are run automatically when faults are logged by software during normal DEFINITY AUDIX system operation. These processes are described in Chapter 7, ‘‘Alarms, Logs, and Audits’’.
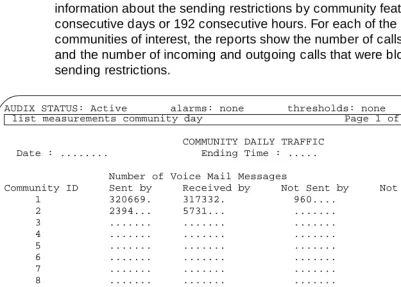
■ Traffic reports — DEFINITY AUDIX report-generating programs collect data about your system’s activities during specified hours, days, or months. These reports are used to evaluate actual system use compared to projected use and are helpful in predicting your future equipment requirements. Traffic reports are described in Chapter 8, ‘‘Traffic Reports’’. ■ AUDIX Administration and Data Acquisition Package (ADAP) — Collects
and transfers DEFINITY AUDIX screens data (such as subscriber, traffic, and billing information) to a PC from the DEFINITY AUDIX system
administration terminal port. The data is transferred to a PC database and stored in a format compatible with dBASE III PLUS™. Once this data is collected and downloaded to a PC, it can be presented in standard reports generated by ADAP, or programs can be written to present this data in formats that fit your specific needs. This software package is described in AUDIX Administration and Data Acquisition Package,
Introduction
1-6 DEFINITY AUDIX Administrator Responsibilities
1
DEFINITY AUDIX Administrator
Responsibilities
Your responsibilities as a DEFINITY AUDIX system administrator include the following tasks:
■ Performing the initial system administration tasks such as changing the system password, customizing system announcements
(optional), setting up the automated attendants, and distributing documentation to subscribers. This administration is described in
Chapter 2, ‘‘Preparing for DEFINITY AUDIX System Operation’’. ■ Determining which DEFINITY AUDIX features to make available to
subscribers and performing system and subscriber administration that activates, deactivates, modifies, or monitors these features. This administration is described in Chapter 3, ‘‘Feature
Administration’’.
■ Performing ongoing daily, weekly, and monthly preventive maintenance tasks to monitor system performance. This administration is described in Chapter 4, ‘‘Ongoing Preventive Maintenance’’.
■ Performing ongoing subscriber administration to add, change, and remove subscribers as new employees are added to the DEFINITY AUDIX system, as new features are made available, and as subscribers change locations or leave your company. This administration is described in Chapter 5, ‘‘Ongoing Subscriber Administration’’.
■ Performing ongoing data administration including backing up filesystems, customizing system greetings, and changing announcement versions. This administration is described in
Chapter 6, ‘‘Ongoing Data Administration’’.
■ Monitoring system alarms, the administration log, and system audits to ensure that your system is performing properly and to correct administrative errors that may occur. This administration is described in Chapter 7, ‘‘Alarms, Logs, and Audits’’.
■ Monitoring traffic reports that provide detailed information about the DEFINITY AUDIX system and subscribers to ensure that your system is performing properly and to spot potential problems and trends that may require intervention on your part. This
administration is described in Chapter 8, ‘‘Traffic Reports’’. ■ If you use AUDIX ADAP collection features, you also may be
responsible for setting up these features, collecting raw data from the DEFINITY AUDIX system on a PC, and producing additional traffic and financial management reports. AUDIX ADAP is
described in AUDIX Administration and Data Acquisition Package,
Introduction
1-7 DEFINITY AUDIX Administrator Responsibilities
1
■ If you are using the Audio Messaging Interchange Specification (AMIS) Analog Networking feature or the Message Delivery feature, you will be responsible for initial and ongoing administration of these features. This administration is described in AMIS Analog Networking, 585-300-512.
■ If you use the Automated Attendant feature, you also will be responsible for setting up and managing automated attendants. This administration is described in Chapter 9, ‘‘Automated Attendant’’.
■ Maintaining and monitoring the DEFINITY AUDIX system for system security. Security issues and preventive measures are described in
Chapter 10, ‘‘Ongoing System Security’’.
■ If you are using INTUITY Message Manager, coordinating with your Local Area Network (LAN) administrator when administering the DEFINITY AUDIX system as a server on a LAN and when isolating problems to the server or the LAN.
■ Interacting with your subscribers, ensuring that they are properly trained, correcting their misconceptions, troubleshooting their problems, and listening to their needs.
Introduction
1-8 DEFINITY AUDIX Administrator Responsibilities
Preparing for DEFINITY AUDIX System Operation
2-1 Overview
2
2
Preparing for DEFINITY AUDIX
System Operation
This chapter describes the administrative activities that you should complete before subscribers start using the DEFINITY AUDIX system.
Overview
Your responsibilities during the initial administrative phase begin after the Lucent service technicians at your site have installed the DEFINITY AUDIX system, performed (with you) acceptance tests to verify that the system is working properly, set up the switch integration method selected by your company, and administered the DEFINITY AUDIX system subscribers.
Activities described in this chapter are listed in the order in which they should be performed during this phase. During the ongoing administration phase, you may need to perform some of these activities again on a regular basis, though not necessarily in the order listed here. Your initial tasks include the following:
■ Logging into the DEFINITY AUDIX system through the administration terminal
■ Creating your own personal password for security ■ Setting the system password
NOTE:
Preparing for DEFINITY AUDIX System Operation
2-2 Initial Administration Prerequisites
2
■ Deciding how you will administer DEFINITY AUDIX system data, including backing up and recovering data and customizing system announcements ■ Customizing system announcements and/or fragments (optional)
■ Customizing automated attendants
■ Distributing appropriate DEFINITY AUDIX system documentation to new subscribers
Besides the tasks in the list above, there are a number of other tasks that also might be completed during this preparatory phase. For example, you could modify default values in certain fields on the administrative forms. However, you may wish to wait until the system has been in use for some time before changing the defaults. This will give you a chance to evaluate actual usage requirements and make changes based on those requirements.
Initial Administration Prerequisites
Before you can begin your phase of initial administration, you must verify that the necessary switch administration has been completed, and you must know how to use the DEFINITY AUDIX administration terminal to access and modify DEFINITY AUDIX administrative screens.
Switch Administration
Switch administration sets up communications between the DEFINITY AUDIX system and the switch and defines where the DEFINITY AUDIX system fits in the call-coverage paths of individual DEFINITY AUDIX subscribers.
This administration is performed by Lucent technical personnel during DEFINITY AUDIX system installation. Before you begin DEFINITY AUDIX system
administration, verify with your switch administrator and/or Lucent personnel that the switch administration has been completed. Refer to Switch Administration for the DEFINITY AUDIX System, 585-300-509, or Installation and Switch
Preparing for DEFINITY AUDIX System Operation
2-3 Initial Administration Prerequisites
2
Using the Administration Terminal
and Administrative Forms
DEFINITY AUDIX system administration is performed at a data terminal or PC connected to the DEFINITY AUDIX administration port. The following terminals are supported for the DEFINITY AUDIX system:
■ 513 ■ 4410 ■ 4425 ■ 5420
■ PC (using the ADAP package)
■ 715 (The 715 terminal provides the ability to toggle back and forth between the DEFINITY AUDIX system and switch administration screens. ■ DEFINITY G3 Management Applications (G3-MA). For more information on
the G3-MA, refer to DEFINITY Communications System Generic 3 Management Applications Operations, 585-229-202, and DEFINITY Communications System Generic 3 Management Applications Quick Guides, 585-229-204.
The terminal should have been installed and tested during DEFINITY AUDIX system installation.
The screens displayed on the administrative terminal, called the DEFINITY AUDIX administrative screens, are used to add, change, remove, or display information relating to the DEFINITY AUDIX system and its subscribers.
Online help is available when you are using administrative screens. This program provides three levels of information: path-line help, screen help, and field help. All three levels of help information are available for every administrative and maintenance screen.
Preparing for DEFINITY AUDIX System Operation
2-4 Passwords
2
Passwords
This section describes the login and system passwords.
There are four login IDs that can access DEFINITY AUDIX screens. One of these is the cust login, which is specifically allocated for administration. This is the only login that you, the system administrator, will use. The other login IDs are reserved for Lucent personnel and are used to install the DEFINITY AUDIX system and to perform remote maintenance operations on your system as appropriate.
The DEFINITY AUDIX system is delivered with a default password for the cust
login. The system technicians who install your system may assign login passwords to one or more of the Lucent login IDs but they will not change the login password for the cust login ID. You should change the password for the
cust login as described in the next section.
The system password is a second level of system security for the cust login. Only you, the DEFINITY AUDIX system administrator, have the ability to establish the system password. It will not exist until you add it as described in the next section.
For maximum system security, you should change the cust login password and the system password periodically. See Chapter 10, ‘‘Ongoing System Security’’, for information on choosing and changing passwords to maintain a high level of system security.
Customer Initial Administration Tasks
This section describes the tasks that you should perform once you have received your DEFINITY AUDIX system.
Task 1: Logging into the DEFINITY AUDIX
System
To administer your DEFINITY AUDIX system, you must first log in at your administration terminal.
To log in:
1. Enter cust (the administrative login ID) at the login prompt.
2. Enter custpw (the default login password) at the password prompt. 3. Press at the system password prompt.
Preparing for DEFINITY AUDIX System Operation
2-5 Customer Initial Administration Tasks
2
After you have logged in, the screen displays:
From this screen you can access DEFINITY AUDIX screens to perform administration tasks or type logoff.
Task 2: Changing Your Passwords
After you are logged in, change the default login password and the system password to passwords of your choosing.
Change the Login Password
Change the login password for the cust login ID. You will use this new password with the cust login ID each time you log in to perform DEFINITY AUDIX system administration.
Use the Password screen to change your login password. Refer to the
Preparing for DEFINITY AUDIX System Operation
2-6 Customer Initial Administration Tasks
2
Change the System Password
Change the system password. You will use this new system password each time you log in to perform DEFINITY AUDIX system administration.
NOTE:
If you forget your login ID, your login password, or the system password once you have changed them, you must contact the AUDIX Helpline to reassign the system default password or login ID. This is a complicated procedure that may require re-entering system translations and other information, and this may incur charges for the Technical Services Organization (TSO) engineer’s time. Some of this information may be difficult to duplicate. Therefore, do not forget your login ID or passwords.
Task 3: Customizing System Announcements
Your DEFINITY AUDIX system comes with the announcement sets that you chose for your system. You may customize these announcement sets for your company. Refer to Customizing Announcements in Chapter 6, ‘‘Ongoing Data
Administration’’. This section ofChapter 6 also provides procedures for
Changing the Default Call Answer Greeting and Changing the Default Voice Mail Greeting. You should verify that the system announcements are suitable for your application before you allow subscribers to begin using the DEFINITY AUDIX system.
Task 4: Customizing Automated Attendants
The Automated Attendant feature allows you to set up automatic answering services that provide callers with a voice menu of options for transferring calls to other extensions. For example, an automated attendant can answer your
company’s phone and prompt callers to dial extensions directly if they know the number or to press the appropriate key on their touch-tone phones in response to voiced menu options. The automated attendant can have as many as 10 menu options, corresponding to the buttons 0 through 9 on a touch-tone telephone.
If possible, you should customize automated attendant announcements before you allow subscribers to use the DEFINITY AUDIX system. However, you will probably find that the way the automated attendant feature is used will change with system usage.
Customizing automated attendants and announcements is discussed in detail in
Chapter 9, ‘‘Automated Attendant’’.
Preparing for DEFINITY AUDIX System Operation
2-7 Customer Initial Administration Tasks
2
Task 5: Distributing Documentation to
Subscribers
At this point, it is important for you to provide your subscribers with the appropriate documentation to help them use the DEFINITY AUDIX system properly. Appendix A, ‘‘Communicating with Subscribers’’, includes several template letters that you can customize and distribute to subscribers to help you in this endeavor. Select the appropriate template and make the necessary changes. The following DEFINITY AUDIX documentation is recommended also:
■ A Portable Guide to Voice Messaging, 585-300-701 ■ Voice Messaging Quick Reference, 585-300-702
■ Multiple Personal Greetings Quick Reference, 585-300-705 ■ Voice Messaging Wallet Card, 585-300-704
■ Voice Messaging Business Card Stickers, 585-304-705 ■ Outcalling Quick Reference, 585-300-706
You should decide which documents will best suit your subscribers’ needs and then order the appropriate number of documents. Ordering information is located on the back of the title page of this document.
Alternately, you can use the Guide Builder Software for AUDIX Systems,
585-310-745, to create subscriber documentation that is tailored to your
company and subscriber requirements. The Guide Builder software was shipped with your system.
Preparing for DEFINITY AUDIX System Operation
2-8 What to Do After Initial Administration
2
What to Do After Initial
Administration
Basic DEFINITY AUDIX initial administration is now completed. At this point, you have established basic DEFINITY AUDIX service for your initial subscribers and set system parameters.
Your next task is to determine which DEFINITY AUDIX features you will use and to activate or deactivate those features as required for your system. Features are discussed in Chapter 3, ‘‘Feature Administration’’.
You also should review Chapter 4, ‘‘Ongoing Preventive Maintenance’’, for some insight into your ongoing responsibilities as administrator of the DEFINITY AUDIX system. Set up a daily, weekly, and monthly ongoing maintenance schedule and make it an important part of your routine.
NOTE:
Your DEFINITY AUDIX system has been carefully designed to be very secure. However, it is your responsibility to take administrative precautions to ensure and maintain the maximum amount of system security possible. Therefore, it is recommended that you review and follow the suggestions in
Chapter 10, ‘‘Ongoing System Security’’, before allowing your subscribers to use the system.
Feature Administration
3-1 Overview
3
3
Feature Administration
This chapter describes administration you may need to perform to set up and use individual DEFINITY AUDIX system and subscriber features. DEFINITY AUDIX System — Feature Descriptions, 585-300-206, contains more detailed information and administration procedures for all features.
Overview
Besides the preliminary and initial administration described in Chapter 2, ‘‘Preparing for DEFINITY AUDIX System Operation’’, you may need to perform additional administration to activate or deactivate DEFINITY AUDIX features and to modify feature parameters to meet your specific requirements.
You should review each feature individually and make decisions about its usage in your organization before administering your DEFINITY AUDIX subscriber population and making the system live.
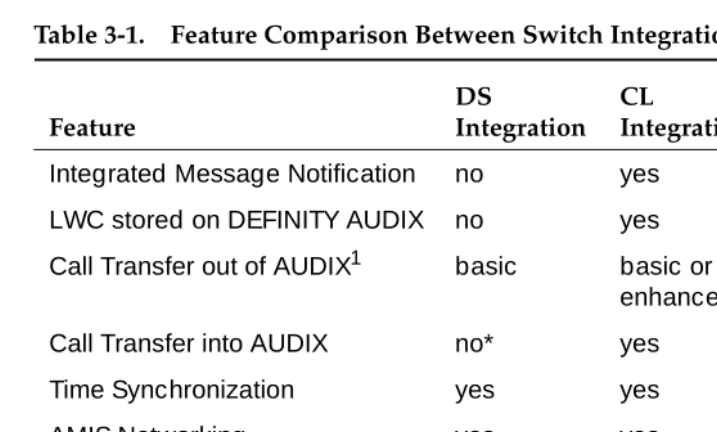
As detailed in Table 3-1, Feature Comparison Between Switch Integration Methods, some features are available to users of Control Link switch integration and not to users of Display Set integration, and vice versa. This table will give you an idea how some features vary for each switch integration method.
In addition, each of the DEFINITY AUDIX features and their administration requirements are summarized in this chapter.
NOTE:
Unless otherwise noted, the feature described is available for all switch integration methods.
Feature Administration
3-2 AMIS Analog Networking
3
AMIS Analog Networking
Audio Messaging Interchange Specification (AMIS) Analog Networking is a DEFINITY AUDIX feature that permits subscribers to exchange voice mail messages with any other voice mail system that also has AMIS analog capabilities, anywhere in the world. Messages can be exchanged with subscribers on remote voice mail systems with AMIS capabilities, including Lucent or other vendors with AMIS capability. AMIS network outcalls will be made using the System announcement set. AMIS Analog Networking is an optional feature that is not included in the basic DEFINITY AUDIX system and must be purchased separately.
You can administer a range of remote systems that can be addressed via AMIS two-step addressing; individual remote voice mail systems do not need to be administered. However, you also can choose to administer any specific remote voice mail systems with heavy AMIS analog traffic for AMIS one-step addressing (this simplifies the addressing procedure). Remote subscribers on remote systems administered for one-step addressing can be administered on the local DEFINITY AUDIX system.
For complete instructions and information on AMIS Analog Networking, refer to
AMIS Analog Networking, 585-300-512. AMIS Analog Networking is available for all switch integration methods.
Table 3-1. Feature Comparison Between Switch Integration Methods
Feature
DS
Integration CL
Integration
Integrated Message Notification no yes
LWC stored on DEFINITY AUDIX no yes
Call Transfer out of AUDIX1
1. Transfer can be accomplished indirectly.
basic basic or
enhanced
Call Transfer into AUDIX no* yes
Time Synchronization yes yes
AMIS Networking yes yes
Call Screening yes no
available on Call Answer no yes
Feature Administration
3-3 Alarm Origination
3
Alarm Origination
The Alarm Origination feature enables the DEFINITY AUDIX system to call you or a remote maintenance center when a major or minor alarm has occurred. If this feature is not activated, no call can be sent. To display the Alarm Origination feature, use the System-Parameters Maintenance screen.
Announcements and Announcement
Sets
Up to nine announcement sets may be installed on the DEFINITY AUDIX system at one time as long as enough disk space is available for both the announcement sets and voice message storage.
You can look at and modify the composition of system announcements heard by subscribers. This requires very precise intervention and is recommended only when necessary. In addition, announcement sets are available to allow you to record, change, or listen to short sections of DEFINITY AUDIX voice prompts called fragments. Announcements and announcement sets are administered via the change/remove/copy announcement, change/remove/copy annc-set,
change/remove/copy fragment, and change system-parameters features
screen-activation commands.
The number of announcement sets available for DEFINITY AUDIX is always expanding. If you are interested in using (for example) several languages for your announcements, contact your Lucent sales outlet to acquire the most recent list of announcement sets.
ADAP
The AUDIX Administration and Data Acquisition Package (ADAP) is a data collection and reporting tool that transfers raw data from your DEFINITY AUDIX database to a personal computer (PC) for further analysis. This software
package includes a set of menu-driven standard reports that work in conjunction with the dBASE III PLUS relational database program, and a separate
MS-DOS-based command language for retrieving data from DEFINITY AUDIX database files for use in customized reports. This command language also can be used to modify subscriber data in the database files from the PC. Refer to
Feature Administration
3-4 Automated Attendant
3
Automated Attendant
The Automated Attendant feature allows you to set up the DEFINITY AUDIX system to answer extensions and prompt callers to press appropriate keys on their touch-tone telephones to transfer to desired extensions or leave messages for individual subscribers. You can set up any number of automated attendants, and you can nest them so that an option selected from one attendant menu dials another automated attendant to provide a completely new menu of options. Callers can be transferred directly to DEFINITY AUDIX mailboxes from
automated attendant menu options without going to the switch, allowing you to efficiently handle DEFINITY AUDIX coverage for shared extensions and non-resident subscribers with an automated attendant.
The first stage of an automated attendant in a multilingual environment might ask the user to select a language. Subsequent stages can implement the
auto-attendant function in the language chosen.
To administer an automated attendant:
1. Access the Subscriber screen. Set the Call Answer Language Choice field to “n” and press to call up the Subscriber Class Of Service Parameters screen.
2. Type auto-attendant in the PERMISSIONS, Type: field to establish the subscriber as an automated attendant. This action adds a third page to the screen, Subscriber Automated Attendant Menu, on which to
administer the attendant. To access this page, press . 3. Record the attendant menu using your touch-tone telephone. You can
record as many languages within the Automated Attendant as needed. Since you record the Automated Attendant menu, an Automated Attendant is not limited to two languages. If you have the Multilingual feature set to ON, Automated Attendants can use the Multiple Personal Greetings feature as long as the Call Answer Language Choice field is set to “n”. If you set the Call Answer Language Choice field to “y”, the first menu in the automated attendant should be one where the caller chooses a language (such as press 1 for English or press 2 for French Canadian); then you can set up separate menu trees for each language.
Refer to Chapter 9, ‘‘Automated Attendant’’, for complete instructions on setting up and using automated attendants.
NEXTPAGE
Feature Administration
3-5 Broadcast Messages
3
Broadcast Messages
The Broadcast Messages feature allows selected subscribers to send broadcast messages to all local subscribers and selected remote subscribers. Permission to send broadcast messages can be assigned on a per-subscriber basis or by class-of-service. You should limit permission to send broadcast messages to yourself or to a few selected subscribers to avoid overuse of this feature. Any user with broadcast permission can interact with the system in the language of her or his choice. The broadcaster should consider the appropriateness of broadcasting a uni-lingual message versus a multilingual message to a multilingual community.
The broadcast message is seen as the first message in the subscriber’s mailbox regardless of subsequent message activity. The subscriber can retrieve, listen, save, and — if the message is not private — forward the message. Broadcast messages are not actually distributed. Instead, subscribers hear the message from a mailbox that is administered as the broadcast mailbox. Since the message is not actually sent, the sender can specify a date when the message should no longer be played.
The sender can also specify whether or not notification of the message is to be provided; if so, the message activates the message-waiting indicator (MWI), stutter dial tone, and/or outcalling as if the broadcast message was a new message.
NOTE:
You are urged not to specify notification for broadcast messages under normal circumstances because lighting the MWI on every subscriber’s phone simultaneously can severely impact the DEFINITY AUDIX system and switch performance. Note that even if you attempt to limit the impact by scheduling the message delivery during out-of-hours, each subscriber will find their message notification mechanism active the next morning, causing a large burst of DEFINITY AUDIX system traffic.
NOTE:
A hearing-impaired user who uses only a teletypewriter (TTY) for
Feature Administration
3-6 Broadcast Messages
3
Setting Up the Broadcast Mailbox
The broadcast mailbox is associated with a “phantom” subscriber. (A “phantom” subscriber in the DEFINITY AUDIX system is one that is administered on a Subscriber screen in the DEFINITY AUDIX system for an extension that logically exists in the DEFINITY AUDIX system but is not administered on the switch.) This phantom subscriber must be added to the system before anyone will be allowed to create and send a broadcast message or login announcement. The
PERMISSIONS, Type field must be set to “none” to disallow call answer permission for this subscriber. The phantom subscriber is identified as the broadcast mailbox by a “y” in the Broadcast Mailbox? field. You must specify “y” when initially adding the phantom subscriber, because you will not be able to change the value in the broadcast mailbox later (to change the broadcast mailbox value, you must delete the subscriber record and re-enter it). The broadcast mailbox extension is identified on the System-Parameters Features screen for reference.
Login ID and Password
Subscribers with broadcast permission do not normally need to use the broadcast mailbox login ID and password to create broadcast messages. Therefore, consider carefully how many individuals are given the extension and password of the broadcast mailbox. The only reason to log into this mailbox is to prematurely purge a broadcast message or login announcement before its scheduled expiration time or to scan the mailbox to see what broadcast messages are present. If you scan messages in the broadcast mailbox, do not
press while scanning messages (the message being scanned will be totally deleted from the system and no one will hear that message again).
Message Storage and Deletion
When a subscriber with broadcast permission creates a broadcast message, the message is stored in the subscriber’s outgoing mailbox until the scheduled delivery time when it is delivered to the broadcast mailbox. The subscriber can change the message’s text and status prior to delivery the same as any voice mail message originated by the subscriber.
After the message is delivered to the broadcast mailbox, it is no longer owned by the originator and can be deleted only by logging in to the DEFINITY AUDIX system using the broadcast mailbox extension and password. Broadcast messages are deleted automatically two days after the delivery date unless otherwise specified during message creation.
Feature Administration
3-7 Broadcast Messages
3
The size of the broadcast mailbox is defined on the Subscriber screen. The maximum length of individual broadcast messages is defined by each originator’s maximum message length on page 2 of the Subscriber screen. A maximum of 16 messages can be in the broadcast mailbox at one time.
However, because broadcast messages will be presented to subscribers before their other messages, use restraint with this feature to avoid overwhelming subscribers with message headers that must be scanned before they can hear their personal messages.
The List Measurements Feature and List Measurements Subscriber screens include information about the number of broadcast messages that are sent during their respective reporting periods.
Administration
To administer broadcast messaging: 1. Choose one of the following:
■ If permission to create broadcast messages is by class-of-service, use the List Subscriber screen (or the AUDIX ADAP) to verify that only the intended subscribers are members of that class-of-service. Then set broadcast permission to “both” or “voice” on the
appropriate Class of Service screen.
■ If permission to create broadcast messages is on a per-subscriber basis, set broadcast permission to “both” or “voice” on the
Subscriber screen for each individual subscriber who will have that permission.
2. Set up a phantom subscriber for the broadcast mailbox on the Subscriber screen using a DEFINITY AUDIX extension that is not administered at the switch. Set the Broadcast Mailbox? field to “y” (you must set the broadcast mailbox to “y” when you initially create the phantom subscriber because you cannot change the field on an existing subscriber). Set PERMISSIONS, Type to “none” for this subscriber. Make sure the mailbox size is large enough to hold at least 16 messages, and that incoming mailbox retention times are longer than the number of days you will want to keep broadcast messages active in your system.
To create a broadcast message:
1. Using your touch-tone phone, log in to the DEFINITY AUDIX system as a subscriber who has broadcast permission, and press to record a message.
2. Record the message, and press to approve the message. 3. Indicate that there are no additional recipients by pressing . 4. Press in response to the voice prompts to make the message a
broadcast message.
1
#
#
Feature Administration
3-8 Broadcast Messages
3
5. If you want the message to be private, press in response to the voice prompts, and subscribers will be unable to forward the message. In the delivery options menu, you also can specify filing or future delivery. Press
to file a copy of your broadcast message. Press to specify delivery for some time in the future.
6. Optionally, press to hear the second-level broadcast options menu, and then press to notify recipients of the broadcast message (not recommended under normal circumstances) or to change the
message expiration date from the default (two days after delivery date) up to a year in the future. Press as prompted to approve your broadcast option changes, and return to the delivery options menu.
7. Press in response to the voice prompts to approve the delivery options.
Note that the broadcast messages you create are “delivered” into one and only one mailbox, the special broadcast mailbox. Subscribers will hear broadcast messages from this broadcast mailbox, although they will have the perception that the messages are in their own mailboxes. Subscribers must press
after hearing a broadcast message, or the DEFINITY AUDIX system will make a copy of that message in the subscriber’s mailbox in the unopened or old category, depending on whether or not they listened to the message body.
To change or delete a broadcast message:
■ To change the message text or delivery instructions before the scheduled delivery, log in to the DEFINITY AUDIX system using the extension and password of the person who created the message, press to check outgoing messages, and edit as you would for any outgoing message. To change message options (broadcast, private, notification), activate or deactivate options as prompted. To change broadcast options
(notification, expiration date), press at the delivery options menu to hear the broadcast options menu and make changes as appropriate. ■ To purge a broadcast message after the scheduled delivery but before the
expiration date, log in to the DEFINITY AUDIX system using the extension and password of the broadcast mailbox, scan the incoming mailbox until you find the broadcast message you wish to purge, and press to delete it.
NOTE:
If you delete a broadcast message that has had message waiting notification turned on, it will take the system an audit cycle to turn off all the Message Waiting Indicators (MWIs). To minimize subscriber confusion, if a broadcast message with message waiting notification is deleted from the broadcast mailbox or expires while MWIs are lit for it, subscribers will hear a message, “Broadcaster has deleted this broadcast message” when they respond to the broadcast message notification. This new broadcast deleted message will be purged from subscriber mailboxes when the nightly audits run and MWIs that are still lit will be turned off at that time.
Feature Administration
3-9 Bulletin Board
3
Bulletin Board
The Bulletin Board feature allows you to set up extensions that callers can dial to hear recorded messages. The message is actually the personal greeting of the extension assigned to the bulletin board. Bulletin board extensions also can be included on automated attendant menus.
To administer a bulletin board:
1. Use the Subscriber screen to create a bulletin board subscriber. If callers want to reach the bulletin board directly, use an extension administered at the switch. Otherwise, use an unadministered extension. This is the extension you will use for the bulletin board. Assign this subscriber a name that describes its function (for directory purposes), and assign the PERMISSIONS, Type field to “bulletin-board” or create a class-of-service for bulletin boards using the Class of Service screen.
2. Using your touch-tone telephone, log in to the DEFINITY AUDIX system as the subscriber you just created, and record the bulletin board message as that subscriber’s personal greeting.
3. To test your administration, you can call the bulletin board extension if it has been administered on the switch.
Refer also to the Multiple Personal Greetings feature, which describes how to establish up to nine different personal greetings that may be activated
automatically during specified time periods (such as prime time or out-of-hours) or depending on the caller (such as internal or external). This feature may be useful for bulletin boards.
Call Answer
Feature Administration
3-10 Call Screening
3
The Call Answer feature works in conjunction with the call forwarding and call coverage features in the switch. Subscribers who will have call coverage by the DEFINITY AUDIX system must be administered with the (PERMISSIONS, Type set to “call-answer”) on the associated Class Of Service screen for that
class-of-subscribers or on the Subscriber screen for individual subscribers. In addition, the switch must be correctly administered to provide the call coverage or call forwarding switch features that are required to direct calls to the DEFINITY AUDIX system for call answering.
A caller can designate a message as priority for any extension having call answer coverage to the DEFINITY AUDIX system if the Priority on Call Answer field is set to “y” on the System-Parameters Features screen. Callers also can designate the message as private.
On systems using Control Link switch integration, there may be another capability to the Call Answer feature. This is the use of to restart the DEFINITY AUDIX login session from the beginning. The subscriber can press
anytime during a DEFINITY AUDIX call-answer session. Then the subscriber can access his/her mailbox and retrieve messages without having to hang up and redial into the DEFINITY AUDIX system. This capability is especially convenient if a subscriber is calling long distance.
NOTE:
It is important to verify that the PERMISSIONS, Type field is set to “call-answer” for subscribers whose calls cover to the DEFINITY AUDIX system. If this field is not set correctly, the DEFINITY AUDIX system will not answer the call, but one of its ports will be tied up until the caller hangs up. The DEFINITY AUDIX system warns you when this happens via the
Administration-Log screen.
Call Screening
The Call Screening feature is available only for the DP mode of switch integration. This feature allows subscribers with digital phones to listen to or intercept call answer messages as they are being left by callers. Use (exit AUDIX) to drop the DEFINITY AUDIX system and intercept the call. The subscriber uses this feature directly from his/her touch-tone telephone, and the feature requires no special administration by the DEFINITY AUDIX system administrator.
*
R*
R
Feature Administration
3-11 Changing the DEFINITY AUDIX Extension Length
3
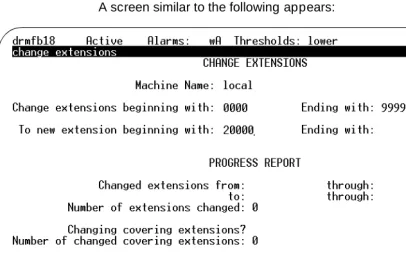
Changing the DEFINITY AUDIX
Extension Length
This procedure, while rarely required, can save you from having to delete and re-enter all subscribers if your switch numbering plan changes. Changing the number plan requires that the switch and its DEFINITY AUDIX system be updated with the new extension numbers.
To change the DEFINITY AUDIX system extension length:
1. Change the extension length on the Machine screen to the new length and also change the start and end extensions to match the new length. 2. Reboot the system using the Reset System Reboot screen.
3. Change the system covering extension on the System-Parameters Features screen to the new number.
4. Change the DEFINITY AUDIX port extensions on the Voice-Group screen to the new numbers.
5. Busyout all network and voice ports on the machine to be changed. 6. Enter change extensions (or ch e, for short).
!
CAUTION:
Feature Administration
3-12 Changing the DEFINITY AUDIX Extension Length
3
A screen similar to the following appears:
Figure 3-1. Change Extension Screen
7. Enter the name of the machine to be affected.
On the sample screen, local appears in this field. The keyword local
indicates the machine you are currently operating. This screen can also be used (during a separate session) to change extension numbers on a remote machine by entering any administered remote machine name. 8. Enter the boundaries of the extension numbers to be moved.
Here, you enter two numbers: the beginning (smallest affected) extension number. and the ending (la