Active Data Recovery Software
User Guide
This End-User License Agreement (EULA) is a legal agreement between you (either an individual or a single entity) and Active Data Recovery Software for the personal use or business use of Active@ UNERASER for DOS (UNERASER).
By installing, copying, or otherwise using UNERASER you agree to be bound by the terms of this EULA. If you do not agree to the terms of this EULA, do not install or use UNERASER.
ACTIVE DATA RECOVERY SOFTWARE REQUIRES THAT EACH PURCHASER USE THE FREE DEMO VERSION OF UNERASER (DEMO VERSION) BEFORE PAYING A LICENSE FEE FOR THE REGISTERED VERSION TO GET A FULL UNDERSTANDING OF THE CAPABILITIES AND THE EASE-OF-USE OF UNERASER. DEALERS MUST EITHER SUPPLY A COPY OF THE DEMO VERSION OR RECOMMEND THAT THE PURCHASER DOWNLOAD THE DEMO VERSION. ACTIVE DATA RECOVERY SOFTWARE WILL NOT ISSUE REFUNDS AFTER THE UNERASER LICENCE FEE HAS BEEN PAID. Active Data Recovery Software may have patents, patent applications, trademarks, copyrights, or other intellectual property rights covering subject matter in this document. The furnishing of this document does not give the user any license to these patents, trademarks, copyrights, or other intellectual property.
1. UNERASER LICENSE. UNERASER is licensed, not sold. Copyright laws and international copyright treaties, as well as other intellectual property laws and treaties protect UNERASER.
2. GRANT OF LICENSE.
(a) FREE DEMO VERSION. You may use the DEMO VERSION without charge on an evaluation basis to back up the Master Boot Record (MBR), create disk images, scan drives for deleted partitions, logical drives and files, and preview their contents. The license fee must be paid in full to acquire the REGISTERED VERSION of UNERASER and gain access to features that can restore files and folders back to the HDD.
(b) REDISTRIBUTION OF DEMO VERSION. If you are using the DEMO VERSION on an evaluation basis you may make copies of the DEMO VERSION as you wish, give exact copies of the original DEMO VERSION to anyone, or distribute the DEMO VERSION in its unmodified form via electronic means (Internet, BBS, Shareware distribution libraries, CD-ROM, etc.). You may not charge any fee for the copy or use of the evaluation DEMO VERSION itself, except that you may charge a distribution fee that is reasonably related to any cost you incur distributing the DEMO VERSION (e.g. packaging). You must not represent in any way that you are selling UNERASER itself. Your distribution of the DEMO VERSION will not entitle you to any compensation from Active Data Recovery Software. You must distribute a copy of this EULA with any copy of UNERASER and anyone to whom you distribute UNERASER is subject to this EULA.
(c) REGISTERED VERSION. After you have purchased the license for UNERASER, and have received UNERASER distribution package, you are licensed to copy UNERASER only into the number of floppy disks corresponding to the number of licenses purchased. Under no other circumstances may UNERASER be operated at the same time on more than the number of floppy disks for which you have paid a separate license fee. You may not duplicate UNERASER in whole or in part, except that you may make one copy of UNERASER for backup or archival purposes. You may terminate this license at any time by destroying the original and all copies of UNERASER in whatever form. You may permanently transfer all of your rights under this EULA provided the recipient agrees to the terms of this EULA and provided you turn over all copies of UNERASER (including copies of all prior versions if UNERASER is an upgrade) and retain no copies.
3. RESTRICTIONS. You may not reverse engineer, decompile, or disassemble UNERASER, except and only to the extent that such activity is expressly permitted by applicable law notwithstanding this limitation. You may not rent, lease, or lend UNERASER. You may permanently transfer all of your rights under this EULA, provided the recipient agrees to the terms of this EULA. You may not use UNERASER to perform any unauthorized transfer of information (e.g. transfer of files in violation of a copyright) or for any illegal purpose.
4. SUPPORT SERVICES. Active Data Recovery Software may provide support services related to UNERASER. The nature of Support Services may be modified from time to time and is governed by Active Data Recovery Software polices and programs as described in the online documentation and web site, and/or in other materials provided by Active Data Recovery Software. Any supplemental software code provided to you as part of the Support Services shall be considered part of UNERASER and subject to the terms and conditions of this EULA. With respect to technical information you provide to Active Data Recovery Software as part of the Support Services, Active Data Recovery Software may use such information for its business purposes, including for product support and development. Active Data Recovery Software will not utilize such technical information in a form that personally identifies you.
5. TERMINATION. Without prejudice to any other rights, Active Data Recovery Software may terminate this EULA if you fail to comply with the terms and conditions of this EULA. In such event, you must destroy all copies of UNERASER.
6. COPYRIGHT. UNERASER is protected by copyright law and international treaty provisions. You acknowledge that no title to the intellectual property in UNERASER is transferred to you. You further acknowledge that title and full ownership rights to UNERASER will remain the exclusive property of Active Data Recovery Software and you will not acquire any rights to UNERASER except as expressly set forth in this license. You agree that any copies of UNERASER will contain the same proprietary notices which appear on and in UNERASER.
7. DISCLAIMER OF WARRANTY. Active Data Recovery Software expressly disclaims any warranty for UNERASER. UNERASER AND ANY RELATED DOCUMENTATION IS PROVIDED “AS IS” WITHOUT WARRANTY OF ANY KIND, EITHER EXPRESS OR IMPLIED, INCLUDING, WITHOUT LIMITATION, THE IMPLIED WARRANTIES OR MERCHANTABILITY, FITNESS FOR A PARTICULAR PURPOSE, OR NONINFRINGEMENT. THE ENTIRE RISK ARISING OUT OF USE OR PERFORMANCE OF UNERASER REMAINS WITH YOU.
8. LIMITATION OF LIABILITY. IN NO EVENT SHALL ACTIVE DATA RECOVERY SOFTWARE OR ITS SUPPLIERS BE LIABLE TO YOU FOR ANY CONSEQUENTIAL, SPECIAL, INCIDENTAL, OR INDIRECT DAMAGES OF ANY KIND ARISING OUT OF THE DELIVERY, PERFORMANCE, OR USE OF UNERASER, EVEN IF ACTIVE DATA RECOVERY SOFTWARE HAS BEEN ADVISED OF THE POSSIBILITY OF SUCH DAMAGES. IN ANY EVENT, ACTIVE DATA RECOVERY SOFTWARE'S ENTIRE LIABILITY UNDER ANY PROVOSION OF THIS EULA SHALL BE LIMITED EXCLUSIVELY TO PRODUCT REPLACEMENT.
Contents
O
VERVIEWWelcome to Active@ UNERASER...1
What’s New in Version 3.0 ...1
Overview of Restoring Deleted Data...2
Files Erased ...2
Partition Damage ...3
Steps to UNERASE Files and Folders ...4
S
YSTEMR
EQUIREMENTSP
REPARING TOU
SET
HEU
TILITY Preparing a DOS-Bootable Floppy Disk or a Bootable CD-ROM ...7Bootable Floppy Creator ...7
Bootable ISO CD-ROM Image...9
Copying Active@ UNERASER ...10
U
SINGT
HEUNERASER C
ONSOLE Starting Active@ UNERASER for DOS ...11Starting Active@ UNERASER for Windows...12
Performing a Drive Scan...14
Performing a Device Scan ...15
Searching for Deleted Files and Folders ...17
Using the Hex/Text Viewer ...19
UNERASE Deleted Data...20
Unerasing a Deleted File ...20
Unerasing a Deleted Folder ...21
Creating a Disk Image ...22
Working with Disk Image ...23
Long File Names Support ...26
Recovering Files With Long Names ...26
U
SINGC
OMMAND-L
INEP
ARAMETERS Overview of Command Line Parameters ...27D
ATAR
ECOVERYC
ONCEPTS Hard Disk Drive Basics ...29Making Tracks...29
Sectors and Clusters ...30
Structure of a FAT Volume... 31
File Allocation System ... 33
FAT Root Folder ... 34
FAT Folder Structure ... 34
FAT32 Features... 36
The NTFS File System ... 45
NTFS Partition Boot Sector ... 46
NTFS Master File Table (MFT)... 49
NTFS File Types... 50
The File Recovery Process ... 57
Disk Scanning for Deleted Entries... 58
Defining the Chain of Clusters... 61
Recovering the Chain of Clusters... 63
The Partition Recovery Process ... 65
System Boot Process ... 65
MBR is Damaged ... 66
Partition is Deleted or Partition Table is Damaged ... 69
Partition Boot Sector is Damaged ... 71
Missing or Corrupted System Files ... 73
D
ATAR
ECOVERYT
IPS Treat Recovery Area With Care ... 75Save Recovered Files Onto a Different Drive ... 75
1
O
VERVIEW
This chapter gives an overview of Active@ UNERASER application.
Welcome to
Active@
UNERASER
Active@ UNERASER is a powerful software utility, designed to restore files and directories that may have been accidentally deleted. It allows you to recover files that have been deleted from the Recycle Bin, as well as those deleted when bypassing the Recycle Bin (for example when using [Shift]+[Delete]). The utility can be used under a Windows or DOS environment. Active@ UNERASER is compact enough to be installed on and run from a bootable floppy disk, so that the risk of overwriting your data is minimized.
What’s New in Version 3.0
The list below shows new features in version 3.0: • Optimized drive scanning performance
• Two types of drive and device scan: Basic (Fast) and Thorough (Slow) • Long and localized filenames full support for display and recovery • Extended file and drive attributes support for info display
• Encrypted files (EFS) supported in Windows (Console) Application • Advanced Searching: by Mask, Size, Attribute, Deleted/Existing Only • Advanced Disk Imaging:
• Raw and Compressed disk images
n Composing disk images from raw chunks (created by other tools) • Checking Disk Image consistency
• Re-designed user interface to be more convenient
• Re-designed Windows Explorer Style user interface includes: • Menus
n User's Activity Log n Progress Bar with timing
• Extended File Attributes ([Ctrl]+[Enter])
New Installation Features:
• Windows Installer simplifies software installation and configuration n Active@ UNERASER for Windows (Console Application) is included n Full featured *.chm Windows help instead of text manual
• Bootable ISO CD-Image for DEMO and Commercial (registered) version
The features listed below are standard UNERASER features that you will recognize from previous versions:
• Recover data from a deleted NTFS partition or drive
• Recover one or several FAT or NTFS partitions or drives, as originally created
• Restore erased partitions even if new drive space has been formatted and has been used to store files, including using the new space for the operating system
• After partition space is restored, recover data from the deleted partition. • Perform Extended Disk Scan in Interactive DOS mode to ignore Master Boot
Record and scan drive contents.
• Easily create a “test” file using command line parameters. Send the test file to Active Data Recovery Software technicians for analysis if you encounter a drive that is difficult to UNERASE.
Overview of
Restoring Deleted
Data
No one wants to lose vital data stored on a hard disk. To ensure the integrity of data, backup copies can be the best line of defence. When the unthinkable happens, and data cannot be seen from the operating system, another route must be taken to retrieve lost data.
Table 1-1, below outlines the main causes of data loss, showing the frequency of occurrence:
Table 1-1 Common Causes of Data Loss
When the above cases are assessed, the situation boils down to two states:
1 Individual files or folders have been deleted or overwritten and the drive partition or physical drive can still be displayed by the operating system
2 The partition table is deleted, damaged or overwritten and physical drives or logical drives become invisible to the operating system
Files Erased When files or folders have been deleted and the partition is intact, the task is to scan the surface of the hard disk or partition in search of deleted file or folder
Cause Chance
Accidental removal of files and folders and then emptying Recycle Bin
~ 75% After physical damage of critical sectors on HDD (“bad clusters”)
some drives become unreadable
~ 6% Loss of information due to a power failure or power surge ~ 5% Deletion of logical drive or partition itself then recalling important data on it
~ 3% Damage of MBR, Partition Table, Volume Boot Sectors by virus ~ 3%
Overview of Restoring Deleted Data 3
entries. The search area is the Root Folder (FAT) or the Master File Table (NTFS) of the partition. When deleted entries are found, the utility displays them by name and offers the user an opportunity to save whatever is recoverable to a new location.
Partition Damage In the case of partition damage, the job for the recovery utility is to analyze the surface of the HDD and retrieve clues around structure of the logical data in order to reconstruct the partition or drive parameters (such as the first sector number, cluster size, file system type, etc.). As this process makes logical connections based on probability, it creates an entity called a virtual drive. Without any kind of drive structure, no data can be retrieved. The virtual drive partition will give the user some data to work with.
This User Guide assumes that you have some basic knowledge of hard disk drive and file system organization to be able to understand the recovery terminology and examples.
Active@ UNERASER helps you restore data residing on hard drives or floppy drives formatted in any of the following file systems:
• FAT12 • FAT16 • FAT32 • NTFS • NTFS5 • NTFS + EFS
It works under all DOS and Microsoft Windows family of operating systems: • MS-DOS • PC-DOS • FreeDOS • DR-DOS • Windows 95 • Windows 98 • Windows ME • Windows NT • Windows 2000 • Windows XP • Windows Server 2003
Active@ UNERASER supports the following configurations: • IDE, ATA, SCSI hard drives and floppy disks
• Large sized drives (more than 8 GB)
• Recovery of compressed, fragmented and encrypted files on NTFS • Detection and recovery from deleted or damaged file partitions
• Previewing file content and any sectors on the drive in Hex/Text Viewer • Advanced file search by location, mask, size, attributes
• Disk Image creation and restoring data from it Steps to UNERASE
Files and Folders
This is a simplified list created to help you get inoformation quickly. In the steps below, click on the link to jump directly to the instruction. These are the steps:
1 If you can see all drive partitions and logical drives, perform a drive scan [Performing a Drive Scan].
2 If you know there is a device or drive partition missing, perform a device scan first, then perform step number 1, above. [Performing a Device Scan]
3 After scanning the drive, search for deleted files and folders. [Searching for Deleted Files and Folders]
4 After finding files and folders to recover, UNERASE deleted files and folders. [Unerasing a Deleted File]
2
S
YSTEM
R
EQUIREMENTS
This chapter outlines the minimum requirements for PCs using Active@ UNERASER
Personal Computer
Minimum system requirements for Active@ UNERASER are: • AT compatible CPU with 386 or newer processor • 640Kb of RAM or more
• 1.44 Mb floppy diskette drive or CD-ROM drive • EGA 640x480 or better screen resolution
• Bootable CD-ROM or Floppy disk containing MS-DOS, or startup disk for Windows 95/98/ME/XP
• HDD of type IDE/ATA/SCSI attached to be recovered.
Active@ UNERASER Version
The performance of Active@ UNERASER depends on the version of the application, as displayed in the table below:
Table 2-1 Differences Between Demo and Registered Versions Feature
Demo Version
Registered Version
Contains Bootable Floppy Creator utility and Bootable ISO
CD-Image Containing DOS application
yes yes
Displays complete physical and logical drive information (DOS and Windows environments)
yes yes
Supports IDE / ATA / SCSI / Zip / Floppy drives (DOS and Windows environments)
yes yes
Supports large drive partitions (more than 128GB) yes yes Supports FAT12, FAT16, FAT32, NTFS, NTFS5 (DOS and
Windows) and NTFS5+EFS (Windows) file systems
yes yes
Supports Microsoft DOS, Windows 95 / 98 / ME / NT / 2000 / XP / 2003 partitions (DOS and Windows)
yes yes
Detects deleted primary and extended partitions and drives (DOS and Windows)
yes yes
Scans partitions damaged by virus or with damaged MBR (DOS and Windows)
yes yes
Assesses ability to recover files and folders (DOS and Windows)
yes yes
Previews files and folders before recovery (DOS and Windows)
Supports preview and recovery of fragmented, compressed,
sparse (DOS and Windows) and encrypted files (Windows)
yes yes
Includes advanced search by file name, mask, size range, attribute (DOS and Windows)
yes yes
Displays the content of any sector on the drive with Disk Viewer (DOS and Windows)
yes yes
Creates and works with Raw and Compressed Disk Images (DOS and Windows)
yes yes
Supports local-language and long file names (DOS and Windows)
yes yes
Contains two types of drive and device scan: Basic (fast) and Thorough (slow) (DOS and Windows)
yes yes
Can be saved and run from a bootable 3.5-inch floppy (DOS) yes yes Un-erases and saves deleted files and folders onto FAT
drives (DOS) and FAT/NTFS drives (Windows)
- yes
Copies existing files and folders from FAT or NTFS partitions to FAT drives (DOS) and FAT/NTFS drives (Windows)
- yes Feature Demo Version Registered Version
3
P
REPARING
TO
U
SE
T
HE
U
TILITY
This chapter describes how to prepare to use the application.
Preparing a
DOS-Bootable
Floppy Disk or a
Bootable CD-ROM
Active@ UNERASER is compact enough to operate from a floppy drive. As an alternate, you may also run Acitve@ UNERASER from a bootable CD-ROM If you have a bootable floppy or CD-ROM, skip to the Copying Active@ UNERASER section, below.
Bootable Floppy
Creator When you installed Active@ UNERASER from our web site, a utility named BootableFloppyCreator.EXE was included. Follow the steps below to create a new bootable floppy and copy the utility to it:
1 Put a blank 3.5-inch floppy disk in the floppy drive.
2 Start the Bootable Floppy Creator utility using one of the methods below: • Open the folder where Active@ UNERASER is installed and double-click
BootableFloppyCreator.EXE
• From the Microsoft Start button, click All Programs > Active@ UNERASER > Bootable Floppy Creator
3 Follow directions to create the startup disk.
Creating a Bootable Floppy Manually
To prepare a bootable floppy manually from MS-DOS or Windows
95/98/ME/XP, put a blank 3.5-inch floppy in the floppy drive (A:) and follow the appropriate instructions below:
1 From MS-DOS or in Command Prompt mode of Windows 95/98:
a On the screen, type the format command as follows (see figure below): FORMAT A: /S
b Follow on-screen messages until process is complete. Figure 3-1 DOS Format Progress Messages
2 From the Windows 95/98/ME screen:
a Click the Start button and click Settings, Control Panel.
b From the Control Panel screen, click Add/Remove Programs.
c In the Add/Remove Programs screen, click the Startup Disk tab.
d Click the Startup Disk... button and follow the screen instructions until the process is complete.
Preparing a DOS-Bootable Floppy Disk or a Bootable CD-ROM 9
3 From the Windows XP screen:
a Right-click A: drive.
b From the drop-down menu, click Format...
c Enable the checkbox beside Create an MS-DOS startup disk.
d Click the Start button and follow the screen instructions until the process is complete.
Bootable ISO CD-ROM Image
When you installed Active@ UNERASER from our web site, an ISO image named Uneraser-Boot-Image.ISO was included. This image works with a CD-ROM writing utility such as Ahead Nero Express.
Follow the steps below to create a new bootable CD-ROM and copy the utility to it:
1 Put a blank 5-inch writable CD-ROM in the CD-ROM writer drive.
2 Start your CD-ROM writing utility.
3 Follow utility instructions to record a disk from a disk image previously burned onto the hard drive.
4 The CD-ROM image is located in the same folder where Active@ UNERASER was installed. Open this image and write it to the blank CD-ROM.
Copying Active@ UNERASER
Copy the Active@ UNERASER file (UNERASER.EXE) to the bootable floppy disk or startup disk in drive a:.
If you don’t have the Active@ UNERASER file, download it from our web site:
http://www.uneraser.com
.After copying the file onto the floppy disk, remove it from the floppy drive. Once preparation of the bootable 3.5-inch floppy disk is complete, you are ready to begin recovering data.
4
U
SING
T
HE
UNERASER
C
ONSOLE
This chapter describes how to use the application with the UNERASER Console interface.
Starting Active@
UNERASER for
DOS
Start the program and display drive information in Microsoft DOS operating system using the following steps:
1 With power off, insert the prepared floppy disk into drive A:. Turn power on and boot from the floppy disk. Active@ UNERASER for DOS starts automatically. The UNERASER DOS Console appears.
Figure 4-1 UNERASER DOS Console
2 On the left side of the window all detected drive devices or partitions are listed and numbered. Beneath each drive device or partition, logical drives appear in a tree formation, as shown in the figure above. Deleted partitions and hard drive space not occupied by partitions are listed as “Unallocated”.
Commands at the bottom of this screen are described below. Click on the links for more information about that item:
• Ctrl+V - View Sectors - View the sectors of this drive or partition with the Hex Viewer.
• Ctrl+I - Image - Create a Disk Image of this partition or drive. See Creating a Disk Image.
• ENTER - Scan - Perform a simple Drive Scan. See Performing a Drive Scan.
3 Use the arrow keys to move the cursor over items on the list of drives. Positioning the cursor on a named drive, displays its information on the right side of the program window.
Starting Active@
UNERASER for
Windows
Start the program and display drive information in Microsoft Windows operating system using the following steps:
1 In Windows, click the Microsoft Start button.
2 Click All Programs > Active@ UNERASER > Active@ UNERASER for Windows (Console). The UNERASER Windows Console appears. Figure 4-2 UNERASER Windows Console
3 On the left side of the window all detected drive devices or partitions are listed and numbered. Beneath each drive device or partition, logical drives appear in a tree formation, as shown in the figure above. Deleted partitions and hard drive space not occupied by partitions are listed as “Unallocated”.
Commands at the bottom of this screen are described below. Click on the links for more information about that item:
• Ctrl+V - View Sectors - View the sectors of this drive or partition with the Hex Viewer.
• Ctrl+I - Image - Create a Disk Image of this partition or drive. See . • ENTER - Scan - Perform a simple Drive Scan. See Performing a Drive
Scan.
• F9 - Menu - Display a command menu bar at the top of the screen. Choose a menu command with the mouse pointer, or using the arrow keys.
4 Use the mouse pointer or arrow keys to move the cursor over items on the list of drives. Positioning the cursor on a named drive, displays its information on the right side of the program window.
Starting Active@ UNERASER for Windows 13
Command Menu Bar
The table below describes the command menu bar at the top of the console in the main page.
Table 4-1 Command Menu Bar Menu Item Command
Keyboard
Shortcut Description
File Refresh Devices [Ctrl]+[D] Refresh the report showing all devices on the system.
Save Hardware Info
[Ctrl]+[H] Save report of hardware information to a text file.
Save Log [Ctrl]+[L] Save a log of UNERASER activity to a text file.
Exit [Esc] From the main screen, exit the utility and return to DOS. From any other screen, exit that function and return to a previous screen.
View Activity Log [Ctrl]+[A] Open the screen with the list of UNERASER activities.
Sectors in Hex Viewer
[Ctrl]+[V] Open the Hex Viewer to view sectors of the selected partition.
Scan Advanced Device Scan
[Enter] With a device selected, start the Advanced Device Scan.
Low Level Device Scan
[Ctrl]+[Enter] With a device selected, start the Low Level Device Scan
Basic Drive Scan [Enter] With a logical drive selected, start the Basic Drive Scan.
Advanced Drive Scan
[Ctrl]+[Enter] With a logical drive selected, start the Advanced Drive Scan.
Search for Files and Folders
[Ctrl]+[F] Start a Basic Drive Scan and then open the Search parameters dialog box.
Image Create Image [Ctrl]+[I] Create a Disk Image file. Open Image [Ctrl]+[O] Open an existing Disk Image file. Compose Image
Manually
Edit a Disk Image file.
Check Image [Ctrl]+[C] Check the validity of an existing disk image. Check
Composed Image
Check the validity of an existing disk image that is composed from disk image chunks (a disk image created by a third-party utility)
Performing a Drive Scan
Before you start data recovery or search for files and folders, the hard drive must be scanned. Scanning uncovers areas of the hard drive that may contain deleted files. If you are searching for a deleted partition or logical drive, read the instructions in Performing a Device Scan.
There are two types of drive scan, as described below:
• Basic Drive Scan is a quick and general scan. Most of deleted files and folders can be found with this type of scan. Try this scan first [Enter]. • Advanced Drive Scan is much slower as it processes the entire surface of
the hard drive, detecting all possible clues that may reveal deleted data. If the Basic Drive Scan does not reveal the files you are searching for, try this scan next [Ctrl]+[Enter].
After the cursor is positioned over a logical drive, press [Enter] to scan that drive with a Basic Drive Scan.
To stop (cancel) the scanning process, press [Esc] at any time.
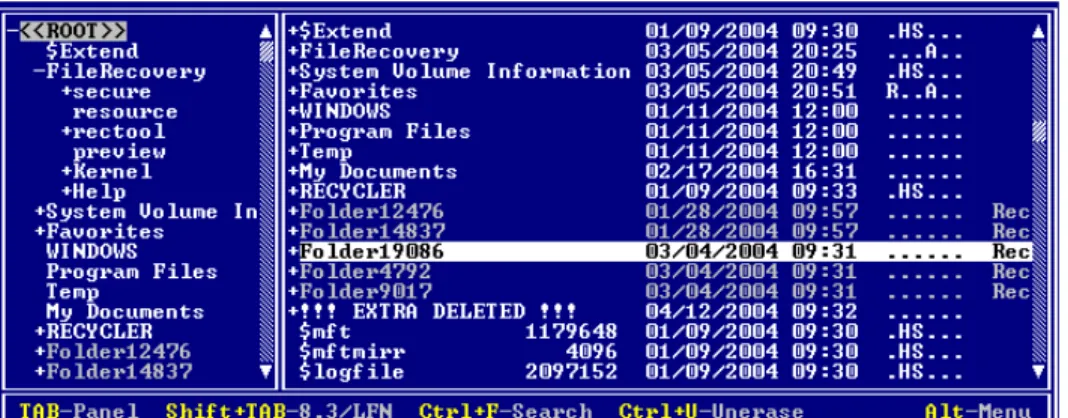
After completing a drive scan the screen displays the areas where data may have been deleted, similar to the figure below:
Figure 4-3 After Drive Scan
Commands at the bottom of this screen are described below: • TAB-Panel - Switch between left and right panels.
• Shift+TAB-8.3/LFN - Change file names from 8.3 notation to Long File Name notation.
• Ctrl+F-Search - Open the search parameter dialog box to begin search. • Ctrl+U-Unerase - Unerase file.
• F9-Menu - Open the command menu at the top of the console.
Try to locate your files and folders visually by going through the folder tree. Alternately, use the instructions found in Searching for Deleted Files and Folders.
Starting Active@ UNERASER for Windows 15
Performing a Device
Scan Do a Device Scan when a partition or logical drive has been deleted or damaged. In other words, use it when you are unable to locate a drive listed under My Computer.
A Device Scan processes the surface of the physical device trying to locate all possible logical drives and partitions, whether they are existing, damaged or deleted.
There are two types of device scan, as described below:
• Advanced Device Scan reads each hard drive track and looks for the boot sectors of deleted or damaged partitions. If found, a boot sector is
interpreted as a drive. You can scan it and the look for deleted files and folders.
• Low Level Device Scan reads each hard drive sector looking for boot sectors and tries to reconstruct drive structures based on remnants of the drive's system structures that it finds. This is very slow process but usually detects more partitions.
To perform a Device Scan follow the steps below:
1 From the UNERASER DOS/Console main screen, choose a physical device or partition that contains your data. It may be a hard disk drive or a floppy disk drive.
2 Press [F9] > Scan > Advanced Device Scan or press [Enter] to start the Advanced Device Scan. The Advanced Scan dialog box appears.
3 Alternately, press [F9] > Scan > Low Level Scan or press [Ctrl]+[Enter] to start the Low Level Device Scan.
Figure 4-4 Advanced Device Scan Options
4 Specify scanning parameters using [Tab] and arrows keys. Press [Enter] to start the scan. Press [Esc] to close this dialog box and return to a previous screen. Use the descriptions below to help configure the device scan: • From sector: - To sector - If you know the approximate sector location,
enter a range here to reduce scanning time.
• Confirm detected drive - Yes (default) = If a new drive is detected during a device scan, a dialog box appears and waits for an answer whether to add
the new device to the tree or not. No = Any newly detected device is added to the tree automatically with no human interaction.
• Skip detected size - Yes (default) = If a new drive is detected during a device scan, the size of the device is calculated and the area is not scanned (it is skipped). Scanning continues past the boundary of this new device. No = The new device is scanned.
• Scan every sector - Usually a Drive Boot Sector is located at the beginning of each track (every 63rd sector). Yes = Scan every sector (slow). No (default) = Scan every track (63 times faster).
5 After the scan starts, you can watch the progress bar and wait until the device scan is finished. You can cancel the operation anytime by pressing [Esc].
6 After the device scan is complete, all detected partitions and logical drives appear. These drives are ready for the Drive Scan process the same way as with regular drives.
Starting Active@ UNERASER for Windows 17
Searching for Deleted Files and Folders
Before performing the search process, scan the drive to reveal areas that contain damaged or deleted files and folders. Follow the steps below to locate individual deleted files and folders:
1 In Windows, check the Windows Recycle Bin to see if the file or folder is there. If it is, use standard Windows Restore command to recover it from there. If not, continue with step 2.
2 If working in DOS, restart your PC in DOS mode with the UNDELETE bootable floppy. If working in Windows, start Active@ UNERASER.
3 If you know exactly where the files or folders were located before being deleted, use Performing a Drive Scan procedure.
Figure 4-5 Drive Scan Completed
4 After drive has been scanned go directly to the folder where you know the files or folders should be.
If you do not see your files where they should be, look under the !!!EXTRA DELETED!!! tree node. If the parent of the file or folder has been deleted or damaged, most likely the item you are looking for will be in this virtual folder. If you are still unable to locate your data, proceed to the next step.
(i)
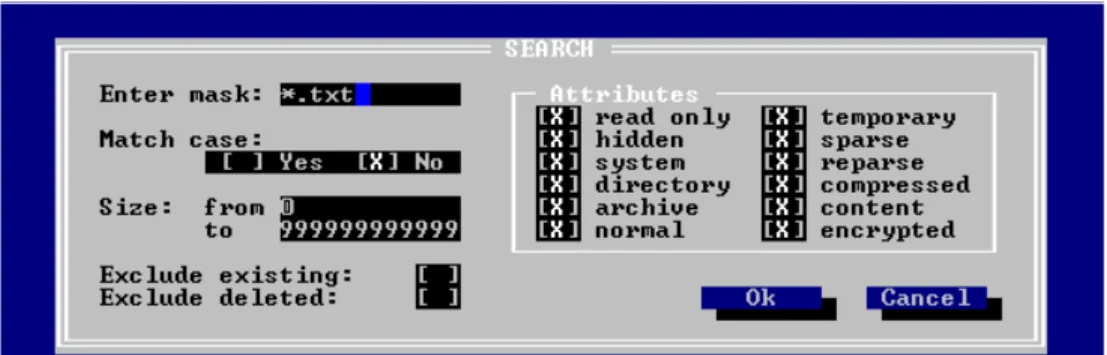
Note: If you see !!!EXTRA!!!, use [Shift]+[Tab] to change the file name display from 8.3 to Long File Name (LFN).5 If you cannot find the deleted file or folder by viewing this list, try Search mode. Position marker to the Drive or Folder and press [F9 > Scan > Search for Files
or press [Ctrl]+[F]. The Search dialog box appears. Specify the search criteria here:
Figure 4-6 Search Dialog Box
Use the [Tab] key to move from field to field. Use the spacebar to select or uncheck each item. An “X” indicates the item is selected. Use the descriptions below to help configure the search parameters:
• Enter Mask - Define a search pattern, for example type “*.doc” to find all Microsoft Word files (with doc extension). For help with this, see Searching for Files by Name, below.
• Match case - Case sensitive or non-sensitive search.
• Size - If you know the size range for files to be searched, you can reduce the length of the search time by eliminating files larger or smaller than the sizes you indicate here.
• Attributes - Each selected attribute will be included in the search. If you know, for example that the file you are looking for is not hidden, then uncheck that attribute. Search will ignore that attribute in all files.
• Exclude Existing - With this item selected, search will not report on files that presently exist on the drive. Only deleted or damaged files and folders will be reported.
• Exclude Deleted - With this item selected, search will not report on files that are known to be deleted. It will report on damaged files.
Press [Enter] to run the search. After the search is complete, examine the list of matched files and folders.
6 If no files were found after Basic Drive Scan, run an Advanced Drive Scan to look more closely at all the drive's surfaces. After the Advanced Scan, repeat Step 4, above.
If, after completing all five steps above, your files and folders still cannot be found, it is likely that the physical drive space has been completely overwritten with other data. If this is the case, no recovery tools can help you.
Overwriting a drive’s physical space can happen when a lot of writing
operations occur on a drive (for example, during software installation). As well, Windows operating system sometimes creates temporary files for different processes. This might affect an area with deleted data as well.
Using the Hex/Text Viewer 19
Searching for Files by Name
If you know the name or part of the name of the deleted files or folders, create a search pattern, similar to a search in Microsoft DOS or Windows.
The asterisk or star symbol (*) is used as a wild-card character. The search engine looks for the file name, replacing the star with any number of characters. The question mark symbol (?) is used to replace a single variable character. The search engine looks for the file name and replaces the question mark with another single character.
Table 4-2 Examples of Searchable Expressions
Using the
Hex/Text Viewer
Use the Hex/Text Viewer to view sectors in a file, a logical drive or physical device. Follow the steps below:1 Start Active@ UNERASER and use the arrow keys to set the marker on a file, a drive or a device.
2 Run the View Sectors command by one of the following methods: • Press [Ctrl]+[V] key combination
• Press [F9] > View > Sectors in Hex/Text Viewer.
A preview window appears and you can see the data in Hex/Text format, similar to the figure below:
Figure 4-7 Hex/Text Viewer
3 You can inspect the data using keyboard keys, as described below: • [TAB] - Switch between Text mode and Hex/Text mode
Example Search Results
* All named files and folders *.txt All files with the suffix “txt” My*.* All files starting with “My”
My p????. All files starting with “My p” text, having eight characters in the file name and no suffix or extension
• [Ctrl]+[G] - Go to a specific sector number. Type the sector number manually
• Arrow Keys - Move the red marker within view area
• [Page Up], [Page Down] - Go one sector backward or forward • [Home], [End] - Jump to the first or last sector
Numbering Sectors
Sectors are numbered in three different ways, as described below:
Files (relative file sectors) - Numbering starts at sector zero and continues to last sector of the file (calculated as file size divided by 512 plus one) Logical Drives (logical sectors) - Numbering starts at sector zero and continues to the last sectors on the drive (calculated as drive size divided by 512 minus one)
Physical Device (physical sectors) - Number starts at sector zero and continues to the last sector on the device (calculated as device size divided by 512 minus one)
UNERASE Deleted
Data
Use the scan or search procedures above to identify deleted files and folders and to inspect the contents to see if the data is worth recovering. Use the methods below to recover deleted files and folders.Unerasing a Deleted
File To unerase file (copy its content to another safe location) execute the Unerase command by one of the following methods: • Press [Ctrl]+[U] key combination
• Press [F9] > File/Folder > UNERASE
A dialog box appears, similar to the figure below: Figure 4-8 Recovery To Dialog Box
Select a secure drive and folder where the restored file will be saved. Press [Enter] to begin the process.
UNERASE Deleted Data 21
After the recovery process is complete, verify the contents of recovered files and subfolders. In some cases, a file can not be restored completely because its contents or a part of it has been overwritten.
(!)
Important: For the safety reasons, the utility warns you if you are trying to write the restored file back into the same drive. A newly-created file requires space to be saved. It is possible to overwrite the contents of the other deleted files or part of the very file you are trying to recover. Always restore files to another logicalremovable, floppy or network drive.
Unerasing a Deleted
Folder To restore the contents of a folder recursively (including files and subfolders), execute the Unerase command by one of the following methods: • Press [Ctrl]+[U] key combination
• Press [F9] > File/Folder > UNERASE
A dialog box appears, similar to the figure below: Figure 4-9 Recovery To Dialog Box
Select a secure drive and folder where the restored folder contents will be saved.
Press [Enter] to begin the process.
After the recovery process is complete, verify the contents of recovered files and subfolders.
(i)
Note: If the folder that you've recovered under DOS contains files with long filenames, the batch file _RENAME.BAT is created at the destination folder and each subfolder. When you run this file under the Windows environment later on, it will rename temporary short (8.3) DOS filenames to more descriptive long file names supported by Windows. You cannot create files with long filenames under the DOS environment as long as DOS does not support them.(!)
Important: For the safety reasons, the utility warns you if you are trying to write the restored file back into the same drive. A newly-created file requires space to besaved. It is possible to overwrite the contents of the other deleted files or part of the very file you are trying to recover. Always restore files to another logical
removable, floppy or network drive.
Creating a Disk
Image A Disk Image is a mirror copy of your entire logical drive or physical device stored as set of files. It may be a good idea to create a Disk Image for a drive containing deleted files that you want to recover, if you have enough space on another drive.
“Why should I create a Disk Image on a drive that holds my deleted files?” If you run into difficulty, or do something wrong while attempting to recover deleted files (for example, by recovering them onto the originating drive instead of a different drive, thereby destroying their contents), you will be able to recover these deleted files and folders from the Disk Image that you have wisely created.
Disk Image consists of configuration file (with an extension .DIM) and set of files having extensions .000, .001, .002 and so on. The size of each file is 2 Gb to accommodate most file systems (FAT16 and FAT32 file systems do not support file sizes larger than 2 Gb and 4 Gb respectively).
Here are the steps to create a Disk Image:
1 Start Active@ UNERASER and select a drive or hardware device.
2 Run the Create Image command by doing one of the following: • Press [Ctrl]+[I] key combination
• Press [F9] > Image > Create Image
The Create Image dialog box appears, similar to the figure below: Figure 4-10 Create Image Dialog Box
3 In this dialog box, create a description, choose a compression ratio, a Disk Image location and create an Image File name.
UNERASE Deleted Data 23
4 Watch the progress and wait while drive's contents are copied to the new location. You can cancel the process of image creation anytime by pressing [Esc].
(!)
Important: The Target Location for the Create Image command must always be specified on another drive.Checking the Disk Image
After a Disk Image is created it is a good idea to check its validity to be sure that everything was written properly.
To check the validity of created Disk Image, follow these steps:
1 Start Active@ UNERASER.
2 Run the Check Image command by doing one of the following: • Press [Ctrl]+[C] key combination
• Press [F9] > Image > Check Image The File Open dialog box appears.
3 Select the Disk Image configuration file (*.DIM) in the File Open dialog and press Ok.
4 Watch the progress and view the result. You can stop data verification anytime by pressing [Esc].
Working with Disk
Image A Disk Image is a mirror copy of your entire logical drive or physical device stored as set of files. It may be a good idea to create a Disk Image for a drive containing deleted files that you want to recover, if you have enough space on another drive.
To open a Disk Image (via configuration file) follow these steps:
1 Start Active@ UNERASER.
2 Run the Open Image command by doing one of the following: • Press [Ctrl]+[O] key combination
• Press [F9] > Image > Open Image The Open Image dialog box appears.
3 Select an existing Disk Image (file with DIM extension) in the Open Image dialog and press [OK].
A Virtual Disk Image appears in the list of devices. Figure 4-11 Virtual Disk Image Appears
4 The opened disk image appears underneath existing devices in the tree in the left pane of the console. Work with an opened Disk Image the same way as with any regular drive or device, i.e. scan, find and restore files from it. Opening a Third Party Disk Image
If you have created a Raw Disk Image using tools other than Active@
UNERASER, you still can access and recover data from it by composing disk image from chunks.
To open a Disk Image from chunks (without configuration file), follow these steps:
1 Start Active@ UNERASER.
2 Press [F9] > Image > Run Compose Image. The Compose Image dialog box appears. Figure 4-12 Compose Image Dialog Box
3 In this dialog box, build a Disk Image by adding one or more chunks of the image. Press Add. A File Open dialog box appears.
UNERASE Deleted Data 25
5 Specify image parameters in the Compose Image dialog box. A description of the parameters follows:
• Image Type - Specify whether the image was created for a logical drive or a physical device
• Name - Image name as it will be displayed in the device tree
• Geometry - Device geometry (if you know it). You can leave default values here, it will work, but performance of the utility will be a bit slow.
Press Ok when all parameters are complete.
6 After refreshing the devices list, the new Disk Image appears in the tree. Work with this image the same way as with any regular device or drive. Scan it for partitions and files, find and restore files from it.
Long File Names
Support
Since Windows 95, filenames are not limited in size to the 8.3 pattern and can have a length of up to 255 characters. Standard View displays all files and folders the same way as DOS does, i.e. in 8.3 formats. However sometimes it is not convenient to see only first symbols of the long file name.To display long filenames (up to 36 symbols):
1 Boot in DOS mode and run Active@ UNERASER
2 Scan the particular drive by pressing [Enter].
3 Press the [Tab] key to switch to long filenames view (Figure 15)
Figure 4-13 Figure 15: Long file names display
Recovering Files
With Long Names It is important to note that you cannot create or recover files with long filenames under the DOS environment as long as DOS does not support long filenames. Files with long file names are saved with a temporary short file name (in the 8.3 format).
If you have recovered files and folders from the DOS environment and those files or folders have long filenames, you can recover the long filenames with a utility provided by Active@ UNERASER. This utility is a batch file named _RENAME.BAT. It is created in the UNERASE destination folder and in each subfolder.
After completing the recovery process in DOS, restart your PC in Windows. Run _RENAME.BAT in the Windows environment to restore the more descriptive long filenames to your files.
5
U
SING
C
OMMAND
-L
INE
P
ARAMETERS
This chapter describes how to use the application with command line parameters.
Overview of
Command Line
Parameters
Active@ UNERASER for DOS supports a set of command line parameters. To view them and their definitions, type:
A:\>UNERASER -?
Table 5-1 Command Line Parameters
Parameter Description Note
No parameter The DOS Interactive screens appear.
-? Question mark The table of parameters appears.
-writelog[=fullpath] Create a log file with debug information
-writetest[=fullpath] Create a file containing hardware configuration -retries=[0...99] When an error is detected, the
utility attempts to read and write the area this number of times before moving on.
6
D
ATA
R
ECOVERY
C
ONCEPTS
This chapter describes some basic concepts that might help when unerasing data.
Hard Disk Drive
Basics
A hard disk is a sealed unit containing a number of platters in a stack. Hard disks may be mounted in a horizontal or a vertical position. In this description, the hard drive is mounted horizontally.Electromagnetic read/write heads are positioned above and below each platter. As the platters spin, the drive heads move in toward the center surface and out toward the edge. In this way, the drive heads can reach the entire surface of each platter.
Making Tracks On a hard disk, data is stored in thin, concentric bands. A drive head, while in one position can read or write a circular ring, or band called a track. There can be more than a thousand tracks on a 3.5-inch hard disk. Sections within each track are called sectors. A sector is the smallest physical storage unit on a disk, and is almost always 512 bytes (0.5 kB) in size.
The figure below shows a hard disk with two platters. Figure 6-1 Parts of a Hard Drive
The structure of older hard drives (i.e. prior to Windows 95) will refer to a cylinder/ head/ sector notation. A cylinder is formed while all drive heads are in the same position on the disk. The tracks, stacked on top of each other form a cylinder. This scheme is slowly being eliminated with modern hard drives. All new disks use a translation factor to make their actual hardware layout appear
continuous, as this is the way that operating systems from Windows 95 onward like to work.
To the operating system of a computer, tracks are logical rather than physical in structure, and are established when the disk is low-level formatted. Tracks are numbered, starting at 0 (the outermost edge of the disk), and going up to the highest numbered track, typically 1,023, (close to the center). Similarly, there are 1,024 cylinders (numbered from 0 to 1,023) on a hard disk.
The stack of platters rotate at a constant speed. The drive head, while
positioned close to the center of the disk reads from a surface that is passing by more slowly than the surface at the outer edges of the disk. To compensate for this physical difference, tracks near the outside of the disk are less-densely populated with data than the tracks near the center of the disk. The result of the different data density is that the same amount of data can be read over the same period of time, from any drive head position.
The disk space is filled with data according to a standard plan. One side of one platter contains space reserved for hardware track-positioning information and is not available to the operating system. Thus, a disk assembly containing two platters has three sides available for data. Track-positioning data is written to the disk during assembly at the factory. The system disk controller reads this data to place the drive heads in the correct sector position.
Sectors and Clusters A sector, being the smallest physical storage unit on the disk, is almost always 512 bytes in size because 512 is a power of 2 (2 to the power of 9). The number 2 is used because there are two states in the most basic of computer
languages - on and off.
Each disk sector is labelled using the factory track-positioning data. Sector identification data is written to the area immediately before the contents of the sector and identifies the starting address of the sector.
The optimal method of storing a file on a disk is in a contiguous series, that is, all data in a stream stored end-to-end in a single line. As many files are larger than 512 bytes, it is up to the file system to allocate sectors to store the file’s data. For example, if the file size is 800 bytes, two 512 k sectors are allocated for the file. A cluster is typically the same size as a sector. These two sectors with 800 bytes of data are called two clusters. They are called clusters because the space is reserved for the data contents. This process protects the stored data from being over-written. Later, if data is appended to the file and its size grows to 1600 bytes, another two clusters are allocated, storing the entire file within four clusters.
If contiguous clusters are not available (clusters that are adjacent to each other on the disk), the second two clusters may be written elsewhere on the same disk or within the same cylinder or on a different cylinder - wherever the file system finds two sectors available. A file stored in this non-contiguous manner is considered to be fragmented. Fragmentation can slow down system
performance if the file system must direct the drive heads to several different addresses to find all the data in the file you want to read. The extra time for the heads to travel to a number of addresses causes a delay before the entire file is retrieved.
The FAT File System 31
Cluster size can be changed to optimize file storage. A larger cluster size reduces the potential for fragmentation, but increases the likelihood that clusters will have unused space. Using clusters larger than one sector reduces fragmentation, and reduces the amount of disk space needed to store the information about the used and unused areas on the disk.
The FAT File
System
The File Allocation Table (FAT) file system is a simple file system originally designed for small disks and simple folder structures. The FAT file system is named for its method of organization, the file allocation table, which resides at the beginning of the volume. To protect the volume, two copies of the table are kept, in case one becomes damaged. In addition, the file allocation tables and the root folder must be stored in a fixed location so that the files needed to start the system can be correctly located.A volume formatted with the FAT file system is allocated in clusters. The default cluster size is determined by the size of the volume. For the FAT file system, the cluster number must fit in 16 bits and must be a power of two.
Structure of a FAT
Volume The figure below illustrates how the FAT file system organizes a volume. Figure 6-2
This section covers information about the FAT system. Topics covered are: • FAT Partition Boot Sector
• FAT File System • FAT Root Folder • FAT Folder Structure • FAT32 Features
Table 6-1 displays differences between the FAT systems: Table 6-1 Differences Between FAT Systems
For more detailed information see resource kits on Microsoft's web site http://www.microsoft.com/windows/reskits/webresources/default.asp or Microsoft Developers Network (MSDN) http://msdn.microsoft.com.
System
Bytes Per Cluster Within
File Allocation Table Cluster Limit
FAT12 1.5 Fewer than 4,087 clusters.
FAT16 2 Between 4,087 and 65,526 clusters,
inclusive.
FAT32 4 Between 65,526 and 268,435,456
FAT Partition Boot Sector
The Partition Boot Sector contains information that the file system uses to access the volume. On x86-based computers, the Master Boot Record use the Partition Boot Sector on the system partition to load the operating system kernel files.
Table 6-2 describes the fields in the Partition Boot Sector for a volume formatted with the FAT file system.
Table 6-2 Fields in Partition Boot Sector (FAT File System)
Table 6-3 describes BIOS Parameter Block and Extended BIOS Parameter Block Fields.
Table 6-3 BIOS Parameter Block and Extended BIOS Parameter Block Fields Byte Offset
(in hex) Field Length
Sample
Value Description
00 3 bytes EB 3C 90 Jump instruction.
03 8 bytes MSDOS5.0 OEM Name in text
0B 25 bytes BIOS Parameter Block
24 26 bytes Extended BIOS Parameter Block
3E 448 bytes Bootstrap code
1FE 2 bytes 0x55AA End of sector marker
Byte Offset Field Length
Sample
Value Description
0x0B WORD 0x0002 Bytes per Sector. The size of a hardware sector. For most disks in use in the United States, the value of this field is 512.
0x0D BYTE 0x08 Sectors Per Cluster. The number of sectors in a cluster. The default cluster size for a volume depends on the volume size and the file system. 0x0E WORD 0x0100 Reserved Sectors. The number of sectors from
the Partition Boot Sector to the start of the first file allocation table, including the Partition Boot Sector. The minimum value is 1. If the value is greater than 1, it means that the bootstrap code is too long to fit completely in the Partition Boot Sector.
0x10 BYTE 0x02 Number of file allocation tables (FATs). The number of copies of the file allocation table on the volume. Typically, the value of this field is 2. 0x11 WORD 0x0002 Root Entries. The total number of file name
entries that can be stored in the root folder of the volume. One entry is always used as a Volume Label. Files with long filenames use up multiple entries per file. Therefore, the largest number of files in the root folder is typically 511, but you will run out of entries sooner if you use long filenames.
0x13 WORD 0x0000 Small Sectors. The number of sectors on the volume if the number fits in 16 bits (65535). For volumes larger than 65536 sectors, this field has a value of 0 and the Large Sectors field is used instead.
The FAT File System 33
For more detailed information see resource kits on Microsoft's web site http://www.microsoft.com/windows/reskits/webresources/default.asp or Microsoft Developers Network (MSDN) http://msdn.microsoft.com File Allocation
System The FAT file allocation system is named for its method of organization, the file allocation table, which resides at the beginning of the volume. To protect the volume, two copies of the table are kept, in case one becomes damaged. In addition, the file allocation tables must be stored in a fixed location so that the files needed to start the system can be correctly located.
The file allocation table contains the following types of information about each cluster on the volume (see example below for FAT16):
0x15 BYTE 0xF8 Media Type. Provides information about the media being used. A value of 0xF8 indicates a hard disk.
0x16 WORD 0xC900 Sectors per file allocation table (FAT). Number of sectors occupied by each of the file allocation tables on the volume. By using this information, together with the Number of FATs and Reserved Sectors, you can compute where the root folder begins. By using the number of entries in the root folder, you can also compute where the user data area of the volume begins.
0x18 WORD 0x3F00 Sectors per Track. The apparent disk geometry in use when the disk was low-level formatted. 0x1A WORD 0x1000 Number of Heads. The apparent disk geometry
in use when the disk was low-level formatted. 0x1C DWORD 3F 00 00 00 Hidden Sectors. Same as the Relative Sector
field in the Partition Table.
0x20 DWORD 51 42 06 00 Large Sectors. If the Small Sectors field is zero, this field contains the total number of sectors in the volume. If Small Sectors is nonzero, this field contains zero.
0x24 BYTE 0x80 Physical Disk Number. This is related to the BIOS physical disk number. Floppy drives are numbered starting with 0x00 for the A disk. Physical hard disks are numbered starting with 0x80. The value is typically 0x80 for hard disks, regardless of how many physical disk drives exist, because the value is only relevant if the device is the startup disk.
0x25 BYTE 0x00 Current Head. Not used by the FAT file system. 0x26 BYTE 0x29 Signature. Must be either 0x28 or 0x29 in order
to be recognized by Windows NT.
0x27 4 bytes CE 13 46 30 Volume Serial Number. A unique number that is created when you format the volume.
0x2B 11 bytes NO NAME Volume Label. This field was used to store the volume label, but the volume label is now stored as special file in the root directory.
0x36 8 bytes FAT16 System ID. Either FAT12 or FAT16, depending on the format of the disk.
Byte Offset Field Length
Sample
• Unused (0x0000) • Cluster in use by a file • Bad cluster (0xFFF7)
• Last cluster in a file (0xFFF8-0xFFFF)
There is no organization to the FAT folder structure, and files are given the first available location on the volume. The starting cluster number is the address of the first cluster used by the file. Each cluster contains a pointer to the next cluster in the file, or an indication (0xFFFF) that this cluster is the end of the file. These links and end of file indicators are shown below.
Figure 6-3 Example of File Allocation Table
This illustration shows three files. The file File1.txt is a file that is large enough to use three clusters. The second file, File2.txt, is a fragmented file that also requires three clusters. A small file, File3.txt, fits completely in one cluster. In each case, the folder structure points to the first cluster of the file.
For more detailed information see resource kits on Microsoft's web site http://www.microsoft.com/windows/reskits/webresources/default.asp or Microsoft Developers Network (MSDN) http://msdn.microsoft.com
FAT Root Folder The root folder contains an entry for each file and folder on the root. The only difference between the root folder and other folders is that the root folder is on a specified location on the disk and has a fixed size (512 entries for a hard disk, number of entries on a floppy disk depends on the size of the disk).
See Folder Structure topic for details about folder organization.
For more detailed information see resource kits on Microsoft's web site http://www.microsoft.com/windows/reskits/webresources/default.asp or Microsoft Developers Network (MSDN) http://msdn.microsoft.com FAT Folder Structure Folders have set of 32-byte Folder Entries for each file and subfolder
contained in the folder (see example figure below).
The Folder Entry includes the following information: • Name (eight-plus-three characters)
• Attribute byte (8 bits worth of information, described later in this section) • Create time (24 bits)
The FAT File System 35
• Create date (16 bits) • Last access date (16 bits) • Last modified time (16 bits) • Last modified date (16 bits.)
• Starting cluster number in the file allocation table (16 bits) • File size (32 bits)
There is no organization to the FAT folder structure, and files are given the first available location on the volume. The starting cluster number is the address of the first cluster used by the file. Each cluster contains a pointer to the next cluster in the file, or an indication (0xFFFF) that this cluster is the end of the file. See File Allocation System for details.
The information in the folder is used by all operating systems that support the FAT file system. In addition, Windows NT can store additional time stamps in a FAT folder entry. These time stamps show when the file was created or last accessed and are used principally by POSIX applications.
Because all entries in a folder are the same size, the attribute byte for each entry in a folder describes what kind of entry it is. One bit indicates that the entry is for a subfolder, while another bit marks the entry as a volume label. Normally, only the operating system controls the settings of these bits. A FAT file has four attributes bits that can be turned on or off by the user — archive file, system file, hidden file, and read-only file.
Filenames on FAT Volumes
Beginning with Windows NT 3.5, files created or renamed on FAT volumes use the attribute bits to support long filenames in a way that does not interfere with how MS-DOS or OS/2 accesses the volume. Whenever a user creates a file with a long filename, Windows creates an eight-plus-three name for the file. In addition to this conventional entry, Windows creates one or more secondary folder entries for the file, one for each 13 characters in the long filename. Each of these secondary folder entries stores a corresponding part of the long filename in Unicode. Windows sets the volume, read-only, system, and hidden file attribute bits of the secondary folder entry to mark it as part of a long filename. MS-DOS and OS/2 generally ignore folder entries with all four of these attribute bits set, so these entries are effectively invisible to these operating systems. Instead, MS-DOS and OS/2 access the file by using the conventional eight-plus-three filename contained in the folder entry for the file.
Example of Folder Entries for the long filename
Figure 6-4 below shows all of the folder entries for the file Thequi~1.fox, which has a long name of The quick brown.fox. The long name is in Unicode, so each character in the name uses two bytes in the folder entry. The attribute field for the long name entries has the value 0x0F. The attribute field for the short name is 0x20.
Figure 6-4 Long File Name Folder Entry Example
(i)
Note: Windows NT/2000/XP and Windows 95/98/ME use the same algorithm to create long and short filenames. On computers that dual-boot these two operating systems, files that you create when running one of the operating systems can be accessed when running the other.FAT32 Features The following topics describe the FAT32 file system. • File System Specifications
• Boot Sector and Bootstrap Modifications • FAT Mirroring
• Partition Types
File System Specifications
FAT32 is a derivative of the File Allocation Table (FAT) file system that supports drives with over 2GB of storage. Because FAT32 drives can contain more than 65,526 clusters, smaller clusters are used than on large FAT16 drives. This method results in more efficient space allocation on the FAT32 drive.
The FAT File System 37
The FAT32 file system includes four bytes per cluster within the file allocation table. Note that the high 4 bits of the 32-bit values in the FAT32 file allocation table are reserved and are not part of the cluster number.
Boot Sector and Bootstrap Modifications Table 6-4 Modifications to Boot Sector
BPB (FAT32)
The BPB for FAT32 drives is an extended version of the FAT16/FAT12 BPB. It contains identical information to a standard BPB, but also includes several extra fields for FAT32 specific information.
This structure is implemented in Windows OEM Service Release 2 and later.
A_BF_BPB STRUC A_BF_BPB_BytesPerSector DW ? A_BF_BPB_SectorsPerCluster DB ? A_BF_BPB_ReservedSectors DW ? A_BF_BPB_NumberOfFATs DB ? A_BF_BPB_RootEntries DW ? A_BF_BPB_TotalSectors DW ? A_BF_BPB_MediaDescriptor DB ? A_BF_BPB_SectorsPerFAT DW ? Modifications Description
Reserved Sectors FAT32 drives contain more reserved sectors than FAT16 or FAT12 drives. The number of reserved sectors is usually 32, but can vary.
Boot Sector Modifications Because a FAT32 BIOS Parameter Block (BPB), represented by the BPB structure, is larger than a standard BPB, the boot record on FAT32 drives is greater than 1 sector. In addition, there is a sector in the reserved area on FAT32 drives that contains values for the count of free clusters and the cluster number of the most recently allocated cluster. These values are members of
the BIGFATBOOTFSINFO structure which is contained
within this sector. These additional fields allow the system to initialize the values without having to read the entire file allocation table.
Root Directory The root directory on a FAT32 drive is not stored in a fixed location as it is on FAT16 and FAT12 drives. On FAT32 drives, the root directory is an ordinary cluster chain. The A_BF_BPB_RootDirStrtClus member in the BPB structure contains the number of the first cluster in the root directory. This allows the root directory to grow as needed. In addition, the BPB_RootEntries member of BPB is ignored on a FAT32 drive.
Sectors Per FAT The A_BF_BPB_SectorsPerFAT member of BPB is
always zero on a FAT32 drive. Additionally, the A_BF_BPB_BigSectorsPerFat and
A_BF_BPB_BigSectorsPerFatHi members of the
updated BPB provide equivalent information for FAT32 media.