Oracle Communications Diameter Signaling Router Diameter Security Application User's Guide, Release 8.4 Copyright © 2020 Oracle and/or its affiliates. All rights reserved.
This software and related documentation are provided under a license agreement containing restrictions on use and disclosure and are protected by intellectual property laws. Except as expressly permitted in your license agreement or allowed by law, you may not use, copy, reproduce, translate, broadcast, modify, license, transmit, distribute, exhibit, perform, publish, or display any part, in any form, or by any means. Reverse engineering, disassembly, or decompilation of this software, unless required by law for interoperability, is prohibited.
The information contained herein is subject to change without notice and is not warranted to be error-free. If you find any errors, please report them to us in writing.
If this is software or related documentation that is delivered to the U.S. Government or anyone licensing it on behalf of the U.S. Government, then the following notice is applicable:
U.S. GOVERNMENT END USERS: Oracle programs, including any operating system, integrated software, any programs installed on the hardware, and/or documentation, delivered to U.S. Government end users are "commercial computer software" pursuant to the applicable Federal Acquisition Regulation and agency-specific supplemental regulations. As such, use, duplication, disclosure, modification, and adaptation of the programs, including any operating system, integrated software, any programs installed on the hardware, and/or documentation, shall be subject to license terms and license restrictions applicable to the programs. No other rights are granted to the U.S. Government.
This software or hardware is developed for general use in a variety of information management applications. It is not developed or intended for use in any inherently dangerous applications, including applications that may create a risk of personal injury. If you use this software or hardware in dangerous applications, then you shall be responsible to take all appropriate fail-safe, backup, redundancy, and other measures to ensure its safe use. Oracle Corporation and its affiliates disclaim any liability for any damages caused by use of this software or hardware in dangerous applications.
Oracle and Java are registered trademarks of Oracle and/or its affiliates. Other names may be trademarks of their respective owners.
Intel and Intel Xeon are trademarks or registered trademarks of Intel Corporation. All SPARC trademarks are used under license and are trademarks or registered trademarks of SPARC International, Inc. AMD, Opteron, the AMD logo, and the AMD Opteron logo are trademarks or registered trademarks of Advanced Micro Devices. UNIX is a registered trademark of The Open Group. This software or hardware and documentation may provide access to or information about content, products, and services from third parties. Oracle Corporation and its affiliates are not responsible for and expressly disclaim all warranties of any kind with respect to third-party content, products, and services unless otherwise set forth in an applicable agreement between you and Oracle. Oracle Corporation and its affiliates will not be responsible for any loss, costs, or damages incurred due to your access to or use of third-party content, products, or services, except as set forth in an applicable agreement between you and Oracle. My Oracle Support (MOS) (https://support.oracle.com) is your initial point of contact for all product support and training needs. A representative at Customer Access Support (CAS) can assist you with MOS registration.
Call the CAS main number at 1-800-223-1711 (toll-free in the US), or call the Oracle Support hotline for your local country from the list at http://www.oracle.com/us/support/contact/index.html.
2. Understanding DSA Functionality and Logic ... 10
2.1 DSA Overview ... 11
2.2 Understanding DSA Functionality ... 11
2.3 DSA Logic Process... 12
2.3.1 DSA Mandatory Configuration ... 14
2.4 DSA Stateless Countermeasure Logic ... 14
2.4.1 Application-ID Whitelist Screening (AppIdWL) ... 14
2.4.2 Application-ID and Command-Code Consistency Check (AppCmdCst) ... 16
2.4.3 Origin Realm and Destination Realm Whitelist Screening (RealmWLScr) ... 16
2.4.4 Origin Host and Origin Realm Consistency Check (OhOrCstChk) ... 17
2.4.5 Destination-Realm and Origin-Realm Match Check (DrOrMatch) ... 17
2.4.6 Visited-PLMN-ID and Origin-Realm Consistency Check (VplmnORCst) ... 17
2.4.7 Realm and IMSI Consistency Check (RealmIMSICst) ... 18
2.4.8 Subscriber Identity Validation (SubsIdenValid) ... 19
2.4.9 Specific AVP Screening (SpecAVPScr) ... 19
2.4.10AVP Multiple Instance Check (AVPInstChk) ... 19
2.5 DSA Stateful Countermeasure Logic ... 20
2.5.1 Message Rate Monitoring (MsgRateMon) ... 20
2.5.2 Time-Distance Check (TimeDistChk) ... 20
2.5.3 Previous Location Check (PreLocChk) ... 21
2.5.4 Source Host Validation HSS (SrcHostValHss) ... 22
2.5.5 Source Host Validation MME (SrcHostValMme) ... 22
3. Configuring Comagent with UDR as Remote Server ... 23
3.1.1 ComAgent Configuration on DSR ... 23
3.1.2 Comagent Configuration on UDR ... 25
3.1.3 Comagent Connection Status Validation ... 26
4. UDR Configuration ... 29
4.1 Enable Security Profile on Active UDR NOAM for DSA Application ... 29
5. Upgrade ... 30
6. Configuring DSA ... 31
6.1 DSA Pre-Activation Activities ... 32
6.2 Activate DSA ... 32
6.3 Configure DSA Business Logic and Database Schema ... 33
6.4 Configure DSA Mandatory Options ... 33
6.5 ART Configuration for DSA ... 34
6.6 Enable DSA ... 34
6.7 Disable DSA ... 35
6.8 Deactivate DSA ... 35
7. DSA Tables ... 35
7.1 Configure DSA Tables ... 37
7.2 Provision DSA Tables ... 37
7.3 DSA Table Details ... 38
7.3.1 Security_Countermeasure_Config Table ... 38 7.3.2 Foreign_WL_Peers_Cfg_Sets Table ... 42 7.3.3 System_Config_Options Table ... 44 7.3.4 MCC_MNC_List Table ... 49 7.3.5 AppIdWL_Config Table ... 51 7.3.6 Realm_List Table ... 52 7.3.7 VplmnORCst_Config Table ... 53 7.3.8 SpecAVPScr_Config Table ... 54 7.3.9 AVPInstChk_Config Table ... 56 7.3.10TimeDistChk_Config Table ... 59 7.3.11TimeDistChk_MCC_Config table ... 60 7.3.12TimeDistChk_Continent_Config Table... 61 7.3.13MsgRateMon_Config Table ... 62 7.3.14AppCmdCst_Config Table ... 63 7.3.15CreateAndSendMsg_Config table ... 64
7.3.16Additional Provisioning Rules ... 65
7.3.17Exception_Rule_Config Table ... 66 7.3.18IMSI_Exception_Config Table ... 68 7.3.19MCC_MNC_Exception_Config Table ... 71 7.3.20Origin_Host_Exception_Config Table ... 73 7.3.21Realm_Exception_Config Table ... 76 7.3.22VPLMN_ID_Exception_Config Table ... 79
8.2.6 CreateAndSendMsg ... 87
8.3 SysMetric ... 87
8.3.1 VulnerableBy<Countermeasure ShortName> ... 87
8.3.2 MsgRatePerPeer ... 89
8.4 <Countermeasure ShortName>ExecFailed Alarm ... 90
9. DSA Vulnerable Message Logs ... 90
9.1 Configure Vulnerable Message Logging ... 91
9.2 dsa_application.cron File Script and Log ... 92
Appendix A. General Recommendations ... 93
10. Security Exception Function for CounterMeasure ... 93
10.1Configure Security Exception List ... 94
Appendix B. My Oracle Support (MOS) ... 95
Table 1. DSA Configuration Tables ... 35
Table 2. Security_Countermeasure_Config Fields ... 38
Table 3. Field Details for Security_Countermeasure_Config ... 40
Table 4. Foreigh_WL_Peers_Cfg_Sets Fields... 43
Table 5. Field Details for Foreigh_WL_Peers_Cfg_Sets ... 43
Table 6. System_Config_Options Fields ... 44
Table 7. Field Details for System_Config_Options ... 47
Table 8. MCC_MNC_List Fields... 49
Table 9. Field Details for MCC_MNC_List ... 50
Table 12. AppIdWL_Config Fields ... 51
Table 13. Field Details for AppIdWL_Config ... 51
Table 14. Realm_List Fields... 52
Table 15. Field Details for Realm_List ... 52
Table 16. VplmnORCst_Config ... 53
Table 17. Field Details for VplmnORCst_Config... 53
Table 18. SpecAVPScr_Config Fields ... 54
Table 19. Field Details for SpecAVPScr_Config ... 55
Table 21. Field Details for AVPInstChk_Config ... 57
Table 22. TimeDistChk_Config Fields ... 59
Table 23. Field Details for TimeDistChk_Config ... 59
Table 24. TimeDistChk_MCC_Config Fields ... 60
Table 25. Field Details for TimeDistChk_MCC_Config ... 60
Table 26. TimeDistChk_Continent_Config ... 61
Table 27. Field Details for TimeDistChk_Continent_Config ... 61
Table 28. MsgRateMon_Config Fields ... 62
Table 29. Field Details for MsgRateMon_Config ... 63
Table 30. AppCmdCst_Config Fields ... 63
Table 31. Field Details for AppCmdCst_Config ... 64
Table 32. CreateAndSendMsg_Config Fields... 65
Table 33. Field Details for CreateAndSendMsg_Config Table ... 65
Table 34. ProcessedBy<Countermeasure ShortName> Measurement ... 84
Table 35. DetectedBy<Countermeasure ShortName> Measurement ... 84
Table 36. DroppedBy<Countermeasure ShortName> Measurement ... 85
Table 37. RejectedBy<Countermeasure ShortName> Measurement ... 86
Table 38. FailedBy<Countermeasure ShortName> Measurement... 86
Table 39. CreateAndSendMsgReqCnt Measurement ... 87
Table 40. CreateAndSendMsgAnsCnt Measurement ... 87
Table 41. CreateAndSendMsgReqFailedCnt Measurement ... 87
Table 42. VulnerableBy<Countermeasure ShortName> SysMetric ... 87
Table 43. MsgRatePerPeer SysMetric ... 89
Table 44. <Countermeasure ShortName>ExecFailed Alarm ... 90
Table 45. fetchLogDsa.ini File Configuration Options ... 92
• Application control
• System Options (SO Only)
DSA is a Diameter Custom Application (DCA) framework application. Like other DCA framework applications, you can use DSA to work with the DCA framework functions. If the Diameter Security Application is visible in the DCA framework GUI menu, the application is already activated and provisioned.
1.1 References
[1] Diameter Custom Applications Feature Activation Guide [2] Diameter User’s Guide
[3] DCA Programmer’s Guide
1.2 Overview of DSA Tasks
This document provides the following types of information about DSA tasks: • DSA logic
• Procedures to configure and manage DSA components, including DSA provisioning tables • Information about DSA components and GUI elements
• References to related documentation including the DCA Programmer's Guide and DCA Feature Activation
1.3 Intended Scope and Audience
This content is intended for personnel who perform DSA tasks, and it includes procedures for performing tasks using the product GUI.
This content does not describe how to install or replace software or hardware.
The DSA software application interacts with UDR . For this reason, this content includes references to the shared applications, and might describe GUI options that are not visible or applicable to DSA.
1.4 Acronyms and Terms
Acronym or Term DefinitionAIR/A Authentication-Information Request/Answer
Acronym or Term Definition
AVP Attribute-Value Pair
The Diameter protocol consists of a header followed by one or more attribute-value pairs (AVPs). An AVP includes a header and is used to encapsulate protocol-specific data (for example, routing information) as well as authentication, authorization or accounting information.
CLR/A Cancel-Location Request/Answer
DCA Diameter Custom Application
DRA Diameter Relay Agent
DRL Diameter Routing Layer
The software layer of the stack that implements Diameter routing.
DSA Diameter Security Application
DSR Diameter Signaling Router
A set of co-located Message Processors which share common Diameter routing tables and are supported by a pair of OAM servers. A DSR Network Element may consist of one or more Diameter nodes.
DSR/A Delete-Subscriber-Data Request/Answer
FQDN Fully Qualified Domain Name
The complete domain name for a specific computer on the Internet (for example, www.oracle.com). A domain name that specifies its exact location in the tree hierarchy of the DNS.
GUI Graphical User Interface
The term given to that set of items and facilities which provides you with a graphic means for manipulating screen data rather than being limited to character based commands.
HSS Home Subscriber Server
A central database for subscriber information.
IDA Insert-Subscriber-Data Request
IDR Insert-Subscriber-Data Answer
IMSI International Mobile Subscriber Identity
A unique internal network ID identifying a mobile subscriber.
IP Internet Protocol
IP specifies the format of packets, also called datagrams, and the addressing scheme. The network layer for the TCP/IP protocol suite widely used on Ethernet networks, defined in STD 5, RFC 791. IP is a connectionless, best-effort packet switching protocol. It provides packet routing, fragmentation and re-assembly through the data link layer.
IPX IP exchange
KPI Key Performance Indicator
LTE Long-Term Evolution
See also MCC.
MNO Mobile Network Operator
MP Message Processor
The role of the Message Processor is to provide the application messaging protocol interfaces and processing. However, these servers also have OAM components. All Message Processors replicate from their Signaling OAM's database and generate faults to a Fault Management System.
NOAMP Network Operations, Administration, Maintenance, and Provisioning
NOR/A Notify Request/Answer
PLMN Public Land Mobile Network
A wireless communications network that uses land-based radio transmitters or base stations, intended for public use by terrestrial subscribers in vehicles or on foot. A PLMN is identified by its Mobile Country Code (MCC) and Mobile Network Code (MNC).
PRT Peer Route Table or Peer Routing Table
PUR/A Purge-UE Request/Answer
RSR/A Reset-Subscriber Request/Answer
SOAM System Operations, Administration, and Maintenance
SS7 Signaling System #7
A communications protocol that allows signaling points in a network to send messages to each other so that voice and data connections can be set up between these signaling points. These messages are sent over its own network and not over the revenue producing voice and data paths. The EAGLE is an STP, which is a device that routes these messages through the network.
ULR/A Update-Location Request/Answer
VPLMN Visited Public Land Mobile Network
The PLMN to which a mobile subscriber has roamed when leaving the subscriber’s Home Public Land Mobile Network.
UDR Unified Data Repository
1.5 Content Organization
• General information about DSA including overview and logic information, the organization of this content, and how to get technical assistance.
• Understanding DSA Functionality and Logic describes DSA logic. • Configuring DSA provides information about customizing DSA resources
• Configuring Comagent Configuration to store the state data in UDR DB. • Configuring UDR Specific configuration.
• Upgrade
• DSA Tables provides information about provisioning DSA database.
• DSA MEALs provides information about DSA Measurements, SysMetrics, and Alarms. • DSA Vulnerable Message Logs describes the usage of vulnerable message logging interface.
1.6 Customer Training
Oracle University offers training for service providers and enterprises. Visit our web site to view, and register for, Oracle Communications training:
http://education.oracle.com/communication
To obtain contact phone numbers for countries or regions, visit the Oracle University Education web site: www.oracle.com/education/contacts
2. Understanding DSA Functionality and Logic
This section describes DSA functionality and logic.DSA is a business logic application that functions within the DCA framework. The DCA framework is a prerequisite for DSA.
DSA must be activated to access DSA GUI menu and functionality.
Note: DCA framework is a set of APIs and services that are made available to DCA developers who need to develop applications.
The following documents contain information about the DCA framework applications and functionality: • DCA Feature Activation
• Activating and enabling DCA applications and framework • Deactivating DCA applications and framework
• DCA Programmer's Guide • Provisioning DCA
• Developing stateful DCA applications • Monitoring DCA applications
• Using DCA applications • Using Custom Meals • Using the DCA GUI
DSA lets the operator protect its LTE network from various threats/attacks from roaming partners. This application defines various validation procedures (called countermeasures), which can be independently enabled/disabled as per the user’s requirement. Some of these countermeasures require data from previous diameter messages to validate the current diameter message. In these cases, UDR is used to preserve the data of the previous diameter message, which is later retrieved for validating subsequent diameter messages.
During the message validation by a countermeasure, if the message is found as vulnerable by the countermeasure’s business logic, DSA allows the operator to either discard the vulnerable message or send an error answer to the vulnerable message or continue processing the vulnerable message (to find more vulnerabilities).
DSA is configured as the owner of a UDR database. To avoid overloading DSA, the Application Routing Table (ART) is configured to route only messages from foreign networks (Incoming Roaming Traffic, meaning, messages that have Origin-Realm that do not match the realm of the operator’s home network and Destination-Realm that match the realm of the operator’s home network) to DSA. Some countermeasures are required to process outgoing diameter messages that are being sent to a foreign network from the operator’s home network. These outgoing diameter messages to the foreign networks (Outgoing Traffic to foreign network, meaning, messages that are have Origin-Realm that match the realm of the operator’s home network and Destination-Realm that does not match the realm of the operator’s home network) are also routed to DSA.
DSA can be enabled and disabled as a DCA framework application. Disabling DSA on a specific site is possible only if DSA has been disabled on all the DA-MPs for that specific site. DSA can be completely configured at the SO.
The DCA framework creates applications on top of the Diameter Signaling Router (DSR) allowing for a faster development cycle. There can be up to 10 versions of each DCA in the various states.
To use DSA for DCA, the DCA framework must be activated on the NO. Activation needs to be
performed only once. See the [1] Diameter Custom Applications Feature Activation Guide for instructions on how to activate the DCA framework.
When DSA is initially installed, it is disabled, and you must manually enable it. To do so, navigate to Diameter > Maintenance > Applications and enable the application for every DMAP using DSA. If DSA is in the DCA framework GUI menu, this means the application is already enabled, but that does not guarantee it is provisioned. You can also disable DSA from the Diameter > Maintenance >
Applications.
DCA framework application functionality varies between the SO and NO, for example, System Options is available on the SO only.
2.2 Understanding DSA Functionality
DSA allows the operator to screen various diameter messages received from roaming partners for possible vulnerability. It should be deployed at DSR, which is acting as DEA for the operator’s home network so all roaming traffic can be screened for vulnerability by DSA.
DSA screens the incoming diameter message for vulnerability by a set of countermeasures. Each countermeasure has a predefined validation process, which is performed to validate the incoming diameter message for vulnerability. The validation process requires some DSA specific configuration data for performing validation. Apart from DSA specific configuration, some of the countermeasures also require data from an earlier diameter message. Based on this, the countermeasures are broadly divided into two categories.
• Stateful countermeasures • Stateless countermeasures
Stateful countermeasures require data from an earlier diameter message (apart from DSA configuration data) for checking vulnerability of a given incoming diameter message. UDR is used in this case to save data from a diameter message. The saved data are later fetched by the countermeasure for performing the validation procedure. A list of stateful countermeasures the DSA provides includes: • Message Rate Monitoring
• Time-Distance Check • Previous Location Check • Source Host Validation HSS • Source Host Validation MME
Stateless countermeasures do not requires any data from earlier diameter message for checking vulnerability of a given incoming diameter message. The message is screened for vulnerability by using DSA configuration data. So stateless countermeasures do not require UDR for performing validation procedure. A list of stateful countermeasures DSA provides includes:
• Application-ID Whitelist Screening
• Application-ID and Command-Code Consistency Check • Origin Realm and Destination Realm Whitelist Screening • Origin host and Origin Realm Consistency Check • Destination-Realm and Origin-Realm Match Check • Visited-PLMN-ID and Origin-Realm Consistency Check • Realm and IMSI Consistency Check
• Subscriber Identity Validation • Specific AVP Screening • AVP Multiple Instance Check
2.3 DSA Logic Process
To trigger DSA logic, some prerequisite conditions are required. For example, the DCA framework must be activated and DSA must be activated, enabled, and provisioned. See Configuring DSA and DSA Tables.
DSA logic is triggered when DSA receives a diameter message. Once a diameter message is received: 1. DSA starts executing the provisioned countermeasures, which are enabled, in a predefined sequence
irrespective of the countermeasure’s provisioning sequence. Refer to 4.3.1 for provisioning countermeasures using countermeasure_Type.
6. Visited-PLMN-ID and Origin-Realm Consistency Check (VplmnORCst) 7. Realm and IMSI Consistency Check (RealmIMSICst)
8. Subscriber Identity Validation (SubsIdenValid) 9. Specific AVP Screening (SpecAVPScr) 10. AVP Multiple Instance Check (AVPInstChk)
• The stateful countermeasures are executed in this sequence (if configured and enabled): 1. Message Rate Monitoring (MsgRateMon)
2. Time-Distance Check (TimeDistChk) 3. Previous Location Check (PreLocChk) 4. Source Host Validation HSS (SrcHostValHss) 5. Source Host Validation MME (SrcHostValMme)
4. Provisioning is provided to specify the list of foreign peers (refer to 4.3.2 for configuring whitelist foreign peers using Foreign_WL_Peer_Cfg_Set) for which a given countermeasure is executed for checking vulnerability. This is provided for flexibility to apply individual countermeasures only to untrusted foreign network peers.
5. When a message is found to be vulnerable by a countermeasure, action is performed depending upon the countermeasure’s operating mode. Refer to 4.3.1 for configuring countermeasure’s Operating_Mode. The supported operating modes are:
• Detection_Only: The countermeasure works on monitoring mode. The vulnerable message is only reported to the user by measurements (refer to 5).
• Detection_And_Correction_By_Drop: The vulnerable message is discarded at DSR and is not processed/relayed any further.
• Detection_And_Correction_By_Send_Answer: The vulnerable message is rejected by DSR by sending an Error Answer and is not processed/relayed any further. Error Answer can be customized per countermeasure by configuring Result-Codes, Error-Messages, and Vendor-ID. Refer to 4.3.1 for configuring countermeasure’s Result_Code, Error_Message, and Vendor_ID. 6. When a countermeasure finds a message to be vulnerable and Detection_Only is configured as
operating mode, then the user can choose to continue processing the message and checking for more vulnerability by the remaining configured countermeasure. Refer to 4.3.1 for configuring countermeasure’s Continue_If_Vulnerable option.
7. Once the message is processed by all the provisioned countermeasures and not found as vulnerable or found as vulnerable, but continue if vulnerable option is selected, then DSA does not take any action on the message. This message is further processed by DSR for relaying it.
8. An option is available for logging the vulnerable message details into a file that can be used for analyses. A user can choose to enable/disable logging. Refer to 4.3.3 for enabling/disabling DSA
vulnerable message logging using Enable_Tracing option. Refer to 6 for DSA vulnerable message logging framework.
2.3.1 DSA Mandatory Configuration
To screen the incoming message for vulnerability, DSA uses various values provisioned in DSA tables (refer to 4.3) for executing countermeasure’s business logic. A few of these tables are required to be provisioned for enabling DSA business logic. Reaming tables are specific to countermeasure’s business logic and needs to be provisioned only if the countermeasure is provisioned.
Countermeasure specific DSA tables are discussed in the respective countermeasures in more details. This is a list of configuration that must be done to enable DSA business logic.
• At least one countermeasure needs to be provisioned in the Security_Countermeasure_Config Table. These provisioned values define the list of countermeasures that screen the incoming message for vulnerability.
• At least one Home network’s MCC and MNC needs to be provisioned in the MCC_MNC_List Table. These provisioned values determine the Roaming Status (Inbound Roaming Subscriber vs. Outbound Roaming Subscriber) of any given subscriber. If the MCC and MNC portion of the
subscriber’s IMSI matches with the Home network’s MCC and MNC, then the subscriber is treated as an outbound roaming subscriber. Otherwise, the subscriber is treated as an inbound roaming
subscriber.
• At least one Home networks’ Realm needs to be provisioned in the Realm_List Table.
These provisioned values determine the Message Type (Ingress Message vs Egress Message) of any incoming diameter message. If the incoming message’s Origin-Realm AVP value does not match the Home network’s Realm, then the message is treated as an ingress message from a roaming network. If the incoming message’s Origin-Realm AVP value matches the Home network’s Realm, and Destination-Realm AVP value does not match the Home network’s Realm, then the message is treated as a home network’s egress message destined to a roaming network. • System_Config_Options Table needs to be provisioned with an entry.
This provisioned value defines the behavior of DSA when an UDR failure occurs or any logical error occurs while executing DSA Perl business logic or enabling/disabling logs of vulnerable message details. It also defines a few countermeasure-specific options, which are discussed in more detail in the countermeasure’s business logic section.
2.4 DSA Stateless Countermeasure Logic
Stateless countermeasures do not require maintenance of any State-Data (in UDR) for validating vulnerability of the diameter message.
2.4.1 Application-ID Whitelist Screening (AppIdWL)
This countermeasure screens the ingress diameter request message to check if the Peer from which the message is received is allowed to send this diameter message.
This countermeasure considers the ingress diameter request message as vulnerable if any of these conditions are true:
• The Application-ID of the ingress diameter message is not configured
• The Application-ID of the ingress diameter message is configured but the Peer from which the diameter message is received is not configured in the Whitelist Foreign Peer List of
2.4.2 Application-ID and Command-Code Consistency Check (AppCmdCst)
This countermeasure screens the ingress diameter request message to check if the received Application-ID and Command-Code combination is allowed for a given Roamer Type.
This countermeasure considers the ingress diameter request message as vulnerable if any of these conditions are true:
• Subscriber is an Inbound Roaming Subscriber, but the received Application-ID and Command-Code is not configured as an allowable combination for an Inbound Roamer.
• Subscriber is an Outbound Roaming Subscriber, but the received Application-ID and Command-Code is not configured as an allowable combination for an Outbound Roamer.
Apart from the mandatory configuration discussed in 2.3.1 DSA Mandatory Configuration, configure the following table for this countermeasure.
AppCmdCst_Config Table: For configuring allowable Application-ID and Command-Code
combinations for Inbound and Outbound Roamers which are used by this countermeasure for screening.
2.4.3 Origin Realm and Destination Realm Whitelist Screening (RealmWLScr)
This countermeasure screens the ingress diameter request message to check if the received Origin-Realm and Destination-Origin-Realm are allowed from the ingress Peer or. This ingress diameter message screening is done for both Inbound Roaming Subscribers and Outbound Roaming Subscribers. This countermeasure also screens the egress diameter request message to check if DSR is allowed to send a diameter request message with the given Destination-Realm. The egress diameter message screening is only done for Inbound Roaming Subscribers.Screening of ingress diameter message for Origin-Realm, screening of ingress diameter message for Destination-Realm, and screening of egress diameter message for Destination-Realm can be
enabled/disabled independently.
This countermeasure considers the incoming diameter request message as vulnerable if any of these conditions are true:
• The Origin-Realm of the ingress diameter message is not configured as Foreign network’s Realm. • The Origin-Realm of the ingress diameter message is configured as Foreign network’s Realm but the
Peer from which the diameter message is received is not configured in the Whitelist Foreign Peer List.
• The Destination-Realm of the ingress diameter message is not configured as Home network’s Realm. • The Destination-Realm of the ingress diameter message is configured as Home network’s Realm but
the Peer from which the diameter message is received is not configured in the Whitelist Foreign Peer List.
• For an Inbound Roamer, the Destination-Realm of the egress diameter message is not configured as Foreign network’s Realm.
Note: Appropriate ART configuration needs to be done for routing the egress request messages (only toward foreign networks) to DSA so that screening of egress diameter message for Destination-Realm can be performed. See ART Configuration for DSA for more details.
Apart from the mandatory configuration discussed in 2.3.1 DSA Mandatory Configuration, configure the following tables for this countermeasure.
Realm_List Table: For configuring allowable Realm and Peer list combinations for Home network and Foreign network which are used by this countermeasure for
with Origin-Realm matching the exception list is exempted from this countermeasure’s screening. This countermeasure considers the ingress diameter request message as vulnerable if this condition is true:
• The Origin-Realm is not configured in the exception list of Realms and the Origin-Host’s FQDN string is not ending with Origin-Realm’s string.
Apart from the mandatory configuration discussed in 2.3.1 DSA Mandatory Configuration, configure the following table for this countermeasure.
System_Config_Options Table: For configuring exception list of Realms, which are exempted from this countermeasure’s screening.
2.4.5 Destination-Realm and Origin-Realm Match Check (DrOrMatch)
This countermeasure screens the ingress diameter request message to check if the Origin-Realm and Destination-Realm are having different value.
This countermeasure considers the ingress diameter request message as vulnerable if this condition is true:
• The Origin-Realm and Destination-Realm of the ingress diameter request are having same value. Apart from the mandatory Configuration discussed in 2.3.1 DSA Mandatory Configuration, no other tables need to be configured for this countermeasure.
2.4.6 Visited-PLMN-ID and Origin-Realm Consistency Check (VplmnORCst)
This countermeasure screens the ingress diameter request message to check if the MCC and MNC values in Visited-PLMN-ID AVP match the MCC and MNC values in the Origin-Realm AVP.
The option is available to configure the Application-ID and Command-Code combinations this countermeasure uses for screening.
Below are the pre-conditions for executing this countermeasure. If any of these conditions are not met, then the ingress diameter request message is not screened for vulnerability.
• The Application-ID and Command-Code of the ingress diameter request message must be configured.
• Visited-PLMN-ID AVP must be present in the ingress diameter request message. • The Origin-Realm AVP must be in the format as defined in 3GPP 23.003.
This countermeasure considers the ingress diameter request message as vulnerable if this condition is true:
• The MCC and MNC values in Visited-PLMN-ID AVP do not match the MCC and MNC values in the Origin-Realm AVP
Note: As per Section 19.2 of 3GPP 23.003, the Realm should be in the form of: epc.mnc<MNC>.mcc<MCC>.3gppnetwork.org
where <MNC> and <MCC> fields correspond to the MNC and MCC of the operator’s PLMN. Both fields are three (3) digits. If the MNC of the PLMN is two (2) digits, then add a zero to the beginning.
For example, for a network with MCC = 234 and MNC = 15, Realm/Domain name is epc.mnc015.mcc234.3gppnetwork.org.
Apart from the mandatory configuration discussed in 2.3.1 DSA Mandatory Configuration, configure the following table for this countermeasure.
VplmnORCst_Config Table: For configuring the Application-ID and Command-Code combinations used by this countermeasure for screening.
2.4.7 Realm and IMSI Consistency Check (RealmIMSICst)
This countermeasure screens the ingress diameter request message to check if the MCC and MNC values present in IMSI match the MCC and MNC values in the Origin-Realm/Destination-Realm AVP. For Inbound Roaming Subscriber, MCC and MNC values of the Origin-Realm AVP are used for matching; and for Outbound Roaming Subscriber, MCC and MNC values of the Destination-Realm AVP are used for matching.
Below are the pre-conditions for executing this countermeasure. If any of these conditions are not met, then the ingress diameter request message is not screened for vulnerability.
• For an Inbound Roamer, the countermeasure screens only S6a/d IDR, RSR, DSR or CLR messages. • Screening is performed only if the Origin-Realm AVP is in the format as defined in 3GPP 23.003. • For an Outbound Roamer, the countermeasure screens only S6a/d AIR, ULR, PUR, or NOR
messages.
• Screening is performed only if the Destination-Realm AVP is in the format as defined in 3GPP 23.003.
This countermeasure considers the ingress diameter request message as vulnerable if any of these conditions are true:
• For an Inbound Roamer, the MCC and MNC values present in Origin-Realm AVP do not match the MCC and MNC values in the IMSI.
• For an Outbound Roamer, the MCC & MNC value present in Destination-Realm AVP do not match the MCC and MNC values in the IMSI.
Note: For S6a IDR, DSR, CLR, AIR, ULR, PUR, and NOR messages, User-Name AVP is used to fetch the MCC and MNC of the IMSI.
For S6a RSR messages, User-ID AVP is used to fetch the MCC and MNC of the IMSI. Note: As per Section 19.2 of 3GPP 23.003, the Realm should be in the form of:
epc.mnc<MNC>.mcc<MCC>.3gppnetwork.org
where <MNC> and <MCC> fields correspond to the MNC and MCC of the operator’s PLMN. Both fields are three (3) digits. If the MNC of the PLMN is 2 digits, then add a zero to the beginning.
For example, for a network with MCC = 234 and MNC = 15, Realm/Domain name is epc.mnc015.mcc234.3gppnetwork.org.
MCC_MNC_List Table: For configuring MCC and MNC combinations of Foreign networks used by this countermeasure for validating Subscriber’s identity.
2.4.9 Specific AVP Screening (SpecAVPScr)
This countermeasure screens the ingress diameter request/answer message for checking invalid AVP value(s).
The option is available to configure the list of AVP values used by this countermeasure for performing screening.
This countermeasure considers the ingress diameter request/answer message as vulnerable if this condition is true:
• One of the AVP in the ingress request/answer message matches the configured AVP value, which is provisioned as an invalid value.
Note: Appropriate ART configuration needs to be done for routing the egress request messages (only toward foreign networks) to DSA so the ingress answer message from the foreign peers can be screened for vulnerability by this countermeasure. See ART Configuration for DSA for more details.
Apart from the mandatory configuration discussed in 2.3.1 DSA Mandatory Configuration, configure the following table for this countermeasure.
SpecAVPScr_Config Table For configuring values for AVP(s) used by this countermeasure for screening. AVP value, applicable Application-ID, Command-Code, and the Message Type (Request/Answer) combination are defined.
2.4.10 AVP Multiple Instance Check (AVPInstChk)
This countermeasure screens the ingress diameter request/answer message for checking minimum and maximum allowable instance of AVP(s).
The option is available to configure the list of AVPs along with the allowable minimum and maximum instance values used by this countermeasure for performing screening.
This countermeasure considers the ingress diameter request/answer message as vulnerable if any of these conditions are true:
• One of the AVP in the ingress request/answer message is having lesser number of instances than the configured minimum allowed number of instances.
• One of the AVP in the ingress request/answer message is having higher number of instances than the configured maximum allowed number of instances.
Note: Appropriate ART configuration needs to be done for routing the egress request messages (only towards foreign networks) to DSA so that ingress answer message from the foreign peers can be screened for vulnerability by this countermeasure. See ART Configuration for DSA for more details.
Apart from the mandatory configuration discussed in 2.3.1 DSA Mandatory Configuration, configure the following table for this countermeasure.
AVPInstChk_Config Table For configuring minimum and maximum allowable instance of AVPs used by this countermeasure for screening. AVP minimum and maximum instances, the applicable Application-ID, Command-Code, and the Message Type (Request/Answer) combination are defined.
2.5 DSA Stateful Countermeasure Logic
Stateful countermeasures require maintenance of some State-Data (depending upon the countermeasure’s business logic) for validating various diameter messages. UDR is used for maintaining the State-Data record.
First the State-Data is created for the Subscriber when the reference diameter message is received (depending upon the countermeasure type, the reference diameter message varies). For subsequent diameter messages for that subscriber, the State-Data is used to validate against the incoming diameter message content.
Note: For all the stateful countermeasures (except Message Rate Monitoring (MsgRateMon)), the State-Data is created only after DSA processes the referenced diameter message. The
countermeasures mark the non-vulnerable message as vulnerable if appropriate State-Data is not present for that subscriber.
Therefore, it is important that after a stateful countermeasure is enabled, all the outbound and inbound roamers must be forced to re-register so DSA can process the reference diameter messages first or, alternatively, keep the stateful countermeasure’s Operating Mode as Detection Only.
2.5.1 Message Rate Monitoring (MsgRateMon)
This countermeasure screens various ingress diameter request message to check if the current aggregate request message rate for a given diameter message type is less than the threshold value. The option is available to configure the threshold value for various diameter message types (that is, Application-ID and Command-Code combinations) used by this countermeasure for screening.
For each diameter message type, aggregate rate is maintained foreign peers (the foreign peers list is the Foreign_WL_Peer_Cfg_Set of Security_Countermeasure_Config Table for this countermeasure). This countermeasure considers the ingress diameter request message as vulnerable if this condition is true:
• The current aggregate request message rate of the diameter message type and ingress peer combination is greater than the configured threshold value.
Apart from the mandatory configuration discussed in 2.3.1 DSA Mandatory Configuration, configure the following table for this countermeasure.
MsgRateMon_Config Table: For configuring Application-ID and Command-Code combinations along with its allowable threshold value used by this countermeasure for screening.
2.5.2 Time-Distance Check (TimeDistChk)
This countermeasure screens S6a/d ULR and AIR messages of Outbound Roaming Subscribers currently in international roaming to check if it is physically possible for a Subscriber to move from its previous location to the new location within the current transit time.
• The geographical coordinates for both the countries is configured, but the actual transit time is less than the calculated minimum transit time (calculated using geo-coordinates of the two countries). • The geographical coordinates for either of the countries is not configured and the configuration says
to mark the message as vulnerable, if matching configuration not found.
This countermeasure also provide exception list of neighboring countries for each country to exempt S6a/d ULR and AIR messages from screening.
Note: International Roaming is identified by matching the Home MCCs configured in
MCC_MNC_List Table (for example, first three digits of MCC_MNC with Network_Type as Home_Network) against the MCC value in Visited-PLMN-Id AVP.
Note: Transit time between two geo-coordinates point is calculated using distance (between two geo-coordinate points) and speed (user configured in the System_Config_Options table, default: 700 km/hr).
Apart from the mandatory configuration discussed in 2.3.1 DSA Mandatory Configuration, configure the following tables for this countermeasure.
TimeDistChk_Country_Config Table: For configuring geographical coordinates (Latitude/Longitude) for each country used by this countermeasure for screening.
System_Config_Options Table: Option to indicate the average flight speed to consider for calculating the transit time. . Option to define the behavior when no matching Source and Destination location is configured. Option to enable the behavior for neighboring country exemption list screening.
TimeDistChk_Exception_List For Configuring List of neighboring countries MCC for which Time Distance Check screeing will not be applied.
TTL_Config Table: For configuring the TTL value of the State-Data created for this countermeasure.
2.5.3 Previous Location Check (PreLocChk)
This countermeasure screens S6a/d PUR and NOR messages of Outbound Roaming Subscribers to check if the MME from which the PUR/NOR message is received is the same MME on which the subscriber is currently registered.
The Outbound Roaming Subscriber is considered successfully registered to a Foreign network MME when an ingress S6a/d ULR/A (ULA with Result-Code as 2xxx) is processed by DSA.
The Outbound Roaming Subscriber is considered de-registered from the Foreign network MME when: • An egress S6a/d CLR is processed by DSA, or
• An egress S6a/d RSR is processed by DSA, or
This countermeasure considers the ingress S6a/d PUR and NOR message as vulnerable if any of these conditions are true:
• The subscriber has not registered to any MME.
• The MME from which the PUR/NOR message is received is different from the MME on which the subscriber is registered.
Note: Appropriate ART configuration needs to be done for routing the egress request messages (only towards foreign networks) to DSA so that the egress CLR can be processed by this
countermeasure. See ART Configuration for DSA for more details.
2.5.4 Source Host Validation HSS (SrcHostValHss)
This countermeasure screens S6a/d IDR, DSR and CLR message of Inbound Roaming Subscribers to check if the HSS from which the IDR/DSR/CLR/RSR message is received is the same HSS to which earlier registration request has been sent successfully.
The Inbound Roaming Subscriber is considered successfully registered with the Home network when an egress S6a/d ULR/A (ULA with Result-Code as 2xxx) is processed by DSA.
The Inbound Roaming Subscriber is considered de-registered from the Home network when: • An egress S6a/d PUR is processed by DSA, or
• A non-vulnerable ingress CLR or RSR(with appropriate range of User-Ids) message is processed by DSA.
This countermeasure considers the ingress S6a/d IDR, DSR and CLR message as vulnerable if any of these conditions are true:
• The subscriber has not registered with the Home network.
• The HSS from which the IDR/DSR/CLR message is received is different from the HSS to which earlier registration request has been sent.
Note: Appropriate ART configuration needs to be done for routing the egress request messages (only towards foreign networks) to DSA so that the egress ULR and PUR can be processed by this countermeasure. See ART Configuration for DSA for more details.
Note:
System_Config_Options Table: Check field Process_Foreign_RSR_Msg, if RSR message needs to be process by this counter measure
2.5.5 Source Host Validation MME (SrcHostValMme)
This countermeasure screens S6a/d ULR and PUR message of Outbound Roaming Subscribers to check if the MME from which these messages are received is valid. This countermeasure also validates the sequential ordering of authentication and registration process when the subscriber moves from one foreign network to another foreign network.
The Outbound Roaming Subscriber is considered successfully authenticated by the Home network when a ingress S6a/d AIR/A (AIA with Result-Code as 2xxx) is processed by DSA.
The Outbound Roaming Subscriber is considered as successfully registered to a Foreign network when a non-vulnerable ingress S6a/d ULR/A (ULA with Result-Code as 2xxx) is processed by DSA.
The subscriber is considered de-registered from the Foreign network when: • An egress S6a/d CLR is processed by DSA, or
• The MME from which the PUR message is received is different from the MME on which the subscriber is registered.
Appropriate ART configuration needs to be done for routing the egress request messages (only towards foreign networks) to DSA so that the egress CLR/RSR can be processed by this countermeasure. See ART Configuration for DSA for more details.
3. Configuring Comagent with UDR as Remote Server
Note: Comagent Configuration with UDR DB will be NOAM Level Configuration.
3.1.1 ComAgent Configuration on DSR
For Comagent configuration go to Communication agent TAB on Active DSR NO GUI and configure UDB DB Server IMI IP as remote server.
Note:
If DSR and UDR deployment are in same network use UDR IMI IP as Comagent Remote Server Configuration.
If DSR and UDR deployment are in different network use UDR XSI IP as Comagent Remote Server configuration.
For this, add new XSI Interface on both DSR and UDR side for Comagent Communication. Make sure new added XSI interface are Desktop routable and accessible from both side.
Do not use DSR signaling Interface (XSI Interface) for comagent communication.
Configure UDR DB as Remote Server.
• Connection Group configuration :
Add previously configured Remote Server to STBDbSvc Connection Group.
Note: Restart the MPs Server to make the Comagent service /connection up • Steps to Restart the MPs Server :
- Go to Active DSR NOAM status & Manage section, select the MP server and restart the MP server with click on restart button.
Figure Remote Server Configuration on DSR NO Server
3.1.2 Comagent Configuration on UDR
For Comagent configuration go to Communication agent TAB on Active UDR NO GUI and configure all the DSR MP IMI IP as client.
Note : Please refer section #ComAgent Configuration on DSR Note for configuring the Interface IP as client .
• Remote Server Configuration : Configure DSR MPs IMI IP as Client.
Note: Reboot the Active UDR NOAM Server to make the Comagent service /connection up. • Steps to Reboot the MPs Server :
- Go to Active UDR NOAM status & Manage section, select the Active NOAM server and reboot the Active NOAM server with click on reboot button.
3.1.3 Comagent Connection Status Validation
• Comagent Connection status check on DSR NO Server :
For Connection, status check go to Communication agent Maintenance TAB on DSR NO GUI.
• Routed Service status check on DSR NO Server :
For routed service, status check go to Communication agent Maintenance TAB on DSR NO GUI.
• HA Service status check on DSR NO Server :
For HA Service status check go to Communication agent Maintenance TAB on DSR NO GUI.
Figure Comagent Connection status check on DSR NO Server
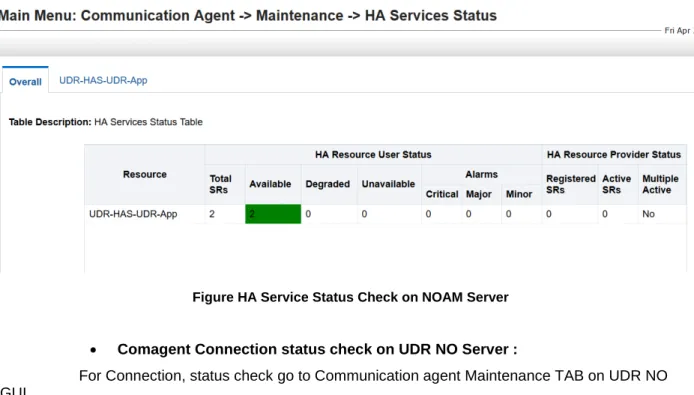
• Comagent Connection status check on UDR NO Server :
For Connection, status check go to Communication agent Maintenance TAB on UDR NO GUI.
• Routed Service status check on UDR NO Server :
For routed service, status check go to Communication agent Maintenance TAB on UDR NO GUI.
• HA Service status check on UDR NO Server :
For HA Service status check go to Communication agent Maintenance TAB on UDR NO GUI.
4. UDR Configuration
4.1 Enable Security Profile on Active UDR NOAM for DSA Application
Login to Active NOAM Server through putty session and run this loader (enableSecurityApp) with following steps:
• Go to this path “/usr/TKLC/udr/prod/maint/loaders/upgrade” • Execute the “enableSecurityApp” script.
• Reboot the both UDR NOAM server.
Figure Routed Service Status check on UDR NO Server
4.2 Audit Time Configuration on Active UDR NOAM
By Default this configuration will disable (unchecked) e.g. no record will be clean up on UDR server.
• if you want to clean old record on UDR ,we need to configure as
• “Cleanup Inactive Security App Subscriber Enabled” is checked (enable) and “Security App SDO Audit Interval” is set value as “10” => all records will be cleared after 10 sec.
5. Upgrade
• DSA with UDR in this release (8.4.0.0.5) does not support Upgrade.
• Follow Below steps to migrate the configuration data from old release to new release(8.4.0.5) setup:
• Export SOAM Configuration data on Old release setup. – Login SOAM GUI
– Export B Level Configuration data – Export of SOAM Configuration Data
• click on B level config data and save on local system
Figure DSA SOAM Level Configuration export
• Before Import the configuration data on new release setup
Note: as mentioned in previous slide release 8.4.0.5 does not support upgrade.
• System should fresh install on new release 8.4.0.5 before importing the B level configuration data.
• Import of SOAM Configuration Data
- click on Import B Level config data, select the “file”, and then click on import.
Figure Import B Level DSA Configuration on SOAM Server
6. Configuring DSA
This section contains information about DSA and describes the procedures used to activate, configure, and deactivate DSA.
DSA uses these tables for holding configuration values: • Security_Countermeasure_Config Table • Foreign_WL_Peers_Cfg_Sets Table • System_Config_Options Table • MCC_MNC_List Table • AppIdWL_Config Table • Realm_List Table • VplmnORCst_Config Table • SpecAVPScr_Config Table • AVPInstChk_Config Table • TimeDistChk_Config Table • MsgRateMon_Config Table • AppCmdCst_Config Table
Some of these tables are specific to countermeasures used only during that countermeasure’s business logic execution.
6.1 DSA Pre-Activation Activities
Before activating DSA as a DCA application, DCA framework must be activated on the NO. See [1] Diameter Custom Applications Feature Activation Guide.
Following DCA framework activation, DSA can be activated.
Note: After DSA is activated, by default the application is in the disabled state. While disabled, no diameter traffic is delivered to DSA. See [2] Diameter User’s Guide for the procedure to enable an application.
DSA’s operational status is unavailable until a successful compiled version (production or trial version) of DSA is configured.
6.2 Activate DSA
This procedure activates DSA.See [1] Diameter Custom Applications Feature Activation Guide for detailed information. 1. Make sure the DCA framework has already been activated. See DCA Feature Activation. 2. Activate DSA using the DCA Application Activate procedure. See DCA Feature Activation. 3. Recommended DCA Short Name: DSA
4. Recommended DCA Long Name: Diameter Security Application
5. Post DSA activation, check the visibility of DSA subtree in the main menu DCA Framework > Diameter Security Application.
This procedure verifies DSA is activated before enabling DSA and performing provisioning activities. 1. Confirm the DSA folder is visible on the GUI under the main menu: DCA Framework.
6.3 Configure DSA Business Logic and Database Schema
This procedure imports DSA business logic and the configuration database schema using the DSA JSON file.
DSA NO JSON filename: Diameter_Security_Application-Version1.json See [3] DCA Programmer’s Guide for detailed information.
1. From the NO GUI main menu, navigate to DCA Framework > Diameter Security Application > Application Control.
2. Select the newly added DSA Version Name.
3. Click Business Logic in the Import section of the Application Control page.
4. Click Browse and select the Diameter_Security_Application-Version1.json file from the File upload screen.
5. Mark the Abort on first error checkbox to abort the import process in case of error. 6. Click Import to start the import process.
This procedure verifies DSA JSON has successfully imported before enabling DSA and performing provisioning activities.
1. From the NO GUI main menu, navigate to DCA Framework > Diameter Security Application > Application Control, and make sure an entry is added in DCA application version details table. 2. Select the newly added version and click Config Tables and Data.
3. Make sure all DSA configuration tables are listed.
4. Select the newly added version and click Development Environment. 5. Make sure DSA Perl business logic is present.
6.4 Configure DSA Mandatory Options
This procedure configures various DSA Mandatory Options. Increase the maximum supported State-Data size:1. From the NO GUI main menu, navigate to DCA Framework > Configuration 2. Set the Maximum Size of Application State to 4800.
3. Click Apply.
1. From the NO GUI main menu, navigate to DCA Framework > Diameter Security Application > General Options.
2. Update Perl Subroutine for Diameter Request to process_request. 3. Update Perl Subroutine for Diameter Answer to process_answer. 4. Update Max. UDR Queries per Message to 10.
5. Unselect the Enable Opcodes Accounting option to disable opcode accounting. 6. Click Apply.
6.5 ART Configuration for DSA
DSA processes ingress diameter messages received from foreign networks to check vulnerability. For this:
• Create an ART to route all the ingress traffic to DSA. • Assign the ART to all the foreign peers.
If you do not want to screen ingress diameter messages from a specific foreign peer, then skip the ART configuration for that peer.
DSA also processes egress diameter messages to send to a foreign network from a home network. For this:
• Create an ART to route only egress traffic from a home network toward a foreign network to DSA, that is, messages where
• Origin-Realm matches the Home network Realm, and
• Destination-Realm does not match the Home network Realm.
• Assign the ART only to those home network peers that can send egress messages to a foreign network.
If you want to screen the diameter message using any of these countermeasures, then assign the ART to the home peers that can send egress messages to a foreign network:
Stateless countermeasures:
• Origin Realm and Destination Realm Whitelist Screening (RealmWLScr) • Specific AVP Screening (SpecAVPScr)
• AVP Multiple Instance Check (AVPInstChk) Stateful countermeasures:
• Previous Location Check (PreLocChk) • Source Host Validation HSS (SrcHostValHss) • Source Host Validation MME (SrcHostValMme)
Note: For the above stateful countermeasures, if egress traffic is not routed to DSA, then the countermeasure business logic does not work, which may lead to traffic loss due to wrongly marking the messages as vulnerable by the countermeasures.
6.6 Enable DSA
is still in the Production and/or Trial state.
Before deactivation can take place, DSA must be disabled on all MPs in the network and no ART rules should refer to DSA.
See [1] Diameter Custom Applications Feature Activation Guide for detailed information.
1. Disable DSA for all the MPs from the SO GUI main menu, navigate to Diameter > Maintenance > Applications.
2. Delete ART rules referring to DSA.
3. Deactivate DSA using DCA Application Activate procedure. See DCA Feature Activation.
7. DSA Tables
DSA database schema defines various tables used to define and customize the application behavior. Table 1 lists these DSA configuration tables.
All these DSA configuration tables are SO level tables, that is, provisioning in these tables is allowed only from the SO GUI.
Note: To maintain the subscriber’s states (for Stateless countermeasure business logic execution), DSA keeps subscriber’s state related records in a UDR Generic State database indexed by the subscriber's IMSI.
Table 1. DSA Configuration Tables
Table Name Description
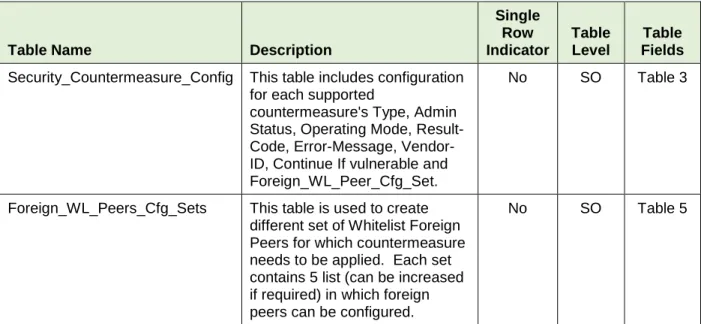
Single Row Indicator Table Level Table Fields Security_Countermeasure_Config This table includes configuration
for each supported
countermeasure's Type, Admin Status, Operating Mode, Result-Code, Error-Message, Vendor-ID, Continue If vulnerable and Foreign_WL_Peer_Cfg_Set.
No SO Table 3
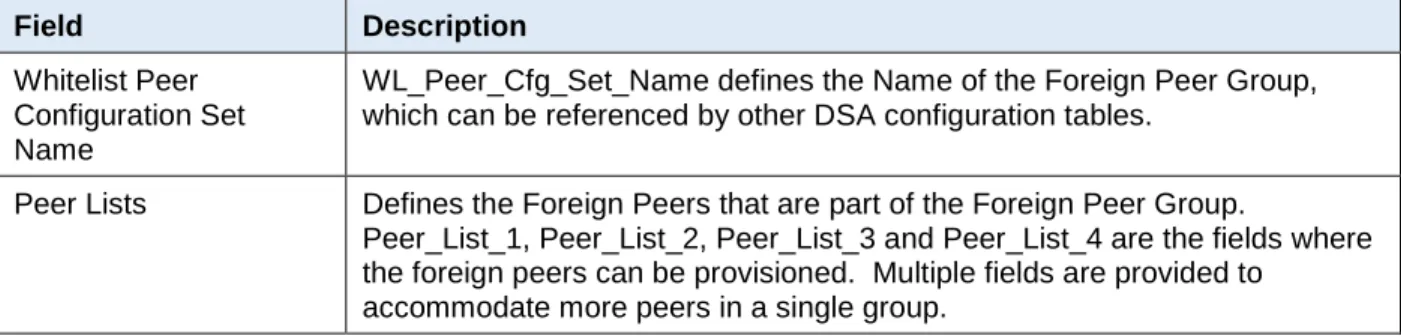
Foreign_WL_Peers_Cfg_Sets This table is used to create different set of Whitelist Foreign Peers for which countermeasure needs to be applied. Each set contains 5 list (can be increased if required) in which foreign peers can be configured.
Table Name Description Single Row Indicator Table Level Table Fields
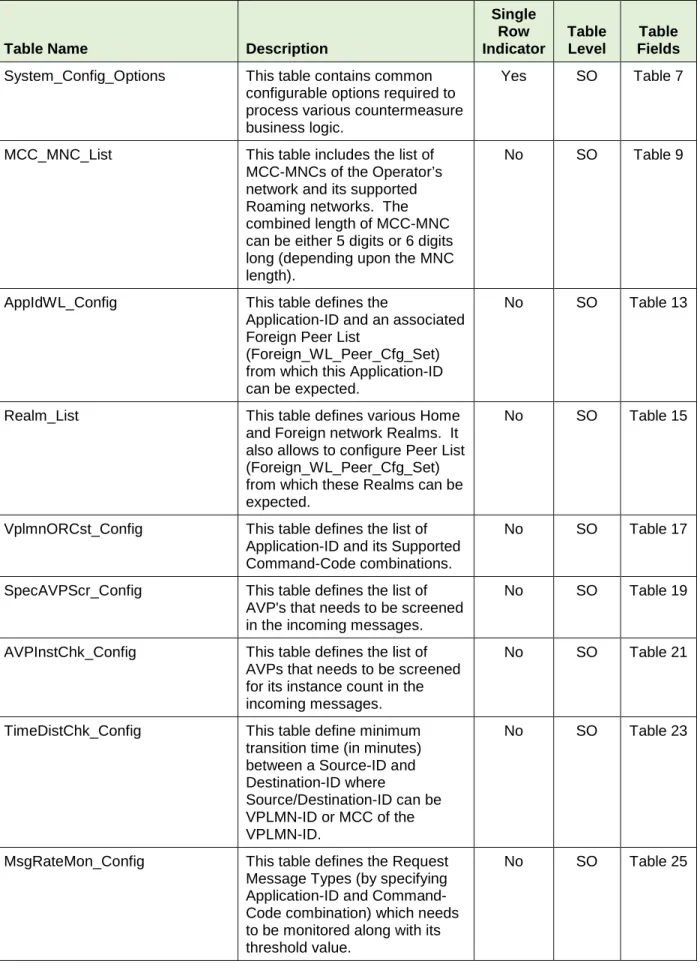
System_Config_Options This table contains common
configurable options required to process various countermeasure business logic.
Yes SO Table 7
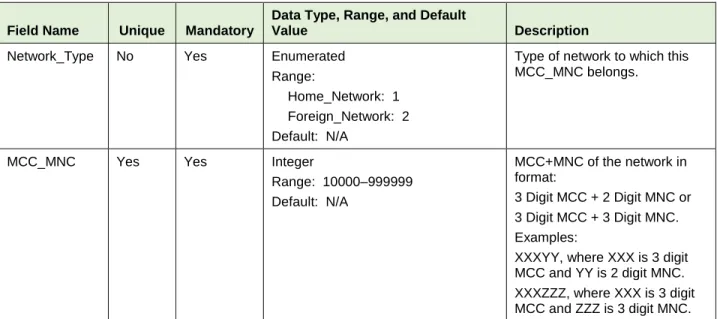
MCC_MNC_List This table includes the list of
MCC-MNCs of the Operator’s network and its supported Roaming networks. The combined length of MCC-MNC can be either 5 digits or 6 digits long (depending upon the MNC length).
No SO Table 9
AppIdWL_Config This table defines the
Application-ID and an associated Foreign Peer List
(Foreign_WL_Peer_Cfg_Set) from which this Application-ID can be expected.
No SO Table 13
Realm_List This table defines various Home
and Foreign network Realms. It also allows to configure Peer List (Foreign_WL_Peer_Cfg_Set) from which these Realms can be expected.
No SO Table 15
VplmnORCst_Config This table defines the list of
Application-ID and its Supported Command-Code combinations.
No SO Table 17
SpecAVPScr_Config This table defines the list of
AVP's that needs to be screened in the incoming messages.
No SO Table 19
AVPInstChk_Config This table defines the list of
AVPs that needs to be screened for its instance count in the incoming messages.
No SO Table 21
TimeDistChk_Config This table define minimum
transition time (in minutes) between a Source-ID and Destination-ID where
Source/Destination-ID can be VPLMN-ID or MCC of the VPLMN-ID.
No SO Table 23
MsgRateMon_Config This table defines the Request
Message Types (by specifying Application-ID and Command-Code combination) which needs to be monitored along with its
DSA configuration tables are pre-populated if DSA is configured using DSA JSON file. Refer to 3.3 Configure DSA Business Logic and Database Schema.
Alternatively DSA configuration tables can be configured manually using the following steps. See the [3] DCA Programmer’s Guide for detailed information
1. From the NO GUI main menu, navigate to DCA Framework > Diameter Security Application > Application Control.
2. Select the newly added DSA Version Name. 3. Click Config Table and Data.
If DSA JSON is not used to import DSA business logic and the configuration database schema, then the configured table list is empty.
4. Click Insert.
5. Fill out the fields to define the table. 6. Click Add to add multiple Table Fields. 7. Click OK/Apply.
8. Repeat steps 4 to 7 for each table listed in Table 1. DSA Configuration Tables.
7.2 Provision DSA Tables
This procedure imports DSA default provisioning data using DSA JSON file.
DSA SO JSON filename: Diameter_Security_Application-Version1_Default_Config.json See the [3] DCA Programmer’s Guide for detailed information.
1. From the SO GUI main menu, navigate to DCA Framework > Diameter Security Application > Application Control.
2. Select the newly added DSA Version Name.
3. Click B Level Config Data in the Import section of the Application Control page.
4. Click Browse and select the Diameter_Security_Application-Version1_Default_Config.json file. 5. Mark the Abort on first error checkbox to abort the import process in case of error.
Click Import to start the import process.
Apart from the default entries, additional provisioning needs to be done manually using the following procedure. See the [3] DCA Programmer’s Guide for detailed information.
1. From the SO GUI main menu, navigate to DCA Framework > Diameter Security Application > Application Control.
2. Select the newly added DSA Version Name. 3. Click Config Data.
If DSA JSON is not used import DSA business logic and the configuration database schema, then the configured table list is empty.
4. Select the table that needs to be provisioned. 5. Click Provision Table.
6. Click Insert.
7. Fill out the values for required fields of the table. 8. Click OK/Apply.
7.3 DSA Table Details
7.3.1 Security_Countermeasure_Config Table
This table is used to configure various supported countermeasures. It allows to customize the countermeasure behavior using the following options.
Table 2. Security_Countermeasure_Config Fields
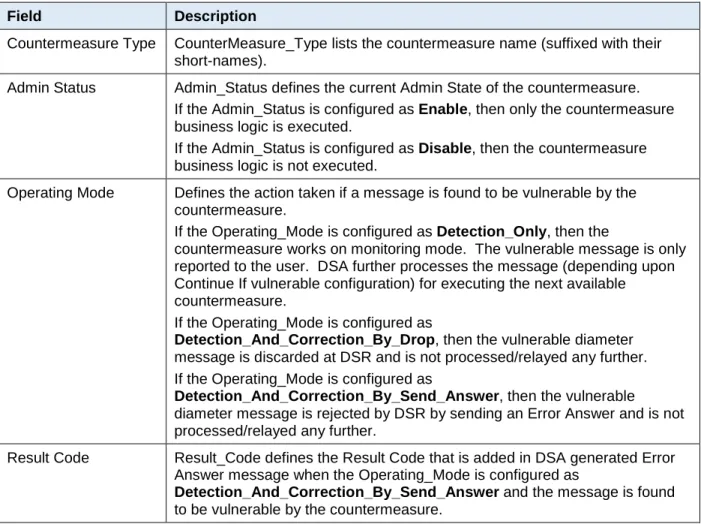
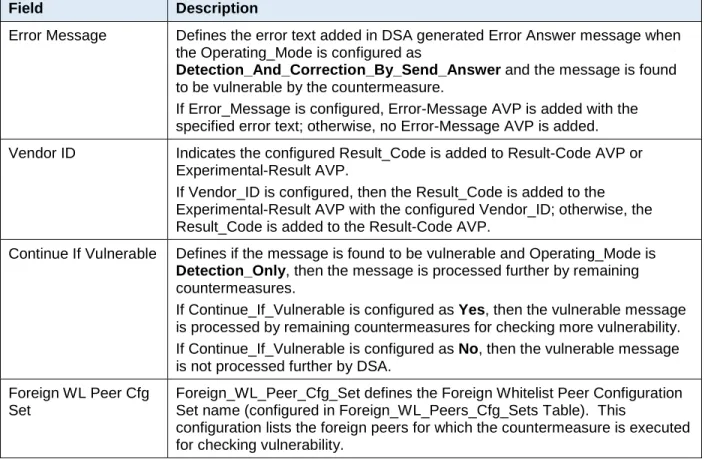
Field Description
Countermeasure Type CounterMeasure_Type lists the countermeasure name (suffixed with their short-names).
Admin Status Admin_Status defines the current Admin State of the countermeasure. If the Admin_Status is configured as Enable, then only the countermeasure business logic is executed.
If the Admin_Status is configured as Disable, then the countermeasure business logic is not executed.
Operating Mode Defines the action taken if a message is found to be vulnerable by the countermeasure.
If the Operating_Mode is configured as Detection_Only, then the
countermeasure works on monitoring mode. The vulnerable message is only reported to the user. DSA further processes the message (depending upon Continue If vulnerable configuration) for executing the next available countermeasure.
If the Operating_Mode is configured as
Detection_And_Correction_By_Drop, then the vulnerable diameter message is discarded at DSR and is not processed/relayed any further. If the Operating_Mode is configured as
Detection_And_Correction_By_Send_Answer, then the vulnerable diameter message is rejected by DSR by sending an Error Answer and is not processed/relayed any further.
Result Code Result_Code defines the Result Code that is added in DSA generated Error Answer message when the Operating_Mode is configured as
Detection_And_Correction_By_Send_Answer and the message is found to be vulnerable by the countermeasure.
Experimental-Result AVP with the configured Vendor_ID; otherwise, the Result_Code is added to the Result-Code AVP.
Continue If Vulnerable Defines if the message is found to be vulnerable and Operating_Mode is Detection_Only, then the message is processed further by remaining countermeasures.
If Continue_If_Vulnerable is configured as Yes, then the vulnerable message is processed by remaining countermeasures for checking more vulnerability. If Continue_If_Vulnerable is configured as No, then the vulnerable message is not processed further by DSA.
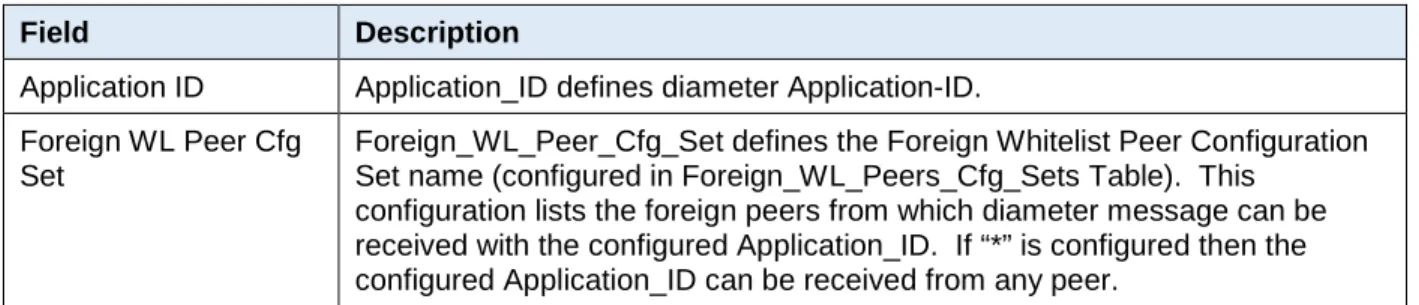
Foreign WL Peer Cfg Set
Foreign_WL_Peer_Cfg_Set defines the Foreign Whitelist Peer Configuration Set name (configured in Foreign_WL_Peers_Cfg_Sets Table). This
configuration lists the foreign peers for which the countermeasure is executed for checking vulnerability.
Table 3 describes the field details for the Security_Countermeasure_Config Table.
Note: Upon enabling a new countermeasure, make sure the associated configuration table is configured properly for countermeasure to take effect. Any misconfiguration will lead to the countermeasure not working properly.
For both stateless and stateful countermeasures, Oracle recommends setting the Operating Mode parameter in the Security_Countermeasure_Config table as Detection_Only first to analyze and validate the configurations. This helps avoid traffic loss due to misconfiguration. Once configuration is validated, the Operating Mode parameter in the
Security_Countermeasure_Config table can be changed as desired.
For stateful countermeasures, Oracle recommends setting the Operating Mode parameter in the Security_Countermeasure_Config table as Detection_Only for at least the first 24 hours. This allows the security application to learn about any subscribers who are already roaming in partner networks without impacting their service. The operating mode can be changed to Detection and Correction after that period, if desired by the operator.
Table 3. Field Details for Security_Countermeasure_Config
Field Name Unique Mandatory Data type, Range, and Default Value Description
countermeasure_Type Yes Yes Enumerated Range: Application_ID_and_Command_Code_c onsistency_check_AppCmdCst: 1 Origin_Realm_and_Destination_Realm_ whitelist_screening_RealmWLScr: 2 Subscriber_Identity_validation_SubsIden Valid: 3 Specific_AVP_screening_SpecAVPScr: 4 Origin_host_and_Origin_Realm_consist ency_check_OhOrCstChk: 5 Visited_PLMN_ID_and_Origin_Realm_c onsistency_check_VplmnORCst: 6 Realm_and_IMSI_consistency_check_R ealmIMSICst: 7 Destination_Realm_and_Origin_Realm_ match_check_DrOrMatch: 8 AVP_Multiple_Instance_check_AVPInst Chk: 9 Application_Id_whitelist_screening_AppI dWL: 10 Previous_Location_Check_PreLocChk: 11 Time_Distance_Check_TimeDistChk: 12 Source_Host_validation_MME_SrcHost ValMme: 13 Message_rate_monitoring_MsgRateMon : 14 Source_Host_validation_HSS_SrcHostV alHss: 15 Default: N/A List of various supported countermeasures.
Admin_Status No Yes Enumerated Range: Disable: 1 Enable: 2 Default: Disable Countermeasure's Admin Status. If enabled, countermeasure is applied to the message; otherwise, skipped.
tion_By_Send_Answer : Send Answer if vulnerable. Result_Code No No Integer Range: 1000–5999 Default: N/A This configuration is applicable when the countermeasure's Operating_Mode is set to
Detection_And_Correc tion_By_Send_Answer . This value is used to set the Result-Code AVP of the Answer Message.
Error_Message No No UTF8String
Range: 1–64 characters Default: N/A
This configuration is applicable when the countermeasure's Operating_Mode is set to Detection_And_Correc tion_By_Send_Answer . If specified, the Answer Message is added with Error-Message AVP with the specified Text.
Vendor_ID No No Integer
Range: 1–4294967295 Default: N/A
This configuration is applicable when the Operating_Mode is set to
Detection_And_Correc tion_By_Send_Answer . If the value is specified, the Answer Message consists of Experimental-Result grouped AVP with the specified Vendor-ID