CP/M 3 Operating System User's Guide
Copyright © 1982 Digital Research
P.O. Box 579 160 Central Avenue Pacific Grove, CA 93950
(408) 649-3896 TWX 910 360 5001
COPYRIGHT
Copyright
©
1982 by Digital Research. All rights reserved. No part of this publication may be reproduced, transmitted, transcribed, stored in a retrieval system, or translated into any language or compu ter language, in any form or by any means, electronic, mechanical, magnetic, optical, chemical, manual or otherwise, without the prior written permission of Digital Research, Post Office Box 579, Pacific Grove, California, 93950.DISCLAIMER
Digital Research makes no representations or warranties with respect to the contents hereof and specifically disclaims any implied warranties of merchantability or fitness for any particular purpose. Further, Dig i tal Research reserves the right to revise this publication and to make changes f rom time to time in the content hereof wi thout obligation of Digital Research to notify any person of such revision or changes.
TRADEMARKS
CP/M is a registered trademark of Digital Research. CP/M 3, SID, MAC, and R~C are trademarks of Digital Research.
The CP/M 3 Operating System User I s Guide was prepared using the Digital Research TEX Text Formatter and pr inted in the United States of America by Commercial Press/Monterey.
**********************************
*
Preliminary: November 1982*
**********************************CP/M 3 and its utility programs are distributed on two floppy disks. The system disk contains the operating system and the most commonly used utility programs. A second disk contains additional utilities.
How To Use CP/M 3 Documentation
The CP/M 3 documentation includes three manuals: • CP/M 3 Operating System User's Guide
• CP/M 3 Operating System Programmer's Guide • Programmer's Utilities Guide
The CP/M 3 Operating System User's Guide introduces you to the CP/M 3 operating system and tells you how to use it. The User's Guide assumes that the version of CP/M 3 on your distribution disk is ready to run on your computer. To use this manual, you must be familiar with the parts of your computer, know how to set it up and turn it on, and how to handle, insert, and store disks. However, you do not need a great deal of experience with comp~ters.
The CP/M 3 Operating System Programmer's Guide presents information for application programmers who are creating or adapting programs to run under CP/M 3. The Programmer's Utilities Guide includes information on the CP/M assemblers and debuggers that experienced programmers use to create new CP/M 3 programs.
Bow This Guide is Organized
This guide begins with simple examples, proceeds with basic concepts, then presents a detailed reference section on commands. The first four sections describe CP/M 3 operation for the first-time user. Section 1 introduces CP/M 3 and tells you how to start the operating system, enter commands, edit the command line, and create a back-up copy of your distribution disks. Section 2 discusses files, disks, and drives. Section 3 describes how you can use CP/M
3 to manage your pr inter and console. Section 4 develops the concepts you need to use CP/M 3 commands. If you are new to CP/M, read the f i r s t four sections carefully to get a general understanding of how to use CP/M 3 before you proceed to the specific command descriptions.
Section 5 provides detailed information on each CP/M 3 utility program, arranged alphabetically for easy reference. Many of these are programming utilities that you will not use until you start writing your own CP/M 3 programs. Section 6 tells you how to use ED, the CP/M 3 file editor. With ED, you can create and edit program, text; and data files.
TABLE OF CONTENTS
1 Introduction
1.1 How to Start CP/M 3 1.2 The Command Line . •
1.3 Why You Should Back Up Your Files 1.4 How to Make Copies of Your CP/M 3 Disks
2 Files, Disks, and Drives
2.1 What is a File?
2.2 How Are Files Created? .
2.3 Naming Files--What's in a Name?
2.4 Accessing Files--Do You Have the Correct Drive?
3
2.5 Accessing Files--User Numbers
2.6 Accessing More Than One F i l e . 2.7 How to Protect Your Files
2.7.1 2.7.2 2.7.3
File Attributes • • • . Time and Date Stamping Passwords • • . • • . .
2.8 How Are Files Stored on a Disk? 2.9 Changing Floppy Disks
2.10 Protecting a Drive
Console and Printer
3.1 Controlling Console Output
3.2 Controlling Printer Output
3.3 Console Line Editing
3.3.1 Line Editing in Nonbanked
.
CP/M 3.3.2 Line Editing in Banked CP/M 3
· · ·
· ·
·
· ·
3
·
·
TABLE OF CONTENTS
(continued)
3.4 Redirecting Input and Output 3.5 Assigning Logical Devices
22 24
4 CP/M 3 Command Concepts
5
4.1 Two Kinds of Commands 25
4.3 Transient Utility Commands. 26
4.4 How CP/M 3 Searches for Program and Data Files. 28 4.4.1 Finding Data Files
4.4.2 Finding Program Files
28 28
4.5 Executing Multiple COIT~ands 30
4.6 Terminating Programs • 31
4.7 Getting Help 32
Command Summary 5.1 5.2 The The The The The The
Let's Get Past the Formalities How Commands Are Described DATE Command
.
.
. .
Set the Date and Time DEVICE COTIl!nand
.
.
3336
42 42 44 Display Device Characteristics and Assignments . 45 Assign a Logical Device • • • • • . . 46 Set Attributes of a Physical Device . • • • • • 47 Display or Set the Current Console Screen Size 47 DIR Command
Display Directory Display Directory with DUMP Command
ED Command ERASE Command
TABLE OF CONTENTS
(continued)
The GENCOM Command
Attach RSX Files to a COM File • • • . Generate a COM File Using only RSX Files • • Restore a File with Attached RSXs
Update (Add or Replace) RSX Files The GET Command • •
Get Console Input from a File Terminate Console Input from a File The HELP Command
The The The The The PIP
Display Information
Add Your Own Descriptions to the HELP.HLP File HEXCOM Command
INITDIR Command
.
LIB Command·
LINK Command MAC Command·
Command
.
. · . .
. .
. .
Single File Copy • • Multiple File Copy • Combining Files • • • •.
.
Copy Files to and from Auxiliary Devices • •
Multiple Command Mode • • • . • •
Using ~ptions with PIP • • • • • • The PUT Command • • • • • • •
Direct Console Output to a File Put Printer Output to a File • • • Terminate Console Output to a File • Terminate Printer Output to a File • The RENAME Command
The RMAC Command
The SET Co~~and • •
TABLE OF CONTENTS
(continued)
Assign a Label to the Disk .
Assign Password to the Label .
Enable/Disable Password Protection for Files • Assign Passwords to Files • • • •
Set Password Protection Mode for Files • Assign a Default Password
Set Time Stamp Options on Disk • Set File Attributes . • . .
Set Drive Attribute . • • • • • • • . Additional SET Examples
The SETDEF Command
Display the Program Loading Search Definitions • Assign the Drive for Temporary Files • • • • . Define the Disk Drive Search Order
Define the File Type Search Order Turn On/Off System Display Mode The SHOW Command
Display Display Display Display Display
Access Mode and Disk Space Available • Disk Label • • • • •
User Number Information • • • • Number of Free Directory Entries • Drive Characteristics
The SID Command • • • SID Utilities The SUBMIT Command
Program Input Lines in a SUB File The SUB File • • • •
Executing the SUBMIT Command • • The PROFILE.SUB Start-up File The USER Command
The XREF Command
6 ED, The CP/M 3 Context Editor 6.1 Introduction to ED
6.2 Starting ED
6.3 ED Oper a tion • •
TABLE OF CONTENTS (continued)
6.3.1 Appending Text into the Buffer 6.3.2 ED Exit.
6.4 Basic Editing Commands • • . 6.4.1
6.4.2 6.4.3 6.4.4 6.4.5
Moving the Character Pointer • • Displaying Memory Buffer Contents • • Deleting Characters • . •
Inserting Characters into the Memory Buffer • Replacing Characters
6.5 Combining ED Commands 6.5.1
6.5.2 6.5.3
Moving the Character Pointer Displaying Text . • . • • Editing . • • • . • • • • 6.6 Advanced ED Commands . •
6.6.1 6.6.2 6.6.3 6.6.4
Moving the CP and Displaying Text . • . Finding and Replacing Character Strings Moving Text Blocks • . • . • . • • . Saving or Abandoning Changes: ED Exit 6.7 ED Error Messages
A
B
C
D
APPENDIXES
CP/M 3 Messages • • •
ASCII and Hexadecimal Conversions • Filetypes
CP/M 3 Control Character Summary E . User's Glossary • • • • • • • . .
xii
163
193
197
199
Foreword
Welcome to the world of microcomputers opened to you by your eight-bit microprocessor. Welcome also to the world of application software accessible through your Digital Research CP/M 3 operating system. Digital Research designed CP/M 3 especially for the 8080, 8085, ZBO or equivalent microprocessor that is the heart of your computer.
What CP/M 3 Does For You
CP /M 3 manages and supervises your computer's resources, including memory and disk storage, the console (screen and keyboard), printer, and communications devices. It also manages information stored magnetically on disks by grouping this information into files of programs or data. CP/M 3 can copy files from a disk to your computer's memory, or to a peripheral device such as a printer. To do this, CP/M 3 places various programs in memory and executes them in response to commands you enter at your console.
Once in memory, a program runs through a set of steps that instruct your computer to perform a certain task. You can use CP/M 3 to create your own programs, or you can choose from the wide variety of CP/M 3 application programs that entertain you, educate you, and help you solve commercial and scientific problems.
What You Need to Run CP/M 3 on Your Computer
Digital Research provides two kinds of CP/M 3 systems: banked and nonbanked. Your computer dealer can tell you if you have a banked or nonbanked system. The banked system requires more memory, but in turn provides more memory space for application programs. The banked version also has additional enhancements that are noted
in the text.
The minimum hardware requirement for both versions of CP/M 3 is a computer based on an 8080, 8085, or equivalent microprocessor, a console device (generally a keyboard and display device such as a CRT screen), and at least one floppy disk drive. To use all the capabilities of CP/M 3, you should have two disk drives. At least one should be a single density floppy drive, because CP/M 3 and most CP/M applications are distributed on floppy disks.
table. Appendix C lists the filetypes associated with CP/M 3. Appendix D lists and defines the CP/M 3 control characters. Appendix E provides a simple glossary of commonly used computer
terms.
If you are new to computers, you might find some of the topics, such as the programming utilities, a bit difficult to understand at first. Learning to use'your computer is a challenge, and we hope you'll find it fun. This book proceeds $tep by step so that you can quickly proceed from opening your new system disk package to mastering CP/M 3's powerful facilities.
Section 1
Introduction to CP/M 3
This section tells you how to start CP/M 3, how to enter a command and edit the command line, and how to make a back-up copy of your CP/M 3 distribution disks.
1.1 Bow to Start CP/M 3
Starting or loading CP/M 3 means reading a copy of the operating system from your CP/M 3 system disk (1 of 2 of your distribution disks) into your computer's memory.
First, be sure your computer's power is on. Next, insert the CP/M 3 system disk into your initial drive. In this section, assume that the initial drive is A and the disk is removable. Close the drive door. Then, press the RESET or RESTART button. This automatically loads CP/M 3 into memory. This process is called booting, cold starting, or simply loading the system.
After CP/M 3 is loaded into memory, a message similar to the following is displayed on your screen:
CP/M 3 Version V.V
The version number, represented above by V.V, tells you the version of CP/M 3 that you own. After this display, the following two-character message appears on your screen:
A>
This is the CP/M 3 system prompt. The system prompt tells you that CP/M 3 is ready to read a command from your keyboard. In this example, the prompt also tells you that drive A is your default drive. This means that until you tell CP/M 3 to do otherwise, it looks for program and data files on the disk in drive A.
1.2 The Command Line
CP/M 3 performs certain tasks according to specific commands that you type at your keyboard. A CP/M 3 command line is composed of a command keyword, an optional command tail, and a carrlage return keystroke. The command keyword identifies a command (program) to be executed. The command tail can contain extra information for the command, such as a filename or parameters. To end the command line, you must press the carriage return key. The following example shows a user entering a command line';
CP/M 3 User's Guide 1.2 The Command Line
The characters the user types are slanted to distinguish them from characters the system displays. In this example, OIR is the command keyword and MYFILE is the command tail. The car r iage return keystroke does not appear on the screen or in the example. You must remember to press the carriage return key to send a command line to CP/M 3 for processing. Note that the carriage return key can be marked ENTER, RETURN, CR, or something similar on your keyboard. In this guide, RETURN signifies the carriage return key.
As you type characters at the keyboard, they appear on your screen. The single-character position indicator, called the cursor, moves to the right as you type characters. If you make a typing mistake, press either the BACKSPACE key (if your keyboard has one) or CTRL-H to move the cursor to the left and correct the error. CTRL is the abbreviation for the CONTROL key. To type a control character, hold down the CTRL key and press the required letter key. Foe example, to move the cursor to the left, hold down CONTROL and press the H key.
You can type the keyword and command tail in any combination of upper-case and lower-case let.ters. CP/M 3 treats all letters in the command line as upper-case.
Generally, you type a command line directly after the system prompt. However, CP/M 3 does allow spaces between the prompt and the command keyword.
CP/M 3 recognizes two different types of commands: Built-in commands and Transient Utili ty commands. Buil t- in commands execu te programs that reside in memory as a part of CP/M 3 operating system. Built-in commands can be executed immediately. Transient utility commands are stored on disk as program files. They must be loaded from disk to perform their task. You can recognize Transient Utility program files when a directory is displayed on the screen because their filenames are followed by COM. Section 4 presents lists of the CP/M 3 Built-in and Transient commands.
For Transient Utilities, CP/M 3 checks only the command keyword. If you include a command tail, CP/M 3 passes it to the utility without checking it because many utilities require unique command tails. A command tail cannot contain more than 128 characters. Of course, CP/M 3 cannot read either the command keyword or the command tail until you press the RETURN key.
Let's use one command to demonstrate how CP/M 3 reads command lines. The OIR command tells CP/M 3 to display the names of disk files on your screen. Type the OIR keyword after the system prompt, omit the command tail, and press RETURN.
A>OIR
CP/M 3 responds to this command by writing the names of all the files that are stored on the disk in drive A. For example, if you have your CP/M 3 system disk in drive A, these filenames, among others, appear on your screen:
CP/M 3 User's Guide 1.2 The Command Line
COPYSYS COM
PIP COM
SET COM
CP/M 3 recognizes only correctly spelled command keywords. If you make a typing error and press RETURN before correcting your mistake, CP/M 3 echoes the command line with a question mark at the end. For example, if you mistype the DIR command, CP/M 3 responds
A>DJR DJR?
to tell you that it cannot find the command keyword. To correct simple typing errors, use the BACKSPACE key, or hold down the CONTROL key and press H to move the cursor to the left. CP/M 3 supports other control characters that help you edit command lines efficiently. Section 3 tells how to use control characters to edit command lines and other information you enter at your console.
DIR accepts a filename as a command tail. You can use DIR with a filename to see if a specific file is on the disk. For example, to check that the Transient utility program COPYSYS.COM is on your system disk, type
A>DIR COPYSYS.COM
CP/M 3 performs this task by displaying either the name of the file you specified, or the message "No File."
Be sure to type at least one space after DIR to separate the command keyword from the command tail. If you do not, CP/M 3 responds as shown.
A>DIRCOPYSYS.COM DIRCOPYSYS.COM?
1.3 Why You Should Back Up Your Files
Humans have faults, and so do computers. Human or computer errors sometimes destroy valuable programs or data files. By mistyping a command, for example, you could accidentally erase a program that you just created or a data file that has been months in the making. A similar disaster could result from an electronic component failure.
Data processing professionals avoid losing programs and data by making copies of valuable files. Always make a working copy of any new program you purchase and save the original. If the program is accidentally erased from the working copy, you can easily restore it from the original.
CP/M 3 User's Guide 1.3 Why You Should Back Up Your Files
the point where it takes ten to twenty times longer to reenter the information than it takes to make the copy.
So far, we have not discussed any commands that change information recorded on your CP/M 3 system disk. Before we do, let's make a few working copies of the your distribution disks.
1.4 Bow to Make Copies of Your CP/M 3 Disks
To back up your CP/M 3 disks, you need two or more floppy disks for the back-ups. The back-up disks can be factory-fresh or used. You might want to format new or reformat used disks with the disk formatting program that accompanies your particular computer. If the disks are used, make sure that there are no other files on the disk.
If your computer's manufacturer has provided a special program to copy disks, you might use i t to make back-ups of your distribution disks. Otherwise, use the COPYSYS and PIP utility programs found on your CP/M 3 distribution disks. PIP can copy all program and data files, but only COPYSYS can copy the operating system. Note that the COPYSYS utility distributed by Digital Research only functions with eight-inch, single-sided drives. However, your computer's manufacturer might have modified COPYSYS to work with your equipment.
This section shows how to make distribution disk back-ups on a system that has two drives: drive A and drive B. Your drives might be named with other letters from the range A through P. To make a copy of your CP/M 3 distribution system disk, labeled 1 of 2, first use the COPYSYS utility to copy the operating system loader. Make sure that your distribution system disk is in drive A, the default drive, and the blank disk is in drive B. Then enter the following command at the system prompt:
A>COPYSYS
CP/M 3 loads COPYSYS into memory and runs it. COPYSYS displays the following output on your screen. When the program prompts you, press RETU~~ only when you have verified that the correct disk is in the correct drive.
Copysys Ver 3.0
Source drive name (or return for default) ?A Source on A then type return
Function complete
Destination drive name (or return to reboot) ?B Destination on B then type return
All Information Presented Here is Proprietary to Digital Research
CP/M 3 User's Guide 1.4 How to Copy Your CP/M 3 Disks
Function complete
Do you wish' to copy CPM3.SYS?yes
(CP/M 3 repeats the above prompts to copy CPM3.SYS.) A>
You now have a copy of the operating system only. To copy the remaining files from disk 1 of 2, enter the following PIP command.
A>PIP B:=A:*.*
This PIP command copies all the files shown in your disk directory to drive B from drive A. PIP displays the message COPYING followed by each filename as the copy operation proceeds. When PIP finishes copying, CP/M 3 displays the system prompt.
Now you have an exact copy of the distribution disk 1 of 2 in drive B. Remove the original from drive A and store it in a safe place. If your original remains safe and unchanged, you can easily restore your CP/M 3 program files if something happens to your working copy.
Remove the copy from drive B and insert it in drive A. Use this copy as your CP/M 3 system disk to make more back-ups, to try the examples shown in the rest of this manual, and to start CP/M 3 the next time you turn on your computer.
You still need to make a back-up copy of distribution disk 2 of 2. This disk contains programmer's utility programs and source files. Place another new or reformatted disk in drive B. This time, type only the command keyword
A>PIP
PIP responds with an asterisk prompt,
*
You can now remove disk 1 of 2 from drive A and insert the disk you want to copy, disk 2 of 2. Type the following PIP command after the asterisk prompt, as shownin the example: *B:=A:*.*
Again, PIP displays the message COPYING, followed by each filename. When PIP completes the copy and displays the asterisk prompt, press RETURN. CP/M 3 then displays the familiar A> system prompt. You now have a copy of disk 2 of 2 in drive B. Remove both 2 of 2 disks and store them in a safe place. You can now reinsert your working system disk and continue to use the system.
CP/M 3 User's Guide End of Section 1
Section 2
Files, Disks, and Drives
CP/M 3's most important task is to access and maintain files on your disks. With CP/M 3 you can create, read, write, copy, and erase disk files. This section tells you what a file is, how to create, name, and access a file, and how files are stored oh your disks. It also tells how to change disks and change the default drive.
2.1 What is a File?
A CP/M 3 file is a collection of related information stored on a disk. Every file must have a unique name because CP/M 3 uses that name to access that file. A directory is also stored on each disk. The directory contains a list of the filenames stored on that disk and the locations of each file on the disk.
In general, there are two kinds of files: program (command) files and data files. A program file is an executable file, a series of instructions the computer can follow step by step. A data file is usually a collection of information: a list of names and addresses, the inventory of a store, the accounting records of a business, the text of a document, or similar related information. For example, your computer cannot execute names and addresses, but it can execute a program that prints names and addresses on mailing labels.
A data file can also contain the source code for a program. Generally, a program source file must be processed by an assembler or compiler before it becomes a program file. In most cases, an executing program processes a data file. However, there are times when an executing program processes a program file. For example, the c~py program PIP can copy one or more program files.
2.2 Bow Are Files Created?
CP/M 3 User's Guide 2.3 Naming Files
2.3 Naaing Files--What's in a Name?
CP/M 3 identifies every file by its unique file specification. A file specification can be simply a one- to eight-character
filename, such as: MYFILE
A file specification can have four parts: a drive specifier, a filename, a filetype, and a password.
The drive specifier is a single letter (A-P) followed by a colon. Each drive in your system is assigned a letter. When you include a drive specifier as part of the file specification, you a=e telling CP/M 3 that the file is stored on the disk currently in that drive. For example, if you enter
B:MYFILE
CP/M 3 looks in drive B for the file MYFILE.
The filename can be from one to eight characters. When you make up a filename, try to let the name tell you something about what the file contains. For example, if you have a list of custome= names for your business, you could name the file
CUSTOMER
so that the name gives you some idea of what is in the file. As you begin to use your computer with CP/M 3, you'll find that files fall naturally into categories. To help you identify files belonging to the same category, CP/M 3 allows you to add an optional one- to three-character extension, called a filetype, to the filename. When you add a filetype to the filename, separate the filetype from the filename with a period. Try to use three letters that tell something about the file's category. For example, you could add the following filetype to the file that contains a list of customer names:
CUSTOMER.NAM
When CP/M 3 displays file specifications in response to a DIR command, it adds blanks to short filenames so that you can compare filetypes quickly.
The program files that CP/M 3 loads into memory from a disk have different filenames, but all have the filetype COM.
CP/M 3 User's Guide 2.3 Naming Files
In banked CP/M 3, you can add a password as an optional part of the file specification. The password can be from one to eight characters. If you include a password, separate it from the filetype (or filename, if no filetype is included) with a semicolon, as shown below:
CUSTOMER.NAM;ACCOUNT
If a file has been protected with a password, you must ENTER the password as part of the file specification to access the file. Section 2.7.3 describes passwords in more detail.
We recommend that you create filenames, filetypes, and passwords from letters and numbers. You must not use the following characters in filenames, filetypes or passwords because they have special meanings for CP/M 3:
< > = , 1 I * ? & / $ [ ] ( ) . : ; \ +
-A complete file specification containing all possible elements consists of a drive specification, a primary filename, a filetype, and a password, all separated by their appropriate delimiters, as shown in the following example:
A:DOCUMENT.LAWiSUSAN
2.4 Accessing Files--Do You Have the Correct Drive?
When you type a file specification in a command tail without a drive specifier, the program looks for the file in the drive named by the system prompt, called the default drive. For example, if you type the command
A>DIR COPYSYS.COM
DIR looks in the directory of the disk in drive A for COPYSYS.COM. If you have another drive, B for example, you need a way to tell CP/M 3 to access the disk in drive B instead. For this reason, CP/M 3 lets you precede a filename with a drive specifier. For example, in response to the command
A>DIR B:MYFlLE.LIB
CP/M 3 looks for the file MYFILE.LIB in the directory of the disk in drive B. When you give a command to CP/M 3, you should note which disk is in the default drive. Many application programs require that the data files they access be stored in the default drive.
CP/M 3 User's Guide 2.4 Accessing Files--Drives
CP/M 3 looks in the directory of the disk in drive B for the file PIP.COM. If CP/M 3 finds PIP on drive B, it loads PIP into memory and executes it.
If you need to access many files on the same drive, you might find i t convenient to change the default drive so that you do not need to enter a drive specifier repeatedly. To change the default drive, simply enter the drive specifier next to the system prompt. In response, CP/M 3 changes the system prompt to display the new default drive:
A>B: B>
Unlik~ the filename and filetype which are stored in the disk directory, the drive specifier for a file changes as you move the disk from one drive to another. Therefore, a file has a different file specification when you move a disk from one drive to another. Section 4 presents more information on how CP/M 3 locates program and data files.
2.5 Accessing Piles--Do You have the Correct User Number?
CP/M 3 further identifies all files by assigning each one a user number which ranges from
a
to 15. CP/M 3 assigns the user number to a file when the file is created. User numbers allow you to separate your files into sixteen file groups. User numbers are particularly useful for organizing files on a hard disk.When you use a CP/M 3 utility to create a file, the file is assigned to the current user number, unless you use PIP to copy the file to another user number. You can determine the current user number by looking at the system prompt.
4A> A>
2B>
User number 4, drive A User number 0, drive A User number 2, drive B
The user number always precedes the drive identifier. User 0, however, is the default user number and is not displayed in the prompt.
You can use the Built-In co~~and USER to change the current user number.
A>USER 3 3A>
You can change both the user number and the drive by entering the new user number and drive specifier together at the system prompt:
CP/M 3 User's Guide
A>3A: 3A>
2.5 Accessing files--User Numbers
Most commands can access only those files that have the current user number. For example, if the current user number is 7, a DIR command with no options displays only the files that were created under user number 7. However, if a file resides in user 0 and is marked with a special file ~ttribute, the file can be accessed from any user number. See the discussion of file attributes in Section 2.7.1.
2.6 Accessing More Than One File
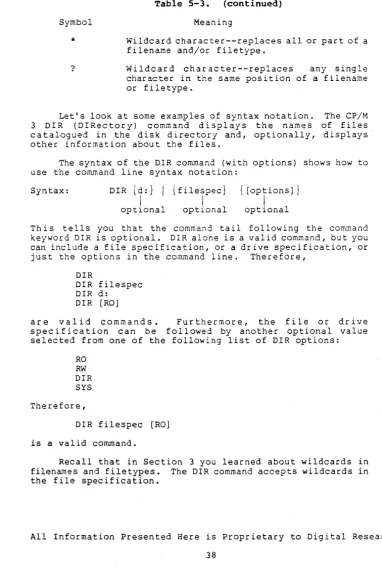
Certain CP/M 3 Built-In and Transient Utilities can select and process several files when special wildcard characters are included in the filename or filetype. A file specification containing wildcards is called an ambiguous filespec and can refer to more than one file because it gives CP/M 3 a pattern to match. CP/M 3 searches the disk directory and selects any file whose filename or filetype matches the pattern.
The two wildcard characters are ?, which matches any single letter in the same position, and *, which matches any character at that position, and any other characters remaining in the filename or filetype. The following list presents the rules for using wildcards.
• A ? matches any character in a name, including a space character.
• An
*
must be the last, or only, character in the filename or filetype. CP/M 3 internally replaces an*
with? characters to the end of the filename or filetype.• When the filename to match is shorter than eight characters, CP/M 3 treats the name as if it ends with spaces.
• When the filetype to match is shorter than three characters, CP/M 3 treats the filetype as if it ends with spaces.
Suppose, for example, you have a disk that contains the following six files:
A.COM, AA.COM, AAA.COM, B.COM, A.ASM, and B.ASM
CP/M 3 User's Guide 2.6 Accessing Multiple Files
*.* is treated as ??????????? ??????????? matches all six names *.COM is treated as ????????COM ????????COM matches the first four names ?COM matches A.COM and B.COM
?* is treated as ????
???? matches A.COM, B.COM, A.ASM, and B.ASM A?COM matches A.COM and AA.COM
A*.COM is treated as A???????COM
A???????COM matches A.COM, AA.COM, and AAA.COM
Remember that CP/M 3 uses wildcard patterns only while searching a disk directory, and therefore wildcards are valid only in filenames and filetypes. You cannot use a wildcard character in a drive specifier.
2.7 Bow to Protect Your Files
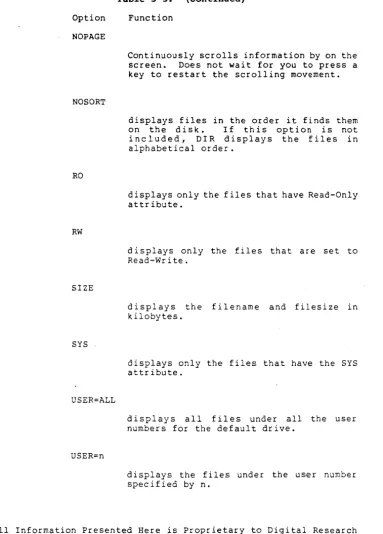
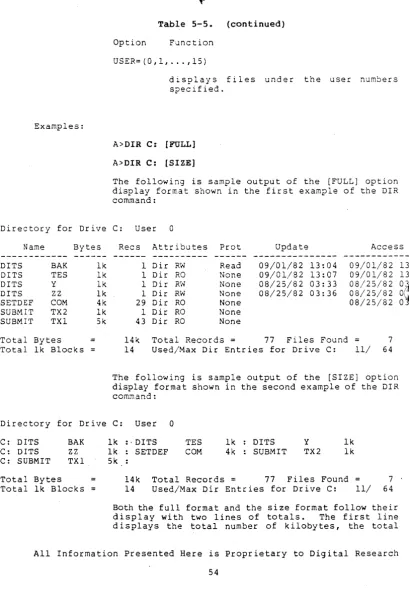
Under CP/M 3 you can organize your files into groups to protect them from accidental change and from unauthorized access. You can specify how your files are displayed in response to a DIR command, and monitor when your files were last accessed or modified. CP/M 3 supports these features by assigning the following to files:
• user numbers • attributes
• time and date stamps
• passwords (banked CP/M 3 only)
All of this information for each file is recorded in the disk directory.
2.7.1 File Attributes
File attributes control how a file can be accessed. When you create a file, CP/M 3 gives it two attributes. You can change the attributes with a SET command.
The first attribute can be set to either DIR (Directory) or SYS (System) • This attribute controls whether CP/M 3 displays the file's name in response to a DIR co~~and or DIRSYS co~~and. When you create a file, CP/M 3 automatically sets this attribute to DIR. You can display the name of a file marked with the DIR attribute
CP/M 3 User's Guide 2.7 File Protection
with a OIR command. If you give a file the SYS attribute, you must use a OIRSYS command to display the filename. Simple DIR and DIRSYS commands display only the filenames c~eated under the current user number.
A file with the SYS attribute has a special advantage when it is created under user O. When you give a file with user number 0
the SYS attribute, you can read and execute that file from any user number. This feature gives you a convenient way to make your commonly-used programs available under any user number. Note, however, that a user 0 SYS file does not appear in response to a DIRSYS command unless 0 is the current user number.
The second file attribute can be set to either R/W (Read-Write) or R/O (Read-Only). If a file is marked R/O, any attempt to write data to that file produces a Read-Only error message. Therefore, you can use the R/O attribute to protect important files. A file with the R/W attribute can be read or written to at any time, unless the disk is physically write-protected.
2.7.2 Time and Date Stamping
If you use time and date stamps, you can quickly locate the most recent copy of a file, and check when it was last updated or changed. You can choose to have the system tell you either when you created the file, or when you last read from or wrote to the file. You use the SET command to enable time and date stamping, and the DIR command with the DATE option to display a file's time and date
stamp.
A SET command enables the option you want to monitor. You can use the following commands to enable time and date stamping on a disk, but you must choose between ACCESS and CREATE. If you choose ACCESS, the stamp records the last time the file was accessed. If you choose CREATE, the stamp records when the file was created.
A>SET [ACCESS=ON] A> SET [CREATE=ON) A>SET [UPDATE=ON]
Files created on or copied to a disk that 'has time and date stamping enabled are automatically stamped. The DATE command allows you to display and reset the time and date that CP/M 3 is using. For a complete discussion of time and date stamping, see the descriptions of the SET and INITDIR commands in Section 5.
2.7.3 Passwords (Banked CP/M 3 Only)
CP/M 3 User's Guide 2.7 File Protection
The SET utility allows you to enable password protection on a drive, assign a password to SET itself (so that unauthorized users cannot disable password protection on a dr i ve) , and ass ign passwords to specific files that have already been created. You can assign passwords to all program and data files. This means that a command line could require the entry of two passwords in order to execute: one password to access the command program and a second password to access the file specified in the command tail.
Some CP/M 3 commands and most word processing, accounting, and other application programs running under CP/M 3 do not accept passwords in the command tail. If you want to protect your file and still use those programs, you can set a default password before executing the application program. See the description of the SET command in Section 5 for an explanation of this process.
2.8 How Are Files Stored on a Disk?
CP/M 3 records the filename, filetype, password, user number, and attributes of each file in a special area of the disk called the directory. In the directory, CP/M 3 also records which parts of the disk belong to which file.
CP/M 3 allocates directory and storage space for a file as records are added to the file. When you erase a file, CP/M 3 reclaims storage in two ways: it makes the file's directory space available to catalog a different file, and frees the file's storage space for later use. It is this dynamic allocation feature that makes CP/M 3 powerful. You do not have to tell CP/M 3 how big your file will become, because it automaticallY allocates more storage for a file as needed, and releases the storage for reallocation when the file is erased. Use the SHOW command to determine how much space remains on the disk.
2.9 Changing Floppy Disks
CP/M 3 cannot, of course, do anything to a file unless the disk that holds the file is inserted into a drive and the drive is ready. When a disk is in a drive, it is online and CP/M 3 can access its directory and files.
At some time, you will need to take a disk out of a drive and insert another that contains different files. You can replace an online disk whenever you see the system prompt at your console. This is a clear indication that no program is reading or writing to the drive.
You can also remove a disk and insert a new one when an application program prompts you to do so. This can occur, for example, when the data that the program uses does not fit on one floppy disk. Note that you must never remove a disk if a program is reading or writing to it.
CP/M 3 User's Guide 2.9 Changing Floppy Disks
You can change disks on the drive without sending any special signals to CP/M 3. This allows you to insert another disk at a program's request and read files from or create files on the new disk.
2.10 Protecting a Drive
Under CP/M 3, drives can be marked RIO (Read-Only) just as files can be given the R/O attribute. The default state of a drive is R/W (Read-Write). You can give a drive the R/O attribute by using the SET command described in Section 5. To return the drive to R/W, you may use the SET command or type a CTRL-C to the system prompt.
CP/M 3 User's Guide End of Section 2
Section 3 Console and Printer
This section describes how CP/M 3 communicates with your console and printer. It tells how to start and stop console and printer output, edit commands you enter at your console, and redirect console and printer input and output. It also expl1?-ins the concept of logical devices under CP/M 3.
3.1 Controlling Console Output
Sometimes CP/M 3 displays information on your screen too quickly for you to read it. Sometimes an especially long display scrolls off the top of your screen before you have a chance to study it. To ask the system to wait while you read the display, hold down the CONTROL key and press S. A CONTROL-S keystroke causes a pause in the display. When you are ready, press CONTROL-Q to resume the display. If you press any key besides CONTROL-Q during a display pause, CP/M 3 sounds the console bell or beeper.
DIR, TYPE, and other CP/M 3 utilities support automatic "paging" at the console. This means that if the program's output is longer than the screen can display at one time, the display automatically halts when the screen is filled. When this occurs, you can press any key to continue the display.
3.2 Controlling Printer Output
You can also use a control command to ec~o console output to the printer. To start printer echo, press a CONTROL-Po To stop printer echo, press another CONTROL-Po While printer echo is in
effect~ any characters that appear on your screen are listed at your printer.
CP/M 3 User's Guide 3.3 Console Line Editing
3.3 Console Line Editing
You can correct simple typing mistakes with the BACKSPACE key. CP/M 3 also supports additional line-editing functions for banked and nonbanked systems that you perform wi th control characters. You can use the control characters to edit command lines or input lines to most programs.
3.3.1 Line Editing in Nonbanked CP/M 3
Nonbanked CP/M 3 allows you to edi t your command Ii ne us ing the set of characters listed in Table 3-1. To edit a co~~and line in nonbanked CP/M 3, use control characters to delete characters left of the cursor, then replace them with new characters.
In the following example command line, the command keyword PIP is mistyped. (The underbar represents the cursor.)
A>POP A:=B:*.*
To move the cursor to the letter 0, hold down the CTRL key and press the letter H eleven times. CTRL-H deletes characters as it moves the cursor left, leaving the following command line:
A>P
Now, you can type the correct letters, press RETUR,.~, and send the command to CP/M 3.
A>PIP A:=B:*.*
Table 3-1 lists all line-editing control characters for nonbanked CP/M 3.
Table 3-1. Nonbanked CP/M 3 Line-editing Control Characters
Character Meaning
CTRL-E Forces a physical carriage return but does not send the command line to CP/M 3. Moves the cursor to the beginning of the next line without erasing your previous input.
CTRL-H
CTRL-I
Deletes a character and moves the cursor left one character position.
Moves the cursor to the next tab stop. Tab stops are automatically set at each eighth column. Has the same effect as pressing the TAB key.
All Information Presented Here is Proprietary to Digital Research
CP/M 3 User's Guide 3.3 Console Line Editing
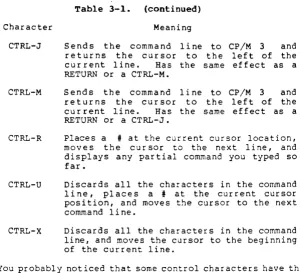
Table 3-1. (continued)
Character Meaning
CTRL-J
CTRL-M
CTRL-R
CTRL-U
CTRL-X
Sends the command line to CP/M 3 and returns the cursor to the left of the current line. Has the same effect as a RETURN or a CTRL-M.
Sends the command line to CP/M 3 and returns the cursor to the left of the current line. Has the same effect as a RETURN or a CTRL-J.
Places a # at the current cursor location, moves the cursor to the next line, and displays any partial command you typed so far.
Discards all the characters in the command line, places a # at the current cursor position, and moves the cursor to the next command line.
Discards all the characters in the command line, and moves the cursor to the beginning of the current line.
You probably noticed that some control characters have the same meaning. For example, the CTRL-J ana CTRL-M keystrokes have the same effect as pressing the RETURN key: all three send the command line to CP/M 3 for processing. Also, CTRL-H has the same effect as pressing the BACKSPACE key.
3.3.2 Line Editing in Banked CP/M 3
Banked CP/M 3 allows you to edit your command line without deleting characters. Using the line-editing control characters
li~ted in Table 3-2, you can move the cursor left and right to insert and delete characters in the middle of a command line. You do not have to retype everything to the right of your correction. In banked CP/M 3, you can press RETU~~ when the cursor is in any position in the command line - CP/M 3 reads the entire command line. You can also recall a command for reediting and reexecution.
In the following sample session, the user has mistyped PIP, and CP/M 3 has returned an error message. The user recalls the erroneous command line by pressing CTRL-W. To correct the error, he uses the control characters annotated below:
A>POP A:=B:*.* POP?
[image:32.470.73.374.50.323.2]CP/M 3 User's Guide 3.3 Console Line Editing
A>fOP A:=B:*.* (CTRL-B to beginning of line) A>POP A:=B:*.* (CTRL-F to move cursor right) A>Pf A:=B:*.* (CTRL-G to delete error) A>PIP A:=B:*.* (I corrects the command name) To execute the corrected command line, the user can press return even though the cursor is in the middle of the line. A return keystroke, or one of its equivalent CTRL characters, not only executes the command, but also stores the command in a buffer so that you can recall it for editing or reexecution by pressing
CTRL-w.
A CTRL-U keystroke can also save a command in the buffer, but it does not execute the command. Note that CTRL-U places only the characters to the left of the cursor in the buffer. Therefore, to use CTRL-U to save an entire command line, position the cursor at the end of the line.
When you insert a character in the middle of a Ii ne, char acter s to the right of the cursor move to the right. If the line becomes longer than your screen is wide, characters disappear off the right side of the screen. These characters are not lost. They reappear if you delete characters from the line or if you press CTRL-E when the cursor is in the middle of the line. CTRL-E moves all characters to the right of the cursor to the next line on the screen.
Table 3-2 gives a complete list of line-editing control characters for a banked CP/M 3 system.
Table 3-2. Banked CP/M 3 Line-editing Control Character.s
Character Meaning
CTRL-A Moves the cursor one character to the left. CTRL-B Moves the cu r sor to the beg i nn i ng of the command line without having any effect on the contents of the line. If the cursor is at the beginning, CTRL-B moves it to the end of the line.
CTRL-E Forces a physical carriage return but does not send the command line to CP/M 3. Moves the cursor to the beginning of the next line without erasing the previous input.
All Information Presented Here is Proprietary to Digital Research
CP/M 3 User's Guide 3.3 Console Line Editing
Table 3-2. (continued)
Character Meaning
CTRL-F CTRL-G
CTRL-H
CTRL-I
CTRL-J
CTRL-K
CTRL-M
CTRL-R
CTRL-U
Moves the cursor one character to the right. Deletes the character indicated by the cursor. The cursor does not move.
Deletes a character and moves the cursor left one character position.
Moves the cursor to the next tab stop. Tab stops are automatically set at each eighth column. Has the same effect as pressing the TAB key.
Sends the command line to CP/M 3 and returns the cursor to the beginning of a new line. Has the same effect as a RETURN or a CTRL-M keystroke.
Deletes to the end of the line from the cursor.
Sends the command line to CP/M 3 and returns the cursor to the beginning of a new line. Has the same effect as a RETU~~ or a CTRL-J keystroke.
Retypes the co~~and line. Places a
t
at the current cursor location, moves the cursor to the next line, and retypes any par tial command you typed so far.CP/M 3 User's Guide 3.3 Console Line Editing
Table 3-2. (continued)
Character Meaning
CTRL-W
CTRL-X
Recall sand displays previously entered command line both at the operating system level and within executing programs, if the CTRL-W is the first character entered after the prompt. CTRL-U, CTRL-M, CTRL-J, and RETURN define the command line you can recall. If the command line contains characters, CTRL-W moves the cursor to the end of the command line. If you press RETURN, CP/M 3 executes the recalled command.
Discards all the characters left of the cursor and moves the cursor to the beginning of the current line. CTRL-X saves any characters right of the cursor.
You probably noticed that some control characters have the same meaning. For example, the CTRL-J and CTRL-M keystrokes have the same effect as pressing the RETURN key: all three send the command line to CP/M 3 for processing. Also, CTRL-H has the same effect as pressing the BACKSPACE key. Notice that when a control character is displayed on your screen, it is preceded by an up-arrow, A For
example, a CTRL-C keystroke appears as AC on your screen.
3.4 Redirecting Input and Output
CP/M 3's PUT command allows you to direct console or printer output to a disk file. You can use a GET command to make CP/M 3 or a utility program take console input from a disk file. The following examples illustrate some of the conveniences GET and PUT offer.
You can use a PUT co~~and to direct console output to a disk file as well as the console. This gives you a convenient way to create a disk file that contains a directory of all the files on that disk, as shown below:
A>PUT CONSOLE OUTPUT TO FILE OIR.PRS Putting console output to file: OIR.PRN A>DIR
A: FILENAME TEX A: FOUR TEX A: TWO TEX
FRONT ONE THREE TEX TEX BAK A>PUT CONSOLE OUTPUT TO CONSOLE Putting console output to console
FRONT LINEDIT EXAMP2 BAK TEX TXT ONE EXAMPI BAK TXT THREE TWO
All Information Presented Here is Proprietary to Digital Research 22
CP/M 3 User's Guide 3.4 Redirecting Input/Output
A>TYPE DIR.PRN A: FILENAME TEX A: FOUR TEX A: TWO TEX
FRONT ONE THREE TEX TEX BAR FRONT LINEOIT EXAMP2 BAR TEX TXT ONE EXAMPI BAR
TXT THREE TWO
You can use a similar PUT command to direct printer output to a disk file as well as the printer.
A GET command can direct CP/M 3 or a program to read a disk file for console input instead of the keyboard. If the file is to be read by CP/M 3, it must contain standard CP/M 3 command lines. If the file is to be read by a utility program, it must contain input appropriate for that program. A file can contain both CP/M 3 command lines and program input if it also includes a command to start a program.
You specify whether CP/M 3 or a program is to start reading the file by adding or omitting the SYSTEM option in the GET command line, as shown in the following sample session. If you omit the SYSTEM option, the system prompt returns so that you can initiate the program that is to take input fOrom the specified file. If you include the SYSTEM option, CP/M 3 immediately takes input from the specified file.
3A>type pip.dat b:=front.tex b:=one.tex
.!::L: =two. tex
~>get console input from file pip.dat Getting console input from file: PIP.OAT 3A>pip
CP/M 3 PIP VERSION 3.0 *b:=front.tex
*b:=one.tex *b:=two.tex *"M
3A>type ccp.dat dir
show dirsys
3A>get console input from file ccp.dat [system] Getting console input from file: CCP.OAT
--->dir
FILENAME TEX FRONT TEX FRONT BAR
-r:
FOUR TEX ONE TEX LINEOIT TEX A: TWO TEX EX&Jo1P3 EXAMP2 TXTA: THREE BAR EXAMP5 CCP OAT
ONE BAR THREE EXAMPI TXT TWO PIP DAT EXAMP4
TEX BAR
CP/M 3 User's Guide
3A>show A: RW, Space: B: RW, Space: 3A>dirsys
3,392k
452k
NON-SYSTEM FILE(S) EXIST
3.4 Redirecting Input/Output
See the descriptions of GET and PUT in Section 5 for more ways to use redirected input and output.
3.5 Assigning Logical Devices
Most CP/M 3 computer systems have a traditional console with a keyboard and screen display. Many also have letter-quality printers. If you use your comp'uter for unusual tasks, you might want to add a different kind of character device to your system: a line printer, a teletype terminal, a modem, or even a joystick for playing games. To keep track of these physically different input and output devices, CP/M 3 associates different physical devices with "logical" devices. Table 3-3 gives the names of CP/M 3 logical devices. It also shows the physical devices assigned to these logical devices in the distributed CP/M 3 system.
Table 3-3. CP/M 3 Logical Devices
Device Name Device Type Assignment
CONIN: Console input Keyboard
CONOUT: Console output Screen
AUXIN: Auxiliary input Null
AUXOUT: Auxiliary output Null
LST: List output Printer
I n some implementations of CP/M 3, you can change these assignments with a DEVICE command. If your system supports the DEVICE command, you can, for example, assign AUXIN and AUXOUT to a modem so that your computer can communicate with others over the telephone.
End of Section 3
Section 4
CP/M 3 Command Concepts
As we discussed in Section 1, a CP/M 3 command line consists of a command keyword, an optional command tail, and a carriage return keystroke. This section describes the two kinds of programs. the command keyword can identify, and tells how CP/M 3 searches for a program file on a disk. This section also tells how to execute multiple CP/M 3 commands, and how to reset the disk system.
4.1 Two Kinds of Commands
A command keyword identifies a program that resides memory as part of CP/M 3, or on a disk as a program file. that identify programs in memory are called Built-in Commands that identify program files on a disk are called Utility commands.
either in Commands commands. Transient
Six Built-in commands and over twenty Transient Utility commands are included with CP/M 3. You can add utilities to your system by purchasing various CP/M 3-compatible application programs. If you are an experienced programmer, you can also write your own utilities that operate with CP/M 3.
4.2 Built-in Commands
Built-in commands are part of CP/M 3 and are always available for your use regardless of which disk you have in which drive. Built-in commands reside in memory as a part of CP/M 3 and therefore load more quickly than the Transient Utilities.
Some Built-in commands have options that require support from a related Transient Utility. The related Transient has the same name as the Built-in and has a filetype of .COM. This type of Transient Utility is loaded only when a Built-in command line contains 'options that cannot be handled by the Built-in command.
If you include certain options in the command tail for a Built-in command, CP/M 3 might return a ".COM Required" message. This means that the command tail options require support from 'a related Transient Utility and CP/M 3 could not find that program file. The following files must be accessible to support all the f~nctions
these Built-ins offer: ERASE.COM, RENAME.COM, TYPE.COM, and DIR.COM.
,..
CP/M 3 User's Guide 4.2 Built-in Commands
Table 4-1. Built-in Commands
Command Function
DIR Display filenames of all files in the directory except those marked with the SYS attribute. DIRSYS Display filenames of files marked with the SYS
(system) attribute in the directory.
ERASE Erase a filename from the disk directory and release the storage space occupied by the file.
REN&~ Rename a disk file.
TYPE Display contents of an ASCII (character) file at your screen.
USER Change to a different user number.
CP/M 3 allows you to abbreviate the Built-in commands as follows:
DIRSYS EAASE
RENAo.'1E
TYPE USER
DIRS ERA
REN
TYP USE
4.3 Transient Utility Commands
When you enter a command keyword that identifies a Transient Utility, CP/M 3 loads the program file from the disk and passes it any filenames, data, or parameters you entered in the command tail. Section 5 provides the operating details for the CP/M 3 Transient Utilities listed in Table 4-2. Remember that many of these
utilities are programming tools you might never need to use.
Table 4-2. Transient Utility Commands
Name Function
COPYSYS DATE DEVICE
Create a new boot disk.
Set or display the date and time.
Assign logical CP/M devices to one or more physical devices, change device dr i ver protocol and baud rates, or set console screen size.
CP/M 3 User's Guide 4.3 Transient Utility Commands
Table 4-2. (continued)
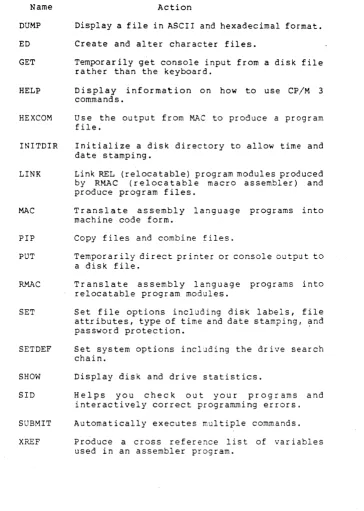
Name Action
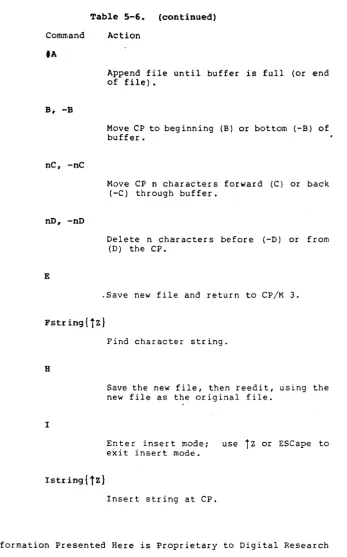
DUMP ED GET
HELP
HEXCOM
INITDIR
LINK
Display a file in ASCII and hexadecimal format. Create and alter character files.
Temporarily get console input from a disk file rather than the keyboard.
Display information on how to use CP/M 3 commands.
Use the output from MAC to produce a program file.
Initialize a disk directory to allow time and date stamping.
Link REL (relocatable) program modules produced by RMAC (relocatable macro assembler) and produce program files.
MAC Translate assembly language programs into machine code form.
PIP Copy files and combine files.
PUT Temporarily direct printer or console output to a disk file.
RMAC
SET
SETDEF
SHOW
Translate assembly language programs into relocatable program modules.
Set file options including disk labels, file attributes, type of time and date stamping, ~nd
password protection.
Set system options including the drive search chain.
Display disk and drive statistics.
SID Helps you check out your programs and interactively correct programming errors. SUBMIT
XREF
[image:40.469.48.412.64.575.2]CP/M 3 User's Guide 4.4 How CP/M 3 Searches for Files
4.4 Bow CP/M 3 Searches for Program and Data Files
This section describes how CP/M 3 searches for program and data files on disk. If it appears that CP/M 3 cannot find a program file you specified in a command line, the problem might be that CP/M 3 is not looking on the drive where the file is stored. Therefore, you need to understand the steps CP/M 3 follows in searching for program and data files.
4.4.1 Finding Data Files
As you recall, when you enter a command line CP/M 3 passes the command tail to the program identified by the command keyword. If the command tail contains a file specification, the program calls CP/M 3 to search for the data file. If CP/M 3 cannot find the data file, the program displays an error message at the console. Typically, this message is "File not found" or "No File", but the message depends on the program identified by the command keyword.'
If you do not include a drive specifier with the filename in a command tail, CP/M 3 searches the directory of the current user number on the default drive. If the file is not there, CP/M 3 looks for the file with the SYS attribute in the directory of user 0 on the default drive. If CP/M 3 finds the file under user 0, it allows the program Read-Only access to the file. For example, if you enter the following command line,
3A>TYPB MYFILB. TXT
CP/M 3 first searches the directory for user 3 on drive A. If it does not find MYFILE.TXT there, it searches the directory of user 0 on drive A for MYFILE.TXT marked with the SYS attribute. If the file is not in either directory, CP/M 3 returns control to ~
which then displays "No File. n l'{Pc
Some CP/M 3 utilities such as PIP and DIR restrict their file search to the current user number. Because CP/M 3 does not allow Read-Write access to SYS files, ERASE and RENAME also restrict their
search to the current user number.
The search procedure is basically the same if you do include a drive specifier with the filename. CP/M 3 first looks in the directory of the current user number on the specified drive. Then, if it doesn't folnd the file, it looks in the directory for user 0 on the specified drive for the file with the SYS attribute. If CP/M 3 does not fin4 the data file after these two searches, it displays an error message.
4.4.2 Finding Program Files
The search procedure for a program file can be very different from a data file search. This is because you can use the SETDEF command described in Section 5 to define the search procedure you
'CP/M_3 User's Guide, 4.4 How CP/M 3 Searches for Files
want CP/M 3 to follow when it is looking for a program file. ,With SETDEF you can ask CP/M 3 to make as many as sixteen searches when you do not include a drive specifier before the command keyword, but that is a ra~e casel We'll begin by describing how CP/M 3 searches for program files when you have not yet entered a SETDEF command.
If a command keyword identifies a Transient Utility, CP/M 3 looks for that program file on the default or specified drive. It looks under the current user number, and then under user 0 for the same file marked with the SYS attribute. At any point in the search process, CP/M 3 stops the search if it finds the program file. CP/M 3 then loads the program into memory and executes it. When the program terminates, CP/M 3 displays the system prompt and waits for your next command. However, if CP/M 3 does not find the command file, it repeats the command line followed by a question mark, and waits for your next command.
If you include a drive specifier before the command keyword, you are telling CP/M 3 precisely where to look for the program file. Therefore CP/M 3 searches only two locations: the directory for the cur rent user on the spec i f ied dr i ve and then for user 0 on the specified drive, before it repeats the command line with a question mark. For example, if you enter
4C>A:SBOW SPACE
CP/M 3 looks on drive A, user 4 and then user 0 for the file SHOW.COM.
If you do not include a drive specifier before the command keyword, CP/M 3 searches directories in a sequence called a drive chain. When you first receive CP/M 3, there is only one drive in your chain: the default drive. Unless you change the chain with a SETDEF command, CP/M 3 looks in two places for the program file. For example, if you enter
7E>SBOW SPACE
CP/M 3 searches the following locations for the file SHOW.COM: 1) Drive E, user 7
2) Drive E, user 0
Remember that a SHOW.COM file under user 0 must be marked with the SYS attribute or else CP/M 3 cannot find it. You should use a SET command to give program files under user 0 to the SYS attribute because then they can be accessed automatically from all other user areas. You do not have to duplicate frequently used program files in all user areas on all drives.