© 2019, IRJET | Impact Factor value: 7.211 | ISO 9001:2008 Certified Journal | Page 93
DEVELOPMENT OF AUTOMATED WORK TABLE AND EXPERIMENTAL
WORK ON ABRASIVE JET MACHINE
Mr. Ketan P. Patel
1, Prof. P. S. Chaudhari
2, Prof. Maulik J. Patel
31
P.G. Student, Mechanical Engineering dept., U. V. Patel College of Engineering
2
Assistant Professor, Mechanical Engineering department, U. V. Patel College of Engineering, Ganpat Vidyanagar
3
Assistant Professor, Mechanical Engineering department, B. S. Patel Polytechnic, Ganpat Vidyanagar
---***---Abstract -Abrasive jet machining is the process of material removal process from a work piece by the application of a high speed stream of abrasive particles carried in gas medium from a nozzle. Garnet 80 as abrasive particle having size of 80 mesh is used and carrier gas as a carrier of abrasive particle. In this project model of abrasive jet machine with automated work table has been fabricated. Cutting of glass with different SOD, Pressure and Travelling speed of nozzle have been carried out by Abrasive Jet Machining process (AJM) in order to determine its controlling parameters of the AJM process. Abrasive jet machine (AJM) removes material through the action of focused beam of abrasive. Micro abrasive particles are propelled by an inert gas of velocity. When directed at a work piece, the resulting erosion can be used for cutting, etching, drilling, polishing and cleaning. In this work optimization of process parameters for surface roughness and material removal rate of Abrasive Jet Machining of glass by Taguchi methodology is presented. The Values obtained in Taguchi Analysis was compared with the Analysis of Variance (ANOVA).Various levels of Experiments are conducted using L9 Orthogonal Array for Garnet 80.Key Words: Abrasive Jet machining process, Garnet 80 glass, Surface roughness, Material removal rate
1. INTRODUCTION
All manuscripts Non-Conventional manufacturing Processes is defined as a group of processes that removes work-piece materials of greater hardness, strength and high temperature resistance, e.g. titanium alloys, it has become difficult to process them by conventional machining methods like turning, milling, drilling, etc. Extensive research and development in this field has finally led to a number of modern machining methods. (Advanced Machining Methods) Electro discharge machining (EDM), Electrochemical machining (ECM), Ultrasonic machining (USM), milling or chemical milling are some of the processes which come under this category.AJM may be a non-conventional machining method wherever a high- pressure air stream with tiny abrasive particles to impinge the work piece fitted on machine-driven work table through a nozzle. AJM is that the method of fabric removal method from a work piece by the appliance of a high speed stream of abrasive particles carried in gas medium from a nozzle. A centered stream of abrasive particles, carried by air mass air or gas is created to strike the surface of the work- piece through a nozzle and therefore the work material is removed by erosion action by high rate abrasive particles. AJM is that the removal of fabric from a work piece by the appliance of a high speed stream of abrasive particles carried in gas medium from a nozzle. The AJM method differs from typical sand blasting therein the abrasive is far finer and therefore the method parameters and cutting action square measure rigorously controlled. Abrasive air jet is Associate in Nursing abrasive machining method wide used for surface improvement, and cutting. The nozzle is that the most crucial half within the abrasive air-jet instrumentality. The method is employed mainly to chop Byzantine shapes in arduous brittle materials that square measure sensitive to heat and have an inclination to chip simply. The method is additionally used for debarring an improvement operations. AJM is inherently free from chatter and vibration issues.
1.1 LITERATURE REVIEW ON AJM PROCESS
© 2019, IRJET | Impact Factor value: 7.211 | ISO 9001:2008 Certified Journal | Page 94
often used and compared for higher results. 3) The study may be checked on varied composites materials that embody differing types of their operating parameters .So, on optimize their parameters to most attainable extent. 4) a lot of tests might also be performed on the mixture glass, to examine erosion the given work piece for instance -small structural check could also be used for observe the assorted small level structure of our given work piece. 5) The analysis might also be done by alternative ways, resembling the multivariate analysis rather than that employed in this explicit investigation.[2] Rajeev Kumar, et al, were studied on Analysis on Performance of various Parameters throughout Abrasive Jet Machining by Taguchi methodology. This paper presents the results of parameters of small AJM on material removal rate (MRR, gm/sec) and overcut (mm) throughout small machining of Si glass. A small AJM setup has been made-up for this purpose. A W inorganic compound nozzle having diameter one.3mm, 1.5mm, 2.3mm is taken into account. For this experiment assail abrasive with grit size 70µm is chosen. Another parameter ranges area unit Pressure 50psi, 55psi, 60psi, Nozzle Tip Distance 8mm, 10mm, 12mm is taken into account. it's determined that MRR of glass, machining by AJM, is raised by increasing Pressure. MRR conjointly raised by decreasing Nozzle Diameter. The optimum worth of MRR is obtained at Pressure 60psi, Nozzle Tip Distance 8mm, and Nozzle Diameter one.5 mm. more within the Over cut, it's determined that over cut shriveled by increasing Pressure. The optimum worth is obtained at Pressure 60psi, Nozzle Tip Distance one0mm and Nozzle Diameter 1.5mm.
[3] Bhaskar Chandra Kandpal, et all, have studid on Machining of glass and ceramic with aluminum oxide and carbide in abrasive jet machining. They conclude that the result of method parameters of AJM on the fabric removal rate (MRR) was measured and graphs were premeditated. These were compared with the theoretical results. it had been ascertained that as nozzle tip distance will increase, material removal rate (MRR) will increase because it is within the general observation within the abrasive jet machining method because the pressure will increase material removal rate (MRR) is additionally inflated as we tend to found in AJM method equally as abrasive particle size will increase MRR will increase
[4] Gaurav Mahajan, et all, were studied impact varied of varied of assorted method Parameters on Abrasive Jet Machining mistreatment carbide as abrasive This paper presents various results of experiments are conducted by dynamic pressure, standoff distance on completely different thickness of glass plates. The impact of their method parameters on the fabric removal rate (MRR), high surface dia. and bottom surface dia. of hole obtained were measured and aforethought. These were compared with the quality results with it had been determined that as nozzle to tip distance (stand of distance) will increase, the highest surface dia. and bottom surface dia. of hole will increase because it is within the general output within the abrasive jet machining method because the pressure will increase MRR was additionally accrued
[5].N. S. Pawar, et al, were studied the impact of amendment in style of moving chamber for associate degree Experimental associate degree analysis for ocean sand as associate degree abrasive in an Abrasive Jet machining method for soft-cast steel Nozzle. They conclude that because the pressure will increase the fabric removal rate will increase owing to the increasing energy offered for erosion. The abrasive particles from the nozzle follow a parallel path provided that pressure is increasing. The powder rate is increasing as pressure will increase owing to correct combination. Lifetime of soft-cast steel nozzle is a smaller amount than ancient nozzle because it is less hardness. Cutting characteristic at corner is decreased thanks to cylindrical in form, provides the proportionate combination of sand abrasive and compressed gas
[6]. Punit Grover, et all, were studied impact of Study of corundum Abrasive on Tempered glass Abrasive Jet Machining mistreatment Taguchi methodology This study has mentioned associate degree application of the Taguchi methodology for work the consequences of method parameters on the metal removal rate worth within the abrasive jet machining (AJM) of tempered glass. Within the AJM method, the parameters were designated taking into thought of manufacturer and industrial necessities. From the analysis of the leads to the AJM method mistreatment the abstract signal-to-noise (S/N) ratio, multivariate analysis, analysis of variance (ANOVA), and Taguchi’s improvement methodology, the subsequent will be over from this study Statistical results (at 95 % confidence level) give the pressure (A), angle (B), and abrasive grit size (C) affects the metal removal rate by 82%, 12.23% and 7.91% within the abrasive jet machining of tempered glass , severally. The most metal removal rate is calculated as zero.00158 g/sec. by Taguchi’s improvement methodology. In this study, the analysis of the confirmation experiment for metal removal rate has shown that Taguchi parameter style will with success verify the optimum cutting parameters (A3B3C3), that square measure pressure=8 kg/cm2 (A3) angle= 00 (B3) and abrasive = 320 mesh size (C3).Metal removal rate will increase with increase in air pressure and abrasive particle size (microns) in AJM of tempered glass work-piece material. Metal removal rate will increase with the decrease in angle and abrasive mesh size in abrasive jet machining of tempered glass.
2. METHODOLOGY
© 2019, IRJET | Impact Factor value: 7.211 | ISO 9001:2008 Certified Journal | Page 95
Based on Literature Survey and Machine specification Table 1 describes the various levels of process parameters used to carry out the experiment.3. EXPERIMENTAL SETUP
The X-Y work table is designed using Creo 3.0 software and after completion of design stage X-Y table is manufactured.
3.1 Design calculation of X-Y Work Table
X-Y work table is the most important part of the Abrasive Jet Machine on which the work piece was to be kept and machined. The main function of the guide ways is to make sure that the machine tool operative element move along predefined path. The guide way provides smooth and linear motion in machine tool due to which higher accuracy and precision was achieved.
3.1.1 Lead screw length calculation
Travel of X-Y table has been decided to be 537 x 412 mm.
So screw of x-axis ball screw:
= 426 mm + 50 mm + 50 mm + 11 mm
(Travel) (Upper table width) (Lower table width) (Allowance for bellows cover)
= 537 mm.
Screw length y-axis ball screw:
= 304 mm + 50 mm + 50 mm + 8 mm
(Travel) (Upper table width) (Lower table width) (Bellows cover allowance)
= 412 mm.
Commercial Ball screws are available from companies like (1) THK, (2) Grampus Impex Ltd., (3) Precision Bearing House, and (4) ABBA etc.
The specifications by companies that satisfy our requirement are:
BNF-1205 5 RR G2 540L 430 C7 (by THK Company)
BNF → model no.
12 → screw shaft diameter
05 → lead
RR → labyrinth seal attached
G2 → axial clearance grade
Level
Sr.No. Process Parameters Minimum Centre Point Maximum
1 Pressure (kg/cm2) 5 7 9
2 Stand of Distance (mm) 1 1.5 2
© 2019, IRJET | Impact Factor value: 7.211 | ISO 9001:2008 Certified Journal | Page 96
540L → overall shaft length (in mm)430 → screw length
C7 → accuracy symbol
SFI-1205 C7 420 310 P0
SFI → model no. (Single nut)
12 → screw shaft diameter
05 → lead
C7 → accuracy grade
420 → total length
310 → screw length
P0 → precision level
3.1.2 Supporting bar length calculation
Supporting bar for x-axis ball screw
= 426 mm + 50 mm + 50 mm
(Travel) (Upper table width) (Lower table width)
= 526 mm.
Supporting bar for y-axis ball screw
= 304 mm + 50 mm + 50 mm
(Travel) (Upper table width) (Lower table width)
= 404 mm.
3.1.3 Support Unit
Support units are required for supporting the ball screw ends. These are special kind of bearings which gives longer service life and better performance. They are of two types,
1. Fixed end support unit,
© 2019, IRJET | Impact Factor value: 7.211 | ISO 9001:2008 Certified Journal | Page 97
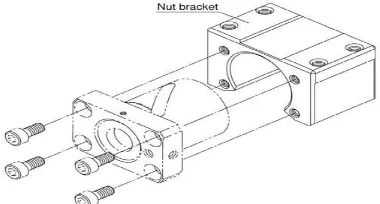
3.1.4 Nut BracketNut bracket is used to bolt the ball screw nut with the work load platform. Following diagram shows a nut bracket along with a ball screw nut.
[image:5.595.114.501.138.808.2]3.2 Design and Development of X-Y Work Table
[image:5.595.204.394.150.252.2]Figure 1: X-Guide
Figure 2: Y-Guide
© 2019, IRJET | Impact Factor value: 7.211 | ISO 9001:2008 Certified Journal | Page 98
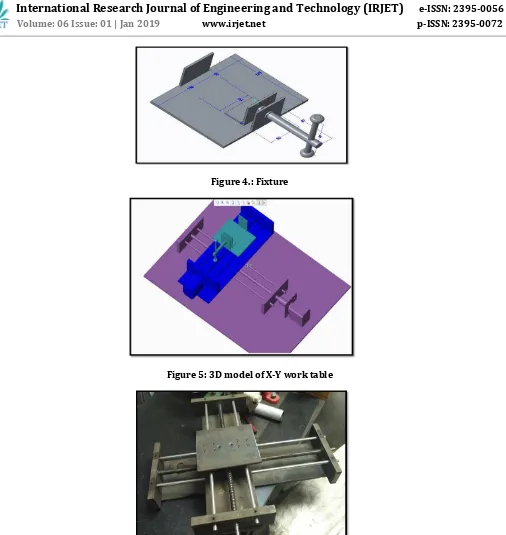
Figure 4.: FixtureFigure 5: 3D model of X-Y work table
Figure 6: X-Y work table Lead screw Assembly
Sr. No.
Pressure (kg/cm2)
Stand of Distance (mm)
Travel Speed (mm/min)
Surface Roughness (µm)
Material Removal Rate (gm/sec)
1 5 1 25 3.119 0.00281
2 5 1.5 30 3.218 0.0026
[image:6.595.36.561.660.793.2]3.3 Experimental output
© 2019, IRJET | Impact Factor value: 7.211 | ISO 9001:2008 Certified Journal | Page 99
3 5 2 35 3.351 0.0023
4 7 1 30 3.128 0.00283
5 7 1.5 35 3.23 0.00353
6 7 2 25 3.115 0.0047
7 9 1 35 3.012 0.00313
8 9 1.5 25 2.963 0.00392
9 9 2 30 3.049 0.0054
3.4 ANOVA Analysis
3.4.1 Analysis of Variance for Surface Roughness
Source of Variation DOF Squares (SS) Sum of Mean Square (MS) Variance Ratio (F)
Probability (P)
Percentage Contribution
(% C)
Pressure 2 0.076525 0.038262 48.66 0.02 66.38
Stand of Distance 2 0.011051 0.005525 7.03 0.125 9.59
Travel Speed 2 0.026136 0.013068 16.62 0.057 22.67
Error 2 0.001573 0.000786 1.36
Total 8 0.115284 100
R-sq= 98.64 %
Above analysis shows that most significant parameter is air pressure for abrasive jet machining for surface roughness and the effect of Pressure = 66.38 %, Stand of distance = 9.59, Travel speed = 22.67 and error is 1.36 %.
3.4.2 Analysis of Variance for Material Removal Rate
Source of Variation DOF Sum of Squares (SS) Mean Square (MS) Variance Ratio
(F) Probability (P)
Percentage Contribution % C
Pressure 2 0.000004 0.000002 3.28 0.234 44.44
Stand of Distance 2 0.000002 0.000001 1.87 0.348 22.22
Travel Speed 2 0.000001 0.000001 0.92 0.522 22.22
Error 2 0.000001 0.000001 11.11
Total 8 0.000009 99.99
R-sq=85.86%
© 2019, IRJET | Impact Factor value: 7.211 | ISO 9001:2008 Certified Journal | Page 100
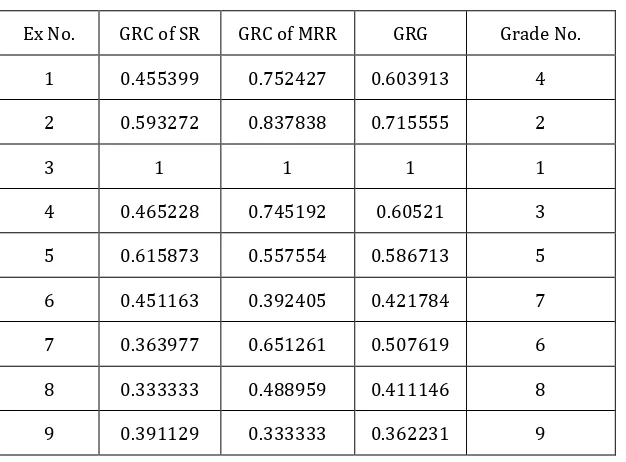
3.5 Grey Relational Analysis [image:8.595.144.457.165.396.2]Grey relational analysis method is an optimization technique, which is used for optimization of more than one output parameters. So it is also known as multi objective optimization.
Table 6.2 GRC and GRG calculation
Ex No. GRC of SR GRC of MRR GRG Grade No.
1 0.455399 0.752427 0.603913 4
2 0.593272 0.837838 0.715555 2
3 1 1 1 1
4 0.465228 0.745192 0.60521 3
5 0.615873 0.557554 0.586713 5
6 0.451163 0.392405 0.421784 7
7 0.363977 0.651261 0.507619 6
8 0.333333 0.488959 0.411146 8
9 0.391129 0.333333 0.362231 9
From it is found that experiment no.3 has the best multiple performance characteristic among all 9 experiments, because it has the highest grey relational grade of 1.
The average of grey relational grade for each input level of the abrasive jet machining process is calculated in following table.
Table 6.3: Grey relational grade main effect
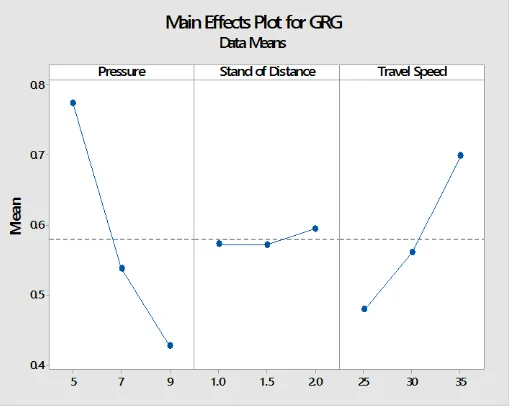
Higher grey relational grade value will give optimum value. So from the table 6.3 it is clear that the response is optimum at cutting condition Pressure 5 bar, Stand of Distance 2 mm and Travel Speed 35 mm/min.
4. RESULTS AND DISCUSSION
4.1 Main effect plot of SR
Optimal conditions for minimum surface roughness are:
Pressure at level 3 (9 kg/cm2), Stand of Distance at level 1 (1 mm), Travel speed at level 1 (25 mm/min). From the figure it is clear that SR is increase when the pressure increase from 5 kg/cm2 to 7 kg/cm2 and SR drastically increase when the pressure increase from 7 kg/cm2 to 9 kg/cm2. Surface roughness continuously
Symbol Control factor Level-1 Level-2 Level-3
A Pressure 0.7732 0.5379 0.4270
B Distance Stand of 0.5722 0.5711 0.5946
[image:8.595.173.424.483.587.2]© 2019, IRJET | Impact Factor value: 7.211 | ISO 9001:2008 Certified Journal | Page 101
Figure 7: Main effects plot-Material Surface roughnessdecrease when stand of distance increases from 1 mm to 2 mm respectively. Surface roughness continuously decreases when Travel speed increases from 25 mm/min to 35 mm/min respectively.
[image:9.595.157.438.406.626.2]4.2 Main effect plot of MRR
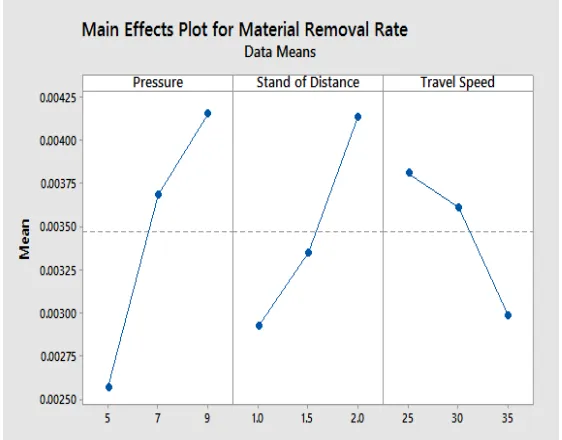
Figure 8: Main effects plot-Material Removal Rate
Optimal conditions for maximum material removal rate are: Pressure at level 3 (9 kg/ cm2), Stand of Distance at level 3 (2 mm), Travel speed at level 1 (25 mm/ min).
© 2019, IRJET | Impact Factor value: 7.211 | ISO 9001:2008 Certified Journal | Page 102
4.3 Main Effect Plot of GRGFigure 9: Main effects plot of GRG
Optimal conditions of maximum GRG:
Pressure at level 1 (5 kg/ cm2), Stand of Distance at level 3 (2 mm), Travel speed at level 3 (35 mm/ min).
Above analysis show that the ANOVA analysis results and grey relational analysis results give the same output.
5. CONCLUSIONS
From the experimental work carried out in this dissertation work we conclude that ANOVA for surface roughness shows that most significant parameter is pressure and the effect of pressure = 66.38 %, stand of distance = 9.59, travel speed = 22.67 and error is 1.36 %.
ANOVA for material removal rate shows that most significant parameter is pressure for abrasive jet machining and the effect of pressure = 44.44 %, stand of distance = 22.22, travel speed = 22.22 and error is 11.11 %.
Gray relational analysis multi objective optimization technique shows that experiment combination no.3 (Pressure = 5 kg/cm2, Stand of Distance = 2 mm, Travel Speed 35 mm/min) was give better performance than the other input parameter combination. The above level has maximum GRG so it gives the best output.
6. REFERENCES
1. R.R. Lakhe, N. S. Pawar, R. L. Shrivastava, “A comparative Experimental Analysis of Sea sand as an abrasive material using Silicon carbide and mild steel Nozzle in vibrating chamber of Abrasive Jet machining”, International Journal of Scientific and Research Publications, Volume 3, Issue 10, October 2013 ISSN 2250-3153.
2. Mr. Sachin Kumar, Mr. Deepak Bhardwaj, Mr. Jitender Panchal ,“A research paper on study the MRR of Soda lime glass at different parameters of AJM”, International Journal of Enhanced Research in Science Technology & Engineering, ISSN: 2319-7463 Vol. 3 Issue 6, June-2014, pp.: (307-318).
3. R. L. Shrivastava, N. S. Pawar, R.R. Lakhe, “An Experimental investigation of sea sand as an Abrasive material in vibrating chamber by using Tungsten Carbide Nozzle in AJM Process”, American Journal of Engineering Research (AJER), e-ISSN : 2320-0847 p-ISSN : 2320-0936, Volume-02, Issue-10, pp-258-263
© 2019, IRJET | Impact Factor value: 7.211 | ISO 9001:2008 Certified Journal | Page 103
5. Parteek, Vijay Kumar, “Study the MRR of Tempered Glass by Using Silicon Carbide Abrasive at Different Parameters ofAbrasive Jet Machine”, IJSRD - International Journal for Scientific Research & Development, Vol. 3, Issue 03, 2015 | ISSN (online): 2321-0613
6. V. Gnana Prakash, F. Anand Raju, Dr. M.L.S Deva Kumar, “Fibre Glass Cutting By Using Abrasive Jet Machining and Analysis of Process Parameters”, International Journal of Computer Trends and Technology (IJCTT) – volume 4 Issue 7–July 2013.
7. Naveen Kumar, Bhaskar Chandra Kandpal, Rahul Kumar, Rahul Sharma, Sagar Deswal, “.MACHINING OF GLASS AND CERAMIC WITH ALUMINA AND SILICON CARBIDE IN ABRASIVE JET MACHINING”, International Journal of Advanced Engineering Technology, E-ISSN 0976-3945
8. “Meet Minitab18”,A Minitab18 software guide
