http://wrap.warwick.ac.uk
Original citation:
Meredith, James, Bilson, Edward, Powe, Richard, Collings, Ed and Kirwan, Kerry. (2015)
A performance versus cost analysis of prepreg carbon fibre epoxy energy absorption
structures. Composite Structures, 124 . pp. 206-213.
Permanent WRAP url:
http://wrap.warwick.ac.uk/71366
Copyright and reuse:
The Warwick Research Archive Portal (WRAP) makes this work of researchers of the
University of Warwick available open access under the following conditions.
This article is made available under the Creative Commons Attribution 4.0 International
license (CC BY 4.0) and may be reused according to the conditions of the license. For
more details see:
http://creativecommons.org/licenses/by/4.0/
A note on versions:
The version presented in WRAP is the published version, or, version of record, and may
be cited as it appears here.
A performance versus cost analysis of prepreg carbon fibre epoxy energy
absorption structures
James Meredith
a,⇑, Edward Bilson
b, Richard Powe
b, Ed Collings
c, Kerry Kirwan
ba
University of Sheffield, UK
b
WMG, University of Warwick, Coventry CV4 7AL, UK
c
Forward Composites, 9/10 Clifton Road, Huntingdon PE29 7EJ, UK
a r t i c l e
i n f o
Article history:
Available online 17 January 2015
Keywords:
Carbon Impact Fractography Prepreg Cost
a b s t r a c t
Carbon fibre epoxy composites are sought after for their excellent specific energy absorption (SEA) but are costly. A range of prepreg carbon fibre epoxy layups were subjected to a 10 m/s impact with 4 kJ of energy. Fibre volume fraction and voidage were determined for each sample and the fracture analysed in detail. SEA ranged from 35.27 J/g to 60.25 J/g with the highest performance from 8 plies of 200 gsm 22 twill all laid at 0°. Vacuum assisted oven cure resulted in higher voidage than autoclave cure (2.52% versus 0.17%) but did not affect SEA. According to a ratio of performance to cost the highest rated samples were an 8 ply oven cure and a 3 ply autoclave cure specimen and there was little difference between them. This work has highlighted that there is enormous potential for cost reduction of prepreg carbon fibre epoxy energy absorption structures through the use of heavier areal weight fabrics and fewer plies as well as through the use of oven cured prepreg.
Crown CopyrightÓ2015 Published by Elsevier Ltd. This is an open access article under the CC BY license (http://creativecommons.org/licenses/by/4.0/).
1. Introduction
Carbon fibre reinforced polymers (CFRP) have been widely used in the aerospace and motorsport sectors for more than twenty years[1]. The high specific strength and stiffness of carbon fibre (CF) have given it a reputation as a high performance engineering material[2]. It is highly valued in motorsport thanks to its ability to fulfil a structural role whilst offering high energy absorption in collisions. In these cases the aim is to absorb the kinetic energy of the impact in a controlled manner such that the vehicle will decelerate at a rate that preserves life.
However, the cost of CF is prohibitively high for many other industry sectors: £6.38/kg, compared to steel and aluminium at £0.30/kg and £1.36/kg respectively [3–5]. The high embodied energy from the manufacturing process, expensive precursor material and elevated manual labour costs for layup mean its use is restricted to sectors which can pay for performance. CFRP is now the material of choice for supercars and expanding into main-stream production vehicles whose price can justify it. In other areas such as lower level motorsport e.g. Formula Ford, wind energy and rail sectors its high price remains a barrier to uptake
[6–8].
Composite energy absorption structures offer the opportunity for significant weight savings over metallic structures. Composites absorb energy though buckling, interlaminar failure, fibre–matrix debonding, fibre pull-out, matrix deformation/cracking, friction and fibre breakage giving them a greater specific energy absorption (SEA) than metallic structures[9–11]. Research has demonstrated that glass–epoxy composites are capable of twice the energy absorption of steel due to their more continuous mode of failure
[12].
Previous research has shown that glass–epoxy tubes have a SEA approximately 20% lower than carbon–epoxy tubes when sub-jected to a compressive impact test[13]. Agarwal et al. (2006) states that glass and Kevlar composites have a higher impact energy than carbon/graphite epoxy using a Charpy test which is a flexural test[14]. However, current estimates put the energy associated with crack propagation during crush of composite sec-tions at 5–20% of the total energy absorbed[15–17]. Thus, a higher impact energy (Charpy) does not necessarily lead to a higher SEA of a structure undergoing dynamic testing e.g. tube or cone as there are more dominant energy absorption mechanisms at play such as friction. There is a link between interlaminar shear strength (ILSS) and SEA [18] but there is little research linking impact energy or fracture toughness and SEA.
In the automotive and aerospace sectors composites give the opportunity to increase payload and reduce emissions and fuel costs but there is a consensus that performance improvements
http://dx.doi.org/10.1016/j.compstruct.2015.01.022
0263-8223/Crown CopyrightÓ2015 Published by Elsevier Ltd.
This is an open access article under the CC BY license (http://creativecommons.org/licenses/by/4.0/).
⇑Corresponding author.
E-mail address:j.meredith@sheffield.ac.uk(J. Meredith).
URL:http://www.sheffield.ac.uk(J. Meredith).
Contents lists available atScienceDirect
Composite Structures
must be tempered by financial concerns[19]. Cost reduction strat-egies include the use of natural fibres[6], recycled carbon and glass fibres[20–22]and supplementation with less expensive low mod-ulus fibre[23]. Process research has been undertaken on produc-tion of aligned, shorter fibre composites through methods such as the 3D Engineered Preforms (3DEP)[24]and Direct ReInforced Fibre Technology (DRIFT) processes[25], particularly in conjunc-tion with recycled carbon or glass fibres. Cheaper manufacturing processes such as vacuum assisted resin transfer moulding (VARTM) have also been developed offering as much as 60% reduc-tion in manufacturing costs [26]. This work investigates energy absorption performance for the same conical structure with a range of different CFRP layups considering cost of material, layup and cure.
2. Experimental procedure
2.1. Materials
This work utilised three different CF prepregs supplied by Umeco structural materials Ltd. A 135 grams per square metre (gsm) unidirectional (UD) with Toray intermediate modulus (M30SC) and cost £38.60/m2, a 200 gsm 2
2 twill with generic high strength fibre at £29.60/m2and a 660 gsm 22 twill with
generic high strength fibre at £52.20/m2all with 42 wt% resin. All
used the same resin system, MTM28B (B designates black) and MTM28-1 (1 designates formulation for UD fibres). The static mechanical properties for these materials are published by Umeco and summarised inTable 1.
2.2. Test specimen manufacture
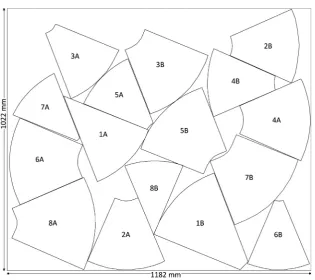
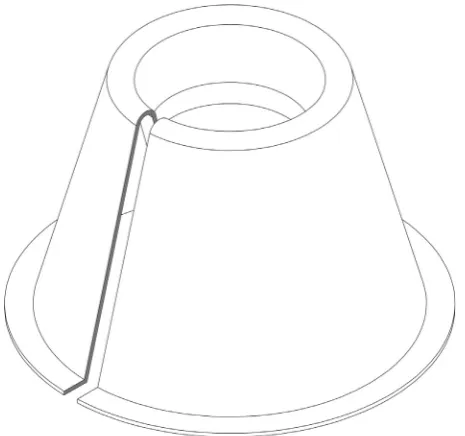
Previous research has demonstrated that cones are more suit-able for impact structures than tubes since they do not require crush initiators [21], furthermore, they more accurately reflect real-life geometry found in the automotive and motorsport arenas than simpler plate type specimens. A test cone identical to previ-ous work[6,21](Fig. 1), designed to absorb 5 kJ of energy was used for these experiments and an aluminium mould tool was manufac-tured to allow for excellent dimensional accuracy of the finished components. The cone was designed and draped in Catia (Dassault Systemes). The ply patterns were outputted to AutoNEST (Sigma-NEST) which generated a nested cutting pattern according to the required fibre direction for each ply and based on the useable width of a standard CF roll of 1182 mm. A typical layout generated by the software is shown inFig. 2, each ply consists of two pieces: 1A and 1B, 2A and 2B and so on. For each cone the first and last plies extend into the tip.
Six different layups were investigated, as described inTable 2. Each ply was laid up in the mould and the seams of each layer were offset by 10 mm to prevent the creation of weak areas. The mould was then bagged in the conventional manner, evacuated and cured according toTable 2.
CL1 was designed to determine the effect on SEA of changing the orientation of alternate plies. CL2 used the same layup as CL1, but was cured under vacuum in an oven. The prepreg used for CL2 is not specifically designed for out of autoclave cure. CL3 used a 0/90 layup as a direct comparator for CL1, and as a bench-mark for the other cones. CL4 used two plies of 660 gsm fabric with both plies extended into the tip of the cone. CL5 used multiple lay-ers of UD and 200 gsm CF to determine the effect of a high stiffness layup. CL6 used three plies of 660 gsm fabric with first and last plies extended into the tip of the cone.
2.3. Impact testing
Each sample was loaded into an Instron impact tower and sub-jected to an impact test with an initial velocity of approximately 10 m/s with a test mass of 78 kg. In each case the test energy was approximately 4 kJ. Two samples of each layup were tested, one to determine SEA and the other for analysis by microscopy. Previous work has demonstrated the predictability of these impact tests and low standard deviation in the results thereby allowing the use of one sample to give an accurate indication of SEA[21].
2.4. Analysis
2.4.1. Determination of fibre volume and void fraction
2.4.1.1. Sample preparation. The dynamically crushed samples were sectioned using an IsoMet 5000 linear precision saw as shown in
Fig. 3and mounted in opaque red EpoFix epoxy resin (Buehler). These were then ground and polished on a semi-automatic Buehler Phoenix 4000 sample preparation system.
2.4.1.2. Optical microscopy. The sample was levelled and placed under a Nikon Eclipse LV100 D microscope in bright field, at 10 objective, using a Zeiss HXP 120 ultraviolet light source to permit higher resolution. Images were captured by an AxioCam ICc 1 and analysed using Zeiss AxioVision digital imaging system to determine fibre volume fraction (FVF) and void fraction (VF). For each sample ten images taken at pseudo-random intervals along the length of the sample were processed into three phases; fibre, matrix and void. These were then translated into a percentage for voidage and fibre volume fraction for each sample.
2.4.2. Fractography
Sections through the fracture of the cones were cut out and pre-pared according to the method in Section2.4.1.1, except for the use of a clear EpoFix resin. Using the same microscope in bright field under high intensity light source (Zeiss illuminator HXP 120), the fracture surface was captured as a montage and stitched together in the AxioVision software.
2.4.3. Cost
The cost of each cone may be broken down into the material, layup and curing costs. The material cost was determined by
calcu-Table 1
Prepreg static mechanical properties.
Units 200 gsm 600 gsm 135 gsm UD
Normalised to 55% volume fraction 55% volume fraction 60% volume fraction
Tensile strength MPa 1070 825 1930
Tensile modulus GPa 67 56 128.8
Compressive strength MPa 693 450 1296
Compressive modulus GPa 58.9 51 120.2
Flexural strength GPa 1070 850 2.164
Flexural modulus GPa 64 52.0 140.5
[image:3.595.43.558.666.753.2]Fig. 1.Engineering drawing of impact structure.
Fig. 2.Nested layup pattern for eight plies. Note that each ply consists of two segments.
Table 2 Layup details.
Ref. Autoclave pressure (psi)
Vacuum pressure (psi)
Resultant pressure (psi)
Cure Layup pattern
CL1 60 15 75 Autoclave 2°C/min to 120°C
hold 90 min
8 plies 200 gsm, laid at 45°, 0/90°, 45°, 0/90°, etc.
CL2 – 15 15 Oven – 90 min at 120°C 8 plies 200 gsm, laid at 45°, 0/90°, 45°, 0/90°, etc.
CL3 60 15 75 Autoclave 2°C/min to 120°C
hold 90 min
8 plies 200 gsm, all laid at 0/90°
CL4 60 15 75 Autoclave 2°C/min to 120°C
hold 90 min
2 plies 660 gsm at 0/90
CL5 60 15 75 Autoclave 2°C/min to 120°C
hold 90 min
1 ply 0/90 200 gsm, 3 plies 135 gsm UD, 2 plies 200 gsm 0/90, 3 plies UD, 1 ply 200 gsm 0/90
CL6 60 15 75 Autoclave 2°C/min to 120°C
hold 90 min
[image:4.595.33.554.632.754.2]lating the cost of the material blank generated by SigmaNEST. The layup cost was determined using information supplied by Forward Composites Ltd and are typical of a UK company manufacturing low volume prepreg composite components. Layup time was pro-portional to the number of plies with 20 min required for each ply and additional time for bagging and mould preparation of fifty minutes per cone. Labour cost was £45.00 per hour including over-heads, with an additional £10.00 per layup for consumables such as the bag. Thus the total layup cost was the labour cost multiplied by layup time plus consumables.
The required pressure of the two methods strongly influences the cost. The autoclave method is more expensive because of cap-ital equipment cost and the energy required to heat and pressurise to 60 psi. The autoclave cures were costed at £70.00 each, and the oven cure used for CL2 was costed at £10.00 to reflect these differ-ences in conditions.
3. Results and discussion
3.1. Impact testing results
Video footage of the impact tests were sampled at two time steps: 0.01 s and 0.0186 s (Fig. 4). CL1, 2 and 3 performed similarly which is reflected in their SEA results (Table 3). CL4 was observed to buckle which is visible as a distortion of the cone where it meets the platen (see white arrowFig. 4). All cones generated some deb-ris during the first stages of impact although CL5 has the greatest quantity of ejected material.
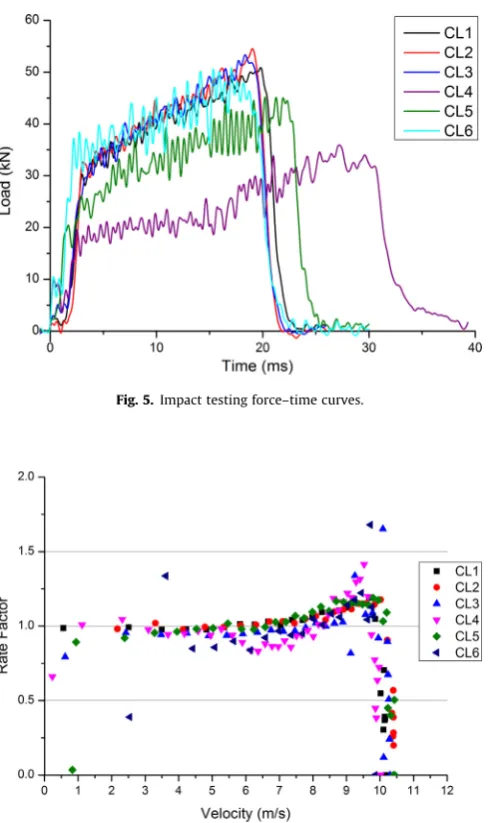
Fig. 5presents the force versus time data, in order to improve clarity the Savitzky–Golay smoothing function within Origin 8.5 (OriginLab) was set at 100 points. It indicates strong similarities between the impacts of CL1, 2 and 3. CL4 and CL6 both have a high initial peak due to having a thicker cone tip. CL4 has a flat load curve up to 15 ms which then increases in line with the greater cross sectional area. CL6 with three plies of thicker material quickly reaches the same load as CL1 but with significant load var-iation during the crush. CL5 follows a similar pattern of loading to CL1, 2 and 3 but with a lower average force and greater variation in load during the impact.
The force displacement data was further analysed in order to investigate if SEA varied with velocity. The cone was divided into discreet sections of 5 mm length. Computer Aided Design (Catia, Dassault Systemes) was used to calculate the mass of each discreet section for each of the samples using its cured thickness. Predicted deceleration was then calculated via Newton’s second law. The test
[image:5.595.53.286.66.284.2]Fig. 3.3D schematic of a crushed cone highlighting the area sectioned for fractography.
[image:5.595.76.530.459.610.2]Fig. 4.High speed video images of sample impact testing.
Table 3
Results of impact testingl.
Mean fibre volume fraction (%) (SD)
Mean void fraction (%) (SD)
Sled mass (kg)
Actual speed (m/s)
Actual energy (J)
Wall thickness (mm)
Mass lost (g)
Specific absorption (J/g)
CL1 49.15 0.169 77.84 10.23 4072.92 2.10 70.9 57.45
CL2 51.80 2.515 77.83 10.12 3985.68 2.14 69.7 57.18
CL3 58.47 0.309 77.84 10.29 4120.85 2.11 68.4 60.25
CL4 45.56 0.126 77.79 10.01 3897.20 1.65 110.5 35.27
CL5 56.96 0.036 77.82 10.44 4241.00 2.08 83.8 50.61
[image:5.595.41.563.678.755.2]data was divided into the same 5 mm sections for comparison and actual deceleration during the test calculated. The test and pre-dicted performance were then compared using the formula below and plotted inFig. 6:
Rate factor¼ Test performanceðdecelerationÞ Predicted performanceðdecelerationÞ
Rate factor versus velocity is shown inFig. 6and demonstrates an overall trend of higher than mean SEA at the higher velocities. CL1 and 2 perform similarly, CL3 is unstable at the start but settles into the same region as CL1 and 2. CL4 and 6 using fewer, thicker plies demonstrate greater rate sensitivity with higher initial SEA. CL5 is stable and performs similar to CL1, 2 and 3.
3.2. Fibre volume fraction and void fraction
Fig. 7presents an example micrograph from a section through the wall of each cone. These were used to analyse the FVF of each sample. The consolidation of CL2 is good when compared to CL1, but voids are visible in the interior of the tows; significant pores were also observed along the interface between the laminae. Con-solidation in the other samples was good with little voidage evi-dent. The larger tows of CL4 are evident, and the fibre volume fraction is higher in CL5 thanks to the UD layers. This is supported by the quantitative analysis of VF and FVF presented inTable 3. In each case the VF was less than 0.3% except for CL2 (2.5%) which was cured under vacuum only. FVF varied from 45.6% (CL4) to 58.4% (CL3).
The structure of the layups provides some explanation for this variation. The packing of the fibres is dependent on the degree of crimp, weight and orientation of the material. For CL1 and CL2 the fabrics are of the same weight and weave, but orientated at 45°between layers. Thus the consolidation between the layers is lower than in CL3, where the fabric is orientated in the same direc-tion in all layers, leading to a higher FVF than in the first two lay-ups. CL4 uses a 660 gsm fabric and the crimp is greater than for the 200 gsm material, leading to lower consolidation and the lowest FVF. CL5 has two sets of three UD plies. The UD has no crimp and the layers pack together extremely well leading to a high FVF, although the interlaminar strength is low as a result of poor mechanical interlock between two flat surfaces [27]. However, the flat UD surface will not consolidate well with the crimped 200 gsm which is used for the other layers, leading to resin rich areas along the boundaries between these layers.
[image:6.595.38.285.61.473.2]When SEA is plotted against FVF there is evidence of a general relationship between increased FVF and SEA (Fig. 8), particularly for the cones produced from the 200 gsm prepreg. This suggests a relationship between SEA and FVF in 22 twill prepregs, and
Fig. 5.Impact testing force–time curves.
[image:6.595.37.283.65.254.2]Fig. 6.Rate factor versus velocity for impact tests.
[image:6.595.306.547.441.625.2]Fig. 7.Fibre volume fraction sample analysis.
[image:6.595.70.522.683.740.2]is in line with previous work on energy absorption in composites which found that a high FVF resulted in a high SEA[6]. The SEA results suggest that there is a small advantage in choosing the 0/ 90 weave over the ±45. Early work in composite energy absorption structures indicated that a Kevlar composite tube with plies orien-tated at 0/90°would offer ‘‘similar’’ values for SEA as one with plies at ±45[28]. Opinion on this matter is still debated and there is evi-dence to support the use of ±45 and 0/90 plies[29,30]. It is not pos-sible to state definitively whether the presence of such layers or the lower FVF is responsible for the lower SEA.
The presence of UD in CL5 has led to a high FVF, but this has not been reflected in the SEA performance. CL4 has a lower FVF thanks to the greater degree of crimp and its position onFig. 8is because it buckled during the impact test (seeFig. 4). CL6 had a slightly better FVF but much improved SEA as failure was progressive.
There is little difference between the SEA of CL1 and CL2, despite the difference in voidage, suggesting that it does not affect SEA in this case. The difference in cure cost between an autoclave cure at 75 psi and an oven cure under vacuum alone makes this a significant finding. Since lower void content composites are con-sidered preferable this is unexpected. It remains to be seen how applicable such structures will be to motorsport, since these are often required to act as structural components that may be more sensitive to additional porosity.
Research with an identical cone, layup and similar FVF (56.6%) to CL3 but using MTM49 (high strength) resin had an SEA of 34.8 J/g[21]. The resin used in CL3 is a high toughness resin and delivered a significantly higher SEA at 60.25 J/g with a FVF of 58.5%. This suggests a relationship between increased resin tough-ness and increased SEA which is supported by a previous study
[12].
3.3. Fractography
The ideal failure for an energy absorbing structure is stable, pro-gressive and includes inter- and intra-laminar failure of the lami-nate. These may occur alone, sequentially or concurrently, leading to a complex fracture site[27]. Interlaminar failure can occur viapeel(mode I failure),shear(mode II) ortwist(mode III)
[31].Fig. 9displays a section through the failure region for each sample.
CL1 failed progressively, through the formation of a stable crush zone. Mode II interlaminar failure is evident inFig. 9CL1 (arrow a). The lamina on the inside of the fronds show evidence of micro-buckling (arrow d) and compressive intralaminar failure (arrow b), with longitudinal tows suffering from fibre breakage (arrow g) and splitting down the tows. The visible outer hoop tows (those at 0/90 and ±45) demonstrate signs of tensile fibre–matrix debond-ing (arrow c). Laminae towards the centre of the sample are com-paratively intact.
The pattern of failure in CL2 is similar to CL1, with mode II interlaminar failure visible in Fig. 9CL2 (arrow a). The laminae inside the fronds have evidence of microbuckling in longitudinal tows (arrow d) and cracks in the hoop tows (arrow b), although less than in CL1. The outermost visible hoop tows show signs of multiple transverse cracks (arrow c) (intralaminar failure) and in some cases single longitudinal cracks. Overall, the fracture mecha-nisms of CL1 and CL2 are similar.
CL3 failed progressively with a greater degree of mode II delam-ination than CL1 or CL2,Fig. 9CL3 (arrow a). The laminae are more splayed than the first two cones with a large degree of intralaminar failure in the delaminated portion. There is a large compressive failure zone on the inside of the fronds, with microbuckling and shear failure in longitudinal tows (arrow b). The outermost lamina has been lost to a debris wedge; the outside edge of the sample is visible only as a trail of debris (arrow e). Overall, this is a more
dis-ordered fracture surface than CL1 and CL2, demonstrating greater levels of delamination and intra-laminar failure and subsequently a higher SEA.
CL4 did not fail progressively but by global buckling and form-ing an unstable crush zone as seen inFig. 4. Previous work suggests that for energy absorbing frusta there is a critical ratio of wall thickness to diameter in order for a progressive and stable crush zone to form[32]. However, energy was absorbed through mode I delamination of the two plies, Fig. 9CL4 (arrow a). Inspecting the crushed portion of the cone, the plies are completely separated to the fracture point and relatively intact sections are visible. With only two plies the energy absorbed through delamination, fibre– matrix debonding and fibre breakage was limited giving rise to a low SEA. The force time curve for CL4 (Fig. 5) demonstrates an ini-tial peak which corresponds to the failure of the cone tip. Force then falls off briefly before progressive failure begins. In this instance the tip was not an effective initiator since both plies extended into it. The CL6 curve exhibits the same peak but then begins progressive failure immediately as the main body of the cone was 3 plies and the tip 2 plies.
CL5 failed progressively, demonstrating extensive delamination with a mixture of mode I and mode II failure (Fig. 9CL5). The use of high stiffness UD adversely affected the energy absorption perfor-mance of the cone. The twill material in other cones was able to ‘roll’ through the failure zone as it met the platen, leading to com-pressive and tensile fibre–matrix de-bonding failure. By contrast, the UD appears to have ‘folded’ (rather than rolled) once the
dela-Fig. 9.Fracture surfaces of samples, set in clear resin, brightfield illumination, 5
[image:7.595.317.558.64.432.2]minated UD reached a critical length, creating points of stress (arrow f) on the twill it is interspersed with. At these points, multi-ple tensile and compressive cracks are visible, but between them there are fewer cracks. A debris wedge is visibleFig. 9CL5 (arrow e) and has formed as the outer layers have debonded and been ejected during the test.
[image:8.595.35.562.86.157.2]3.4. Cost analysis
Table 4summarises all of the cost information and adds a cost ratio – SEA/cost. Layup formed the greatest proportion of total cost due to the skilled labour required. CL5 proved to be the least cost effective, with high layup costs due to the increased number of plies. The use of more expensive UD prepreg failed to improve SEA and has increased the material cost. The change in ply orienta-tion between CL1 and CL3 did not greatly affect the material cost. CL2 was £60 cheaper than CL1 and 3 as a direct result of the differ-ence in cure process without penalising SEA. While the low SEA of CL4 is due to its failure mode, the concept of using fewer and thicker layers still makes economic sense. According to cost ratio CL2 with an oven only cure provides the best value for money although CL6 with three 660 gsm plies and autoclave cure was comparable. From these results it is reasonable to conclude that a vacuum oven cured sample will perform similar to autoclave cure. Thus, an oven cured version of CL6 would have a cost of £125.76 giving it a cost ratio of 0.371 J/g/£ a significant improve-ment over CL2 at 0.268 J/g/£.
4. Conclusions
A range of conical CFRP layups were impact tested with a mass of 78 kg at 10 m/s and found to have SEA from 35.27 J/g to 60.25 J/ kg. Samples with identical layups (8 plies of 200 gsm alternating 0/ 90 and ±45) one with autoclave cure at 75 psi and one with oven cure at 15 psi vacuum were found to have near identical SEA at 57.45 J/g and 57.18 J/g respectively even though voidage for the oven cured sample was higher (2.52% versus 0.17%). Thus, up to 2.5% voidage has no effect on SEA for CFRP structures. This means that oven cure under vacuum is feasible for energy absorbing structures helping to reduce cure cost dramatically.
There was a small increase in SEA (60.25 J/g) for a layup with all laminae orientated at 0/90. This layup had a higher FVF, 58.5% ver-sus 49.2% for a 0/90, ±45 layup because of improved consolidation between plies. For the 8 ply 200 gsm samples higher FVF results in higher SEA. However, with only small improvements from higher FVF it is important to strike a balance between nesting efficiency for minimal waste versus higher FVF.
The samples with 8 plies of 200 gsm had higher SEA than sam-ples with 2 or 3 plies of 660 gsm (57–60 J/g versus 35–46 J/g) dem-onstrating that more plies equals more energy absorption. However, when cost is considered then fewer plies results in less layup time and is better value even when considering the lower SEA.
There is great potential for cost reduction of CFRP energy absorption structures through the use of heavier areal weight
fab-rics with fewer layers and oven rather than autoclave cure. Alter-native fabrication techniques such as VARTM will also play a part in cost reduction since higher voidage has minimal effect on performance.
Acknowledgements
The authors would like to acknowledge Engineering and Physi-cal Sciences Research Council (EP/E007252/1), Advantage West Midlands and the European Regional Development Fund for con-tributing to this work.
References
[1]Phillips LN. Improving racing-car bodies. Composites 1969;1(1):50–1. [2]Bader MG. Selection of composite materials and manufacturing routes for
cost-effective performance. Compos A Appl Sci Manuf 2002;33(7):913–34. [3]Guilvezan G, Carberry B. Composite recycling and disposal; an environmental
R&D issue. Boeing Environ Technotes 2003;8(4):4.
[4] Exchange LM. LME steel billet. 2012 [cited 2012 19/02/2012]. Available from: <http://www.lme.com/steel/latest_price.asp>.
[5] Exchange LM. LME aluminium. 2012 [cited 2012 22/02/2012]. Available from: <http://www.lme.com/aluminium.asp>.
[6]Meredith J et al. Natural fibre composite energy absorption structures. Compos Sci Technol 2012;72(2):211–7.
[7]Marsh G. Composites conquer with carbon supercars. Reinf Plast 2006;50(1):20–4.
[8]Marsh G. Can composites get firmly on the rails? Reinf Plast 2004;48(7):26–30. [9]Mamalis AG et al. Crashworthy capability of composite material structures.
Compos Struct 1997;37(2):109–34.
[10]Mamalis AG et al. On the experimental investigation of crash energy absorption in laminate splaying collapse mode of FRP tubular components. Compos Struct 2005;70(4):413–29.
[11]Mamalis AG et al. On the response of thin-walled CFRP composite tubular components subjected to static and dynamic axial compressive loading: experimental. Compos Struct 2005;69(4):407–20.
[12]Warrior NA et al. Effect of resin properties and processing parameters on crash energy absorbing composite structures made by RTM. Compos A Appl Sci Manuf 2003;34(6):543–50.
[13]Ochelski S, Gotowicki P. Experimental assessment of energy absorption capability of carbon–epoxy and glass–epoxy composites. Compos Struct 2009;87(3):215–24.
[14]Agarwal BD, Broutman LJ, Chandrashekhara K. Analysis and performance of fiber composites. 3rd ed. Wiley; 2006.
[15]Mamalis AG et al. The static and dynamic axial crumbling of thin-walled fibreglass composite square tubes. Compos B Eng 1997;28(4):439–51. [16]Mamalis AG et al. Energy absorption capability of fibreglass composite square
frusta subjected to static and dynamic axial collapse. Thin-Walled Struct 1996;25(4):269–95.
[17]Ghasemnejad H et al. Experimental studies on fracture characterisation and energy absorption of GFRP composite box structures. Compos Struct 2009;88(2):253–61.
[18]Daniel L, Hogg PJ, Curtis PT. The crush behaviour of carbon fibre angle-ply reinforcement and the effect of interlaminar shear strength on energy absorption capability. Compos B Eng 2000;31(5):435–40.
[19]Hae Park C et al. Integrated optimization for weight, performance and cost of composite structures. In: Alexandre D et al., editors. Information control problems in manufacturing 2006. Oxford: Elsevier Science Ltd; 2006. p. 763–8. [20]Kennerley JR et al. The characterisation and reuse of glass fibres recycled from scrap composites by the action of a fluidised bed process. Compos A Appl Sci Manuf 1998;29(7):839–45.
[21]Meredith J et al. Recycled carbon fibre for high performance energy absorption. Compos Sci Technol 2012;72(6):688–95.
[22]Akonda MH, Lawrence CA, Weager BM. Recycled carbon fibre-reinforced polypropylene thermoplastic composites. Compos A Appl Sci Manuf 2012;43(1):79–86.
[23]Hitchen SA, Kemp RMJ. Development of novel cost effective hybrid ply carbon-fibre composites. Compos Sci Technol 1996;56(9):1047–54.
Table 4
Total manufacturing cost.
Layup Material cost (£) Layup cost (£) Cure cost (£) Total cost (£) Cost ratio (J/g/£)
CL1 35.63 167.50 70.00 273.13 0.210
CL2 35.63 167.50 10.00 213.13 0.268
CL3 35.45 167.50 70.00 272.95 0.221
CL4 19.09 77.50 70.00 166.59 0.212
CL5 59.50 197.50 70.00 327.00 0.155
[24] Janney NA, HDP. Fabrication of NetShape, chopped fiber preforms by the 3DEP process. In: Carbon fiber 2007 conference. Washington, DC; 2007.
[25]Hartness T et al. The characterization of low cost fiber reinforced thermoplastic composites produced by the DRIFT™ process. Compos A Appl Sci Manuf 2001;32(8):1155–60.
[26] RTM process cuts fighter tail costs. Reinf Plast 2001;45(2):15.
[27]Sohn M-S, Hu X-Z. Processing of carbon-fibre/epoxy composites with cost-effective interlaminar reinforcement. Compos Sci Technol 1998;58(2):211–20. [28]Thornton PH. Energy absorption in composite structures. J Compos Mater
1979;13(3):247–62.
[29]Mamalis AG et al. The static and dynamic axial collapse of fibreglass composite automotive frame rails. Compos Struct 1996;34(1):77–90.
[30] Mamalis AGM, Manolakos DE, Demosthenous GA, Ioannidis MB. Crashworthiness of composite thin-walled structural components. Technomic Publishing Co Inc; 1998.
[31]Adams DD. Mixed-mode fracture toughness of composites. High performance composites. Gardner Business Media Inc; 2012.