LEARNING GUIDE
BASIC EDUCATION ASSISTANCE FOR MINDANAO
Third Year Science
Module 3 — Laboratory Apparatus
COPYRIGHT NOTICE
Section 9 of the Presidential Decree No. 49 provides: “No copyright shall subsist in
any work of the Government of the Philippines. However, prior approval of the
government agency or office within the work is created shall be necessary for
exploitation of such work for profit.” This material has been developed within the
Basic Education Assistance for Mindanao (BEAM) project. Prior approval must be
given by the author(s) or the BEAM Project Management Unit and the source must
be clearly acknowledged.
THIRD YEAR CHEMISTRY
MODULE 3 — LABORATORY APPARATUS
Mind Map
The Mind Map displays the organization and relationship between the concepts and activities in this Learning Guide in a visual form. It is included to provide visual clues on the structure of the guide and to provide an opportunity for you, the teacher, to reorganize the guide to suit your particular context.
Assessment
All six Stages of Learning in this Learning Guide may include some advice on possible formative assessment ideas to assist you in determining the effectiveness of that stage on student learning. It can also provide information about whether the learning goals set for that stage have been achieved. Where possible, and if needed, teachers can use the formative assessment tasks for summative assessment purposes i.e as measures of student performance. It is important that your students know what they will be assessed on.
Stages of Learning
The following stages have been identified as optimal in this unit. It should be noted that the stages do not represent individual lessons. Rather, they are a series of stages over one or more lessons and indicate the suggested steps in the development of the targeted competencies and in the achievement of the stated objectives.
1. Activating Prior Learning
This stage aims to engage or focus the learners by asking them to call to mind what they know about the topic and connect it with their past learning. Activities could involve making personal connections.
Background or purpose
The study of Science is never complete without a laboratory – be it in school, in industry, field site or any place. High school students are also already exposed in conducting experiments even in early years. This only shows that third year students have some prior knowledge on the different laboratory apparatuses and their use/s. This activity aims to probe on that prior knowledge.
Activity 1- Name Me! (10 minutes)
Distribute the alphabet key to the students. (refer to page 13)
THIRD YEAR CHEMISTRY
MODULE 3 — LABORATORY APPARATUS
Move the students into groups of three where they must share their ideas with the group. Join two groups of three together to make a group of six. Again, let them share and clarify their responses.
This time tell the students to consolidate their work and write it on a manila paper. Post it on the board
Remind them that they will use their alphabet key in the next activity.
Strategy
Alphabet Key
Using the alphabetical format clarifies students' thinking. It is a sorting process which is made easier by considering one aspect at a time.
In this activity, students are asked to name laboratory apparatuses chronologically using the alphabet key.
1-3-6 Procedure
a strategy which allows the students to form his or her own individual opinion on a topic or an issue before discussing it with a group. He/she then joins two of his/her classmates to form a group of 3 to share ideas together. This group (with 3 members) will then join another group to form a group of 6. They will then share and consolidate their ideas. It also allows students to share their ideas and opinions with a group.
Students name apparatus using the alphabet key at the same time following this procedure.
Formative Assessment
Rubric for individual and Group Performance (refer to 34) Alphabet Key will be checked
Roundup
In doing the activity, the students were given the chance to review lessons learned in the previous years particularly on the different apparatuses used in the experiments previously conducted, such as the test tube, graduated cylinder among others.
2. Setting the Context
This stage introduces the students to what will happen in the lessons. The teacher sets the objectives/expectations for the learning experience and an overview how the learning experience will fit into the larger scheme.
Background or purpose
Remembering the names does not show or is not an evidence that students fully
understood the concept of apparatus. They must also be able to identify and understand its uses. The activity that follows will enable the students to do so.
Activity 2: Laboratory Apparatus Scavenger Hunt (30 minutes)
Prepare three tables. These will serve as learning stations.
THIRD YEAR CHEMISTRY
MODULE 3 — LABORATORY APPARATUS
(1)
(2)
(3)
(4)
(5)
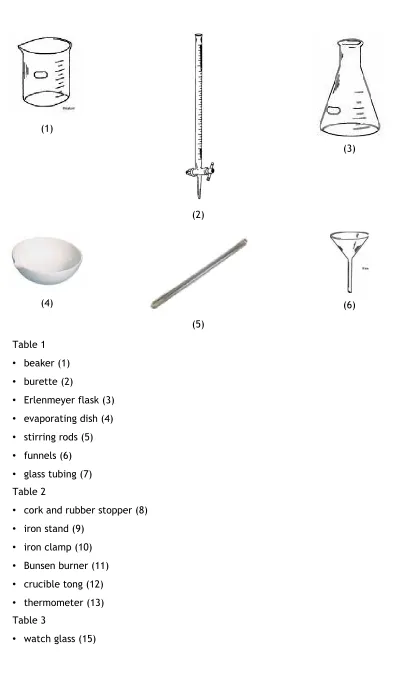
[image:5.595.101.508.109.783.2](6)
Table 1
• beaker (1)
• burette (2)
• Erlenmeyer flask (3)
• evaporating dish (4)
• stirring rods (5)
• funnels (6)
• glass tubing (7) Table 2
• cork and rubber stopper (8)
• iron stand (9) • iron clamp (10)
• Bunsen burner (11)
• crucible tong (12)
• thermometer (13)
Table 3
THIRD YEAR CHEMISTRY
MODULE 3 — LABORATORY APPARATUS
• test tube (16)
• test tube rack (17)
• test tube holder (18)
• wire gauze (19)
• clay triangle (20)
• crucible (21)
NOTE: For schools that do not have a science laboratory, you can do this inside the classroom. Just remind the students to take precautions on the transport and handling of materials.
For schools that do not have apparatuses, commercial flashcards or improvised laboratory equipment could be used.
Write the numbers, names and uses of the apparatuses found on each station on a manila paper as shown in the Teacher Resource Sheet 1- Laboratory Apparatus page 15
Post it after the activity for them to check their answers.
Let the students be with their previous group(consisting six members).
Divide the number of groups with the three stations. (Example, If you have six groups, divide it by three stations. Therefore, assign two groups in each station.)
Another option would be to setup 2 sets of these learning stations (e.g. two learning station 1; two learning station 2; and so on) to prevent overcrowding.
Let them take hold of their alphabet key again.
Instruct them to see attached Student Activity Sheet 2 “Apparatus Scavenger Hunt” page 14
Explain the instructions further to clarify things.
Emphasize that each group will have a station of origin to start at. Learners will be given the same amount of time per station to do the task/s. As a signal is made by the teacher, they will then move to the next station. They will do this process in a round robin manner until they will arrive at their station of origin.
Move from one station to the other to check students' performance. Remind them not to reveal their answer to the group.
After the activity, have them select a reporter (one per station only).
After the report, discuss further the uses of the different laboratory apparatuses for deeper understanding by posting the names and uses of the apparatuses in each station written on a manila paper.
Strategy
Laboratory Apparatus Scavenger Huntis a strategy which allows students to deepen their understanding of a certain text by visualizing it. In this manner they are given the chance to build their own understanding of a concept.
In this activity, students identify some laboratory apparatuses and give their uses. They do this through a modified “hunting” activity.
Formative Assessment
THIRD YEAR CHEMISTRY
MODULE 3 — LABORATORY APPARATUS
Roundup
Through the “hunt”, students did not only name the apparatuses but were also able to picture it. In other words, they were able to know what common laboratory apparatus looks like as well as its uses such as, test tube; which are glass instruments to hold liquids. Beakers, graduated cylinders, Erlenmeyer flasks are also glass instruments which are also used to hold liquids but have graduations to allow the experimenter to estimate the volume of the liquid. Stirring rods are used when mixing solutions or when doing filtration or decantation. See Teacher Resource Sheet 1- Laboratory Apparatus
3. Learning activity sequence
This stage provides the information about the topic and the activities for the students. Students should be encouraged to discover their own information.
Background or purpose
The success of an experiment does not depend solely on the use of equipment but also on the technique of how to handle it and the necessary precautions. This is the aim of the activities that follow.
Activity 3 – Be Safe Than Sorry! (15 minutes)
A day before this activity divide the class into groups of eight.
Assign a role to every member of the group. 4 members as actors, 1 reporter, 1 member as secretary and 2 members to prepare the necessary materials in every act.
Distribute the Student Activity Sheet 3, “Be Safe Than Sorry!” page 18
Tell the students to read and understand the Laboratory Techniques/Safety given to them and discuss among themselves the possible consequences if violated.
Instruct the secretary of the group to take note of the possible consequences discussed. The information will be used in the next activity.
Write each laboratory safety rule in a piece of paper. Roll it. Next day:
Prepare the materials needed for the role play such as the laboratory gown, googles, test tubes, make-believe chemicals.
Instruct the students to be with their group.
Instruct the group to choose a representative to pick four rolled papers from the box. Tell the students in each group that they will pantomime every technique/safety written on the piece of paper. Remind them not to tell the other group/s what laboratory technique/safety they are going to pantomime.
Give them seven minutes to prepare. Tell them to recall the previous roles given to them. But all of them should help to come up with a good and clear pantomime.
As one group pantomimes, assign one group to guess what laboratory technique/safety is performed by the group. The secretary records the guess/es. This will be in a rotation manner (e.g. Group 2 will observe as group 1 acts, group 3 will observe as group 2 acts. Group 4 to group 3, group 5 to group 4 and group 1 to group 5).
THIRD YEAR CHEMISTRY
MODULE 3 — LABORATORY APPARATUS
Make sure to conduct a lecturette to discuss the laboratory rules after the presentation of all groups to ensure deeper understanding.
Activity 4 – How Could I Do It? ( 40 min)
Prepare five stations. Use one task card ( see Student Activity Sheet 4 page 21 ) for each learning station that you wish to set up.
Place the card along with the required apparatus or materials, at each learning station or desk.
Divide the class into five groups.
Tell the students that they will again do a learning station activity. But by this time, they will no longer identify the apparatus but really use it.
Let them perform Activity 4 – How Could I Do It? ( see attached student activity sheet 4 “How could I do it?” page 20 for further instruction.)
Clarify the procedures by reading along with them. Have time to explain the process.
To keep students moving at a regular pace, use a timer or a clock to help signal uniform time intervals.
Tell them that they will only be given five minutes for every station. Move around to check if the students are on task as well as to guide them.
After performing the activity, distribute Teacher Resource Sheet 3 – HANDLING APPARATUS page 23 and let them answer Student Activity Sheet 5 – Reflection Journal page 29
Provide a lecturette after the activity to emphasize key concepts.
Preparation for every station:
Station 1 – filter paper (1 for every group), task card 1
Station 2 – 1- 50mL graduated cylinder, 1- 10mL graduated cylinder, water, 1 – 100mL beaker, task card 2
Station 3 – 1 – 10mL graduated cylinder, triple beam balance, task card 3
Station 4 – small plastic ruler, task card 4
Station 5 – thermometer, beaker with tap water, task card 5
Strategy
Role Play/ Simulation
Use of natural activities e.g. song, dance, and drama to take on a role for the purpose of exploring real life situations.
For Activity 3, students will act out the ways on how to handle laboratory apparatus safely.
Station Task Cards/Rotating Learning Stations ( for Activity 4)
Task cards are instructions that are written on little cards for each station. The students are to follow the instructions to complete the task at each station.
This strategy teaches the students to follow written directions. It allows the students to take control and be their own teacher.
THIRD YEAR CHEMISTRY
MODULE 3 — LABORATORY APPARATUS
Formative Assessment
Rubrics for Group Performance (refer to page 34) Reflection Journal will be checked
Roundup
With the above activities,students did not only learn every piece of equipment found inside a laboratory but also on how to use some of them safely and accurately before doing any experiment.
4. Check for Understanding of the topic or skill
This stage is for teachers to find out how much students have understood before they apply it to other learning experiences.
Background or purpose
The students should have gained understanding on the different laboratory apparatuses and their uses. The activity below will show the extent of their understanding.
Activity 5 – Find The Word! (15 min)
Inform students that in this activity they will work individually
Distribute Student Activity Sheet 6 – Find the Word! (refer to page 30) Ask them to read the procedure carefully before performing the activity.
Activity 6 – Check It Out!
Inform students that they will work individually. Distribute Student Activity Sheet 7 (refer to page 32) Tell Them to read the procedure carefully.
Strategy
Irregular Crossword Puzzle is a strategy where students will answer the given questions to be sequentially arranged horizontally in the prepared irregular crossword puzzle. They will then read their answers vertically to find the word that makes sense---the magic word. Diagram/Picture is a visual tool to represent information. In this strategy, students will study a picture inside the laboratory room. They will identify activities that properly and improperly done inside the laboratory.
Formative Assessment
Student Activity Sheet 6 will be checked. Answers are on the Teacher Resource Sheet 3 page 31)
Student Activity Sheet 7 will be checked.
Roundup
Every piece of apparatus which contributes to the success of an experiment. In using them, there are some safety rules to follow on how to use them effectively.
5. Practice and Application
THIRD YEAR CHEMISTRY
MODULE 3 — LABORATORY APPARATUS
Background or purpose
With the skill in handling some laboratory apparatuses acquired in the previous lesson, students are expected to perform the activity successfully in this stage.
Activity 7 – The Dyer's Workshop
Divide the class into groups of five.
Tell them that in this activity they will use the skills learned in handling apparatus. Distribute Student Activity Sheet 8 “ The Dyer's Workshop” (refer to page 33 ) as well as the materials.
Instruct them to read the procedure carefully.
Go around and give assistance. Take note on how they handle the apparatuses and conduct a post laboratory discussion.
Strategy
Practical Work
Any teaching and learning activity which involves at some point the students in observing and manipulating real objects and materials.
In this activity, the students will perform an activity where they will use the skills in handling apparatuses learned previously.
Formative Assessment
Rubric on Group Performance.
Roundup
The students were able to perform their activity well with the proper skills in handling laboratory apparatuses.
6. Closure
This stage brings the series of lessons to a formal conclusion. Teachers may refocus the objectives and summarize the learning gained. Teachers can also foreshadow the next set of learning experiences and make the relevant links.
Background or purpose
The next activity will enable the students to share knowledge learned about Safety Rules in Laboratory and Proper Handling of some laboratory apparatus in a non-intimidating manner.
Activity 8 – This, I Have To Say!
Divide the class into groups of three.
Prepare strips of paper with topics written on it. Topics, such as Safety Rules, Apparatus and its Use, Measuring Length Using Meterstick, Measuring Mass Using Laboratory Balance and Using the Laboratory Thermometer.
Provide each group with these strips. Give these instructions to the students.
● Each member of the triad, takes a turn assuming the roles of Authority, Reporter
THIRD YEAR CHEMISTRY
MODULE 3 — LABORATORY APPARATUS
● For every turn, the Authority will pick one strip. He/She will be given two minutes
to talk about the topic focusing on the most interesting, familiar and the difficult part to learn.
● The reporter will take the task of paraphrasing what the Authority says. He/She
must clarify the information by asking questions.
● The observer will comment on the accuracy of the paraphrasing and whether any
important information was omitted.
● After this, they will switch roles until all of them experienced different roles. ● Remind them that the reporter should submit a report to the teacher (which
means everybody has a report to submit since all of them will assume this role) Example:
Step 1
Student 1 – Authority Student 2 – Reporter Student 3 – Observer
Step 2
Student 1 – Observer Student 2 – Authority Student 3 – Reporter
Step 3
Student 1 – Reporter Student 2 – Observer Student 3 - Authority
Collect their report after the activity.
Activity 9 – Stop and Look!
Divide the class into groups of three prior to the activity.
Let them bring drawing materials such as cartolina, crayons and pencil.
On the activity day, let them design and make a safety poster which tells children about one of the safety rules.
Let them post their work.
Strategy
Reflect/Reflect/Reflect Outline a strategy for paraphrasing and clarifying.
This strategy enables the students to internalize the importance of reflecting on and personalizing their learning. By doing this activity, they will be reminded that merely hearing,viewing or reading is not enough. They must pause periodically to think about what they are experiencing and verbalize their learning both to others and to themselves.
THIRD YEAR CHEMISTRY
MODULE 3 — LABORATORY APPARATUS
Poster Making
Is a strategy that develops the student's creativity and critical thinking for it will make them think of a drawing that will really convey the desired idea.
In this lesson, students will design a poster which will show some safety laboratory rules.
Formative Assessment
Report will be checked
Rubrics for Group Performance
Posters will be checked using rubric. (refer to page 35)
Roundup
The students successfully shared what they had learned from the lesson on Laboratory Apparatuses. Summary of the whole lesson will be done in this stage.
Teacher Evaluation
(To be completed by the teacher using this Teacher’s Guide) The ways I will evaluate the success of my teaching this unit are: 1.
THIRD YEAR SCIENCE
MODULE 3 — LABORATORY APPARATUS
Student Activity Sheet 1
Laboratory Apparatus Alphabet Key
Letter Name of Apparatuses A
THIRD YEAR SCIENCE
MODULE 3 — LABORATORY APPARATUS
Student Activity Sheet 2
Laboratory Apparatus Scavenger Hunt
Materials:
•
Alphabet Key
•
marker
•
manila paper
Procedure:
Be with your previous group (group in activity 1).
Review your alphabet key done in activity 1.
Your teacher had prepared three stations. Each station has laboratory apparatuses
that are numbered. Match the apparatuses that you have on your alphabet key with
the actual apparatuses you can see on the station designated to your group.
Enter your answers on the table below.
Write the name of the apparatus from your alphabet key on the first column. Draw
it on the second.
Think of how it is being used and write your answer on the third column.
If you can't find it in your station, hunt it out in the other stations. But wait until
you are told by your teacher to move.
Write your work on a manila paper for the report.
THIRD YEAR SCIENCE
MODULE 3 — LABORATORY APPARATUS
Teacher Resource Sheet 1
Answer Sheet for Activity 2
Station 1
Number Name of Apparatus Description & Use
1 Beaker An open glass cylinder with a pouring lip used as a standard laboratory container, and mixing and heating vessel. It has graduations to allow the experimenter to estimate the volume of a liquid but cannot measure it accurately.
2 Mortar and pestle used to grind solid chemicals into smaller pieces. The mortar is a ceramic, thick-walled bowl, while the pestle is a heavy, ceramic blunt-ended cylinder.
3 Erlenmeyer flask a glass conical container used for mixing, heating and storing chemicals. The flask is shaped like a cone with the opening at the top of the flask being the narrow end of the cone. While many Erlenmeyer flasks have markings on the side indicating volume, these graduations are only approximate values; they should not be used for measuring exact volumes. It is also useful in titration experiments,where the shape of the flask enables the contents to be swirled with a minimum overflow. It is also useful in the preparation of supersaturated solutions; the conical shape slows the rate at which the contents cool, and help minimize premature crystallization of the solute particles.
4 Evaporating dish made of ceramic and is used to evaporate the liquid away from a small volume of solution.
5 Stirring rod usually made of glass. It is used to stir mixtures and facilitate the pouring of liquids. When placed across the top of a beaker so that it lies along the spout, stirring rods can help prevent the liquid being poured from dribbling down the outer side of the container.
6 Glass tubing usually used when connecting large glasswares or for allowing aspiration.
THIRD YEAR SCIENCE
MODULE 3 — LABORATORY APPARATUS
Station 2
Number Name Use
8 Cork and rubber stoppers used to seal test tubes and other glassware to keep out airborne contaminants.
9 Iron stand an equipment where iron rings and iron clamps are attached during experiments. It is used with clamps and bossheads to hold containers at a required height.
10 Iron ring attached to a ring stand and is used to support laboratory equipment above the work surface. Wire gauze is placed on top of the iron ring to support beakers and flasks when heating . A clay triangle is placed on top of the iron ring to support a crucible when it is being heated.
11 Bunsen burner consists of a hallow metal barrel that has one or more openings at its base to allow the entry of air. Gas is piped in at the base, mixes with the air, and at the top of the barrel creates a flame of varying intensity. It is used for heating.
12 Crucible tong a metal instrument used for holding hot objects.
13 Laboratory thermometer used to measure temperature. It contains a liquid (usually mercury or an alcohol solution) in a reservoir whose volume is linearly dependent on the temperature .
THIRD YEAR SCIENCE
MODULE 3 — LABORATORY APPARATUS
Station 3
Number Name Use
15 Watch glass a circular, slightly concave piece of glass used to
evaporate a liquid, or as a cover for a beaker. The latter use is generally applied to prevent dust or other particles entering the beaker.
16 Test tube a narrow glass cylinder, closed at one end, used for mixing, heating, and storing small quantities of chemicals.
17 Test tube rack can be made of wood, metal or plastic. It is used for holding test tubes upright when they contain chemicals and also hold test tubes upside down to dry. It can also be used to line up several test tubes to be used as collection containers in a distillation process.
18 Test tube holder used to hold and transport hot test tubes.
19 Wire gauze used for supporting beakers and flasks when they are being heated with a Bunsen burner. They are made of a metal mesh screen that contains a ceramic fiber coating in the center that can withstand extremely high
temperatures.
20 Clay triangle used to support crucibles when heating them. The clay portion is actually a ceramic material that can withstand extreme temperatures. The triangle is set on top of an iron ring and the crucible is placed at the center of the triangle.
21 Crucible crucible and its lid is made of a heat-resistant ceramic. It is used to heat chemicals (usually solids) at high
temperature. It is supported above a Bunsen burner by a clay triangle.
Source: http://www.msnucleus
http://www.ideaplace.org/Chemistry
http://www.mreisley.com/tutorials/equipment
THIRD YEAR SCIENCE
MODULE 3 — LABORATORY APPARATUS
Student Activity Sheet 3
Be Safe Than Sorry!
Read and understand each of the given laboratory techniques. In your group,
discuss the possible consequences if violated.
1. Wear a laboratory gown to protect your clothes from stains. Safety glasses
must be worn while working with any chemical that could be harmful to the
eyes.
2. Be careful in heating objects. Point the test tube away from you or your
classmates. The hot content may be thrown out on you.
3. To insert glass tubing through a cork or rubber stopper, never push in the
glass tubing as it may break. Protect your hands with gloves or cloth or
paper towels. Hold the stopper with one hand and insert the tube in a
screw-like motion.
4. To smell the the odor of a substance, fan the vapor towards you because
some substances may have irritating odor.
5. Taste only substances that your teacher tells you to. Some substances may
be poisonous.
6. In case of fire, cover the burning object with a wet cloth. Do not panic.
7. Refrain from playing inside the laboratory while doing the experiment.
8. Always ask the teacher if the procedure is not clear to you.
9. If corrosive chemicals get on the skin or eyes, the first thing to do is to wash
the affected area immediately with water. Second, notify the laboratory
instructor/your teacher.
10.Avoid rubbing your eyes when your hands are contaminated with chemicals.
11.Use Bunsen burners only at the direction of the teacher. Open flames are
prohibited when flammable substances are used in the laboratory. Never
leave active burners unattended.
12.Tie long hair while working in the laboratory; watch for flames and
machinery.
13.Always wash your hands thoroughly at the end of the laboratory period.
14.Do not consume food or water while in the laboratory; never taste
chemicals.
15.Keep desk tops clear of all books, clothing and other personal property
except necessary laboratory directions and notebooks.
16.In case of broken glass, clean up immediately and throw the pieces in the
garbage can.
17.Return cleaned equipment to its proper place when finished. Report any
damage to equipment to the instructor.
THIRD YEAR SCIENCE
MODULE 3 — LABORATORY APPARATUS
19.Do not use unlabeled chemicals. Check labels twice to be sure that you have
the right bottle. Refer unlabeled containers to your teacher.
THIRD YEAR SCIENCE
MODULE 3 — LABORATORY APPARATUS
Student Activity Sheet 4
How Could I Do It?
Materials:
•
filter paper (one for every group)
•
50 mL graduated cylinder
•
10 mL graduated cylinder
•
water
•
triple beam balance
•
meter stick
•
beaker
Procedure:
Be with your assigned group.
Learning stations are prepared for you by your teacher. Each station has a task card
and certain laboratory instruments.
Each task is not provided with procedures. Use your own initiative to come up with
a procedure to perform the task.
You are only given five minutes to do the task in every learning station.
After five minutes, move to another station as signaled by your teacher.
Record your answers as well as your procedures on the table below.
Station What is your answer? How did you do it?
1
2
3
4
THIRD YEAR SCIENCE
MODULE 3 — LABORATORY APPARATUS
Student Activity Sheet 4
Task Cards
Task Card 1
Set up the filter paper
for a filtration activity.
Task Card 2
In a large graduated cylinder, measure 20 mL
of water from a beaker.
In a smaller graduated cylinder
pour 9 mL of water. Draw what you see.
Task Card 3
THIRD YEAR SCIENCE
MODULE 3 — LABORATORY APPARATUS
Task Card 4
Using a small plastic ruler, measure the length
and width of the rectangular figure
below to the nearest millimeter (mm).
Task Card 5
Hold the thermometer in the tap water.
Allow it to remain in the water for
1 minute or
THIRD YEAR SCIENCE
MODULE 3 — LABORATORY APPARATUS
Teacher Resource Sheet 2
Handling Science Apparatus
Using a Filter Paper
Filtration is a process used to separate liquids from insoluble solids. In this
procedure, the solid/liquid mixture is poured into a funnel in which a filter paper
traps the solid particles and allows the liquid to pass through. The liquid can be
collected in a container and the solid is left in the filter paper.
The filter paper may come in a circular shape. It is formed by:
1. Fold the circle in half.
2. Fold it in half again, to make it into quarters.
3. Open the top so that there are three folds on one side and one on the other.
4. Place the filter paper in the funnel.
THIRD YEAR SCIENCE
MODULE 3 — LABORATORY APPARATUS
Measuring liquids using a Graduated Cylinder
A graduated cylinder is a cylindrical glass or plastic
tube sealed at one end with a calibrated scale etched
or marked on the outside wall. It is also referred to as
a measuring cylinder.
The volume of liquid in the graduated cylinder is
obtained directly by reading the calibrated scale.
The scale division on a graduated cylinder is generally
determined by its size. For example, the 50mL
graduated cylinder is divided into 1mL increments, a
10mL cylinder is divided into 0.1mL increments and a
500mL cylinder is divided into 5mL increments.
The liquid surface is curved rather than horizontal
due to the attractive force between the water and
the glass. The curved surface is called the
MENISCUS.
THIRD YEAR SCIENCE
MODULE 3 — LABORATORY APPARATUS
Measuring Mass using a Laboratory Balance
The laboratory balance is used to measure the mass of an object.
The triple beam balance is a typical mechanical balance. It has a beam which is supported by a fulcrum. On one side is a pan on which the object is placed. On the other side the beam is split into three parallel beams, each supporting one weight.
Steps for using the balance properly.
1. The triple beam balance is used to measure masses; the reading error is 0.05 gram.
2. With the pan empty, move the three sliders on the three beams to their leftmost positions, so that the balance reads zero. If the indicator on the far right is not aligned with the fixed mark, then calibrate the balance by turning the set screw on the left under the pan. 3. Once the balance has been calibrated, place the object to be measured on the pan. 4. Move the 100 gram slider along the beam to the right until the indicator drops below the
fixed mark. The notched position immediately to the left of this point indicates the number of hundreds of grams.
5. Now move the 10 gram slider along the beam to the right until the indicator drops below the fixed mark. The notched position immediately to the left of this point indicates the number of tens of grams.
6. The beam in front is not notched; the slider can move anywhere along the beam. The boldface numbers on this beam are grams and the tick marks between the boldface numbers indicate tenths of grams.
7. To find the mass of the object on the pan, simply add the numbers from the three beams. 8. As with a ruler, it is possible to read the front
scale to the nearest half tick mark.
THIRD YEAR SCIENCE
MODULE 3 — LABORATORY APPARATUS
Measuring Length using a Meter Stick
A meter stick is a measuring device one meter long that is usually marked in centimeters and usually in millimeters.
1. Place the ruler firmly against the object you are measuring.
2. Align one edge of the object exactly with the zero end of the ruler.
3. Look at the other end of the object to see which mark on the ruler is closest to that edge. 4. Make sure you read the ruler from directly above it.
Using a thin ruler
Eye position A gives the most accurate reading = 6.0 cm Eye position B gives a shorter reading = 5.7 cm
Eye position C gives a longer reading = 6.4 cm
Using a thick ruler
Note:
1) Make three readings in order to take care of possible errors. Then find the average of the readings.
THIRD YEAR SCIENCE
MODULE 3 — LABORATORY APPARATUS
Using the Laboratory Thermometer
The thermometer is used to measure temperature. It contains a liquid, usually mercury or an alcohol solution. As the liquid is heated, it expands into a narrow tube that has been calibrated to indicate the temperature. The volume of the liquid is linearly dependent on the temperature (as the temperature increases, the volume, and therefore the length of the liquid in the tube increases by a proportional amount).
Caution: Never heat a thermometer beyond its upper limit.
Techniques to suspend a thermometer in a solution
1. Use a commercial thermometer clamp.
2. Attach a string to the top of the thermometer from a stable piece of equipment.
3. Insert the thermometer through a one-hole rubber stopper and clamp the stopper to a ring stand.
4. Insert the thermometer through a short length of rubber tubing and clamp to a ring stand.
Measuring the temperature of liquids
• Immerse the entire bulb in the liquid but do not allow it to touch the sides or bottom of the
vessel, otherwise you will measure the temperature of the vessel, not the liquid.
• Never use the thermometer as a stirring rod.
• Read the thermometer as soon as the level of the liquid becomes constant.
• Read the thermometer with the eye level with the top of the liquid in the column.
• Do not rest a thermometer on a bench where it is likely to roll off.
• Immediately report any breakage of thermometers — the broken glass is very sharp and the liquid may be
THIRD YEAR SCIENCE
MODULE 3 — LABORATORY APPARATUS
Heating substances
Transferring liquid substances
Evaporating nonflammable substances
evaporating dish
wire gauge
Bunsen burner
ring stand
Precaution: Do not point the open end of the test tube towards your neighborutility clamp test tube
iron stand Bunsen burner
solid
glass rod
THIRD YEAR SCIENCE
MODULE 3 — LABORATORY APPARATUS
Student Activity Sheet 5
Reflection Journal
Procedure:
From your teacher's discussion and the activity that you had done about the proper
handling of some laboratory apparatuses, reflect on the steps that you missed
while doing the activity.
Write your reflection on the table below.
STATION STEPS THAT WE MISSED IN DOING THE TASKS
1
2
3
4
5
THIRD YEAR SCIENCE
MODULE 3 — LABORATORY APPARATUS
Student Activity Sheet 6
Find The Word!
Procedure:
Fill in the boxes horizontally by providing the answers to the numbered questions
below. When you are done, read your answers vertically and find the magic word,
the only word that makes sense.
1
2
3
4
5
6
7
8
9
1. A glass cylinder used for mixing, holding liquids and heating chemicals.
2. A ceramic bowl and cylinder which are used to grind solid chemicals into
smaller pieces.
3. This could be in the form of cork or rubber that is used to seal glasswares
such as test tubes to avoid contaminants.
4. Also termed as “calibrated”
5. A metal mesh screen which is used for supporting beakers and flasks when
they are being heated with a Bunsen burner.
6. It is used to support crucibles when heating them.
7. A narrow glass cylinder, closed at one end, that is used for mixing and
heating.
8. A ceramic container with lid which is used to heat chemicals to high
temperatures.
THIRD YEAR SCIENCE
MODULE 3 — LABORATORY APPARATUS
Teacher Resource Sheet 3
Answer Sheet for Activity 5
1 B E A K E R
2 M O R T A R A N D P E S T L E
3S T O P P E R
4G R A D U A T E D
5W I R E G A U Z E
6C L A Y T R I A N G L E
7T E S T T U B E
8C R U C I B L E
9R E T O R T S T A N D
THIRD YEAR SCIENCE
MODULE 3 — LABORATORY APPARATUS
Student Activity Sheet 7
Check It Out!
Procedure:
●
Study the picture carefully. It shows students doing sensible as well as
dangerous things inside a laboratory.
●
Identify which is sensible and which is dangerous. Explain your choice.
THIRD YEAR SCIENCE
MODULE 3 — LABORATORY APPARATUS
Student Activity Sheet 8
The Dyer's Workshop
Material for each group:
•
3 – 250 mL
beakers
•
1 – 100 mL
measuring cylinder
•
1 glass rod
•
1 crucible tong
•
1 Bunsen burner or alcohol lamp
•
iron stand with clamp or tripod and gauze
•
filter funnel with filter paper
•
a piece of cotton cloth (plain white)
•
red onion skins
•
mangosteen pulp
•
goggles
Procedure:
PRECAUTION: Wear goggles.
●
Put some onion skins into a beaker and some mangosteen pulp into another
beaker.
●
Add about 100 cm
3of water to each beaker.
●
Carefully boil for 10-15 minutes to get the juices out.
●
When the dye is ready, let the beaker cool for a few minutes. Filter the
cooled liquid into a clean beaker. This is your DYE BATH.
●
Using tongs, put one piece of cotton cloth into a dye bath. Carefully boil for
10 minutes, stirring with the glass rod from time to time. Take the materials
out of the dye bath using tongs. Hang them to dry.
●
Observe.
THIRD YEAR SCIENCE
MODULE 3 — LABORATORY APPARATUS
Teacher Resource Sheet 4
Rubric for Group Performance
10 – Thorough Understanding
●
Consistently and actively works towards group goals.
●
Is sensitive to the feelings and learning needs of all group members.
●
Willingly accepts and fulfills individual role within the group.
●
Consistently and actively contributes knowledge, opinions, and skills.
●
Values knowledge, opinion and skills of all group members and encourages
their contribution.
●
Helps group identify necessary changes and encourages group action for
change.
7 – Good Understanding
●
Works toward group goals without prompting.
●
Accepts and fulfills individual role within the group.
●
Contributes knowledge, opinions, and skills without prompting.
●
Shows sensitivity to the feeling of others.
●
Willingly participates in needed changes.
4 – Satisfactory Understanding
●
Works toward group goals with occasional prompting.
●
Contributes to the group with occasional prompting.
●
Shows sensitivity to the feelings of others.
●
Participates in needed changes, with occasional prompting.
1 – Needs Improvement
●
Works toward group goal only when prompted.
●
Contributes to the group only when prompted.
●
Needs occasional reminders to be sensitive to the feelings of others.
THIRD YEAR SCIENCE
MODULE 3 — LABORATORY APPARATUS
Teacher Resource Sheet 5
Rubric for Poster Making
Criteria Excellent Satisfactory Needs Improvement
Relevance to the lesson The poster is very relevant to the lesson.
The poster is slightly relevant to the lesson.
The poster is not relevant to the lesson.
Attractiveness The poster is very attractive in terms of design, layout and neatness.
The poster is slightly attractive in terms of design, layout and neatness.
The poster is
distractingly messy or poorly designed.
Audience Impact The overall
organization, design, use of colors, and use of space is very good that it helps make the poster interesting and really communicates the message.
The overall
organization, design, use of colors and use of space is slightly good that made the poster a little bit interesting and barely communicates the message.
The overall
THIRD YEAR CHEMISTRY
MODULE 3 — LABORATORY APPARATUS
For the Teacher: Translate the information in this Learning Guide into the following matrix to help you prepare your lesson plans.
Stage
1.
Activating Prior Learning2.
Setting the
Context
3.
Learning
Activity Sequence
4.
Check for
Understanding
5.
Practice and
Application
6.
Closure
Strategies
Activities from the Learning Guide
Extra activities you may wish to include
Materials and planning needed
Estimated time for this Stage