Implementation and Management
Study Guide (70-284)
Will Schmied and James Chellis
Chapter 3: Installing Microsoft Exchange Server 2003
Copyright © 2004 SYBEX Inc., 1151 Marina Village Parkway, Alameda, CA 94501. World rights reserved. No part of this publication may be stored in a retrieval system, transmitted, or reproduced in any way, including but not limited to photocopy, photograph, magnetic or other record, without the prior agreement and written permission of the publisher.
ISBN: 0-7821-4338-5
SYBEX and the SYBEX logo are either registered trademarks or trademarks of SYBEX Inc. in the USA and other countries. TRADEMARKS: Sybex has attempted throughout this book to distinguish proprietary trademarks from descriptive terms by following the capitalization style used by the manufacturer. Copyrights and trademarks of all products and services listed or described herein are property of their respective owners and companies. All rules and laws pertaining to said copyrights and trademarks are inferred. This document may contain images, text, trademarks, logos, and/or other material owned by third parties. All rights reserved. Such material may not be copied, distributed, transmitted, or stored without the express, prior, written consent of the owner.
The author and publisher have made their best efforts to prepare this book, and the content is based upon final release software whenever possible. Portions of the manuscript may be based upon pre-release versions supplied by software manufacturers. The author and the publisher make no representation or warranties of any kind with regard to the completeness or accuracy of the contents herein and accept no liability of any kind including but not limited to performance, merchantability, fitness for any particular purpose, or any losses or damages of any kind caused or alleged to be caused directly or indirectly from this book.
Sybex Inc.
1151 Marina Village Parkway Alameda, CA 94501 U.S.A.
Phone: 510-523-8233 www.sybex.com
Chapter
3
Installing Microsoft
Exchange Server 2003
MICROSOFT EXAM OBJECTIVES COVERED
IN THIS CHAPTER:
Prepare the environment for deployment of Exchange Server 2003
Install, configure, and troubleshoot Exchange Server 2003 Install, configure, and troubleshoot Exchange Server 2003 in
a clustered environment
Because Exchange Server 2003 is a Microsoft Windows Server 2003 application, the installation process is pretty straightforward. However, there are still some issues that need to be addressed in a careful manner. In this chapter, you will learn the necessary steps to install Microsoft Exchange Server 2003. The main subjects of this chapter are as follows:
Exchange Server 2003: Standard Edition vs. Enterprise Edition Pre-installation considerations
Installing Exchange Server 2003
Upgrading from Exchange 2000 Server to Exchange Server 2003 Installing Exchange Server on a cluster
Post-installation considerations
Troubleshooting a Microsoft Exchange installation
Exchange Server 2003: Standard Edition
vs. Enterprise Edition
Microsoft Exchange Server 2003 is available in two editions: a Standard Edition, which is sim-ply called Exchange Server 2003, and an Enterprise Edition. The main difference between them is the advanced features supported in the Enterprise Edition.
Standard Edition Features
The Standard Edition includes the following features:
Basic messaging functionality
Microsoft Exchange Web Storage System
Connectors for Lotus Notes and Novell GroupWise Distributed (front-end/back-end) configuration of servers Support for Volume Shadow Copy
Usage of the Recovery Storage Group
Support for Outlook Mobile Access (OMA) and Outlook Web Access (OWA)
Additional Enterprise Edition Features
The Enterprise edition includes all of the features of the Standard edition and adds the following:
No limit on database size (the Standard Edition is limited to 16 GB).
Allows up to five databases per storage group (the Standard Edition allows only for up to
two databases per storage group).
Up to four production storage groups per server (the Standard Edition supports only one
per server).
Active/Active and Active/Passive clustering support. The X.400 connector is included.
Pre-installation Considerations
You must address several important issues before installing Exchange Server. Having the cor-rect information and making the right decisions about these issues will go a long way toward ensuring a successful installation. The following pre-installation issues are covered in this section:
Verifying system requirements
Windows Active Directory domain user accounts related to the Exchange installation Licensing issues
Verifying that Windows services are installed and running Running diagnostics tests on domain controllers and the network Preparing Active Directory
Other pre-installation steps
Verifying System Requirements
This section lists the minimum requirements for the computer system upon which Exchange is to be installed. These minimums are valid when you install only the core components. Using additional Exchange components, and depending on your particular performance demands, could require more resources than the following minimum requirements.
Hardware Requirements
The minimum and recommended hardware requirements for installing Exchange are detailed in Table 3.1.
The Microsoft Exchange Server software comes on a CD. If the machine intended to be the Exchange server has no CD-ROM drive, the administrator can copy the necessary files from the CD to a shared hard disk or share a CD-ROM drive on another machine.
Software Requirements
The software requirements for an Exchange installation are listed below:
T A B L E 3 . 1 Exchange Server 2003 Hardware Requirements
Item Minimum Recommended
CPU 133 MHz Pentium or comparable 733 MHz Pentium or comparable RAM 256 MB 512 MB
Disk space 500 MB available on the Exchange drive, 200 MB available on the system drive
Space as required, with the databases kept on fault-tolerant drive sets
Drives CD-ROM for installation CD-ROM for installation Video display VGA or better VGA or better
Operating system Microsoft Windows Server 2003 Standard Edition, Enterprise Edition, or Datacenter Edition. Windows 2000 Server, Advanced Server, or Datacenter Server with at least Windows 2000 Service Pack 3.
Active Directory All domain controllers and global catalog servers that Exchange Server 2003 will contact must be running Windows Server 2003 or Windows 2000 Server 2000 Service Pack 3 or higher. The Exchange server must have access to domain controllers and global catalog servers that are located in the same Active Directory site as the Exchange server.
DNS At least one DNS server must be available that meets the needs of Active Directory. Multiple DNS servers are recommended in larger environments.
Windows Active Directory User Accounts Related to the
Exchange Installation
Because of Exchange Server 2003’s involvement with Active Directory, its installation involves a number of Windows Active Directory user and group security accounts. Following are some of the more pertinent accounts:
TCP/IP Transmission Control Protocol/Internet Protocol (TCP/IP) is required on all Exchange servers and on all clients that need to access Exchange Server. IIS Internet Information Services, along with its WWW, NNTP, and SMTP
subcomponents, must be installed on any server on which Exchange Server 2003 will be installed.
File system The volumes to hold the Exchange application files and Exchange database and log files should all be formatted with the NTFS file system.
Schema Admins Members of this group have the rights and permissions necessary to modify the schema of Active Directory. To run the ForestPrep tool (described later in this chapter) that modifies the schema for Exchange Server 2003, you must belong to the Schema Admins group, the Enterprise Admins group, and the local Administrators group on the computer on which you actually run the tool. Enterprise Admins Members of this group have the rights and permissions
necessary to administer any domain in a forest. To run the ForestPrep tool, you must be a member of the Enterprise Admins group, the Schema Admins group, and the local Administrators group on the computer running the tool. Domain Admins Members of this group have the rights and permissions
necessary to administer any computer or resource in a domain. You must be a member of this group in order to run the DomainPrep tool (also discussed later in this chapter) that prepares each domain for Exchange Server 2003 installation. Administrators Members of this local group are given the rights necessary to
administer a local computer and install software on it. To install Exchange Server 2003 on a Windows Server 2003 or Windows 2000 Server, you must be a member of this group. This level of privileges is needed because, during installation, services will be started and files will be copied to the \<winnt_ root>\SYSTEM32 directory.
Licensing Issues
Licensing issues relate to matters of legality (specifically, the number of servers Exchange can be installed on and the number of clients that can access a server). Three main licenses pertain to the various Microsoft Exchange product packages:
Server License
Client Access License (CAL) Client License
Server License
The basic Server License provides the legal right to install and operate Microsoft Exchange Server 2003 on a single-server machine. In addition, the Exchange System Manager Microsoft Management Console snap-in (the primary utility used to administer an Exchange organiza-tion) can be installed on additional machines without additional licenses.
Since many licensing policies can change over time, always check for the latest policy to ensure your compliance. You can find the licensing policies for Exchange Server 2003 at www.microsoft.com/exchange/howtobuy/ enterprise.asp.
Client Access License (CAL)
A Client Access License (CAL) gives a user the legal right to access an Exchange server. An orga-nization designates the number of CALs it needs when a Microsoft Exchange server is pur-chased. Each CAL provides one user the legal right to access the Exchange server. Any client software that has the ability to be a client to Microsoft Exchange Server is legally required to have a CAL purchased for it. Microsoft Exchange Server 2003 uses a per-seat licensing mode, which means that each client accessing the server must possess a valid CAL.
Exchange Domain Servers Along with the Exchange Enterprise Servers local group, this global security group provides Exchange servers with the permissions necessary to access one another and perform necessary Exchange functions. All Exchange servers are placed into the Exchange Domain Servers group, and this group is placed into the Exchange Enterprise Servers local group on each Exchange computer.
Exchange Enterprise Servers See the description of the Exchange Domain Servers group above.
Site Services Account Exchange Server 5.5 services use this account to log on to the Windows system and carry out their functions.
Client Access Licenses are not included in any version of Microsoft Windows or Microsoft Office. For example, the version of Office Outlook 2003 that comes with Microsoft Office 2003 requires, by law, that a separate CAL be purchased before accessing an Exchange server.
Client License
In addition to having a CAL, each piece of client software must also be licensed for use on the client computer. This means that each piece of client software, such as Office Outlook 2003, needs its own license to be legally installed on the client computer plus a CAL to legally connect to an Exchange server.
Verifying Windows Services
The Exchange Server 2003 setup process has been made easier and more error-proof than ever before. As part of this improved setup process, you are prompted to verify and install, as required, those key services that are required to support the installation of Exchange Server 2003. Before Exchange Server 2003 can be installed on a server, the NNTP, SMTP, and WWW services must be installed and running on the server. If the server is Windows Server 2003, then ASP.NET must also be installed.
The steps to verify Windows services, perform network diagnostics, and run ForestPrep and DomainPrep are all part of the normal installation sequence for a new Exchange Server 2003 organization. All of these steps are accessible from the Exchange Server Deployment Tools page, as you’ll see later in Exercise 3.2.
Exercise 3.1 outlines the steps that you will need to perform to install and enable the required services.
E X E R C I S E 3 . 1
Installing and Enabling Required Services
1. Open the Add or Remove Programs applet, located in the Control Panel.
2. Click the Add/Remove Windows Components button.
3. On the Windows Components dialog box, select the Application Server option and click the Details button.
4. On the Application Server dialog box, shown below, select the ASP.NET option.
5. Select the Internet Information Services (IIS) option and click the Details button.
6. On the Internet Information Services (IIS) dialog box, shown below, select the NNTP Ser-vice, the SMTP SerSer-vice, and the World Wide Web Service.
7. Click OK to close the Internet Information Services (IIS) dialog box.
8. Click OK to close the Application Server dialog box.
9. Back at the Windows Components dialog box, click Next to continue.
10. Click Finish when prompted.
You can verify that services are running by opening the Services console located in the Administrative Tools folder.
Performing Diagnostics Testing
In an effort to prevent problems that often occur from difficulties connecting to domain con-trollers and other network hosts, the Exchange Server 2003 setup process includes steps to run DCDiag and NetDiag to perform diagnostics on domain controllers and the network, respectively.
The Exchange Server Deployment Tools make it easy for you perform these tests as long as you have your Windows Server 2003 CD available. You will simply need to install the Windows Support Tools from the Support folder on the Windows Server 2003 CD and then run these two diagnostics tools. Although they are run during the normal Exchange Server setup process, locating and correcting any problems now will make the actual installation an easier one.
Preparing Active Directory
Before installing the first Exchange server in an organization, you may need to prepare the forest and each domain into which Exchange will be installed. For these tasks, you will use two tools provided with the Exchange installation software: ForestPrep and DomainPrep. ForestPrep must be run once in a forest. It extends the Active Directory schema with the objects necessary to run Exchange Server 2003. DomainPrep must be run in each domain to identify the domain’s address list server and to create special domain accounts that Exchange needs in order to run properly.
Though this seems like a complicated installation routine, it does provide a significant advan-tage. Many networks separate the administrative responsibilities of domain management, schema management, and Exchange management. For example, one group may be in charge of admin-istering the schema and the primary domains of the forest, another may be in charge of managing the child domains, and still another group will manage Exchange.
11. To enable ASP.NET, open the Internet Information Services (IIS) console located in the Administrative Tools folder.
12. Expand the nodes to locate the Web Service Extensions node.
13. In the right-hand pane of the console, select the ASP.NET option and click the Allow button.
These additional setup tools provide the ability for separate administrators to perform their necessary part of the Exchange installation and simplify the Exchange deployment. For example, the group in charge of managing the schema will have the permissions required to run the ForestPrep tool to extend the schema. Domain administrators will have the permissions required to use the DomainPrep tool that modifies domains. Once these tasks are done, Exchange administrators can install and manage Exchange without having to be given permis-sions for the other preparation tasks.
If a single administrator or group runs the network and has all the appropriate permissions (or if there is only one domain in your forest), the installation of Exchange is simplified. If the account with which you install the first Exchange server belongs to the Schema Admins, Enterprise Admins, and Administrators groups for the local computer, you do not need to manually run ForestPrep or DomainPrep since you will run them during the normal Exchange setup process.
Preparing a Windows Active Directory Forest
In order to run the ForestPrep tool, you must belong to the Schema Admins and Enterprise Admins security groups. In addition, you must belong to the local Administrators group on the server on which Exchange will be installed. If you are not a member of these groups, the appropriate administrator will have to run the ForestPrep tool before you can install Exchange Server 2003.
When ForestPrep is run, it performs several tasks:
It extends the Active Directory schema with Exchange-related information. It creates the organization object in Active Directory.
If the forest contains no existing versions of Exchange Server, ForestPrep prompts you for
an Exchange organization name and then creates the organization object in the Active Directory. If the forest contains a previous version of Exchange Server 5.5, ForestPrep cre-ates the organization object in the Active Directory based on information in the Exchange Server 5.5 organization. The organization is at the top of the Exchange hierarchy. This case-sensitive field can be up to 64 characters in length. The organization name is associ-ated with every object in the Exchange directory, such as mailboxes, public folders, and dis-tribution lists. The organization name cannot be modified after installation.
It assigns the Exchange Full Administrator role to the account that you specify. This
account or group has the authority to install and manage Exchange 2003 Server on any computer throughout the forest. This account or group also can delegate additional Exchange Full Administrator permissions after the first server is installed.
Exercise 3.2 outlines the steps for running ForestPrep in a forest that does not have a previ-ous version of Exchange running. The process to prepare a forest and domain for Exchange Server 2003 coexistence with Exchange Server 5.5 is lengthier and will be discussed later in Chapter 11, “Coexisting with and Migrating from Exchange 5.5.”
E X E R C I S E 3 . 2
Running ForestPrep in a Forest with No Previous Versions of Exchange
1. Insert the Microsoft Exchange Server CD into the server’s CD-ROM drive. If your CD-ROM drive is set to automatically run CDs, this will automatically open the Welcome to Exchange Server 2003 Setup page, as shown below. If not, browse to the location of your CD-ROM and double-click the setup.exe file.
2. Click the Exchange Deployment Tools link.
3. On the Welcome to the Exchange Server Deployment Tools page shown below, click the Deploy The First Exchange 2003 Server link.
4. On the Deploy the First Exchange Server 2003 page, shown below, click the New Exchange 2003 Installation link.
5. Scroll down the Exchange Server Deployment Tools page, shown below, until you locate item 6, Run ForestPrep. Click the Run ForestPrep Now link.
You can also start the ForestPrep process from the command line by entering the command d:\setup\i386\setup.exe /forestprep where volume D repre-sents the correct location of the Exchange Server 2003 installation files.
6. When prompted, agree to the EULA, and then click Next to continue.
7. Enter your 25-digit CD key, and click Next to continue.
8. On the Component Selection dialog box, shown below, note that ForestPrep has been selected. Click Next to begin the forest preparation process.
9. On the Microsoft Exchange Server Administrator Account dialog box, type the name of the user who will be responsible for administering Exchange, and click Next. The account must be entered in the format of domain\account. This account is assigned the Exchange Full Administrator role and will have the permissions to install Exchange Server 2003 and to create other types of Exchange administrator accounts.
10. Next, ForestPrep begins to update the schema and may prompt you with a dialog to verify the update. If it does, click OK to go on.
11. Once the schema is updated (and this can take quite a long time, depending on the size of your forest), the Completion screen appears. Click Finish.
Preparing a Windows Active Directory Domain
Once you have prepared the Windows Active Directory forest using ForestPrep, you must also prepare each domain in the forest that will run Exchange Server 2003 using DomainPrep. In addition, you must run DomainPrep in the forest root domain and each domain that will con-tain Exchange Server 2003 mailbox-enabled objects or that has users or groups that will man-age Exchange Server 2003 computers.
To run DomainPrep, you must be a member of the Domain Admins group for that domain and the Administrators group on the local computer where you will be running DomainPrep. DomainPrep performs the following tasks:
Creates the Exchange Domain Servers global group Creates the Exchange Enterprise Servers local group
Adds the Exchange Domain Servers group to the Exchange Enterprise Servers group Creates the Exchange System Objects container, which is used for mail-enabled public
folders
Sets permissions for the Exchange Enterprise Servers group at the root of the domain, so
that the Recipient Update Service has the appropriate access to process recipient objects
Adds the local Exchange Domain Servers group to the Pre–Windows 2000 Compatible
Access group
Grants permissions for Exchange Server 2003 administrators and servers
Exercise 3.3 outlines the steps for running DomainPrep.
E X E R C I S E 3 . 3
Running DomainPrep
1. Insert the Microsoft Exchange Server CD into the server’s CD-ROM drive. If your CD-ROM drive is set to automatically run CDs, this will automatically open the Welcome to Exchange Server 2003 Setup page, as seen previously in Exercise 3.2. If not, browse to the location of your CD-ROM and double-click the setup.exe file.
2. Click the Exchange Deployment Tools link.
3. On the Welcome to the Exchange Server Deployment Tools page shown in the previous exercise, click the Deploy The First Exchange 2003 Server link.
4. On the Deploy the First Exchange Server 2003 page, click the New Exchange 2003 Instal-lation link.
5. Scroll down the Exchange Server Deployment Tools page until you locate item 7, Run DomainPrep. Click the Run DomainPrep Now link.
You can also start the DomainPrep process from the command line by entering the command d:\setup\i386\setup.exe /domainprep where volume D repre-sents the correct location of the Exchange Server 2003 installation files.
Other Pre-installation Steps
Prior to installing the Exchange Server software, you should consider these additional steps:
Verify that the Windows Server 2003 domain controllers and global catalog servers are
operational.
Close any messaging-aware applications.
Verify that Microsoft Clustering Service is installed and properly configured if you will be
installing Exchange in that environment.
Installing Exchange Server
This section explains several installation scenarios and component options and then walks you through an actual installation of the first server in an organization. So boot up your Windows Server 2003 computer, grab your Exchange Server 2003 CD, and get ready.
There are four basic contexts in which Exchange Server 2003 can be installed:
As the Exchange Server 2003 computer in an organization As a subsequent Exchange Server 2003 installation
As an upgrade from Exchange 2000 Server to Exchange Server 2003
As a coexistence with or migration from Exchange Server 5.5 to Exchange Server 2003
In addition to these four contexts, this section also covers installing Exchange on a cluster.
6. When prompted, agree to the EULA, and click Next to continue.
7. Enter your 25-digit CD key, and click Next to continue.
8. On the Component Selection dialog box note that DomainPrep has been selected. Click Next to begin the domain preparation process.
9. On the Completion screen, click Finish.
We will examine the installation and management of Exchange Server 2003 computers for coexistence with and migration from Exchange Server 5.5 in Chapter 11.
Installing the First Exchange Server
Installing the first Exchange Server 2003 in an organization is a fairly important task. If you have already run (or had someone else run) the ForestPrep and DomainPrep tools, then the Active Directory and Windows domains are all ready for the Exchange installation.
If you are a member of the Schema Admins, Enterprise Admins, and local Administrators groups, you can forgo running the ForestPrep tool; it is possible to update the schema during the setup of the initial Exchange Server. In addi-tion, if you are installing into a single domain environment, you can forgo run-ning the DomainPrep tool. Be warned, though: If you install Exchange without running the ForestPrep tool into a forest where no version of Exchange already exists, Setup creates an organization based on the name of the domain.
When installing the first Exchange server, you will be prompted to enter information on the following topics:
Name of the directory for installation The default directory location and name are
C:\Program Files\Exchsrvr, but this can be modified by the installer.
CD Key The Setup program will present you with a dialog box requesting the CD Key or Product ID (PID) number. The CD Key is a unique 25-digit number found on the back of the Exchange Server CD case.
Choosing Installation Components
You can initiate Exchange Server Setup by using either the graphical Welcome to Exchange Server 2003 Setup page that loads if auto-play is enabled or alternatively by executing the
setup.exe command, which is located on the Exchange Server CD in the \Setup\I386\
directory.
You can perform the installation from a network share if desired.
When Setup runs, it checks for a current installation of Exchange on that machine. If it finds one, it goes into maintenance mode and lets you add or remove components and reinstall or remove all components.
If Setup does not find a current installation, it prompts you for the specific components to install, as seen previously in the final screen shown in Exercise 3.2.
There are two main categories of components available under the main Microsoft Exchange entry:
Microsoft Exchange Messaging and Collaboration Services, which includes the basic
Exchange routing engine and optional subcomponents for the various available messaging connectors
Microsoft Exchange System Management Tools, which includes the System Manager
snap-in for managsnap-ing Exchange and a ssnap-ingle optional subcomponent—the Exchange 5.5 Admsnap-in- Admin-istrator tool for managing Exchange 5.5 servers
In addition, there are three installation types that you can choose using the drop-down menu (under the Action heading) to the left of the Microsoft Exchange component at the top of the component list:
Typical, which installs the Messaging and Collaboration Services and the System
Manage-ment Tools components but none of their subcomponents
Minimum, which installs only the Messaging and Collaboration Services component itself Custom, which you can use to select individually only the components you want
When you install Exchange Server 2003 into a forest where no version of Exchange already exists, Setup creates a default routing group, named First Routing Group, and a default administrative group, named First Administrative Group. If you want to create groups with more imaginative (or useful) names, run the ForestPrep and DomainPrep tools as normal. Then, perform an instal-lation of Exchange Server 2003, but select only the Microsoft Exchange System management Tools to be installed. Using this console, you can then create routing and administrative groups before you ever deploy your first actual Exchange server.
Performing an Installation
Exercise 3.4 provides the actual steps to install Microsoft Exchange Server 2003. This exercise assumes that you have already used both the ForestPrep and DomainPrep tools and that you are installing the first Exchange server in an organization.
Remember that Setup will run ForestPrep and DomainPrep for you if they have not already been performed and you have all of the required permissions on your user account.
Please review the system requirements needed by your lab computer to perform these exer-cises. Those requirements are found in the introduction of this book in the section “How to Use This Book.”
E X E R C I S E 3 . 4
Installing Microsoft Exchange 2000 Server
1. Insert the Microsoft Exchange Server CD into the server’s CD-ROM drive. If your CD-ROM drive is set to automatically run CDs, this will automatically open the Welcome to Exchange Server 2003 Setup page as seen previously in Exercise 3.2. If not, browse to the location of your CD-ROM and double-click the setup.exe file.
2. Click the Exchange Deployment Tools link.
3. On the Welcome to the Exchange Server Deployment Tools page, click the Deploy The First Exchange 2003 Server link.
4. On the Deploy the First Exchange Server 2003 page, click the New Exchange 2003 Instal-lation link.
5. Scroll down the Exchange Server Deployment Tools page until you locate item 8, Install Exchange Server 2003. Click the Run Setup Now link.
6. When prompted, agree to the EULA, and click Next to continue.
7. Enter your 25-digit CD key, and click Next to continue.
8. The Component Selection page lists the installation options, as well as the option to choose the directory into which Exchange Server will be installed. This latter option is accessed through the Change Path button. For this exercise, we will assume that the instal-lation directory is the default, C:\Program Files\Exchsrvr. The installation option we will use for this exercise is the Typical option, which includes the messaging components and management tools. If you would like to see the individual components that can be selected, choose the Custom option from the drop-down menu to the left of the first item in the list, Microsoft Exchange. You can then choose whether to install each individual option using that option’s drop-down menu. Once you’ve made all of your decisions, click Next to go on.
9. A Licensing screen appears, explaining the need for you to purchase Client Access Licenses before clients can access this Exchange server. Exchange Server 2003 supports only the per-seat licensing mode. Once you have read and agreed to this licensing, click the I Agree That I Have Read And Will Be Bound By The License Agreements For This Product option, and then click Next.
After the initial setup, you can add and remove individual components by run-ning the Setup program again using the same procedure as outlined above. You can also access the Setup program using the Windows Add or Remove Programs Control Panel applet.
Installing Subsequent Exchange Servers
There are many reasons to add additional Exchange servers to an organization. The primary reasons are performance, capacity and scaling, and fault tolerance. Each is briefly discussed below.
Performance An organization could place certain Exchange services on additional Exchange servers, dedicating those servers to those functions. Examples are as follows:
Public and/or private information stores These databases could be located on an addi-tional Exchange server dedicated to performing as a mailbox server or public folder server.
Connector software The same principle relates to running connector software on a dedi-cated Exchange server.
Capacity and scaling If the physical limits of a particular system are being approached, Exchange services and their related physical resources (e.g., disk space) can be spread out among multiple Exchange servers. This issue also relates to performance problems.
Fault tolerance through redundancy Many Exchange services and resources are replicated throughout an Exchange organization. This redundancy implements a built-in level of fault tol-erance. For example, all the Exchange servers within a site share the same directory information through replication. If one particular Exchange server is taken offline, its directory information is automatically updated by another Exchange server through the replication mechanism when it comes back online.
The actual process of adding a subsequent Exchange server to an existing organization is nearly identical to installing the first server. The only difference is when you have defined more than one administrative or routing group in your organization (as detailed in Chapter 8,
“Build-10. The Installation Summary dialog box appears, asking you to confirm your installation choices. You can use the Back button to change any settings you have made. When you are satisfied with your choices, click Next to install Exchange Server 2003.
11. The installation process can take some time. When it is done, a Congratulations screen appears, informing you that the installation is complete. Click the Finish button.
while using the Installation Wizard. The first lets you choose the administrative group you want the new server to be a part of. The second dialog box, shown in Figure 3.1, lets you choose a routing group within the chosen administrative group that the server should be a part of. If you have not configured more than one administrative or routing group, you will see neither of these screens, and the installation will be identical to installing the first server.
F I G U R E 3 . 1 Choosing a routing group for a subsequent installation
Upgrading from Exchange 2000 Server
Exchange Server 2003 supports upgrades only for servers that are running Exchange 2000 Server with Service Pack 3 or later installed. If you are currently running a previous version of Exchange Server, you can either upgrade it to Exchange 2000 Server with Service Pack 3 to support an upgrade to Exchange Server 2003 or upgrade it to Exchange 5.5 Server with Service Pack 3 for a co-existence/migration scenario, as discussed later in Chapter 11.
The process to upgrade an Exchange Server 2003 Service Pack 3 computer to Exchange Server 2003 is a fairly simple once you’ve met all of the prerequisites. You should ensure that you understand the following points before attempting to upgrade your Exchange 2000 Server:
The server must be running Windows 2000 Service Pack 3 or higher or Windows Server 2003. The Exchange 2000 Server installation must not have any of these components installed
(you must uninstall them before upgrading):
Microsoft Mobile Information Server components Exchange 2000 Conferencing Server
The Instant Messaging service The Exchange Chat service The Key Management service The cc:Mail connector The MS Mail connector
If you need to continue using any of these components and services, you will not be able to upgrade that server to Exchange Server 2003.
If you use a front-end/back-end Exchange server arrangement (discussed more in Chapter 4,
“Creating and Managing Exchange Clusters,” and Chapter 7, “Configuring Client Access”), you must upgrade all of your front-end servers before starting to upgrade any of your back-end servers.
You can upgrade only the same language version of Exchange. For example, you cannot use
the French language version of Exchange Server 2003 to upgrade a German language ver-sion of Exchange 2000 Server.
The Exchange 2000 Server organization must be operating in native mode.
For more information about Exchange 2000 Server to Exchange Server 2003 upgrade considerations, be sure to see Knowledge Base article 822942, located at http://support.microsoft.com/default.aspx?scid=kb;en-us;822942.
Once all of these requirements are in place, upgrading to Exchange 2000 Server is not too difficult.
Before undertaking an upgrade, you should always perform a complete backup of your current installation. If something goes drastically wrong with the upgrade, you can then go back to your previous installation.
Performing the Exchange 2000 Server Upgrade
Once you’ve met all of the requirements to upgrade your Exchange 2000 Server native mode servers to Exchange Server 2003, the actual upgrade process is very similar to that of installing a new Exchange Server 2003 computer.
The basic sequence of steps you must perform, as instructed by the Exchange Server Deploy-ment Tools Upgrade From Exchange 2000 Native Mode option, is as follows:
2. Run the DCDiag and NetDiag tools to gather diagnostics data on your domain controllers and network.
3. Run ForestPrep to extend the Active Directory schema for Exchange Server 2003.
4. Run DomainPrep to prepare the required domains for Exchange Server 2003.
5. Upgrade the Exchange 2000 Server computer by running the Exchange Setup application and selecting Upgrade on the Component Selection dialog box. The user account you are using must have Full Exchange Administrator permissions and must be a member of the local Administrators group on the server.
Installing Exchange Server 2003 on Clustered Servers
As stated earlier in this chapter, the Enterprise Edition of Exchange Server 2003 is designed to work with the Microsoft Clustering Service. Clustering groups servers logically into an interde-pendent system, called a cluster, for the purpose of fault tolerance. This cluster appears as a sin-gle server to clients and applications. In the event of a failure on one system, the Clustering Service moves the affected services to a functioning node in the cluster. Previously Exchange 5.5 supported only Active/Passive clustering, in which only one node of a cluster was active at a time, and Exchange 2000 Server supported only Active/Active clustering, in which all nodes function simultaneously. Exchange Server 2003 supports both Active/Active clustering with two nodes and Active/Passive clustering with between two and eight nodes. Server clusters allow you to enable resource groups that are not bound to a specific computer and can fail over to another node. Exchange considers each resource group as a separate instance of Exchange, called a virtual server.
Each resource group in a cluster running Exchange must share the following resources:
IP address Network name
A physical disk or disk system, such as RAID5 Exchange System Attendant service
Obviously, there is a lot more to clustering than a single chapter can go into. For more detailed information on Exchange clustering, see Chapter 4.
In order to run Exchange with the Microsoft Clustering Service, you must be running Win-dows Server 2003 Enterprise Edition, WinWin-dows Server 2003 Datacenter Edition, WinWin-dows 2000 Advanced Server, or Windows 2000 Datacenter Server. The number of nodes you can have in the Exchange Server 2003 cluster is limited by the operating system the server is running:
You are limited to two nodes when installing on Windows 2000 Advanced Server SP4. You are limited to four nodes when installing on Windows 2000 Datacenter Server SP4. You can have up to eight nodes when installing on Windows Server 2003 Enterprise
When installing Exchange Server 2003 into a cluster, it must be completely installed on one node before being installed on another node. In addition, you must install Exchange on each node using the same user account that you used to install the Clustering Service. You must also install Exchange on the same drive letter and directory on all nodes. Finally, you must install the same Exchange components on all nodes. We will examine the installation and management of Exchange clusters in more detail in Chapter 4.
Post-installation Considerations
This section discusses some of the results of the Exchange installation. During the installation of Exchange, the activities of setup.exe include creating Exchange services, creating an Exchange directory structure, copying files to that directory structure, creating share points to the directory structure, and adding keys and values to the Windows Registry. Knowing the results of these activities is helpful for the Exchange administrator, especially in troubleshooting situations (which will be discussed later in this chapter).
Exchange Services
After a successful installation of Exchange Server 2003, you can verify that the required services are installed. When you examine the Services console, you should see the following new Exchange services listed:
Microsoft Exchange Event Microsoft Exchange IMAP4
Microsoft Exchange Information Store Microsoft Exchange Management Microsoft Exchange MTA Stacks Microsoft Exchange POP3
Microsoft Exchange Routing Engine Microsoft Exchange Site Replication Service Microsoft Exchange System Attendant
Not all of the services listed will be configured for an automatic startup. For example, until you configure and start using POP3, it will remain in a disabled state. In addition, you may have other services installed depending on the type of installation you have performed.
Default Directory and File Structure for Exchange
The default root directory for Exchange is \Program Files\Exchsrvr. Setup creates subdi-rectories under that root directory and copies Exchange files to those subdisubdi-rectories. Table 3.2 is a listing of the default Exchange subdirectories under the root and the type of files in those subdirectories.
T A B L E 3 . 2 Default Exchange Directories and Their Contents
Folder Contents
ADDRESS This directory contains subdirectories with program files (DLLs) that can be used to generate foreign addresses for Exchange recipients. When an Exchange server uses a connector or gateway to create interoperability with a for-eign system, the System Attendant component automati-cally generates a foreign address for each Exchange recipient. This foreign address, also referred to as a proxy address or simply an e-mail address, is what the users of the foreign mail system see and where they send mail. The program files in the subdirectories can generate these proxy addresses. The complete installation downloads files for the following foreign mail systems: Lotus cc:Mail, Microsoft Mail, Novell GroupWise, Lotus Notes, Internet mail (SMTP), and X.400 mail.
BIN This directory contains many of the files that are the com-ponents and services of Microsoft Exchange Server.
CONNDATA This directory contains subdirectories that hold the files that are the Microsoft connectors. The complete installa-tion downloads files for the following connectors: the Microsoft GroupWise Connector, the Microsoft Schedule+ Free/Busy Connector, and the Lotus Notes Connector.
ExchangeServer_computername This directory is named using the NetBIOS name of the computer and holds miscellaneous files for global Exchange support.
exchweb This directory holds files for Outlook Web Access.
Computername.log This directory holds log files for message tracking.
Mailroot This directory holds working directories for message transfer.
Share Points and Permissions for Exchange Directories
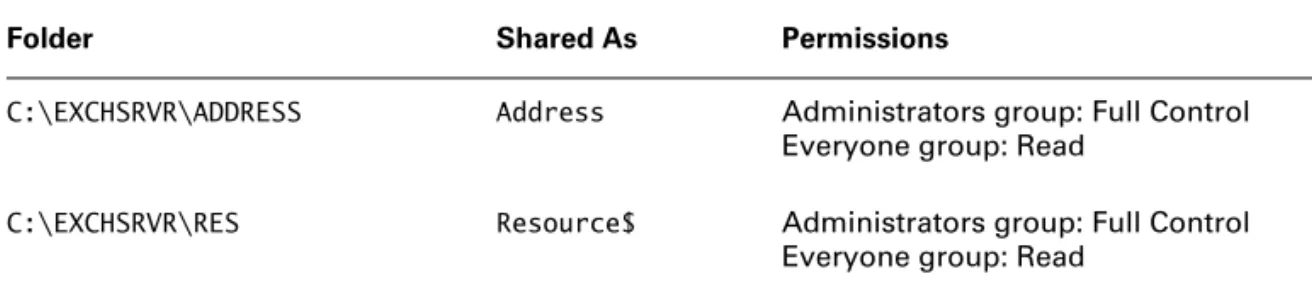
Table 3.3 lists the Exchange directories that are shared on the network, with the specified share names and permissions, assuming that Exchange was installed on the C: drive.
MDBDATA This directory is one of the most important on your server, because it contains the Information Store database. This database is composed of the following files: the Private Information Stores (EDB and STM), which are the server-based storage of mailboxes; the Public Information Stores (EDB and STM), which are the server-based storage of public folder data; and the database transaction log files (LOG), which are the files to which data is initially written in order to provide for faster performance and fault tolerance.
MTADATA This directory holds the files that make up and relate to the Message Transfer Agent (MTA).
OMA This directory holds files for Outlook Mobile Access.
RES This directory holds files that contain message strings used when Exchange logs events to the Windows Event Log.
SCHEMA This directory holds the XML files that support the Exchange extension of the Active Directory Schema.
SRSDATA This directory holds Site Replication Service–related data.
T A B L E 3 . 3 Microsoft Exchange Network Shares and Permissions
Folder Shared As Permissions
C:\EXCHSRVR\ADDRESS Address Administrators group: Full Control Everyone group: Read
C:\EXCHSRVR\RES Resource$ Administrators group: Full Control Everyone group: Read
C:\EXCHSRVR\ COMPUTERNAME.LOG COMPUTERNAME.LOG Administrators group: Full Control
T A B L E 3 . 2 Default Exchange Directories and Their Contents (continued)
Exchange Entries in the Windows Registry
During installation, Setup creates entries in the Windows Registry. Some of these entries are mentioned here.
Registry information about the presence of the Exchange application on a machine, as well as the directory location of the installation, is found in the following Registry location:
HKEY_LOCAL_MACHINE \SOFTWARE \Microsoft \Exchange \Setup
The following Registry location records the settings for the various Event Logs created by the different Exchange components:
HKEY_LOCAL_MACHINE \SYSTEM \CurrentControlSet \Services \EventLog \Application \<Exchange components>
The Exchange component settings are stored in the Registry at the following location:
\HKEY_LOCAL_MACHINE \SYSTEM
\CurrentControlSet \Services
\<Exchange component>
License settings for Exchange are stored in the following location:
\HKEY_LOCAL_MACHINE \SYSTEM \CurrentControlSet \Services \LicenseInfo \MSExchangeIS
Although these Registry locations are good to know, don’t expect to be tested on them during your exam.
Exchange System Manager
One powerful feature of Microsoft Exchange is the ability to centrally administer an entire Exchange organization. This is accomplished through a snap-in for the Microsoft Management Console named Exchange System Manager (see Figure 3.2). This snap-in can run on any Windows 2000, Windows XP Professional, or Windows Server 2003 computer on the Exchange network. From this single point, an administrator can administer all the Exchange servers in an organization. This is sometimes referred to as single-seat administration.
F I G U R E 3 . 2 The Exchange System Manager
The actual snap-in file for System Manager is Exchange System Manager.msc and is stored in the \EXCHSRVR\BIN directory. While the Exchange Setup program can install the snap-in on the Exchange Server machine, the administrator will probably also want the Exchange System Manager on their workstation. Installing the Exchange System Manager onto a computer also installs a new version of the Windows Backup utility and extensions to the Active Directory Users and Computers and Performance Monitor programs. These changes enable those pro-grams to work with Exchange Server 2003.
Deploying Exchange Server 2003 in a Large Organization
You are the lead network administrator for a large manufacturing corporation that has 45 geo-graphical locations within North America. In the past, your company has never had a real company-wide network that spanned all locations and linked all users and resources together. You have just completed the installation of a new Windows Server 2003 Active Directory net-work that provides one unified netnet-work to all users and all locations within your organization. Your network consists of a single Active Directory forest and five domains under the root domain named canada.manufacturing.com, mexico.manufacturing.com, west.manufactur-ing.com, central.manufacturwest.manufactur-ing.com, and east.manufacturing.com.
The root domain of manufacturing.com contains no user accounts or member servers. You have two assistant administrators for each of the five child domains that have Domain Admins permis-sions for their applicable child domain. Only your user account has the Enterprise Admins and Schema Admins permissions configured. As well, only your user account has the Domain Admins permissions for the root domain. You have local administrative access on the servers in the root domain, and your assistant administrators have local administrative access on all computers and servers in their child domain. Your office is located within the east.manufacturing.com child domain. To facilitate the process of installing Exchange Server 2003 on six Windows Server 2003 computers in each child domain, you have provided network shares in each child domain that contain the installation source files. As well, you have run the ForestPrep portion of the Exchange Setup pro-gram to extend the Active Directory Schema to support the installation of Exchange Server 2003. After ForestPrep has been run, your domain user account now has Exchange Full Administrator permissions. In order to allow your assistant administrators to perform the installation of Exchange Server 2003 in their respective domains, you will need to delegate the Full Adminis-trator permissions to their domain user accounts. Before you can perform this delegation, how-ever, you must install the first Exchange Server 2003 computer in one of the child domains. In order to perform this installation, you instruct one of the assistant network administrators in the east.manufacturing.com domain to run the DomainPrep command to prepare that domain for the installation of Exchange Server 2003. After DomainPrep has been run, you can install the first Exchange Server 2003 computer and delegate the Exchange Full Administrator permission to the rest of your assistant administrators. You may, however, want to consider installing the Exchange System Manager first to create and customize your Administrative Group and Rout-ing Group structure for the Exchange organization.
Once your assistant administrators have been delegated the Exchange Full Administrator per-mission, they may begin to install the 29 other Exchange Server 2003 computers using the instal-lation source files located on their local network shares. As you can see, the Exchange instalinstal-lation process can be quite lengthy and complicated in a large network environment; however, care-ful planning and execution can lead to first-time success.
Troubleshooting an Exchange
Installation
If any problems arise during an Exchange installation, there are several areas you may want to investigate first. Should you run into installation problems, you should begin your trouble-shooting efforts by checking the following:
Make sure that you have installed Internet Information Services (IIS) and the necessary protocol support. IIS is no longer automatically installed on a clean installation of Windows Server 2003. You will need to install IIS and the required services and components of IIS as discussed earlier in this chapter.
Make sure that you have installed Windows 2000 Service Pack 3. Installing Exchange Server 2003 on a Windows 2000 Server computer requires that Windows 2000 Service Pack 3 or later has been installed first. Without SP3 or later installed, the installation of Exchange Server 2003 will fail.
Determine that you have the appropriate permissions to install the software. In order to install Exchange Server 2003, you must have local Administrators permission on the server on which you want to install. In order to run the ForestPrep tool, you must be a member of the Enterprise Admins and Schema Admins groups and the local Administrators group on the computer on which you run the utility. In order to run DomainPrep, you must be a member of the Domain Admins group and the local Administrators group on the computer on which you run the utility.
Verify that you have properly prepared the forest and domain. In order to install Exchange Server 2003 in all but the simplest single-domain situation, the ForestPrep tool may need to be run once in the forest, and the DomainPrep tool may need to be run in each domain in which Exchange Server 2003 will be installed.
Make sure that you have established share permissions. Make sure the necessary Exchange directories are shared if other servers are having problems connecting to the Exchange server after installation.
Observe the Exchange Server boot process for alert messages and to ensure that all necessary services have been started. If there are any problems with the Exchange server boot process, alert messages can be sent to the console and/or written to the Windows Event Log. You may also want to check that all the necessary Exchange services have been started. This can be done by going to Administrative Tools and Services or to a command prompt and executing NET START. Some Exchange services are dependent on other Windows services being started. If the dependent service is not started, the Exchange service will not start.
Use the Setup Log to determine problems that the Exchange Setup program may have logged.
While Setup is running, it creates a log of what it is attempting. This log file, called Exchange Server Setup Progress.log, is stored in the root directory of the drive on which Exchange is installed. If you run into problems during installation, the log file can help you find out what
Summary
Although installing Microsoft Exchange Server is a straightforward process, there are still some important concepts for you to understand. One of the most important phases of an installation is pre-installation. Before starting the actual installation, you must make sure that the minimum requirements for Exchange are met. You must obtain the proper licenses to ensure compliance with legal issues. Because Exchange utilizes user accounts from Active Directory, Exchange Server 2003 is tightly integrated with Active Directory. Before Exchange can be installed, you will need to ensure that the required IIS services and components are installed and running. To avoid problems during the setup process, you should use the DCDiag and NetDiag tools to test your network’s connectivity. Finally, you must prepare the Active Directory forest by running ForestPrep (or by having someone with the appropriate permissions do so) and prepare each domain that will host Exchange Server 2003 by running DomainPrep.
Exchange installation happens in one of four contexts: as the first server in an organization, as a subsequent server, as an upgrade, or for a coexistence/migration. During the first or a sub-sequent installation, you will select the various components that make up an Exchange server. Upgrades can be performed from Exchange Server 2003 Service Pack 3 computers that are oper-ating in Exchange native mode. If Exchange Server 5.5 is being used in your organization, you will need to coexist with and/or migrate to Exchange Server 2003. There are three types of installation options:
Typical This option installs the Exchange Server software, the basic Messaging and Collabo-ration components, and the System Manager snap-in program. It does not include the addi-tional connectors.
Custom This option lets you choose exactly which components should be installed.
Minimum This option installs only the Exchange Server software and the basic Messaging and Collaboration components.
After an Exchange Server installation, you should know the directory structure that Setup has created. The default directory name for the installation is Program Files\Exchsrvr.Setup also creates network shares and modifies the Windows Registry.
Exam Essentials
Understand ForestPrep and DomainPrep. If you’re working in single-domain forest, you may likely never need to work with ForestPrep and DomainPrep. Even if this is case, you should not neglect to learn what these powerful setup tools do and what permissions are required to use them. Consider the example of a very large, geographically dispersed network where multiple administrators at various levels work together to manage and maintain the network—in this
situation ForestPrep and DomainPrep are invaluable tools that can assist in getting Exchange Server 2003 installed by splitting the installation tasks up according to domain group permis-sions that have been assigned.
Remember which groups interact with Exchange. Several different domain and local groups interact with Exchange before, during, and after the installation of Exchange is complete. You should keep in mind the basic functions and responsibilities of each of these groups.
Know the limitations on upgrading from Exchange 2000 Server. Recall that Exchange Server 2003 does not support the following Exchange 2000 Server services and components; thus they must be removed before upgrading an Exchange 2000 Server computer:
Microsoft Mobile Information Server components Exchange 2000 Conferencing Server
The Instant Messaging service The Exchange Chat service The Key Management service The cc:Mail connector The MS Mail connector
Remember the requirements to install Exchange Server 2003. Exchange Server 2003 can be installed on a Windows Server 2003 computer or a Windows 2000 Server Service Pack 3 or later computer. All domain controllers and global catalog servers that the Exchange Server 2003 computer will communicate with must be at least Windows 2000 Server SP3. The hardware requirements listed previously in Table 3.1 are minimums and will likely yield the minimum acceptable performance if used in a production environment.
Review Questions
1. One of your company’s locations contains an Exchange server with 25 users, each using Microsoft Outlook. You have purchased 25 Client Access Licenses. The company hires 10 new employees who will connect to the site remotely. Five of the new users will be using POP3 appli-cations, and five will be using HTTP applications. How many additional Client Access Licenses must you purchase?
A. 0 B. 2 C. 5 D. 6 E. 10 F. 12
2. You are the Exchange administrator for a large network. You do not have the appropriate per-missions to update the Active Directory Schema on your network, so you must get another administrator to do this before you can install Exchange Server 2003. To which of the following groups must that person belong in order to run the ForestPrep utility? (Choose all that apply.)
A. Server Admins
B. Domain Admins
C. Schema Admins
D. Enterprise Admins
3. You have two Exchange Server 2003 computers that provide all messaging access for your 250 network users. If all 250 of your users connect to the Exchange server using Office Outlook 2003 and Outlook Web Access, how many CALs do you need to have?
A. 1
B. 2
C. 250
4. Your company is running a messaging system that consists of four Exchange 2000 Servers run-ning on Windows 2000 Advanced Server. Which of the following steps must you take in order to upgrade all of your servers to Exchange Server 2003? (Choose all that apply.)
A. Upgrade all servers to Windows 2000 Server Service Pack 3.
B. Upgrade all servers to Exchange 2000 Server Service Pack 2.
C. Upgrade all servers to Windows 2000 Server Service Pack 2.
D. Install the Active Directory Connector on all servers.
E. Install Windows Server 2003 on all servers.
F. Upgrade all servers to Exchange 2000 Server Service Pack 3.
G. Place all Exchange 2000 Servers in Exchange native mode.
5. You have four computers on which you are considering installing Exchange Server 2003 as a testing environment. Which of the following systems would you have to upgrade before install-ing Exchange Server 2003? (Choose all that apply.)
A. Pentium 90 MHz, 256 MB RAM, 750 MB disk space
B. Pentium II 450 MHz, 256 MB RAM, 2500 MB disk space
C. Pentium III 933 MHz, 256 MB RAM, 1000 MB disk space
D. Pentium II 400, 512 MB RAM, 250 MB disk space
6. You have just finished an installation of Exchange Server 2003 and have restarted the computer. When the computer restarts, you get a message saying that several services were unable to start. You verify this fact using the Event Viewer and then determine that none of the Exchange services are running. Which file would you use to see the details of the Exchange installation?
A. Exchange Server Setup Progress.txt
B. Exchange Server Setup Progress.log
C. Exchange Server Setup Log.txt
D. Exchange Server Error.log
7. Your network consists of a single Active Directory forest with three domains: one root domain and two child domains. If Exchange Server is to be installed in only one of the two child domains and not at all in the root domain, how many times must you run the ForestPrep tool?
A. None
B. One time
C. Two times
8. You are configuring a custom Microsoft Management Console snap-in for an assistant admin-istrator who will be taking care of certain Exchange tasks for you. You would like to configure the System Manager snap-in so that the assistant can run it on their personal workstation instead of giving them access to the Exchange server. What file from the Exchange server would you need to install on the workstation?
A. \EXCHSRVR\BIN\Exchange System Manager.msc
B. \EXCHSRVR\BIN\System Manager.mmc
C. \EXCHSRVR\Exchange System Manager.msc
D. \EXCHSRVR\BIN\Exchadmin.msc
9. Your network consists of a single Active Directory forest with three domains: one root domain and two child domains. If Exchange Server is to be installed in only one of the two child domains and not at all in the root domain, how many times (minimum) must you run the DomainPrep tool?
A. None
B. One time
C. Two times
D. Three times
10. You are the network administrator for a large importing company. You are preparing to imple-ment a new Exchange Server 2003 organization for your corporate network. You would like to be able to organize your Exchange organization before installing the first actual Exchange Server 2003 computer. Which of the following steps are required to allow you to perform this task? (Choose all that apply.)
A. Run the ForestPrep tool.
B. Install the Exchange System Manager.
C. Run the DomainPrep tool in all domains.
D. Install the Windows Server 2003 support tools.
E. Run the DomainPrep tool in the root domain of the forest.
11. Your Windows Active Directory forest consists of a single domain tree. That tree consists of a single root-level domain and four child domains of that root domain. You are about to prepare the root-level domain for an Exchange Server 2003 installation. Which of the following com-mands would you use?
A. forestprep.exe
B. forestprep.exe /setup
C. setup.exe /domainprep
12. Which of the following features are included in a Typical setup of Exchange Server 2003? (Choose all that apply.)
A. Exchange System Manager
B. The Novell GroupWise connector
C. The core Messaging and Collaboration Services files
D. The Exchange 5.5 Administrator
13. You are preparing to install Exchange Server 2003 on a computer running Windows 2000 Server Service Pack 4. Which of the following components of Internet Information Services should you make sure are installed prior to installing Exchange Server 2003? (Choose all that apply.)
A. SMTP
B. WWW
C. FTP
D. NNTP
14. You are planning to create a Windows 2000 cluster on which to install Exchange Server 2003. Which of the following is a requirement for Exchange Server 2003 to work with the Microsoft Clustering Service? (Choose all that apply.)
A. The purchase of a 1,000-user license
B. Microsoft Windows 2000 Advanced Server or Datacenter Server
C. The purchase of the optional Windows 2000 Clustering Server
D. The Enterprise Edition of Exchange Server 2003
15. You are preparing to upgrade an Exchange 2000 Server computer to Exchange Server 2003. Which of the following conditions must be met before this upgrade can take place? (Choose all that apply.)
A. The server must be running Windows Server 2003.
B. The Exchange Key Management service must be removed.
C. The Exchange Chat service must be removed.
D. The SMTP Service must be removed.
16. What is different about installing the second and subsequent Exchange Server 2003 computers into an existing Exchange organization as compared to the installation of the first Exchange Server 2003 computer? (Choose all that apply.)
A. You will not be asked for your 25-digit CD key.
B. You will be able to select the administrative group that the server should be a part of.
C. You will be able to select the routing group that the server should be a part of.
17. Your Windows Active Directory forest consists of a single domain tree. That tree consists of a single root-level domain and 14 child domains of that root domain. You are about to prepare the forest itself for an Exchange Server 2003 installation. Which of the following commands would you use?
A. setup.exe /forest
B. forestprep.exe /setup
C. forestprep.exe
D. setup.exe /forestprep
18. You have been directed to create an Active/Passive cluster of four Exchange Server 2003 com-puters. Which operating systems will you be able to use on the servers to perform this task? (Choose all that apply.)
A. Windows Server 2003
B. Windows 2000 Advanced Server
C. Windows Server 2003 Enterprise Edition
D. Windows 2000 Datacenter Server
19. Exchange Server 2003 supports which of the following types of clustering? (Choose all that apply.)
A. Active/Active
B. Active/Passive
C. Passive/Passive
D. Unified
20. With which of the following resources must each resource group in a cluster running Exchange Server 2003 be configured? (Choose all that apply.)
A. IP address
B. A physical disk drive
C. Exchange System Attendant Service
D. Exchange Message Transfer Agent Service
Answers to Review Questions
1. E. Every user who connects to the Exchange server will need a Client Access License, no matter what client software is used to connect.
2. C, D. In order to run the DomainPrep utility, a user must belong to both the Schema Admins and Enterprise Admins global groups. The user must also belong to the local Administrators group on the computer on which the utility is actually run.
3. C. Exchange Server 2003 is licensed in the per-seat mode, meaning that each client that accesses the server must have a valid CAL. Since you have a total of 250 clients, you need to have 250 CALs for your organization, even if the clients access the Exchange server in more than one way, such as Outlook or Outlook Web Access.
4. A, F, G. In order to upgrade Exchange 2000 Server computers to Exchange Server 2003 comput-ers, the Exchange organization must be operating in Exchange native mode. In addition, all Win-dows 2000 Server installations and Exchange 2000 Server installations must be updated with Windows 2000 Service Pack 2 and Exchange 2000 Server Service Pack 3, respectively. There is no need to upgrade to or install Windows Server 2003 on the computers for the upgrade as long as all domain controllers and global catalog servers are running Windows 2000 Server SP3 at the minimum. The Active Directory Connector is used for coexistence with and migration from Exchange Server 5.5.
5. A, D. Exchange Server requires a minimum of a Pentium 133 MHz processor, 256 MB RAM, and 500 MB of disk space available on the Exchange drive (with 200 MB available on the system drive).
6. B. While Setup is running, it creates a log of what it is attempting. This log file, called Exchange Server Setup Progress.log, is stored in the root directory of the drive on which Exchange is installed.
7. B. You must run the ForestPrep tool one time, and one time only, for each Active Directory for-est that will have Exchange Server 2003 installed into it.
8. A. The actual snap-in file for System Manager is Exchange System Manager.msc and is stored in the \EXCHSRVR\BIN directory.
9. C. Once the Windows Active Directory forest is prepared using ForestPrep, each domain in the forest that will run Exchange Server 2003 must also be prepared using DomainPrep. In addition, the forest root domain and each domain that will contain Exchange Server 2003 mailbox-enabled objects or that has users or groups that will manage Exchange Server 2003 computers must have DomainPrep run in it.
10. A, B, E. By running the ForestPrep and DomainPrep tools on the root domain, you can install the Exchange System Manager and create administrative groups and routing groups before the first Exchange Server 2003 computer is ever installed. This allows you to create the organization ahead of time and then simply install your Exchange servers and place them as desired, saving time and headache later.