User Guide
Description of “security pack” installation for IS OTE
in WINDOWS
Version: I 28.11.2008 Instalace_sec_pack_Eng.doc Page 2 / 30
1 Checking for the Correct Version of Internet Explorer... 3
2 Connecting the Device... 3
3 Installing the SW... 3
3.1 GEMSAFE Card Reader... 3
3.2 USB token iKey 2032 – CIP Utilities v6.1 ... 7
4 Automatic Certificate Registration... 9
4.1 Card Reader ... 9
4.2 USB token iKey 2032 ... 9
5 Importing and Registering OTECA in the Windows Certificate Store ... 9
6 Attachment 1 – Setting Up Internet Explorer for Access to OTE ... 13
7 Attachment 2 – SUN Java installation and configuration... 19
7.1 How to uninstall MS Java application... 19
7.2 Verification and configuration of workstation on Sun Java ... 20
7.3 Sun Java Installation instructions ... 21
7.4 Internet browser settings ... 24
7.5 Sun Java settings... 25
7.6 Installation of certificate and others security settings ... 27
7.7 Setup of rights... 28
8 Attachment 3 – Registration of file extensions for import/export of data in the OTE application ... 29
1
Checking for the Correct Version of Internet Explorer
For correct security activity in IS OTE, MS Internet security v IS OTE MS Internet Explorer version 6.0 with applied security patches (SP2) and the service packs issued by Microsoft with “High Encryption” must be used or MS Internet Explorer version 7.0
Verification: Run IE / Help / About Internet Explorer – Cipher Strength 128-bit is necessary.
2 Connecting the Device
We connect the reader prior to the installation of the corresponding SW, whereas the USB token must be connected after installation!
Prior to connecting the card reader to the serial port the computer must be turned off, to prevent damage to the card reader!
3 Installing the SW
To enable installation the user must have local administrator rights.
3.1
GEMSAFE Card Reader
Run the GemSAFE 3.2.2 installation application by running the setup.exe file from GEMSAFE installation directory and perform the installation following the directions in the installation program. The installation is demonstrated in the following figures.
Version: I 28.11.2008 Instalace_sec_pack_Eng.doc Page 6 / 30
Before restarting the computer make sure that the Windows installation contains the VB6FR.DLL library in the directory %SystemRoot%\system32. If it does not, it needs to be copied to this location (it is included in the installation pack).
Version: I 28.11.2008 Instalace_sec_pack_Eng.doc Page 8 / 30
Follow with CIP Utilities v6.1 (SafeNet BorderLess Security PK Klient) installation.
4 Automatic Certificate Registration
4.1
Card Reader
CertReg runs when the computer is started up and ensure registration of a certificate when it is inserted/removed into/from the card reader.
It’s activity is demonstrated in the system list with an icon of a card reader.
4.2
USB token iKey 2032
The CIP Utilities installation contains the win32 service which runs when a computer has been started and which detects the insertion of a token. This ensures the automatic import/removal of certificates located on tokens.
5 Importing and Registering OTECA in the Windows Certificate Store
It is also necessary to import the root certificate for work with IS OTE(OTECA) NEW_OTECA.cer which is included in the installation pack into Windows 2000/Windows XP.
Version: I 28.11.2008 Instalace_sec_pack_Eng.doc Page 10 / 30
or by clicking on the button showing information about the certificate in the dialogue box:
Here you can keep the automatic selection, because the system will recognise the fact that the concerned are certificate authorities.
If this dialogue box appears, the certificate has been successfully imported:
WARNING: Registration of all imported certificates relates to the WINDOWS 2000/Windows XP user account which is logged on.
When first logging on to IS OTE when the above imported certificates are displayed check the “Always trust this certificate” check box so that the user is not asked this question repeatedly.
Verifying the installation and setting up the Microsoft Internet Explorer SP2 browser
for the OTE application
The instructions below ensure the correct cooperation between the browser and the OTE application of the portal server.
Important:
The MS IE6 browser and 7 are cable of communicating with the OTE Web server using the https protocol only at the level of High Encryption 128bit.
Verification:
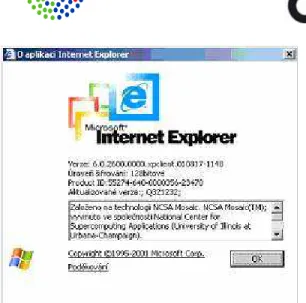
In the top menu in the Microsoft Internet Explorer window click on Help
and select About Internet Explorer. The About Internet Explorer window must show the following:
Version: 6.0..or 7.0.
Cipher Strength: 128-bit ... Update Versions; SP2 (IE6.0)
Version: I 28.11.2008 Instalace_sec_pack_Eng.doc Page 14 / 30 In the window... -Microsoft Internet Explorer
click on the top Tools menu and select Internet Options…
*In the Internet Options window before establishing a connection to the OTE server for the first time
Chose
Tab on the tab’s card perform the following actions
--- --- --- General Temporary Internet Files click on the Delete Files
button... and in the Delete Files window chose
and click OK
click on the Settings button..., in theSettings window select [x] Every visit to the page
and click OK clicking on the
Accessibility button..., in the lower
corner of the
Internet Options window
in the Accessibility window keep all options turned off and click OK
Version: I 28.11.2008 Instalace_sec_pack_Eng.doc Page 16 / 30
Chose
Tab on the tab’s card perform the following actions
--- --- --- Security Select content zone highlight Internet
Security level for this zone should be set up based on
Content Certificates click on Certificates...,
Choose Trusted Root
Certification Authorities and
Version: I 28.11.2008 Instalace_sec_pack_Eng.doc Page 18 / 30
Issued to Issued By
OTECA OTECA
Connection Local network settings click on
Local network settings...,
in the Local network settings tab (LAN)
select the options based on the local security policy
• If it is necessary to use both of Java applications (MS and Sun), than you have to switch between them. It is not possible to switch on both at the same time. Only one of them can be used.
• If is necessary to uninstall MS Java application (Microsoft VM) from the clients station than do the following steps, chapter 7.1. The uninstallation of Microsoft VM
can be done only by administrator!
7.1
How to uninstall MS Java application
The uninstallation of Microcost VM application (MS Java) from clients station does just the administrator. Do the following steps:
1. First it is necessary to deactivate Microsoft VM in the IE settings - Settings – Internet Settings – Advanced. There you can find Microsoft VM item. Deactivate all its nested items.
Version: I 28.11.2008 Instalace_sec_pack_Eng.doc Page 20 / 30
2. Download following files from OTE web page http://www.ote-cr.cz/the-participants/a/files-installation-procedure-sun-java/ – MS_JAVA_Uninstall.bat a MS
JAVA_Uninstall_2.bat. Store those files in the root directory on your HD, e.g. c:\ drive
3. Run MS_JAVA_Uninstall.bat file from a root directory (c drive) 4. Microsoft_VM_uninstall will be open. Please click on„Yes“ button.
5. If needed restart your workstation in order to complete the removal of Microsoft VM. 6. After restart of the workstation run MS_JAVA_Uninstall_2.bat file.
7. The Microsoft VM (MS Java) is removed from your workstation now. If this procedure has not completed successfully please follow instructions, which can be found in appendix A (just in case that automated uninstall failed and Microsoft VM is still on your workstation).
7.2
Verification and configuration of workstation on Sun Java
In order to verify existence of SUN Java on your workstation do following. Open Control Panel window (main menu„Start -> Control Panel). Click on Java icon in order to open “Java Control Panel”. Click on the About button. About Java window shows a current Java version. If you will not find Java icon in the ControlPanel window then Java has not been installed on your workstation yet.
Important: If you have Sun Java on your computer, i tis necessary to do following steps:
1. Do you have version J2SE(TM) Runtime Environment 5.0 Update 6 (version 1.5.0_06)? If yes, it is not necessary to download and install this program. Continue with configuration of IE, chapter 7.4.
2. Do you have higher version of Sun Java than in the point 1? If yes, it is not necessary to download and install this program. Continue with configuration of IE, chapter 7.4
with downloading and installing Sun Java, chapter 7.2.
It is always necessary to install correct certificate for the right functioning of the application WEBSIOM, chapter 7.6.
7.3
Sun Java Installation instructions
Because of switching from MS Java to Sun Java some applications which need MS Java can work improperly. If there is situation both of Java applications are needed it is necessary to solve this with administrator. The following steps don’t solve problems of using both Java applications together. If you want to uninstall Microsoft VM application (MS Java) from the clients station and to use just Sun Java application, uninstall Microsoft VM before you begin with installation of Sun Java. Uninstallation of Microsoft VM describes chapter 7.1
Description of installation of Sun Java follows.
First it is necessary to download Java Sun installation package:
1. Open Internet Explorer a use the address to open the website: https://cds.sun.com/is-
bin/INTERSHOP.enfinity/WFS/CDS-CDS_Developer-Site/en_US/- /USD/ViewProductDetail-Start?ProductRef=jre-1.5.0_06-oth-JPR@CDS-CDS_Developer.
2. If the security window s in the picture appears, it’s necessary to click on the “Yes” button:
3. After this the website J2SE(TM) Runtime Environment 5.0 Update 6 opens.
4. On this site it’s necessary to choose Platform - Windows, set up Language on
Multi-language, choose I agree… and click on the Continue button.
5. The new website Download J2SE(TM) Runtime Environment 5.0 Update 6 for
Windows, Multi-language is shown (If the security window appears again, click on the
Yes button).
6. On this website it’s necessary to choose Windows Offline Installation in the part called
Version: I 28.11.2008 Instalace_sec_pack_Eng.doc Page 22 / 30
MB).
7. After clicking on the shortcut the window for downloading the install file is shown. It’s necessary to click on the “Run” button:
8. In the dialog window you can see the downloading process:
Installation of Sun Java:
9. After downloading the Java installation file the window for installation is shown. It’s necessary to click on the “Run” button:
10. After a while the installation begins automatically and a License agreement window is shown. It’s necessary to choose “Typical setup…” and than click on the “Accept” button
11. Than the installation process window appears. For finishing the process it’s necessary to click on the „Finish“ button
12.When the installation is finished the requirement of restarting the system can appears. If yes, click on the „Yes“ button to restart the computer.
13.The installation is typically done into the system drive (usually C:\, in the next text is termed like system_drive) into directory Program Files\Java\jre1.5.0_06 (in the next text just Java_dir).
Version: I 28.11.2008 Instalace_sec_pack_Eng.doc Page 24 / 30
7.4
Internet browser settings
After restarting machine and logging into the system run Internet Explorer browser and do the following steps:
• Through menu „Tools“ choose „Internet options“. The following window appears
• Nested item „Use Java 2 v 1.5.0_06 for <applet> (requires restart)“ has to be chosen, it not, choose it. If „Microsoft VM“ items are chosen, unclick all of them. After that use the „Use“ button and than click on the „OK“ button
• Close all windows of the Internet Explorer application.
7.5
Sun Java settings
For the right working of Sun Java application it is necessary to change some settings of this environment. Do following steps:
• Open Java Control Panel through menu „Start -> Control Panel -> Java“ and switch to the
Version: I 28.11.2008 Instalace_sec_pack_Eng.doc Page 26 / 30
• Open the Debugging group and make sure, that none of the items of this group is chosen. If yes, deactivate it.
• Open the Java console group and check, that the Hide console is chosen. If not, choose it.
• Open the Security group and check, that all of items are chosen except one: Use TLS 1.0. This one must be deactivated.
7.6
Installation of certificate and others security settings
For the right functioning of the new applets the certificate OTECA installation is needed. You can download it from the OTE website. This certificate must be stored in the directory of trustable authority of the Java Runtime Environment, which you have installed in chapter. Do the following steps:
Version: I 28.11.2008 Instalace_sec_pack_Eng.doc Page 28 / 30
logicacmg/installation-procedure-logicacmg/?set_language=en) download the OTECA certificate - „The OTECA authority certificate (DER format)“ and save it into the root directory on system drive (usually c:\) - After clicking on the certificate the window for saving appears. Click on the „Save“ button and save the certificate into the root directory of the system drive.
2. Download following file from OTE web page http://www.ote-cr.cz/the-participants/a/files-installation-procedure-sun-java/– Certificate_Import.bat. Store the file in the root directory on your HD, e.g. c:\ drive
3. Run Certificate_Import.bat file from a root directory (c:\ drive). The certificate is successfully installed on your workstation now.
4. If this procedure has not completed successfully please follow instructions, which can be found in appendix B (just in case that automated install failed ).
7.7
Setup of rights
1. Download following file from OTE web page http://www.ote-cr.cz/the-participants/a/files-installation-procedure-sun-java/– .java.policy.
2. Store the file in the following directory:
„C:\Documents and Settings\user_name“, where „user_name“ means folder of a current user (the user who is going to use IS OTE system).
The Internet Explorer is ready for the first launch of WEBSIOM applications with SUN Java applets (1.5.0_06) .
8
Attachment 3 – Registration of file extensions for import/export of data in the OTE applicationExtension registration for import/export of data offers and bilateral agreements
W2kpro Settings for OTE:
---
In the system it is necessary to relate 'NAB' a 'DVS' file extensions with the file type 'Application Data Control', and for the 'open' action to specify that the program to be used is C:\WINNT\NOTEPAD.EXE.
* On the desk top double-click My Computer
* In the My Computer window in the menu select Tools \ Folder Options...
Extension NAB
* In the Folder Options window select the File Type tab and under the list
Registered File Types: Click New
* In the Create New Extension window add Extension: NAB and click on
Advanced
* In the Create New Extension window select Associated File Types: Application Data
Control and click OK
* In the Folder Options click on the File Type tab and select Registered File Types: row
File Extension
--- --- NAB Application Data Control
and in the text 'NAB' file extension details click Advanced
* In the Edit Tile Type window keep the Application Data Control in the window and click on New
* In the New Action window add:
Action: OPEN
Application used to perform actions: [C:\WINNT\]NOTEPAD.EXE
and click on OK * In the Edit file type
- make sure that the top shows the NOTEPAD.EXE icon on the left of the window showing
Application File Control and that the Action: list includes an OPEN row
- make sure that when the OPEN action in the Action: list is selected and the
Edit... button in the Application used to perform actions: area includes the following text [C:\WINNT\]NOTEPAD.EXE
- select the option
[x] Confirm after download
and click OK
Extension DVS
* In the Folder Options window select the File Type tab and under the list
Registered File Types: Click New
* In the Create New Extension window add Extension: DVS and click on
Advanced
Version: I 28.11.2008 Instalace_sec_pack_Eng.doc Page 30 / 30
* In the Folder Options click on the File Type tab and select Registered File Types: row
File Extension
--- --- DVS Application Data Control
and in the text 'DVS' file extension details click Advanced
* In the Edit Tile Type window keep the Application Data Control in the window and click on New
* In the New Action window add:
Action: OPEN
Application used to perform actions: [C:\WINNT\]NOTEPAD.EXE
and click on OK * In the Edit file type
- make sure that the top shows the NOTEPAD.EXE icon on the left of the window showing
Application File Control and that the Action: list includes an OPEN row
- make sure that when the OPEN action in the Action: list is selected and the
Edit... button in the Application used to perform actions: area includes the following text [C:\WINNT\]NOTEPAD.EXE
- select the option
[x] Confirm after download