Information Technology Group Computer Software & Systems U.S Coast Guard Auxiliary
WOW II Platform: Creating Email Response Forms
Email Response Forms – Version 1.2
Note: This material is targeted at WOW webmasters with substantial HTML experience, particularly with forms.
One of the most requested features by advanced WOW users is an “email response form.” This is page on your WOW site where visitors can answer a questionnaire or input information, and, with the push of a button, can email the contents of the form to someone in your unit.
WOW now has the capability to accomplish this. Version 1.2 of WOW Email Response Forms allows you to create a form in HTML on any WOW page, and by providing the right “hidden” fields, will email the contents of the form to you. This version has absolutely no error checking of user input: what the user enters, for better or worse, gets emailed to you. In addition, you are expected to have a thorough understanding of HTML forms. Even though the Announcement editor has been enhanced to simplify forms entry without resorting to HTML, you still must be familiar with what is happening “under the hood” with HTML forms to make a usable form. The new capability allows you to send your form to multiple email addresses, and using WOW’s “hidden pages” (see Application Note: WOW II Pushbutton Website Platform: Using Hidden Pages, July 17, 2012), you can create custom confirmation pages. All this is explained below.
Version 1.2 adds a poor man’s “CAPTCHA” – anti-SPAM capability.
Getting Started
The WOW version 1.2 forms process can be summarized as follows:
1. Create a new CUSTOM page in the left menu, give it a descriptive, short name like “OWT Training Report”, and a descriptive page title that will serve as the title of your form.
2. Create an optional announcement that will represent all the boilerplate above your actual form (explanation of form, how to complete, etc.) and caption it “Form Introduction”, or some such.
3. Create an empty announcement that will be your actual form, and caption it “Email Response Form” (for ease of identification). To gain access to form editing tools in the Announcement Editor, check the new “Form” checkbox adjacent to the “ADD NEW ANNOUNCEMENT” button.
4. Create an optional empty announcement that will contain any boilerplate after your form, such as what to expect by way of response, etc. Note that this latter content, and that in step 2, are entirely optional.
5. Edit your empty form announcement (from Step 3): use the form tools that appear in the editor, or enter the HTML mode, and type in your form elements, or copy the HTML from an existing form – see
Form Structure for WOW
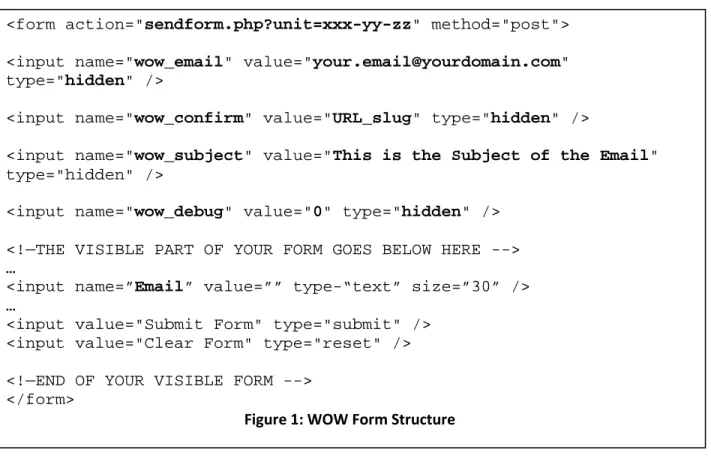
A WOW Form is simply an HTML form with a specific “action” that sends the posted data to a specific routine in WOW, and which contains several “hidden” input fields that tell WOW how to process the data. Here is the structure, in HTML:
As a starting point, you may actually copy the above text into a pure text editor, and then from the text editor into the WOW announcement editor (in the HTML mode), as a starting point. Be sure that you have designated this announcement as a “form” when you created it.
The following are the minimum required tags for a WOW form, as shown in the above example:
1. Form Tag – the “action” attribute of the <form> tag must be “sendform.php?unit=xxx-yy-zz”, where “xxx-yy-zz” is your canonical unit number (e.g., 114, 114-12, or 114-12-04 for districts, divisions, and flotillas, or “V-DEPT” for departments, and “IT-GROUP” for groups [ANACO directorates]). Also, the method must be “post”.
The following form tag will submit a form for the flotilla 085-33-17’s WOW site:
<form action=”sendform.php?unit=085-33-17” method=”post”>
Note that the final statement in the form is the closing </form> tag.
You may program these tags in directly in the HTML mode, or use the “Form” icon in the third row of the editor toolbar, in the normal mode. HINT: hover your mouse over each icon to see what it does. If you
<form action="sendform.php?unit=xxx-yy-zz" method="post"> <input name="wow_email" value="[email protected]" type="hidden" />
<input name="wow_confirm" value="URL_slug" type="hidden" />
<input name="wow_subject" value="This is the Subject of the Email" type="hidden" />
<input name="wow_debug" value="0" type="hidden" /> <!—THE VISIBLE PART OF YOUR FORM GOES BELOW HERE --> …
<input name=”Email” value=”” type-“text” size=”30” /> …
<input value="Submit Form" type="submit" /> <input value="Clear Form" type="reset" /> <!—END OF YOUR VISIBLE FORM -->
</form>
use the Form icon, a dotted red box appears in your content, and represents the boundaries of the form. Everything described below must fall inside this boundary.
2. Hidden Input Variables (required)
You may program hidden variables directly in HTML, or use the “Hidden” icon in the Normal mode, and set the name and value properties to match those shown below.
a. wow_email - The “value” attribute of this hidden variable is a list of email addresses that the completed form should be sent to, separated by commas, as follows:
<input name="wow_email" value="[email protected]" type="hidden" /> <input name="wow_email" value="[email protected],[email protected]" type="hidden" /> The first example will cause the form to be emailed to [email protected], while the second will send the form to both [email protected] and [email protected]. Additional email addresses are permitted.
BEST PRACTICE: Email your form to a generic email address such as [email protected], and then forward it from there to one or more actual member email addresses.
b. wow_confirm (optional) - The value attribute of this hidden variable is the URL slug of the form’s
confirmation page (if any) on your WOW site. You can find the slug by navigating to your confirmation page, and copying the slug out of the URL showing in your web browser. For example, let’s say that the URL of your confirmation page is as follows:
http://wow.uscgaux.info?content.php?unit=114-12-04&category=form-test The slug is the text after “category=”, in this case “form-test” (shown in bold, above).
TIP: create the confirmation page first and don’t hide it. That way you will have the correct slug and
you can actually see the page to navigate to it (to get the slug). Then hide it.
c. wow_subject – The value attribute of this hidden variable contains the “subject” of the email that gets sent.
d. wow_debug (optional) – For debugging your form, include this hidden field and change the value attribute to “1”. WOW will give you a debug screen that shows the variables your form is posting, sends the email, but suppresses the redirect to the confirmation page. In this way, you can be editing your form’s HTML in one browser window, and testing it in another, and seeing immediately the results of changes to the input fields (tags). After debugging is done, leave the tag in place but switch the value attribute to zero.
3. Visible Input Variables
a. Submit button (required) – The <input type=”submit value=”Submit” /> tag gives you
the required “Submit” button. You should set the field’s value to “Submit” or “Submit This Form”, or some such. In the Normal mode, use the “Submit Button” icon.
b. Reset button (optional) – The <input value="Clear Form” type="reset" /> tag gives
your users a convenient way to clear the form with one button click and start over. In the Normal mode, use the “Reset Button” icon.
The balance of your HTML will contain the input tags required to implement the form that the user sees. You may name the fields anything you wish. However, the name “Email” (case sensitive) is reserved for the optional field where you collect the user’s email address. If you specifically name that field “Email”, then WOW will send a CC of the form to the user who completed it (assuming a valid address).
Completing Your Form
The form email generator creates an email from the names of the form input fields plus the answers that the user supplies. For example, if you request the user’s name with the following <input> tag:
<input type=”text” name=”fm_user_name” size=”30” />
and the user enters his name “Dobie Gillis”, then the email that gets send will include the following line:
fm user name: Dobie Gillis
The name of the input tag is used as the label in the email (with underscores replaced with spaces). A better implementation would be:
<input type=”text” name=”Full_Name” size=”30” />
and the user enters his name “Dobie Gillis, Esq.”, then the email that gets sent will include the following line:
Full Name: Dobie Gillis, Esq .
Bottom line: name your input fields to be sensible labels in your email submission.
Providing a Confirmation Page
Internet users expect a confirmation page after submitting a form, and you can easily provide one by creating a
hidden page in WOW, according to available documentation. The Page Title of your page should be something like “Form Confirmation” or “Your Form Has Been Sent”. You should then use the content area of the page to provide a reassuring message to the submitter, such as “Your form has been sent to our blah..blah..blah. You can expect a reply soon.”
You might also use the confirmation page to provide “For further information” links to other relevant information (in the scope of the form that was just submitted) both on you WOW site, and elsewhere.
Starting With an Existing Form
Departments or units converting to WOW from conventional sites may have been using forms already. In this case, you can steal the old form and plug it directly into WOW. Here are the steps:
1. Find the HTML source code for your original form. Copy everything between and including the <form …> and </form> tags into a raw text editor (unless you are already using such to view the source), and then re-copy the code from the text editor into your WOW form announcement, in the HTML mode.
2. In WOW, edit the <form> tag itself to add the “sendform.php…” action described above, and method=”post”, if missing.
3. Add in the required hidden fields, from above, and test.
TIP: Completely remove all style information from the HTML. For example, if you see any of the following:
<div class=”whatever”>Some Text</div> <span class=”something”>Some Text</span>
<font ..anything…>Some Text</font>
then (a) remove “class=’whatever’” from the <div> tag; (b) remove the <span>…</span> tags completely and (c) remove the <font…>…</font> tags completely. After you get your form working perfectly, then go back in and use the features of the WOW editor to style your form to match the rest of your WOW site.
TIP: If your form is still online somewhere, you can navigate to the form, and tell your browser to “View Source” (or equivalent). You can then select and copy everything between and including the <form …> and </form> tags into a raw text editor, and then proceed as above with step #1. Under no circumstances transfer any of the HTML from outside the form. For that (for example, to get a prologue or postscript to the form) instead copy the rendered text from a regular browser window (not “View Source”), “cleanse” it of HTML by pasting it into a text editor, and then copy and paste it from the text editor into separate announcements on your form page (see “Getting Started, steps #2 and #4).
Announcement Editor Enhancements
The “Cute Editor” (announcement editor) has been enhanced to include a comprehensive set of form-building tools, including every type of input field, as well as a complete set of table editing tools. These tools appear in the third row of Cute Editor icons if (and only if) you checked the “Form” box prior to creating the announcement with “ADD NEW ANNOUNCEMENT”. See Figure 1.
In Figure 2, the additional editing tools are shown. From the left (third row) they are: Insert Form, Text Area, Text Field, Password Field, List Box, Dropdown Text Box, Radio Button, Checkbox, Submit Button, Reset Button, Plain Button. Then: Create Table, Insert Row Above, Insert Row Below, Delete Row(s), Insert Column Left, Insert Column Right, Delete Column(s) , Insert Cell, Delete Cell(s), Row Properties, Cell Properties, Merge Cells Right, Split Cells Right, Split Cells Down.
Caveats; Support
This Version 1.2 of WOW forms is being offered with absolutely no promise of support, except for true bugs. The national staff is not available to assist you with HTML programming. If you wish to use WOW Forms in its
present incarnation, you must be thoroughly familiar with the programming of HTML forms, or turn the design of your form over to someone in your flotilla, division, or district who is. Report bugs via Dashboard Feedback.
Adding CAPTCHA
CAPTCHA is an anti-SPAM scheme that prevents net-bots from completing your form with garbage that gets sent to you. All CAPTCHA schemes use a challenge-response scheme where the challenge is some string of text – often displayed with great distortion as an image – that the user must type in a nearby field. If the data that the user types matches the challenge string, the form is accepted.
Version 1.2 of WOW forms adds an optional poor-man’s CAPTCHA scheme. You simply add a hidden variable that contains your challenge text, for example “G5%Yb”, and an additional text field to capture the response. If the forms engine detects that you have included the hidden challenge field, it then requires the same value to have been typed into an appropriately named response field. If the values match, then the form is processed and the email is sent. If the values do not match, the user is redirected to the home page of the site without comment!
To implement CAPTCHA, invent a challenge string, and then add the following HTML to the form, along with the other hidden variables (order is not important):
<input name="wow_challenge" value=”G5%Yb” type="hidden" />
Your challenge text goes between the quotation marks of the “value” parameter. Now, in the visible part of the form, right above the “Submit Form” button, add the following label and input field:
Type <b>G5%Yb</b> here (anti-SPAM): <input name=”wow_response” value=”” type=“text” size=”10” />
This will produce the following on your form:
Type G5%Yb here (anti-SPAM): [_______________________]
You can phrase this label (challenge) any way you want, and making the actual challenge text – which must
match the value of your hidden input “wow_challenge” – bold is also optional. It helps the user understand what to type without the need for quotation marks, which some users would type into the field, causing a mismatch.
Returning to the home page on error is a little abrupt, but it gets the net-bot off the form. A future version might add an additional hidden page field to catch CAPTCHA mismatches.
Future Plans
WOW II is a “pushbutton” website platform. Ultimately, a pushbutton form generator will be implemented which will call for no HTML knowledge. But there are many higher priority projects with far more leverage to the organization that need to be done first. Resources are limited and we are all volunteers.
Revision 1.2 January 9, 2013 Steve Johnson