www.novell.com/documentation
Administration Quick Start
ZENworks
®11 Support Pack 3
Legal Notices
Novell, Inc., makes no representations or warranties with respect to the contents or use of this documentation, and specifically disclaims any express or implied warranties of merchantability or fitness for any particular purpose. Further, Novell, Inc., reserves the right to revise this publication and to make changes to its content, at any time, without obligation to notify any person or entity of such revisions or changes.
Further, Novell, Inc., makes no representations or warranties with respect to any software, and specifically disclaims any express or implied warranties of merchantability or fitness for any particular purpose. Further, Novell, Inc., reserves the right to make changes to any and all parts of Novell software, at any time, without any obligation to notify any person or entity of such changes.
Any products or technical information provided under this Agreement may be subject to U.S. export controls and the trade laws of other countries. You agree to comply with all export control regulations and to obtain any required licenses or classification to export, re‐export or import deliverables. You agree not to export or re‐export to entities on the current U.S. export exclusion lists or to any embargoed or terrorist countries as specified in the U.S. export laws. You agree to not use deliverables for prohibited nuclear, missile, or chemical biological weaponry end uses. See the Novell International Trade
Services Web page (http://www.novell.com/info/exports/) for more information on exporting Novell software. Novell assumes no responsibility for your failure to obtain any necessary export approvals.
Copyright © 2007‐2014 Novell, Inc. All rights reserved. No part of this publication may be reproduced, photocopied, stored on a retrieval system, or transmitted without the express written consent of the publisher.
Novell, Inc.
1800 South Novell Place Provo, UT 84606 U.S.A.
www.novell.com
Online Documentation: To access the latest online documentation for this and other Novell products, see the Novell
Documentation Web page (http://www.novell.com/documentation).
Novell Trademarks
For Novell trademarks, see the Novell Trademark and Service Mark list (http://www.novell.com/company/legal/trademarks/ tmlist.html).
Third-Party Materials
Contents
About This Guide 7
Part I System Configuration 9
1 Quick List 11
1.1 Management Tools . . . 11
1.2 Zone Configuration. . . 11
1.3 Agent Deployment . . . 14
1.4 System Messages . . . 14
2 Management Tools 17 2.1 ZENworks Control Center . . . 17
2.1.1 Accessing ZENworks Control Center . . . 17
2.1.2 Navigating ZENworks Control Center . . . 18
2.2 zman Command Line Utility . . . 20
2.2.1 Location . . . 20
2.2.2 Syntax . . . 20
2.2.3 Help with Commands. . . 20
2.3 zac Command Line Utility . . . 21
2.3.1 Location . . . 21
2.3.2 Syntax . . . 21
2.3.3 Help with Commands. . . 22
3 Management Zone Configuration 23 3.1 Organizing Devices: Folders and Groups . . . 23
3.1.1 Folders . . . 24
3.1.2 Groups . . . 26
3.1.3 Assignment Inheritance for Folders and Groups . . . 29
3.2 Creating Registration Keys and Rules . . . 29
3.2.1 Registration Keys. . . 29
3.2.2 Registration Rules . . . 30
3.2.3 Device Naming Template . . . 31
3.2.4 Where to Find More Information . . . 32
3.3 Connecting to User Sources . . . 33
3.4 Creating ZENworks Administrator Accounts . . . . 34
3.4.1 Creating Administrator Account . . . 35
3.4.2 Creating Administrator Group Account . . . 36
3.5 Modifying Configuration Settings . . . 38
3.5.1 Modifying Configuration Settings at the Zone . . . 39
3.5.2 Modifying Configuration Settings on a Folder . . . 39
3.5.3 Modifying Configuration Settings on a Device . . . 40
3.6 Zone Sharing and Subscription . . . 40
3.7 Updating ZENworks Software . . . 40
3.8 Creating Locations . . . 41
4 ZENworks Adaptive Agent Deployment 47
4.1 Configuring Adaptive Agent Features . . . 47
4.1.1 Customizing the Adaptive Agent Features . . . 48
4.1.2 Coexisting with the ZENworks Desktop Management Agent . . . 49
4.2 Configuring Adaptive Agent Security . . . 50
4.3 Installing the ZENworks Adaptive Agent . . . 51
4.3.1 Manual Installation on Windows . . . 52
4.3.2 Manual Installation on Linux . . . . 53
4.3.3 Manual Installation on Macintosh . . . 54
4.4 Using the ZENworks Adaptive Agent . . . 56
4.4.1 Logging In to the Management Zone . . . 56
4.4.2 Navigating the Adaptive Agent Views . . . 56
4.4.3 Promoting a Managed Device to be a Satellite . . . 60
5 System Messages 61 5.1 Viewing System Messages . . . 61
5.1.1 Viewing a Summary of Messages . . . 61
5.1.2 Acknowledging Messages . . . 62
5.1.3 Where to Find More Information . . . 64
5.2 Creating a Watch List . . . 64
6 Audit Management 65 6.1 Types of Audit Events . . . 65
6.2 Enabling an Event . . . 65
6.3 Viewing a Generated Event . . . 67
Part II Product Administration 69 7 Quick List 71 7.1 Asset Management . . . 71
7.2 Configuration Management . . . 72
7.3 Endpoint Security Management . . . 73
7.4 Full Disk Encryption . . . 74
7.5 Patch Management . . . 75
8 Asset Management 77 8.1 Activating Asset Management . . . 77
8.2 Enabling Asset Management in the ZENworks Adaptive Agent . . . 77
8.3 Collecting Software and Hardware Inventory . . . 78
8.3.1 Initiating a Device Scan . . . 78
8.3.2 Viewing a Device Inventory . . . 79
8.3.3 Generating an Inventory Report . . . 80
8.3.4 Where to Find More Information . . . 80
8.4 Monitoring Software Usage . . . 81
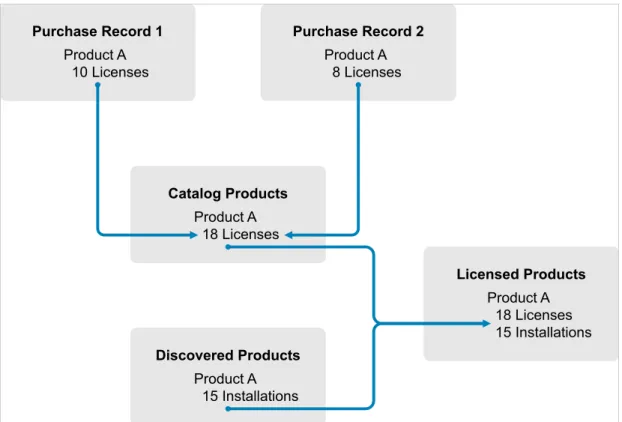
8.5 Monitoring License Compliance . . . 82
8.5.1 License Compliance Components . . . 82
8.5.2 Discovering Installed Products . . . 84
8.5.3 Creating a Catalog Product and Purchase Record . . . 84
8.6 Allocating Licenses . . . 89
9 Configuration Management 93 9.1 Activating Configuration Management . . . 93
9.2 Enabling Configuration Management in the ZENworks Adaptive Agent . . . 94
9.3 Distributing Software . . . 94
9.3.1 Creating a Bundle . . . 95
9.3.2 Assigning a Bundle . . . 95
9.3.3 Where to Find More Information . . . 95
9.4 Applying Policies . . . 95
9.4.1 Creating a Policy . . . 97
9.4.2 Assigning a Policy . . . 98
9.4.3 Where to Find More Information . . . 98
9.5 Imaging Devices. . . 98
9.5.1 Setting Up Preboot Services . . . 99
9.5.2 Taking an Image . . . 101
9.5.3 Applying an Image . . . 103
9.5.4 Where to Find More Information . . . 105
9.6 Remotely Managing Devices . . . 105
9.6.1 Creating a Remote Management Policy . . . 107
9.6.2 Configuring Remote Management Settings . . . 109
9.6.3 Performing Remote Control, Remote View, and Remote Execute Operations on a Windows Device . . . 110
9.6.4 Performing a Remote Diagnostic Operation . . . 113
9.6.5 Performing a File Transfer Operation . . . 114
9.6.6 Performing Remote Control, Remote View, and Remote Login Operations on a Linux Device . . . 116
9.6.7 Performing Remote SSH Operation on a Linux Device . . . 118
9.6.8 Where to Find More Information . . . 119
9.7 Collecting Software and Hardware Inventory . . . 119
9.7.1 Initiating a Device Scan . . . 119
9.7.2 Viewing a Device Inventory . . . 120
9.7.3 Generating an Inventory Report . . . 120
9.7.4 Where to Find More Information . . . 120
9.8 Personality Migration . . . 121
9.9 Linux Management. . . 121
10 Endpoint Security Management 123 10.1 Activating Endpoint Security Management . . . . 123
10.2 Enabling the Endpoint Security Agent . . . 124
10.3 Creating Locations . . . 124
10.4 Creating a Security Policy . . . 124
10.5 Assigning a Policy to Users and Devices . . . 128
10.6 Assigning a Policy to the Zone . . . 129
10.7 Where to Find More Information . . . 131
11 Full Disk Encryption 133 11.1 Activating Full Disk Encryption . . . 133
11.2 Enabling the Full Disk Encryption Agent . . . 134
11.3 Creating a Disk Encryption Policy . . . 134
11.5.1 Standard Hard Disk . . . 138
11.5.2 Standard Hard Disk with Pre-Boot Authentication . . . 138
11.5.3 Self-Encrypting Hard Disk . . . . 140
11.6 Where to Find More Information . . . 140
12 Patch Management 141 12.1 Activating Patch Management . . . 141
12.2 Enabling Patch Management in the ZENworks Adaptive Agent . . . 142
12.3 Starting the Subscription Service . . . 142
12.4 Deploying a Patch . . . 143
About This Guide
This ZENworks 11 SP3 Administration Quick Start helps you quickly master the basics of administering
your ZENworks 11 SP3 Management system. You should already have installed your ZENworks
system. If not, see the ZENworks 11 SP3 Server Installation Guide. The information in this guide is organized as follows:
System Configuration (page 9): Provides instructions for configuring your ZENworks
Management Zone prior to using the ZENworks 11 SP3 products.
Product Administration (page 69): Provides instructions for using ZENworks 11 SP3 products
(Asset Management, Configuration Management, Endpoint Security Management, Full Disk
Encryption, and Patch Management).
Audience
This guide is intended for anyone who will configure the ZENworks system, monitor the ZENworks
system, or perform any ZENworks tasks related to managing devices or users.
Feedback
We want to hear your comments and suggestions about this manual and the other documentation
included with this product. Please use the User Comments feature at the bottom of each page of the
online documentation.
Additional Documentation
ZENworks 11 SP3 is supported by other documentation (in both PDF and HTML formats) that you
can use to learn about and implement the product. For additional documentation, see the ZENworks 11SP3 documentation Web site (http://www.novell.com/documentation/zenworks113).
I
ISystem Configuration
The following sections provide information to help you configure your ZENworks system. The
configuration tasks apply regardless of which ZENworks 11 SP3 products (Configuration
Management, Patch Management, Asset Management, and Endpoint Security Management) you are
using.
Chapter 1, “Quick List,” on page 11
Chapter 2, “Management Tools,” on page 17
Chapter 3, “Management Zone Configuration,” on page 23
Chapter 4, “ZENworks Adaptive Agent Deployment,” on page 47
Chapter 5, “System Messages,” on page 61
1
1Quick List
You’ve installed your ZENworks Server (or maybe a couple of servers) and are eager to start using all
of the time‐saving functionality in Novell ZENworks 11 SP3.
Before you begin using any of the ZENworks 11 SP3 products (Configuration Management, Patch
Management, Asset Management, Endpoint Security Management and Full Disk Encryption) that
you’ve licensed or are evaluating, you should review the concepts and tasks in the following sections.
These sections are designed to quickly introduce you to what you need to know and do to configure
your Management Zone:
Section 1.1, “Management Tools,” on page 11
Section 1.2, “Zone Configuration,” on page 11
Section 1.3, “Agent Deployment,” on page 14
Section 1.4, “System Messages,” on page 14
1.1
Management Tools
ZENworks 11 SP3 provides both a Web‐based console (ZENworks Control Center) and a command
line utility (zman) that you can use to manage your ZENworks system. You should become familiar
with at least ZENworks Control Center.
1.2
Zone Configuration
Before you start taking full advantage of the management capabilities provided by the ZENworks
products you activated during installation of your Management Zone, there are a few configuration
tasks you need to complete to ensure that your Management Zone is configured correctly.
Task Details
Launch ZENworks Control Center
For instructions, see Section 2.1, “ZENworks Control Center,” on page 17.
Discover how to run the zman utility
The zman utility is a command line interface that lets you perform many of the same tasks as ZENworks Control Center.
For instructions, see Section 2.2, “zman Command Line Utility,” on page 20. Discover how to run the zac
utility
The zac utility is a command line interface for the ZENworks Adaptive Agent.
For instructions, see Section 2.3, “zac Command Line Utility,” on page 21.
Task Details Create folders and groups for
organizing devices
Organize devices into folders and groups to ease the overhead involved in applying ZENworks configuration settings and
performing tasks on similar devices. Rather than making assignments or performing tasks on individual devices, you can manage the folders and groups, with each device in a folder or group inheriting the assignment or task. For instructions, see Section 3.1, “Organizing Devices: Folders and Groups,” on page 23. Create registration keys or rules The ZENworks Adaptive Agent must be
installed on each device that you want to manage. When you deploy the ZENworks Adaptive Agent to a device, the device is registered in your Management Zone. You can use registration keys or rules to automatically assign devices to the appropriate folders and groups, enabling the devices to immediately inherit any assignments associated with the folders and groups.
For instructions, see Section 3.2, “Creating Registration Keys and Rules,” on page 29.
Add user sources You can connect to one or more LDAP
directories to provide authoritative user sources in ZENworks.
Adding a user source lets you associate ZENworks administrator accounts with LDAP user accounts and associate devices with the users who primarily use them. In addition, adding users enables additional functionality for the following ZENworks products:
Configuration Management: Enables you to assign bundles and policies to users as well as devices. Enables user-based inventory reports.
Asset Management: Enables you to account for software licenses on a user basis as well as a device basis.
Endpoint Security Management: Enables you to assign policies to users as well as devices.
For instructions, see Section 3.3, “Connecting to User Sources,” on page 33.
Create additional administrator accounts
During installation, a default ZENworks administrator account (named Administrator) is created. This is a Super Administrator account. It has full administrative rights within the Management Zone.
You can create additional administrator accounts and give them Super Administrator rights. Or, you can create administrator accounts with restricted rights to limit the administrator’s scope of accessible tasks, devices, and users.
For instructions, see Section 3.4.1, “Creating Administrator Account,” on page 35.
Create administrator group accounts
You can choose to create administrator groups. If you assign rights and roles to an administrator group, the assigned rights and roles are applicable to all the members within the group. For instructions, see Section 3.4.2, “Creating Administrator Group Account,” on page 36. Modify zone configuration
settings
The Management Zone settings are preset to provide the most common configuration. You don’t need to change any settings at this time, but you might want to browse the settings to become more familiar with them.
For instructions, see Section 3.5, “Modifying Configuration Settings,” on page 38.
Update ZENworks Software The System Updates feature allows you to
obtain updates to the Novell ZENworks 11 SP3 software on a timely basis, and also allows you to schedule automatic downloads of the updates.
For instructions, see Section 3.7, “Updating ZENworks Software,” on page 40.
Create Locations Security policies can be global or specific to
locations. A global policy is applied in all locations. A location-based policy is applied only when the ZENworks Adaptive Agent determines that the device’s network
environment matches the environment defined for the location.
For instructions, see Section 3.8, “Creating Locations,” on page 41.
1.3
Agent Deployment
The ZENworks Adaptive Agent communicates with the ZENworks Server to perform management
tasks on a device. You must deploy the Adaptive Agent to all devices you want to manage.
Deploying the Adaptive Agent installs the agent files and registers the device in your Management
Zone.
1.4
System Messages
As you perform management tasks in your zone, information is recorded so that you can view the
status of your zone and the activities taking place within it.
Task Details
Enable the ZENworks Adaptive Agent features
The ZENworks Adaptive Agent includes features specific to each of the ZENworks 11 SP3 products (Asset Management, Configuration Management, Endpoint Security Management, Full Disk Encryption, and Patch Management). By default, the features for your activated products (licensed and evaluation) are enabled during Management Zone installation. However, you should verify the configuration in ZENworks Control Center. For instructions, see Section 4.1, “Configuring Adaptive Agent Features,” on page 47.
Secure the ZENworks Adaptive Agent
You can configure the ZENworks Adaptive Agent uninstall and self-defense settings.
For instructions, see Section 4.2, “Configuring Adaptive Agent Security,” on page 50.
Install the ZENworks Adaptive Agent
You can use a variety of methods to install the ZENworks Adaptive Agent to a device:
Use ZENworks Control Center to deploy the agent
from a ZENworks Server to the device.
At the device, use a Web browser to download the
agent from a ZENworks Server and install it.
Include the agent in an image and apply the image to the device.
For instructions, see Section 4.3, “Installing the ZENworks Adaptive Agent,” on page 51.
Log in and use the ZENworks Adaptive Agent
To receive user-assigned bundles and policies on a device, you must log in to the Management Zone. For instructions, see Section 4.4, “Using the ZENworks Adaptive Agent,” on page 56.
Task Details
View system messages The ZENworks system generates informational, warning,
and error messages to help you monitor activities such as the distribution of software and application of policies. For instructions, see Section 5.1, “Viewing System Messages,” on page 61.
Create a Watch List If you have devices, bundles, and policies whose activity
you want to closely monitor, you can add them to the Watch List.
For instructions, see Section 5.2, “Creating a Watch List,” on page 64.
2
2Management Tools
Novell ZENworks 11 SP3 provides both a Web‐based console (ZENworks Control Center) and a
command line utility (zman) that you can use to manage your ZENworks system. The following
sections explain how to access and use the management tools:
Section 2.1, “ZENworks Control Center,” on page 17
Section 2.2, “zman Command Line Utility,” on page 20
Section 2.3, “zac Command Line Utility,” on page 21
2.1
ZENworks Control Center
ZENworks Control Center is installed on all ZENworks Servers in the Management Zone. You can
perform all management tasks on any ZENworks Server. Because it is a web‐based management
console, ZENworks Control Center can be accessed from any supported workstation.
If you use Novell iManager to administer other Novell products in your network environment, you
can enable ZENworks Control Center to be launched from iManager. For more information, see
“Accessing ZENworks Control Center through Novell iManager”in the ZENworks 11 SP3 ZENworks
Control Center Reference.
Section 2.1.1, “Accessing ZENworks Control Center,” on page 17
Section 2.1.2, “Navigating ZENworks Control Center,” on page 18
2.1.1
Accessing ZENworks Control Center
1 Enter the following URL in a Web browser:
https://ZENworks_Server_Address:port
Replace ZENworks_Server_Address with the IP address or DNS name of the ZENworks Server.
You only need to specify the port if you are not using one of the default ports (80 or 443).
ZENworks Control Center requires an HTTPS connection; HTTP requests are redirected to
HTTPS.
2 In the Username field, type Administrator.
3 In the Password field, type the Administrator password created during installation. To prevent unauthorized users from gaining access to ZENworks Control Center, the
administrator account is disabled after three unsuccessful login attempts, and a 60‐second
timeout is enforced before you can attempt another login. To change these default values, see
“Changing the Default Login Disable Values” in the ZENworks 11 SP3 ZENworks Control Center
Reference.
4 Click Login to display ZENworks Control Center.
For more detailed information on logging in as a different administrator, see “Accessing ZENworks Control Center” in the ZENworks 11 SP3 ZENworks Control Center Reference.
2.1.2
Navigating ZENworks Control Center
Navigation Tabs: The tabs in the left pane let you navigate among the functional areas of ZENworks.
For example, the Servers page shown above lets you manage tasks associated with servers.
Task List: The task list in the left pane provides quick access to the most commonly performed tasks
for the current page. The task list changes for each page. For example, the task list on the Devices
page displays device‐related tasks and the task list on the Configuration page displays configuration‐
related tasks.
Frequently Used Objects: The Frequently Used list in the left pane displays the 10 objects that you
have accessed most often, from most used to least used. Clicking an object takes you directly to the
details page for the object.
Work Panel: The work panels are where you monitor and manage your ZENworks system. The
panels change depending on the current page. In the above example, there are two work panels: Devices and Search. The Devices panel lists the servers, folders, server groups, and dynamic server
groups that have been created; you use this panel to manage servers. The Search panel lets you filter
the Devices panel based on criteria such as a server’s name, operating system, or status.
Help Information: The Help button links to Help topics that provide information about the current
2.2
zman Command Line Utility
The zman utility provides a command line management interface that lets you perform many of the
tasks available in ZENworks Control Center. For example, you can add content to bundles, assign
policies to devices, and register devices. The main advantage to using the command line utility is the
ability to create scripts for handling repetitive or mass operations. Like ZCC, the zman utility is
installed on all Primary Servers, but it can only run from the command line on the server.
The primary purpose of the zman utility is to enable you to perform operations through a script.
However, you can also perform operations manually at a command line.
Section 2.2.1, “Location,” on page 20
Section 2.2.2, “Syntax,” on page 20
Section 2.2.3, “Help with Commands,” on page 20
2.2.1
Location
The utility is installed on all ZENworks Servers in the following location:
%ZENWORKS_HOME%\bin
where %ZENWORKS_HOME% represents the ZENworks installation path. On Windows, the default path
is C:\Program Files (x86)\Novell\Zenworks\bin. On Linux, the default path is /opt/novell/ zenworks/bin.
2.2.2
Syntax
The zman utility uses the following basic syntax:
zman category-action [options]
For example, to assign a software bundle to a device, you use the following command:
zman bundle-assign workstation bundle1 wks1
where bundle-assign is the category‐action and workstation bundle1 wks1 are the options. In
this example, the options are device type (workstation), bundle name (bundle1), and target device
(wks1).
For example, to initiate an inventory scan of a device, you use the following command:
zman inventory-scan-now device/servers/server1
where inventory-scan-now is the category‐action and device/servers/server1 is an option that
specifies the folder path of the device to be scanned.
2.2.3
Help with Commands
The best way to understand the commands is to use the online help or see “zman(1)” in the ZENworks
11 SP3 Command Line Utilities Reference. To use the online help:
This command displays the basic usage (syntax) and a list of the available command categories.
You can also use the following to get help:
2.3
zac Command Line Utility
The zac utility provides a command line management interface that lets you perform tasks available
in the ZENworks Adaptive Agent.
Section 2.3.1, “Location,” on page 21
Section 2.3.2, “Syntax,” on page 21
Section 2.3.3, “Help with Commands,” on page 22
2.3.1
Location
The utility is installed on all Windows managed devices in the following location:
%ZENWORKS_HOME%\bin
where %ZENWORKS_HOME% represents the ZENworks installation path. The default path is c:\program files\novell\zenworks\bin on a 32‐bit Windows device and c:\program files
(x86)\novell\zenworks\bin on a 64‐bit Windows device.
2.3.2
Syntax
The zac utility uses the following basic syntax:
zac command options
For example, to launch a bundle on a device, you use the following command:
zac bundle-launch "bundle 1"
where bundle-launch is the command and bundle 1 is the command option. In this example, the
option is the display name of the bundle to be launched. Enclosing quotation marks are required only
if the bundle display name includes spaces.
For example, to initiate an inventory scan on a device, you use the following command:
zac inv scannow
where inv is the command and scannow is the command option.
Command Description
zman --help | more Displays a complete list of commands by category.
zman category --help | more Displays a complete list of commands within a category.
2.3.3
Help with Commands
The best way to understand the commands is to use the online help or see “zac for Windows(1)” in
the ZENworks 11 SP3 Command Line Utilities Reference. To use the online help:
1 On the managed device, enter one of the following commands at a command prompt.
Command Description
zac --help Displays a complete list of commands.
3
3Management Zone Configuration
Novell ZENworks 11 SP3 is designed to let you efficiently manage a large number of devices and
users with as little effort as possible. The first step in easing this management burden is to ensure that
you’ve configured your Management Zone so that you can take full advantage of the ZENworks
capabilities.
The following sections introduce the basic concepts you need to set up a Management Zone that best
supports the ongoing management tasks you perform. Each section explains a management concept
and provides general steps to perform the tasks associated with the concept.
Section 3.1, “Organizing Devices: Folders and Groups,” on page 23
Section 3.2, “Creating Registration Keys and Rules,” on page 29
Section 3.3, “Connecting to User Sources,” on page 33
Section 3.4, “Creating ZENworks Administrator Accounts,” on page 34
Section 3.5, “Modifying Configuration Settings,” on page 38
Section 3.6, “Zone Sharing and Subscription,” on page 40
Section 3.7, “Updating ZENworks Software,” on page 40
Section 3.8, “Creating Locations,” on page 41
3.1
Organizing Devices: Folders and Groups
Using ZENworks Control Center, you can manage devices by performing tasks directly on
individual device objects. However, this approach is not very efficient unless you have only a few
devices to manage. To optimize management of a large number of devices, ZENworks lets you
organize devices into folders and groups; you can then perform tasks on a folder or group to manage
its devices.
You can create folders and groups at any time. However, the best practice is to create folders and
groups before you register devices in your zone. This allows you to use registration keys and rules to
automatically add devices to the appropriate folders and groups when they register (see “Creating Registration Keys and Rules” on page 29).
Section 3.1.1, “Folders,” on page 24
Section 3.1.2, “Groups,” on page 26
3.1.1
Folders
Folders are a great tool to help you organize devices in order to simplify management of those
devices. You can apply configuration settings, assign content, and perform tasks on any folder. When
you do so, the folder’s devices inherit those settings, assignments, and tasks.
For best results, you should place devices with similar configuration setting requirements in the same
folder. If all devices in the folder require the same content or tasks, you can also make content or task
assignments on the folder. However, all devices in the folder might not have the same content and
task requirements. Therefore, you can organize the devices into groups and assign the appropriate
content and tasks to each groups (see “Groups” on page 26 below).
For example, assume that you have workstations at three different sites. You want to apply different
configuration settings to the workstations at the three sites, so you create three folders (/ Workstations/Site1, /Workstations/Site2, and /Workstations/Site3) and place the
appropriate workstations in each folder. You decide that most of the configuration settings apply to
all workstations, so you configure those settings at the Management Zone. However, you want to
perform a weekly collection of software and hardware inventory at Site1 and Site2 and a monthly
inventory collection at Site3. You configure a weekly inventory collection at the Management Zone
and then override the setting on the Site3 folder to apply a monthly schedule. Site1 and Site2 collect
inventory weekly, and Site3 collects inventory monthly.
Creating a Folder
1 In ZENworks Control Center, click the Devices tab.
2 Click the Workstations folder.
4 In the Name field, type a name for the new folder.
When you name an object in the ZENworks Control Center (folders, groups, bundles, policies,
and so forth), ensure that the name adheres to the following conventions:
The name must be unique in the folder.
Depending on the database software being used for the ZENworks database, uppercase and
lowercase letters might not create uniqueness for the same name. The embedded database
included with ZENworks is case insensitive, so Folder 1 and FOLDER 1 are the same name
and cannot be used in the same folder. If you use an external database that is case‐sensitive,
Folder 1 and FOLDER 1 are unique.
If you use spaces, you must enclose the name in quotes when entering it on the command
line. For example, you must enclose Folder 1 in quotes (“Folder 1”) when entering it in the
zman utility.
The following characters are invalid and cannot be used: / \ * ? : ʺ ʹ < > | ` % ~
5 Click OK to create the folder.
You can also use the workstation-folder-create and server-folder-create commands in the
zman utility to create device folders. For more information, see “Workstation Commands” and
3.1.2
Groups
As you can with folders, you can also assign content and perform tasks on device groups. When you
do so, the group’s devices inherit those assignments and tasks. Unlike with folders, you cannot apply
configuration settings to groups.
Groups provide an additional layer of flexibility for content assignments and tasks. In some cases,
you might not want to assign the same content to and perform the same task on all devices in a folder.
Or, you might want to assign the same content to and perform tasks on one or more devices in
different folders. To do so, you can add the devices to a group (regardless of which folders contain
the devices) and then assign the content to and perform the tasks on the group.
For example, let’s revisit the example of the workstations at three different sites (see Section 3.1.1, “Folders,” on page 24). Assume that some of the workstations at each site need the same accounting
software. Because groups can be assigned software, you could create an Accounting group, add the
target workstations to the group, and then assign the appropriate accounting software to the group.
Likewise, you could use the groups to assign Windows configuration and security policies.
The advantage to making an assignment to a group is that all devices contained in that group receive
the assignment, but you only need to make the assignment one time. In addition, a device can belong
to any number of unique groups, and the assignments from multiple groups are additive. For
example, if you assign a device to group A and B, it inherits the software assigned to both groups. ZENworks provides both groups and dynamic groups. From the perspective of content assignments
or performing tasks, groups and dynamic groups function exactly the same. The only difference
between the two types of groups is the way that devices are added to the group. With a group, you
must manually add devices. With a dynamic group, you define criteria that a device must meet to be
a member of the group, and then devices that meet the criteria are automatically added.
ZENworks include several predefined dynamic server groups for example, Windows 2012 Servers
Windows 2003 Servers and SUSE Linux Enterprise Server.
ZENworks also includes dynamic workstation groups for example, Windows XP Workstation,
Windows 8 Workstation, Windows Vista Workstations and SUSE Linux Enterprise Desktop. Devices
that have these operating systems are automatically added to the appropriate dynamic group.
Creating a Group
1 In ZENworks Control Center, click the Devices tab.
2 If you want to create a group for servers, click the Servers folder. or
3 Click New > Server Group (or New > Workstation Group for workstations) to launch the Create New
Group Wizard.
4 On the Basic Information page, type a name for the new group in the Group Name field, then
click Next.
The group name must follow the naming conventions.
5 On the Summary page, click Finish to create the group without adding members. or
Click Next if you want to add members to the group, then continue with Step 6.
6 On the Add Group Members page, click Add to add devices to the group, then click Next when
finished adding devices.
You can also use the workstation-group-create and server-group-create commands in the
zman utility to create device groups. For more information, see “Workstation Commands” and
“Server Commands” in the ZENworks 11 SP3 Command Line Utilities Reference.
Creating a Dynamic Group
1 In ZENworks Control Center, click the Devices tab.
2 If you want to create a group for servers, click the Servers folder. or
If you want to create a group for workstations, click the Workstations folder.
3 Click New > Dynamic Server Group (or New > Dynamic Workstation Group for workstations) to
The group name must follow the naming conventions.
5 On the Define Filter for Group Members page, define the criteria that a device must meet to
become a member of the group, then click Next.
Click the Help button for details about creating the criteria.
6 On the Summary page, click Finish to create the group.
3.1.3
Assignment Inheritance for Folders and Groups
When you assign content to a folder, all objects (users, devices, subfolders) except groups that are
located in the folder inherit the assignment. For example, if you assign BundleA and PolicyB to
DeviceFolder1, all devices within the folder (including all devices in subfolders) inherit the two
assignments. However, none of the device groups located in DeviceFolder1 inherit the assignments.
Essentially, folder assignments do not flow down to groups located within the folder.
3.2
Creating Registration Keys and Rules
When you deploy the ZENworks Adaptive Agent to a device, the device is registered in your
Management Zone and becomes a managed device. As part of the registration, you can specify the
device’s ZENworks name and the folder and groups to which you want the device added.
By default, a device’s hostname is used as its ZENworks name, it is added to the /Servers or / Workstations folder, and it is not given membership in any groups. You can manually move devices
to other folders and add them to groups, but this can be a burdensome task if you have a large
number of devices or if you are consistently adding new devices. The best way to manage a large
number of devices is to have them automatically added to the correct folders and groups during
registration.
To add devices to folders and groups during registration, you can use registration keys, registration
rules, or both. Both registration keys and registration rules let you assign folder and group
memberships to a device. However, there are differences between keys and rules that you should be
aware of before choosing whether you want to use one or both methods for registration.
Section 3.2.1, “Registration Keys,” on page 29
Section 3.2.2, “Registration Rules,” on page 30
Section 3.2.3, “Device Naming Template,” on page 31
Section 3.2.4, “Where to Find More Information,” on page 32
3.2.1
Registration Keys
A registration key is an alphanumeric string that you manually define or randomly generate. During
deployment of the ZENworks Adaptive Agent on a device, the registration key must be provided.
When the device connects to a ZENworks Server for the first time, the device is added to the folder
and groups defined within the key.
You can create one or more registration keys to ensure that devices are placed in the desired folders
and groups. For example, you might want to ensure that all of the Sales department’s workstations
are added to the /Workstations/Sales folder but are divided into three different groups
(SalesTeam1, SalesTeam2, SalesTeam3) depending on their team assignments. You could create three
different registration keys and configure each one to add the Sales workstations to the /
To create a registration key:
1 In ZENworks Control Center, click the Configuration tab, then click the Registration tab.
2 In the Registration Keys panel, click New > Registration Key to launch the Create New
Registration Key Wizard.
3 Follow the prompts to create the key.
For information about what you need to supply at each step of the wizard, click the Help button. You can also use the registration-create-key command in the zman utility to create a registration
key. For more information, see “Registration Commands” in the ZENworks 11 SP3 Command Line
Utilities Reference.
3.2.2
Registration Rules
If you don’t want to enter a registration key during deployment, or if you want devices to be
automatically added to different folders and groups based on predefined criteria (for example,
operating system type, CPU, or IP address), you can use registration rules.
ZENworks includes a default registration rule for servers and another one for workstations. If a
device registers without a key and you haven’t created registration rules, the default registration
rules are applied to determine the folder assignments. The two default rules cause all servers to be
as recommended in Section 3.1, “Organizing Devices: Folders and Groups,” on page 23, you’ve
established folders for devices with similar configuration settings and groups for devices with
similar assignments, then newly registered devices automatically receive the appropriate
configuration settings and assignments. To create a registration rule:
1 In ZENworks Control Center, click the Configuration tab, then click the Registration tab.
2 In the Registration Rules panel, click New to launch the Create New Registration Rule Wizard.
3 Follow the prompts to create the rule.
For information about what you need to supply at each step of the wizard, click the Help button. You can also use the ruleset-create command in the zman utility to create a registration rule. For
more information, see “Ruleset Commands” in the ZENworks 11 SP3 Command Line Utilities Reference.
3.2.3
Device Naming Template
The device naming template determines how devices are named when they register. By default, a
device’s hostname is used. You can change it to use any combination of the following machine
variables: ${HostName}, ${GUID}, ${OS}, ${CPU}, ${DNS}, ${IPAddress} and ${MACAddress}.
1 In ZENworks Control Center, click the Configuration tab.
3 Click Registration to display the Registration page.
4 In the Device Naming Template panel, click , then select the desired machine variable from
the list.
You can use any combination of one or more variables. For example:
${HostName}${GUID}
5 Click OK to save the changes.
3.2.4
Where to Find More Information
3.3
Connecting to User Sources
You can connect to one or more LDAP directories to provide authoritative user sources in ZENworks. Adding a user source lets you associate ZENworks administrator accounts with LDAP user accounts
and associate devices with the users who primarily use them. In addition, adding users enables
additional functionality for the following ZENworks products:
Configuration Management: Enables you to assign bundles and policies to users as well as
devices. Enables user‐based inventory reports.
Asset Management: Enables you to account for software licenses on a user basis as well as a
device basis.
Endpoint Security Management: Enables you to assign policies to users as well as devices. When you define an LDAP directory as a user source, the directory is not affected; ZENworks
requires only read access to the LDAP directory and stores all assignment information in the
ZENworks database. For more detailed information about the specific read rights required when
connecting to a user source, see “Creating User Source Connections”in the ZENworks 11 User Source
and Authentication Reference.
You can connect to Novell eDirectory and Microsoft Active Directory as user sources. The minimum
requirements are Novell eDirectory 8.7.3 and Microsoft Active Directory on Windows 2000 SP4. The
minimum LDAP requirement is version 3.
After you connect to an LDAP directory, you define the containers within the directory that you want
exposed. For example, assume you have a Microsoft Active Directory domain tree named
MyCompany. All users reside in two containers in the MyCompany tree: MyCompany/Users and
MyCompany/Temp/Users. You could reference the MyCompany tree as the source and the
MyCompany/Users and MyCompany/Temp/Users as separate user containers. This limits access
within the directory to only those containers that include users.
In addition to the users that reside within the containers you add, ZENworks Control Center also
displays any user groups located in the containers. This enables management of both individual user
and groups of users
To connect to a user source:
1 In ZENworks Control Center, click the Configuration tab.
3 Follow the prompts to create the user source.
For information about what you need to supply at each step of the wizard, click the Help button. You can also use the user-source-create command in the zman utility to create a connection to a
user source. For more information, see “User Commands” in the ZENworks 11 SP3 Command Line
Utilities Reference.
3.4
Creating ZENworks Administrator Accounts
During installation, a default ZENworks administrator account (named Administrator) is created.
This account, called a Super Administrator account, provides full administrative rights to the
Management Zone.
Typically, you should create administrator accounts for each person who will perform administrative
tasks. You can define these accounts as Super Administrator accounts, or you can define them as
administrator accounts with restricted rights. For example, you could give a user an administrator
account that only enables him or her to discover and register devices in the Management Zone.Or the
account could only enable the user to assign bundles to devices. Or, the account might be limited to
performing asset management tasks such as contract, license, and document management.
In some cases, you might have multiple administrator accounts that require the same administrative
rights. Rather than assign rights to each account individually, you can create an administrator role,
assign the administrative rights to the role, and then add the accounts to the role. For example, you
might have a Help Desk role that provides administrative rights required by several of your
administrators.
You can choose to create administrator groups. If you assign rights and roles to an administrator
3.4.1
Creating Administrator Account
1 In ZENworks Control Center, click the Configuration tab.
2 In the Administrators panel, click New > Administrator to display the Add New Administrator
dialog box.
The Add New Administrator dialog box lets you create a new administrator account by
providing a name and password, or you can create a new administrator based on an existing
user in the user source. Optionally, you can give the new administrator the same rights that the
logged‐in administrator has.
Create a New Administrator by Providing Name, Password: Select this option if you want to
create a new administrator account by manually specifying the name and password.
Based on User(s) in a User Source: Select this option if you want to create a new administrator
account based on user information from your user source. To do so, click Add, then browse for
and select the user you want.
Give this Administrator the Same Rights as I Have: Select this option to assign the new
administrator the same rights that you have as the currently logged‐in administrator. If you have
Super Administrator rights, the new administrator is created as a Super Administrator.
4 When you have finished filling in the fields, click OK to add the new administrator to the
Administrators panel.
5 If you need to change the new administrator’s rights or roles, click the administrator account
and then the Rights tab to display the account details:
6 If Super Administrator is selected, deselect the option. You cannot modify Super Administrator rights.
7 Using the Assigned Rights panel, modify the assigned rights.
8 Using the Assigned Roles panel, modify the assigned roles.
9 When you have finished modifying the rights, click Apply to save the changes.
For more information about creating ZENworks administrator accounts, administrator rights, or
administrator roles, see the ZENworks 11 SP3 Administrator Accounts and Rights Reference. You can also use the admin-create command in the zman utility to create a ZENworks
administrator account. For more information, see “Administrator Commands” in the ZENworks 11
SP3 Command Line Utilities Reference.
3.4.2
Creating Administrator Group Account
2 In the Administrators panel, click New > Administrator Group to display the Add New
Administrator Group dialog box.
The Add New Administrator Group dialog box lets you create a new administrator group
account by providing a group name and adding members to the group, or you can create a new
administrator group based on an existing user group in the user source. Each administrator
group name must be unique.
Create a New Administrator Group by Providing a Name and Adding Members: Select this
option if you want to create a new administrator group account by manually specifying the
name and adding the members. To add members, click Add, then browse for and select the
administrators you want.
You can add any number of administrators to the group. You cannot add other administrator
groups to the group.
Based on User Groups in a User Source: Select this option if you want to create a new
administrator group account based on user group information from your user source. To do so,
click Add, then browse for and select the user group you want.
Import user members of each user group as administrators immediately: Select this option to
enable the user members of the selected user groups to be immediately added as administrators.
4 When you have finished filling in the fields, click OK to add the new administrator group to the
Administrators panel.
5 If you need to change the new administrator group’s rights or roles, click the administrator
group account and then the Rights tab to display the account details:
6 Using the Assigned Rights panel, modify the assigned rights.
7 Using the Assigned Roles panel, modify the assigned roles.
8 When you have finished modifying the rights, click Apply to save the changes.
For more information about creating ZENworks administrator Group accounts, administrator rights,
or administrator roles, see the ZENworks 11 SP3 Administrator Accounts and Rights Reference. You can also use the admin-create command in the zman utility to create a ZENworks
administrator account. For more information, see “Administrator Commands” in the ZENworks 11
SP3 Command Line Utilities Reference.
3.5
Modifying Configuration Settings
The Management Zone configuration settings enable you to control a wide range of functionality
behavior for you zone. There are Device Management settings that let you control how often devices
what levels of messages (informational, warning, or error) are logged by the ZENworks Adaptive
Agent. There are Event and Messaging settings, Discovery and Deployment settings, and much
more.
Management Zone settings that apply to devices are inherited by all devices in the zone. As
discussed in Section 3.1, “Organizing Devices: Folders and Groups,” on page 23, you can override
zone settings by configuring them on device folders or on individual devices. This allows you to
establish zone settings that apply to the largest number of devices and then, as necessary, override
the settings on folders and devices.
By default, your zone settings are preconfigured with values that provide common functionality. You
can, however, change the settings to best adapt them to the behavior you need in your environment.
Section 3.5.1, “Modifying Configuration Settings at the Zone,” on page 39
Section 3.5.2, “Modifying Configuration Settings on a Folder,” on page 39
Section 3.5.3, “Modifying Configuration Settings on a Device,” on page 40
3.5.1
Modifying Configuration Settings at the Zone
1 In ZENworks Control Center, click the Configuration tab.
2 In the Management Zone Settings panel, click the settings category (Device Management,
Discovery and Deployment, Event and Messaging, and so forth) whose settings you want to modify.
3 Click the setting to display its details page.
4 Modify the setting as desired.
For information about the setting, see the ZENworks 11 SP3 Management Zone Settings Reference or
click the Help button in ZENworks Control Center.
5 When you have finished modifying the setting, click OK (or Apply) to save your changes. If the configuration setting applies to devices, the setting is inherited by all devices in the zone
unless the setting is overridden at a folder level or a device level.
3.5.2
Modifying Configuration Settings on a Folder
1 In ZENworks Control Center, click the Devices tab.
2 In the Devices panel (on the Managed tab), browse for the folder whose settings you want to
modify.
3 When you’ve found the folder, click Details next to the folder name to display the folder’s details.
4 Click the Settings tab.
5 In the Settings panel, click the settings category (Device Management, Infrastructure Management,
and so forth) whose settings you want to modify.
6 Click the setting to display its details page.
7 Modify the setting as desired.
For information about the setting, see the ZENworks 11 SP3 Management Zone Settings Reference or
click the Help button in ZENworks Control Center.
8 When you have finished modifying the setting, click OK (or Apply) to save your changes. The configuration setting is inherited by all devices in the folder, including any devices
3.5.3
Modifying Configuration Settings on a Device
1 In ZENworks Control Center, click the Devices tab.
2 In the Devices panel (on the Managed tab), browse for the device whose settings you want to
modify.
3 When you’ve found the device, click the device name to display its details.
4 Click the Settings tab.
5 In the Settings panel, click the settings category (Device Management, Infrastructure Management,
and so forth) whose settings you want to modify.
6 Click the setting to display its details page.
7 Modify the setting as desired.
For information about the setting, see the ZENworks 11 SP3 Management Zone Settings Reference or
click the Help button in ZENworks Control Center.
8 When you have finished modifying the setting, click OK (or Apply) to save your changes.
3.6
Zone Sharing and Subscription
The Subscribe and Share feature in ZENworks allows you to share assignable content objects like
bundles and policies across multiple ZENworks zones. The zone that shares content is known as a
Sharing zone, and the zone that subscribes to the sharing zone and replicates the shared content in its
own zone is known as a Subscriber zone.
In the ZENworks Control Center, you can use the Zone Sharing settings link in the Infrastructure
Management panel to manage the sharing activities of the zone.
A Primary Server is identified in the Sharing zone as a Sharing server. All content sharing activities
are done through this server. The Subscriber zone registration is done by providing a subscriber key
from the sharing zone. Subscriber key does not entitle a subscriber for any content. It is meant for
Subscriber registration.
The required content is then shared from the Sharing zone and is replicated in the Subscriber zone.
You will be notified of replication issues, if any, and be able to take corrective actions for the same. For more details on Zone Sharing and Subscribing, see ZENworks 11 SP3 Subscribe and Share Reference.
3.7
Updating ZENworks Software
You can update your ZENworks 11 SP3 software on all devices in the Management Zone where the
software is installed. Update downloads can be scheduled. Software updates are provided at the
Support Pack release level and you can choose whether to apply each update after viewing its content
(Support Pack releases are cumulative). You can also download the latest Product Recognition
Update (PRU) to update your knowledgebase so that ZENworks Inventory can recognize newer
software.
3.8
Creating Locations
Security requirements for a device can differ from location to location. For example, you might have
different personal firewall restrictions for a device located in an airport terminal than for a device
located in an office inside your corporate firewall.
To make sure that a device’s security requirements are appropriate for whatever location it is in,
ZENworks supports both global policies and location‐based polices. A global policy is applied
regardless of the device’s location. A location‐based policy is applied only when the device’s current
location meets the criteria for a location associated with the policy. For example, if you create a
location‐based policy for your corporate office and assign it to a laptop, that policy is applied only
when the laptop’s location is the corporate office.
If you want to use location‐based policies, you must first define the locations that make sense for your
organization. A location is a place, or type of place, for which you have specific security
requirements. For example, you might have different security requirements for when a device is used
in the office, at home, or in an airport.
Locations are defined by network environments. Assume that you have an office in New York and an
office in Tokyo. Both offices have the same security requirements. Therefore, you create an Office
location and associate it with two network environments: New York Office Network and Tokyo
Office Network. Each of these environments is explicitly defined by a set of gateway, DNS server, and
wireless access point services. Whenever the ZENworks Adaptive Agent determines that its current
environment matches the New York Office Network or Tokyo Office Network, it sets its location to
Office and applies the security policies associated with the Office location. The following sections explain how to create locations:
Section 3.8.1, “Defining a Network Environment,” on page 41
Section 3.8.2, “Creating Locations,” on page 43
Section 3.8.3, “Location and Network Environment Selection on a Managed Device,” on page 44
3.8.1
Defining a Network Environment
Network environment definitions are the building blocks for locations. You can define a network
environment while you are creating a location, but we recommend that you define network
environments first and then add them as you are creating locations. To create a network environment:
2 In the Network Environments panel, click New to launch the Create New Network Environment
Wizard.
3 On the Define Details page, specify a name for the network environment, then click Next. As you complete the wizard, if you need more information about any fields or options, click the Help button located in the upper‐right corner of ZENworks Control Center.
4 On the Network Environment Details page, fill in the following fields:
Limit to Adapter Type: By default, the network services you define on this page are evaluated
against a device’s wired, wireless, and dial‐up network adapters. If you want to limit the
Specify the minimum number of defined network services that must be matched in order to
select this network environment.
For example, if you define one gateway address, three DNS servers, and one DHCP server, you
have a total of five services. You can specify that at least three of those services must match in
order to select this network environment.
When specifying a minimum match number, keep the following in mind:
The number cannot be less than the number of services marked as Match Required.
The number should not exceed the total number of defined services. If so, the minimum
match would never be reached, resulting in the network environment never being selected.
Network Services: The Network Services panel lets you define the network services that the
Adaptive Agent evaluates to see if its current network environment matches this network
environment. Select the tab for the network service you want to define, click Add, then fill in the
required information
5 Click Next to display the Summary page, then click Finish to add the network environment
definition to the list.
3.8.2
Creating Locations
When you create a location, you provide a location name and then associate the desired network
environments with the location.
1 In ZENworks Control Center, click Configuration > Locations.
![Figure 4-1 ZENworks Window The ZENworks Window left pane displays the following: [All] folder: Contains all bundles that have been distributed to you, regardless of the folder in which they are located](https://thumb-us.123doks.com/thumbv2/123dok_us/8455611.2251996/57.918.161.570.115.347/figure-zenworks-zenworks-displays-following-contains-distributed-regardless.webp)